Your favorite part of the week has arrived! Part 7 day!
As I’m slowly becoming more familiar with Waveform, you may notice that the review is also becoming more focused. Today I’m going to cover the good, the bad and the weird of recording in Waveform 9. Recording Audio and MIDI are the topics.
You may notice that this article is perhaps more substantive than others, and that’s because this is what I do day in and day out. I record. I still put in a lot of effort to other sections, but this topic comes more naturally to me due to how I’ve been using Waveform this last month and my general life experience.
This article has some of my favorite features in the software, and some things that other DAWs really should learn from, but like with all software there’s some small things that sour the experience a bit more than it seems like they should. Regardless, Waveform excels in this area… mostly.
- Good
- Retrospective Recording
- Trigger Level
- In Track Meters
- Record to Flac
- Multiple input assignments
- Stacked Recording
- Input Dragging
- Abort and Restart
- Bad
- Recording Delay Compensation
- Low Latency Monitoring
- Latency Issues
- Multiple Record Arming
- Recording Delay Compensation
- Weird
- Stereo Input
Other parts in this series:
- Version 9, Part 0: Intro
- Version 9.1.1, Part 1: Browser, Mixing, GUI, VCAs
- Version 9.1.1, Part 2: Modulation, Plugin browsing, Annoyances, GUI
- Version 9.1.1, Part 3: Macros, UI design, Ghost tracks, Buying
- Version 9.1.1, Part 4: Pattern Generator, Edit Clips, Folder editing, Chord Track
- Version 9.1.1, Part 5: Step Clips, Loops, Clip Linking, Loop Recording, Track Presets
- Version 9.1.1, Part 6: MIDI Editing
- Version 9.1.1, Part 8: Clip Layer FX, Multisampler, Scripting, Project Management and more
- Version 9.1.1, Part 9: Instruments and Effect Review
- Version 9.1.1, Part 10: Conclusion
- Version 10.1.0
VERSION - This review is (hopefully) accurate as of Waveform 9.1.1. Further versions may obsolete these views.
Contents
Good
Retrospective Recording
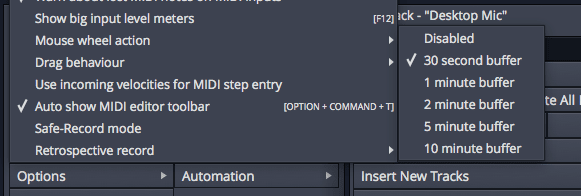
Waveform 9 supports retrospective recording. That means that when you have an input assigned to a track, Waveform is always recording from it.
Maybe you were jamming out and you nailed this riff you’ve been working on for weeks, but you forgot to hit record. No problem! Hit the clock icon in the upper right of Waveform and the last n-minutes of action will be dropped in to your project.
This work for MIDI __and__ Audio. Waveform doesn’t care if playback was active or not either. Take that Logic, you can’t even do this right!.
Retrospective Recording seems like a gimmick, especially considering how poorly other DAWs handle it. I thought it was a gimmick and that I’d never use it. I was wrong. I greatly underestimated how many times this exchange happens…
Musician: -awesome lick-
Engineer: “Oh wow. Can you do that again?”
Musician: “Do what again?”
Engineer: “That lick. Do that thing you just played.”
Musician: “This?” -proceeds to play something totally different-
Engineer: “NO. The thing you just played a minute ago!”
Musician: “This?” …
Engineer: -loads pistol-
Maybe you are the engineer and the musician. Maybe you’re just the engineer. No matter which way you have it, Waveform will save your ass at least once per track.
Trigger Level
What it does is allow you to ‘punch-in’ based on the level of the recording input.
So while recording is happening, the clip isn’t actually recorded until the input signal passes the set threshold. This lets you punch-in simply by beginning to perform.
In the looped video above, you can see that even though recording is ‘active’, the clip is only started at the point where the input volume threshold was violated.
Trigger level could be cooler if it started recording by a triggered level, but it doesn’t. It’d also be neat if it stopped recording after the threshold is no longer violated, with some hysteresis.
Regardless of how it could be improved it’s an excellent feature that I’ve used on a few occasions.
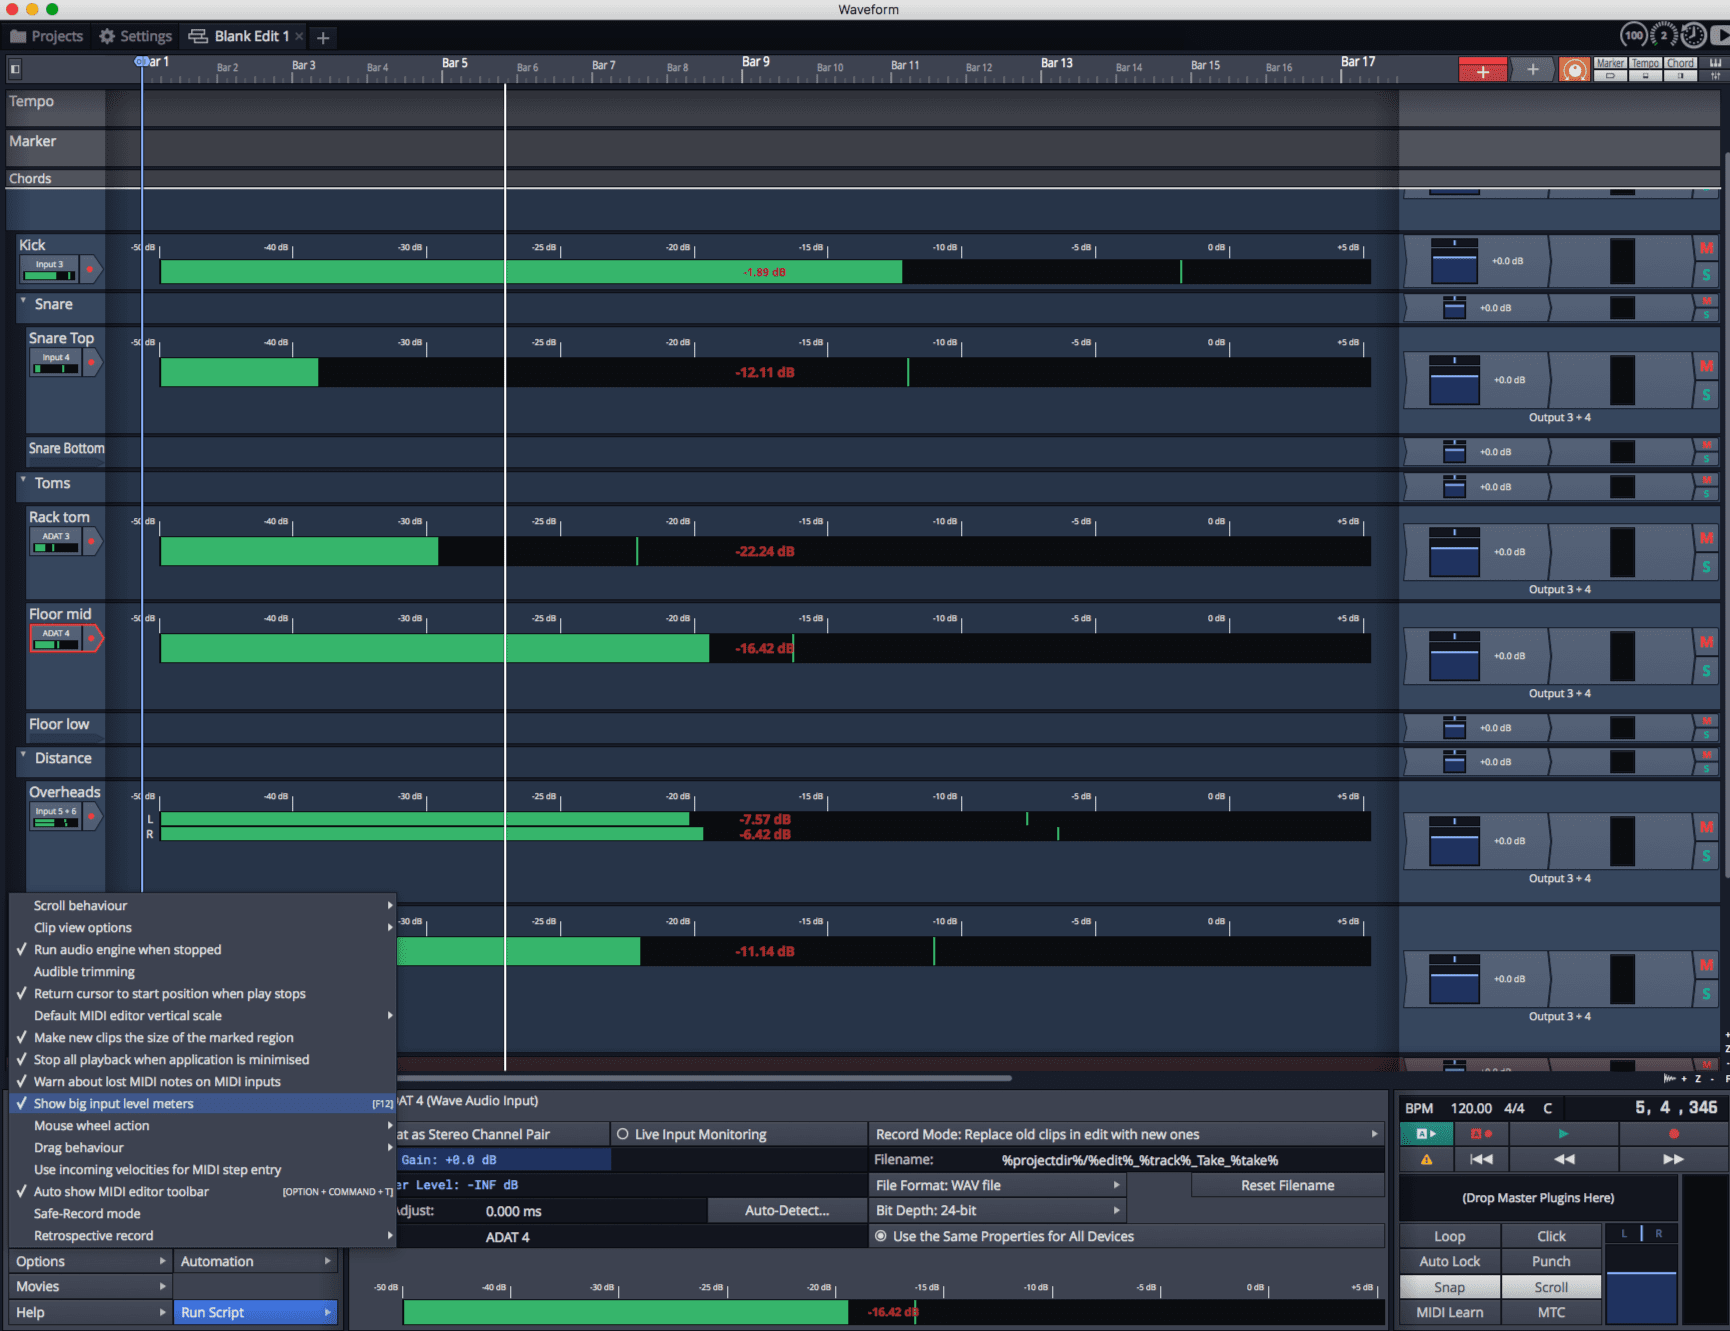
In Track Meters
The default shortcut for this feature, F12, turns on ‘Big input level meters’. This puts a meter square in the middle of your track.
Yeah, that’s it. Either this is exciting to you, or you’re going to just move to the next section.
This is Waveform’s implementation of a Meter Bridge, and it’s probably the best I’ve seen in a DAW before. Even though other Meter Bridge systems let you see more I/O in perhaps a more familiar format, I think that Waveform’s is superior for the following reasons:
- It allows you to quickly confirm input assignments - It’s easy to visually map input to the correct track
- Larger meters - most displays are wider than they are taller.
- Logical arrangement - most DAW meter bridges show I/O in the order they appear on the device. This may not be the order that I’m using them to record with. I find it more logical to show the I/O as I’ve arranged it in my project.
- I/O is labeled by track name AND input name - most meter bridges only tell you the input name, not what it’s assigned to. Waveform’s implementation gives you both.
My only criticism of Waveform’s big meters is that they do not fully resize vertically. It would be fantastic if they could be taller, with larger text. This would allow me to see the peak values from further away.
Record to Flac
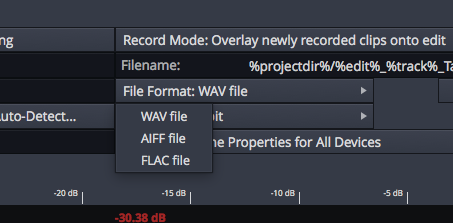
Flac is a file format and encoding that has no loss of quality compared to wave/aiff, but is takes about 50% less space on your drive.
If you are strapped for hard drive space, or if you are making very long recordings, then this is a fantastic feature.
I did one entire project with Flac recording, and I noticed no difference in CPU load. There is some overhead, but it appears to be rather minimal. I wish I had more time to test this.
Multiple input assignments
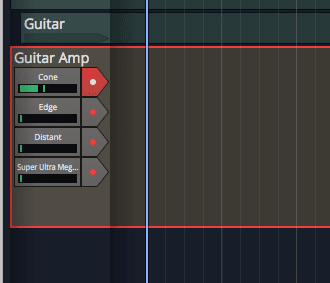
Waveform allows you to have multiple input assignments on a track. You can then select which one you want to record from, or all of them.
I love this feature. It lets me have multiple potential assignments for when I’m testing mics, mic setup, or if I have multiple potential sources for something. No more menu diving for frequent input changes.
I doubt that very many people will appreciate this as much as I do, but if you’ve ever wanted to A/B mic setups or mics on a single source then this simplifies the process a good bit.
Stacked Recording
When multiple inputs are assigned to the same track, then they record to the same track at the same time. Overlaid clips play together by default, so on playback you’ll hear everything that was recorded.
This may not seem like anything special, but I’ve found a fairly nice use for it. I’ve been sticking multiple mics on a target, usually close and distant, then I record them together to the same track.
From there I edit the part so that the distant mic is used for more ‘intimate’ parts and the close mic is used for other parts. This works fantastic for vocals. It gives you an ‘onion’ of vocals and you can peel back the layers to find the sound you want for a specific phrase or word.
There is one big issue though: selecting clips behind other clips is annoying. There needs to be a way to easily select clips in the background, or a way to make the ‘on-top’ clip play exclusively only for that clip.
EDIT - I was just informed on the Tracktion forum that there’s a better way to do this. You can use the ‘Select clips which overlap the selected ones’, then create a comp. From there you can use Waveform’s comping to select the recording to use.
That’s just really cool.
Input Dragging
A small feature, but the seconds you save will pile up.
Ever want to record on another track that’s the same as a track you’ve recording on before? There’s a connection there… they have the same input. Other DAWs often make you menu-dive for input assignments. Waveform lets you just click-drag the input box to the new track.
I’m not a fan of the click-drag paradigm, but I have to admit… this one is nice.
Abort and Restart
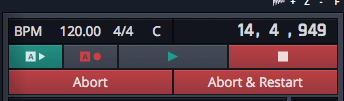
Probably the most used workflow in the entire studio. Stop. Undo. Record.
Why must it be 3 steps though? It’s one idea, “I goofed and I need to go at it again.”
Waveform offers ‘Abort and Restart’ as a single-action method of stopping recording, deleting the previous recording, and starting over. I find this single feature so important that it’s a rating in my DAW chart.
Given how often these actions occur, there’s no reason for any product to force you to use 3+ movements for very common single idea.
It’s also nice that there’s a plain ‘Abort’ button to stop and delete the previous recording.
Bad
Recording Delay Compensation
I’m not talking about compensation for the delay of plugins. I’m talking about compensating for analog->digital conversion and interface latency. First let me explain the problem.
Every audio device has latency. The input stage has latency. The output stage has latency. Each stage’s latency is a combination of the time window given for processing (the buffer size) and hardware latency (the hardware itself needs time for various reasons). The net result is that when the DAW gets input or sends input it’s delayed by the buffer size + hardware latency. You may have heard of the ‘RTL’ value when researching for interfaces, that communicates these combined values.
So when you hear audio from the DAW, it’s delayed by the output latency. When you send audio to the DAW, it’s delayed by the input latency. Hopefully this is simple to understand.
The DAW knows the software latency, the buffer size. Interfaces can report their total latency (including the hardware latency) to the DAW as well, but not all do.
Some readers may be thinking, ‘Ok, but if the latency is always the same, then there’s no problem! Everything is always shifted by the same amount.’ Not so fast!
Let’s assume that we’re recording to a metronome. Our output total output latency is 10ms. Our total input latency is 10ms. The metronome sound takes 10ms to get to us, and if we react perfectly then it takes 10ms to get back to the DAW. Everything that hits the DAW will be 20ms late on the timeline. This works great if we only ever listen to the same reference.
If at anytime, we change references and listen to one of those 20ms late recordings while we record, we’re compounding that with another 20ms of delay. Do that even once and your groove is going to sound like mush.
So what’s the solution? The DAW needs to know the latencies. It needs to know how long the audio takes to go out, because that affects our reaction, and how long it takes to come in. Then the DAW needs to place the audio on the timeline offset by that value.
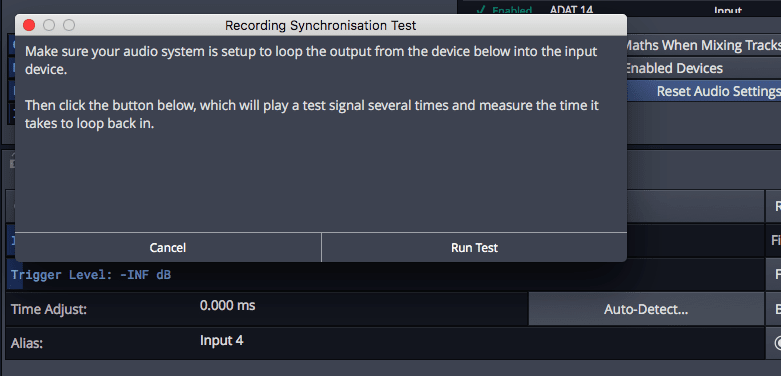
If the interface is a high quality one, then it will report this latency to the DAW and the DAW can do this automatically. Most interfaces I’ve tested are within ~50 samples, some are much better. Waveform does not do this. I tested with multiple interfaces. If it is trying to do it, then it’s not doing it correctly on macOS.
Waveform requires that you set up a hardware loopback and measure the latency yourself. Since the software latency (buffer size) affects the total latency, you need to do this process every time you change the buffer size! So if you recorded everything at a buffer size of 128, started mixing and bumped up to 512 to handle some extra plugins, and want to do an overdub… time for a hassle. Opened another project at a different sample rate? Hassle time. How extraordinarily annoying!
There’s even more issues:
- It’s not accurate - The delay compensation is always 10-40 samples off. That’s not a big deal, but I can get other DAWs within 1 sample without much effort.
- It outputs on 1/2 - I spent nearly 2 hours testing this. The output signal seems to always be sent to 1/2, even if that’s not the default output pair.
- For many people this means that they will need to disconnect their monitors semi-frequently to mess with this.
- Latency is compensated across all inputs - Not all inputs have the same latency though! If you have different converters hooked up to your main interface (as is common with digital expansions), then different inputs will have different latency compensation requirements.
- The compensation is sensitive - You have to get the gain setup just right for Waveforms automatic detection to work. That means if your inputs are carefully gain calibrated for recording in a session and you need to reset the latency compensation, LOL. Sorry dude. (Yes, this has happened to me twice. It probably bothers me more than it should)
- Compensation values are in milliseconds - If you want to manually set the value and get it near perfect (as perfect as it can be, since there’s often some sub-sample shenanigans occurring), then you’re out of luck again. Waveform displays the value in x.000ms. This is a really minor issue, but it’s worth mentioning. It should be milliseconds + samples, or just samples with a milliseconds value shown.
I’d be happier if Waveform just blindly trusted the interface’s reported values and let me enter an offset if necessary. The way it works now is ludicrous, and I’m sure there’s users out there confused as to why their recordings sound ‘mushy’. They have no clue that this is probably the cause.
Low Latency Monitoring

This is a feature that lets you disable latency-causing plugins on your tracks to a set value so you can record with minimal latency. Except, guess what? It just causes a total mess.
Read the previous section. Imagine now that you have an interface with 10ms total latency that you setup to be compensated correctly. You turn up your buffer size while mixing, to give your CPU more time to do things, and now your total latency is 30ms but you don’t change your compensation time..
So you perhaps think, “Ok, I’ll use Low-Latency Monitoring with the Low Latency Buffer Size” set to 5ms. Bzzt Wrong. Now your new recording will be early by 5ms because you calibrated Waveform at 10ms.
But what if you have a plugin on the track causing 5ms of latency… then the total net result on that track will by some stroke of luck be perfect sync. Until you go to record on another track without that, and you’ll be off again.
It’s just a disaster. I spent a while sitting here trying to figure out if it’s possible to get things syncing correctly with ‘Low Latency’ mode turned on. If it is, then it’s a huge pain in the ass. I don’t think it’s reasonably possible though.
Oh yeah, and for some reason you set the low latency buffer size in milliseconds instead of setting the buffer size in samples like you do elsewhere on the page. Strange.
Latency Issues

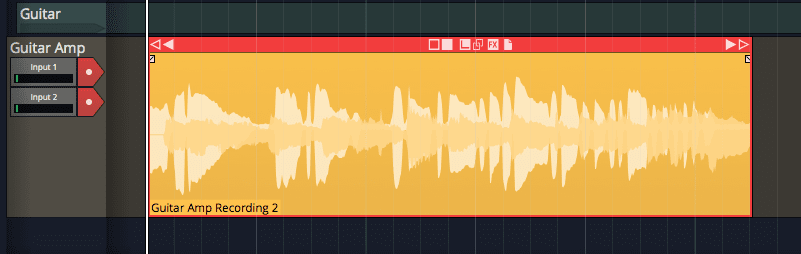
Lest you think I’m fooling you, here’s some proof.
I created a simple loopback recording. This emulates the output stage, which is the time it takes for the sound to reach the listeners ear (which is necessary for the musician to keep time and “react” to the music). It also emulates the input stage.
The bottom waveform is a click track that Waveform 9 plays out.
-
The first clip on the left is the result with Waveform’s delay compensation. It’s quite good. I counted that it was 19 samples off. That’s 0.43ms at 44,100hz sample rate.
-
The middle clip is Low Latency mode turned on with the ‘Low Latency Buffer Size’ set to 2ms. When recorded the placed audio is behind the original audio. (in this case 18 milliseconds behind) Time travel! Not good.
-
The last clip is with latency compensation turned off. The resulting audio is 21ms late. That’s a lot. That’s slapback echo territory nearly.
To compound all of this, you have to fiddle with these settings anytime you change your buffer size.
THIS REALLY NEEDS TO BE FIXED. At the very least, Waveform should have an option to try and use the driver’s reported latency to compensate. Even if it’s not 100% accurate, that would alleviate the problem. Low Latency Monitoring sets the buffer size itself, so it should be able to override the compensation value with some semblance of accuracy.
IMO the correct behaviour is to use the reported latency, and allow the user to supply an offset.
TO BE VERY CLEAR This is something that the user can workaround, but it is error-prone and time consuming sometimes. Many users will be able to setup their compensation and forget it usually. Some users will go bald trying to work with this.
Multiple Record Arming
No image for this one, because you can’t do it.
Waveform allows you to either record enable every input, or one at a time. Nothing in between.
If I want to record enable a drumset then that’s 8-16 clicks. Ewww. It’d be nice if I could ‘record enable all inside folder’ or similar.
This has caused me a lot more clicks than necessary, but more importantly there’s been a number of times where I’ve misclicked or forgotten to click the appropriate input and recorded an excellent take with 1-2 mics off. Clearly my fault, but also something that should be avoidable.
Weird
Stereo Input

Stereo recording isn’t a strange thing. Waveform handles it a bit weird though.
An input can be selected to be treated as a stereo pair, but then you can no longer use either of those channels as a mono input without diving for settings (bottom panel or settings). In a studio where I/O is changed fairly frequently, this has been problematic for me. I just find it so weird that I have to ‘un-stereo’ things or ‘stereo-ize’ inputs to use them how I want. Why can’t I just select any stereo pair I want, or any mono input?
On top of that, stereo pairs always start on odd-inputs. You can have stereo 3+4, but you can not have 4+5. Grrrr. This sometimes ends up forcing me to setup my I/O in a non-logical order relative to how the tracks are presented in the edit. I’d love if this was changed.
Support Me!
This post took 13 hours to research, photograph, write and edit. If you appreciate the information presented then please consider joining patreon or donating!
