This is it! The final 'Cool things' feature in Logic Pro X while I spend a month using it. There will still be the effects and instruments review and a couple more posts though!
There's no theme again today. You may notice that I've also apparently overlooked some crazy cool features in Logic, like the environment. I only am doing this for 30 days, and I have to pick the things that I think will be most exciting or enlightening for folks. I have a list of 12 other features I wanted to include, but there's only so much time!
- Controller mapping
- Capture Recording
- Speed Fades
- Snapshot Automation
- Import Logic Projects
Other parts in this series:
- Cool things in Logic Pro X Part 1
- Cool things in Logic Pro X Part 2
- Cool things in Logic Pro X Part 3
- Cool things in Logic Pro X Part 4
- Logic Pro X Tips & Tricks and more cool things
- Logic Effects Review
- Cool things in Logic Pro X Part 10.4
- Logic Instruments and MIDI Effects Review
- Things I hate about Logic Pro X and Conclusion!
Contents
Controller mapping
Logic's controller mapping is very powerful, yet very simple when necessary.
There's an 'Easy View' method that makes simple CC mapping easy. Move the control on screen, hit command-L, move the knob on your controller. That's it. Fast and easy.
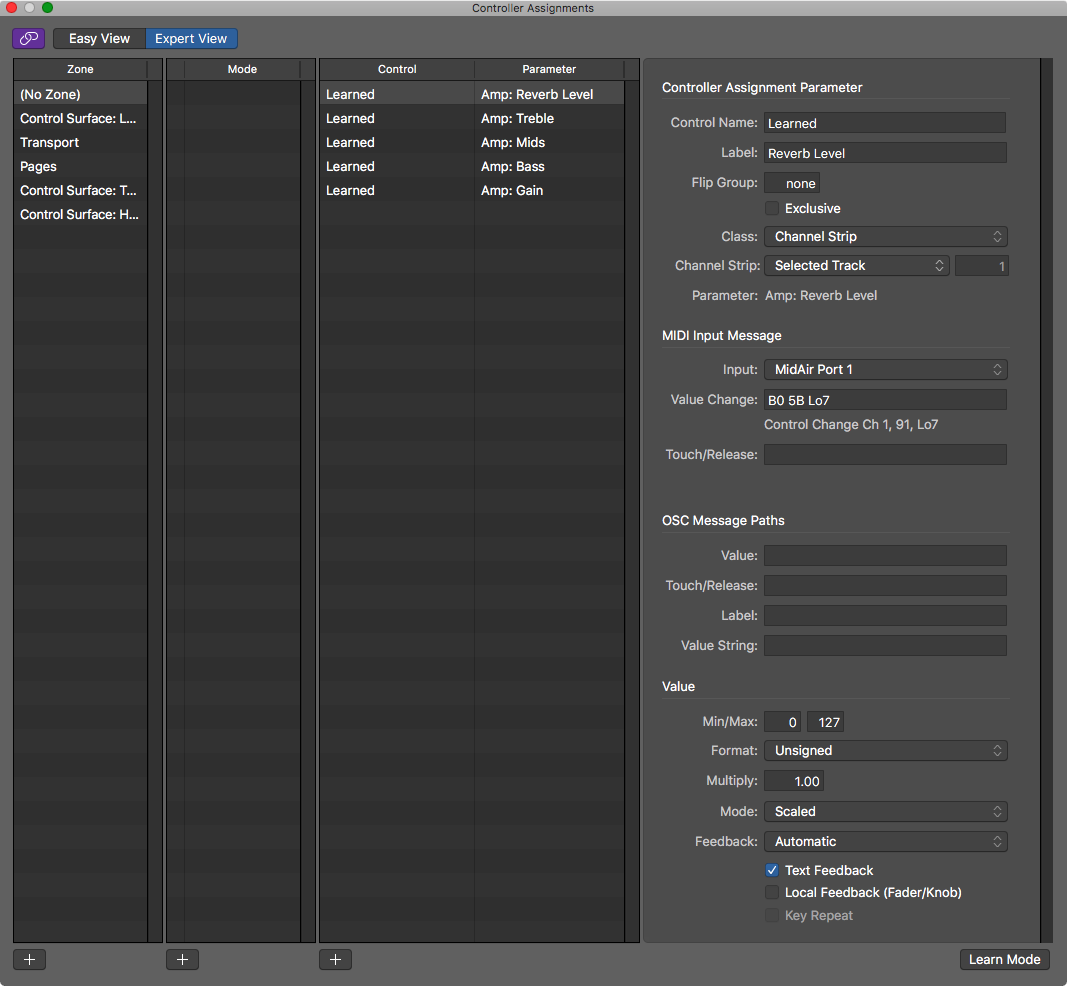
And then there's the 'Expert View', which is where the real fun is.
Zones and Modes are an organizational tool to allow you to layout different 'layers' of the controller. Like you may have an 'Encoder' zone, with shift a shift mode. You can place these mappings in their appropriate 'zone' and 'mode' to make them easier to navigate in the future. Modes can be switched via midi input when a controller assignment class is set to 'Mode Change'.
The parameters view is where the real fun happens! You have total control over the midi data, or osc data input, what it controls and how. There's a wide variety of modes that let you select to control nearly everything in Logic. Playhead/markers/zoom/any AU parameter/fader/pan/track/transport/key command/etc... You can even assign MIDI/OSC to typing letters!
When using MIDI or OSC, you have full control over exactly what data is used from which device. You can input the data in Hex format for Midi and paths for OSC.
Logic supports min/max and inversion, value scaling, various data interpretations for signed formats and different modes for applying the incoming data to thec urrent value. It also supports value feedback, including support for outputting specific data for controller displays!
If you want a good start to some of the midi spec, I suggest starting here. It may seem confusing at first, but it's not that difficult to figure out with some experimenting. OSC specs depend on the device that you're using, check the device/program manual for more information. Or you can just use the 'Easy View' and never think about it!
Logic's Controller Assignments is fantastic. The manual is here and contains a good amount of helpful information. Even if you only use the Easy View, Logic has one of the nicest implementations of external controller interfacing on the market.
Control Surface Support
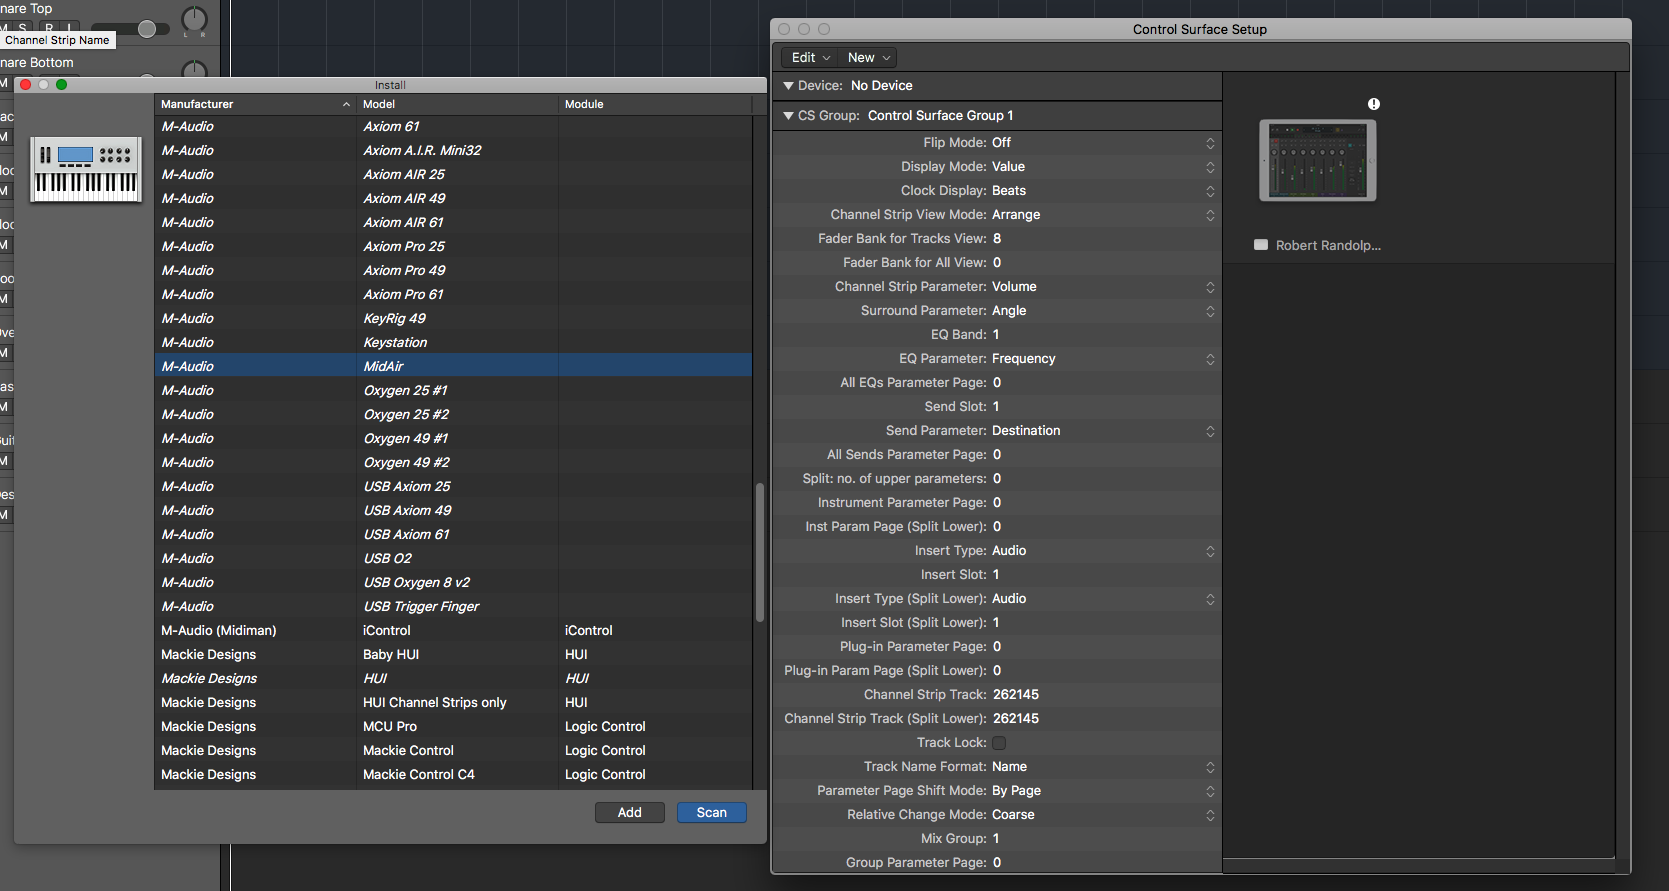
Logic also has built in support for a number of control surfaces. That isn't particularly noteworthy, but what is noteworthy is how much control you are given in the 'CS Group' window. There's a lot of things that you can change regarding the operation of the included controller mappings.
Capture Recording
Capture recording is a deceptively simple feature, but first you must enable it. Right-click (ctrl-click) on the transport and select Customize Control Bar and Display.... Check the Capture Recording box, click ok, and now you will have a new recording button with a halo around it.
What does this button do? Any time you hit 'play' in Logic, it's recording MIDI.
Maybe you just started jamming out while listening to a playback, then you realized you came up with an awesome part. Just hit the 'Capture Recording' button and a midi region will show up on whatever track you have selected! That midi will be whatever you just played during the recent playback.
The 'Capture Recording' button isn't turned on by default, so you may miss this feature unless you are looking for it, but the few times you use it you will be very happy you knew about it.
NOTE: If you start playback again, you lose your hidden recording! Make sure you hit that Capture Recording button before you start playback again if you want to capture the recording.
Allow Quick Punch-In
'Capture Recording' only works for MIDI, but there's a workaround. If you have Record->Allow Quick Punch-in turned on, then logic is always recording on the record-enabled tracks.
To capture a recording that you missed you just need to hit the Record button (or R) before playback stops. A an audio region will show up, and it will look like it only was recording after you hit record, but you can adjust the left-boundary of the region and reveal the entire recording!
This only works on record-enabled tracks, and it only works if you press record before stopping. Still a useful feature, especially if you're like me and hit play without hitting record. If you notice before stopping you can just hit 'R' and capture everything that happened!
Speed Fades
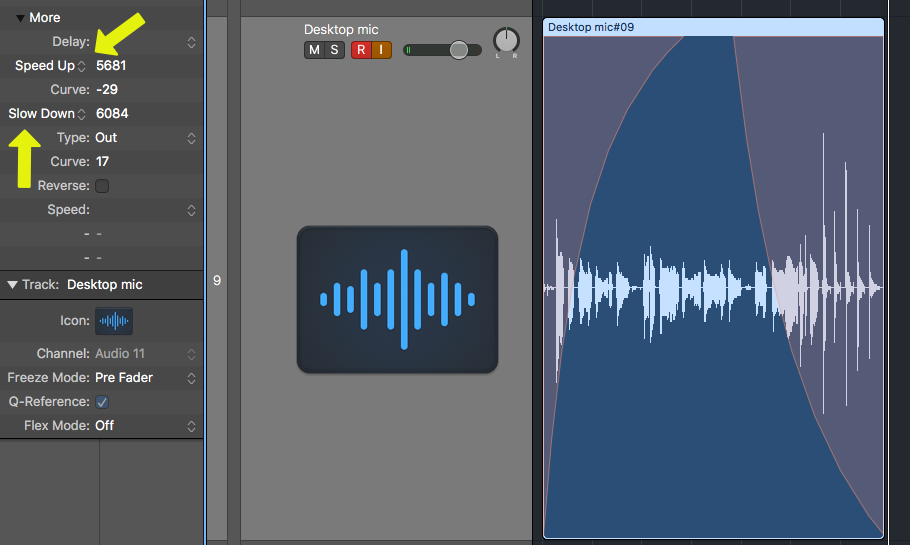
Speed fades are a small feature that I see asked about a lot online. You can turn any fade-in to a 'speed up' and any fade-out to a 'slow down'.
First create a fade, then in the inspector (hit the ⓘ in the upper left to show the inspector), click 'more' if the fade parameters are not open then you can change 'Fade In' and 'Fade Out' to 'Speed up' and 'Slow Down'.
That's all. Now your fade will be a classic tape/vinyl speed effect, and the fade curve applies!
Snapshot Automation
If you've read my previous posts or looked at the DAW Feature Chart then you may have noticed that I have a thing for snapshot automation.
So what is 'Snapshot Automation' exactly? It's when you can place the playhead at a location, change some controls and apply those changes as automation to that point in time. It's an excellent workflow for doing 'spot work' or creative transitions between parts.
In the video above I have the track in 'Read', and I'm adjusting the 'Ratio' parameter of the Compressor plugin. I place the playhead where I want and use Mix->Create Track Automation->Create 1 Automation Point for Visible Parameter. That creates an automation point with the current 'Ratio' value. Then I move the playhead, change the 'Ratio' parameter and select Mix->Create Track Automation->Create 1 Automation Point for Visible Parameter again. Now a new point is created with a ramp between the 2 points.
There is also a Mix->Create Track Automation->Create 2 Automation Points for Visible Parameter which makes the change near-instant instead of a ramp.
I strongly suggest adding a hotkey for Mix->Create Track Automation->Create 1 Automation Point for Visible Parameter and Mix->Create Track Automation->Create 2 Automation Points for Visible Parameter. It makes life much easier.
This type of automation workflow allows you to use native effects GUIs for adjusting automation, or using the normal fader/pan/send knobs to make fine adjustments. Once you start writing automation with real controls instead of tiny little dots, you'll truly understand how awesome this feature is.
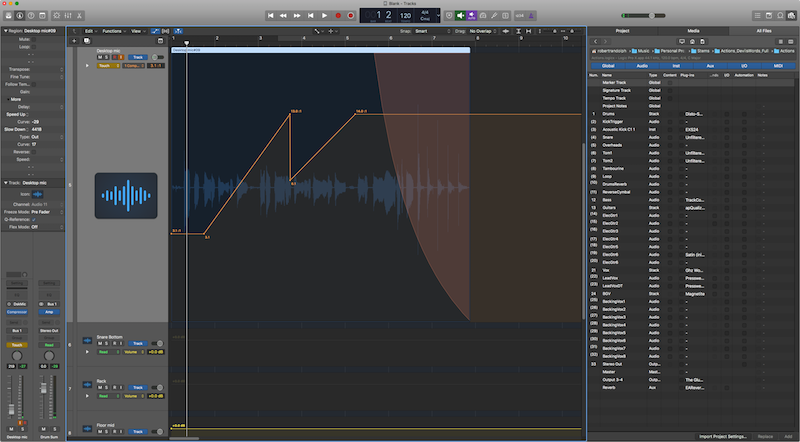
Import Logic Projects
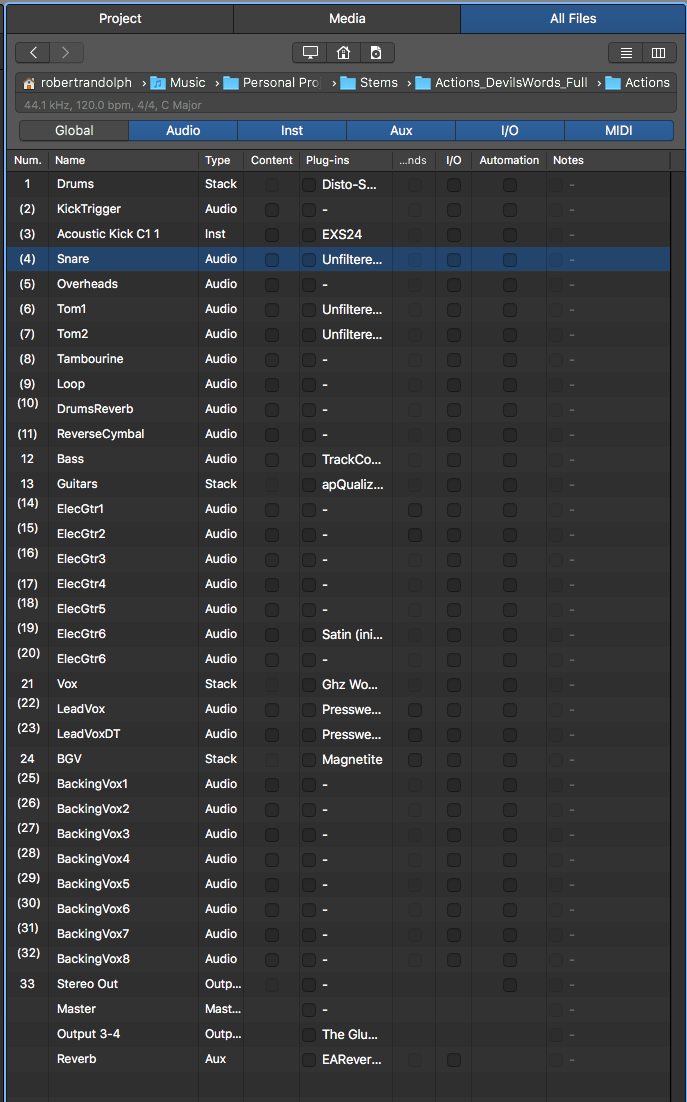
Logic allows you to selectively import content from other projects. You can either use File->Import->Logic Projects... or browse to the .logicx file in the 'All Files' section of the browser.
Every track, including global tracks (marker/signature/tempo/notes), can be imported. You can selectively include content, plugins, automation, I/O assignments and send assignments. If you add a track with a send, Logic will optionally add the assigned sends as well!
For large projects, there is a filter at the top to view only certain types of data.
Not only can content be added, but you can also selectively import the following settings from another track.
- Screensets
- Score Sets
- Score Settings
- Sync Settings
- Tuning Settings
- Movie Settings
- Transform Sets
- Staff Styles
- Metronome Settings
- Audio Settings
- Asset Settings
- Lane Sets
- Text Styles
- Record Settings
- MIDI Settings
Project import is a fantastic feature, and Logic once again makes it simple.
Support Me!
This post took 5 hours to research, photograph, write and edit. If you appreciate the information presented then please consider joining patreon or donating!
If you appreciate the information presented then please consider joining Patreon or donating money/time.
