Waveform 10 has been out for a little while, but I'm just now getting to it. Lucky me too, because it's been a rough launch for them.
The release is pretty huge though! One of the more significant updates to a DAW recently, at least in terms of workflow changes and added products.
Let's get on with it.
Other parts in this series:
Contents
New Features
Groove Doctor
Groove Doctor is a ridiculous name for a fantastic feature.
It has 3 main features.
Quantise Audio
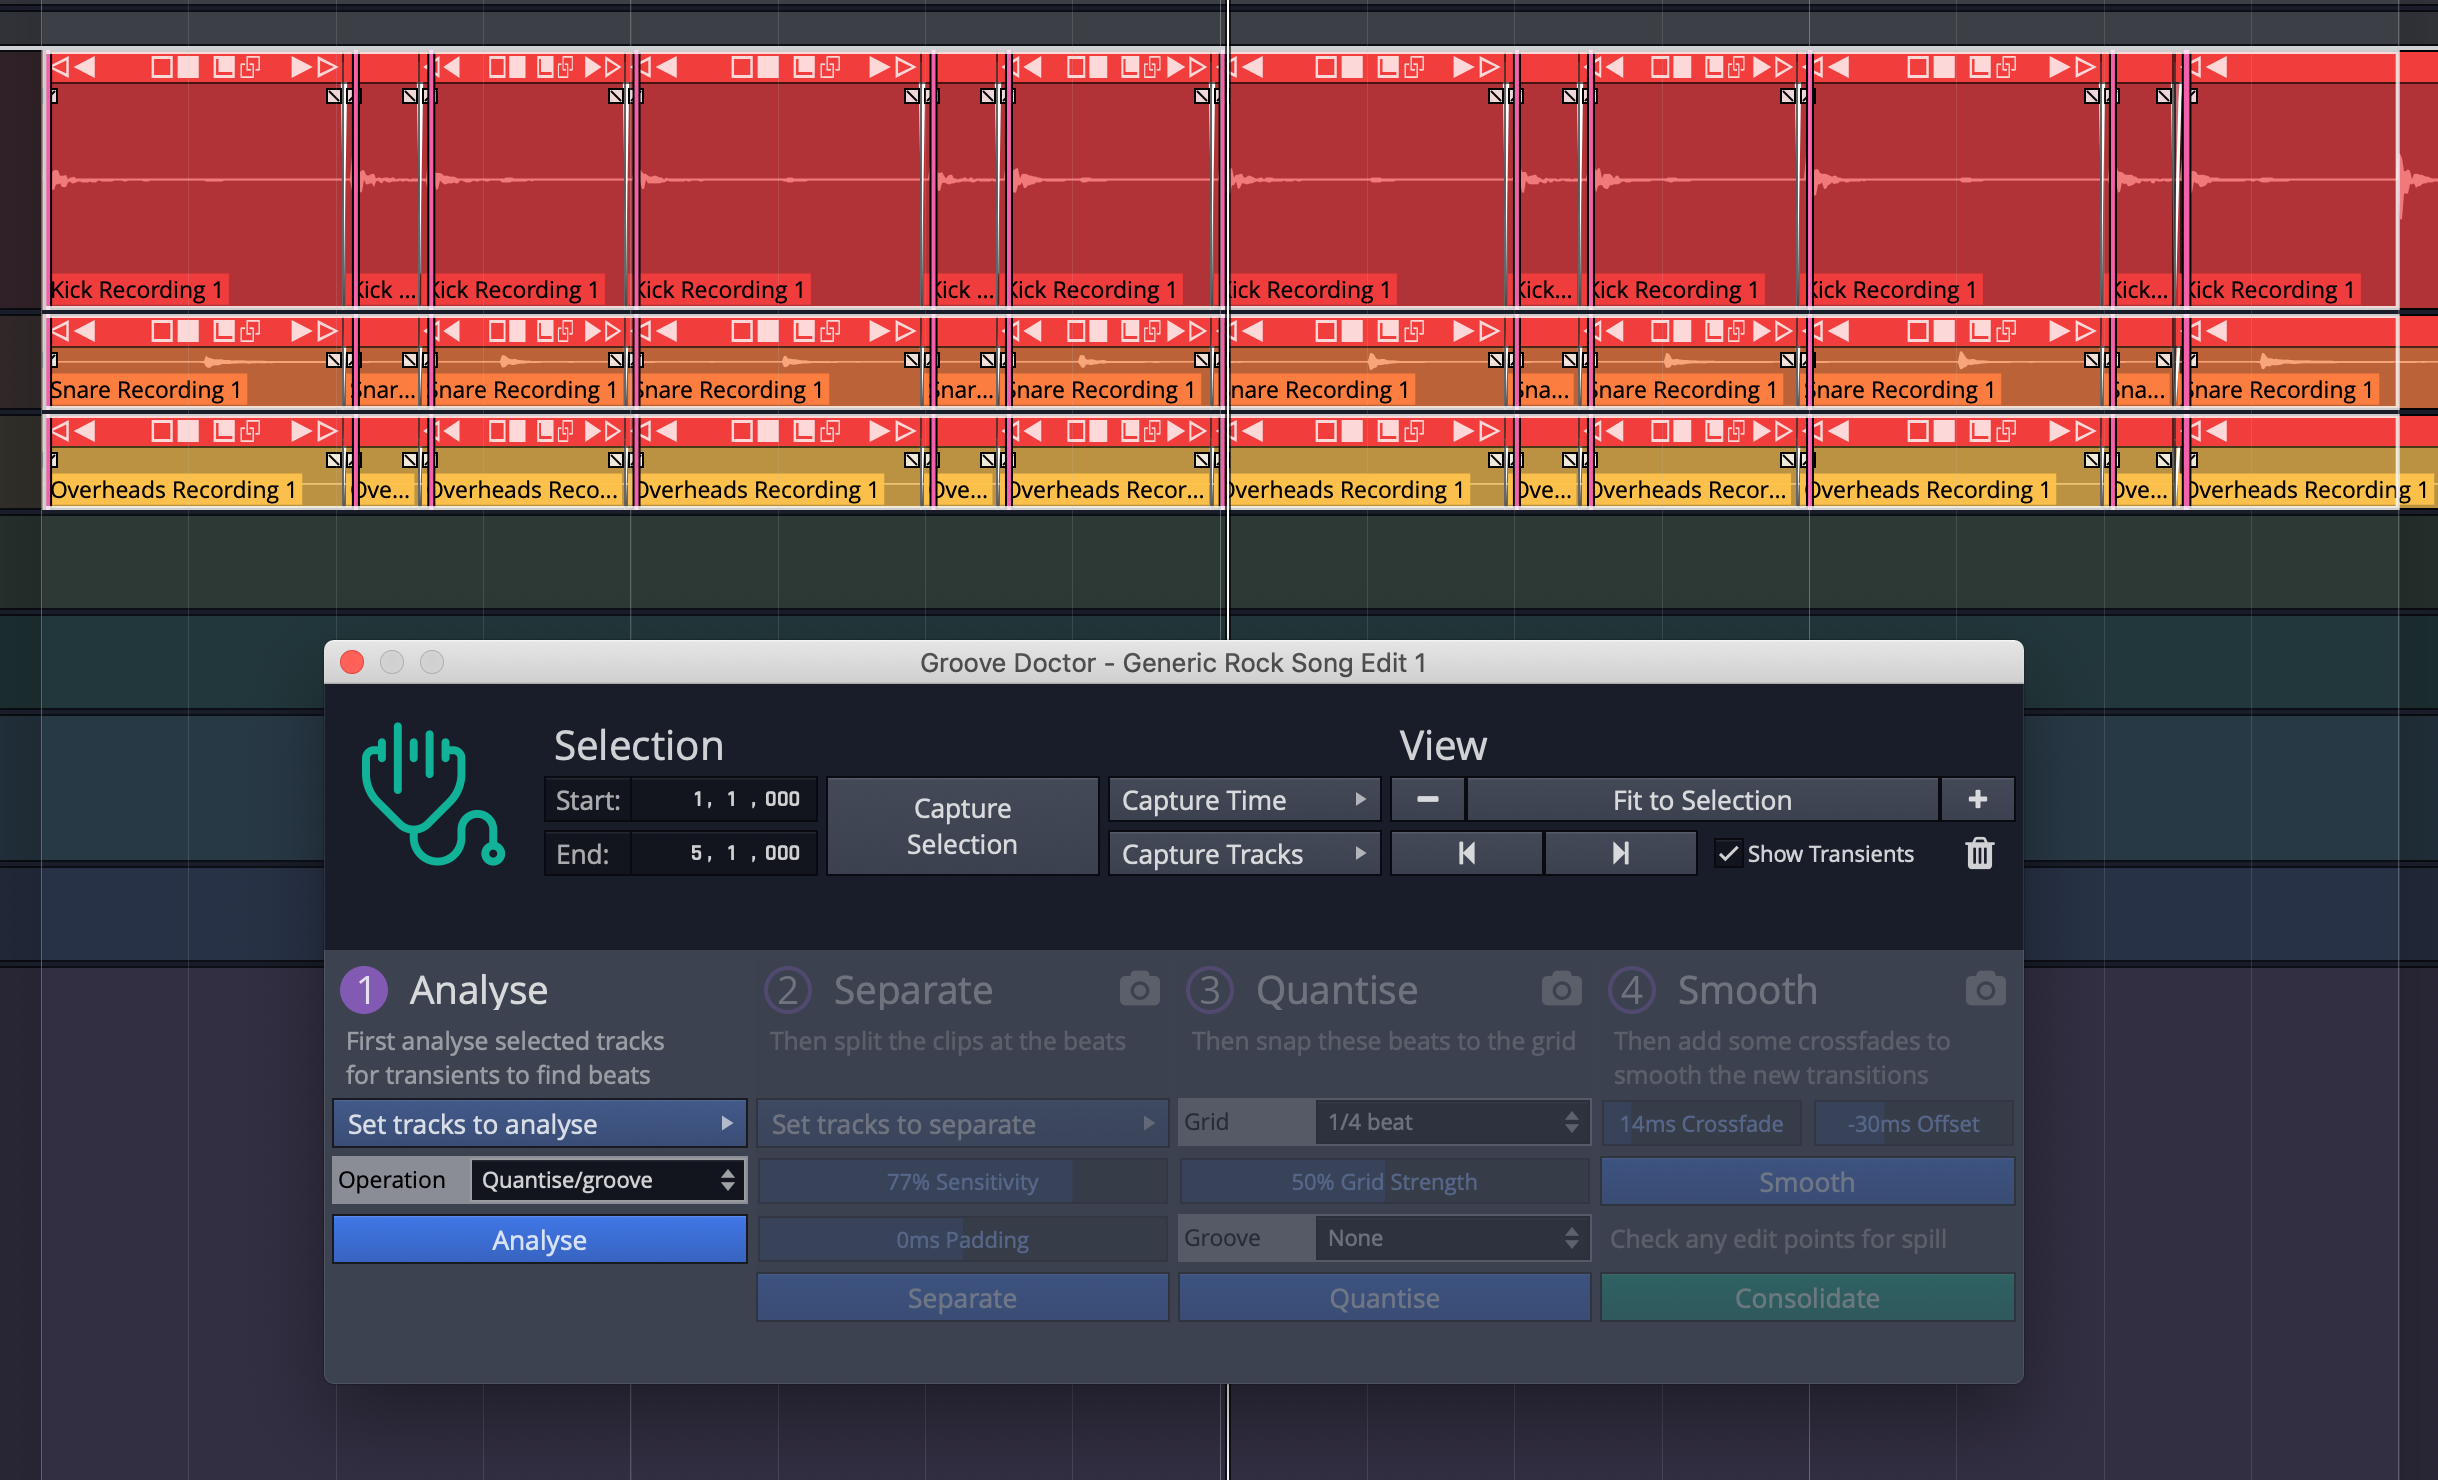
Multitrack audio is a pain to edit, but most DAWs have allow you execute the following workflow:
- Find transients in selected tracks or clips.
- Split all selected clips at the same place at important transients.
- Quantize the start of the clips.
Waveform can do these things with Groove Doctor now.
The quantization of the clips causes gaps to occur though. Some products have wholly ineffective "fill gaps" commands that don't work very well. Waveform uses a method I described in october of 2018. (I'm actually curious if they got the idea from me or if it was serendipitous).
The idea is that you can assume that your transient is at the beginning of the clip. Audio before that transient is likely to be either silent or that it'd mesh well with audio at the end of the previous clip. This should be obvious since the start of a clip used to be connected to the end of the clip before it.
Groove Doctor extends the beginning of the audio in the direction you choose. Ideally a negative value (backwards). Then it crossfades that pulled back audio with what it now overlaps.
The result is usually a quantized drum sound that hasn't lost its punch.
I love how they've implemented this (probably because I independently described the concept months ago ;) ). Here's some tricks:
- Analyse only one important track to start - Ideally the kick drum. Once you analyze that track, then capture a new selection with the rest of your drums and separate. This will make it so the separations only occur on the 'important' part, like a kick. The result is much cleaner.
- Be familiar with your undo/redo keys - It can take a few tries to get the separation sensitivity and smoothing correct.
- Don't be afraid to work in sections! - Groove Doctor allows you to only affect a time selection, as well as selected tracks. If there's a problematic area, then work on that separately. (Many other DAWs don't even let you do this easily!)
- This is particularly important for the grid size! Sometimes drummers will stumble and get a grid-size off. That will make all your efforts for that section sound off time. Work in time-delimited sections with appropriate settings!
- Padding can be used to create feel - If you set the padding in the separate section, then the split will happen early or late. Subsequently your quantization will be early or late. You can make the groove feel laid back with negative padding, or 'driving' with positive padding. Be careful though! Big values may cause your quantization to snap to the wrong beat.
- In the smoothing section, the crossfade and offset values depend upon how busy the track is - Try to use the longest possible negative offset that you can, and the smallest crossfade that you can. Set the crossfade to 1ms and set the largest negative offset that sounds mostly OK, then fine tune it with the crossfade.
- Use the smallest possible grid strength - The goal should not be to make the track perfectly align to the grid. The goal is to make it sound like it's on the grid. You're not going to be moving every single drum hit. If you just move the kicks (and everything between them!) then it will throw off the groove a tiny bit. Focus on how the track feels, not how it looks. This advice holds even for the most metronomic of metal.
- Groove extract if you can - Rather than using the grid as your source, try using another rhythm track. Extract the groove from the bass synth/guitar and apply that groove to the drums. Or do the opposite. Once again, the goal should be to get something sounding tight, not to get something aligned to the grid.
- Transients can be added using the shift key and clicking. Likewise you can edit transients by clicking and dragging.
- Assign hotkeys to the "Scroll to previous transient" and "Scroll to next transient" actions. These commands make it so you can zoom in and quickly zip-zap around to edit things.
- USE SNAPSHOTS! Groove doctor has track snapshot icons for the separate, quantise and smooth sections. USE THEM! You may need to go back and adjust something later.
Groove doctor is awesome. Wish I thought of it ;)
Groove Extraction
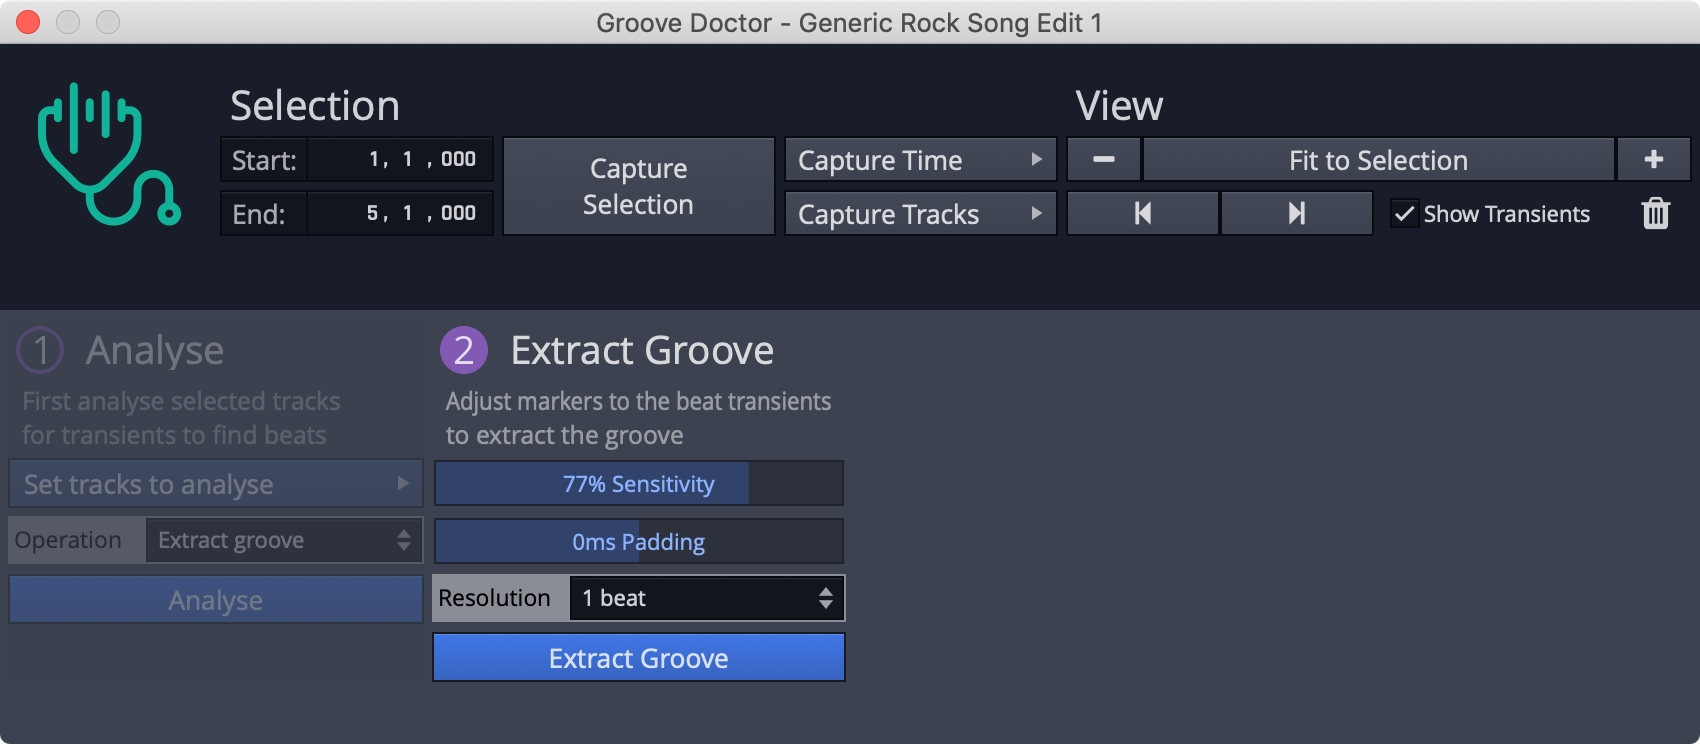
Groove doctor doesn't just let you edit drums. You can extract the timing variances from a track so that you can later apply those to another track.
Once you extra the groove, you can apply that to other audio OR MIDI tracks. The timing variances in your 'source' will now be used to quantize the destination.
Super neat feature.
Extract Tempo Map
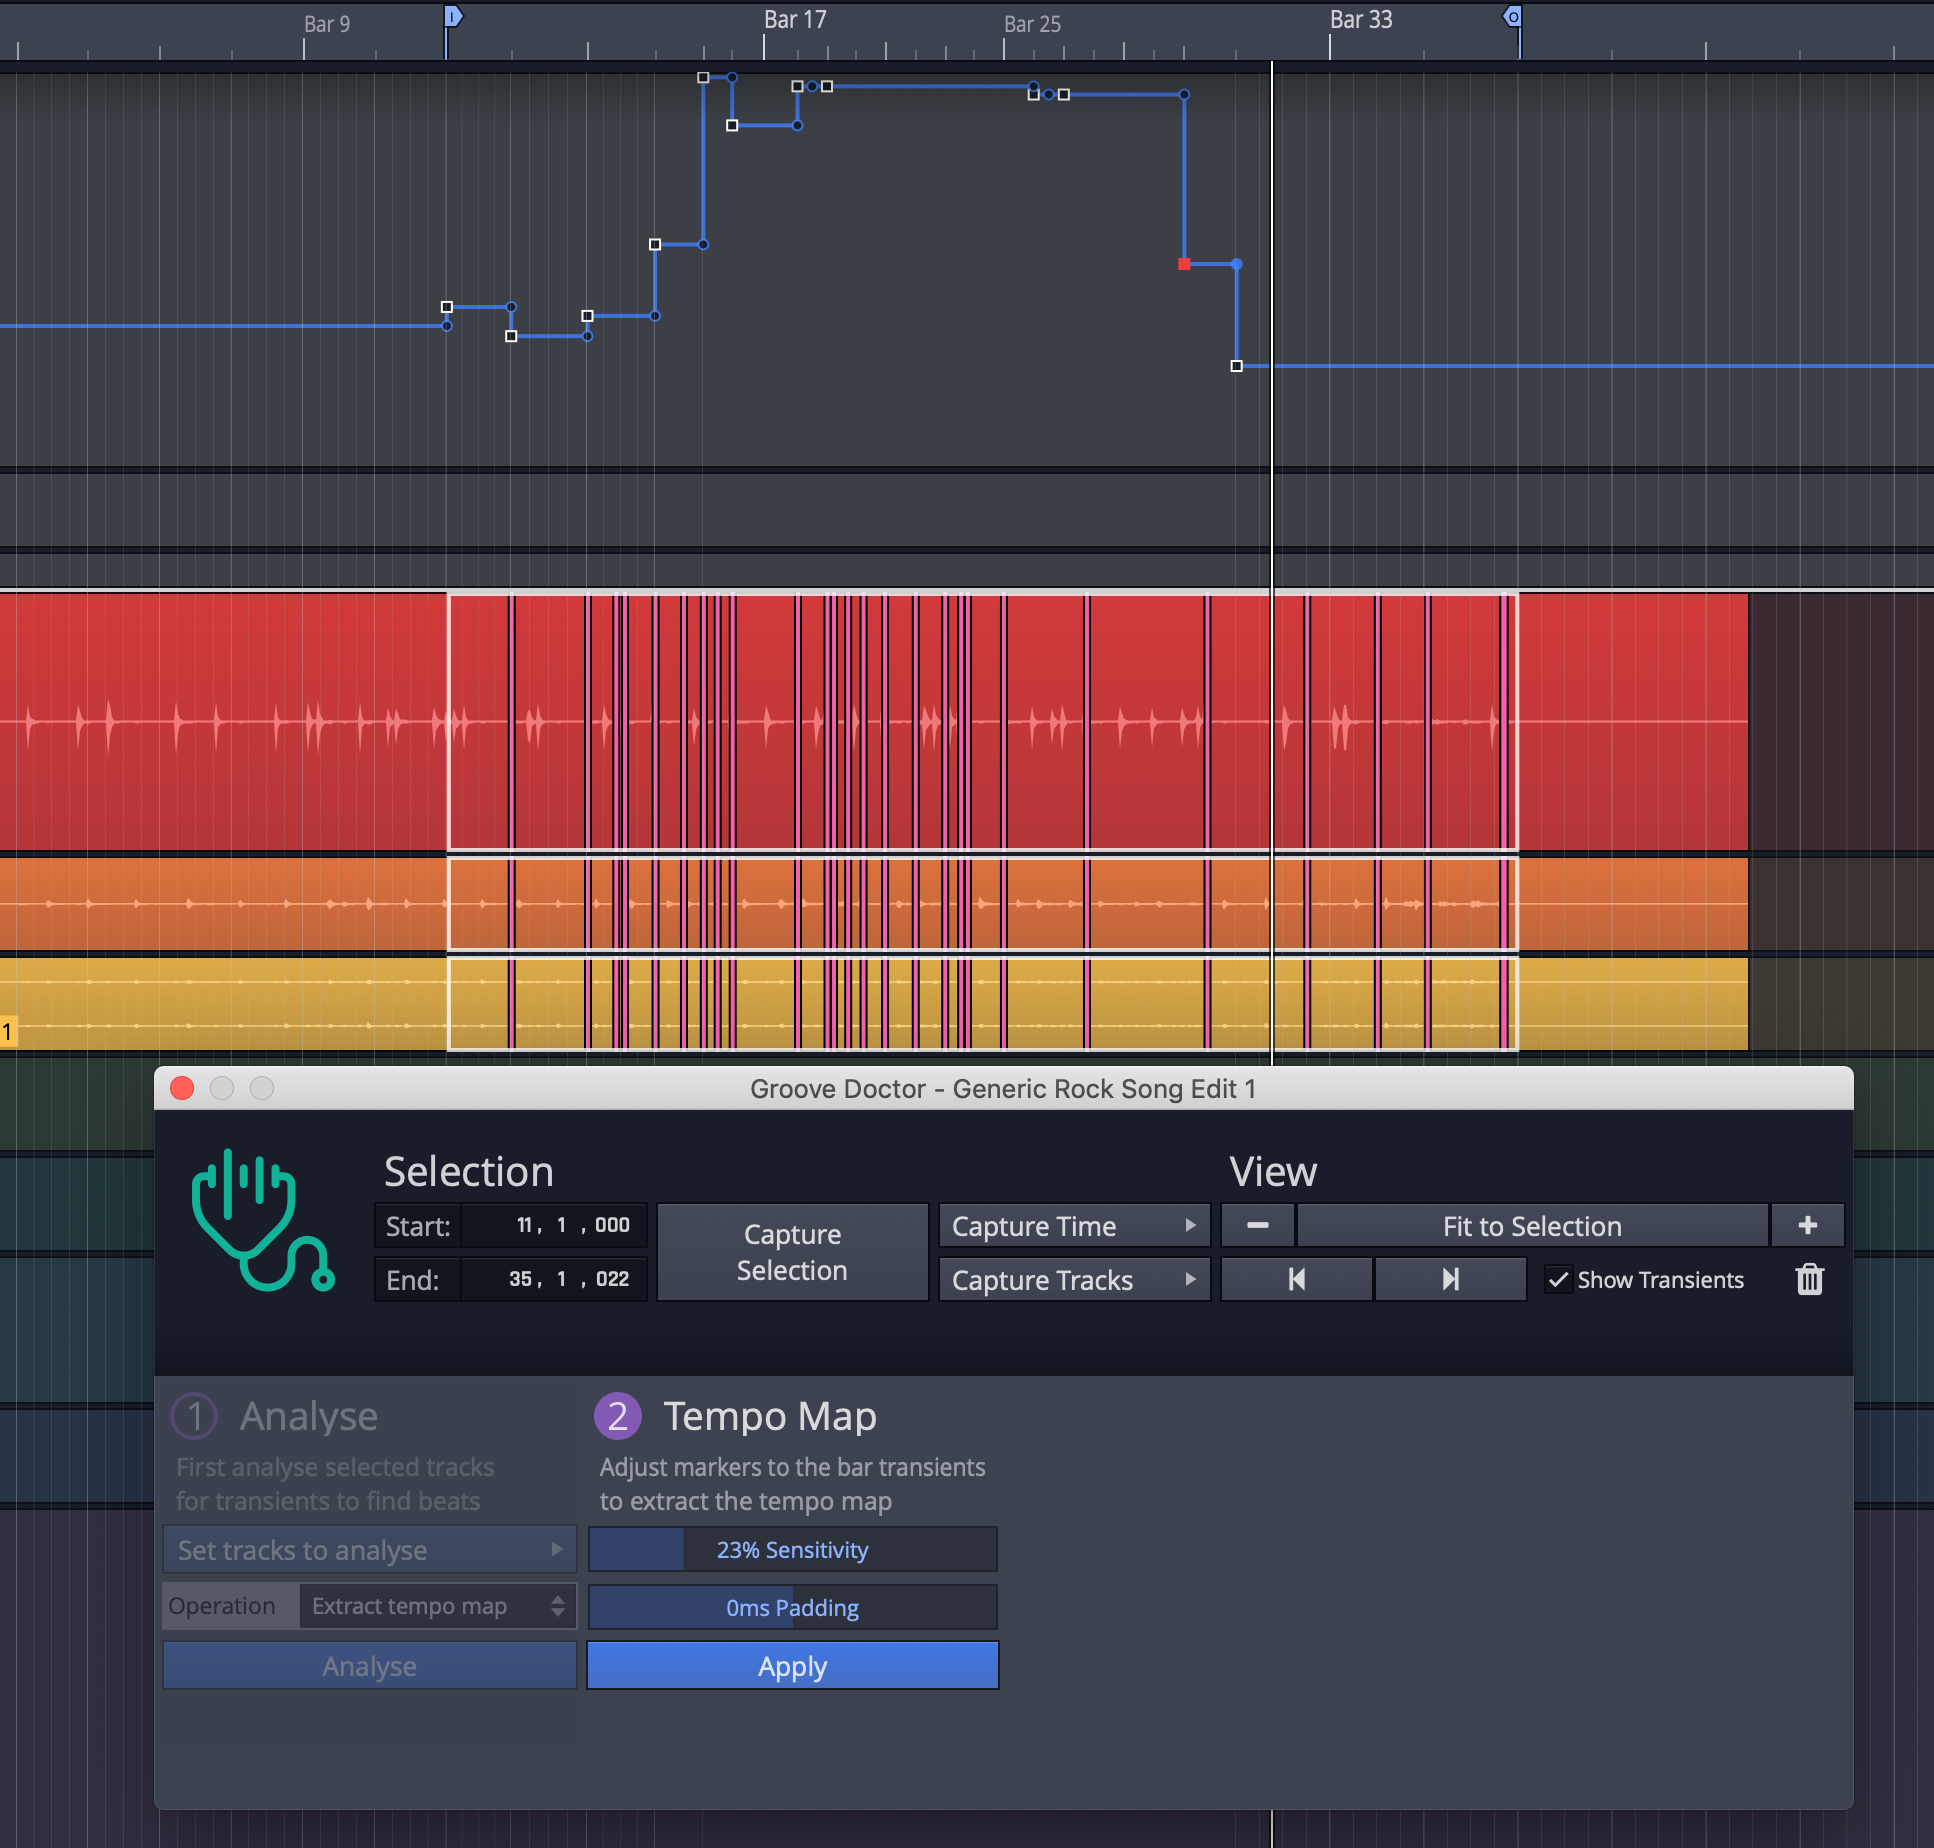
There are times when you think the performance is awesome and you want Waveform's grid to conform to the audio. Extract tempo map does this.
It's quite simple: you extract the groove and instead of copying those time variances to audio or MIDI, you apply those changes in timing to the tempo map.
However, it does not seem to work very well unless your tempo is already very close to the clip. This has further implications if you have a sudden change in tempo or if Waveform seemingly-randomly maxes out the tempo at 300bpm.
In order to get this to work even remotely well, I have had to go through and create a tempo map that's already close to the target, then use the "Extract Tempo Map" function to add another point or two.
Even when the tempo is already close, it rarely seems to give correct results. I tried a wide range of performances from mild rubato to extreme and performances recorded to a click at a different tempo. Waveform never got it right. Not once.
Beat Replace Drum Loop
This is part of the new Multisampler, but it's primarily used on drums (or things that you want to be drums).
Select a clip, go to the multisampler button and click "Beat Replace Drum Loop". This loads your clip into Multisampler with transients marked. Edit your regions and click "Create MIDI".
Now you have a new clip on your track with MIDI notes corresponding to the transients. The MIDI notes contain velocity information as well.
Replacing drum sounds is easy.
The only major issue I've found is that you can't move the multisampler instrument before "Create MIDI" or you lose your audio. It would be nice if you could capture the audio, move multisampler to a new track, then create MIDI on that new track.
- TIP - Beatbox with a microphone, use filters to filter out the bass, snare, hat etc... and then use this feature to create MIDI that you can use to trigger drum sounds.
MIDI Groove extraction
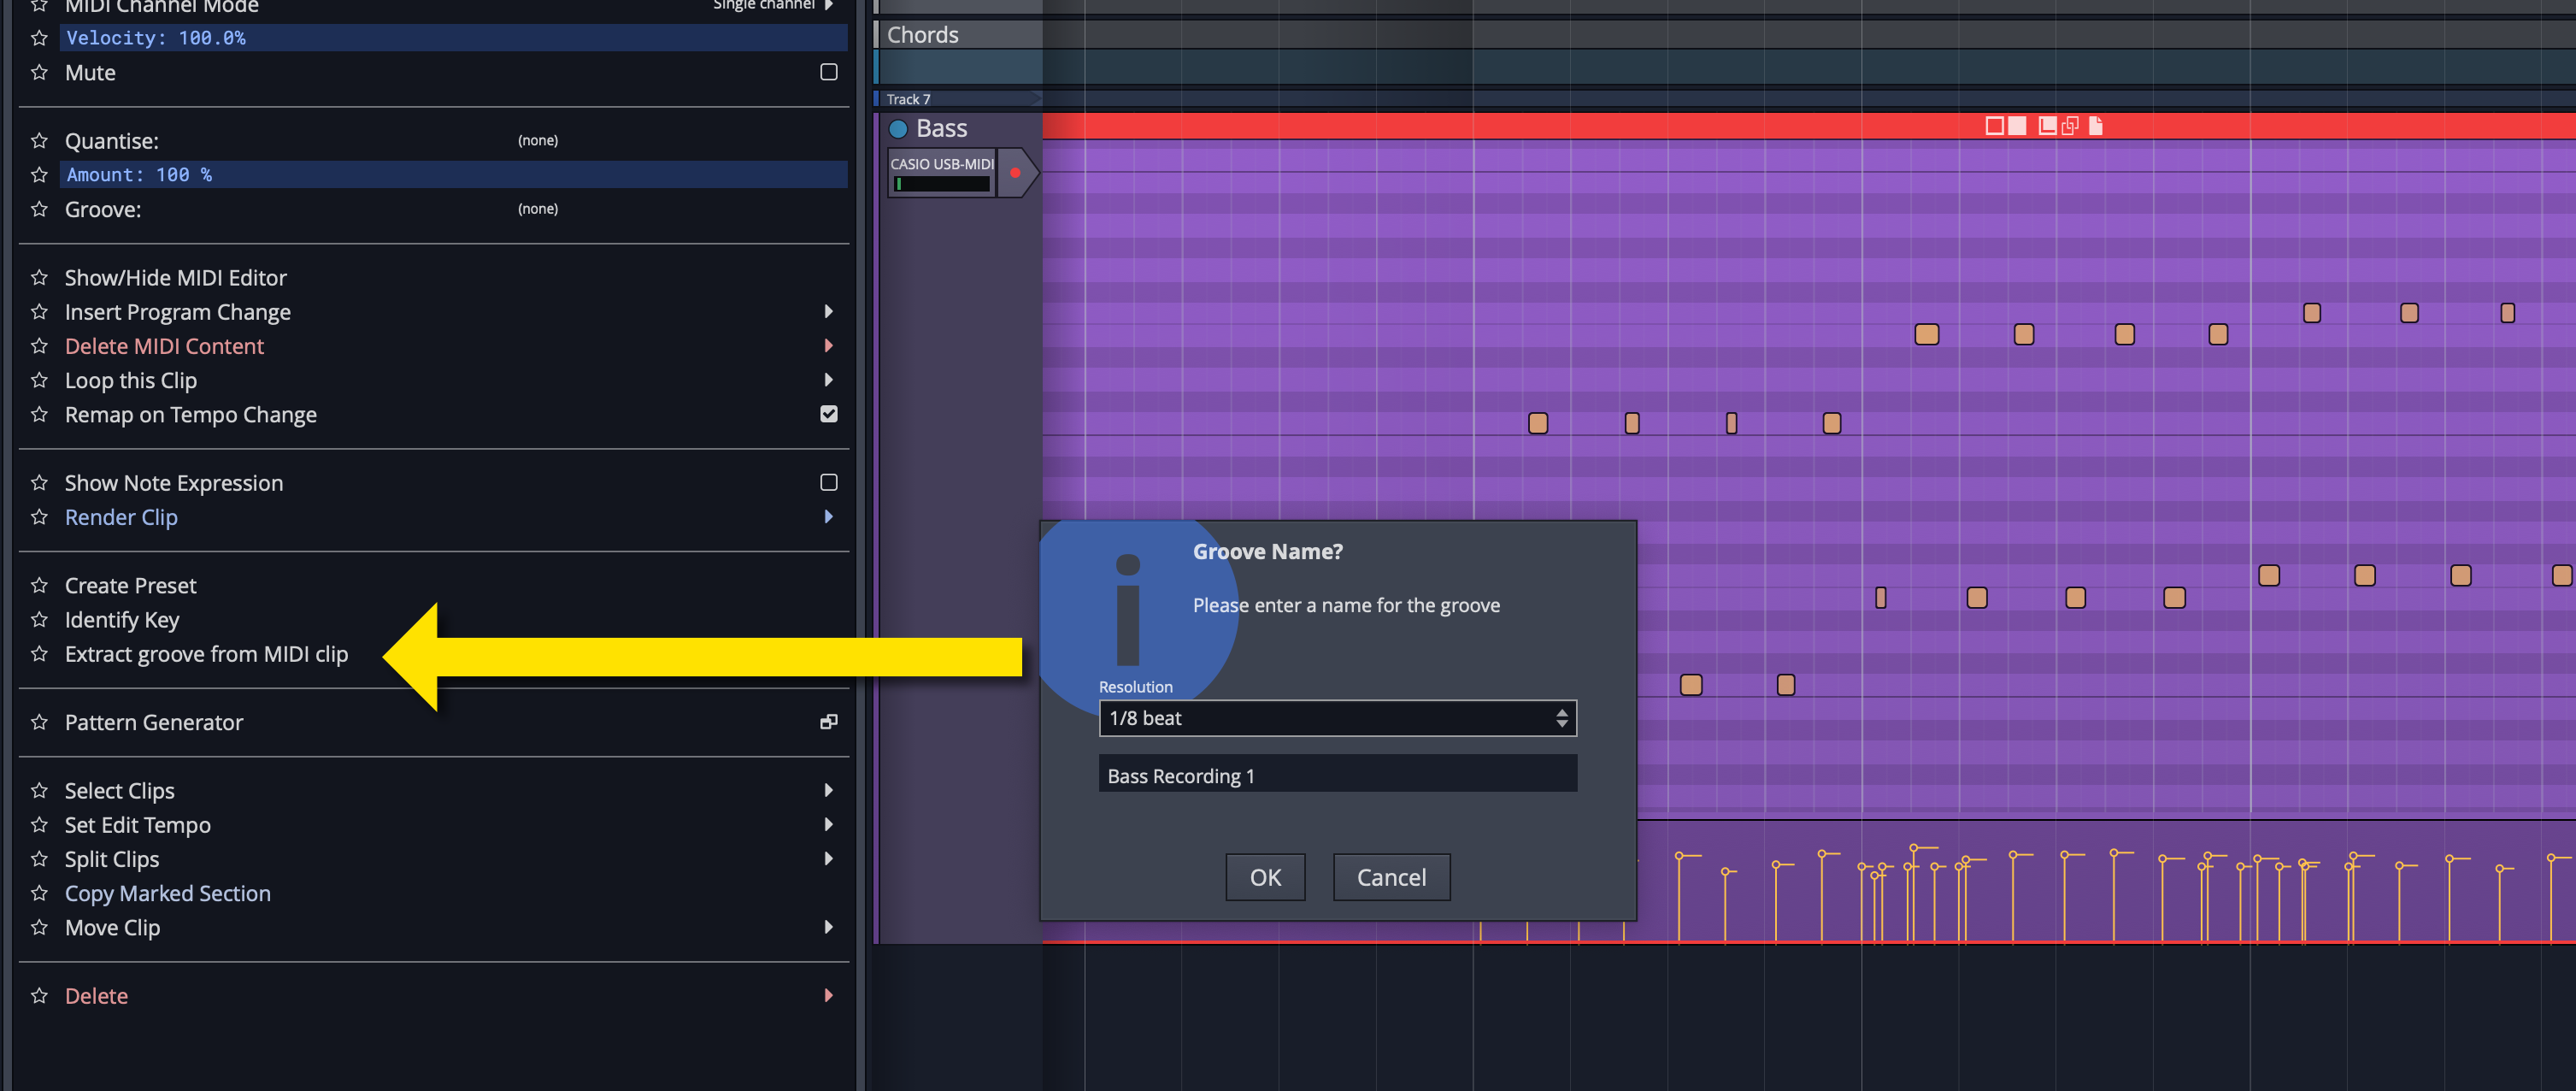
Waveform 10.1 added an action that lets you extra groove information from MIDI, so that you can apply it to MIDI or audio or step clips.
Actions Panel
The actions panel is a new tab in the browser that shows you contextual actions. When you click something, you get to see all of the actions that you can make on that thing.
Many DAWs have actions lists or commands windows. Waveform takes it to another level by directly integrating menu-based actions (click to see a menu), checkboxes, textboxes, meters(!!) and colour pickers directly in the action list. The text in the upper left shows you all connected contexts so that you can quickly jump to a related context without changing your focus.
Seeing every available action when you click something can be overwhelming and is generally unnecessary. The clutter is solved by the little stars next to each action. You can 'favorite' an action, and click the star in the upper right to filter only 'favorites'. If you know you'll only ever solo/mute/create folder/freeze a track, then you can set it up so you only see those.
The inverse of favoriting is possible too; you can hide things you don't want to see.
If you want to see some other shortcuts, keyboard macros or any other action in Waveform in a specific context, then you can add it.
The keyboard shortcuts menu has a "Show favourites menu" action that you can assign to a key of your choice. This opens your favorite actions for whatever context your mouse is over. I love this feature and strongly think they should make this a default shortcut.
The action list is brilliant except for one small thing: you can't assign shortcuts there. If it was possible to assign shortcuts directly in the actions panel then it would be the best in its class by far.
New Plugins
Air Windows
62 new plugins. Most (all?) of them were already free anyway, but now you get to have them cluttering up your plugins list in Waveform 10! Hooray! ??
I am not a fan of this change at all. At least half of them are basically useless, and the rest you could have downloaded yourself.
These plugins should be a separate download, and since Waveform already has a download manager that likes to constantly annoy you, why not??
Whether you like Air Windows or not (I certainly don't!), the concept of including freely available plugins is ridiculous.
4OSC
4OSC (nice naming guys) is a "simple" subtractive synth that's quite powerful.
You have 4 oscillators with the typical sine, square, saw, triangle and noise shapes. Each oscillator has pulse width variation and up to 8 voices of unison (with detune and spread).
There is a single (moog style?) filter with key tracking and its own dedicated envelope with velocity modulation.
There's your typical amplitude envelope and the fun parts: two envelopes and two LFOs that can control nearly every parameter. Oh, and there's MPE mapping along with the full set of MIDI CC available to easily map to what you want.
A simple distortion, chorus, delay and delightfully terrible sounding reverb top off the featureset.
The features aren't what make this exciting. It's how easy it is to both modulate things and know what you modulated. Many other synths have modulation features, but they make it difficult to assign modulation or to figure out what you did at 4am yesterday in a haze of... incense.
Removing modulation is easy as right clicking the triangle next to what's modulated. This is also a quick way to know what things are assigned to a control.
I can't think of many other products that get the simplicity, ease and power ration just right. Anyone with basic synthesis knowledge can comprehend it. Anyone that can operate a mouse can learn to use it in seconds. Anyone with a few minutes can make some crazy cool sounds.
Oh, and it was added for free for all Waveform 10 users in v10.1. They didn't even have to buy out anyone for it.
Subtractive
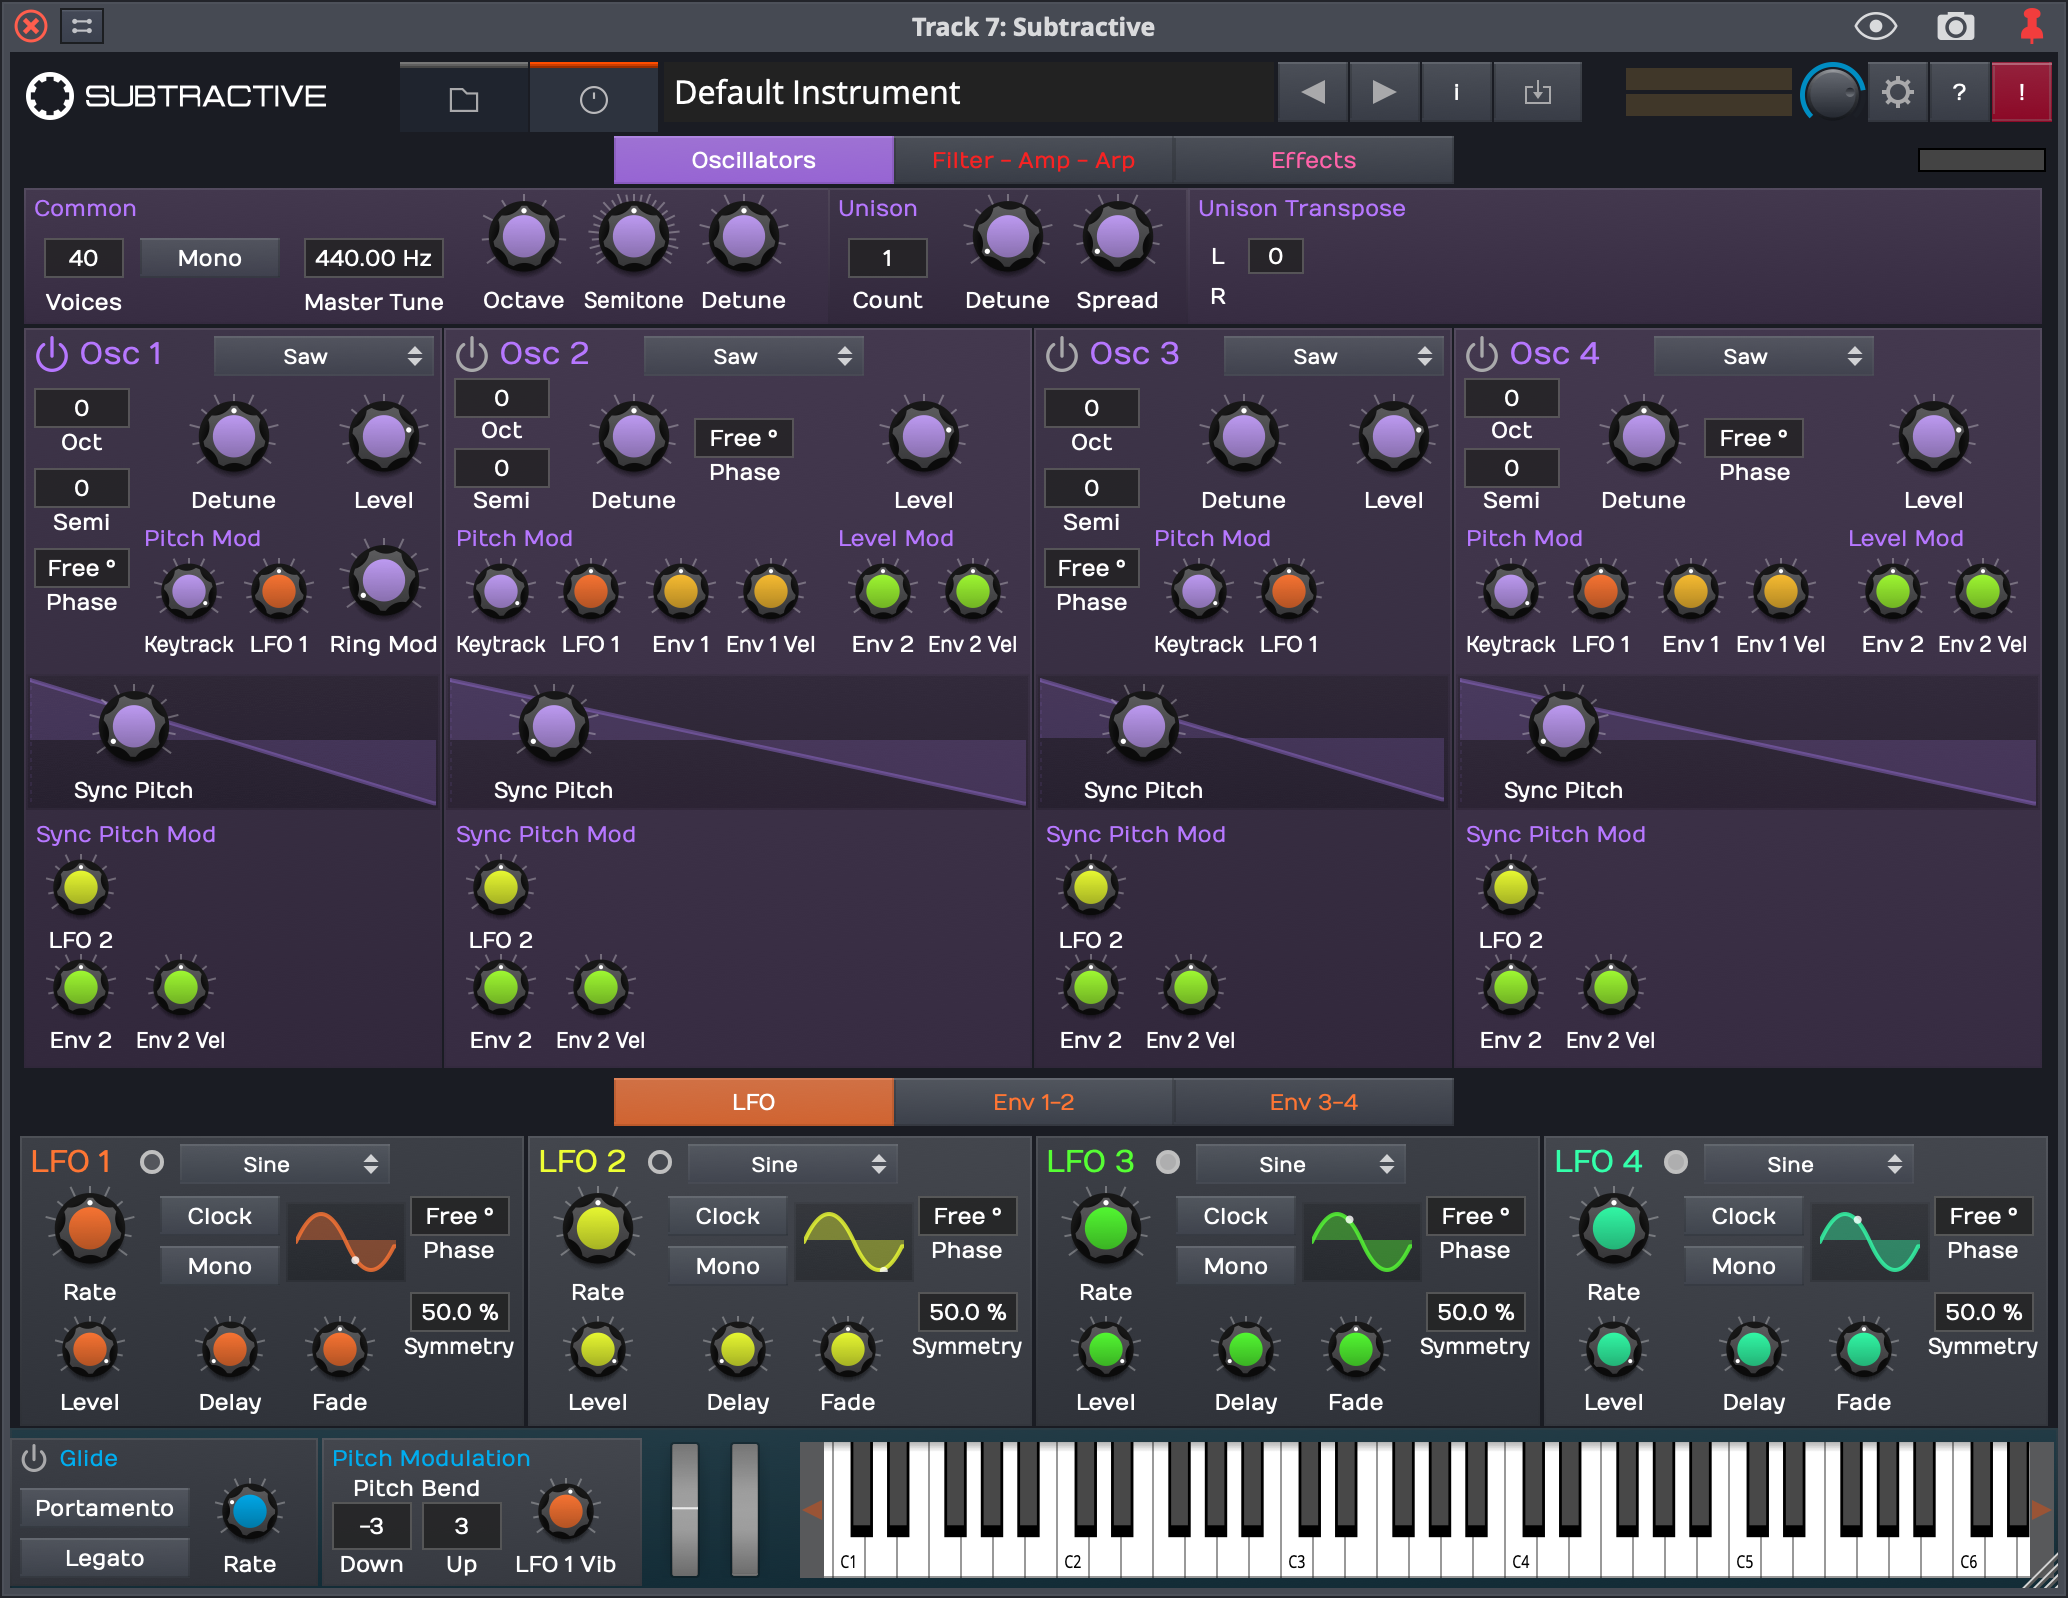
Subtractive is yet another synth included with Waveform 10.
It's similar to 4OSC except you get 2 filters, 4 envelopes, 4 LFOs, an EQ, sync, a variety of overdrives, 4 effects sections with a variety of effects types and an arpeggiator. It also has a glide and pitch mod section to let you setup expressive elements.
I don't like Subtractive as much as 4OSC though, because it's not as easy to use. It's a strong showing of a basic (by today's standards) subtractive synth. That's going to be awesome for a lot of people, especially when it comes with a number of presets and a tag-based preset browser.
It's a good product. It's better than what is available for a subtractive synth in all but 2 DAWs. It's just not as exciting as 4OSC to me.
Not everything needs to be exciting though, and Subtractive fills that nicely.
Multi MIDI Preview
Waveform has had multitrack MIDI editing for a while, but you couldn't utilize MIDI preview to hear notes on multiple tracks at once.
Now you can do that. Wonderful!
Edit and Mix Groups

Not an exciting feature if you're coming from another mature DAW, but a fantastic addition to Waveform 10's list of unique features.
Tracks can now have various parameters linked:
- Editing
- Volume
- Mute
- Solo
- Record
- Colour
- Visibility
- Pan
- Send
- Track height
These are not mutually exclusive mappings either. You can have groups that overlap groups. You can have a drum group that links edits, but have your kick and bass volume linked and still have a "band record" group that links the record state for all open mics in thestudio.
If you need to bypass a group, you can easily disable it temporarily.
Excellent implementation.
Track Snapshots

If you're familiar with versions, lanes, playlists etc... from other DAWs then you know what track snapshots are.
If you're not familiar with those features then let me introduce you: Track Snapshots let you save the current clips at their current state to a 'snapshot'. From that point you can experiment with edits or clip changes without any fear as you can revert back to your previous snapshot.
Snapshots don't work like comping lanes. You can't grab something from another snapshot easily to put it in another.
Track Editor

The concept of a separate editor for an item is fairly common in DAWs. Waveform 10 takes it to another level.
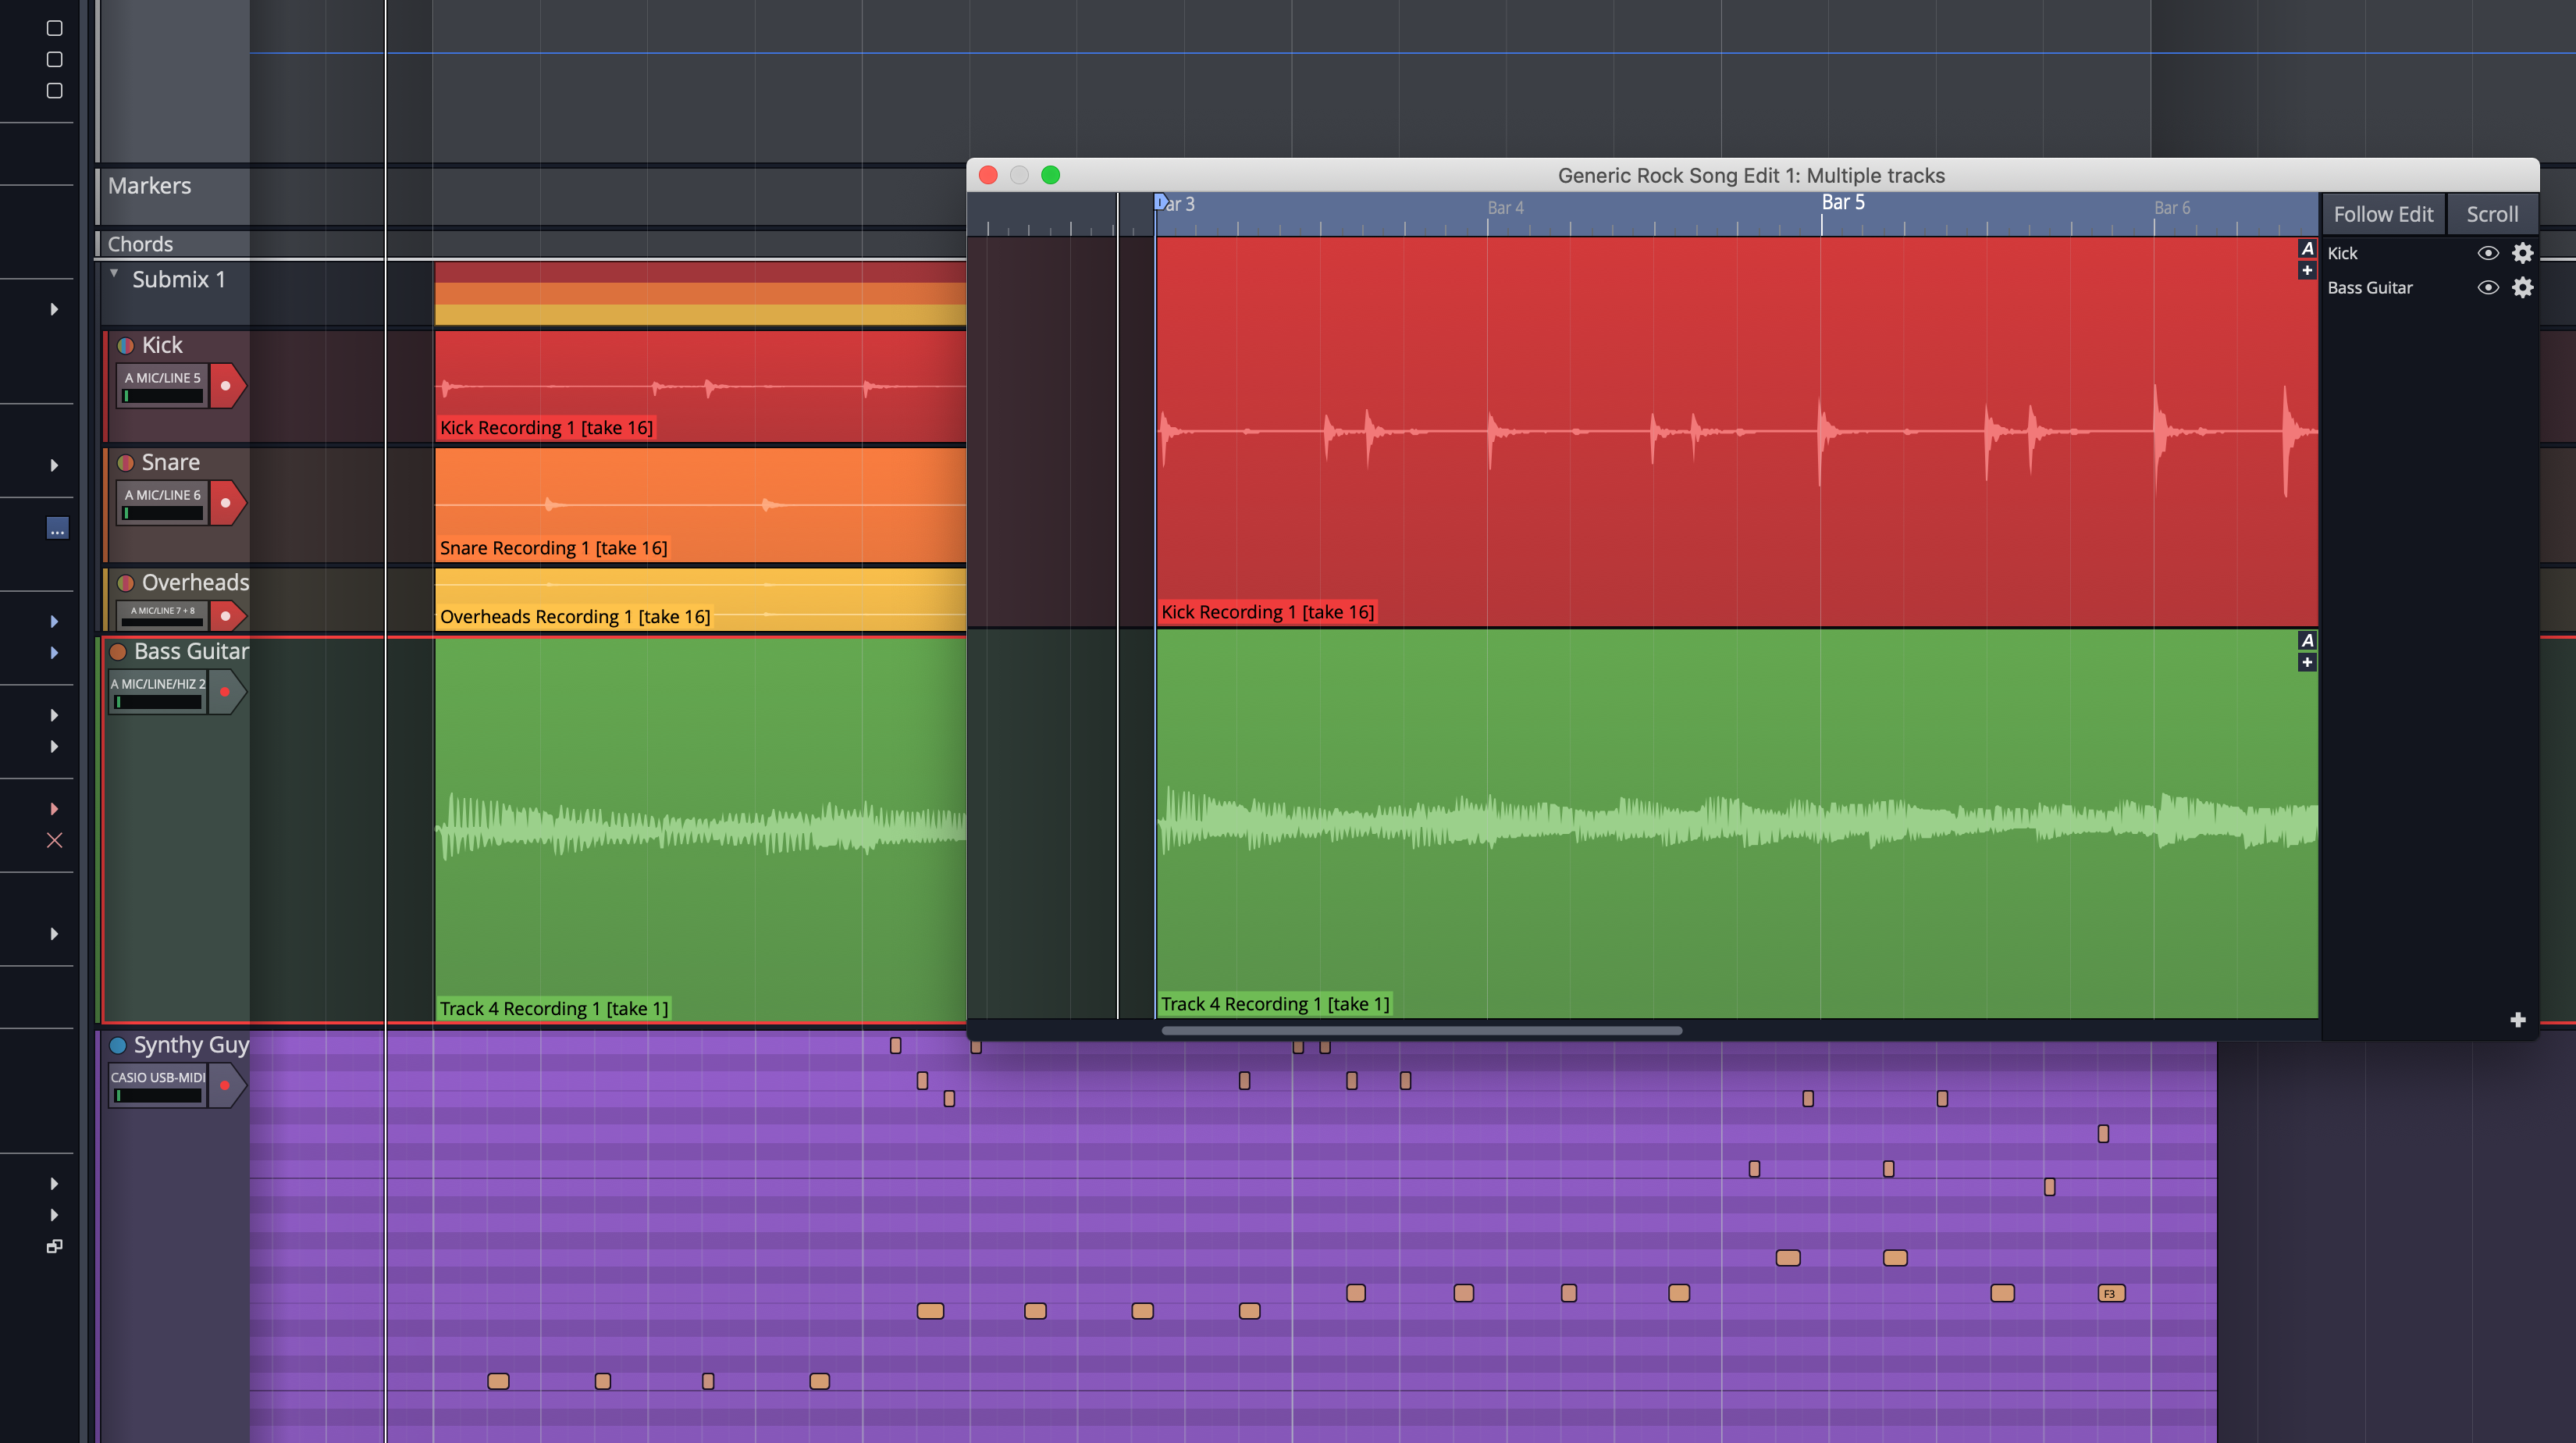
You can launch a window of any track that is that track but in its own window. You can have multiple tracks in a window, and multiple windows with any tracks. Each window can optionally follow the main edit window or not. Scrolling is optional too.
I first thought that this feature was a bit useless, but I forced myself to use it and I've found it indispensable.
Often when editing something you want to focus on it. Obvious, right? I think that most people will naturally zoom in, increase the track height then do the reverse when they need to reference something else in the project.
Track Editor windows can also show any tracks you want. So if you want to edit your kick drum and bass together, you can make a window to do that. You can leave the tracks where they are in your project, the edit window is its own thing. Tracks can easily be added, removed and hidden too.
Track Editors allow you to just launch a window for that track, size it how you want and when you're done just close it (or send it elswhere). No more of the zoom, zoom, unzoom, unzoom dance. I love when DAWs have excellent zooming functions, but this feature makes that less important.
Try it. Force yourself if you must. Anytime you want to work on a track, pop it out to a window.
My only gripe is that opening Track Editors is not easy. There does not appear to be an assignable shortcut for it and I don't see any mouse-based method that's quick. Perhaps something like cmd/ctrl-double clicking a track would be nice? The "Tracks" menu has nothing for it and neither does the info panel for tracks. It's just hidden in the right click menu or actions panel.
It would be nice if adding tracks was search based instead of menu based. I've had some HUGE menus pop up in my face because I have 75+ tracks in the project.
This is still a magnificent feature. Once you use it, any other DAW feels a bit disgusting.
Edit Cursor
Waveform 9 didn't have a visible vertical cursor that told you where things where happening. Waveform 10 adds this.
I don't think I really missed this feature, but now that it's here I wonder how I lived without it. It's just easier to know where a cut is about to happen.
Range Selection
Waveform 10 now has range selection, yet another feature more mature products have had as a basic feature for a long time.
You can select a range by holding shift and alt/option, then work upon that range to split it and move it around if you want.
Autosave and Crash Recovery
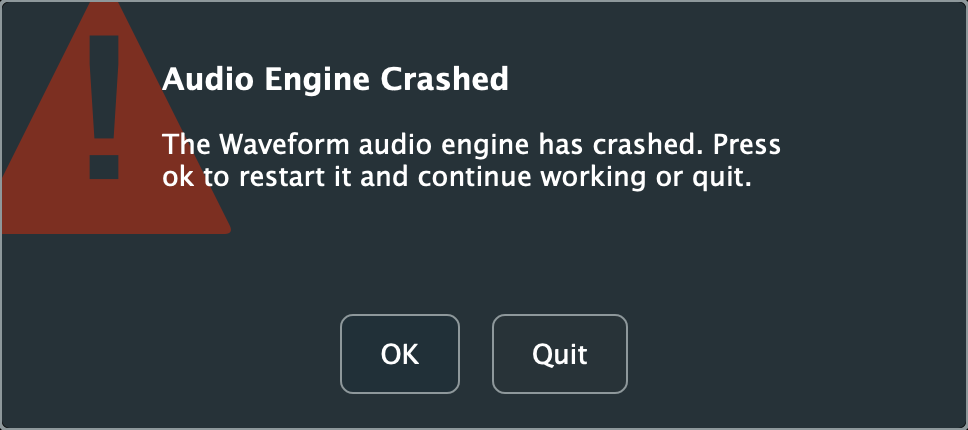
Waveform will autosave your project (never when it'll cause a glitch though!) and help you recover any lost work if there's a crash.
This is a feature that you hope you never have to use, but Waveform 10 has needed this so far due to some pretty nasty bugs upon release. Thankfully it's there to save you.
EXCEPT for one massive failure: your undo history is not saved! If you crash doing something that you want/needed to undo then you're screwed. Your project loads back up and you can't undo anymore. I've had Waveform 10 crash at least a dozen times while writing this (I'm using a beta right now), and most of those times the crash recovery was useless because I was left in a state that I wanted to undo from.
The autosave frequency isn't often enough to alleviate this.
I also noticed that my I/O assignments were incorrect upon reloading a crash recovered project.
They have been rapidly improving the stability of W10, and I've only found crashes when poking deep at things. It's still not forgivable though. Music software needs to be stable to be useful.
Consolidate audio

Assets can optionally be copied to the edit's folder when desired, and there's a 'Consolidate Files' option for edits in the Projects view as well.
Consolidate Files does what it sounds like; it finds all assets in your project and copies them to the project folder.
Autotune
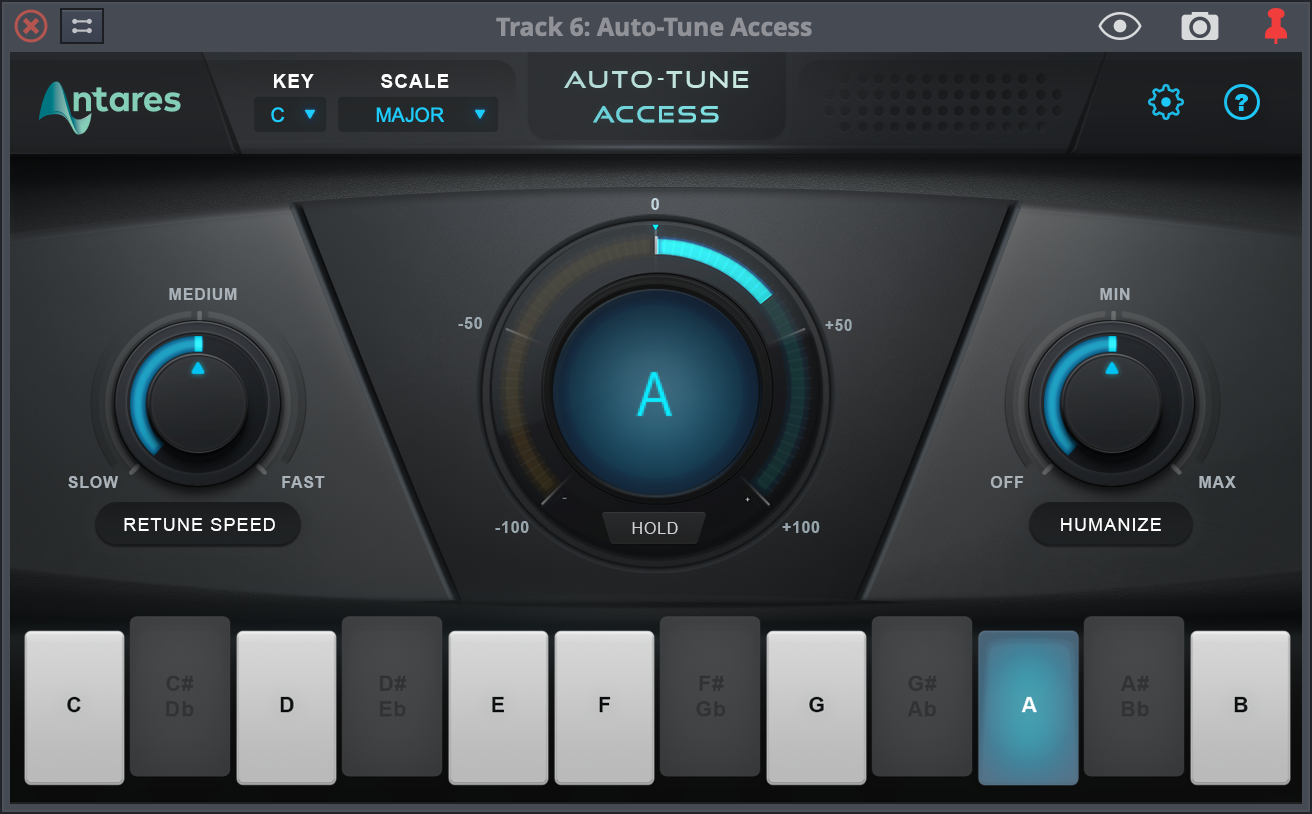
Autotune included! It's the limited version but it works more than well enough for most half-decent singers.
Waveform already includes Melodyne Essential which ok-ish for editing (and it gives you a mild discount to upgrade). Melodyne doesn't help you when you need realtime pitch correction, and that's where Autotune steps in.
You get about a $100 discount to upgrade to Autotune Pro if you want, so even if you don't want to use the access version, you get a coupon to move up if you want.
The downside here is that Autotune uses Wibu's Codemeter. It doesn't bother me, but it is yet another copy protection system on your computer. If you don't care for it, then don't download it. TSC doesn't force it upon you.
Improvements
Modifier Panels

Modifiers now have their own floating windows! Hooray!
Hop over to the actions panel when you click a modifier to see the modifier open actions. The main modifier panel can be opened with a double click on its icon in the filter panel as well.
Multisampler 2.0
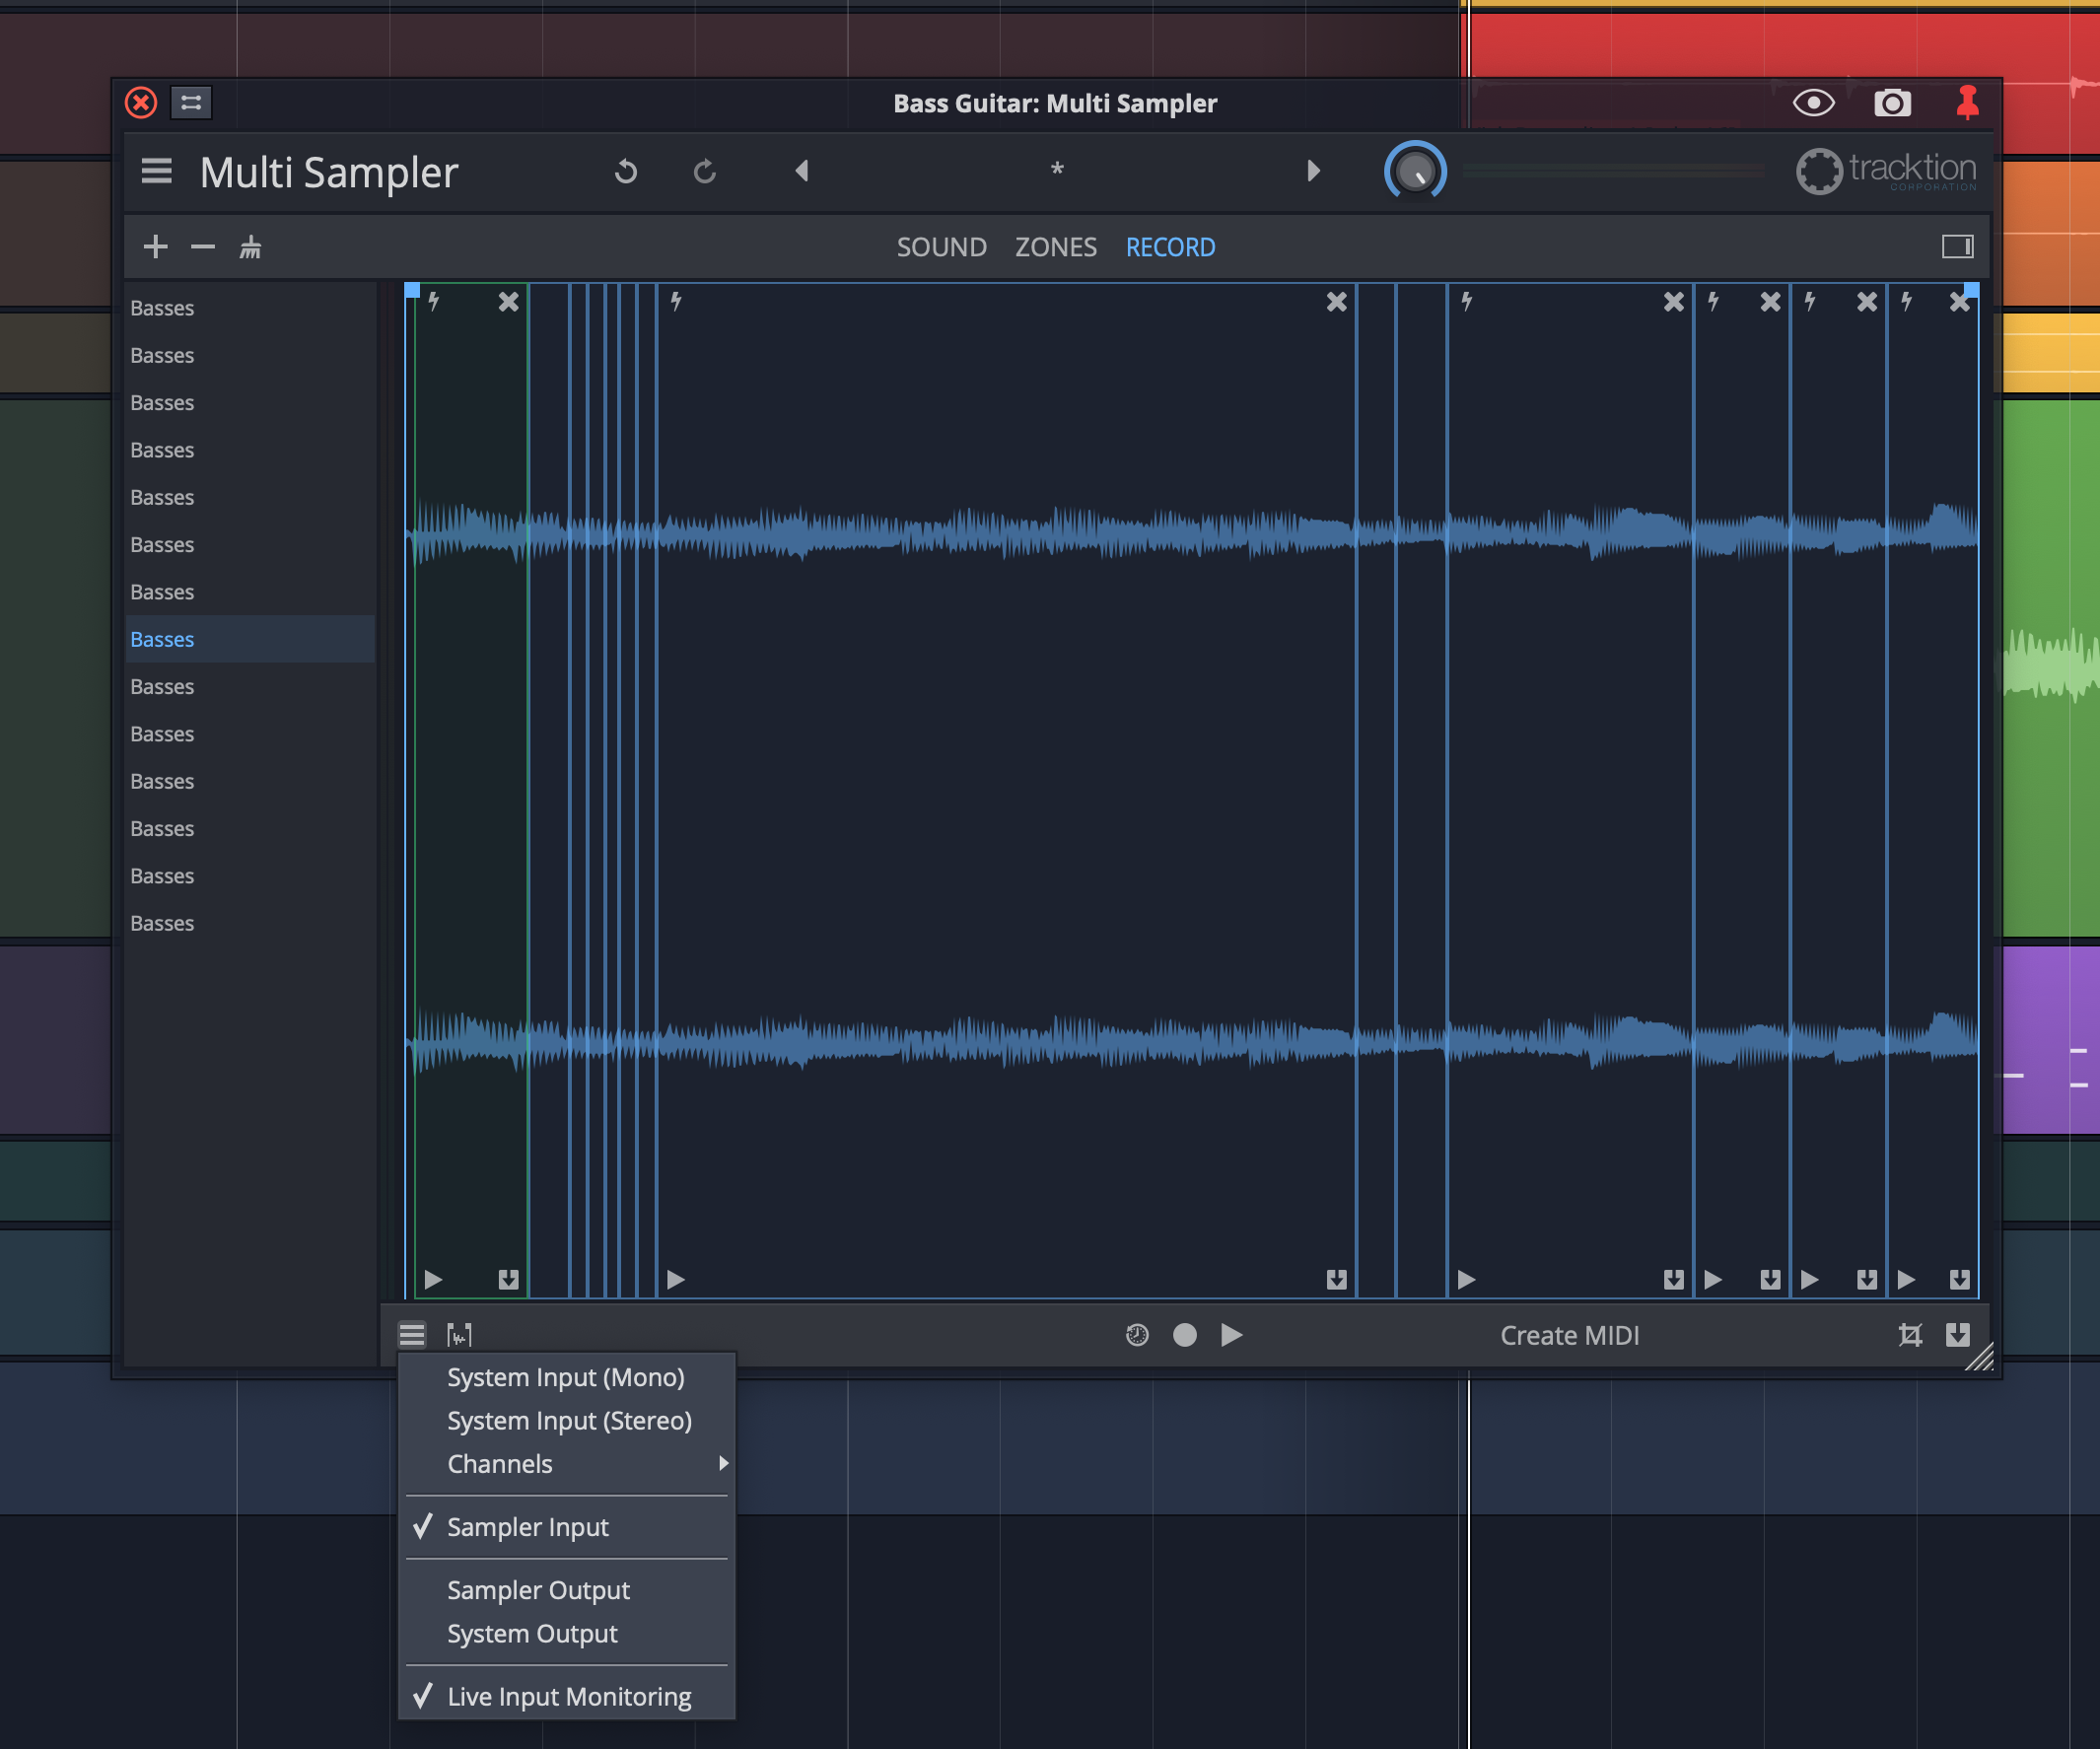
NOT a new plugin, but improved. I'm also not sure if it's actually 2.0, but that's what I'm calling it.
Here's what you can expect:
- Trigger layers for editing via MIDI.
- Layers have mute and solo.
- The recording tab has been improved in design.
- You can now record from: Multisampler input or Audio I/O directly. That's in addition to system input, system output (any sound coming out of your computer!) and the multisampler output (for resampling)
- Live monitoring is now a toggle
- 64 voices with optional voice stealing
- Create MIDI.
Multisampler was already one of the better stock samplers out there, and it's nice to see it improving.
Output assignment
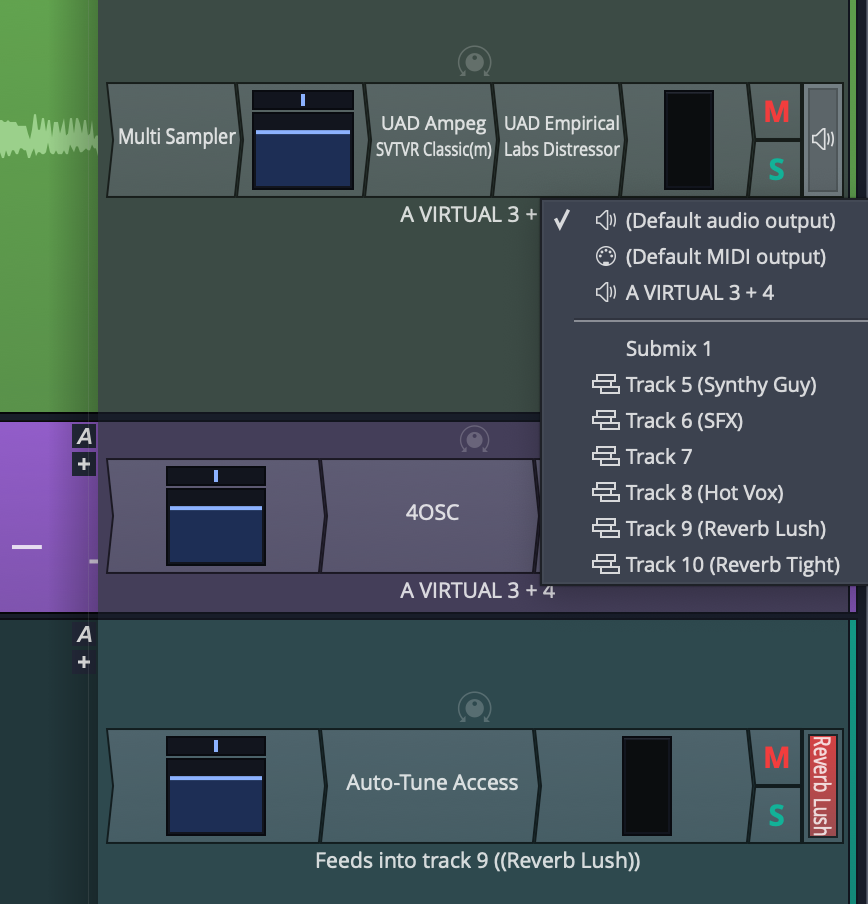
It's finally possible to easily select the output assignment of a track. Click the speaker on the right of the track.
You might notice as well that the output name is clearly displayed at the end of the signal path (rather than at the beginning like most DAWs). I appreciate that.
Waveform's gone from one of the most annoying DAWs to assign outputs for a single track, to one of the easiest. Now we just need a way to assign multiple at once.
Crossfade Adjustment
Small quality of life improvement here: you can now drag complete crossfades around.
Other
Ripped straight from the changelog. I do it so you don't have to.
- Arrange tracks now show track colours and folders
- Arrange tracks show track destinations
- Solo/mute buttons can now be dragged across tracks for quick setting
- Panel visibilities have been unified in to a single panel
- Toggle plugins between normal and faceplate view
- Controllers: Added support for OSC custom controllers (Note: I don't see this as a user-facing feature)
- Mixer: Allow clicks on level meter to reset overloads
- UI: Added gradient to horizontal meters
- Javascript: Added an action to renderClipsFromSelectedRange
- Edit playback: Added a setting to stop playback when a new tab is selected. This can be disabled from the General Behaviour settings
- UI: Added some shading around the loop in and out region in the arrange area
Meta
Plugin Validator
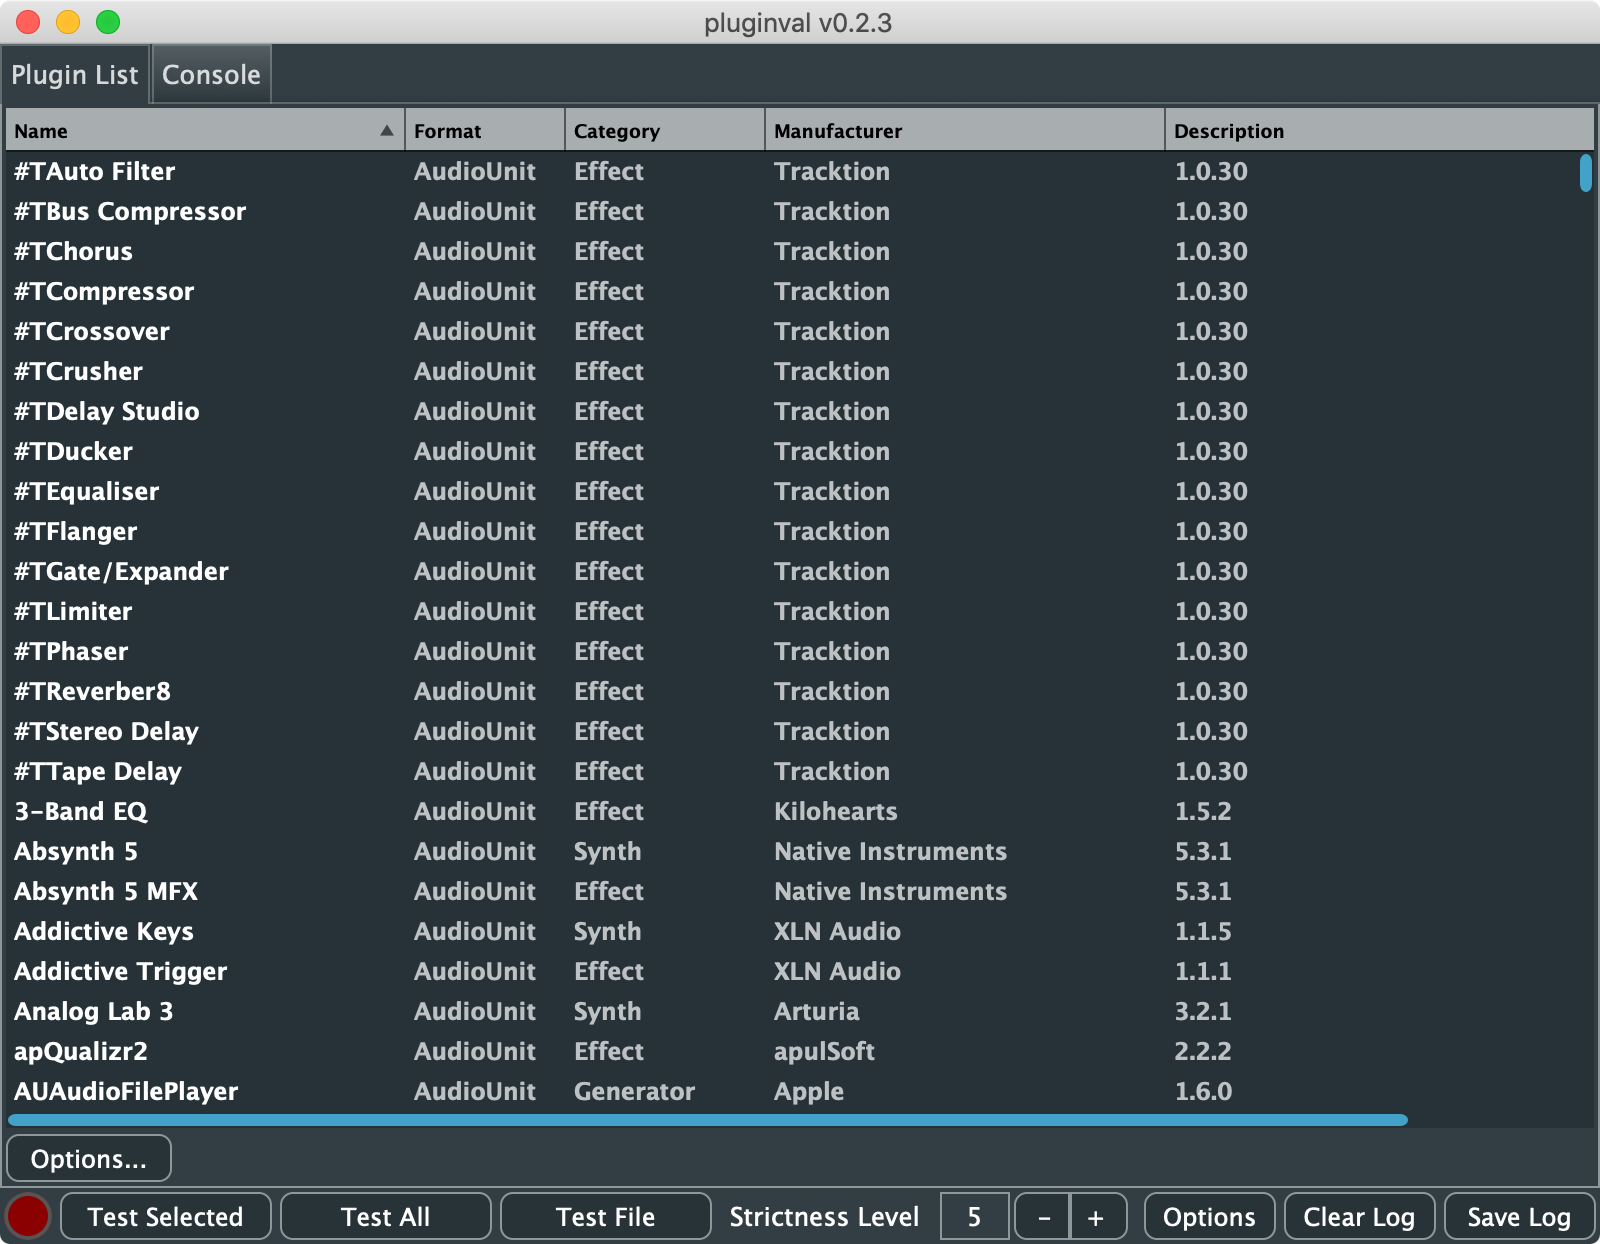
Plugin validation doesn't directly affect the end user. If developers latch on to this idea and utilize such a program to validate their own products, then that will go a long way towards a more stable experience for everyone.
The Tracktion team has made their plugin validator open to the public so that anyone can use it.
Apple already has AUValidator, but Steinberg offers nothing close, nor does Avid (pubicly). If everyone used a single validation product then that would either force the platform publishers (Apple, Steinberg and Avid primarily) to codify (and code) their standards or to conform to what this validator claims to be functional.
It's a long shot, but if it were to catch on then this is the single biggest feature offered by the Tracktion team so far.
Open Source
The Tracktion engine is open source! Not all of Waveform is there, but the core engine is.
What does this mean for you? It means that if other companies, individuals or hobbyists decide to use it and then submit patches, you benefit. More eyes is always a good thing. (More mouths and more hands... not so much).
Like the plugin validator, if this catches on, then it's a huge win for Waveform users. The core of the software will improve and hopefully lessen some of the bikeshedding tendencies that plague every developer of a large project.
Conclusion
It's been a rough launch. Waveform 10 on launch was stable for some folks, and exceedingly unstable for others.
The actual features added are fantastic. This is one of the bigger updates in the DAW world in terms of total functionality added. It adds some features that I pushed for pretty hard. Hopefully some of these new features will start to attract people in the 'professional' recording and production scenes.
There's still some MIDI features needed, and a number of bugs to fix, but Waveform 10 is still my goto when I want to have fun with music again.
Support Me!
This post took 18 hours to research, screenshot, write and edit. If you appreciate the information presented then please consider joining patreon or paying me for my time spent bringing you quality content!
Other parts in this series
- Version 9, Part 0: Intro
- Version 9.1.1, Part 1: Browser, Mixing, GUI, VCAs
- Version 9.1.1, Part 2: Modulation, Plugin browsing, Annoyances, GUI
- Version 9.1.1, Part 3: Macros, UI design, Ghost tracks, Buying
- Version 9.1.1, Part 4: Pattern Generator, Edit Clips, Folder editing, Chord Track
- Version 9.1.1, Part 5: Step Clips, Loops, Clip Linking, Loop Recording, Track Presets
- Version 9.1.1, Part 6: MIDI Editing
- Version 9.1.1, Part 7: Recording
- Version 9.1.1, Part 8: Clip Layer FX, Multisampler, Scripting, Project Management and more
- Version 9.1.1, Part 9: Instruments and Effect Review
- Version 9.1.1, Part 10: Conclusion
If you appreciate the information presented then please consider joining Patreon or donating money/time.
