Waveform: the good, the bad, the weird. - Version 9.1.1, Part 8: Clip Layer FX, Multisampler, Scripting, Project Management and more
Reader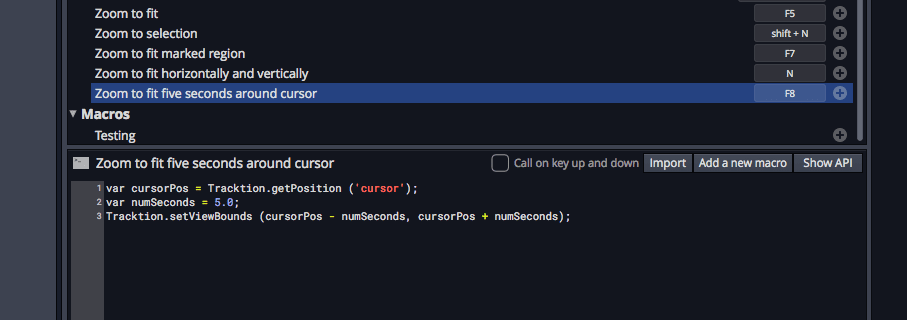
This is the cleanup post. Only 2 more posts left: Effects/Instruments review and the conclusion. So this post is where I try to cover the other things that I’ve missed so far that I find interesting.
There might be a surprise coming later anyway… ;)
- Good
- Clip Layer FX
- Multisampler
- Macros
- Project Management
- Faceplates
- Clip Render
- CPU Metering
- Freezing
- Bad
- Scripting
- Plugin Delay Compensation
- Weird
- Menu Shortcuts
Other parts in this series:
- Version 9, Part 0: Intro
- Version 9.1.1, Part 1: Browser, Mixing, GUI, VCAs
- Version 9.1.1, Part 2: Modulation, Plugin browsing, Annoyances, GUI
- Version 9.1.1, Part 3: Macros, UI design, Ghost tracks, Buying
- Version 9.1.1, Part 4: Pattern Generator, Edit Clips, Folder editing, Chord Track
- Version 9.1.1, Part 5: Step Clips, Loops, Clip Linking, Loop Recording, Track Presets
- Version 9.1.1, Part 6: MIDI Editing
- Version 9.1.1, Part 7: Recording
- Version 9.1.1, Part 9: Instruments and Effect Review
- Version 9.1.1, Part 10: Conclusion
- Version 10.1.0
VERSION - This review is (hopefully) accurate as of Waveform 9.1.1. Further versions may obsolete these views.
Contents
Good
Clip Layer FX
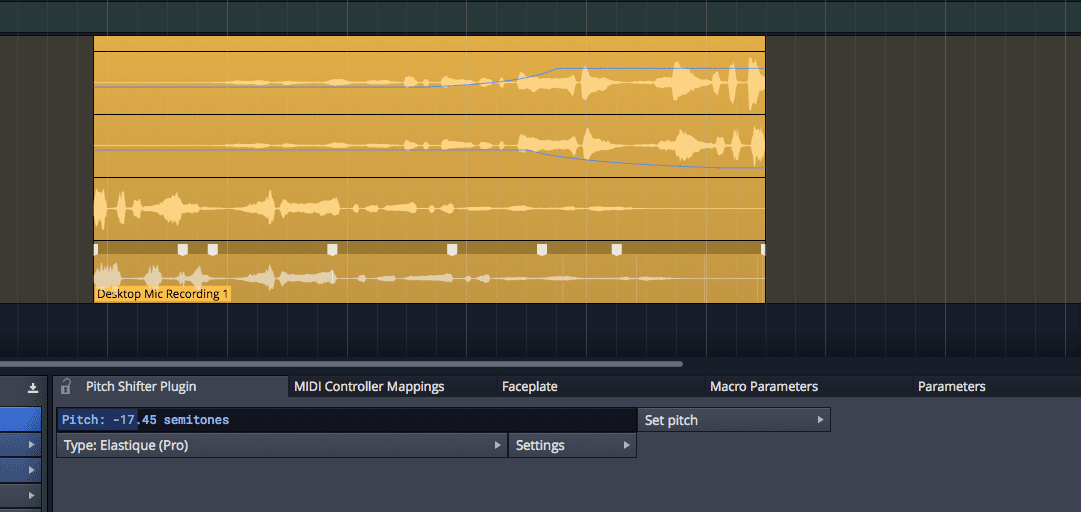
Clip layer effects is a unique idea. Essentially every clip has a selection of effects that can be applied to it:
- Volume
- Volume adjustment - clip level volume
- Fade in/out.
- Step volume adjustment - Essentially a step clip except just for volume. A neat gate effect.
- Pitch/Time
- Pitch shift - automated pitch shift with curves.
- Tape stop-start
- Warp time - in-place beat warping. Time stretching only specific portions of the audio inside the clip
- Effects
- Plugin - apply a plugin to the audio. The plugin is rendered, which can take some time on long clips, but ultimately saves CPU.
- Reverse
- Mastering
- Normalise
- Mono - combine left and right channels
- Invert - polarity inversion
When you apply a clip FX, a new row is created on the clip that shows the results of the effect. You can see the entire process step-by-step as it happens to the clip. Many of the clip fx have their own settings of course.
In the image above I have a volume fade, a pitch drop, a reverse then I’ve warped the clip. Fast and easy.
Clip Layer FX are simple to explain, but functionally they are extremely fun to use! I’m sure the tape stop/start effect and pitch automation are a big plus for electronic producers, and basically everything available is going to speed up your workflow once you learn to use it.
The only thing that I personally wish existed was a ‘merge’ effect or a ‘split’ effect. While using the clip FX, there’s been times where I wanted to apply different clip fx to multiple clips, then apply the same effect to multiple clips. I’d imagine this is technically difficult to implement, but it’d be a nice workflow improvement.
Nevertheless, once you begin using clip layer FX, other DAW’s implementations of item/region/object based editing might seem drab in comparison. (Though many DAWs do offer more functionality, I don’t know of anything that offers the commonly used actions so easily accessible and nicely presented).
NOTE - The inability to apply Clip Layer FX to multiple selected/grouped clips in sync bothers me quite a bit. Due to this I have to do all of my multitrack (like drum recordings) audio editing in another DAW. Waveform really needs to improve this.
Multisampler
I will cover the Multisampler in the next post, but for now I want to discuss how easy it is to use. You may be familiar with Ableton’s Slice to New MIDI Track function, and this is very similar.
You can take any clip and in the properties panel click ‘multisample’. The clip will be loaded in to a multisampler, transient detected and ready to go.
From there you can use the MIDI editing tools, or use Multisampler as you desire to play your clip via MIDI. Quick way to sample sounds or to mangle your own beats.
Unfortunately you are limited to the simplicity of Multisampler, but that is another topic.
Macros

Creating keyboard macros in Waveform takes a small bit of effort, but it’s relatively powerful in the context of what Waveform offers.
This topic is purposely conflated with scripting. Keyboard macros and Scripting utilize the same interface and functionality. I’ve split them up because creating simple ‘do X Y then Z’ keyboard macros is nice.
Creating a macro is done by clicking the + under ‘Macros’ in the ‘Keyboard Shortcuts’ settings window. Make sure ‘Show script Editor’ is on and now you can add your actions in a Javascript-like format. When you click other shortcuts, you can see their underlying code to call them.
That’s all there is to it.
Project Management
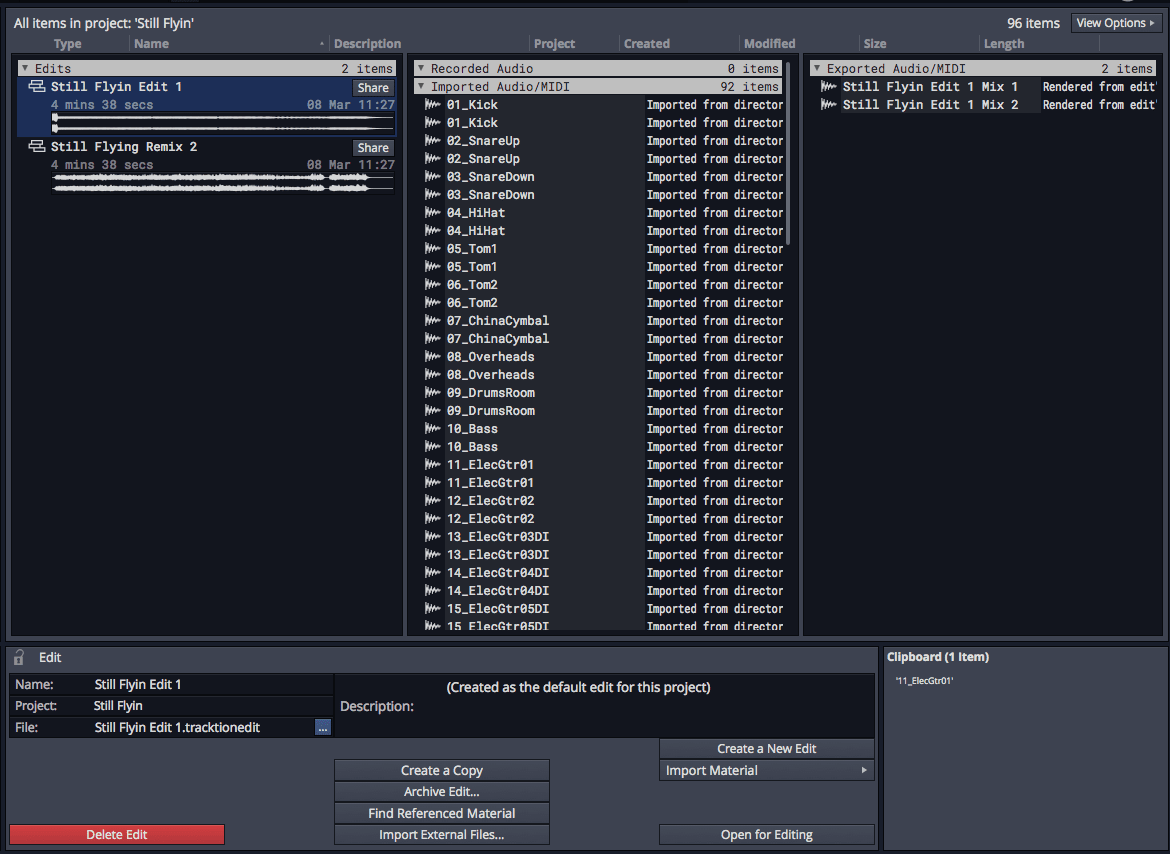
Project management in Waveform is a joy. Multiple versions of projects are easy to create and keep track of. Recorded and imported assets are separated. Renders are kept in a list. Finding missing material is easy. Edits (project versions essentially) have rendered copies that you can listen back to right in the project page. Notes are available for each edit in plain sight.
It’s great. I also love that it lubricates the process of creating and maintaining multiple versions. Many macOS apps have this feature already, but the way Waveform handles it is excellent.
For general studio work the project management makes life better.
Faceplates
Faceplates are user-creatable GUIs that control a plugin or macro parameters.
You have a selection of “sliders” (knobs too), labels, parameter-direct controls and an XY controller. There’s currently 5 skins for controls. The background can be changed and there’s various parameters for handling the background.
In the video above I created a faceplate to control Fabfilter Pro-Q 2. Here’s what I setup:
- Tilt-shift - a tilt shift filter. Pro-Q has one, but I’m using a macro parameter to control 2 shelving filters inverse of each other. Just one knob does this!
- De-Mud - this is a band setup to remove mud from the track. It uses a macro parameter behind the scenes so the Q and gain are connected. The deeper the cut, the narrower the Q. All from one knob.
- Low cut - a very steep high pass. The knob changes the frequency of it.
- ResKill - I have an instrument I record frequently that has a very annoying resonance at 4.38khz. So i just made a knob that lets me ‘turn it off’.
- Freq/q/gain/shape - I also added one freely-accessible band. Normal EQ controls here.
With this setup I never have to look at Pro-Q. I can have various setups tuned for different instruments or situations.
Perhaps you have a massive sampling instrument or a plugin chain that requires digging through multiple windows/menus/tabs to adjust things. Faceplates save the day. Spend 20 minutes setting up a faceplate, save a faceplate preset, and now your complex instrument/fx chain is controllable from a clean GUI that you designed yourself.
Pretty neat.
Clip Render
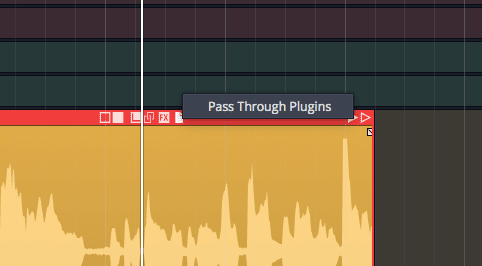
Often it’s desirable to render a clip, especially when using clip fx. Waveform makes this a smooth operation.
Click the icon that looks like a ‘new file’ icon on the clip. You can optionally pass the clip through plugins (right click for this option), which is fantastic. Then you can drag it anywhere you want. Your desktop, a folder, inside Waveform… whatever.
There’s not much to this other than how handy it can be.
My only nitpick is that I can’t find a way to render multiple selected clips at once. Hopefully someone corrects me and says this is possible.
CPU Metering
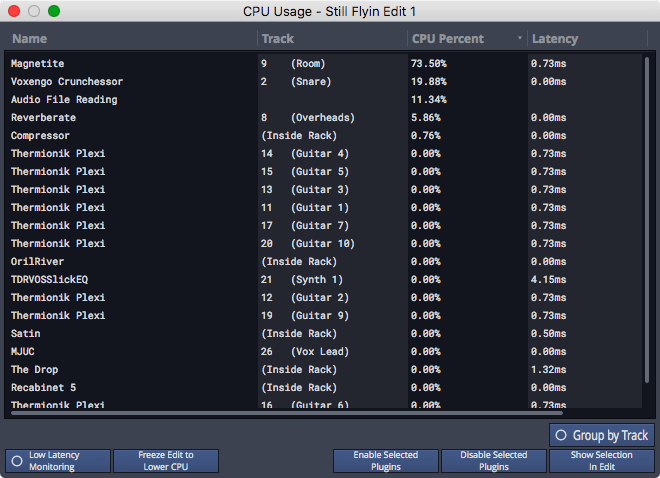
Waveform’s CPU monitoring is about as good as it gets. (The death bringing DAW is better)
Click the dashed circle in the upper right to pull up the ‘CPU Usage’ graph. From there you can see every track in the project, the assigned FX, the processing time usage and the latency of each plugin.
Plugins can be enabled or disabled via this graph as well. A nice shortcut indeed.
There’s an interesting option here to ‘Freeze’ your entire edit. This renders all of the tracks and disables the plugins that were rendered in the process. I’m not exactly sure how often you’d want to do this. This function is not undoable either, which I think makes it even less useful.
This is also where you access that unusable Low Latency Monitoring.
Freezing
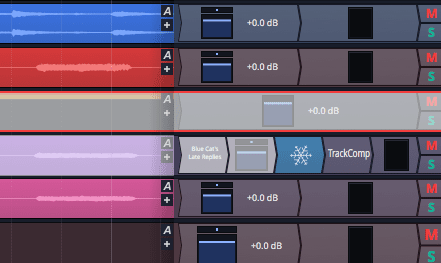
Freezing is basically a semi-render. The idea is that when you have a track consuming too much processing time, you render the track and disable the effects on it. Then the effects are removed from being processed, while you still hear the result (as it was rendered). The downside is that since the effects were rendered, the frozen effects can not be adjusted.
Most good DAWs have freezing, and like Waveform, most DAWs do it painlessly.
What Waveform brings to the table that’s somewhat unique (but not totally) is the concept of freeze points. Rather than freezing your entire process chain, you can place a ‘Freeze Point’ and the track is only frozen up to that. Everything after that point is still processed in realtime.
Freeze points allow more flexibility. You can only freeze up to the point where the most demanding plugin is, and allow later plugins to be available for adjustment in realtime.
Bad
Scripting
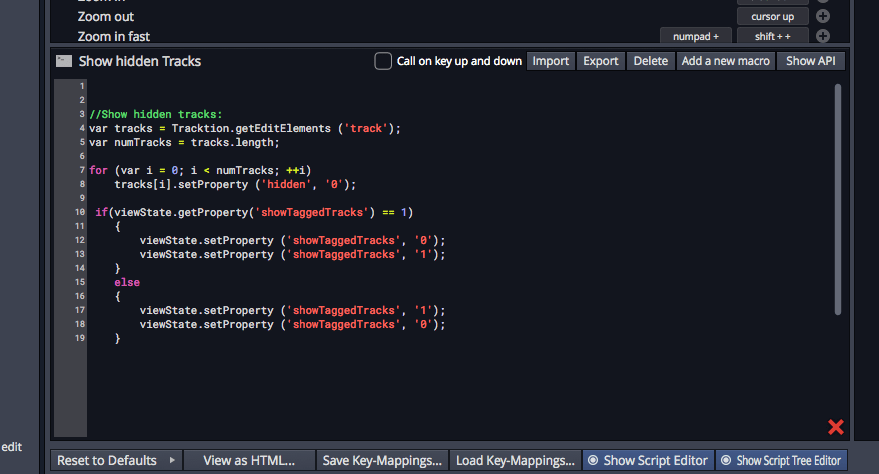
The keyboard macros functionality is provided through a javascript-_like_ language.
Theoretically this allows you to script custom actions… except it’s very limited compared to what other DAWs with scripting ability offer you.
- It’s not javascript. JUCE Javascript is a very small subset of Javascript that’s missing a huge amount of functionality. It’s lacking even basic constructs that were available in ECMAScript 1 in 1997. You get strings, arrays, ints, a little bit of math, C-like if statements, do/while and c-like for loops… and that’s about it. It’s more like a bastardized C without memory access and the standard library of C89 (i.e. basically nothing), not Javascript.
- The API is small. The number of actions that Waveform provides is relatively small already, and not everything is accessible. Major parts of a project are currently inaccessible via the scripting API, for instance you can not set/get anything regarding I/O. There’s no way to tell if a track is a submix, folder or normal track. Most project data is inaccessible or editable.
- No GUIs. Scripts (‘Macros’) offer no sort of GUI other than Tracktion.showMessage() which gives you an anemic tooltip popup.
- No debugging. There’s no way to debug a script AFAIK other than using the previously mentioned popup messages.
- No standardized sharing. Someone did make a thread for working macros, but there’s no other standardized way to share things you’ve created.
The state of scripting is improving with each minor update, but currently it’s nothing more than a decent macro system, not a scripting system.
There’s nothing wrong with that either. Just don’t be sucked in thinking you’re going to be doing crazy stuff.
Plugin Delay Compensation
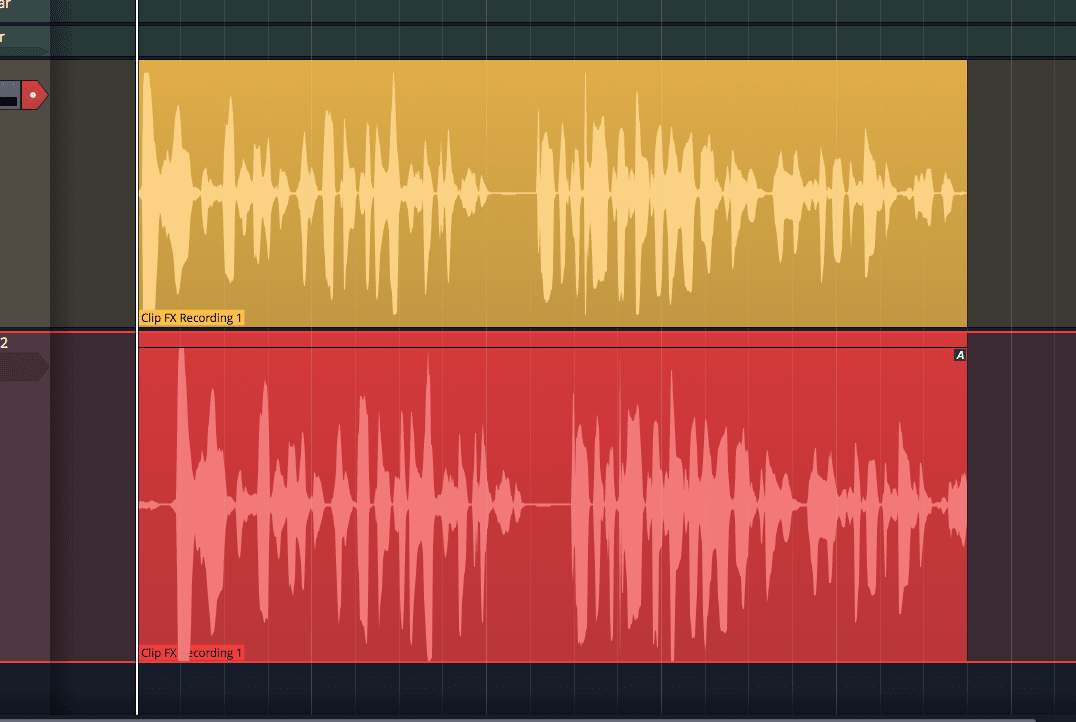
Some plugins exhibit latency. That latency needs to be compensated otherwise things desync. Waveform tries to do this in most places, but there’s places where it doesn’t.
- Clip FX are not compensated (as shown in the image above)
- Racks are often not compensated correctly.
- Latency causing plugins after an Aux Return are not compensated.
- Latency causing plugins after an Aux Send are not compensated.
- Sometimes PDC doesn’t seem to work correctly at all. I’ve encountered scenarios where the compensation is off by a millisecond or two for no discernible reason. Save the edit. Reload it and everything is fine.
- I’ve been tricked in to trying to fix problems that I thought were part of the recording because of phase cancellation issues that were actually the result of incorrect latency compensation! (I wish I knew what caused this so I could report it, Sorry devs!)
Automation Compensation
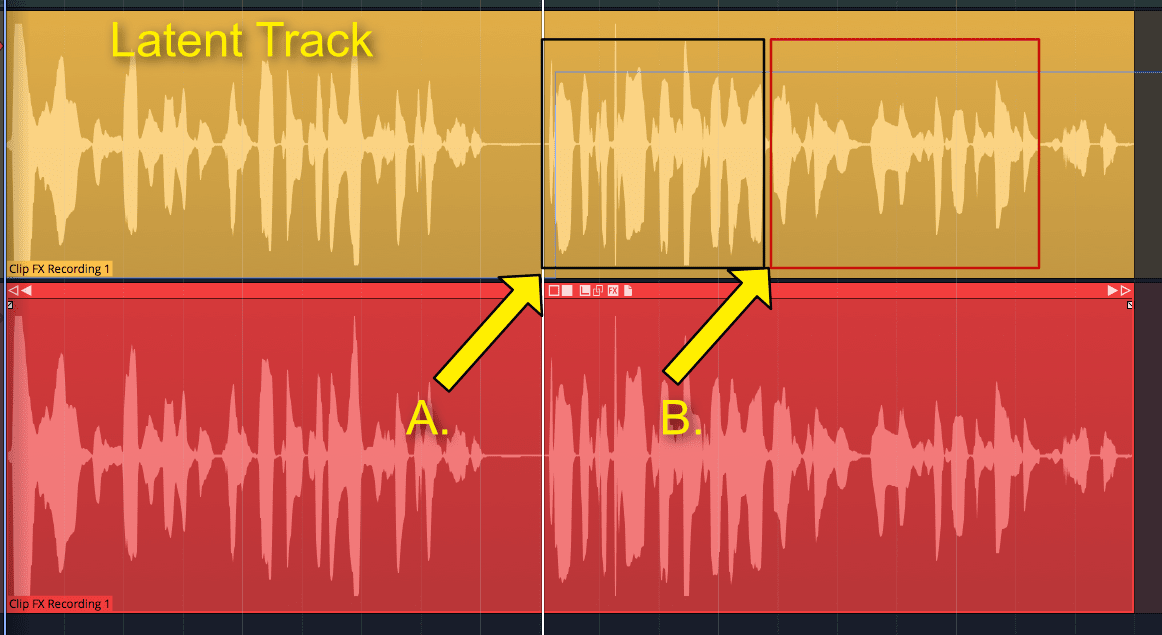
Automation is not latency compensated. That sucks. GUYS (and girls) THAT SUCKS.
In the image above, on the yellow clip, I have volume automation (that light blue line) set so that everything should be muted up until part A. I have a plugin on the track with 1400ms of delay (that’s a lot).
- What should happen is that the automation works and everything is muted until part A, then the audio becomes audible.
- What actually happens is that the audio is muted for an extra 1400ms and doesn’t start until where I marked part B.
The net result is that all of the automation on the track is offset forward by the amount of plugin latency on the track. So anytime you add a plugin with latency, you need to adjust any precision automation. If you remove a plugin with latency then you need to adjust your automation again.
This shouldn’t be a dealbreaker for most folks because a lot of DAWs screw this up, and in fact most of the major DAWs do. If I had to guess, I’d say that 75% of the DAWs out there right now don’t do this correctly. That doesn’t mean that Waveform can’t be one of the few that does do it correctly though.
Weird
Menu Shortcuts
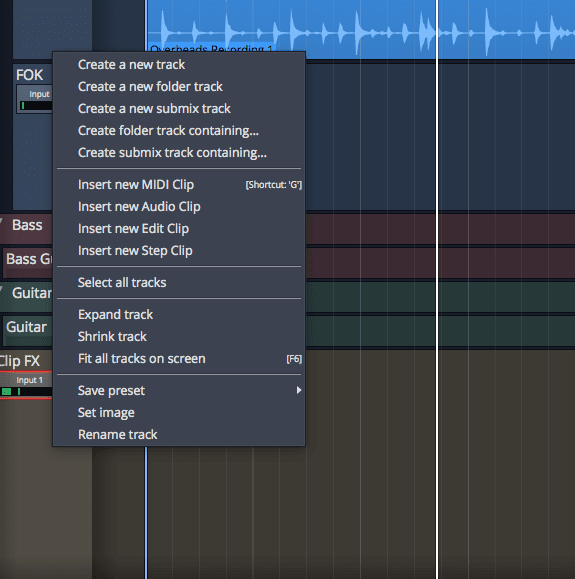
Menus in Waveform show the keyboard short assigned to them… sometimes.
There’s various menus around the program that don’t show what you’d think is the associated shortcut. ‘Create a new track’ is the example above. I suspect that this is a different function than ‘Insert new Track’ (T by default), and that’s why the shortcut doesn’t show.
I’ve found a number of them around Waveform and it is a mild hinderance to learning to be proficient in the software.
Support Me!
This post took 12 hours to research, photograph, write and edit. If you appreciate the information presented then please consider joining patreon or donating!
