Today I’m going to cover the act of getting sound into Ableton Live. Not editing things, but just getting the basic sounds in.
It’s a surprisingly large article for the topic, and surprisingly… well, you can wait till the end.
Other parts in this series:
- 45 Days with Ableton Live Suite
- Editing music in Ableton Live: An Overview
- Mixing music in Ableton Live: An Overview
- Live music with Ableton Live: An Overview
- Live's Plugins: A series of miniature reviews
- Max for Live
- Everything I like about Ableton Live
VALID FOR LIVE 10.1. Future updates may render some of this information invalid.
Contents
- What is “writing music”
- Browsing
- Arrange v Session
- Audio Workflows
- MIDI Workflows
- Conclusion
- Support Me!
What is “writing music”
Before this starts I need to be very clear about what I mean when I say “Writing Music”. I’m specifically talking about getting data into the DAW.
Anything that takes existing data and modifies it would fall under what I’d call “editing”, which certainly is part of making music, but for a lack of a better term it’s not what I’d call “writing music”.
I know my phrasing is inaccurate for various definitions of the term ‘writing’, but I’m hoping that this section clarifies my meaning despite ambiguous wording.
Some of the complaints here are solved or alleviated by a secondary action of modifying data that is in Live. I think having a second step is sub-optimal when not necessary, so I wish to leave that for another section which will be called “Editing”.
Browsing
Quite possibly the core workflow for the majority of users is utilizing the browser to locate data, then to get data into a project. This can be for MIDI, presets, audio for playback, audio for convolution, ‘packs’, effects etc… basically anything that exists as a contained entity in Live can be browsed for.
When utilizing the browser for the act of making music there’s 2 basic things that a user is likely to look for:
- Synthesizers - things that generate sound from instructions (such as MIDI).
- Samples - audio files meant to be played back at a given time in the arrangement.
Samples
Samples in live can exist as clips that contain direct audio data, or they can be inside a sampler. Which one you would use is outside the scope of this section.
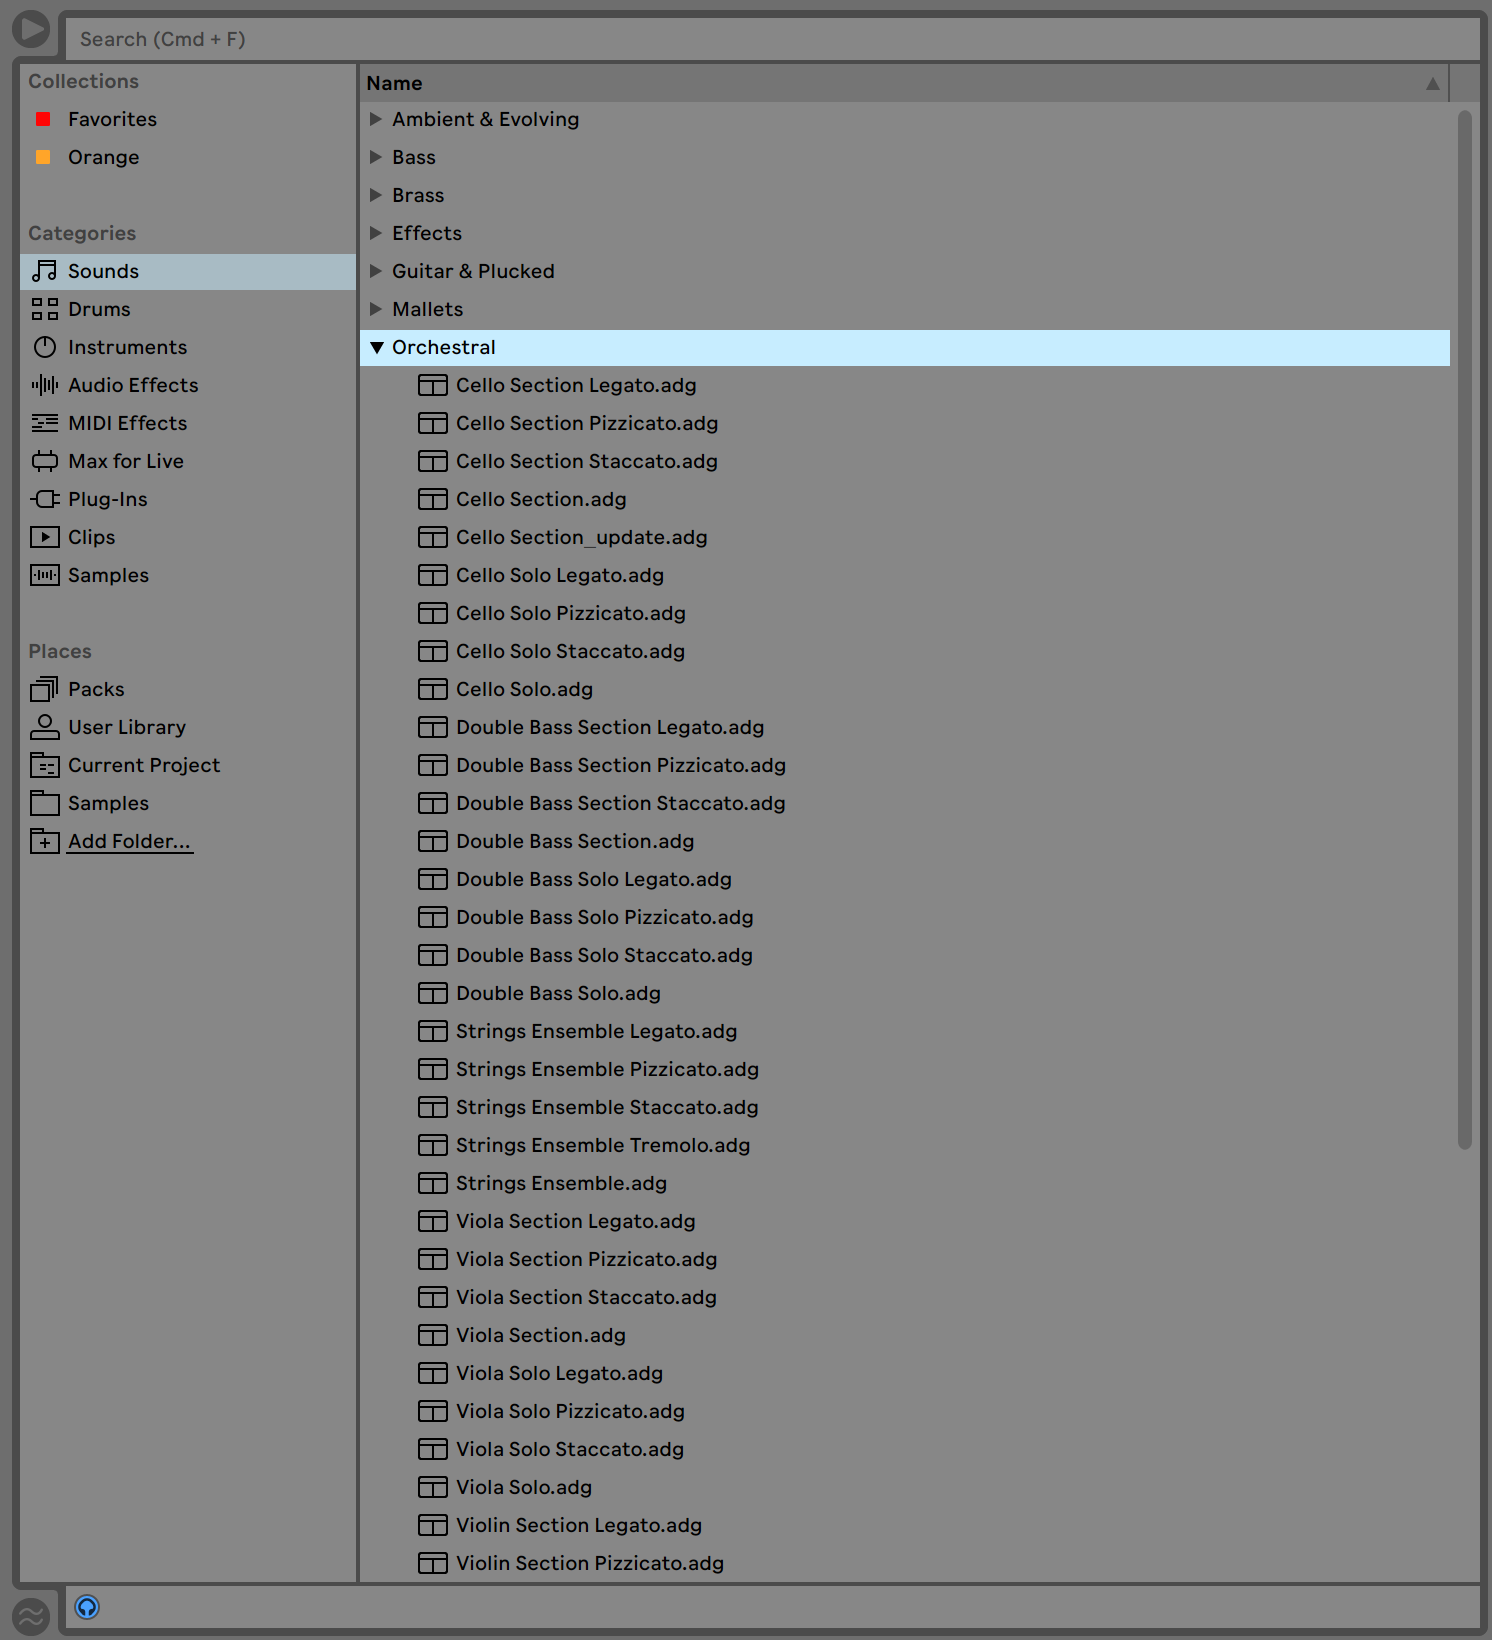
The real meat and potatoes is how you find and evaluate samples in the browser. There’s a few places that you may find samples:
- “Sounds” - These can contain samples in the form of ‘racks’, which is basically a one-shot sampler. However it may also contain instrument presets.
- “Drums” - Once again these can be racks (drum or instrument), but also plain audio files.
- “Samples” - Plain audio files.
- “Packs” - These are groups of things that can be installed into live. This can contain basically anything that could be in the browser.
- “User Library” - This is another location where samples or racks may be located.
- “Current Project” - Audio files in the current project.
- Folders - You can add your own folders of data.
Search is fairly basic. It appears that spaces are wildcards, and anything else is taken literally. If you want to find “Kick 606.wav” then you can’t search for “Kick606”. Searching for “606”, “Kick” or “Kick 606” could possibly bring up hundreds/thousands of results depending on what your library has. “606” will find all 606 samples. “Kick” will find all kick samples. “Kick 606” will find everything of both! EDIT: A reader pointed out that I made a mistake here. Thanks pottering_theverb.
Browsing is somewhat problematic as well. Given that you know you want an audio loop of an amen break, where would you find it? It could potentially be in every single category listed above! Best of luck, and I hope your library is very well organized.
Previews of samples are simple. You hear a sound. Live can attempt to warp the sample to the project tempo, or play it back “raw” without any warping. There is a small waveform of the preview that is non-interactive. (edit: I have been informed that you should be able to click on the overview to listen from a specific time. For some reason that isn’t working for me, but it should apparently.)
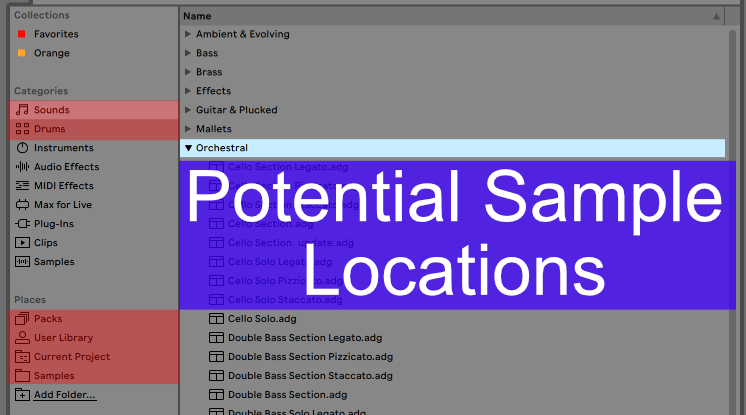
Synthesizers
Synthesizers come in many types in Live’s Browser:
- “Sounds” - These may be instruments along with effects. (or samples, racks, etc…)
- “Drums” - This may be an instrument rack containing other instruments.
- “Instruments” - things that generate sound based on MIDI input that are native to Live.
- “Max for Live” - may contain devices that respond to MIDI input and generate sound.
- “Plug-Ins” - VST/AU instruments (and effects)
- “Packs” - Potentially may contain instruments.
Search works the same as Samples of course.
Previewing only works for native Live instruments, and even those only play a single note. The currently selected MIDI clip has no effect on it, nor does there appear to be a way to change how notes are previewed. They don’t even care about the key of your project. You can use hotswap to emulate this workflow, but it requires utilizing an existing device and track. Hotswap is a cool workflow, but it isn’t preview.
MIDI input can not be sent to the browser for preview.
VST/AU plugins are displayed mixed between instruments and effects so it can be problematic to browse VST/AU instruments if the developer has many products on your system.
VST/AU plugin presets are not shown in the “User Library” nor are they shown for the “Current Project”.
Groove Pool
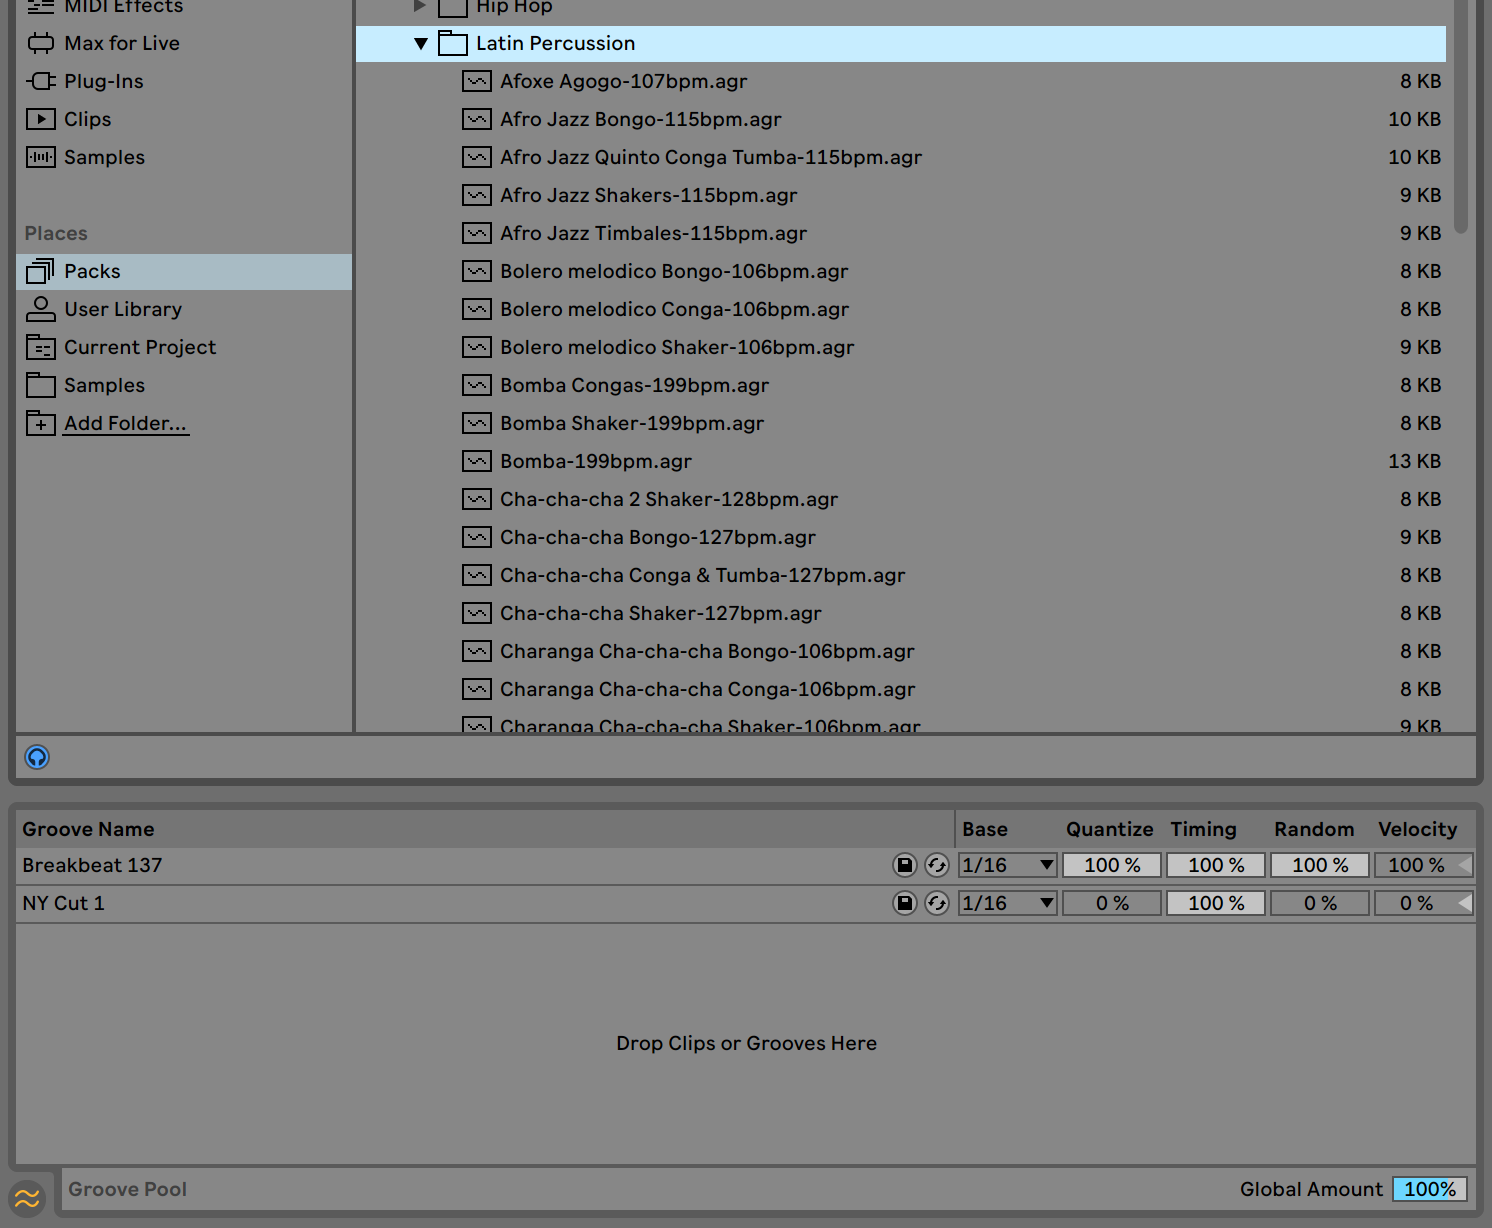
“Grooves” in Live are files that contain information about timing and velocity deviances.
The Groove Pool is a place where you can drag ‘grooves’ to be available for application to a clip in the project. Multiple of the same groove can be available because you can change the base pulse, pre-quantize, timing influence, randomization and velocity influence. Each slot can have different settings.
The Groove Pool is in near the browser pane, and itself is a browser of sorts.
The Groove Pool has one major failure: you can only preview grooves using a woodblock sound. Despite appearing to be part of the browser experience you can not preview grooves with a given file, or preview a given file with a groove.
That said, at least you can preview grooves at all, unlike many other DAWs.
Criticisms
- Speed - Live’s browser ranges between mildly slow and incredibly slow for me on my 18-core system with 3,000mb/s disc read speed. Unacceptable! I initially thought this was an indexing issue, and that it would get faster over time, but in 2 weeks this has not happened. If finder/spotlight/explorer/cortana can find the file instantly, then so should Live.
- Collapsed Results - Search results remember their collapsed/expanded state for folders. That means that it’s highly likely that anything you haven’t looked at recently will be hidden by default.
- Sort - You can sort results by name/size/type/rank/place. Created, last used (global), last used (project), last modified and format would be useful. Type is just the extension. Format would be based on metadata inside the file (“Wav” can represent a variety of formats)
- Type does not differentiate instrument/effect. Sorting by type won’t save you when you want to browse for a VSTi in your folder.
- No sub-searching… kinda - Often when looking for a thing, the best strategy is to search, then search those results, then search those results etc… Live does not allow this. What you can do is search, but put a space between your search terms. That will create a search that matches all of the terms separated by spaces, but in any order.
- Cue out and Preview out are the same - Cue output is particularly important in Live when you wish to listen to parts of your set before triggering them. The browser utilizes the cue output. It’s possible that a user may wish to have these as separate things, such as when there’s a performer on hardware and a performer utilizing the software in a live performance. In the studio I prefer to preview the set via headphones while I’m jamming, but I always want to browse via main outputs. Live makes this difficult.
- .asd - Live LITTERS YOUR DRIVE with .asd files. These are analysis files that allow live to cache information about the file for quick access. This can be turned off in preferences, but then you lose the ability to cache file data.
- Setting .asd to be created local to the project, or to a global folder is needed.
Favorites are sticky - Once you utilize a favorites category then it is stuck there. Even if it’s empty, you can’t remove it.Oops again. There is an edit button next to the word “Collections” when you mouse over it. I missed that.- VST/AU are by folder - It does not appear to be possible to utilize categories or developer for sorting external products. Most other DAWs allow this. Sorting all of your effects/instruments physically on disk does not play well with updaters and installers (so why does Ableton rely on it??)
- 7 Favorites? - In an attempt to solve issues with sorting or with VST/AU conflation it can be tempting to create your own favorites that logically organize your data. Too bad there’s only 7 favorites.
- No Tagging - You can not add extra meta-data to a file that can be searched for. You are limited to favorite browsing or searching file names. You can not use metadata from existing files that already have it.
Cool Stuff
- Packs can update - If you have “Packs” that you’ve purchased, they can be updated at the press of a menu item straight from the browser. Very cool.
- You can also install new packs that become available for your version of Live directly from the browser.
- Numerical sorting is intelligent - 103 does not come before 13 (as it does in many naive sorting systems).
- Hot Swap - Live’s browser integrates with certain instruments to allow you to ‘browse in place’. You can set a slot in the instrument to be hot-swappable, and what you select in the browser will automatically be loaded to that slot. It’s a quick workflow.
Arrange v Session
Ableton Live has two different views for your project. The Arrange view is your classic linear multitrack. Audio flows left to right, tracks are rows, clips are in the rows to the left.
Session view is where things get interesting. Tracks are represented vertically and audio flows from top to bottom. Above the mixer is a grid where clips can be triggered in a non-linear fashion. Rows can be triggered (causing clips to playback on many tracks) and these are called scenes.
I assume that you likely know this. What’s important here is that they have different workflows. Arrange view is the typical multitracker/tape-machine type workflow, so let’s ignore it.
Session view allows you to record Audio or MIDI into a clip non-linearly. That means that you can have any tracks in your project playing any specific clip (and these can be sequenced with follow actions) while you record. Recording into clip view will be discussed later in the respective sections.
After all that introduction blabber, what I really want to talk about is recording your Session into the Arrangement. You can press the Session record button (it’s the normal looking record button in the transport) and then launch clips in Session view as you wish. Live enables playback in the Arrangement view and drops clips into the respective tracks as they are launched and matches the duration that they played back. So you can essentially use the Session view as a soundboard and record the result, but it simply places clips instead of an uninterrupted stream of data.
The concept alone is cool, particularly as it’s a great way to record a live set as you perform it.
There’s some things about the Arrangement recording feature that can be bothersome though:
- Automation is always on - nearly every change you make is recorded. Clip properties, mixer controls and tempos/time signatures are all recorded. This is great when you want it, but there’s no way to choose what is recorded.
- Automation is recorded to Arrangement - It does not seem to be possible to record automation to a clip when in this mode. Automation goes to the arrangement. That certainly makes sense if you’re trying to record a live performance, but it’s annoying if you’re trying to write music using this.
- Recording into the Arrangement and Recording from Session to Arrange are the same thing - You can’t simultaneously record to a track, while fooling with session clips. Your session foolery will be recorded.
- “Back to arrangement” - You must click the “Back to Arrangement” button to hear Session->Arrangement recordings. The track is greyed out in the Arrange view to remind you, but it’s easy, and annoying, to forget.
- Session and Arrangement are visually mutually exclusive - If you want to know what’s coming up in the arrangement, then you need to tab back and forth quickly/frequently to sync yourself. You can’t view Session content and Arrangement content at the same time.
The integration of the linear and non-linear workflows is excellent, but Live’s competitor seems to have a better grasp on this.
Audio Workflows
Recording
Recording audio in Live is incredibly simple: you record enable the track, select an input and press record.
Yeah, that’s it. There’s quite a few things missing:
- No loop record with comping - If you record in a loop, it drops the clips all in the same place, making it difficult to utilize your recordings. There is no facility for loop recording then selecting the best parts of each take.
- I/O Assignment is limited - If you have many tracks to setup for record then you must setup each one of them, one at a time.
- I/O is not automatically named - You either need to manually name all of your I/O or be content with numbers.
- The I/O list shows every single mono and odd-starting stereo pair. If you have 100+ I/O like I do then you are in for a world of hurt! I suspect there’s not many Live users in that situation though.
- Always in Arrangement - You cant record audio directly to a clip. If you want to record, then it must happen using the Arrangement view. This has repercussions if you wish to record while utilizing the Session view. It’s not possible to have a clip of a set length constantly ‘loop recording’ so that you can instantly re-use the recorded clip.
- This can be mitigated by recording then dropping into a Sampler, but that adds complexity to what could be a simple workflow. In some cases Looper is an alternative as well
- No quick redo - One of my favorite things to use is a command that allows you to do the following in one swift move: stop recording, undo, rewind, start recording. It’s difficult enough to record alone, but being able to quickly redo a take makes life much nicer.
- No track grouping - There’s no easy way to link tracks to always record together, always mute together, always solo together etc… It may seem like a convenience, but it’s surprisingly easy to forget to click record on a track for a drumset recording. (only to find that your awesome take has no snare mic)
- No follow selection - There does not appear to be a way to have the currently record enabled track to follow selection.
- No pre/post roll - Pre roll is a fixed amount of playback before a punch-in and post-roll is a fixed amount of playback after a punch-out. They’re fantastic features for overdubbing, and Live has neither. There is a preferences-based count-in feature, but count-in is no substitute for pre-roll. Count-in is always tempo based, and pre-roll is not. They can often work together to give the performer a reference tempo (count-in) then some reference playback (pre-roll), but neither is a substitute for the other.
- Punch and the Manual - The word “punch” doesn’t seem to appear in the manual at all, even though Live clearly has punch in/out capability.
- The loop and punch points are the same thing. Incredibly annoying when you want to keep a loop inactive for another section and quickly overdub something else, or if you wish to punch inside of a loop.
- Metering is poor - The meters are small and unlabeled. Setting levels is frustrating. At the very least there needs to be some specification for what the meter colours mean and a way to change their response time and clipping indicators.
There are some cool things though:
- You can record from other tracks - This allows you to record live audio changes to a track, or to record a track with any effects going to disk.
- Record points - When recording from another track the signal can be tapped pre-fx, post-fx (but pre-fader) or post-mixer (after the whole channel).
- Monitoring is simple - Either monitoring is always on, always off or only on when recording. Other DAWs make this unnecessarily complex with a variety of monitoring modes.
- Resampling - The master output can be recorded directly to a track. No render necessary. If you hear something cool happening and you want to mess with it, then you can quickly resample record it.
As someone that prefers to record my ideas from the outside world into a DAW, Live is frustrating at times. The entire process necessitates editing what you did at almost every facet, which is a glitch in the creative process.
It feels like Live is designed to make recording as easy as possible, but is not setup to make getting your ideas into the DAW as easy as possible. They sound like the same thing, but they very much are not.
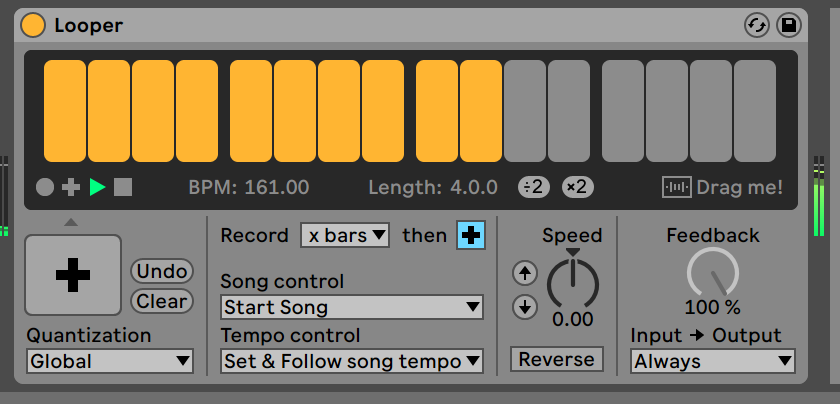
Looper
I will go into more detail about Looper when discussing Live’s plugins, but it deserves a place here as well.
Looper is a plugin that will capture its input, and then loop it when capture ends. New material can be overdubbed during the looping of previous material.
Looper is a brilliant way to build up guitar parts, harmonies or even an entire song (route many tracks to looper and utilize those tracks as the inspiration strikes you). Live doesn’t have a direct way to sample but Looper nearly fills the void.
There’s a variety of ways to control when Loopers starts/stops, MIDI assignable buttons for everything (including record: which I map to my MIDI keyboard’s sustain pedal usually), loop length options, variable feedback, ‘layer undo’, speed controls and I/O controls. The start/stop can be quantized to give you time to hit the button and know it will start/stop at a musically pertinent time.
If you’ve never used a guitar looper pedal before, then you owe it to yourself to just drop Looper in a project, hit play, hit record in Looper and beatbox something. Hit the overdub (+) button again in Looper and overdub some new parts. Before you know it you can mouth-out an entire track. If you like it, then you can drag the vertical bars straight into your Live project as a clip.
Take a built-up set template with all of your instruments ready and route every track to a single track with looper. Hit play, hit record in Looper. Jam out some drums. Hit overdub in Looper and meander over to a bass track and jam out a bass part. Repeat until a few minutes later and you’ve jammed out something cool. Drop it into your Live set and re-use the audio or just keep it as a reference.
Looper doesn’t work for MIDI data, even though it’d be equally as awesome. Live’s MIDI overdub and loop allows you a similar workflow to Looper, but you don’t get the loop length, feedback, open recording length, quantization, reverse, speed or I/O options.
I’m confident that any Live user who doesn’t spend a few hours with looper is missing out on something special.
Sampling

Live has no direct way to “sample” audio. Neither Sampler nor Simpler (the sampling plugins) have a direct method of recording to them.
Recording in the Session/Arrangement view starts when you start and ends when you end. You can setup Quantization for start, but you still must manually hit stop and quantization will generally not be in your favour. The Session view allows you to assign something to a “New” button so you can jump to a new scene when recording, which is useful.
The exception is in the Arrangement view where you can set punch-in/punch-out points that make recording automatically start and/or end. With some fiddling you can likely setup your set and get external synchronization working so you can punch-in/out to get a perfect clip, or you can record in Session view (with quantization) to a clip and very likely need to edit it after.
However there is no way to directly record to a sampler for immediate use, or to integrate sampler recording with the playback. Almost no matter what you will need to edit what you did after you record it.
This workflow is useful when sequencing external hardware (or recording non-linearly) and you wish to grab a specific section to immediately incorporate it into your set.
MIDI Workflows
The Grid
Live works best when working at a known tempo. The core of Live is based on the idea that it can make sense of the timing of your data, and then help you shuffle things around in a tempo-dependent way. Some DAWs let you work free of tempo/time with ease, but Live is most certainly not that type of product.
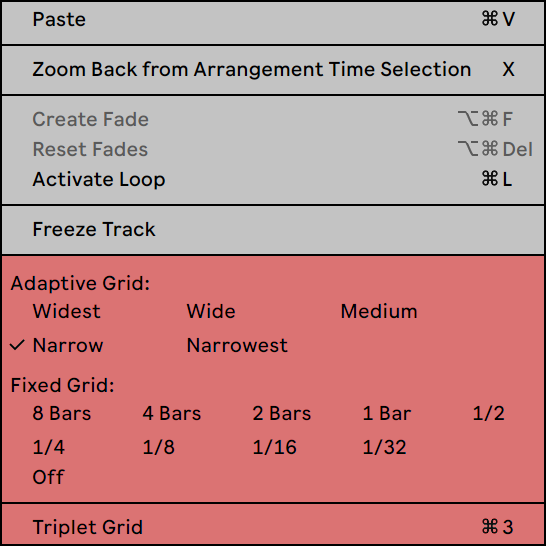
Live has your typical fixed grid where you can select a variety of divisions that persist until changed. The only qualm I have with the fixed grid is that there are not any keyboard shortcuts to specifically activate a grid value. You are limited to using shortcuts that increase/decrease the grid relative to the previous value.
That doesn’t matter much though, because the adaptive grid in Live is the most seamless in any product I’ve used.
The adaptive grid changes the current grid division based on your zoom value. If you zoom closer then your grid divisions are absolutely smaller, but maintain a similar visual width. Zoom out and the grid division is larger, but still maintains the same visual size.
Plenty of DAWs do that, but Live leaps ahead when you start using the adaptive grid modifications. There’s 5 levels of adaptive grid from widest to narrowest that change how the screen is divided based on the zoom level. Ctrl-1 (command-1 macOS) and Ctrl-2 (command-2 macOS) increase or decrease the size of the current adaptation. (same keys that switch fixed grid values). Most other DAWs with auto/adaptive grids try to do it automatically, which leaves you with little recourse but to change zoom levels when you don’t want to. Live gives you 5 levels of adaptation and you will probably not need to ever use anything else because of it.
(This is in the MIDI section because the grid is far more valuable in MIDI-based workflows)
Absolute and Relative
There are two types of snapping: Relative and Absolute.
- Relative - the data snaps by the grid amount. The item moves in increments of the grid, but does not necessarily snap to the grid.
- Absolute - the data snaps to the grid. No matter where the item starts, it will snap to the grid divisions directly.
Ableton integrates both of these. An absolute grid snap is always available, but relative snap values are integrated into the choices.
Live also lets the start of things snap to the end of other things.
It works seamlessly and always makes me wonder why other products mess with having two modes.
Recording MIDI
Recording MIDI is a fairly straightforward thing, but first you need to go into preferences, make sure your device is “Track” activated”. From there you can select “All Ins” or your device, then select “All Channels” or the channel you want. You can only select one channel. Monitoring options are similar to audio recording.
Something notable (for people from some other products) is that MIDI tracks host Instruments directly. There’s no differentiation between a MIDI and Instrument track. It is possible to use a MIDI track as ‘just’ a MIDI track and route multiple MIDI tracks to a single track with a single instrument if you wish. MIDI tracks can be output to other MIDI tracks.
MIDI can be set to overwrite or overdub, but this is a global option.
Live 10 introduced ‘Capture MIDI’ which means Live is always storing input MIDI. Capture MIDI isn’t a unique feature, but Live has a unique twist: if there are no clips or tempo information in the set, then Live will attempt to set the tempo to what it thinks the captured MIDI is. You can open a set and start jamming without thinking about anything. Live does a pretty good job of figuring out the tempo and dropping the MIDI in.
If there is existing data in a set and you attempt to use Capture MIDI then you might be disappointed. Live tries to figure out what phrase you want and shoehorn it into a clip, but in my experience it doesn’t do the best of jobs. I suspect that it expects clearly delineated simple phrases rather than mindless noodling (as I tend to).
The only thing I personally found bothersome was no ability for record to follow track selection. This means that if you have a project setup as a template with various instruments ready then it’s not as straightforward and obvious as just selecting a track to record.
Step Record
Like most DAWs, Live has step recording…
In other DAWs step recording is when the transport is only moved by a note being entered; there is no live playback. The playhead moves when a new note is input. The distance the playhead moves is determined by a current quantize setting or step size.
That’s not how Live’s Step Recording works
In Live you input MIDI and any MIDI notes that have not yet received a note-off message will be input when you press the left/right arrow keys. THIS IS BRILLIANT. It’s simply astonishing how easy it is to input MIDI like this. Press piano keys, move arrow keys. Notes can be erased by placing the cursor before a note, pressing the MIDI note then right->left on the computer keyboard. Notes can be extended by playing with the cursor inside the note and moving it to the right.
The distance that the arrow key moves the note is determined by the current grid size. Since Live has an auto grid that adjusts based on your zoom (controllable with +/- keys), you can program MIDI leads and 1 handed chords with absolute ease just using your MIDI and computer keyboard.
If there’s another DAW that works like this, let me know in the comments because I’ve totally missed it. I’m simply blown away by how useful this is!
Clicking in MIDI
I suspect that mousing-in MIDI is how most people will do things.
This is exceptionally simple in Live. You double click to enter a note, double-click and hold to enter and lengthen it or use “draw mode” to draw a series of notes using the current grid size.
You hear each note as it’s played if you have preview mode on.
There are some significant omissions:
- ~No velocity editing with input - There’s no third dimension when inputting MIDI notes that allows you to simultaneously input the velocity.~
- EDIT - I was totally wrong here. Apparently moving up/down after clicking in the note works to do this.
- No Chord Input - The MIDI editor does not have chord input.
- No Scale Input/Locking - Working to a defined scale is not easily possible.
- No “paint” tool - Some DAWs have a tool that allows you to paint in patterns… not here. Live does have a ‘cut/copy/paste time…’ function that will work with a selection of time from start to end of the selection regardless of where the actual notes start. It’s not a replacement for paint.
- No MPE - MPE is cool. Bitwig has it, Waveform has it, Cubase almost has it, why not Live?
- Draw tool is horizontally limited - The draw tool is great for straight rhythmic patterns on a single note, but not all MIDI data is music. Drawing shapes with MIDI is useful for a variety of things from lighting to working with scale modes… oh, nevermind.
- No MIDI generation - Look what FL Studio can do. Way cool.
- No strum input - Stringed instruments that play chords are usually strummed. Inputting strummed MIDI is fiddly with Live.
- No event list - Event lists that show you a spreadsheet view of all of your data can be an excellent way to input precise data.
- No Score/Notation.
- No Tablature.
- No velocity/pitch colouring - The ability to have notes coloured based in the current note’s pitch/scale value or velocity is awesome. Live very lightly changes saturation of a note based on its velocity, but it’s subtle.
Double clicking to enter a note is incredibly annoying.
Ugh. Nothing about this is enjoyable or quick.
Conclusion
Some of my complaints have multi-step workarounds, but that’s no substitute for core functionality.
Somehow I managed to write a lot about very little though. Live has a minimal set of features for getting data into it. The core featureset and workflows are just enough to qualify it as a DAW, but once you start venturing beyond hitting record Live has a number of failings.
Then again, it is called “Live” and not “Pro Tools” (hah! what a terrible joke), so that could be an unfair evaluation. I have to say that personally I struggle to record with Live due to the lack of pre/post-roll, no loop recording/comping, no Sampler recording, no notation, poor I/O naming and setup, no track grouping, unforgivably feature-dearth browser and lack of a native remote control application.
I am doing my best to use Live as it seems to be intended, but knowing how I could speed up my workflow given unavailable functionality I always feel like I’m working slower in Live than I could be. While writing this I conferred with a number of Live users and the most common thing I heard was “Yeah you can’t do that, but there’s a workaround…”. Blergh. Eck. Blubububub sperrrskkk. That’s all I got to say about that.
There’s a big difference between having software that’s powerful and requires that you configure it, and software that’s excessively simple and requires you to fight against it.
Then again… I really like the Step Record. That was a huge speedup for me while simultaneously simplifying my MIDI input process. Looper is quite useful too.
There’s still plenty more to come though!
Support Me!
This post took 29 hours to research, screenshot, write and edit. If you appreciate the information presented then please consider joining patreon or paying me for my time spent bringing you quality content!
