I've not been friendly to Live so far, and this post isn't going to convince you otherwise. (hang on though... more coming still!).
This is the article where I discuss the mixing process in Live, which I've found to be the most painful of the 3 main processes in the modern music making process.
Other parts in this series:
- 45 Days with Ableton Live Suite
- Writing music in Ableton Live: An Overview
- Editing music in Ableton Live: An Overview
- Live music with Ableton Live: An Overview
- Live's Plugins: A series of miniature reviews
- Max for Live
- Everything I like about Ableton Live
VALID FOR LIVE 10.1. Future updates may render some of this information invalid.
Contents
What is Mixing?
For this post I'm considering mixing as the process of taking recorded and edited data, playing it back and changing their sound in various ways as they go from many tracks to a single output format (stereo or surround?)
This includes plugin use and automation.
Mixer
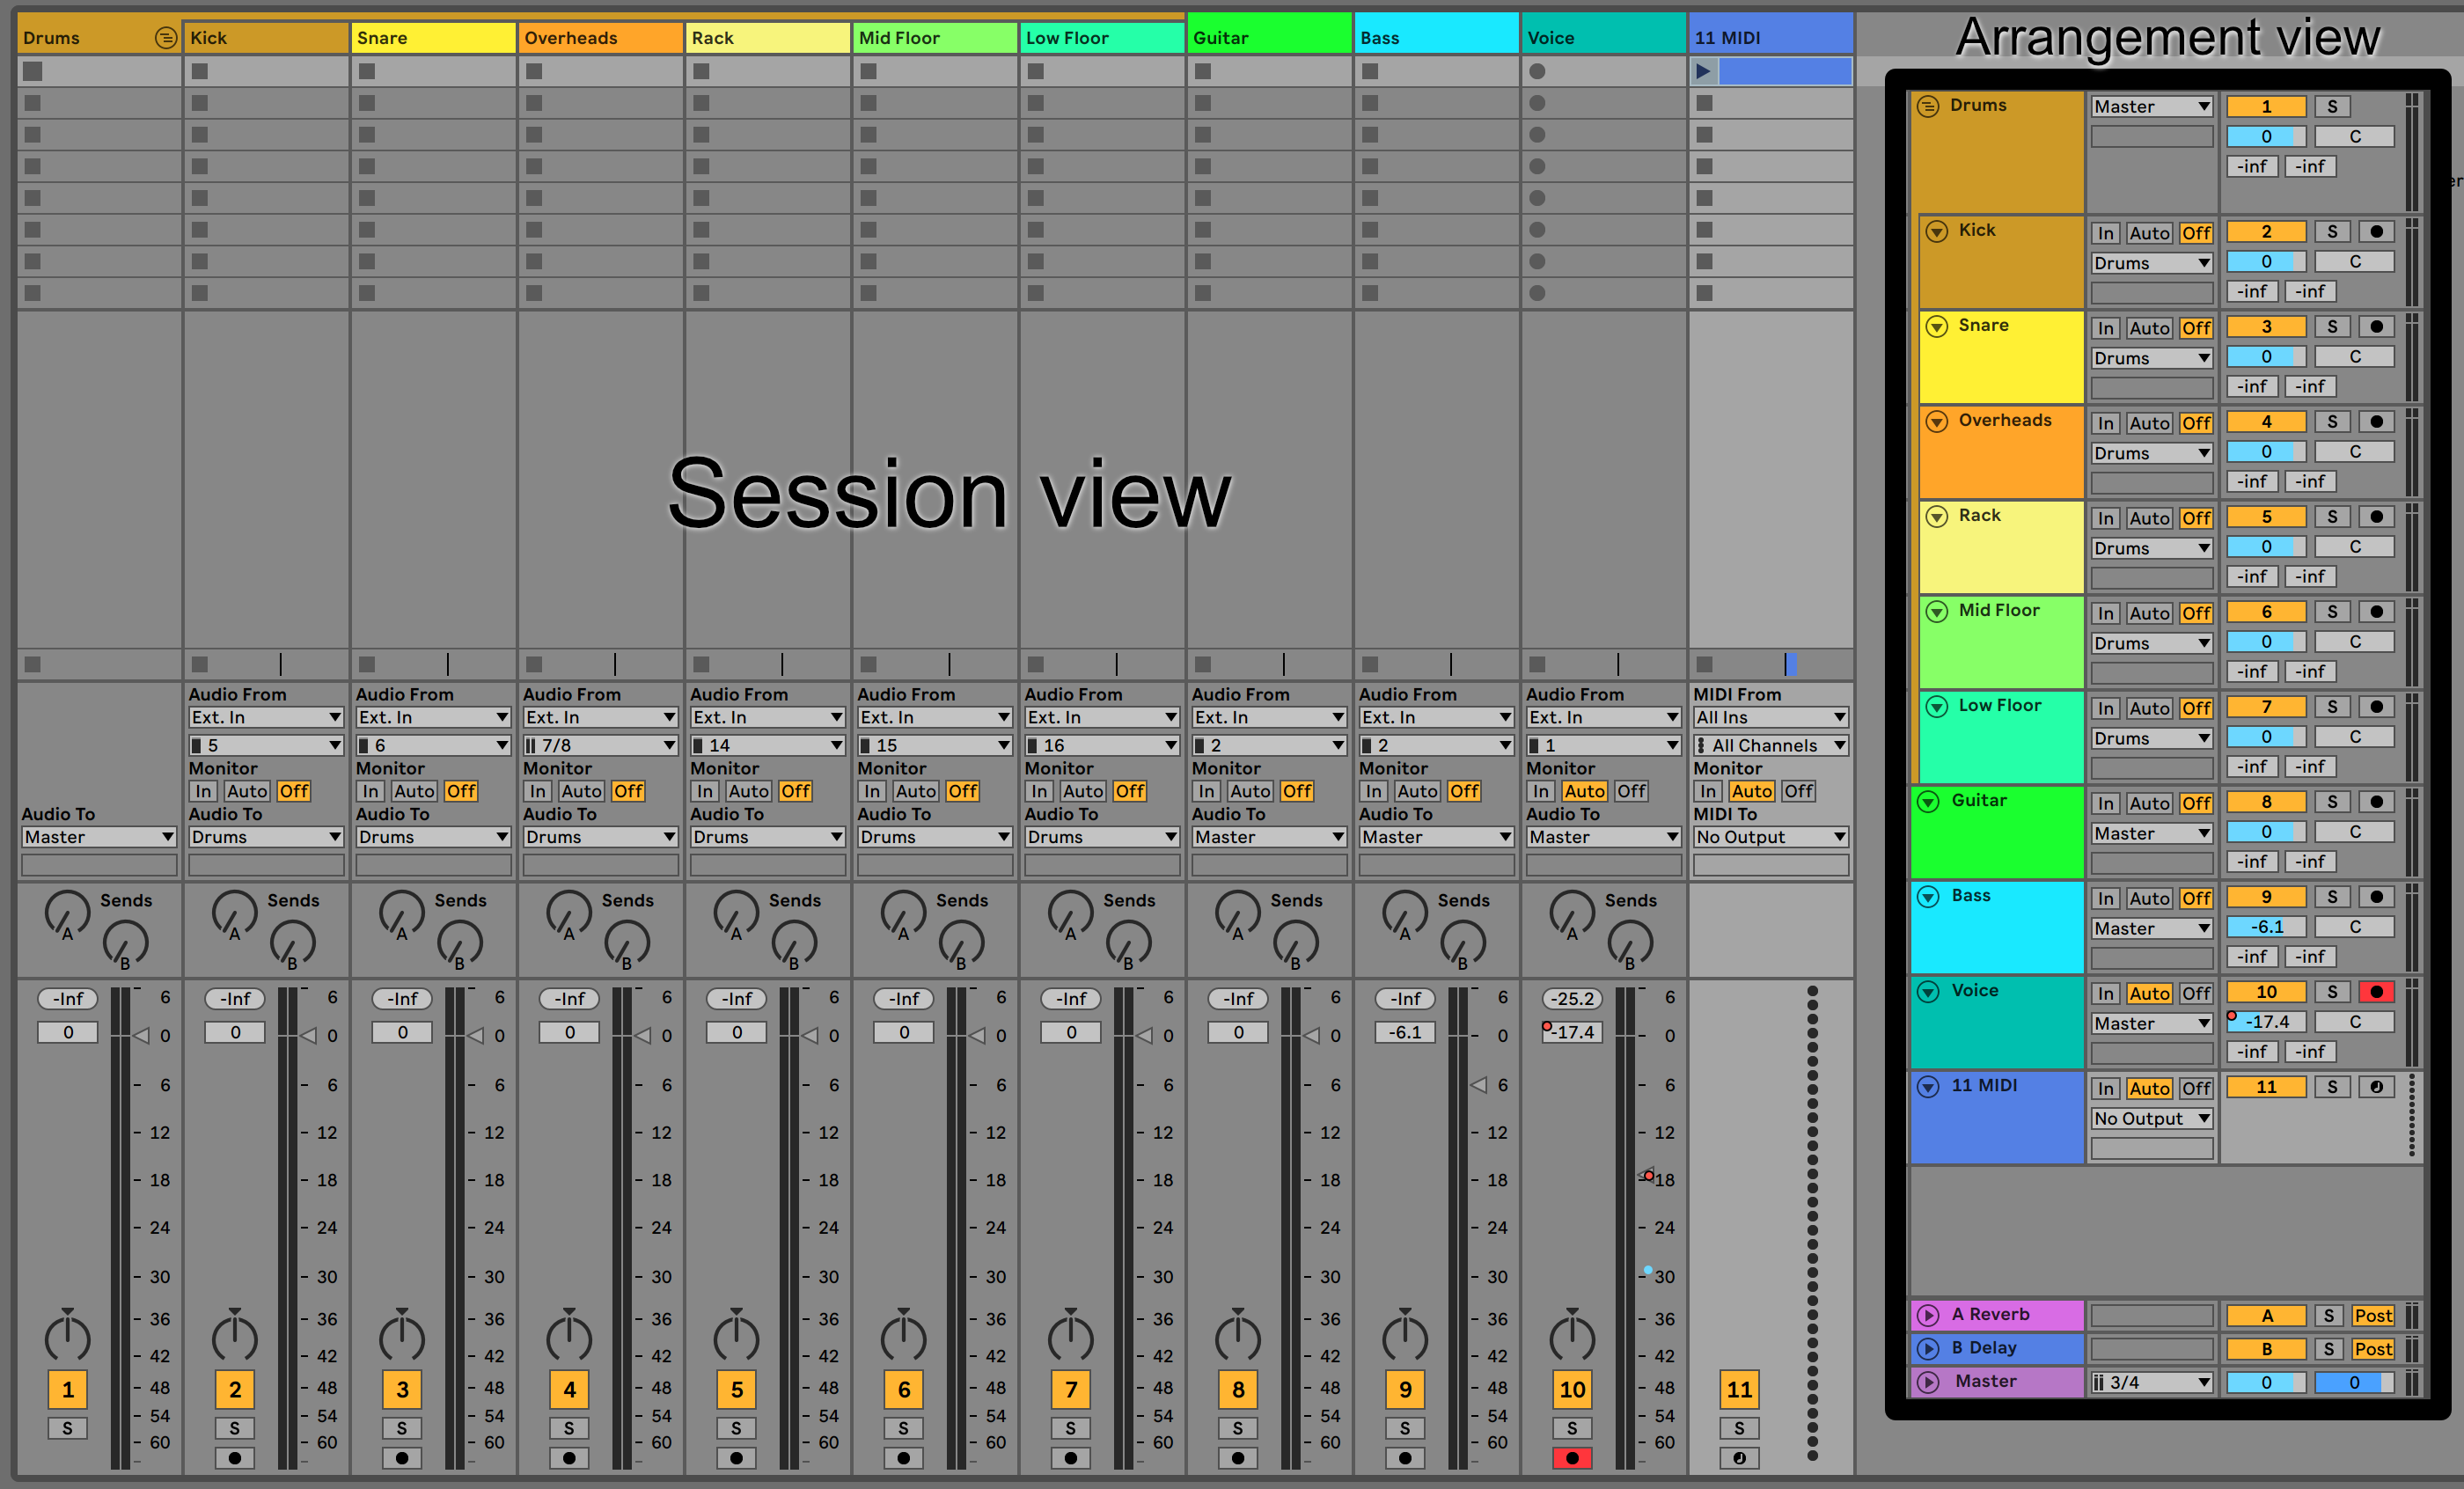
Live has two "Mixers". The Arrangement and Session views both have mixing facilities at the end of where the signal flow is.
Each view has some things in common:
- Mute - Clicking the track number mutes the track.
- Solo - S solos
- Volume - The arrangement view provides a small slider for volume adjustment, and the session view provides a meter with a volume adjustment triangle. The session view fader size is adjustment only up to a moderate height.
- Balance - There is a balance control available
- Sends - Arrangement view gives you some very small sliders for setting send levels, and session view provides some knobs. Sends are always 'active', but default to zero send amount.
- A meter - The arrangement view has a small meter with no markings and a clipping indicator. Session view integrates the meter as part of the fader.
- Output routing - There's a box that allows you to change the output routing of the track to a desired hardware or track destination.
Generally the Session view is where most traditional style mixing will take place as it has the more traditional style mixer. The arrangement view panel is only particularly useful for small changes during the composition process, or I suppose you could mix in it by constantly holding the shift button for 'fine adjustment' of the small controls.
That's really all there is for a 'mixer' in Live.
There are a few notable features:
- Mixer Undo - somehow not all DAWs have this yet, but Live does. Movements of mixer controls are put in the undo stack so that you can try something and undo your way out of it quickly. All automatable plugin parameter movements are put on the undo stack too. It's an overall pleasant experience.
- Undo history stays after save as well. Excellent.
- RMS in all meters - the light green in the meters is RMS and the dark green is sample peak. Unfortunately I don't see any information about how RMS is calculated (300ms window I assume?), nor do i see information about meter ballistics.
- Grouping - Live has track grouping, and groups act both as submixes and as folders. Tracks in a group can have their outputs changed to another destination other than the group, which causes the group to act like a folder only. Creating groups from selected tracks is easy. Moving tracks between groups is easy. Collapsing groups hides all information about the group, which is suboptimal at times. The overall grouping experience is nice.
- Send mute/solo - Soloing a track still lets you hear sends (such as soloing a voice and still hearing a reverb send). Muting works similarly.
And some gripes:
- Sends are always visible - It seems that many modern producer/engineers don't utilize sends enough, but if you do then your mixer will be cluttered very quickly. Sends are always visible as a slider in the Arrangement or knob in the Session view. (EDIT - To be clear, I mean that it's either all sends visible or nothing. Incredibly annoying to show sends for everything when only a handful of tracks are using sends)
- Sends are unlabeled in Arrangement - there's no way to know which send slider is which send in the Arrangement view without counting!
- Sends are labeled by alphabet in Session - Sends are labeled with A B C D E etc... rather than their name in the Session view.
- Sends are globally pre/post fader - It's desirable to make sense post-fader for things like reverbs, where you want your track fader to reduce the send level. Pre-fader is useful for level-dependent effects like saturation or compression. However, there's times where you may want the reverse. Live makes a given send/return path pre or post for all tracks by clicking a button in the Master track.
- Still no labels - If you have more than a few sends, then you'll be counting again. Pre/Post switches are not labeled and you're expected to determine which send they refer to by their vertical placement. Then you have to correlate the A/B/C/D/Etc... to an actual track name. With 2-3 sends it's not a big deal. With 5+ it starts to become a pain.
- No solo modes - No way to solo only a track and not sends, no solo safe, solo defeat, solo inversion, AFL/PFL solo, solo dim, show solo mute. Solo is 'Exclusive' (only one track at a time, unless you press Control/Command to invert the behaviour) by default.
- Likewise there's no global unmute/unsolo.
Crossfader
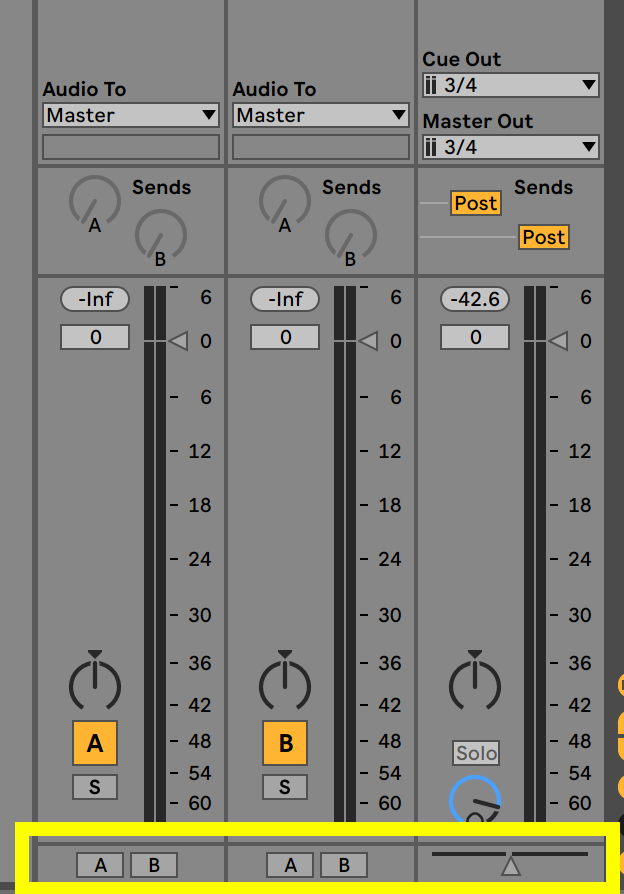
Live has a fairly unique feature: the crossfader.
There's 2 assignments, A and B. A track can be either A or B, and changing the crossfader scales the assigned fader's value accordingly.
The crossfader has 7 different types of faders (even though clip fades are more limited... wat), and it can be automated like most anything else.
Somewhat obviously useful for DJs, but since Live doesn't have track selection recall it's a bit difficult to work with 3+ tracks using the crossfader. Fading from track A to B is simple, but then to fade to track C you must have it assigned to the same crossfader bank as track A, but make sure to mute all of track A's tracks. If there's shared tracks then you're in for a mad scramble. If you want to change track orders then your necessary alternating A B A B A crossfader assignments will need to be redone.
Having multiple crossfader banks and allowing the crossfader's left/right positions to be assigned to a bank would make this significantly more useful for both live performance and studio work.
Track Delay

Each track can be delayed by positive or negative values in up to tenths of a millisecond. Awesome feature for syncing tracks. Great for remixes, DJing, adding "feel", multi-mic recordings and more.
Surround
Hah, no.
Missing Features
Here it comes... you knew it was coming.
- No surround support
- Small Faders - Live's faders do support holding shift for fine tuning parameters, however the fader size is relatively small which necessitates hold shift for most fader movements (unless you mix like a mongoloid... like me).
Only balance - Live does not have a pan control. It has balance. Balance changes the level of the left and right channels in proportion to each other. Pan allows you to change the output of any channel to any other channel. Pan and Balance are often used interchangeably and "Stereo Pan" or "Stereo Balance" being used in place of "Pan".- EDIT - Totally wrong there. Right click a balance control to switch to "Split stereo mode".
- No surround pan either.
- Likewise no width control.
- No plugin display - Plugins are only displayed in the device area, which is also the clip editing area. This makes mixing while composing a task compromised of many shift-tab keypresses.
- NOTE - I'm referring to the GUI of the devices here.
The mixer in Live has no plugin management features at all. You must switch to the device view at the bottom of the screen.EDIT this is incorrect. You can open a plugin/device list in the Mixer using the little plug icon in the lower right of the mixer.
- No fader throw adjustment - Half the fader in session view is -24dB. Half in the Arrangement view is -12dB. There's no way to adjust how this is scaled. Session view is particularly annoying because with proper gain staging having tracks at -24dB is rather rare. That means that you'll be mixing with <25% of the fader throw on already small faders. Ugh.
- No fader value set - This is a feature I feel like has to be me missing something obvious. I don't see how to set a value for a fader/pan in Live to an absolute value. This is frequently useful when adjusting for gain from a plugin or a known input device level.
- EDIT - A single click followed by typing does this. There's no visual feedback to let you know if/what/when you're editing until you start typing!
- Even more annoying for sends where a given send level may make sense for multiple tracks (especially when using sends for cue outputs to multiple sources)
- No polarity inversion - Polarity inversion is only available as a plugin.
- No track deactivation - Live does not appear to have a way to fully disable or deactivate a track. Only mute or freeze are available.
- Track routing is a dropdown - routing a track to a destination is available only via drop-down menu. If you have a lot of tracks it's mind-numbing to navigate the list to find what you want.
- No routing indicators - Tracing track routing is an exercise in memory. There's no indication of what goes where except for an output assignment box.
- No channel strip - I really like channel strip functionality. It reduces friction in the mixing process. Live requires at least 2 clicks and a large mouse movement to adjust a track parameter, often 3 or more and a scroll action. Channel strips let you do basic things like EQ, compression, gating, saturation etc.. in a single click all while being able to see the current values instantly.
- No snapshots - Live does not allow you to easily save/recall alternate mixes.
- No Track visibility - There is no way to easily set track visibility. With projects >16 tracks it there is quite a bit of scrolling or opening/unopening groups involved in a mix. The ability to easily set track visibility from a list and recall specific track visibility setups is a huge workflow improvement.
- No track search - Finding a track while mixing sucks. There's no way to quickly find a track other than to scroll around and read labels. This is made even worse with sends that are labeled by letters.
- No monitor management - Managing various outputs is rather important if you work with anything more than a single listening device. Things like dim, mono collapse, metronome routing, effects on monitor outputs, output selection and much more is very useful
- No Monitor output - The master output and hardware output in Live are linked unless you setup your own ridiculous routing with sends and a variety of default tracks. It's nice to mix at varying SPL levels while keeping a calibrated hardware level without messing with your master fader. Having a monitor output level after the master fader makes this possible.
- No Monitor effects - Same as above, but with effects that only apply to the monitor output. These happen after the master, but would not apply on render.
- No Monitor output - The master output and hardware output in Live are linked unless you setup your own ridiculous routing with sends and a variety of default tracks. It's nice to mix at varying SPL levels while keeping a calibrated hardware level without messing with your master fader. Having a monitor output level after the master fader makes this possible.
- No advanced metering - Any metering needs beyond some ambiguous RMS require acquiring third-party plugins. Having these integrated into the software increases user awareness, increases product value and improves workflow. Win, Win, Win.
- No advanced rendering - Once a mix is complete the final task is to perform it live or render it. Live's render facilities are rather basic. This could be an article in itself, but there's two important features missing: stem export (export tracks/groups/sends) and lufs/rms/k/etc... normalization.
- No G4 Altivec support - If this didn't make you chuckle, then I'm sorry.
- No modulators - Live has an automation feature called 'Mod', which is trim and not modulation. Live does not natively have control modulation generators.
- No Mix groups - Live has no way to group tracks so that certain parameters always move together. This makes working with multi-source instruments a click-click-click afair with requiring track selection to handle multiple tracks at once. Error prone too!
- No markers - Live does have locators. These are not a substitute for a marker system though. Search, hotkeys, naming, ordering, editing commands to/from markers etc... are big boosts to productivity. Live has visual markers that let you play from a position or loop between adjacent locators. Wholly insufficient for an efficient mixing workflow.
- CPU usage - I need to take time to quantify this, but Live appears to reach buffer underruns quite quickly compared to other software. I did a quite test compared to Bitwig and I was able to run ~%15 more of a given plugin (MTurboReverb) before the crackles started. Reaper was nearly 35% better on my system. This requires more testing!
- The "CPU" usage meter is just a bar with a meaningless percentage (as it's unlabeled). Better monitoring is a must, especially when the software appears to be working slower than competitors.
- No freeze points - Live has track freeze however it freezes the whole track. The ability to freeze 'up to a device' is fantastic and something many other DAWs have.
- No send freeze - Live lacks the ability to freeze a send, which sounds like a strange concept since sending tracks may change their output, but it is useful for certain effects or for rendering a send to be used elsewhere.
- No group freeze - you can't freeze groups.
- No Clip effects - You can not apply effects to just a clip. That requires a fiddly automation workflow.
- No "zones" - It's extremely useful to pin a track to the left/right of the mixer, or to unpin it. Live always pins sends and the master to the right (which is incredibly annoying) and offers no way to pin specific tracks or groups, or to unpin sends/master.
Automation

I'm going to try to narrow down the automation discussion to various sections, however there's some general things that are missing:
- No write/read modes - Live does allow you to indicate when you want automation to be read, but on a global scale or in a context menu for that parameter. External plugin parameters don't seem to have a way to put them back on read mode? Very strange unless I've missed something obvious. That would mean that if you move a plugin control that's automated, the automation is turned off, and you have no way to turn just that parameter back on.
- Write modes - There's no way to setup write modes per-track. If you're not familiar with write modes, there's things like write (overwrites), touch (overwrite only when control is active), latch (touch, but the final value is written for the whole control), Latch preview (temporarily automate for a section), Trim (new automation modifies existing), Relative (extra layers of automation) and many more!
- Live uses latch mode by default. New automation is written, and the final value is written as playback continues.
- Write modes - There's no way to setup write modes per-track. If you're not familiar with write modes, there's things like write (overwrites), touch (overwrite only when control is active), latch (touch, but the final value is written for the whole control), Latch preview (temporarily automate for a section), Trim (new automation modifies existing), Relative (extra layers of automation) and many more!
- No VCA - Read about why these matter
- No Trim automation - Live 10.1 has "Mod" envelopes per clip, but it's no substitute for the ability to scale existing automation by a static or dynamic value (another envelope).
- Mixer automation is limited - the points where automation can occur is limited. No pre/post points, no trim points, only one balance, etc...
- Parameter selection - Selecting plugin parameters requires moving the control. There's no way to search or select a parameter on its own. Since moving a control can disable automation, this can be an error-prone situation should you accidentally adjust the wrong control (which is easy for plugins that combine many parameters on a single control like an XY pad).
Both clips and tracks have automation that gets combined. Clips have "Mod" envelopes that scale the automation by a percentage which is nearly trim, but not quite.
When audio clips are envelope linked, then the clip automation moves along with warp markers. This is a very useful and cool feature.
Arrangement
Live has your typical linear automation in the Arrangement view. Pressing the "a" key switches to automation view and you can select to view/edit mixer parameters, plugin parameters or only parameters that already have data.
There's lanes for automation, or you can collapse all automation to display on the track itself.
Envelope points snap to the grid by default, which is excellent when utilizing Live's Adaptive grid. Grid can be bypassed with Control/Command as needed.
Clip Editor
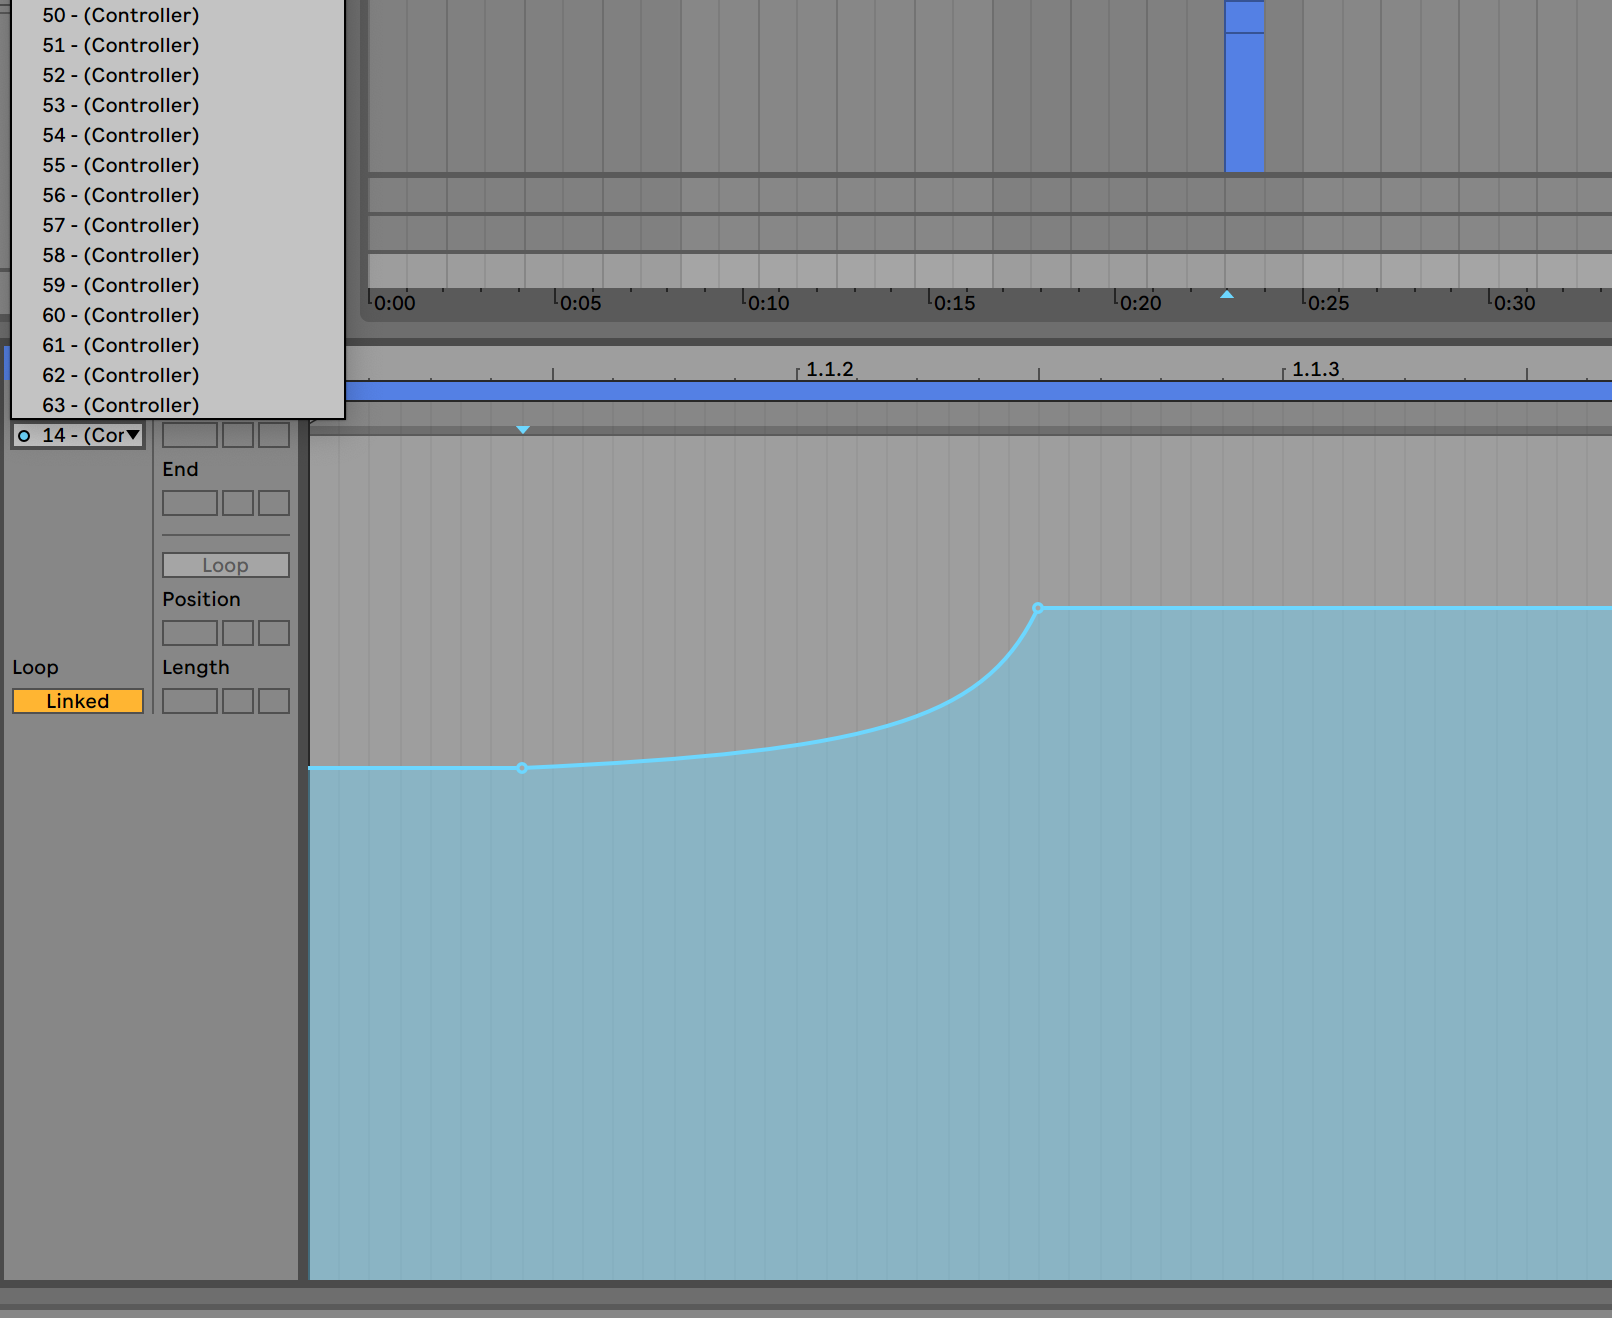
Session view does not have any automation capabilities, so the expectation is that you work directly in the clip editor. (duh?) The clip editor has one specific cool feature: Unlinked Envelopes.
In the clip editor you can turn off the "Linked" button in the envelope section. An unlinked envelope allows you to create an envelope shorter or longer than the clip itself, which means the envelope is completely independent. The envelope can be a long series of points that spans multiple iterations of the clip, or a one-shot, or a small looped envelope that repeats independent of the clips play or loop state.
Unlinked envelopes make it easy to sounds that change overtime irrespective of the originating sound's repeats. A repeating drum loop can have an envelope that morphs over 16 bars without needing to change the loop or work in Arrangement view. You can have an envelope that repeats after 5 beats on top of an 8 beat loop.
Super fun feature, but only applicable to Session view (which makes sense, this is surprisingly not a complaint).
Live 10.1 does introduce "Mod" mode in the clip editor envelope section that gives you a secondary envelope that scales the automation for that parameter by a percentage. This is generally called "trim" in other DAWs, but in Live 10.1 it is constrained to clips. However it only seems to be available per clip, and is toggleable only when viewing Session view. It can only be drawn in, and it only seems to work in Session view. It seems that when in Arrangement mode there is only "modulation" for a clip, but Session view allows "Automation" and "Modulation".
Live 10.0 didn't have mixer/fx envelopes per clip, so it would seem that the new 'Mod' mode allows you to trim an existing automation envelope during that clip when in Arrangement, and to use modulation as a trim over automation in the Session view. The manual doesn't explain this at all currently, and it's a strange design when trim capability in the Arrangement would solve a lot of problems that this doesn't address.
I also find it somewhat disingenuous to call it "Mod" when it's not what you'd normally consider "modulation" in a music context. There's no signal generation here, it's an envelope that changes an envelope. This is a feature that's been called "trim" since mixer automation systems have existed.
Also see the previous section about clip envelopes about a few other bits.
Drawing
Drawing in automation in Live is a fairly normal workflow. You enter automation mode in the Arrangement view or work with the clip editor in Session view. Double click to add points, double click to remove them. Alt/Option-drag on a line between points to create a curve.
For external plugins, points do not show the actual value when adjusting them. You see a breakpoint value between 0 and 100, even if the parameter is adjusting milliseconds between 0 and 20,000 or in dB or whatever. In order to know the value that you're adjusting, you need to refer to the plugin window itself. You can't manually enter values for a breakpoint either, which is generally worthless when you can't see the real values that you're editing for non-native devices.
Live's native plugins do show correct metrics for breakpoints though, and other DAWs show them fine for AU/VST/VST3, so it's certainly possible.
Draw mode writes data in steps the size of the grid, or smaller steps when holding control/command. Nearly totally useless except for the occasionally rhythmic effect (unless you rely on that, then I suppose it's useful.)
The right click menu allows you to 'insert shape' with a variety of shapes, however the frequency, amplitude and phase require secondary and tertiary editing steps. It's not possible to easily scale existing automation by a shape either. Many other DAWs allow you to insert a shape and set its frequency/amplitude/phase all in one swift move while deciding to add, subtract, multiply or divide the new data against existing information.
See the editing section as well. The 'select and box' method works for creating automation as well as morphing it. Great workflow.
Recording
Recording new automation in Live is...
I don't have words.
- You can't set write mode.
- You can't arm specific parameters
- You can't set density (how often it writes changes)
- You can't arm tracks, or unarm tracks.
- You can't see automation unless you're in automation mode (even though you can happily record it accidentally.)
Live's automation recording is extraordinarily limited.
With "Automation Arm" turned on: You hit record and everything is armed. It's combined with audio/midi recording as well, so if you wish to record something then add some automation you will need to be careful to manage your track record arm states or you will overwrite existing information.
With "Automation Arm" turned off: Any parameters that you adjust during recording will subsequently disable the automation envelope for that track. You will need to re-enable it yourself. External plugins seem to require re-enabling globally, so any intentionally disabled envelopes will need to be redone!
Recording automation when in the Session view records it to the Arrangement view, except when it's not. The setup for this is unnecessarily confusing where simply having an automation arm button/mode for a clip, or track could suffice. When using the arrangement view it does not seem to be possible to record to clip envelopes.
I've always found this to be ridiculous given that Ableton likes to push the hardware capabilities of Live. Launching clips is fine, but automation... at least 3 decades behind the competition.
Editing
There's one notable editing feature as shown in the video above. You can select a range then scale the start/end, whole selection and compress/expand it.
There are no features for thinning or interpolating automation data. No features for shaping existing data in any other way.
One of the most annoying things is that I can't find anyway to clear all envelopes on a track. Particularly useful after recording automation and you're a few steps into you're project before you notice, thus making undo unpalatable. EDIT - Right click on the track header to find this option. Right clicking on the envelope itself does not show this option. Glad this exists.
MIDI CC/other
MIDI clips have CC automation, but no ability to attach track parameters to them like audio clips. This can be a limitation! There is no design reason for this, as MIDI clips exist on tracks the same as Audio clips and could conceptually have "mod" (trim) envelopes just like audio clips.
CC is edited via breakpoints, which is a feature that I know many people prefer, but I personally dislike it. It obfuscates the underlying data (CC is singular messages sent one at a time). Some hardware, and even some software, can only handle a maximum density of CC data and Live does not allow you to adjust this. On the opposite spectrum are some devices that have no interpolation on modulated parameters and do best with dense CC data. Timing of CC messages is also difficult to determine.
There is no Sysex, and no NRPN. (Live does label the NRPN CCs, but this does not mean that it supports drawing it)
There are no tools for directly entering CC values, so you must drag with the mouse and watch a label.
Only one envelope at a time can be visible. Aligning items (especially when not on the grid) can be problematic, and there's no guarantees about the order the CC is sent (which can be important for some devices!).
Plugin Use
This harkens back to my barking about the browser, but with more.
Problems first:
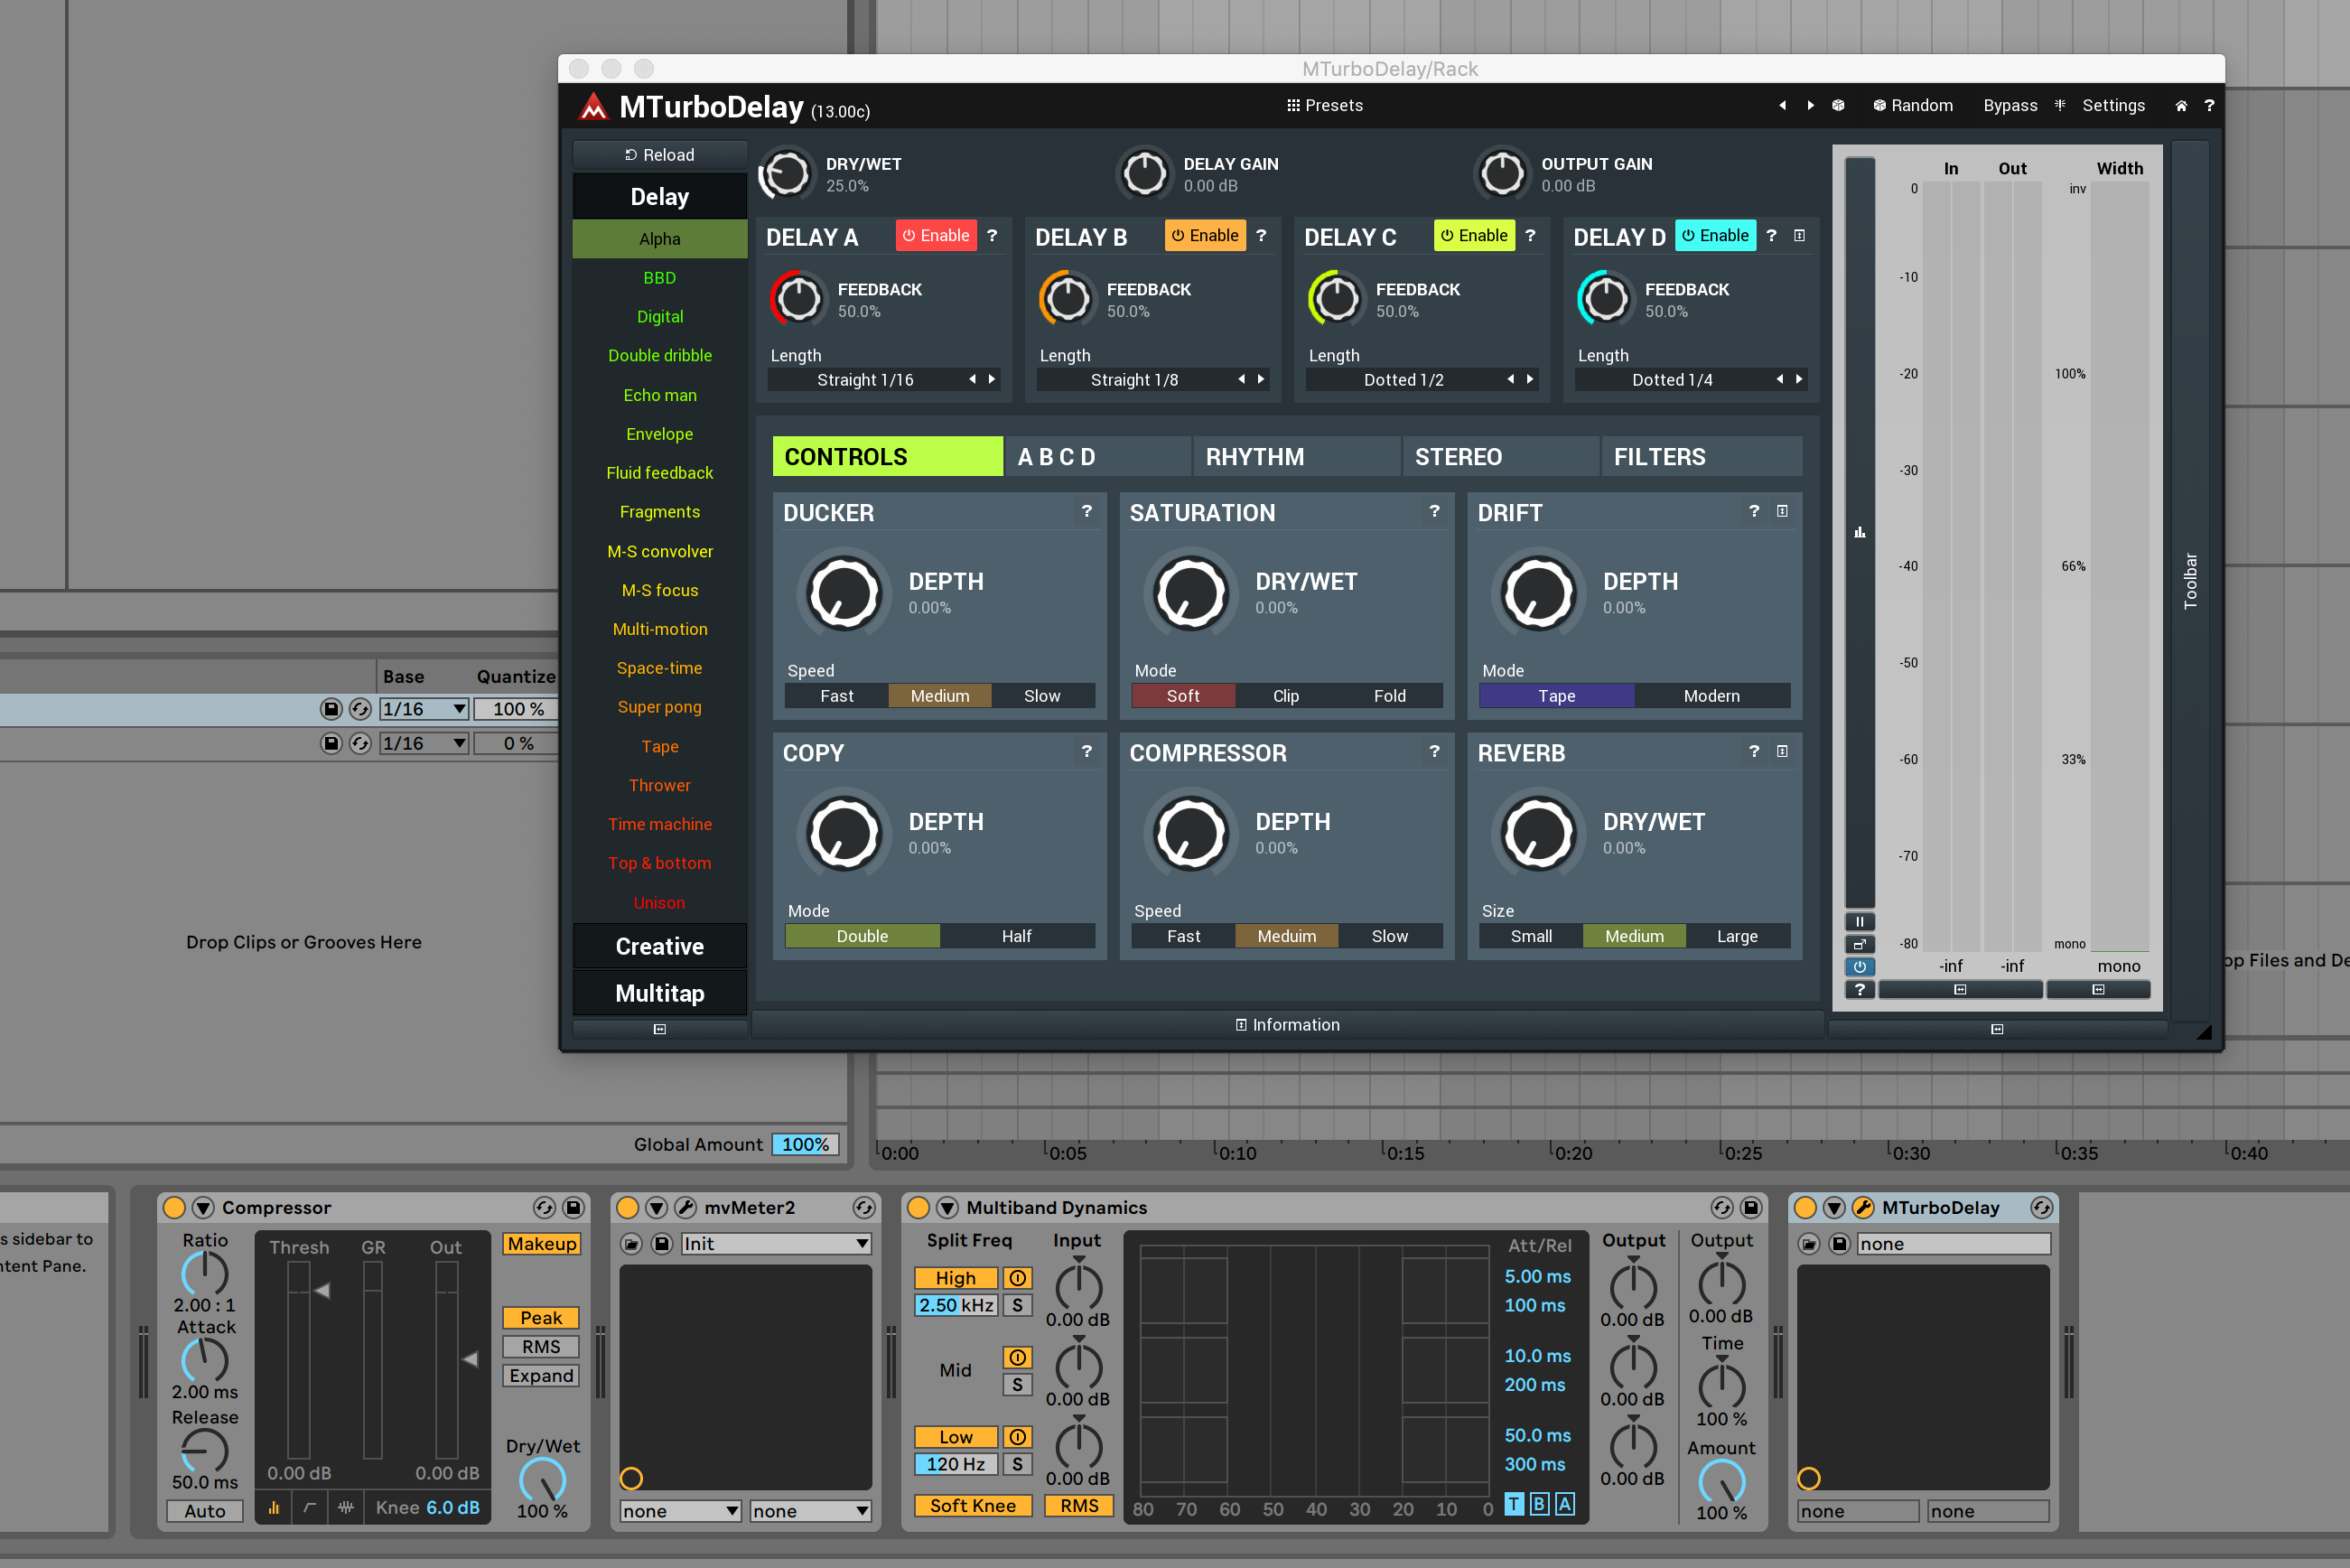
- External vs. Native - Native plugins are displayed only in the device area. External plugins are in their own window. Native devices can take up a lot of space, and so can the square (or larger) box for the non-native devices. So of course you think, "I'll just collapse my non-native devices, they don't need to take up space!". Excellent, except plugins default to the un-collapsed state, so you either add an extra click every time you add a VST/AU or you deal with a bunch of (usually) wasted space.
- Windows disappear - I haven't figured this out, but plugin windows sometimes disappear without me having closed the window. I must then find the device and re-open it with a tiny icon.
- Presets - Presets are not managed from the plugin window. They are managed from the device box, but this doesn't seem to even work?
- Sidechain - Live seems to think that a plugin with more than 2 inputs, has a sidechain. Given that most developers of VST2 plugins use inputs 3/4 for sidechain, this makes sense. IT can be confusing when you open an EQ that Live thinks has a sidechain though...
- No Mix - there's no dry/wet control for output of individual devices. This is only available for sidechain or if the device implements it.
- Drag and Drop - Getting plugins into Live is a drag and drop affair and I HATE drag and drop. Secondary to this is that there's no direct way to know which track you're working with except to look around to double check your track selection or remember the current effects on the track (if any). Live users may not notice it, but the process of adding a plugin means your eyes will likely be darting around nearly the entire screen and then mousing around at least half the screen or more. It's not a big deal in smaller projects, but once your projects grow there starts to be a "Ok... so, where am I?" that precedes each device addition/modification.
- Even worse is that if you try to quickly click->drag->drop from the browser, it doesn't seem to work properly (in macOS, tested 3 computers). It seems that you need to click and hold, pause, then drag. Slowing down the already slow and disconnected process.
- Even more annoying is that you can't click the selection rectangle to drag/drop. You have to click the actual text.
- Scrolling - If you're not actively collapsing devices, then tracks with moderate sound design attempts will often cause the devices to scroll off your screen. This either means constant scrolling or constantly clicking a moving target to collapse/uncollapse devices. There is no scrollbar, but there is a minuscule overview window that you can drag around.
- No plugin categorization - Categorizing plugins can only be done by moving the plugin files into folders on your drive. This can mess up the loading of certain products, and it doesn't work properly with some other DAWs. It also makes updating products that use installers a mess, forcing you to install then find the plugin and move it manually or end up with duplicates in your plugin list.
- No tagging either.
And now the cool stuff:
- XY - Live has an XY macro panel for external plugins. You can assign 2 parameters to the X and Y of a 2 dimensional pad. Not really useful? Maybe on a touch screen or live performance of manipulating 2 controls with a mouse.
- Hot-swap - plugins can be 'hot swapped'. You can select a device to be hot-swappable and then browse. The devices that you select in the browser will replace your hot-swappable device for instant audible feedback of what a new device will sound like.
- Sidechain - Sidechain setup is easy for VSTs that support the 3/4 sidechain input for VST2, or VST3 sidechain. Select the track that you want to be the sidechain input, select the point from pre/post FX/post-mixer. The sidechain input gain is adjustable and a really cool feature is that you can mix the normal input signal with the sidechain. Really cool.
- Meters on each device - There's a little meter showing the output level of each device, which is awesome! Unfortunately it's not labeled and there's no ballistics/calculation of the RMS. It's not too difficult to get a general idea of the metering relative to what you need for decent gain staging, but a few ticks on the meter would really help.
Conclusion
I rather mix a track with a spoon than use Live. Every DAW has some major weakness, and this is Live's.
The mixer is exceptionally basic and scattered across the screen.
Automation is even more basic and feature-barren, which unlike some other feature exclusions in Live; it does not aide in the simplicity of using the software.
Device management is difficult: devices are frustrating to add, easily overflow the screen (with poor management of the overflow), and presets are handled differently for varying device types.
I can not think of a single peer/competitor/similar-class-product to Live that doesn't handle nearly the entire process better. When using Live it feels like it was designed for small and simple projects. The mixing process cements this idea even further by lacking any sort of features for efficiently navigating a large project, managing automation data, handling solo/mute beyond the absolute basics, managing devices, etc...
I know there's people mixing in Live and mixing large projects. Unfortunately, I think these people are either sadists or woefully unaware of how much extra work they're doing for no benefit.
Though... since Live doesn't easily let you render stems/tracks, larger projects become increasingly more difficult to export so you can sanely mix in another software (rewire: not sane). It's rather devious. Brilliant even. Intentional... probably not.
Support Me!
This post took 18 hours to research, screenshot, write and edit. If you appreciate the information presented then please consider joining patreon or paying me for my time spent bringing you quality content!
If you appreciate the information presented then please consider joining Patreon or donating money/time.
