Once again we're here with a new review! I'm doing all of the Instruments and MIDI Effects in Logic Pro X. Just like the Logic Effects review I'm going to split these in to categories.
- Fantastic - These are plugins that I think would be an excellent value to purchase if possible. Likewise, they compare favourably with third-party plugins on the market.
- Sufficient - Sufficient get the job done without much hassle. There may be no fancy extra features like some third-party competitors, or maybe the DAW version is missing some common feature, but nevertheless it's enough to get the job done.
- Flawed - As the name implies, these plugins have some sort of flaw. I would suggest replacing these with a third-party product.
Many of the plugins are vectorized for clean resizing and retina screens. I've marked the non-vectorized models as of Logic 10.4.
The MIDI Effects are all excellent and will have their own section. You can assume that all of these are 'Fantastic'.
There will be a total rating for everything included though, and that rating is...
Spoiler - Overall rating:
Parts in this series:
- Cool things in Logic Pro X Part 1
- Cool things in Logic Pro X Part 2
- Cool things in Logic Pro X Part 3
- Cool things in Logic Pro X Part 4
- Cool things in Logic Pro X Part 5
- Logic Pro X Tips & Tricks and more cool things
- Logic Effects Review
- Cool things in Logic Pro X Part 10.4
- Logic Instruments and MIDI Effects Review
- Things I hate about Logic Pro X and Conclusion!
NOTE - I wrote this post in a different editor than I've been using the last ~9 months. A post is coming up on that in the future, but if you see any random ~~/j:s4k looking characters, it's because my normal mode keychord mapping is not configured to my liking yet. But eventually it'll be good enough
Contents
- Alchemy
- Fantastic Instruments
- Sufficient Instruments
- Flawed Instruments
- MIDI Effects
- Conclusion
- Support Me!
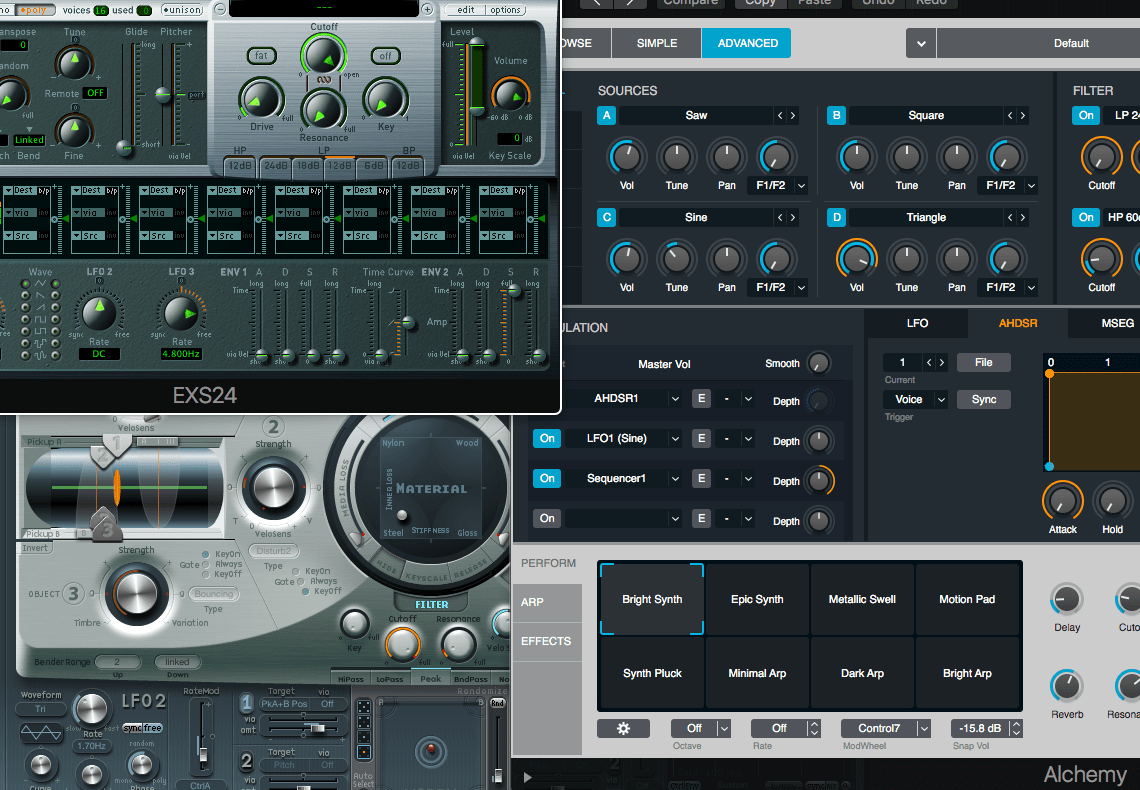
Alchemy
Alchemy has its own section. Alchemy alone is reason enough to buy Logic. It goes beyond fantastic.
Seriously, Alchemy used to sell for more than Logic does now and people happily purchased it. Logic's Alchemy is better still.
Alchemy
Camel Audio Alchemy was an amazing synthesizer. It still is, but now it's only available in Logic and Mainstage.
What makes Alchemy so great? Well... everything.
- It has 1000s of presets which offer either an excellent starting point for a sound, or the sound you want right off the bat. The preset browser works rather well with ratings, search, multiple categories, user tags and temporal selection.
- Assignable macro section with 'transform pads' that allow you to capture settings for quick changes.
- 4 individual voices with wavetable import, 3 filters, additive synthesis, spectral synthesis, pitch, formant, granular and VA modes. There's 100s of oscillator wavetables to import.
- Also the global page where you can make quick changes to the 4 modules, add a global filter and change how the voices interact.
- Also the morph page where you can morph between voices on an XY pad or a timeline in linear and log modes.
- BTW, it's also a full sampler. It rivals EXS nearly.
- LFOs each with dozens of shapes
- AHDSRs with curves and multiple trigger modes
- Multi segment envelopes. These are basically DIY envelopes.
- Sequencer.
- Envelope followers with multiple internal input sources and sidechain.
- Modulation maps - these filter modulation from a modulation source before it hits the destination.
The number of modulators you can have and the modulation destinations are ... I don't know. You can have a lot. Nearly everything can be a modulation target too! The modulator parameters themselves are modulatable. The amount of modulation is shown by an extra circle around the knob, which is very nice.
There's 4 step sequencers (arpeggiators) that let you sequence relative note value, velocity, pan, swing, length and 2 slots for using the arp itself as a modulation source.
There's 15 effects that can be applied globally or to each voice.
Alchemy is amazing. Read the Manual for more, but if you learn to use Alchemy well then it's very likely to be 'the only synth you ever need'. I'd say that thing about how I would love to buy Alchemy if it was available, but I did. I own the Alchemy VST and I paid good money for it. Alchemy Logic is even better, and nicer to use. Worth the entry price to Logic alone if you love to explore synthesis.
Fantastic Instruments
Drum Kit Designer
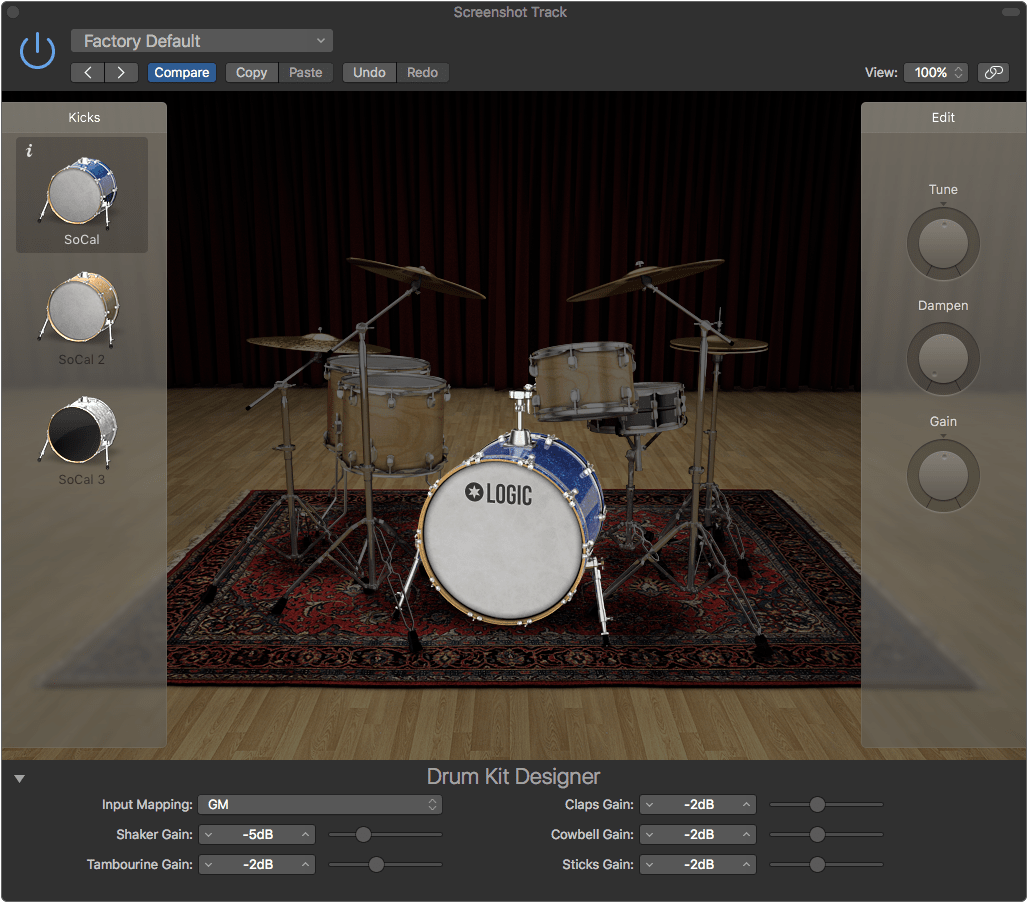
Drum Kit Designer is Logic's acoustic drum kit instrument. It comes in stereo and multi-output versions (which routes each individual kit piece to its own track).
Logic comes with a number of 'kits' for the drum designer, and if you've used Logic's Drummer then you may already be familiar with these. Make sure that you have downloaded the drum kits in Logic Pro X->Sound Library->Open Sound Library Manager... before you try to use Drum Kit Designer, or you may be a bit unhappy with the selection.
Drum Kit designer presents you with a typical trap kit setup: kick drum, snare drum, 2 rack toms, floor tom, ride cymbal, 2 crashes and a set of hi-hats. With a preset selected you can select one of these sections and change that section to the sounds from another preset time. For instance you can load up a 'Birch' kit and use some crazy 'Plexi' (Ludwig vistaline) toms. You must use the 'multi-out' versions to access the producer kit options as far as I can tell, so if you are unable to change cymbals or tom samples then that may be your issue. That difference really caused me issues, and I'm still unclear on how to properly make sure I always end up with a clean 'producer kit' instance.
When selecting the samples used, you can also make adjustments to them. Tuning, damping and gain are standard. When using a producer kit (which you must install separately in the sound library manager), you also adjust if there's mic leakage from other drums and turn on/off the overhead and room mic components of that section. For the room mode there's an 'A Room' and a 'B Room' that can be selected between.
There are a number of types of performance for many parts of the kit: Snare Center, Snare Edge, Snare Sidestick, Ride In, Ride Out, Ride Edge, Ride Bell, Hat Close, Hat Open, Hat Foot Close, Crash stops.
There's 3 types of mapping for notes: V-drum, General MIDI and General MIDI with modwheel for hat open.
Soundwise, for very simple grooves it's an excellent tool. For drum replacement it's an absolutely excellent tool. The samples are all multi-sampled with a round-robin (I think?) mode engaged. So if you have multiple hits in a row of the same velocity you won't get that machine gun trigger effect.
As far as acoustic drum instruments included with DAWs go, this is a very competent tool. It may not be the cream of the crop in the world of acoustic drum instruments, but it's usable and immediately accessible.
Drum Machine Designer
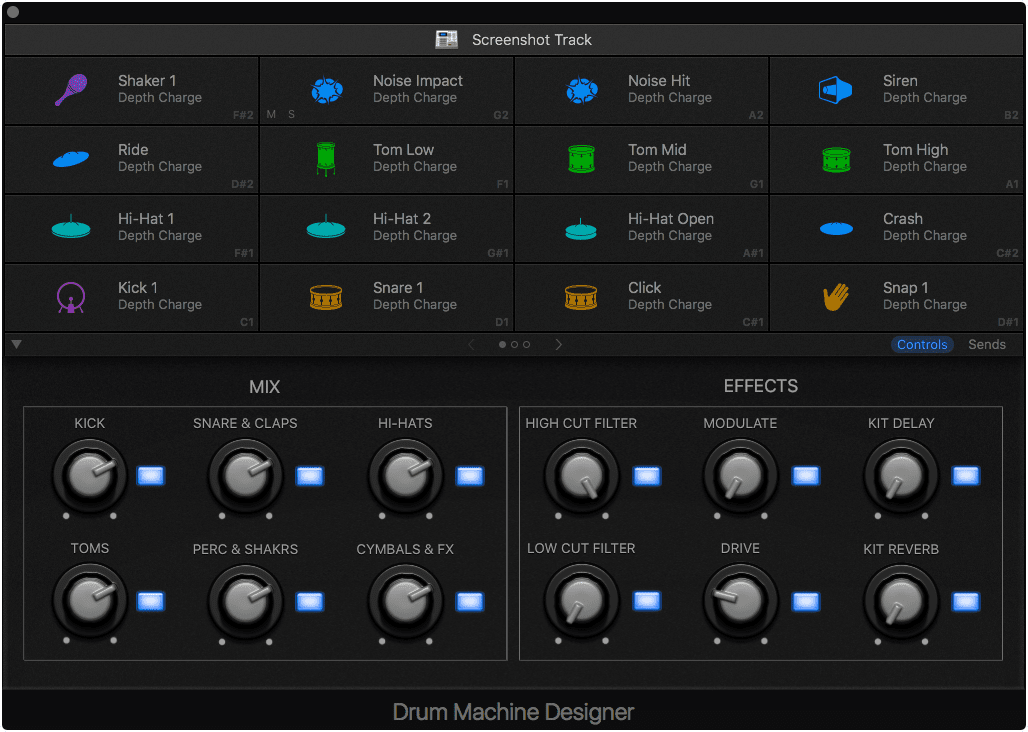
Drum Machine Designer is a weird one. It's not an 'instrument' as much as it is a frontend for Ultrabeat. When you place Drum Machine Designer on a track you will end up with a track folder that contains Ultrabeat, a bunch of effects and tracks for each 'drum'.
As a frontend for Ultrabeat it is nice. Not everyone wants to use Ultrabeat's ancient interface and have to deal with the sequencer aspect just to access the wide variety of samples that Logic has available (Logic Pro X->Sound Library->Open Sound Library...).
Drum Machine Designer gives you 48 slots for drum samples, and you can freely drag&drop new samples to each of those slots. Each slot has parameter mappings to Ultrabeat and the associate effects slots for: pitch, length, envelope, spread, body, presence, pan and volume. For instance pitch modulates the Ultrabeat pitch parameter, but 'spread' changes the Stereo Delay's level (which has a Haas effect like setup). If you delete the affect that's mapped to a knob then you lose the knob! Don't do that.
There's also a sends section where you can control sends for each group to a delay or reverb by default. These can also be changed by adjusting the smart controls mapping.
All of the mappings can be changed if you go to the smart control editor. You can save the entire config as a channel strip if you make any changes that you want to keep later.
The Drum Machine Designer default setup has an Arpeggiator included, so you can just press a bunch of keys on your keyboard at once and get some sort of beat going. The arp is located in the folder on the 'Kick' track or the first track in the folder.
Drum Machine Designer is a really weird instrument. It's fully integrated in to Logic and doesn't even appear in the plugin list. When adding it as an instrument you have to look outside the instruments folder even! Does it work? Yes. It's a fairly nice frontend for one-shot drum samples, and despite its weird integrated nature it does allow you to create your own modulation mappings with the smart control editor that you can save as a channel strip.
I'll be honest though, I had this tagged in the sufficient instruments category initially, but I found myself using it so much that I had to move it to 'Fantastic'. It's just a super convenient way to handle one-shot samples. It's another example of a feature in Logic that is superficially simple and seems to be 'dumb' but is a useful shortcut with a lot of power underneath it.
ES2
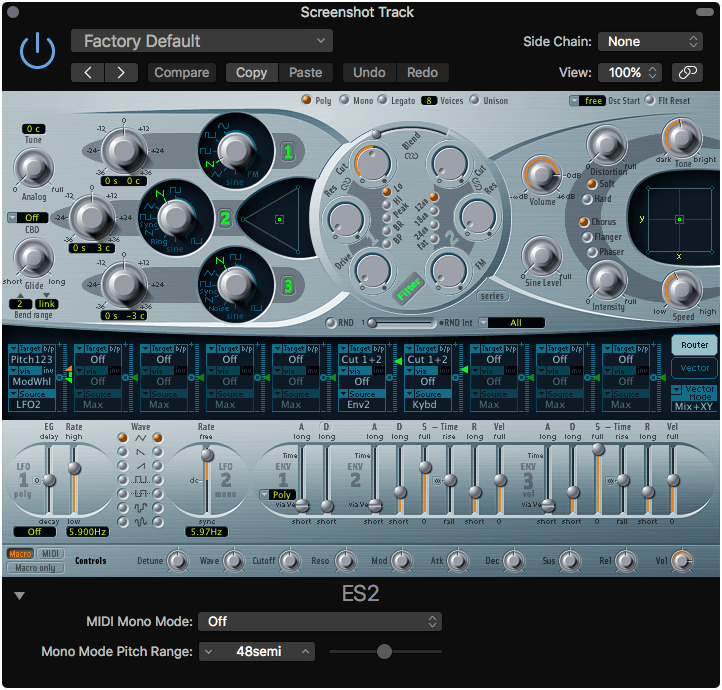
10.4 - NOT VECTORIZED
ES2 15 years ago would have been a powerhouse digital synth. 3 oscillators with a unique triangle mixer, 2 filters with filter FM (osc 1->modulates filter cutoff), 2 LFOs, 3 assignable envelope generators plus the 'Vector Envelope', 3 effects (chorus, flange, phaser), an XY modulation pad and more.
I'm not even going to cover everything in ES2. Read the manual.
ES2 has a randomize feature that scales a selection of parameters by the percentage of the slider. The dropdown menu to the right of the RND slider allow you to select specific groups of parameters that can be scaled. With 'All' on, even the modulation assignments get randomized, which is something missing from many synth randomizers.
ES2 supports 14-bit MIDI parameter mapping to a limited extent, which allows you to have 16,384 values per control rather than the typical 128.
The modulation router not only allows you to assign modulation sources to parameters, but easily assign controls to adjust the depth of the modulation. Not a unique feature, but the implementation makes it unusually accessible. You can have an LFO that controls how much another LFO modulates a parameter, or assign the LFO modulation depth to the mod wheel (as a classic example).
The oscillators have multiple modes including FM on OSC, PWM on OSC 2 and 3, and ROM samples ('wavetables') for all 3 oscs. The oscillators have sync mode, which makes one osc a 'master' that controls when the start point of the slave oscillators triggers. It can make some fairly classic sounds.
ES2 doesn't have the cleanest sound, but the wide variety of capabilities that it offers more than makes up for the harsh edge cases that you will no doubt encounter. On the topic of the 'sound' I would consider this 'Sufficient' given that there's much cleaner and more aggressive sounding third-party synths available cheaply. For the features offered and compared to other synths included with various DAWs it's fantastic.
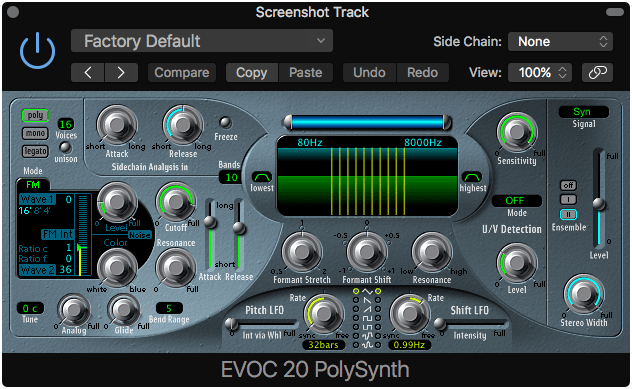
EVOC 20 PolySynth
10.4 - NOT VECTORIZED
I covered EVOC 20 TrackOscillator in the effects posts. EVOC 20 Polysynth is basically the same thing, but as a synthesis front-end.
It has 2 oscillators that can be used in a 'Dual' mode where they can be mixed, or in an FM mode where they act as a sine carrier and modulator. There's a very simple A/R envelope, glide, analog mode and a filter.
Everything else works like EVOC 20 TrackOscillator. Check that review for more. Given how I feel about the effect, you can see why this is in the fantastic section. It's just a ton of fun.
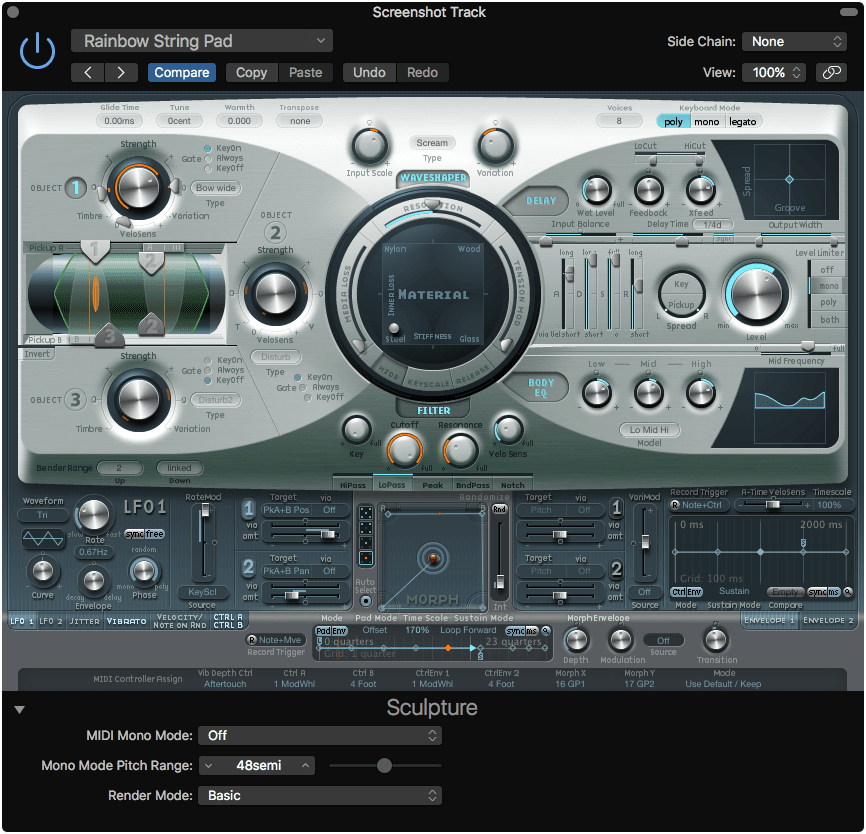
Sculpture
10.4 - NOT VECTORIZED
I explained what happens when I have to review powerful synths. I just don't want to spend 8 hours writing about everything that it offers. Read the Manual if you want to know everything that Sculpture can do.
What can sculpture do? It's a physical modeling synth that focuses on string modeling. It doesn't use oscillators or samples to generate sounds like you may normally be used to. You control objects that act on a string. Sculpture gives you 3 types of these objects to interact with the string and the associated parameters. You can even adjust where on the string the objects interact.
Once the string is stimulated, it resonates inside a 'body'. The body's parameters can be tuned by a variety of controls. The body can also be 'tuned' with the body EQ control.
The sound can be processed by a filter (hp/lp/bp, peak and notch), a true surround sound delay and a waveshaper (distortion) module.
Sculpture has 4 modulators: 2 LFOs and 2 Jitter modulators (which create random fluctuations). Velocity and Note-on each have 2 modulation assignments. There's MIDI controller assignment. The Vibrato section is even its own module, so you don't need to eat up an LFO to create pitch modulations. There's 2 envelope generators as well.
There's a Morph X/Y pad that allows you to morph between parameters. A really cool feature is that you can set the morph to envelope mode and draw a shape in the X/Y pad. When the trigger happens, the movement in the morph pad is played back.
Sculpture has so much to offer. This thing is a pluck machine. It's a pad machine. It's a keyed percussion machine. It's a bass machine. It's a machine machine. Machine machine machine.
If Apple would just update the antiquated GUI I'd be begging to buy Sculpture for my own use elsewhere. Regardless of the GUI it's a feature-packed synth that sounds awesome. Just be ready to bend your brain in new ways to fully grok it.
Studio Horns
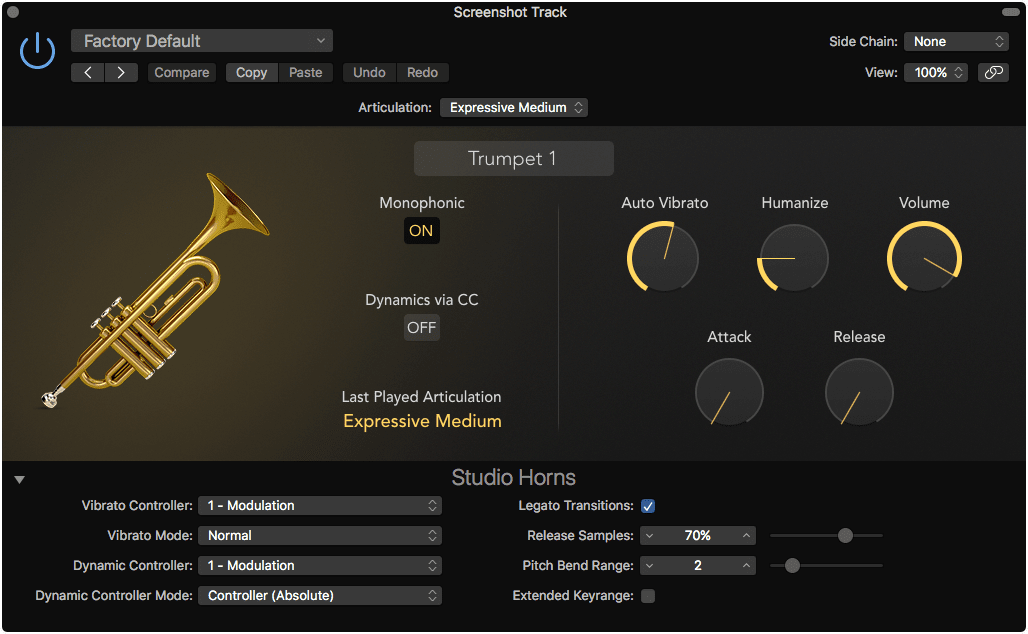
Studio Horns is a frontend for an EXS24 horn library. It has the following instruments:
- 2 Alto Saxes
- 1 Baritone Sax
- 1 Bass Trombone
- 3 Horn Sections (Jazz, R&B, Soul)
- 2 Tenor Saxes
- 3 Trombones
- 4 Trumpets
These instruments have the following articulations:
- Sustain
- Staccato
- Marcato Short
- Marcato Long
- Expressive Medium
- Expressive Long
- Expressive Short
- Passionate
- Fall Long
- Fall Medium
- Fall Short
- Doit
- Grow
- Trill
- Scoop
The articulations can be controlled with Logic 10.4's new assignable articulations. There is a knob for controlling keyclick sounds, humanizing the MIDI input, auto vibrato and adjusting the attack/release.
That's about all there is to it? How does it sound? Good. That's about all that I can really say. I am not one that makes extensive use of sample libraries like this, however I have heard demos that sound really good. I played trombone in high school marching band, and tuba in college orchestra, so I have somewhat of an ear for authentic brass and the ability to compose nearly intelligent horn parts, but! I am simply not as picky about these things as many people seem to be.
I think they are fantastic in context though. I don't know what other DAW gives you a horn library this good.
Studio Strings
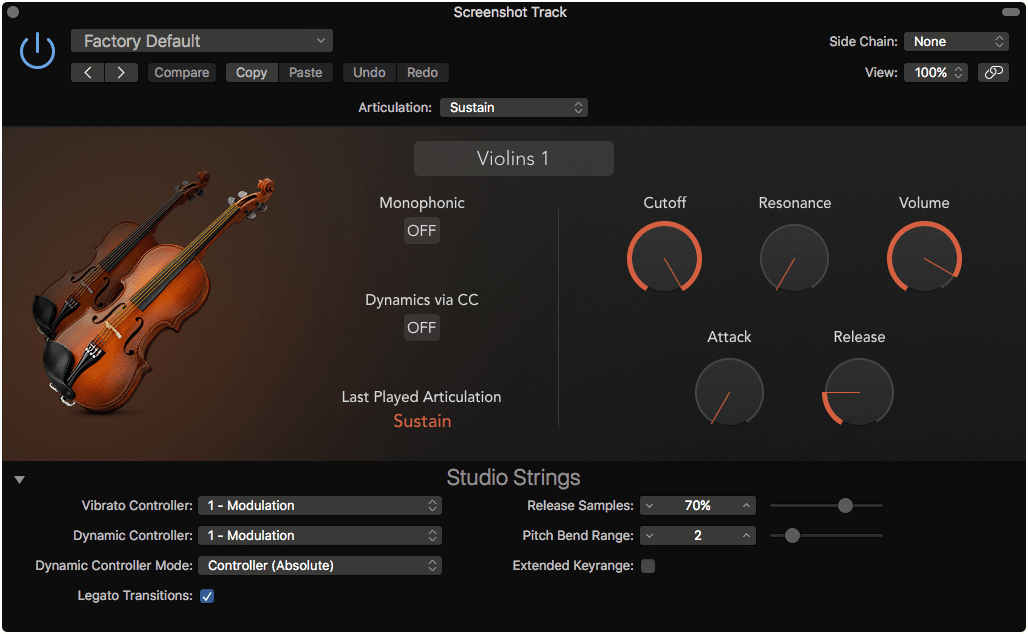
Like Studio Horns, Studio Strings is an ESX24 based sample library. You get:
- 2 Violins
- Viola
- Cellos
- Double Basses
- Small section
- Disco strings
- Singer Songwriter
- String Ensemble
These all have the following articulations:
- Sustain
- Staccato
- Marcato Short
- Marcato Long
- Expressive Medium
- Expressive Long
- Expressive Short
- Passionate
- Fall Long
- Fall Medium
- Fall Short
- Doit
- Grow
- Trill
- Scoop
The articulations can be controlled with Logic 10.4's new assignable articulations. Studio strings has a filter, mono mode, attack and release.
Studio Strings sounds fantastic to me. I'm not the best judge at all, since I rarely use large sample libraries for composition, but I am but a lowly double bassist 'by trade' so I do have plenty of experience in the pit (I also played tuba for 3 years in college orchestra as well). I really enjoy Studio Strings as an entry-level high-quality string library. I am sure you will want to upgrade at some point if you do serious composition with strings, but as a quickie or for pop/rock compositions this is more than sufficient most of the time.
Test Oscillator
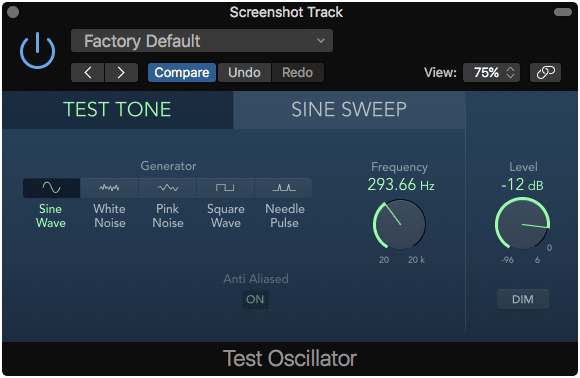
Test oscillator is just like the Test Oscillator effect except you can turn on/off anti-aliasing, and input MIDI changes the frequency of the oscillator. The Sweep mode is not triggerable by MIDI that I can figure out.
I love it. It does exactly what it should.
Ultrabeat
10.4 - NOT VECTORIZED
Ultrabeat is a sequencer/sampler that is either 'You love it' or 'You hate it'.
Ultrabeat gives you a number of 'slots' that can be loaded with a synthesized drum sound. You can import EXS24 patches, use the integrated 2 oscillators/filter, use the sidechain of osc 1 and/or use the 'Sample' mode of osc 2 to import your own samples.
Ultrabeat has a fairly well-featured drum synth with 2 oscillators, LP/HP/BP filters, a simple 2 band EQ and 4 envelopes. All of these are per voice. Osc 1 has phase oscillator, FM and a sidechain input (more on this later). Oscillator 2 has a phase oscillator, sample import and a very simple drum modeling mode.
The core of ultrabeat is really its sequencer. It has a step sequencer that allows you to easily sequence parts. The sequencer is up to 32 steps with each step having a simple gate/velocity parameter. Most of the parameters can also be sequenced by clicking the 'Step' toggle switch in the lower left and the selecting the step and moving the parameter that you wish to sequence. The step length is variable between 1/8th and 1/32nd notes. There's 24 sequencer patterns, and 4 pattern modes (one-shot, sustain, toggle, toggle step 1). With matter mode one, a specific pattern relative to the shown MIDI key is played on midi input rather than the 'sound' assigned to that note. How the sequencer triggers the pattern depends on the mode.
Ultrabeat has up to 25 outputs so you can create multi-track setups that are easier to mix.
One of the most interesting uses of Ultrabeat is to use the sidechain input on OSC 1 and use Ultrabeat as a gated sequencer.
The GUI of Ultrabeat is lousy. Luckily the Drum Machine Designer exists as a frontend for it. Drum Machine Designer offers a simplicity to using Ultrabeat that makes less annoying to use. However if you are wanting to use Ultrabeat to create your own samples then you will be forced to dive in and explore the weird curved faders, strange layout, and distracting raised GUI widgets.
Despite the flaws of the GUI, Ultrabeat is a powerful step sequencer. Combined with Drum Machine Designer, Ultrabeat can be an invaluable tool if you're willing to spend the time with it.
Vintage B3
I am not particularly good at reviewing organs, but here we are with a Hammond B3 emulation of sorts. Like I communicated with the Rotor Cabinet review, this is not my forte but I will do my best.
Vintage B3 is a Hammond B3 organ emulation with a built in based on the Rotor Cabinet effect. It has the normal drawbars, vibrato/chorus and percussion settings that you'd expect.
The options give you more control over the percussion settings, a master tune, minor vibrato/chorus controls and mono/poly modes.
The effects panel offers you a simple wah with mid assignment, a 3 band EQ, 5 mode distortion and a 7 mode reverb. The FX have a pedal bypass, which is nice.
The Expert panel has alllll sorts of settings you can adjust to change the character of the organ. Notably it has mappings for a variety of organ controllers like the Roland VK, Korg CX, Hammond SK/XK, NI B4D, Nord Electro and Crumar.
I am pretty far removed from being able to authentically evaluate a Hammond emulation in a meaningful way, so I am going by how much I enjoy the instrument on its own merits. It's excellent. I particularly enjoy the ability to create expressive and dirty organ sounds with it that are more true to what I think of when I conjure up the sound of a B3 in my head.
It's fantastic for me, but a real Hammond enthusiast may disagree. I don't know?
Vintage Clav
The venerable clavichord, an instrument that has fallen out of modern favour for no good reason.
Vintage Clav offers a variety of modes:
- Belltone
- Classic I
- Classic II
- Dulcitone
- Funktone
- Harpsitone I
- Harpsitone II
- Mellotone
- Plectratone I
- Plectratone II
- Sitartone
- Vintage I
- Vintage II
- Woodtone
All of those modes have a selection of 4 effects: Wah, Compressor, Distortion and Modulation. Theres 2 pickup options and 4 filter modes along with a damper slider as well.
The details panel offers a number of ways to 'tune' the Clav. You can adjust the click, the string's physical properties, adjust the tuning (including stretch tuning which is important) and adjust midi mappings along with the velocity curve.
Vintage Clav sounds awesome. If there's anything here that put me behind in writing this review, it's vintage Clav. You know I selected the funktone mode and swunp my head around in pure bliss far more times than any sane man should. It's just a good fun time, and it sounds quite good.
Vintage Electric Piano
Vintage electric piano is your journey in to the world of Rhodes pianos and Wurlitzer pianos.
Vintage Electric Piano has a bunch of modes:
- Attack Piano
- Deluxe Classic
- Deluxe Modern
- Electra Piano
- Suitcase Mark I
- Suitcase Mark I Bright
- Suitcase Mark II
- Suitcase Mark IV
- Stage Mark I
- Stage Mark II
- Stage Mark II Bright
- Stage Mark II Hard
- Metal Piano
- Wurlitzer 200A
- Wurlitzer 240V
- Wurlitzer Classic
- Wurlitzer Funk
- Wurlitzer Modern
- Wurlitzer Soft
There's an EQ, overdrive, chorus, phaser and tremolo in the effects section. All of which sound alright. I am slightly disappointed in the drive, but I like myself a really dirty rhodes. I'm probably an outlier.
The details section allows you to tune the tines, apply variable stretch tuning and adjust the stereo width.
I am a bit conflicted here because I've owned a few Rhodes, and this doesn't even come close without a lot of post-processing. It does capture the sound of a premiumly tuned electric piano that's DI'd in to a clean console, but does anyone ever play a Rhodes that way? I sure don't. Throw it through some guitar pedals, in to an amp that has no business having a Rhodes in front of it and go crazy. You just don't get that here.
That said, it is a better electric piano than what other DAWs come with, and it's entirely possible that it's a great emulation of using an electric piano in a way that nobody I know uses them. Relative to other DAW offerings, I'm considering this fantastic, but I am slightly disappointed with it.
Sufficient Instruments
ES P
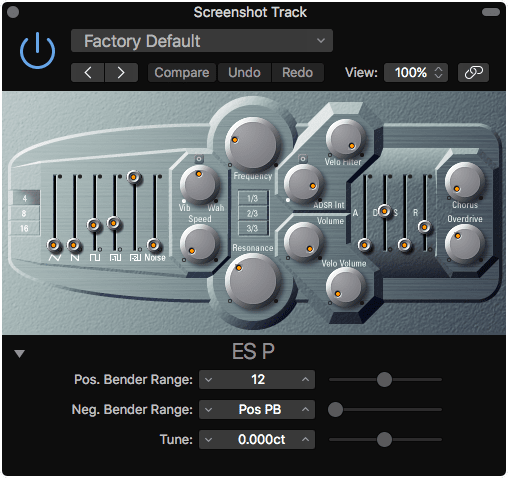
10.4 - NOT VECTORIZED
ES P is Logic's attempt at a Juno 106 type synth. It's polyphonic with a set of mixable oscillators: triangle, saw, 3 rectangle waveforms and noise. It has a pitch and filter LFO modulation, with keytracking on the filter (available via the 1/3, 2/3 and 3/3 buttons). There's a filter envelope and the filter cutoff can be modulated by the main envelope or volume. It has overdrive and chorus as master effects.
ES P aliases a good bit and sounds a bit dirty. It's probably the bare minimum that I'd consider for a 'useful' synth. It's capable of some nice classic rich pad sounds and simple thick basses. Despite how awful the GUI is, it's one of the more usable non-vectorized simple synths in Logic.
Just enough to get by.
ES1
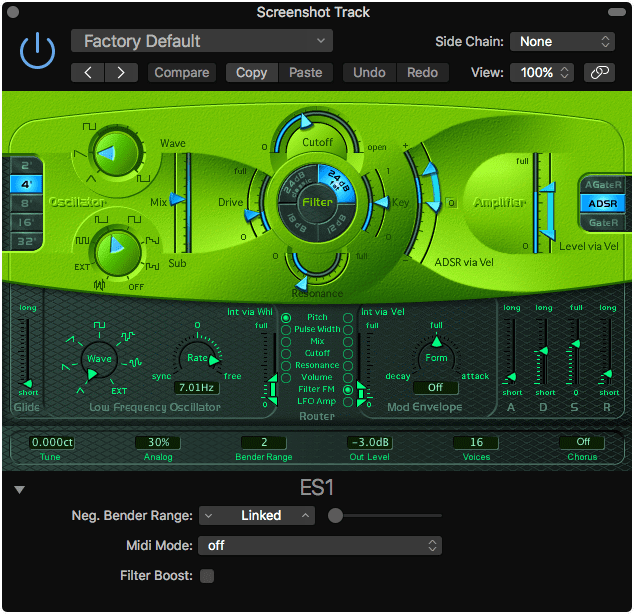
10.4 - NOT VECTORIZED
The lime green synth. ES1 is a virtual analog subtractive synth. It offers a single variable shape oscillator with a sub. The sub oscillator can be side-chained from any Logic track to allow you to mix in another signal. It offers as many voices as your computer can handle with 4 filter types with keytracking and overdrive. It has a single assignable LFO and a single assignable modulation envelope. Those little triangle faders in the GUI let you control how much the modwheel influences the LFO and how much velocity influences the mod envelope. The output section has 2 choruses and an ensemble mode like ES E.
A somewhat notable feature of ES1 is the 'analog' setting. 'Analog' introduces pitch drift for each note along with a small modulation of the filter cutoff frequency. It can be a rather pleasing effect even if it's not a very convincing emulation of how real analog synths work.
The filters in ES1 sound pretty decent, and they allow self-oscillation. When the filter is at very high resonance, the sub set to 'off' and sub mix set to full sub; the filter becomes an oscillator. Abuse of the filter envelope modulation and LFO allow you to create some sci-fi like effects and a few classic oscillating filter sounds. Unfortunately this is a separate mode, and the filter won't self-oscillate with the main oscillator on, so you are limited to 'filter only' sounds.
ES 1 aliases a good bit. The filter oscillation and filter FM modes can lead to some very dirty digital sounds. If you expect ES1 to give you the key the analog heaven, then I think you will be disappointed. As a simple digital VA it's good enough, but very replaceable.
EXS24
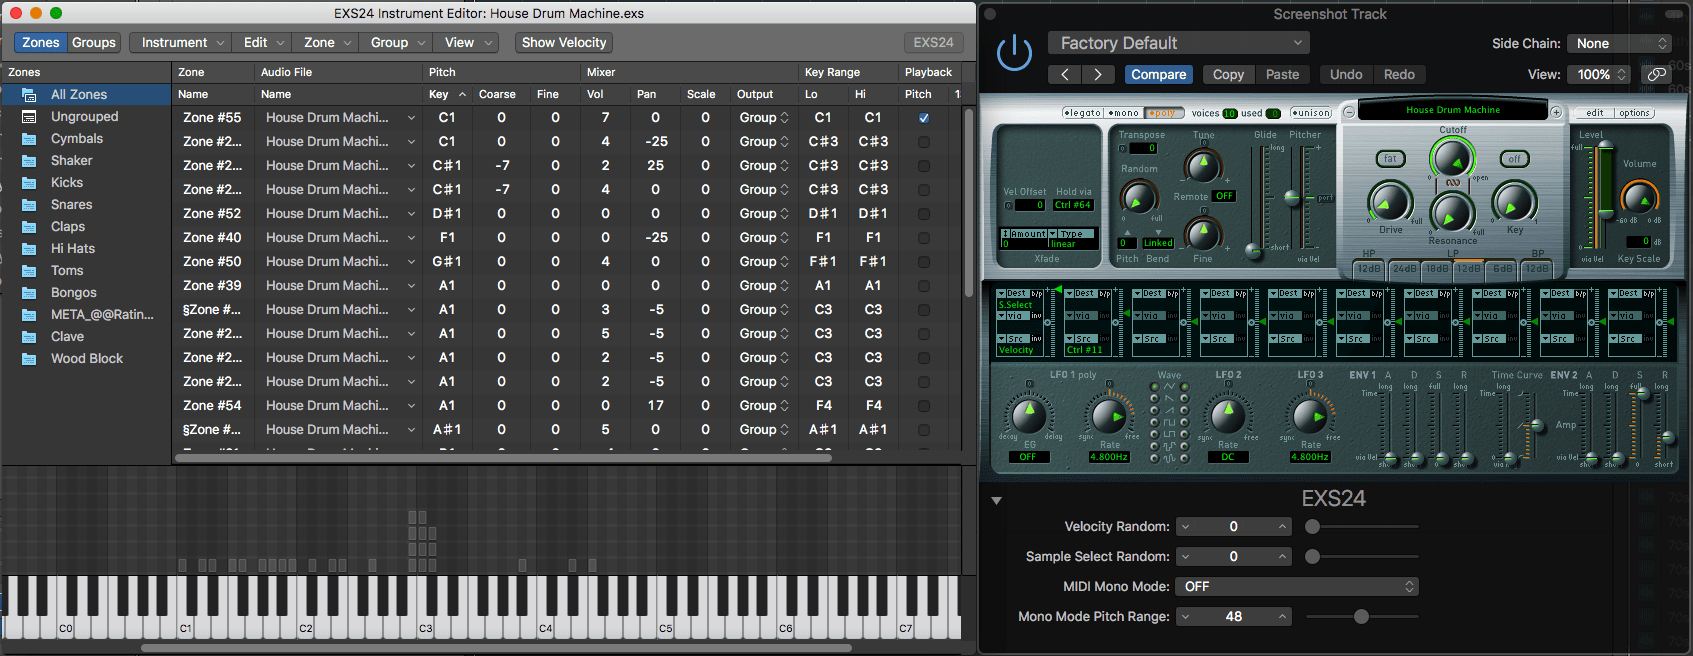
10.4 - PARTIALLY NOT VECTORIZED. Editor is a standard window, but the parameter window is not.
EXS24 is a monster. It's a very powerful sampler with a terrible GUI.
I have this issue when writing these reviews; the more powerful the synth is, the less I want to write about it. There's just so much to write that it would drive me crazy trying to cover everything. This is where I say something like "Read the Manual", because I rather you take advantage of all the excellent documentation that Apple provides.
That said... EXS24 is easily the best included DAW sampler. It's not the best sampler, but it's pretty close. Most of Logic's sampled instruments like Studio Horns, Studio Strings and Vintage Mellotron are powered under-the-hood by EXS24. I have a suspicion that this is true for Drum Kit Designer as well, but I have no proof of this.
EXS24 supports multisampling, multivelocity, AHDSR per sample, filter per sample, key down/up triggers, voice limits, sample key ranges, sample mapping via filename, integrated sample opening in the sample editor, multiple formats (exs, gigasampler, dls, soundfont), assignable articulations, round-robin sample playback, output groups and more.
Let's not forget as well all the content Logic offers, much of which is presented via ESX24.
The parameter window, the window that you see when you open ESX24 is pretty ugly, but it offers you similar modulation and parameter adjustment to ES 2. In fact both the parameter and edit window are somewhat of a let down for the power that's offered.
The big issue with EXS24 is that it lies in an uncomfortable middle ground. It's neither simple enough to be what an 'average' user wants, nor does it offer the features necessary for complex ultra-realistic sample libraries. Conceptually EXS24 is fantastic, but once you begin trying to use it for general music creation it becomes bothersome to interact with. It also lacks the power and the breadth of user base as a popular third party sampler, so it's not particularly common for companies to target EXS24 with their sample library products.
Hopefully in the near future EXS24 will be updated to become easier to use for the average musician, or have some more powerful features integrated like scripting. Until then I have to consider it 'sufficient', solely resting on the back of the content that Logic provides.
External Instrument
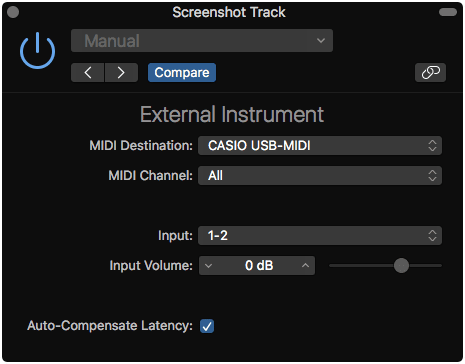
External Instrument allows you to send out MIDI, and return audio back to the External Instrument plugin. Why? So you can control external synthesizers.
It does have automatic latency compensation, which works pretty well. I've found it to be a few milliseconds off, but consistently so. It's not too difficult to adjust this manually after the fact. It doesn't have any method to manually specify the amount of compensation.
There is no facility to optionally send midi clock. There's no program change management built-in.
It's simple. It works mostly. good enough... I guess.
Klopfgeist
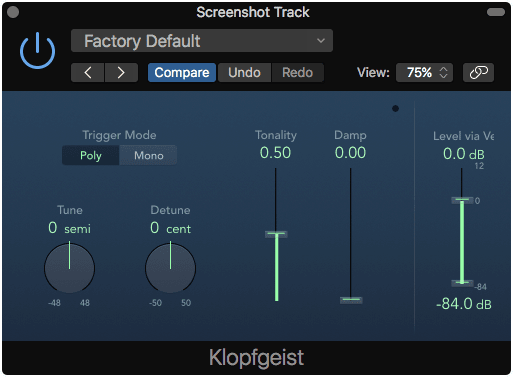
This is what generates Logic's click. (It's a german word referring to a mythical ghost that knocks on the walls, but now usually used to mean 'poltergeist').
It's just a bloop sound with adjustable pitch, tone and damping. I like that it's more configurable than most DAW metronomes, and I also like that the click track is an actual track with an assignable instrument. However that's a Logic design feature, and not that of Klopfgeist.
Sufficient.
Retro Synth
Retro Synth offers a set of variable shape oscillators with shape modulation, or wavetable oscillators or simple FM. There's 8 low pass filter types, 4 bandpass, 4 highpass and 2 (BR 6db Creamy and Peak Creamy). It has a single LFO, an independent filter envelope and your common amp envelope.
There's an optional flanger or chorus master effect. It also has unison mode ("Voice Stacking") in the settings along with spread and detune settings for the unison.
Retro Synth doesn't offer much for fancy features. The sync mode is simple, the wavetable mode doesn't have any assignable modulations and the FM is a single carrier and modulator. Retrosynth does allow 4 external MIDI controller mappings to parameters, but no internal modulation to the via the LFO. It's a shame too, because Retro Synth could be a fun synth with a decent modulation router. At that point though, you basically end up with an updated ES 2.
How does Retro Synth sound? Ok. The oscillators lack some harmonic complexity and there's a good bit of aliasing present that rears its ugly head with any screaming leads or high pitched noises. Retro Synth does do a good job of offering a 'classic' style subtractive synthesizer (subtractive, M1 and DX7 are implied), and the simplicity does make it usable.
Retro Synth just falls short on sound for me. It lacks the features necessary for make up for it too. At least an integrated overdrive or some really aggressive filter types would be nice.
Flawed Instruments
EFM1
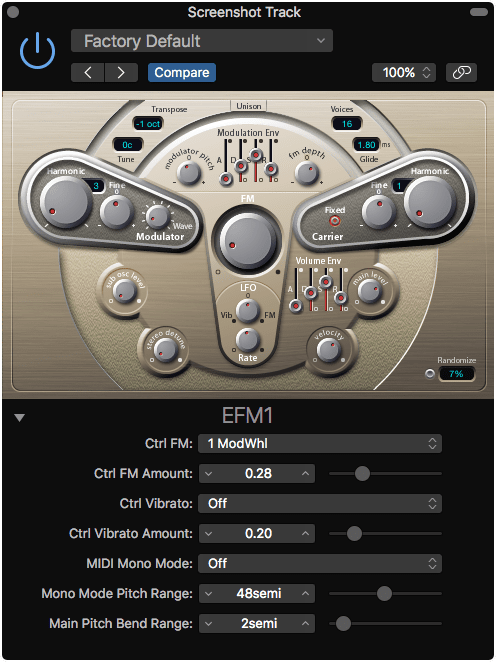
10.4 - NOT VECTORIZED
EFM1 is an FM synth with a synth carrier and a single modulator. The carrier is a sine wave and the modulator is one of many various waveforms determined by the modulator' knob. The amount of modulation has its own envelope that can be inverted and scaled. There's an LFO to modulate pitch or the FM amount. EFM1 has a sine sub oscillator and a unison mode which stacks 2 voices for each incoming note. The carrier oscillator can be disconnected from the incoming midi note by pressing the 'Fixed' button, which is nice for drum sounds.
The only real notable feature here is the randomize button that allows you to scale all of the parameters by a %.
EFM is a very simple synth. It's capable of some interesting sounds, however the GUI is just atrocious. Totally atrocious. It's tiny, difficult to read and the layout doesn't properly communicate the signal flow. Even it's capable of some useful sounds, it's just not worth using most of the time outside of grabbing a preset.
ES E
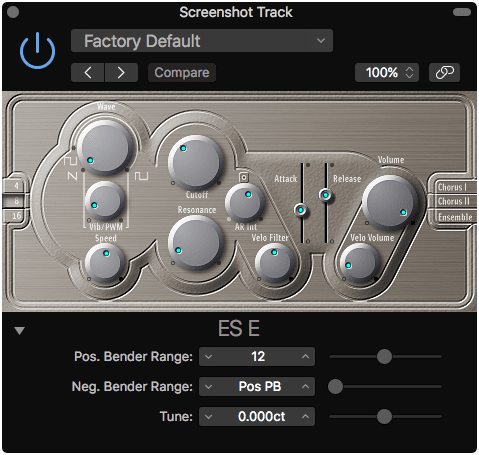
10.4 - NOT VECTORIZED
ES E is a very simple subtractive synthesizer. It has a saw or variable rectangle oscillator (with PWM). There's a filter. There's a very simple envelope. There's a chorus and ensemble effect on the output with no adjustment parameters. The filter can be modulated by the master envelope.
That's about it. The GUI is awful. Very little contrast and tiny. The oscillators alias like crazy.
I see no reason to ever use this.
ES M
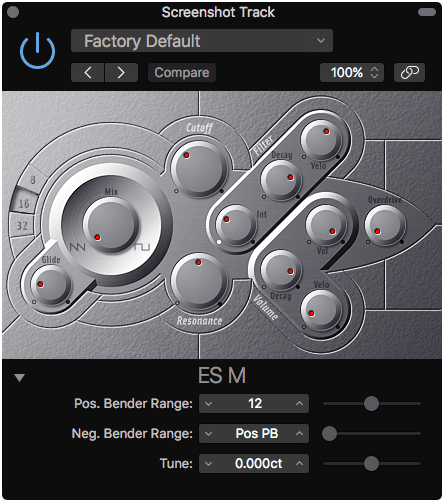
10.4 - NOT VECTORIZED
ES M is another subtractive synth, except it's limited to monophonic sounds. The only 'benefits' that it has over ES E is an overdrive section and portamento (glide).
Aliasing. Ugly GUI. You know the drill. Buzz. Next please.
Vintage Mellotron
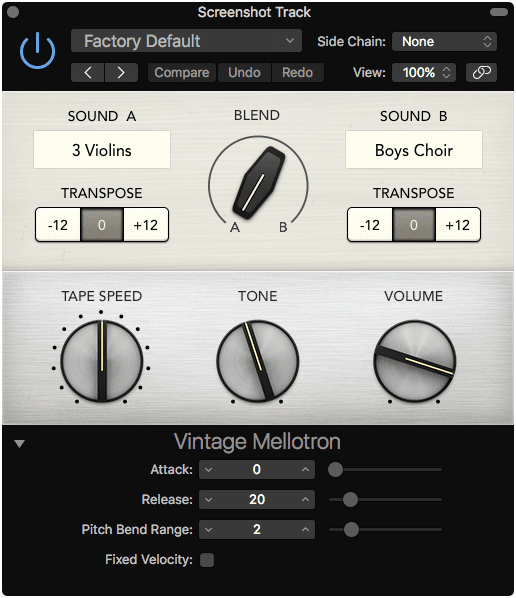
The Mellotron is a rather unique instrument. It's a tape machine connected to a keyboard. It's a bunch of tape machines connected to a keyboard. It's the sound of the late 60s in box.
Vintage Mellotron is an EXS24 instrument with a nice face. You get the following cartridges:
- 3 Violins
- String Section
- Cello
- Flute
- 8 Choir
- Male Choir
- Female Choir
- Boys Choir
- Brass
- GC 3 Brass
From there you have 2 'sounds' that you can blend between. Each sound can be transposed up/down an octave, and blended between the 2. There's a global tape speed and tone control.
I have not used a real Mellotron long enough to comment on the authenticity of this. It's certainly not dirty sounding enough compared to the Mellotron I played with a few times. Vintage Mellotron does sound alright, but it offers nothing that I associate with an authentic Mellotron sound. That subtle wow, the dirt, that saturated sound that you just can't avoid.
I really don't see this as a sufficient replacement for a Mellotron, and frankly I don't think I'd be able to pick it out from a cheap sample pack. Perhaps that's my deficiency, but I just don't 'get it' with this one.
MIDI Effects
Arpeggiator
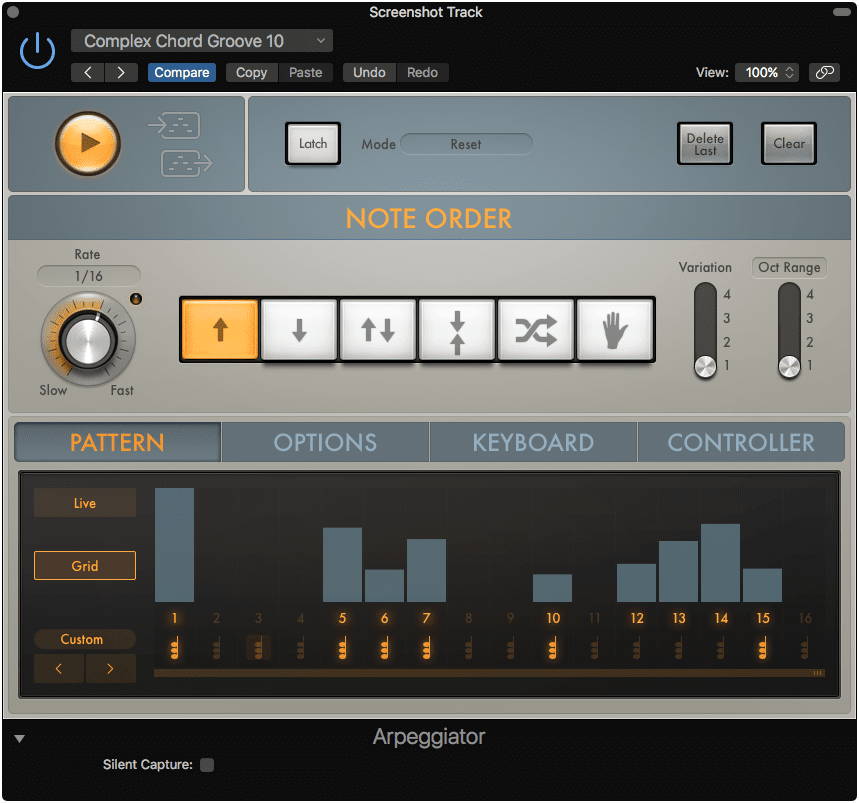
Arpeggiator is a midi effect that takes the currently held notes and then sequences them. The notable features from your 'typical' arpeggiator are:
- Latch - Latch lets you press the keys and let go, while the effect continues to cycle notes. Latch has multiple modes:
- Transpose - first you input a chord, then each subsequent single key press transposes that chord.
- Gated transpose - similar to transpose but only works while the key is held down
- Add - each pressed note is added to end of the sequence. 'Delete Last' and 'Clear' keys work here.
- Add Temporarily - the first chord pressed sets the 'chord'. Then any subsequent keypresses are added to the chord while the key is held down.
- Pattern - allows you to sequence the length and velocity of each step. The grid mode also allows you to sequence the current full chord in to the pattern which is a neat effect.
- Key and Scale snap - input can be snapped to key
- Keyboard split - the keyboard can be split in to 2 sections: remote and arpeggio. The remote selection allows you to control the arpeggiator by pressing note keys, and the portion of the keyboard that responds to notes can be set. Nearly the entire interface is controllable by midi notes in this manner.
- 4 assignable MIDI controls
Arpeggiator is a fantastic effect, with some rather useful functions. The pattern sequencer's 'chord' buttons are particularly useful for creating drum patterns since it allows all of the held notes to be played at the same time. Creating fairly complex drumbeats is surprisingly simple once you become used to using the grid pattern grid mode.
Chord Trigger
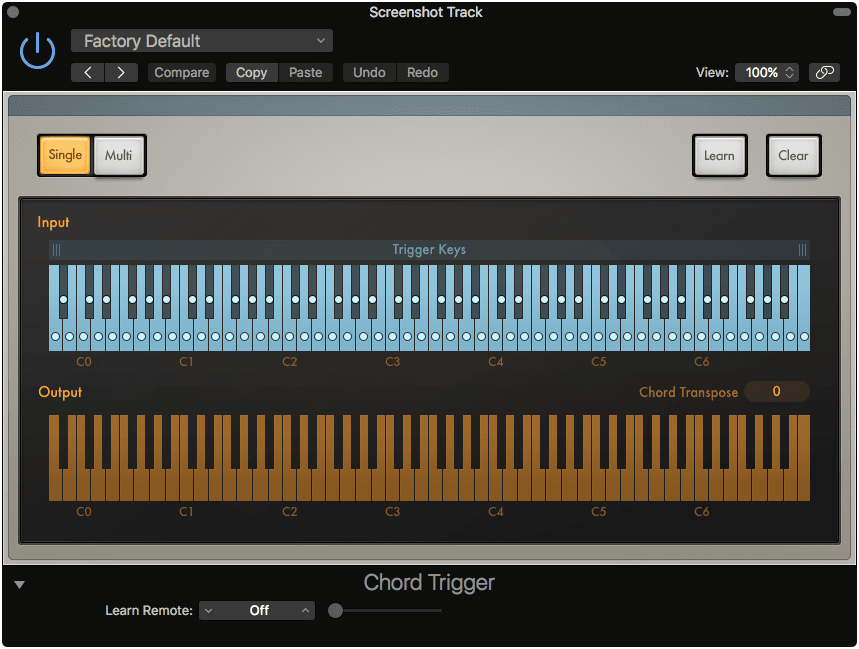
Chord Trigger is surprisingly bare considering what it offers. Chord trigger allows you to assign a full chord to a single key.
You press the 'learn' button, press a chord and you're done. When you press a key in the future, that chord will play. If you click 'multi' mode then you can assign a different chord to each key.
Surprisingly straightforward, but exceptionally useful. A notable use is to better simulate voicings that other instruments use, such as guitar chords.
Modifier
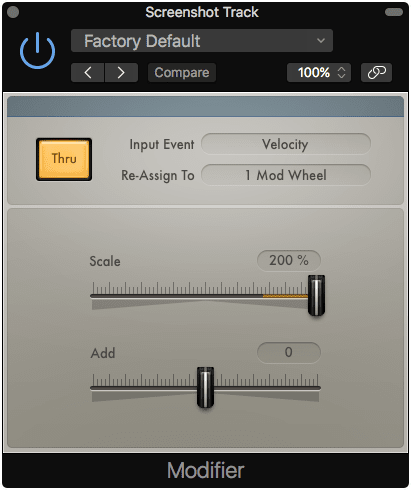
Modifier allows you to scale or add/subtract values from an input MIDI cc, and optionally re-assign it. That's it.
Modulator
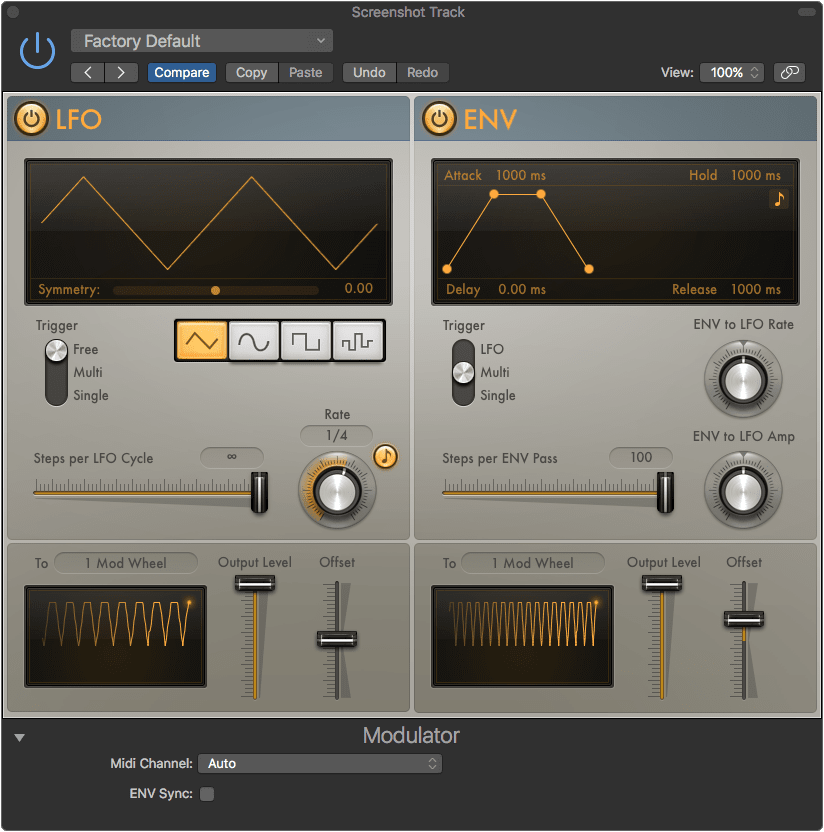
Modulator gives you a plain LFO and a note-triggered envelope that you can assign to MIDI CC or synth parameters. Modulator can even be used to modulate plugin parameters on instrument tracks using the 'Learn Plug-in Parameter' menu from the 'To' section of the modulator.
Bonus Tip!
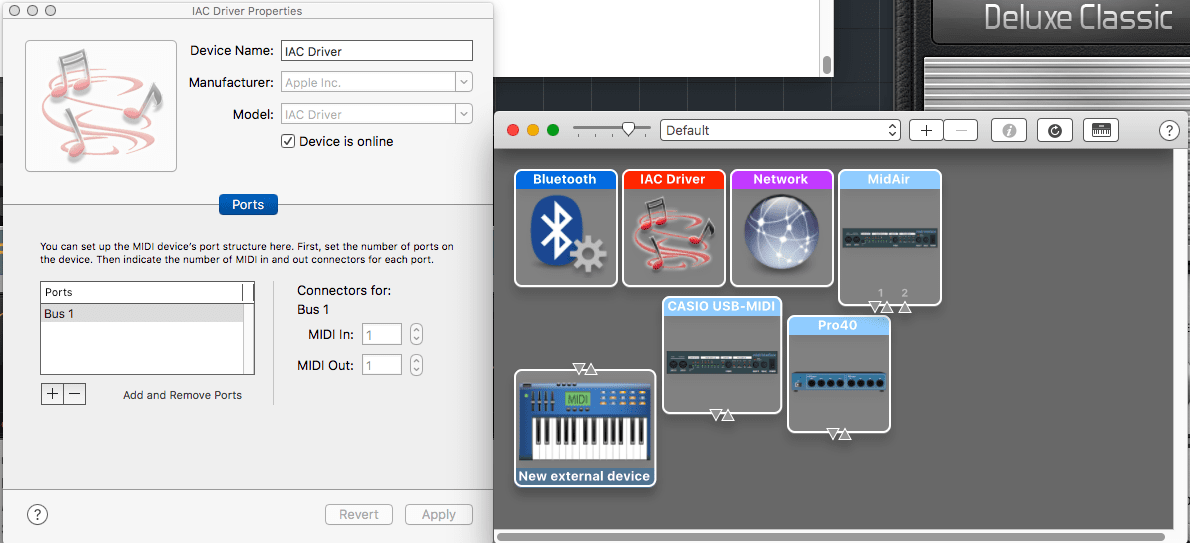
You can use the Modulator to control FX on any track. This requires using the IAC facility of your Mac. Here's the instructions:
- Open Audio Midi Setup.app
Window->Show MIDI Studio- Double click 'IAC Driver'
- Check 'Device is online'
- Add at least 1 bus
Now in Logic:
- Create a new Software Instrument track
- Add Modulator
- Assign the modulation section to a MIDI CC (like CC 1)
- Insert
Utility->External Instrumentas the instrument - Route the instrument to the IAC bus.
Now in your Effect:
- Use Logic's midi mapping (command-L) to map from the IAC bus to the parameter that you wish to control. I suggest using the easy view, moving the control to modulate and then pressing 'Learn'.
You may need to become more familiar with the 'Expert View' in the 'Controller Assignments' window so that you know how to target device->mapping. Otherwise everytime you try to map something that IAC device will be outputting info and overtake your map! You may also need to use a new IAC bus for each mapping.
It's not particularly practical, but it is possible. It's also a good way to learn about some of the native capabilities of macOS and Logic!
Extra Guacamole! This also means you can use modulator to control effects in other DAWs if you wanted ;) You also may have keenly realized this is a great way to send MIDI data between any two programs... it is.
Note Repeater
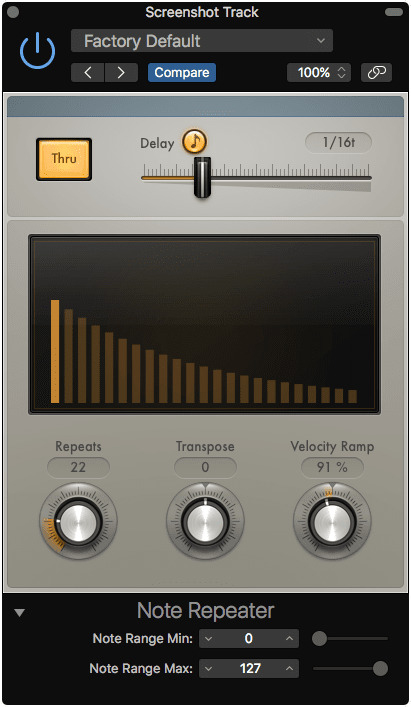
It repeats notes.
You can assign the number of repeats, the speed of the repeats and transpose each successive repeat by a specified number of semitones.
Some very fun effects are possible with the transpose parameter.
Randomizer
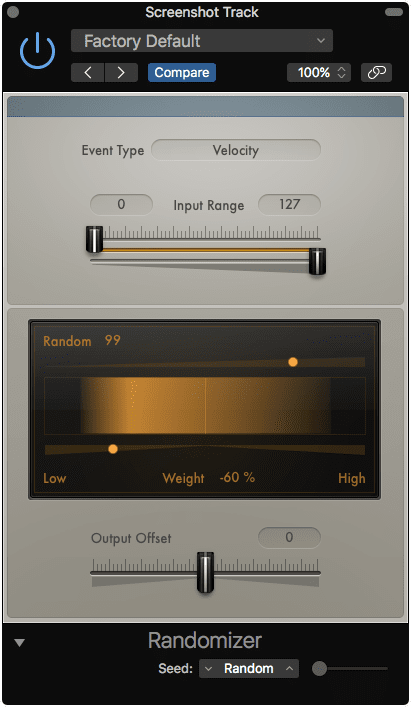
Randomizer randomizes MIDI data. You can constrain the range and weight the randomization towards a specific range. The randomized parameter can be offset +/- as well.
Velocity, Note number, aftertouch, poly aftertouch, tuning, pitch bend and MIDI CC are available.
A particularly useful feature is that the randomization seed can be selected. This allows you to have predictable randomization so that each playback contains the same information.
Scripter
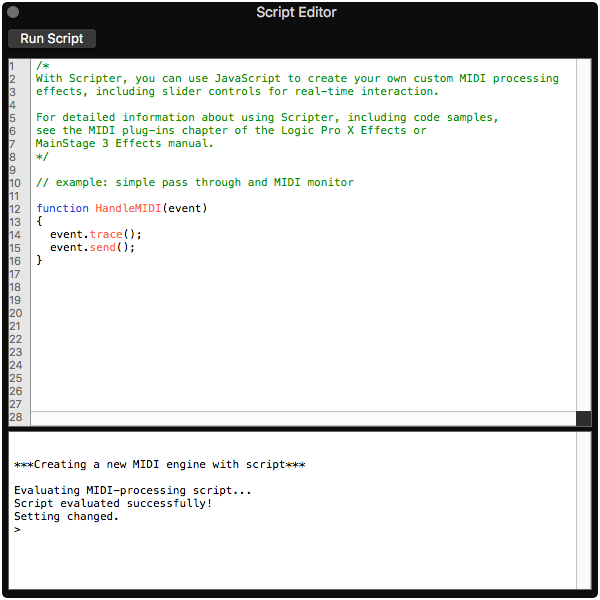
Scripter lets you script your own complex MIDI filters or generators using javascript. The capabilities are nearly endless, rtfm.
There are quite a few scripts out there like the Logic scripts website. Browse it and see all the things that are possible, and don't forget the IAC trick
Transposer
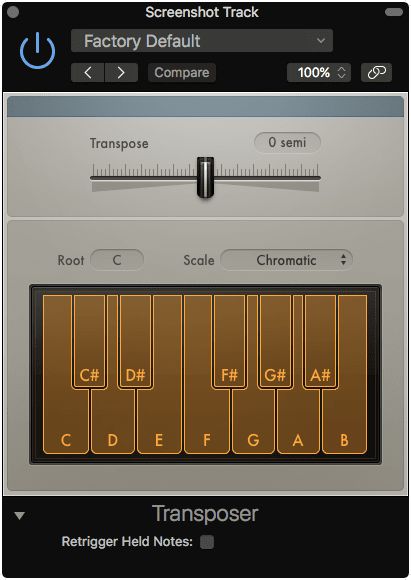
Transposer lets you transpose by a fixed number of semitones and constrain to scale/key.
Something that I do dislike about this processor is that it always transposes 'down' for the scale mode. If you want C# to transpose to D, then you are out of luck. The Scripter comes to the rescue though!
Velocity Processor
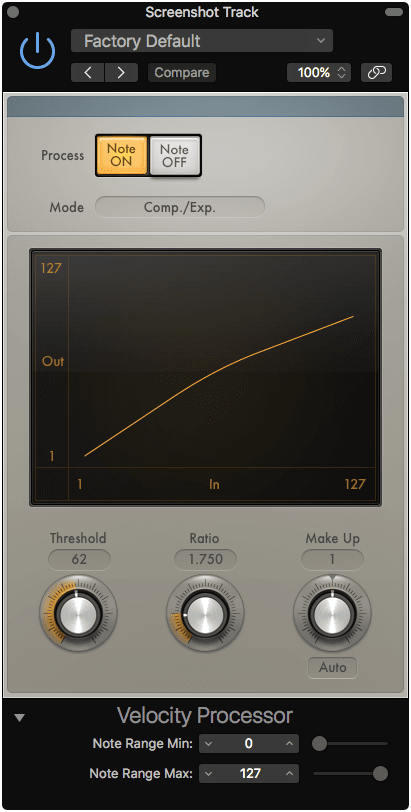
Velocity Processor is a compressor for midi velocity! It has threshold/ratio and makeup gain just like a normal compressor.
There's also a mode to 'set value' for velocity or to constrain to a range. An Add/Scale mode exists as well.
Conclusion
Overall rating:
Logic's instruments are mostly great. Sufficient capability exists to create nearly any music you'd like, though you may find yourself wanting more authentic options from third-parties in some cases.
A wart on Logic's selection is the awful GUIs that many of the instruments have. There's quite a few that I wanted to mark as 'Flawed' simply for how unpleasant of a visual experience they are. I overcame this bias and tried to rate the instruments based on their capabilities and sound instead.
I would prefer if there was some more authentic vintage options, especially a better vintage subtractive than what Retro Synth offers. I don't think that most people would be particularly unhappy with the selection though.
It's impossible to find a better DAW value for instruments. Products like Reason and Ableton Live Suite offer comparable selections of instruments, minus Alchemy, but they cost more and also pale in comparison to Logic's general selection of features.
The total rating is basically a 75 because of the awful GUIs, despite the functionality, but 15 extra points because Alchemy is so awesome. If Alchemy was the only thing that Logic came with then it'd still be a 90, maybe higher.
Support Me!
This post took 15 hours to research, photograph, write and edit. If you appreciate the information presented then please consider joining patreon or donating!
If you appreciate the information presented then please consider joining Patreon or donating money/time.
