Logic 10.4 is out with a LOT of changes. There’s new plugins too! Of course these are added 2 days after my Logic effects review that I spent so much time on.
So today I’m going to cover 3 of my favorite features in the new update, and the new plugins. When this post is live the Logic effects review will be updated as well. I’ve added some extra commentary to Logic effects review and adjusted a couple ratings as well.
There’s a lot of new awesome things in the FREE update, but there’s plenty of places you can learn about the update itself in great detail. I’m just going to go over a few things that I think are extra cool. So what am I covering today?
- Features
- Mixer and Plugin undo
- Articulation management
- Smart Tempo
- Plugins
- Chromaverb
- PhatFX
- StepFX
- Vintage Console EQ
- Vintage Graphic EQ
- Vintage Tube EQ
Parts in this series:
- Cool things in Logic Pro X Part 1
- Cool things in Logic Pro X Part 2
- Cool things in Logic Pro X Part 3
- Cool things in Logic Pro X Part 4
- Cool things in Logic Pro X Part 5
- Logic Pro X Tips & Tricks and more cool things
- Logic Effects Review
- Cool things in Logic Pro X Part 10.4
- Logic Instruments and MIDI Effects Review
- Things I hate about Logic Pro X and Conclusion!
Contents
Mixer and Plugin Undo
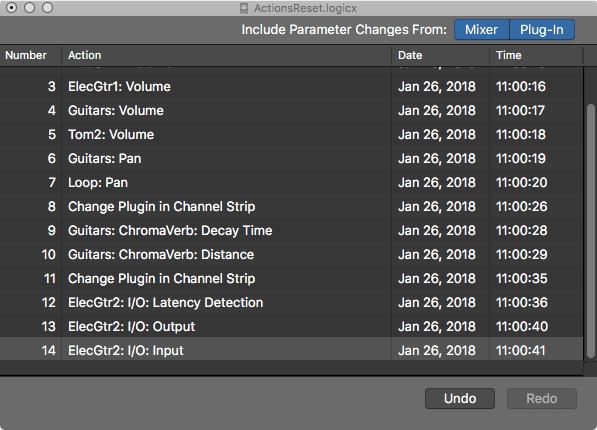
Mixer undo. Plugin undo. 3 separate stacks or one.
Now in Logic 10.4 all Mixer actions and all Plugin actions are undoable. For some DAW users this is quite a yawn, but like many things Logic goes a step further and does it better.
- The mixer has its own undo stack - This means that it’s possible to undo only mixer actions by using the ‘Mixer Undo’ command, or the
Editmenu in the mixer. Mixer actions can be undone without affecting arrangement or plugins if desired. - Every plugin has its own undo stack - In plugin windows there are now ‘Undo’ and ‘Redo’ buttons. There is a new ‘Plug-in Undo’ command as well. Every plugin has its own undo stack, so you can easily undo/redo to a specific plugin at will.
- All 3 undo stacks can be integrated - Look in the picture above in the upper right corner. This window is the ‘Undo History’ window (
Edit->Undo History). The main undo stack can include Mixer and Plug-in actions. This gives you a totally linear project history, so that pressing command-z will revert your project in the order that you modified the project. Plug-in and Mixer settings all get undone linearly.
Plenty of DAWs have mixer undo and/or plugin undo. I don’t know of any product that gives you this granularity of control over what is undone and when.
Assign commands
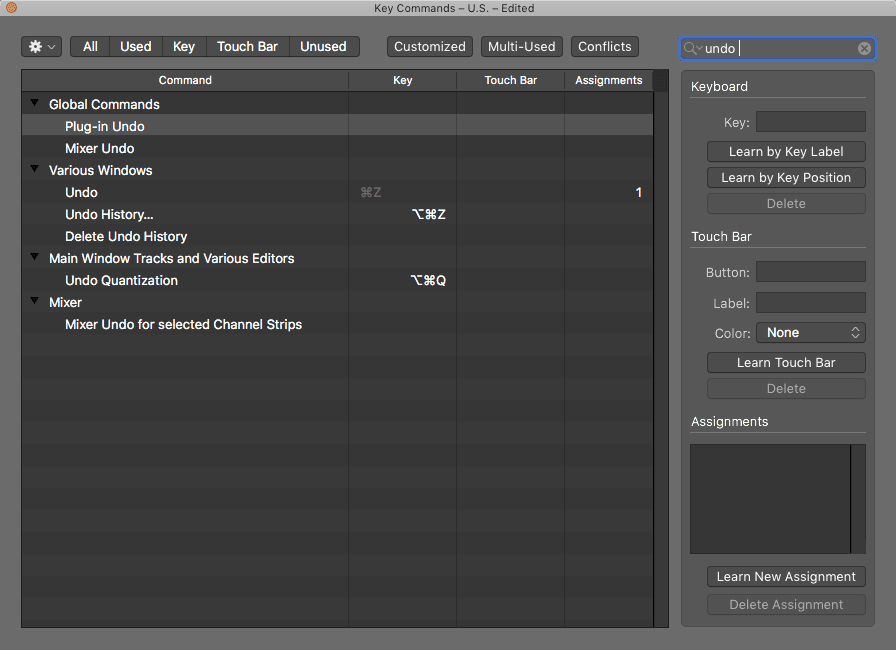
By default there are no keyboard mappings for Mixer undo/redo or for Plug-in undo/redo. I strongly suggest opening up the Key Commands->Edit window and adding your own mappings for these.
The ability to undo/redo only Mixer or only plugin actions is fantastic. Don’t let this pass you by!
Articulation management

Many sample libraries use MIDI data such as notes/channel/CC to trigger changes in the timber and expression of an instrument. Perhaps that doesn’t sound too bad, but the problem is that manage a bunch of C0, D#1, F#-1 in your midi can become rather cumbersome. Midi transform events change them. It’s difficult to remember what is what. It’s difficult to make sure they correspond to the correct parts. Overall it’s just a mess.
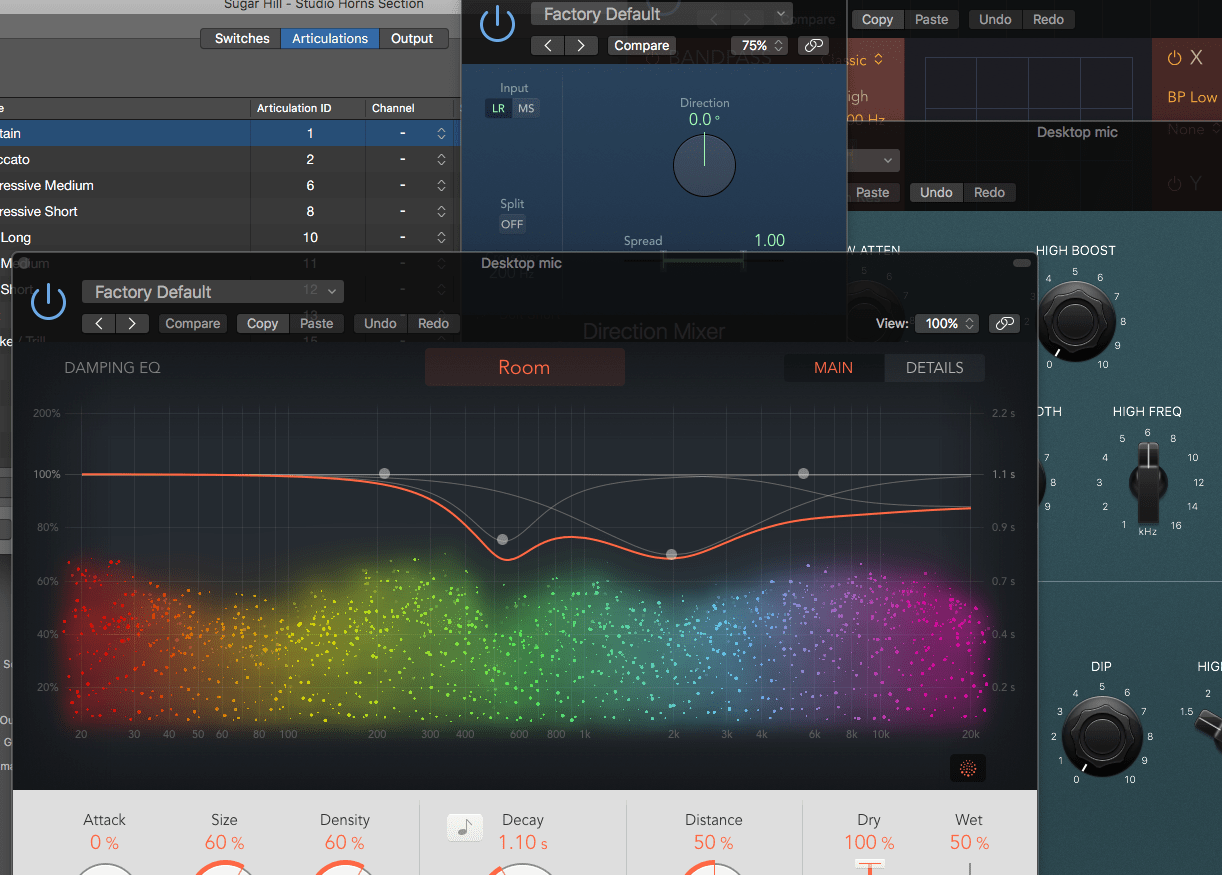
Enter Logic 10.4. The new version of Logic gives you native management of articulations. You can create new articulation sets by clicking Articulation Set->Edit in the track insepector under the ‘Track’ area. I’ve highlighted this area in the image above with a yellow underline.
From there you have the articulation editing window. I suggest checking the manual for more detailed information, but the gist of it is this:
- Switches - This is where you assign MIDI data to trigger Articulation. There is a lot of functionality here, so I suggest once again checking the manual for more information on what is possible. These are mappings of MIDI->Articulation ID. This window is only appropriate for when the instrument supports Articulation IDs.
- Articulations - Articulations are what you see in the Editor, Event List and Smart Controls. These are either used as-is if the instrument supports Articulation IDs, or mapped via the Output window
- Output - Many third-party instruments don’t support ‘Articulation IDs’, so you need to map articulations to specific midi data. This is where you map Articulations to specific MIDI for output.
Notes in the Editor can be assigned articulations via the ‘Articulation’ dropdown, which I’ve underlined in red. Multiple notes can have articulations set at once, or single notes.
Notes in the Event List (upper right in the image) can have articulations assigned. First you need to go to View->Articulation to make the column visible. Then you can adjust the articulation for each specific event in the column I’ve underlined in purple.
Keyswitches also are shown in the ‘Smart Controls’ window now, which isn’t show above. This gives quick access to key switches via the mouse or other input methods.
This is quite a different method of working compared to Cubase’s Expression Maps. The new Articulation support is a great step forward.
Smart Tempo
Logic Guru Eli Krantzberg has a video shown above explaining how Smart Tempo works. (make sure you check out his awesome groove3 content. It’s worth the price)
Basically what this allows you to do is easily conform project tempo to audio, or audio to project tempo. If you watch the video above then you can see how this is fairly unique and interesting.
However, one of the more notable things, based on complaints I’ve heard from users, is that with the ‘Smart Tempo - Adapt’ setting turned on; previewed loops automatically conform to project tempo.
To use this feature there’s 2 things you need to be aware of:
Project Settings->Smart Tempo- settings that affect when/how Smart Tempo is active- Under the tempo in transport - This is where you can easily access smart tempo settings. You will see the word ‘Keep’, ‘Adapt’ or ‘Auto’. You can change the smart tempo mode as necessary here.
So how well does smart tempo work? REALLY WELL. I’m amazed at how well it works…
File Tempo Editor
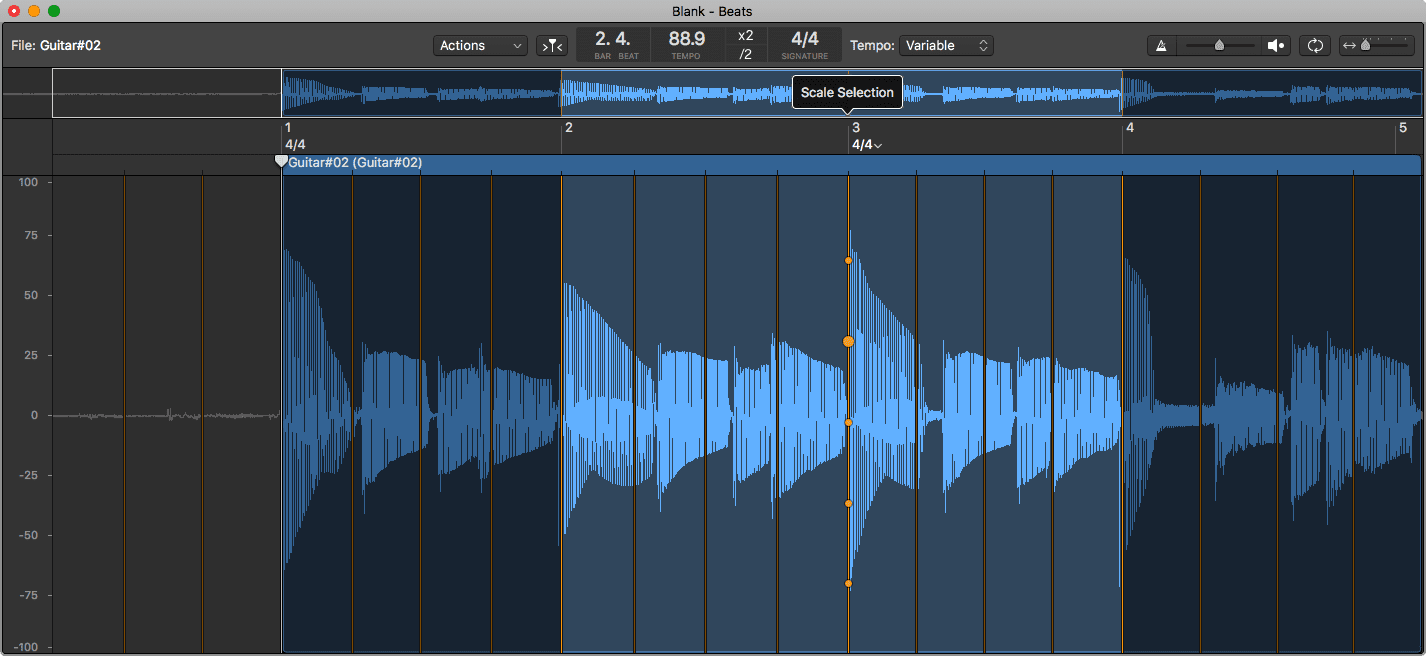
This new window in the editor is a big reason why it works so well. You can freely edit how Logic maps the tempo to your audio.
The file is analyzed, then you can adjust how the beats/bars are mapped. Each marker has 6 handles that allow you to:
- Set Downbeat - Set the downbeat to that marker. This only works on the beats.
- Move Marker - Move one marker without changing anything to the left/right
- Scale Selection - Scale all beat markers between the adjacent downbeats
- Scale Left, Move Right - Scale the current marker with the leftmost downbeat being an anchor. Everything to the right is moved. This only works on downbeats.
- Scale All - Scale everything. Essentially widening or narrowing the beats.
- Move All - Moves all markers together.
The net result is that mapping the tempo to an audio file is easy and fast. The basic workflow is to set your downbeats to match downbeats in the audio, then possibly scale the beats themselves. I’ve worked with a number of various audio sources, and with even the most drug-fueled rubato I was able to map the tempo accurately and quickly.
Once everything is mapped you have 3 options in the actions window:
- Adapt Project Tempo to Region Tempo and Align to Downbeat
- Adapt Project Tempo and All Regions to Region Tempo and Downbeat
- Adapt Region Tempo to Project Tempo and Align to Downbeat
These options are fairly self-explanatory.
I don’t know of any DAW that has such an easy-to-use and effective tempo mapping tool, let alone mentioning the native integration with the DAW itself. Very cool. This is a legit exciting feature for almost anyone.
Effects
Chromaverb
ChromaVerb is Logic’s new reverb. This apparently is a replacement for PlatinumVerb, since PlatinumVerb is now relegated to the ‘Legacy’ effects folder.
Is ChromaVerb any good? YES. It’s awesome. It superficially bears resemblance to Fabfilter Pro-R due to the fact that you can adjust frequency specific decay, but there’s more here.
ChromaVerb offers 14 types of reverb algorithms. Each of those algorithms has the usual reverb controls: pre-delay, wet/dry, and decay. There’s a few extra cool features about it too:
- Main window cool stuff - select ‘Main’ in the upper right
- Attack - you can variable change the build time of the reverb.
- Pre-delay sync - pre-delay can be synced to project tempo and set to specific note values.
- Decay Sync - decay values can be synced to project tempo and set to specific note values.
- Freeze - the current sound can be infinitely reverberated inside the current algorithm. This is automatable!
- Details window cool stuff - select ‘Details’ in the upper right
- EQ - the wet signal of the reverb can be EQ’d with a version of ChannelEQ.
- Modulation - the late portion of the reverb signal can be modulated by sine, random and noise shapes which are smoothable.
- Early/Late mix - I discussed before why I like this. The balance between the early reflections and late reverb signal greatly influence how the reverb sounds. I generally use lots of early reflections when I’m trying to emulate normal sized spaces or just give a ‘sense’ of space to a sound, and I use more late reverb when I want to add texture to a sound or emulate very large spaces.
- Mono Maker - this parameter allows you to collapse the reverb to mono below a specific frequency. This can be very helpful when trying to use ChromaVerb on a signal that’s reliant on being firmly in the center channel for its impact. Very useful on snare drums.
Each algorithm has 2-4 damping bands on the ‘Main’ page. These bands are not an EQ. They change how damped that frequency area is in the reverb output. You can think of these like frequency specific decay controls.
Let’s also not forget that fancy display. You need a computer that supports Metal to see them (if you don’t, that’s why!), but it’s pretty fun. Unfortunately for me I have to turn it off because the colours are reversed to me. I don’t associate low frequencies with red and high with blue. It’s nearly the opposite, with some differences in the middle. I do not think that I have synesthesia, but considering how much this annoys me… maybe? (Really, it makes me feel angry to watch the display. Weird to experience.)
I already said ChromaVerb is AWESOME, but I’m going to say it again. Both from a usability standpoint, and from a sonic standpoint, ChromaVerb is my absolute favorite algorithmic Reverb in a DAW.
p.s. I know you can see the playhead in the upper left of that image. I found a bug in my video editor that made that looping movie take me an extra hour to make… so I’m not fixing it.
PhatFX
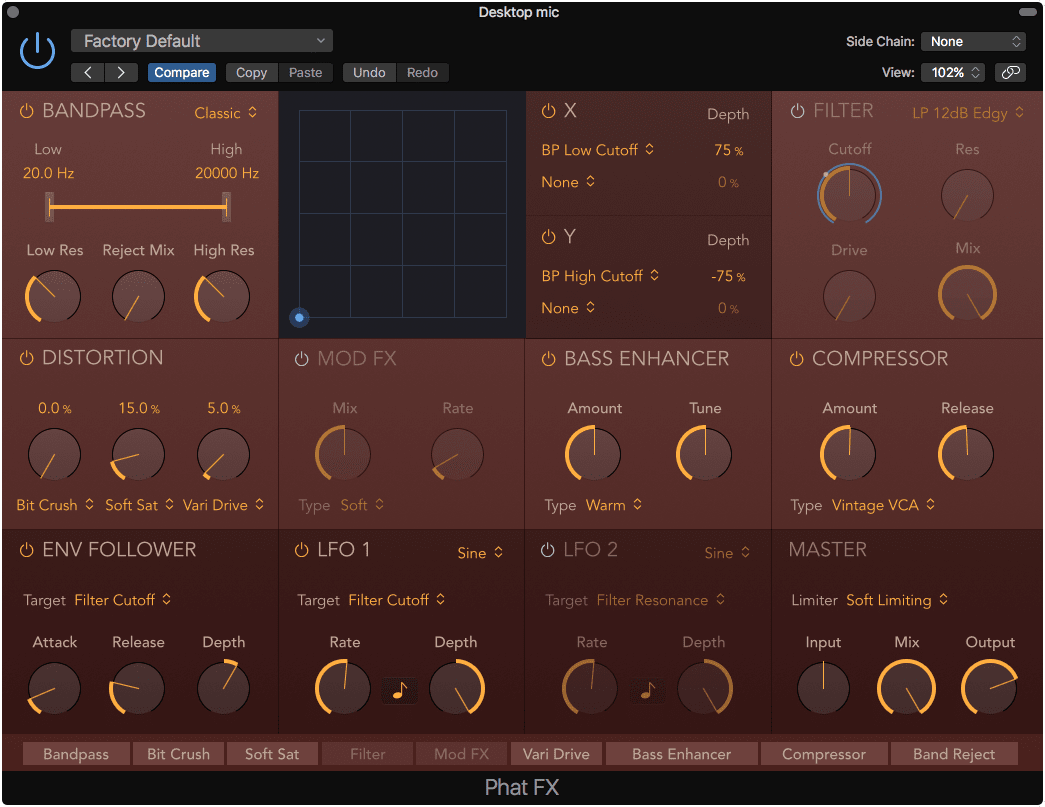
A long time ago in an audio world far far away, there was an effect called CamelPhat. Apple then purchased Camel Audio and there was much sadness until Alchemy was released, but CamelPhat was still missing.
Logic 10.4 brings “new” effect called PhatFX which is basically a new version of CamelPhat, but much better. PhatFX is a multi-effect with 9 effects and an assignable XY panel. The effects run in the order listed at the bottom of the GUI, but those little boxes can be dragged around to re-order them. Here’s what’s included:
- Bandpass - A filter that allows the selected frequencies to pass and nothing else. The high/low pass filters have resonance and the signal that’s filtered out can optionally be mixed back in as much as you want.
- XY Panel - The X and Y axes each can control the value of 2 parameters. The amount of this control, called depth, can have a positively or negatively correlated influence on the parameter. The X/Y values can be assigned to MIDI for easy control.
- Filter - filter offers HP/BP/LP filters with 8 modes each. There’s also selections for 3 types of comb filters, notch and peaking filters. Along with the filters there’s a ring modulator and extra distortions that can be used here. If you don’t need a filter, you can use this module as an extra distortion module.
- Distortion - 11 types of distortion cascaded 3 times.
- Mod FX - chorus like effects, 4 types.
- Bass enhancer - 4 types of bass enhancement.
- Compressor - 9 types of compression with the modes from Compressor included, though without all of the modes
- Modulation - 3 modulators that can be assigned to effects parameters. The amount of modulation is shown on the controller as a blue ring with a grey dot. Look at the ‘Filter Cutoff’ in the image above to see what the indicator looks like.
- Envelope follower - this takes the amplitude of the incoming signal and uses it as a modulator.
- LFO 1 - an LFO with sine, triange, ramp up/down, square, random hold and random glide modes. Can be synced to project tempo
- LFO 2 - another LFO like above.
- Master - 3 mode limiter with input/output gain controls for the whole effect and wet/dry mix.
So that’s a lot of stuff. Do you need to use all of that stuff? No. That’s the beauty of it! You can turn on or off as much as you want.
Do you want to just compress with very simple controls? Use the compressor. Do you want a selection of fun distortion modes? Just distort. Do you want some crazy filter modulation? Just enable the filter and use the modulators.
Personally I’m enamoured with the distortion modes provided when used in conjunction with the envelope follower. You can use the envelope follower to dynamically control the amount of distortion more dependent on the incoming volume than normal. You can also use this to mellow out the distortion on really loud parts, so it sounds gritty on softer parts but doesn’t become overbearing on louder parts (use the envelope follower with a negative depth!).
PhatFX is pretty awesome, and fun. In the last 24 hours I’ve found quite a few uses for it, including using it with ChromaVerb on an Aux to create some very lush reverb sounds.
StepFX
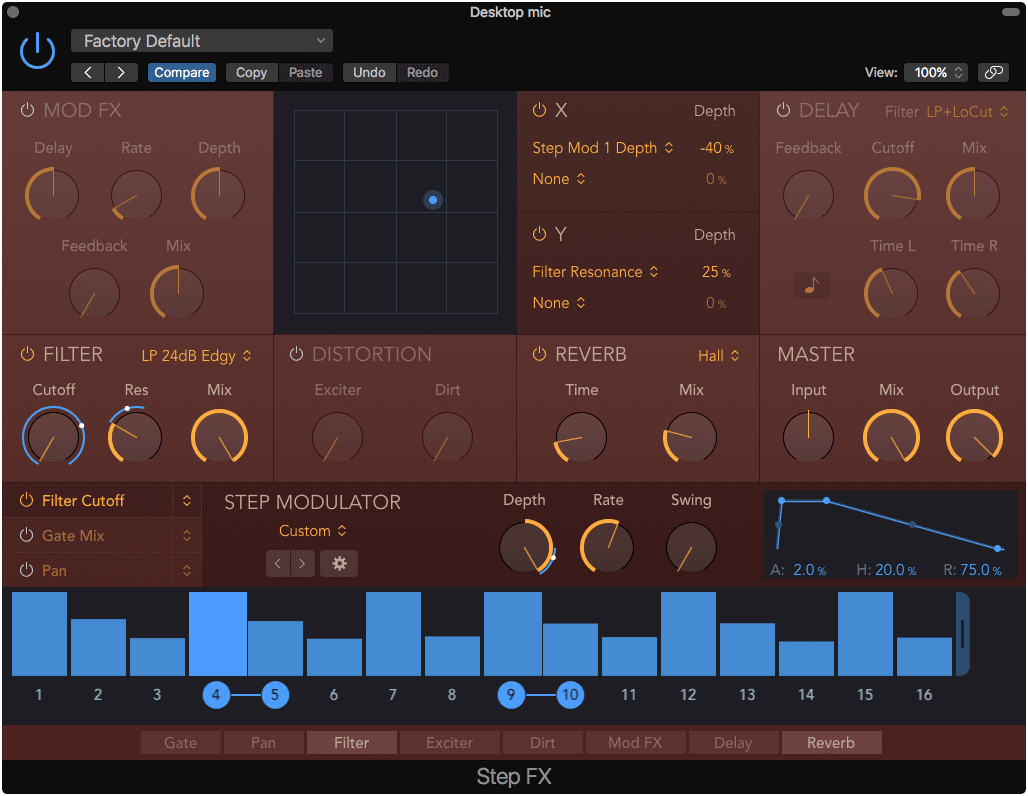
From the ashes of Camel Audio rises another new Logic Effect. StepFX is a new version of CamelSpace. It’s a sequencable multi-effect.
StepFX has 9 sections:
- Mod FX - a chorus effect.
- XY Panel - The X and Y axes each can control the value of 2 parameters. The amount of this control, called depth, can have a positively or negatively correlated influence on the parameter. The X/Y values can be assigned to MIDI for easy control.
- Delay - A delay with individual L/R control, tempo sync, and 4 filter types to act on the fedback signal.
- Filter - filter offers HP/BP/LP filters with 8 modes each. There’s also selections for 3 types of comb filters, notch and peaking filters. Along with the filters there’s a ring modulator and extra distortions that can be used here. If you don’t need a filter, you can use this module as an extra distortion module.
- Distortion - an exciter and ‘Dirt’ distortion.
- Reverb - a simple 9 mode reverb, one of which is ‘Reverse’
- Master - Input/Output gain with mix.
- Gate - a simple gate. No panel for this, it’s accessible as a one of the modulatable parameters as ‘Gate’ (remove signal on a step) or ‘Gate add’ (default to gated and open up on a step)
- Pan - L/R panning. No panel for this, it’s accessible as one of the modulable parameters as ‘Pan’
There’s one more panel: The Step Modulator. This is where the fun happens. There are 3 sequencers with up to 128(!!) steps each (drag the handle on the right of the rightmost step to add/remove steps). Steps can be enabled or disable by clicking their number. By default the steps are segmented, meaning that they turn on/off the parameter every single step, which makes a cool choppy sound sometimes. You can link steps by clicking the bar between the numbers that’s visible when you hover over it.
The steps have an adjustable envelope to change how the effect parameter is moved during the step time. There’s a global depth control, rate control and swing. Swing gives you that groovy galloping-like feel. There’s also an neat selection of preset step patterns under ‘Step Modulator’. You can quickly pull of different preset patterns or save your own for later recall (rather useful).
Just like PhatFX, the order of the modules is adjustable at the bottom.
StepFX is just plain fun. If you are a classical musician you may think that this is only for people doing crazy new modern genres with pre-sequenced effects, but no… it’s more useful than that. Subtle use of StepFX can be the difference between the sound of a virtual performer sitting in place statically playing, or blissfully interacting with their environment or instrument in a nearly inaudible way. It’s great on drum grooves to accent the offbeat a little more with some distortion, or perhaps to add your own subtle ghost-notes to a laid-back drum groove with the delay module.
StepFX is a creative tool that I’m sure you won’t use very often, but it’s nice to have when it’s there. This certainly falls in to the category of ‘things that I never knew I wanted’. It’s fantastic though.
Vintage Console EQ
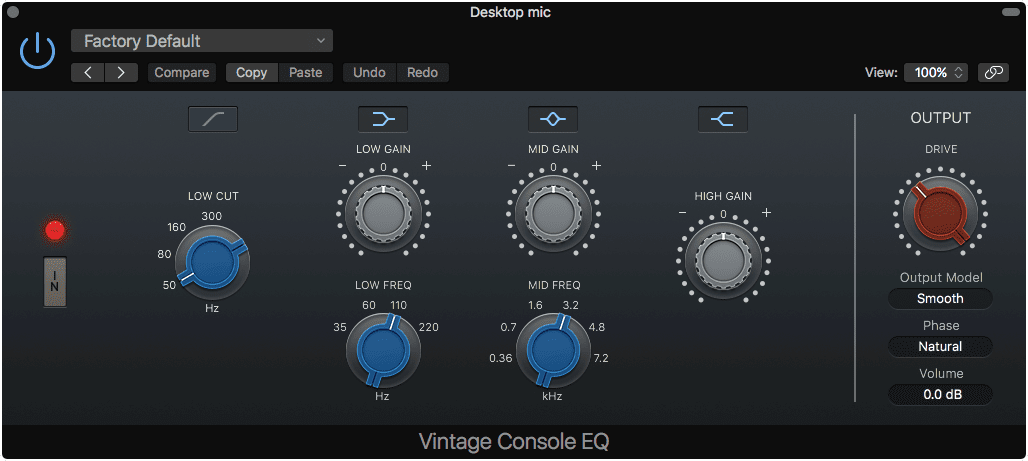
Vintage Console EQ is an EQ that’s inspired by the 1073 in the Neve A88 console. It has parametric bands with a low shelf, high shelf and high pass. You can select the output stage of the Console EQ, the Graphic EQ or the Tube EQ, which is a nice touch. You can also select between Natural and Linear Phase modes, which is weird. The original is not linear phase.
Does this EQ sound like an original Neve 1073? Not exactly, no. Does it work similarly? Yes.
Simply as a saturation box it’s a fantastic device in the ‘Smooth’ output model. Engaged on the track with no EQ active gives you some nice harmonic colouration. The output drive can be increased to give you some really dirty sounds.
As an EQ it’s not the most precise processor. The low cut is only 18db/oct, the Q of the mid gain is quite wide and so is the low shelf. Used as a tone shaping device it works great. Fantastic even.
Vintage Graphic EQ
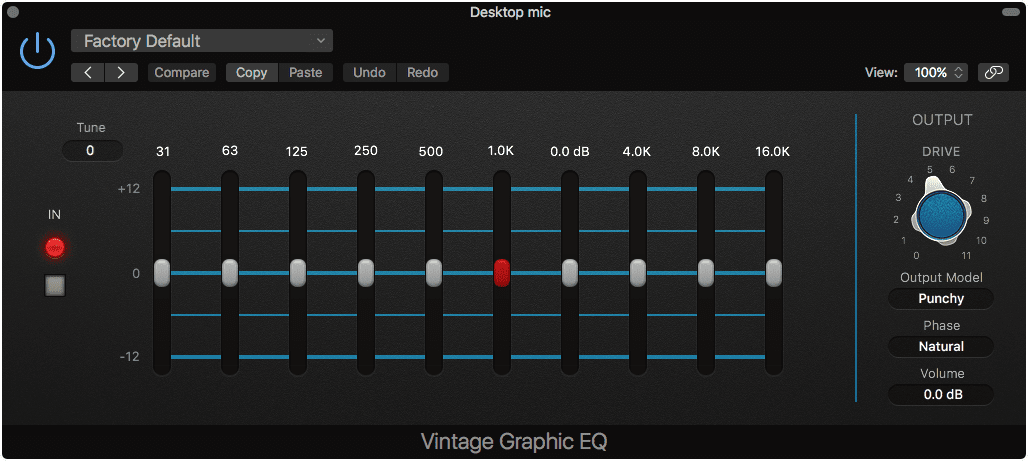
This is Apple’s interpretation of the API 560 EQ. It’s a 10-band graphical equalizer. Interestingly you can adjust the center frequency of each of the bands by changing the ‘tune’ control in the upper left, which is not something that’s normally present on 560 emulations. You can select the output stage of the Console EQ, the Graphic EQ or the Tube EQ.
This sounds pretty close to the API 560 in its default state. The ‘Punchy’ output model isn’t very aggressive, and honestly I’m not sure why it’s called ‘punchy’. I wouldn’t consider the original API 560 as a ‘punchy’ device, nor does this sound as such. The harmonic content does change considerably in contour as the level of the input signal changes, but in my testing with various sources I really didn’t get a ‘punchy’ feel. Despite what I feel is a misnaming of the mode, it does sound very good.
The tune box allows you to change the center frequencies of the bands, which I assume is something people would really enjoy, but I found it near useless. A big charm of the original API 560 was the selection of frequencies and being stuck to them. I approached this feature with an open mind and at best I found it useful for reducing some errant resonances, but the width of the filters really isn’t narrow enough for such duties anyway.
It’s barely fantastic, but it’s still useful and there’s some nostalgia present for certain.
Vintage Tube EQ
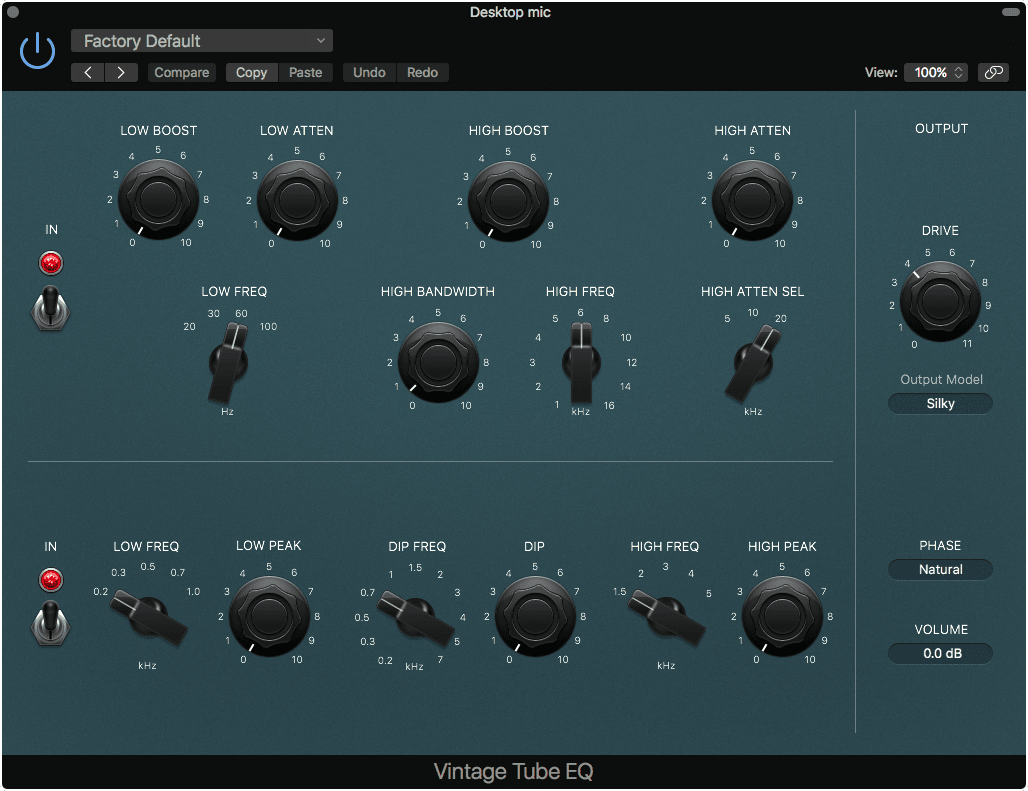
The Pultec passive equalizer is legendary. The Vintage Tube EQ combines the MEQ-5 with an EQP-1A. This is simple EQ with 2 shelves on top, and a unique ‘low’ and ‘high’ peak filter with a cut-only midrange filter. You can select the output stage of the Console EQ, the Graphic EQ or the Tube EQ. You can also select between Natural and Linear Phase modes, which is weird. The original is not linear phase.
Does this sound exactly like a Pultec EQ? I have only used one a single time in the past, so I can’t say for certain. Does it sound good? Very.
The Pultec EQs have a reputation for being easy to operate and get reliably good sounding sonic sculpting out of with minimal effort. Vintage Tube EQ does not fail here. The ‘Silky’ output mode lives up to its name and provides a light saturation with a strong 3rd harmonic component.
This is probably my favorite of the Vintage Collection EQs. It’s just so easy to make things sound ‘Better’ with it. Of the 3 EQs, this is probably the least useful as a saturation box, but the most useful as an EQ.
I want this in other DAWs.
Conclusion
Awesome FREE update. I love everything about it.
Some other companies could learn a think or two from these types of updates. Many features that people want at an incredible price.
It’s mostly the ‘features that people want’ part that gets me. Other DAWs often add a bunch of random stuff that seemingly nobody asked for. This Logic update directly addresses a number of concerns and weaknesses in Logic. At least Apple isn’t the only company that listens to their users when it comes to updates.
Did I mention that all of this is free? It is… as long as you don’t need to upgrade your computer to use Sierra. Sorry about that :(
Support Me!
This post took 7 hours to research, photograph, write and edit. If you appreciate the information presented then please consider joining patreon or donating!
