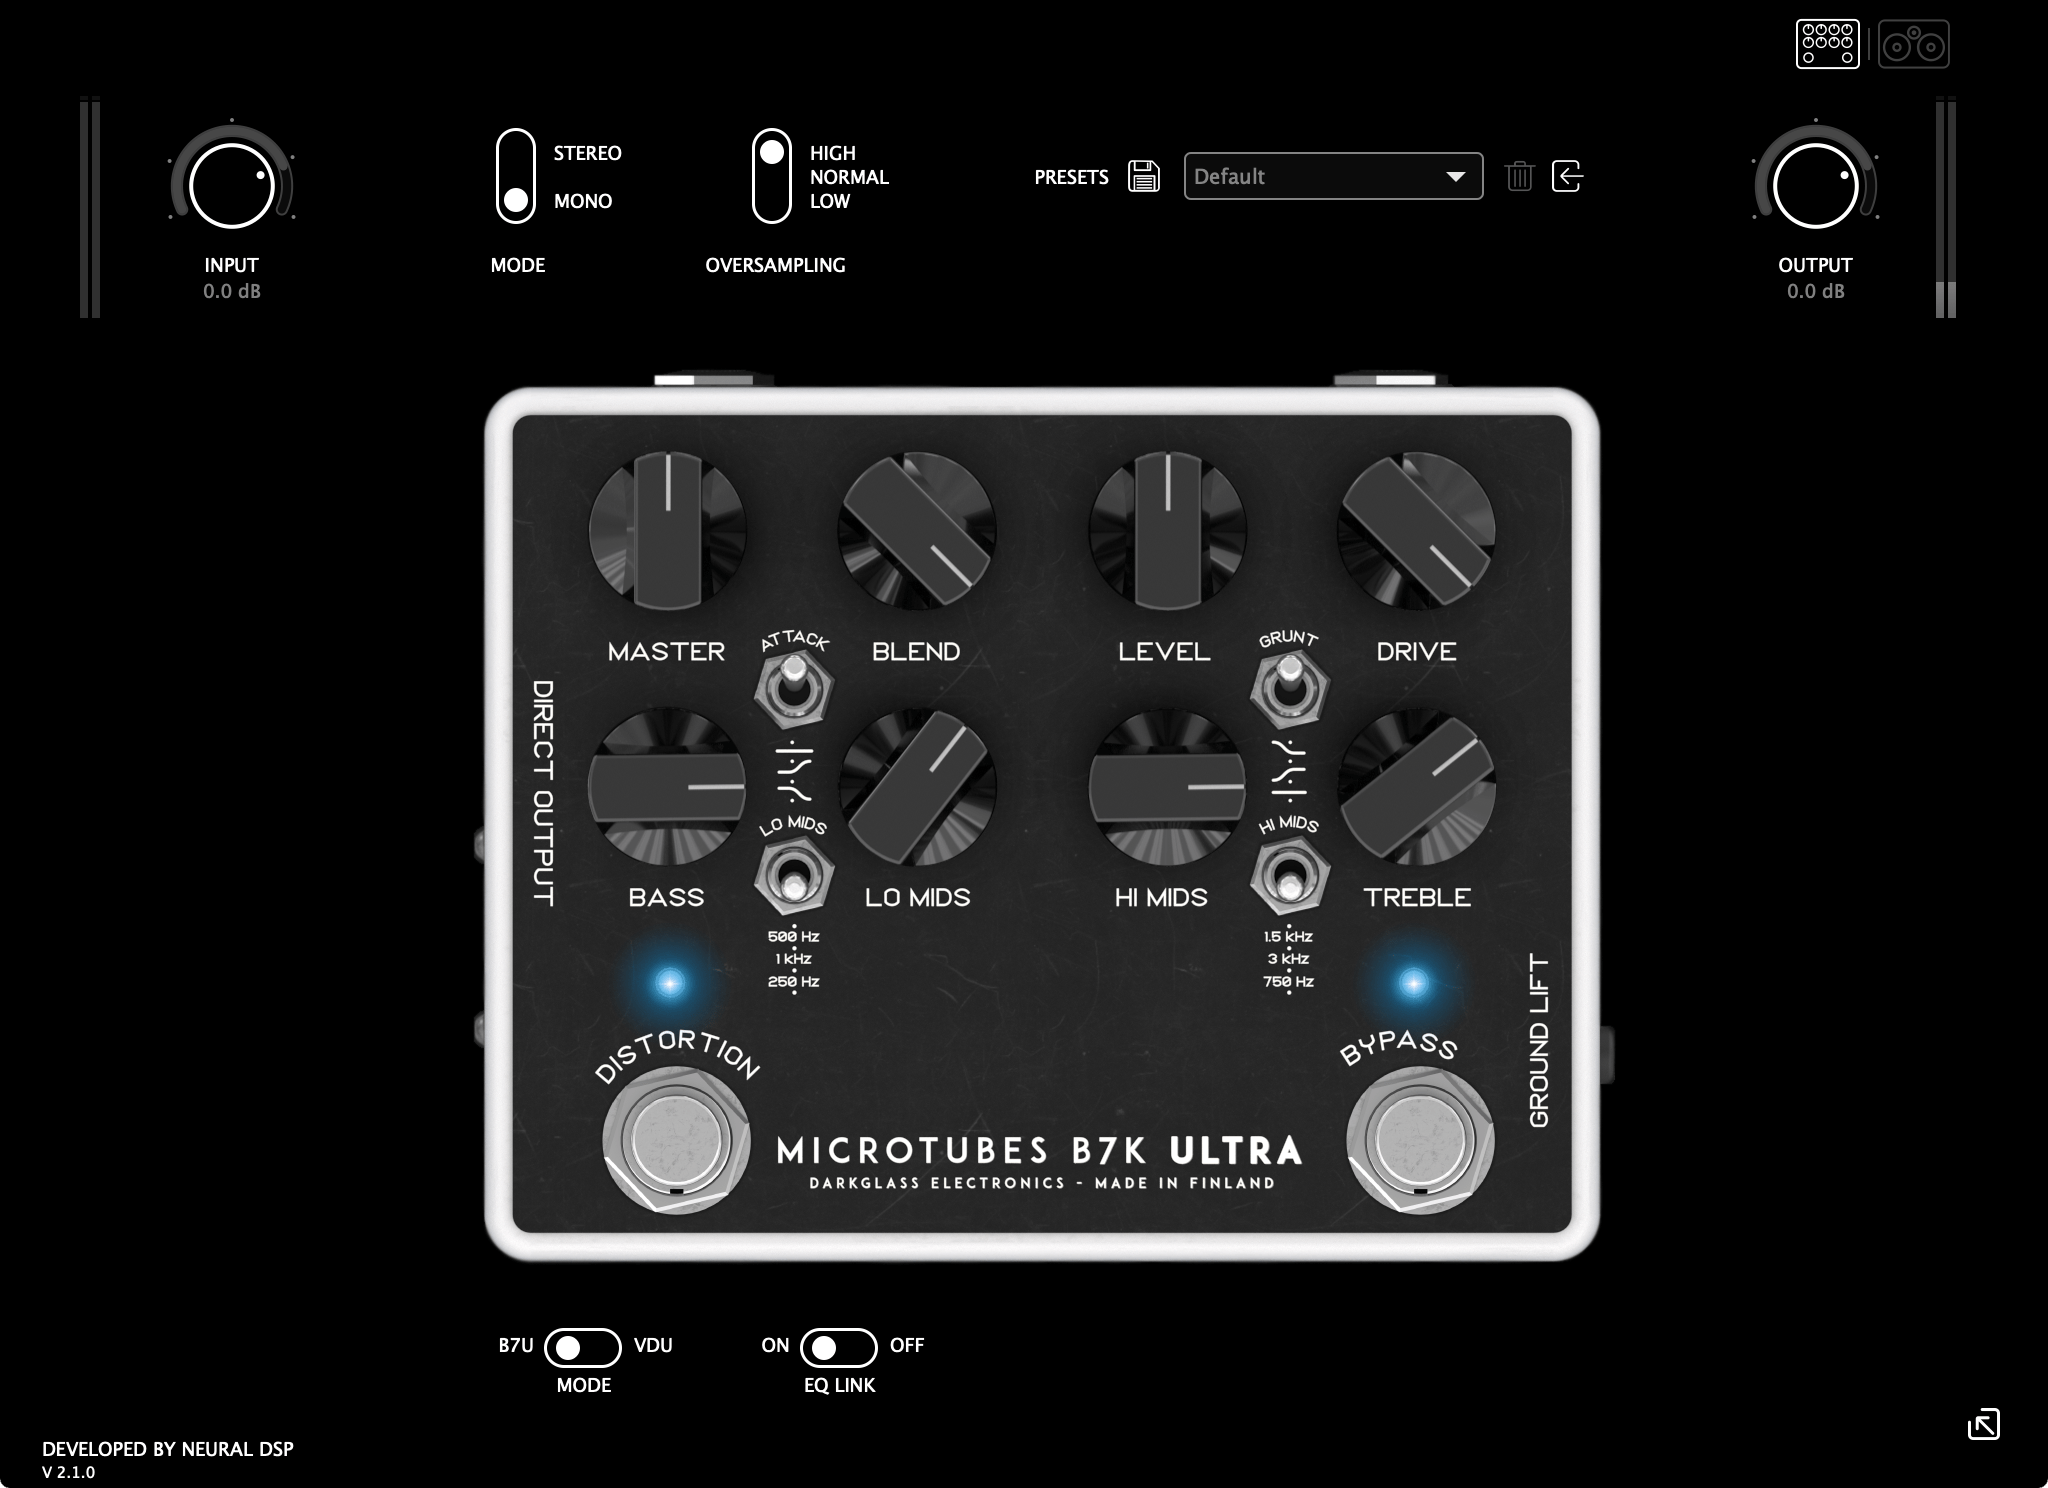
NeuralDSP released emulations of the Darkglass Vintage Ultra and B7K Ultra this year and I’ve yet to see anyone do a real proper review of them.
In this review I’m going to assume that you already know that the Darkglass Vintage Ultra and B7K Ultra are awesome. They are.
What I’m going to cover here is whether or not the plugin version lives up to kings of bass pedals.
Contents
- Prerequisites
- Testing Part 1 - Bypass
- Testing Part 2 - Live pre-test
- Testing Part 3 - Live I/O Methods
- Testing Part 3 - Comparisons to Plugin
- Cabinets
- Real Examples
- Conclusion
- Support Me!
Prerequisites
I’m going to start this out with geeky tests both to show that my test methods are reasonable, and if/that the software is somewhat equivalent to the hardware.
Then we’ll get to “Real World” examples.
Hardware
I’ll be using:
- Focusrite Clarett 8preX for hardware I/O.
- Radial JDI for a direct box
- Radial JCR for a Reamp box
-
Belden + Neutrik cabling
- Fender Jaguar Custom Shop - D’Addario NYXL - 40-95
- Fender American Jazz fretless - La Bella low tension flexible flats: 42-100
- Lakland J-Sonic - Whatever comes on it
-
Danelectro Rumour bass - La Bella Nylon Tapewound: 50-105
- Pigtronix Infinity Looper - Outdoor recording was recorded on the Infinity Looper.
All samples were recorded in Digital Performer.
Terms
- Inst - Instrument Input on my Focusrite Clarett 8PreX
- Line - Line Input on my Focusrite Clarett 8PreX
- Mic - Pedal’s Direct Output to a microphone pre-amp on my Focusrite Clarett 8PreX
- Reamp - This is a device that allows you to change a line output 600ohm signal to a high impedance signal ideal for input to guitar pedals or amplifiers.
Calibration
Given that this is a pedal made for input from magnetic pickups, there will be frequency response changes simply due to the input and output impedance of the device.
I’ll be testing inputting to the pedal from Line output or a Reamp. The output from the pedal to the interface will be attempted with the line and instrument (DI) inputs, along with the pedal’s Direct Output to a microphone preamp.
The expected best setup would be (Interface output)->(Reamp)->(Pedal Direct Output)->(Mic Preamp) or (Interface output)->(Reamp)->(Pedal Output)->(Interface Instrument Input).
I also made sure the plugin’s Cabinet section was turned OFF during measurements.
I don’t like to make these assumptions, so before I test the product I’ll be testing my testing methods.
If you think I’ve screwed up, please call me out on it. I would appreciate it.
Testing Part 1 - Bypass
I will be testing bypass using a -10dBFS 997hz signal and a -3dBFS (true peak) pink noise signal.
The inputs will be manually calibrated to -5.5dBFS return input with the pink noise.
I’m fairly certain these values are too high for normal use, but I’m looking to overdrive the input a bit. You don’t learn much if you use things as intended ;)
I’m only looking to see if this is true bypass, and to get an idea of what measurement signal might be best if this is indeed a buffered device.
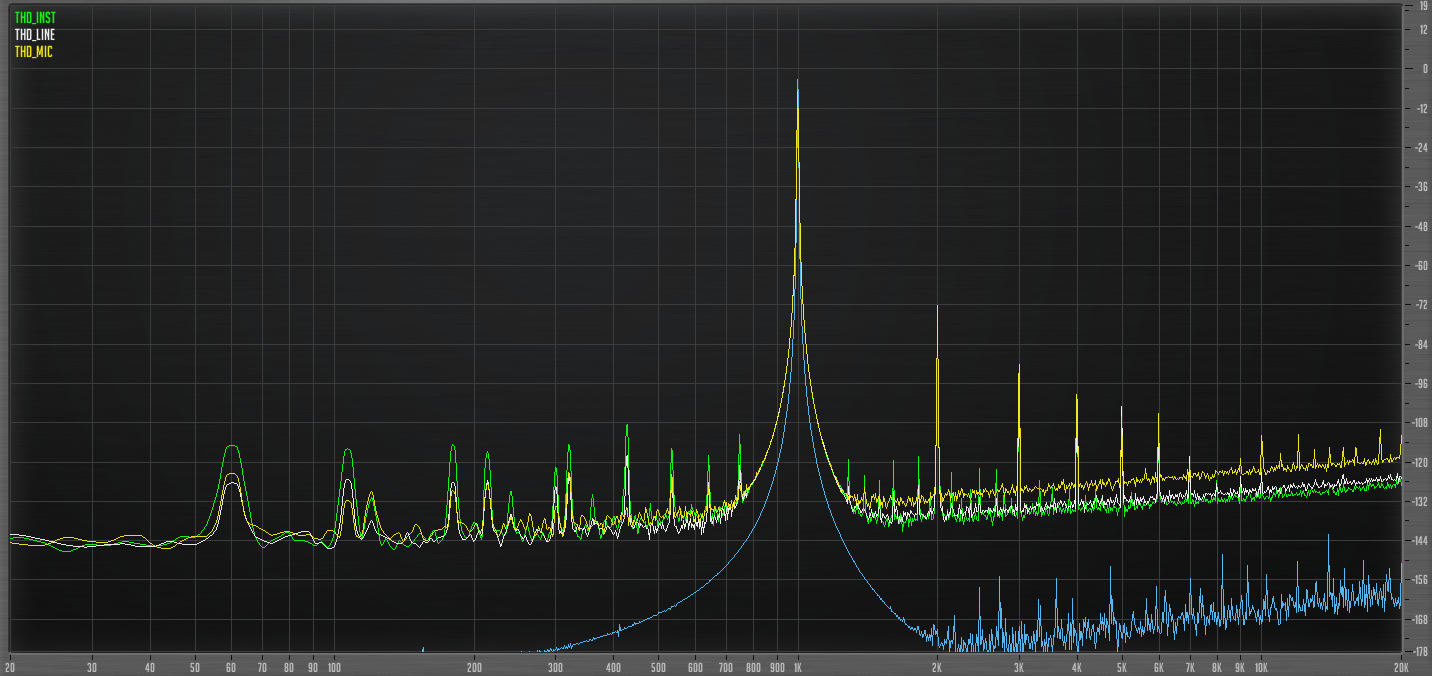
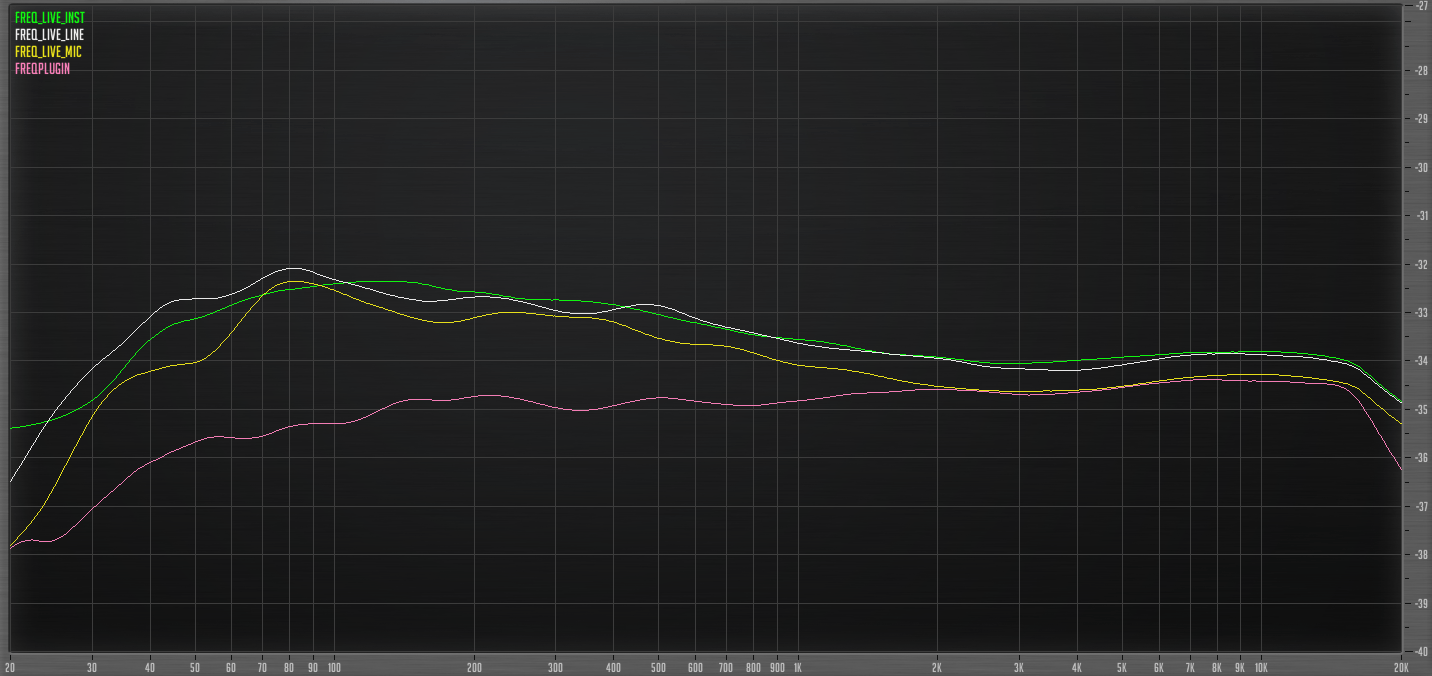
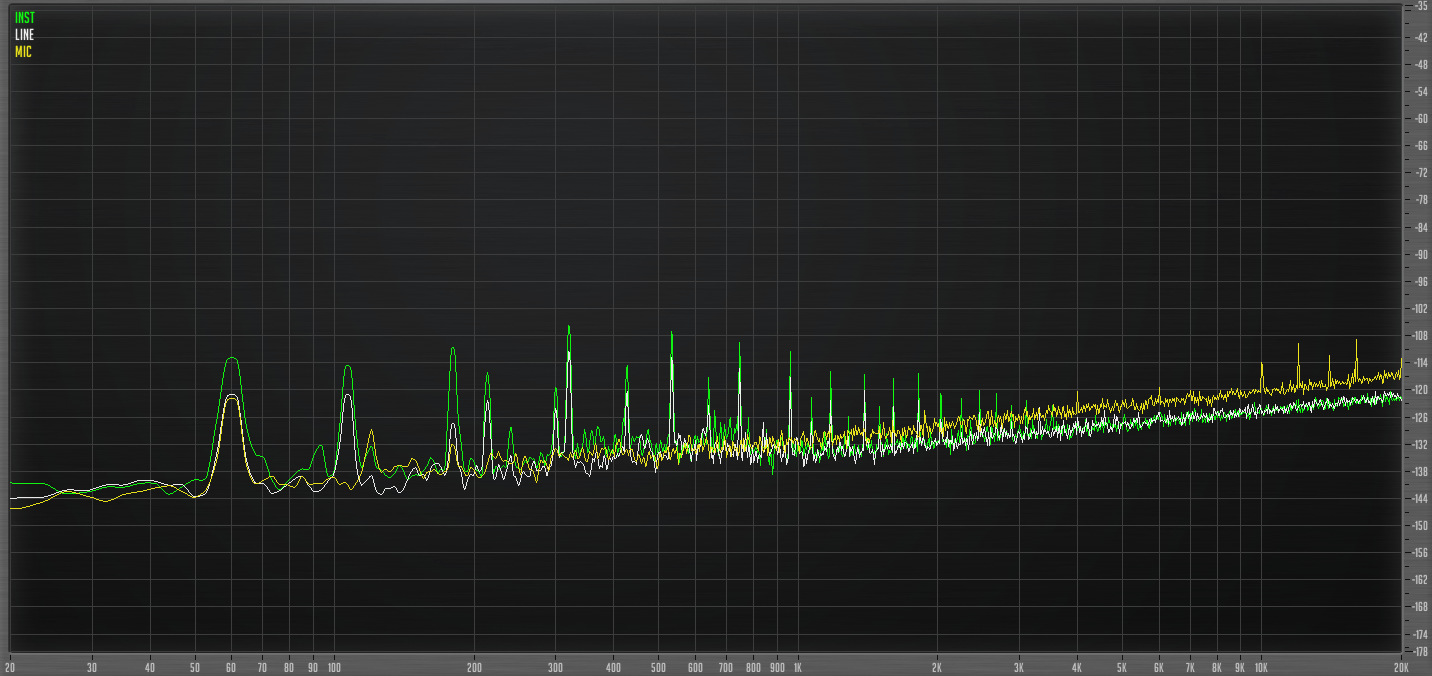
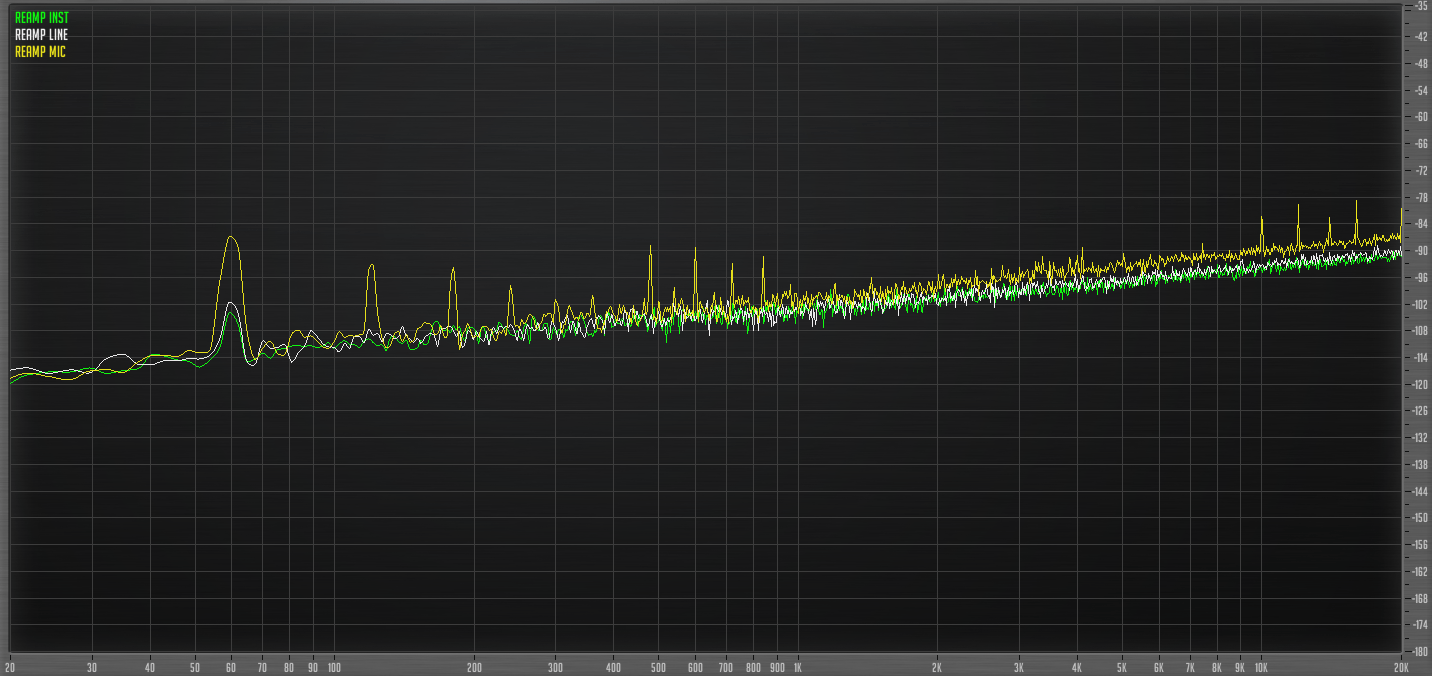
Hardware bypass Frequency Response
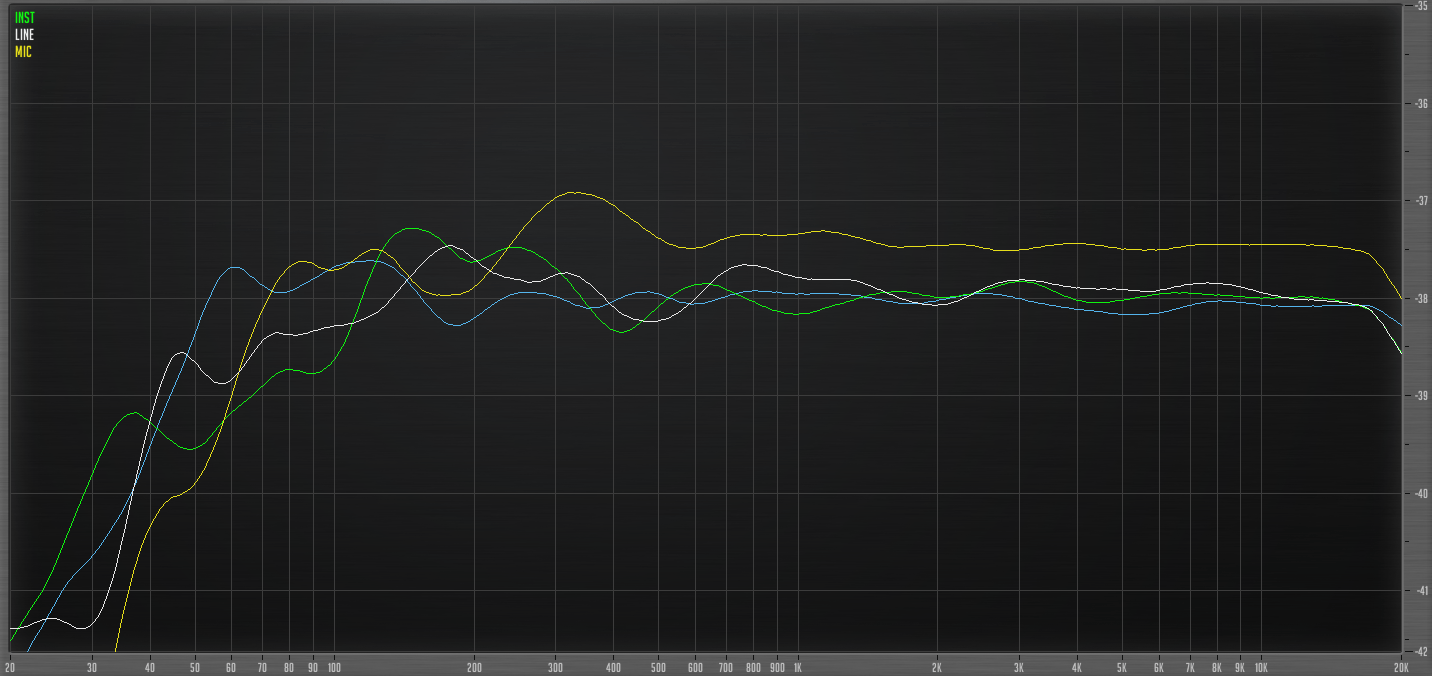
It’s close, but it looks like instrument and line input are our winners here. Let’s compare them.
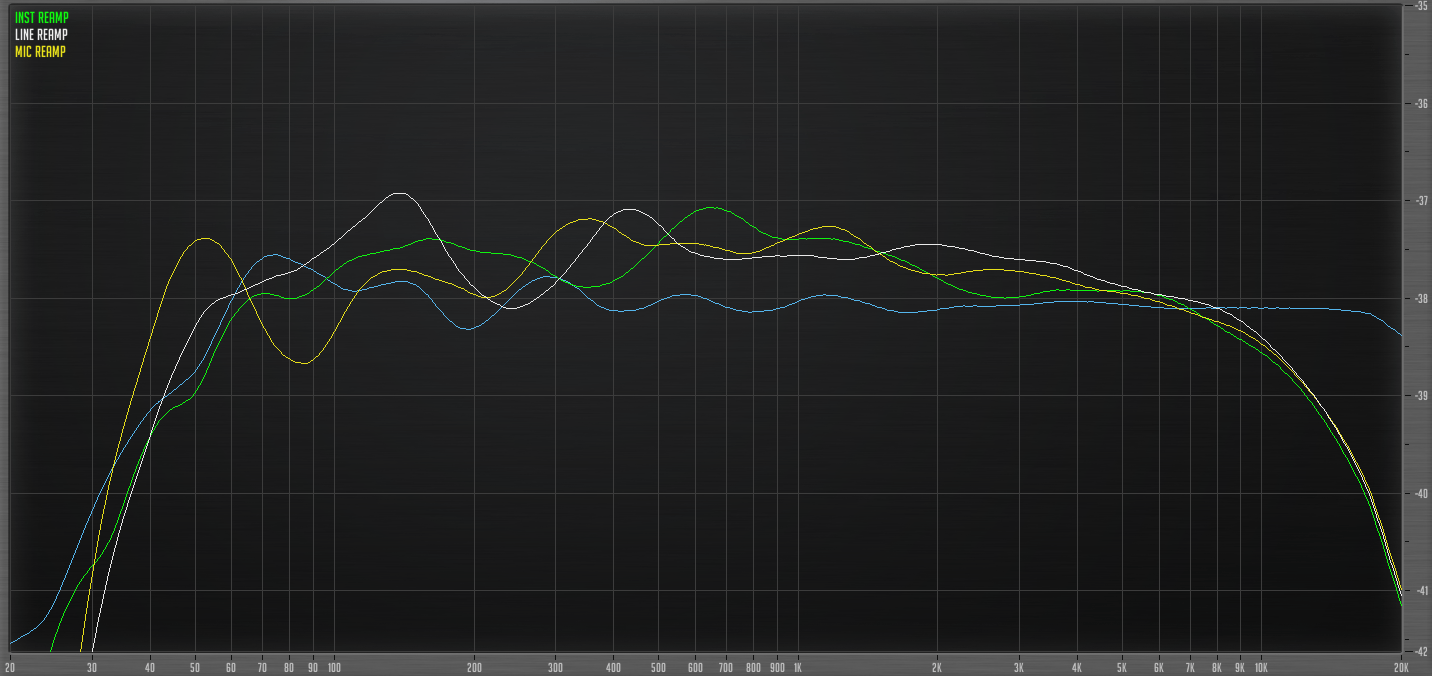
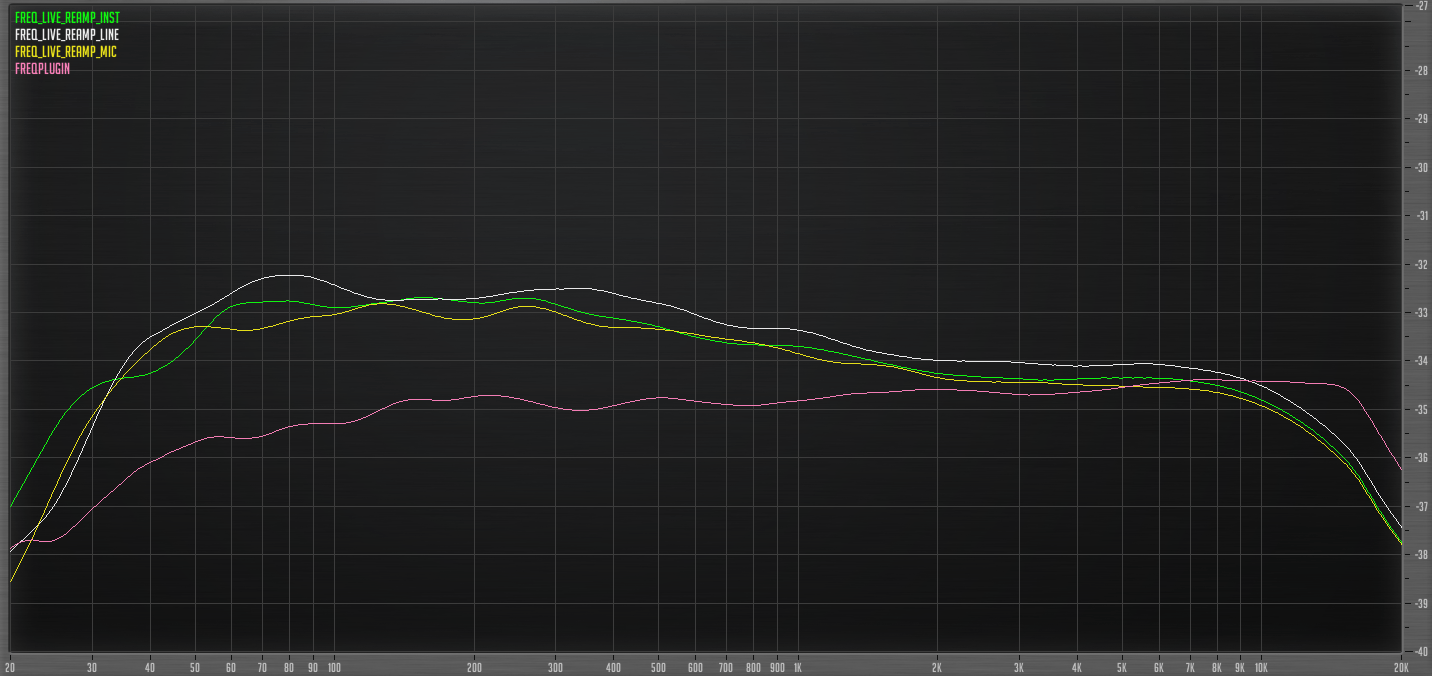
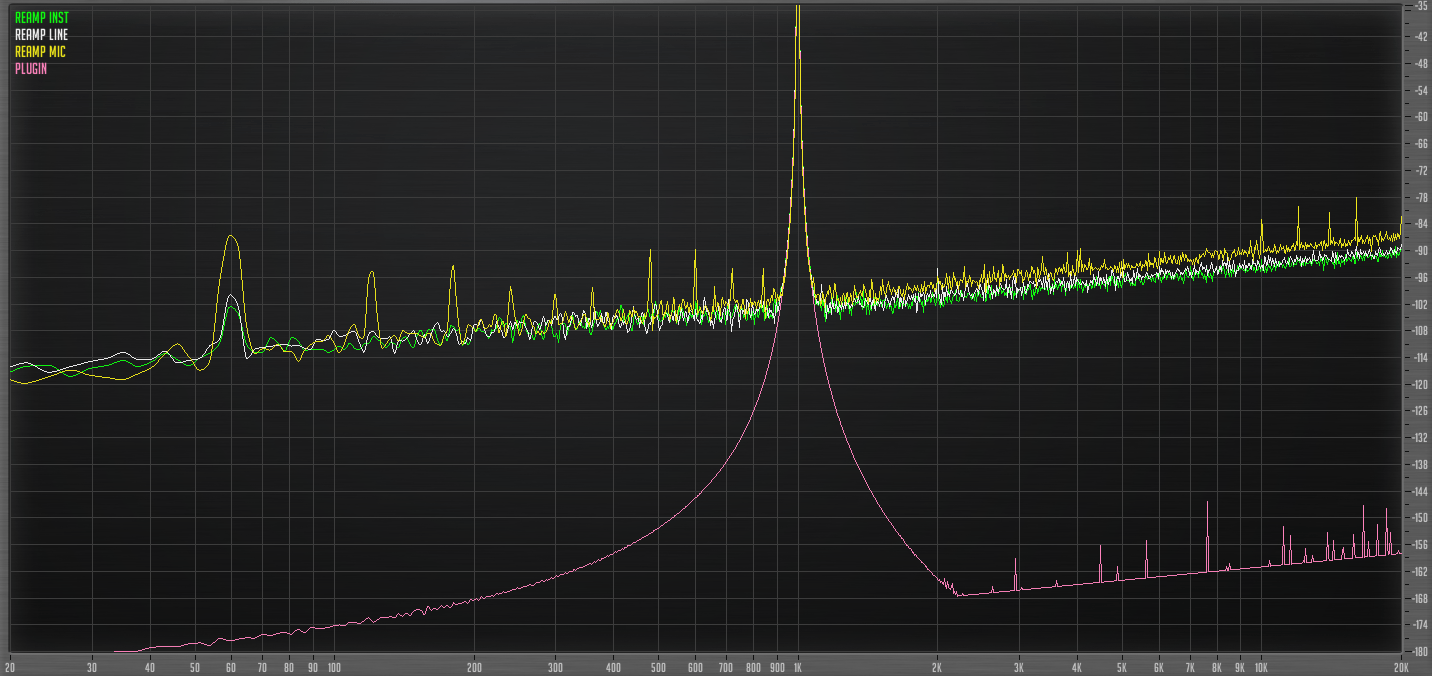
These graphs are showing various setups with I/O through the pedal. Hopefully the labels help guide your way. I’m testing the different types of inputs into the interface, along with variations using the reamp from interface->pedal.
This is a hard call, so let’s do this empirically.
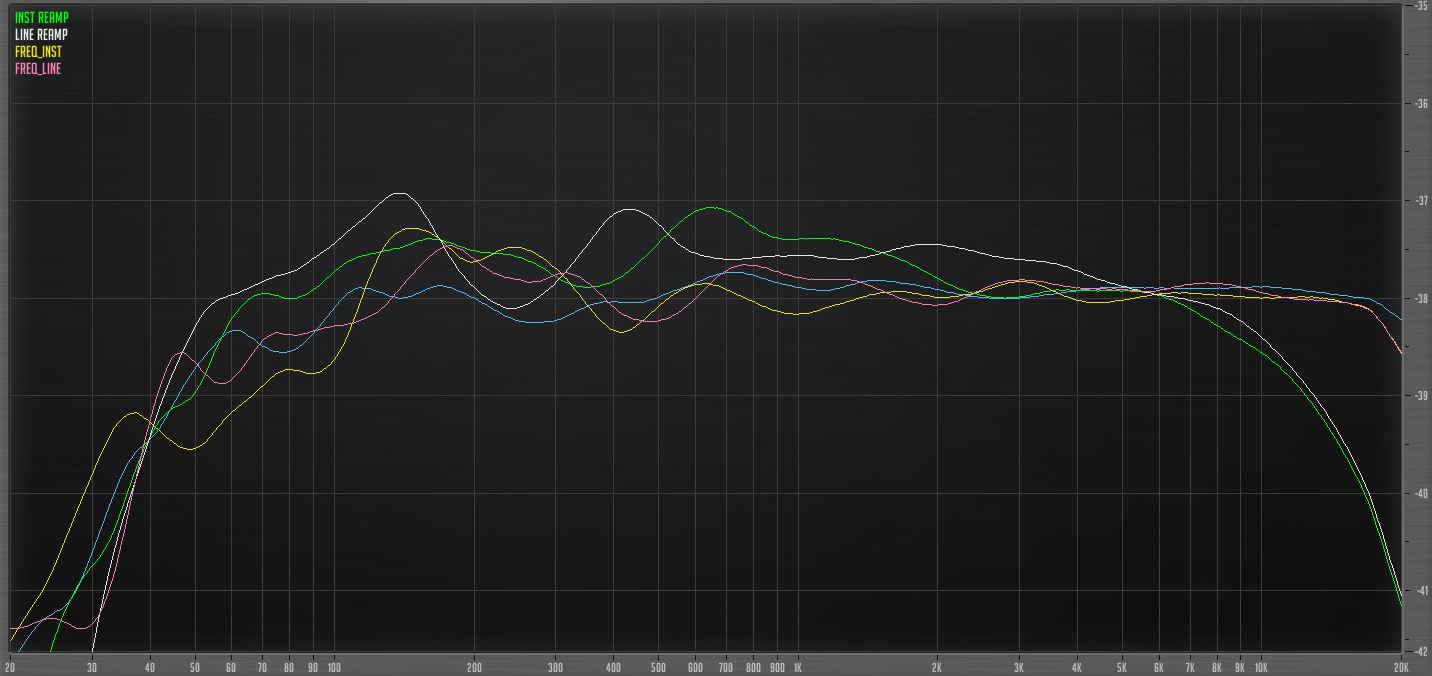
This was testing with pink noise through Voxengo Span Plus. A 8192 sample window was used, with Max bin display.
I then took 60 evenly interpolated points of data, subtracted the reference from the Line, Microphone and Instrument data. Then I took the 60 differences, took the absolute value and here are the results. The CSV files are linked below. A quick ruby script to calculate:
1
2
3
4
5
6
7
8
9
require 'csv'

x = 0.0

CSV.foreach(ARGV[0]) do |row|
    x = x + row[1].to_f.abs
end

puts x
That’s a very simple script. I’ve edited it much more to produce all of these results below for me fairly easily.
- Loopback - 7.1dB, average 0.12dB difference per bin
- Instrument - 11.34dB, average 0.19dB difference per bin
- Line - 12.93dB, average 0.22dB difference per bin
- Reamp Instrument - 25.06dB, average 0.42dB difference per bin
- Reamp Line - 28.59dB, average 0.48dB difference per bin
Even the worst result is pretty good.
Here’s the results < 300hz:
- Loopback - 4.19dB, average 0.07dB difference per bin
- Instrument - 8.83dB, average 0.15dB difference per bin
- Line - 8.18dB, average 0.14dB difference per bin
- Reamp Instrument - 12.02dB, average 0.2dB difference per bin
- Reamp Line - 14.92dB, average 0.25dB difference per bin
And the results > 300hz < 1000hz:
- Loopback - 1.36dB, average 0.02dB difference per bin
- Instrument - 1.35dB, average 0.02dB difference per bin
- Line - 2.12dB, average 0.04dB difference per bin
- Reamp Instrument - 4.05dB, average 0.07dB difference per bin
- Reamp Line - 3.94dB, average 0.07dB difference per bin
Then > 1000hz:
- Line - 2.63dB, average 0.04dB difference per bin
- Instrument - 1.16dB, average 0.02dB difference per bin
- Loopback - 1.55dB, average 0.03dB difference per bin
- Reamp Instrument - 8.99dB, average 0.15dB difference per bin
- Reamp Line - 9.73dB, average 0.16dB difference per bin
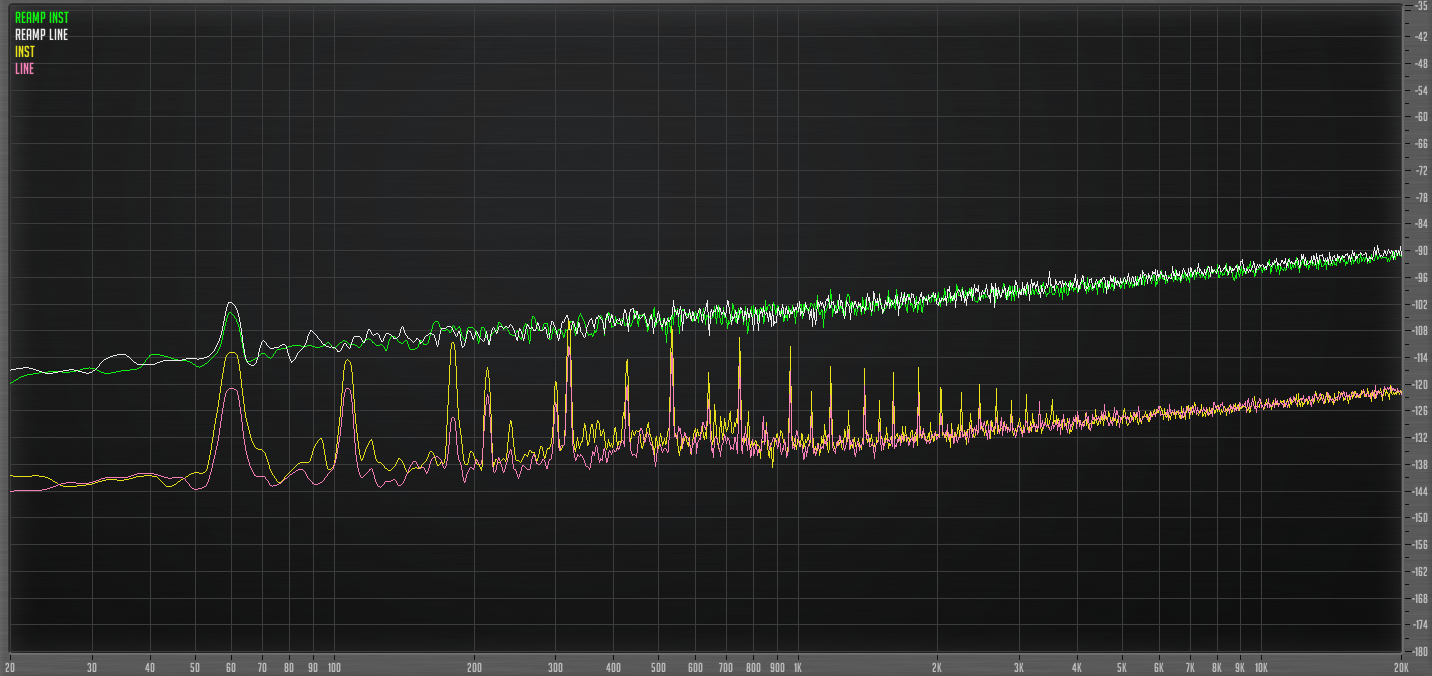
It looks like (Interface Line Output)->(Pedal 1/4” Output)->(Interface Instrument Input) is ideal in bypass.
It appears that we don’t have true bypass, since we’d expect it to match line->line perfectly.
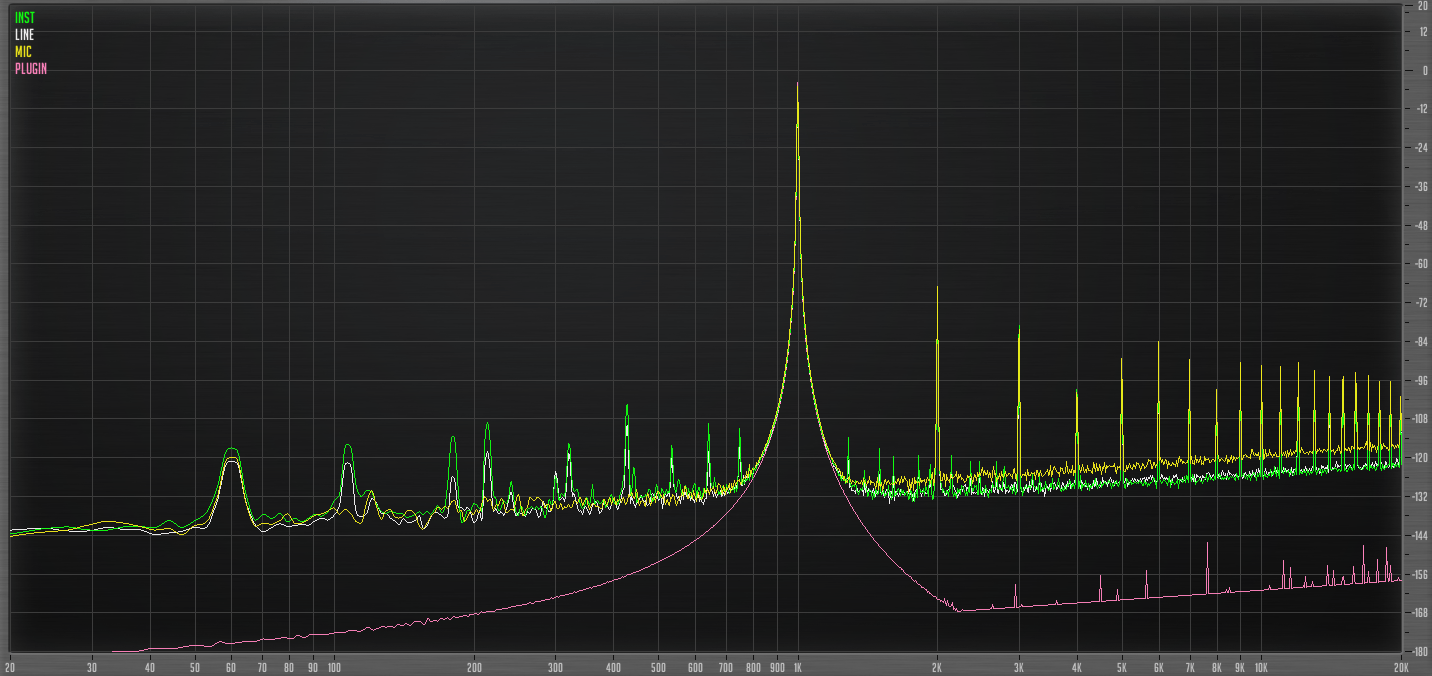
Hardware bypass Distortion
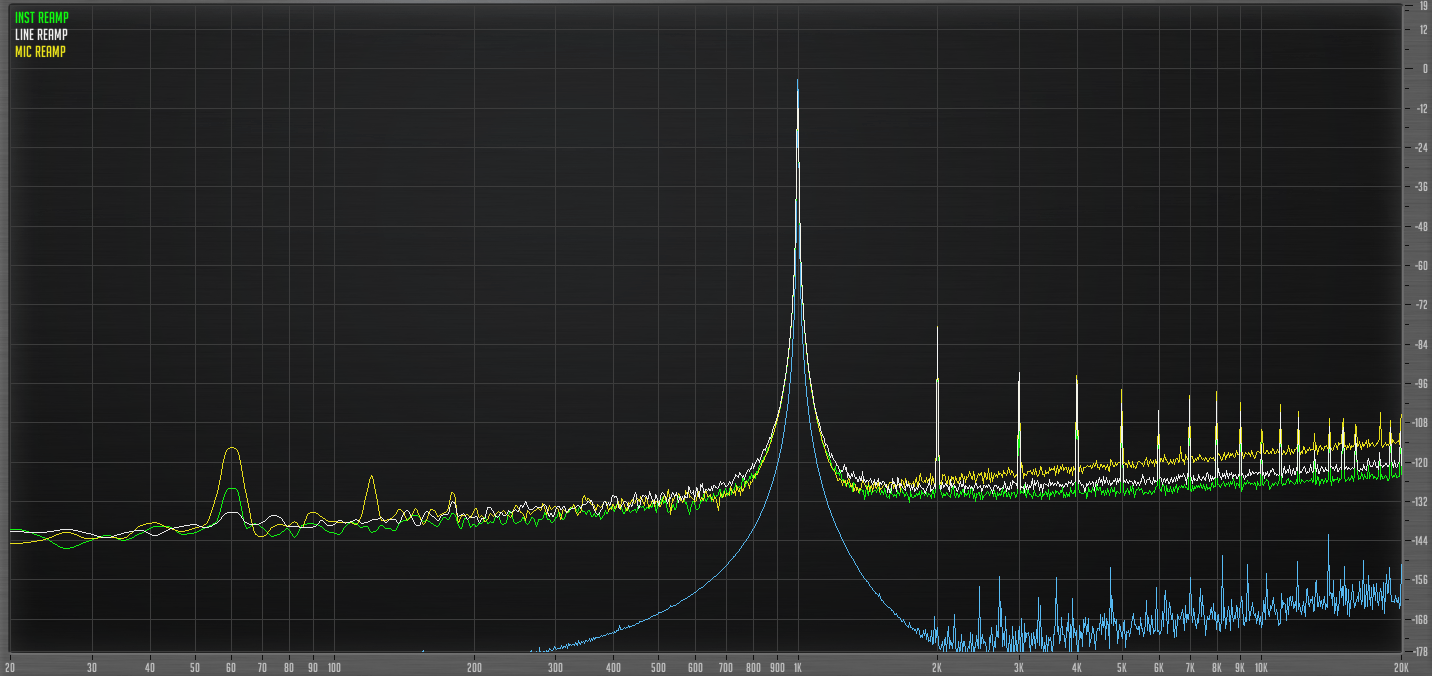
We can see here that the line output of the interface directly to the pedal gives the best results in the no-reamp situation.
Here it is compared to the reamp solutions
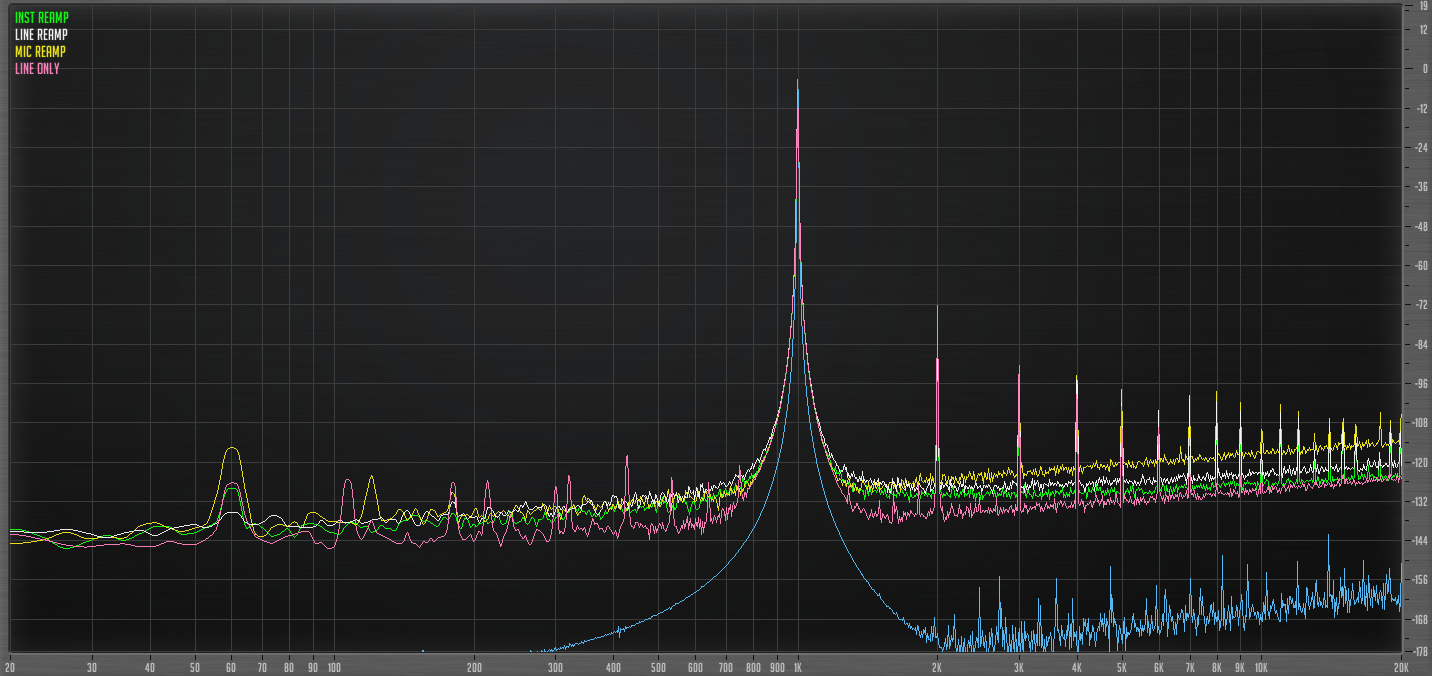
The straight line output seems inferior here. The extra harmonics (those spiky bits) indicate that we’re overloading something.
However, we previous decided that the line output was ideal for frequency response. So just how bad is it compared to the next best for distortion?
At least with bypass off… It still appears that our best bet is (Interface Line Output)->(Pedal 1/4” Output)->(Interface Instrument Input).
This also confirms that we probably don’t have true-bypass. We would expect Line->Pedal->Line to be ideal with true bypass. However this is the opposite result of what I’d expect. I’d expect Reamp + instrument input to be best, or I’d expect Reamp + Microphone Preamp to work equally well.
Sympathetic Vibrations
If you’re smart, you still don’t believe me. Too many variables. So let’s try something else.
I took a Telecaster with an ashtray, a brass rock slide and an EBow.
I placed the EBow against the ashtray cover, and the slide against the EBow. This gave me a repeatable setup to make a ~977hz test signal straight out of a guitar.
(I ended up spending way too much time messing around with a slide and an EBow. Man that sounds cool combined with Colour Copy)
What you see above is the results of these tests. The Direct Output to Microphone Preamp is the best solution here by a small margin, however there’s a lot of variables in this test. After all, look at the setup and you’ll see that it can still go wrong:
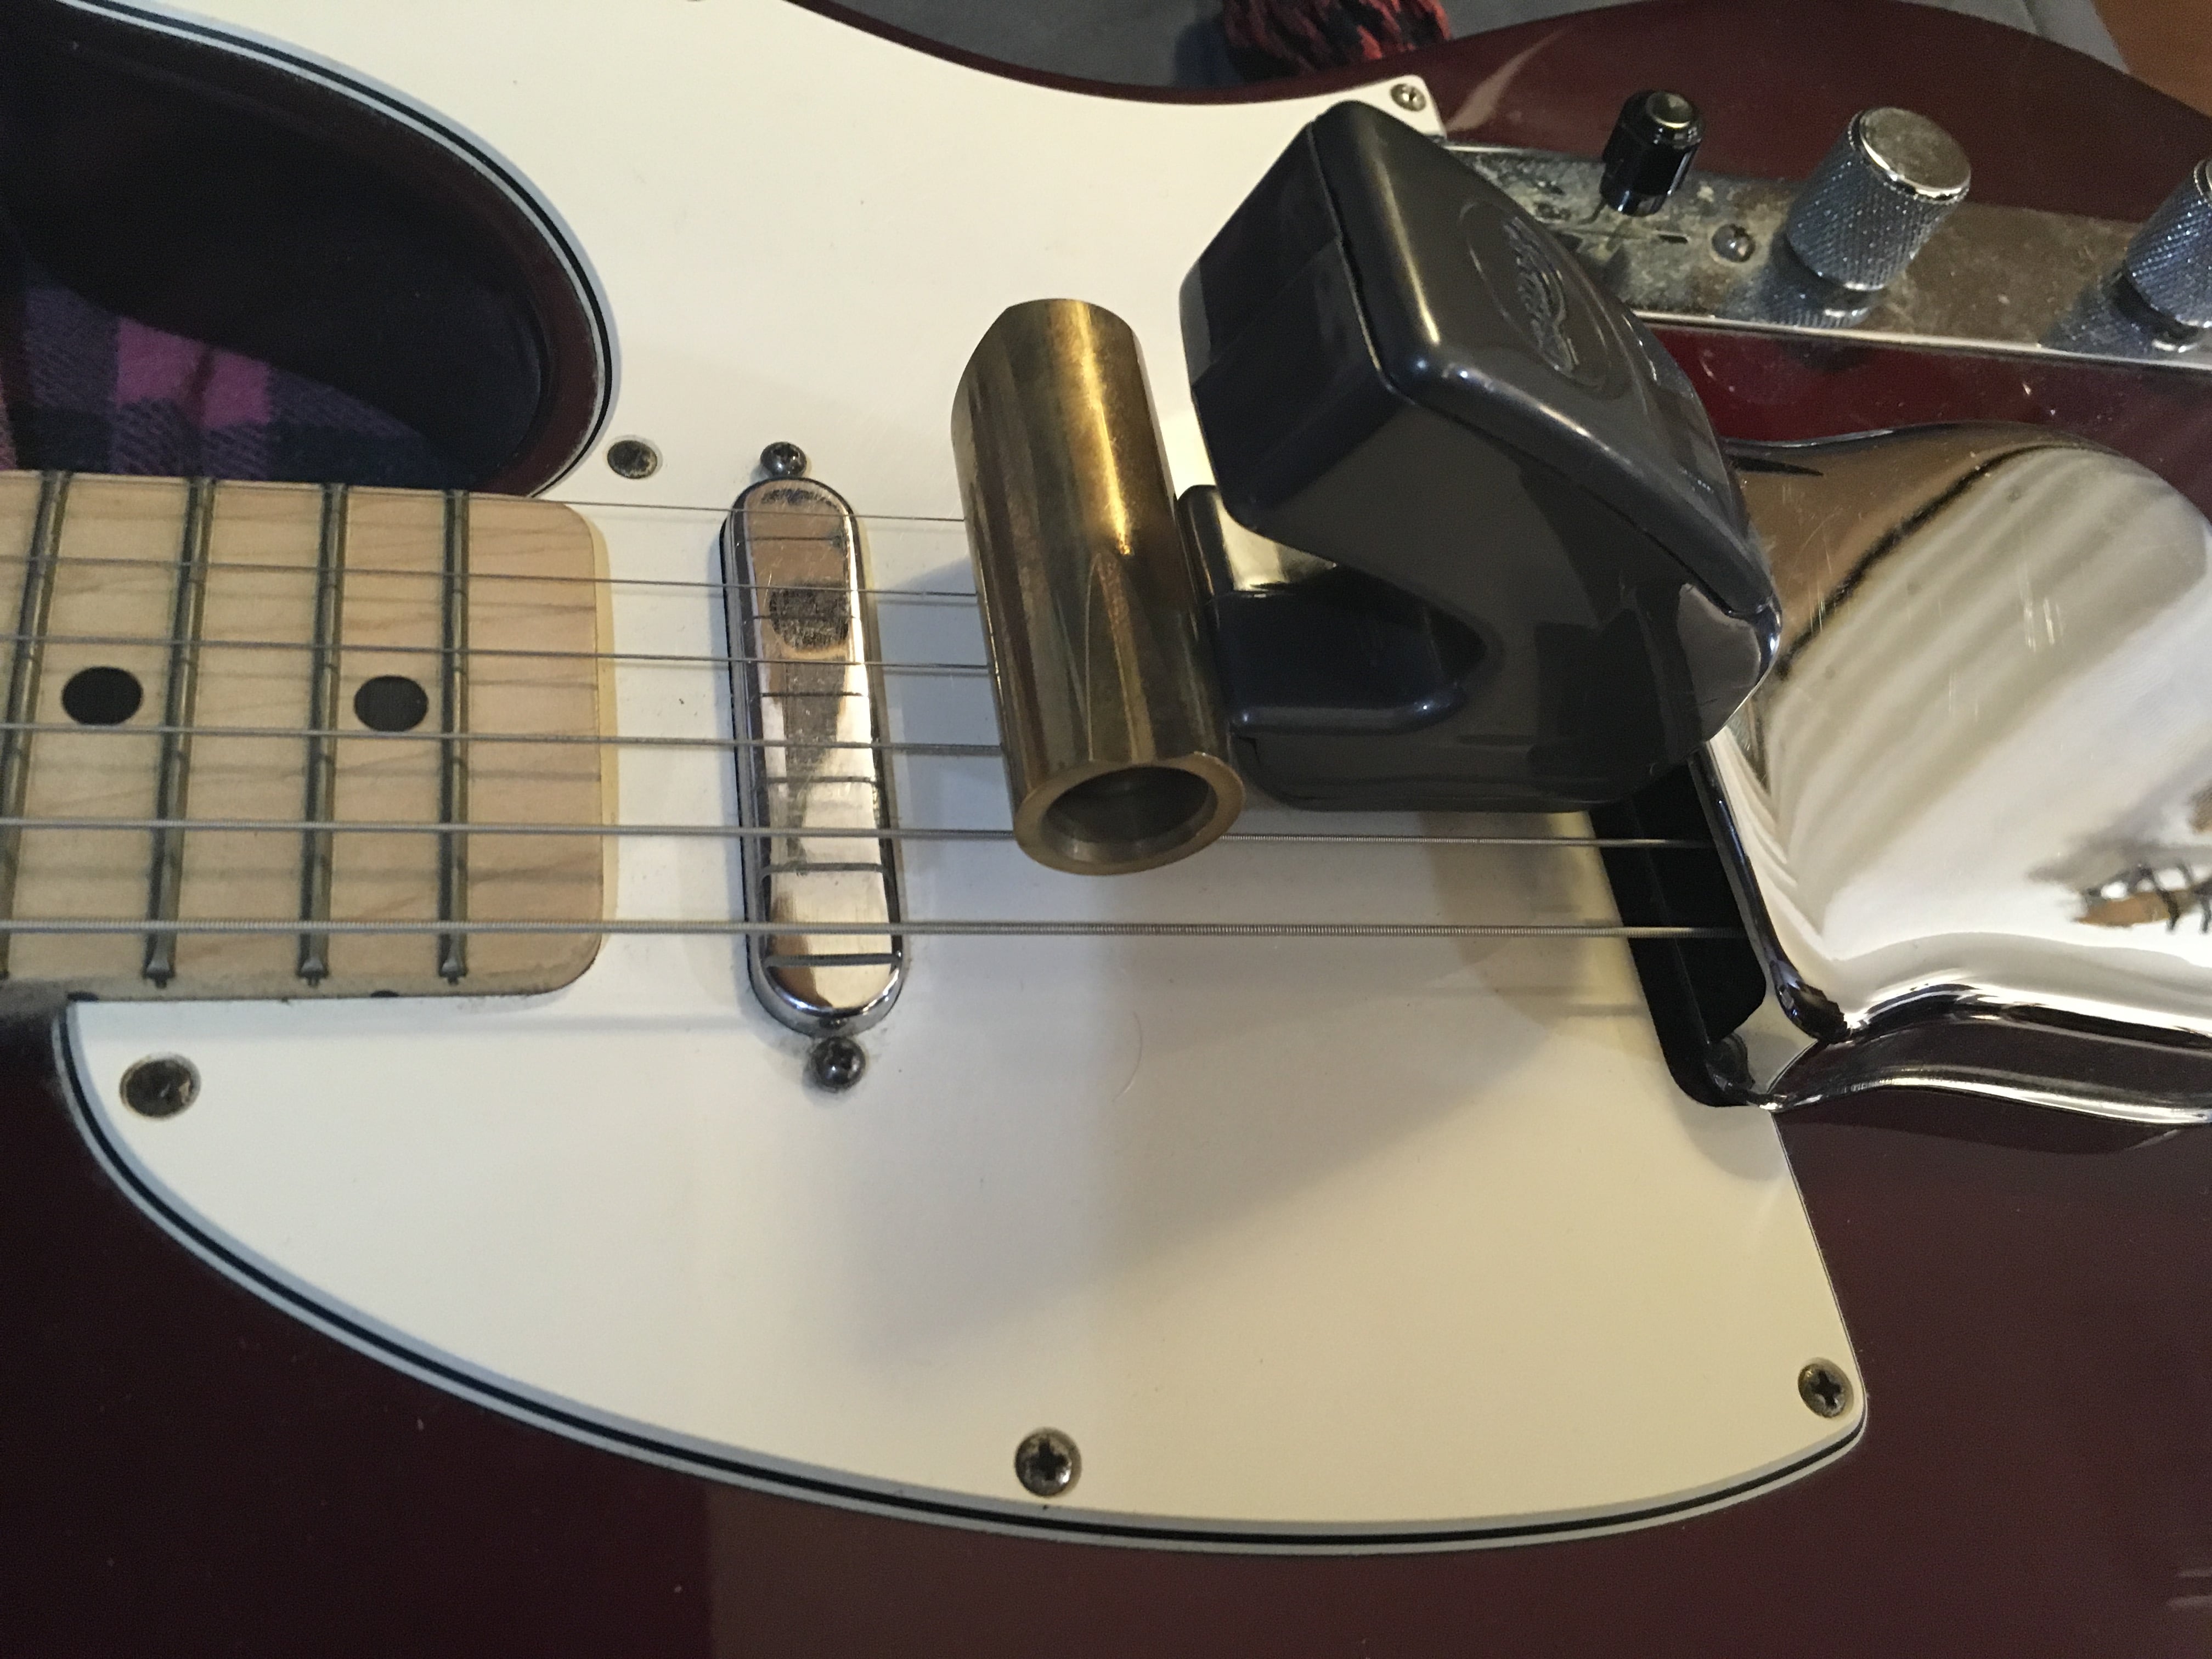
The EBow excites the string and the heavy brass slide “frets” the string. Due to the ashtray (that metal bit), I can set this up pretty reliably.
Conclusion
(Interface Line Output)->(Pedal 1/4” Output)->(Interface Instrument Input) seems to yeild the best frequency response and distortion specs in bypass.
This indicates that there’s some sort of buffer in place when the pedal is bypassed.
Testing Part 2 - Live pre-test
Hardware Active Default
Before I can test the optimal method of measurement with the hardware active, I need to get a baseline. It’s possible that I need to tweak the knobs to get a ‘flat’ result for testing.
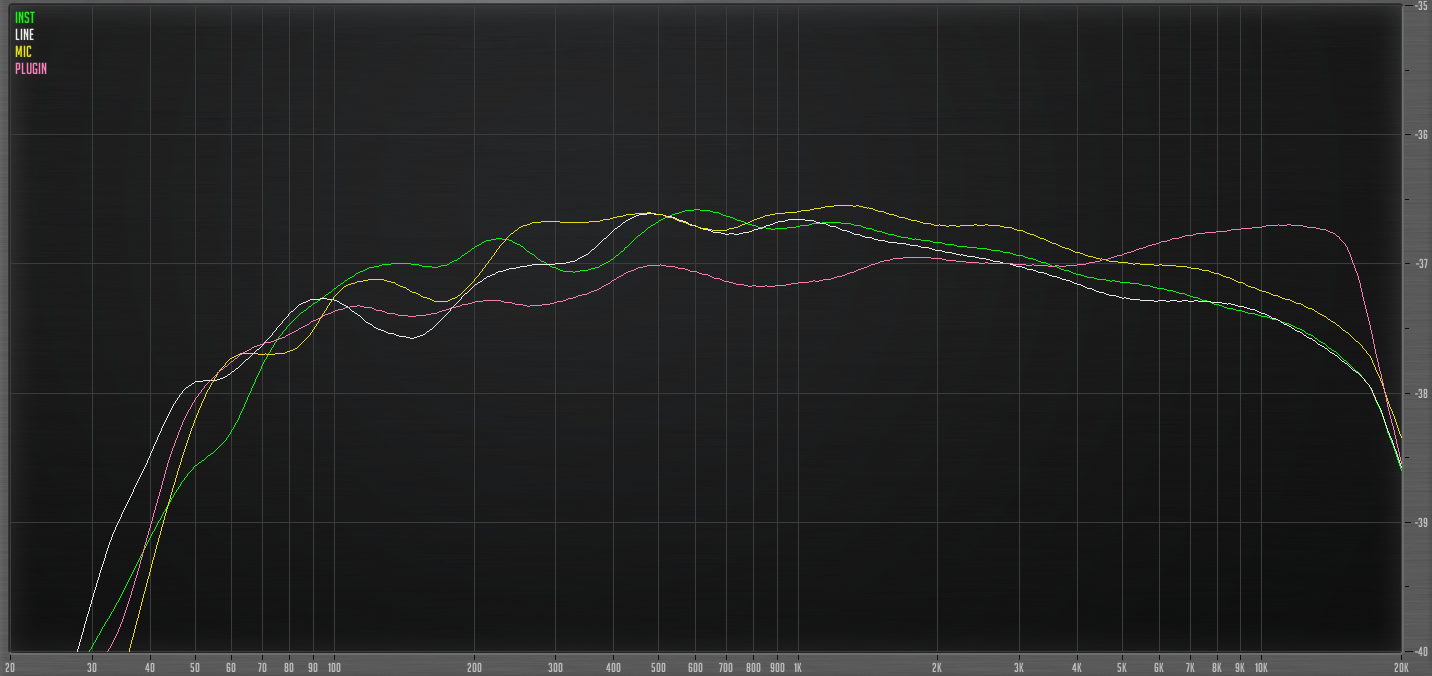
I’m going to run these tests again with the hardware active with all knobs at their default setting. They will be referenced against the plugin’s frequency response and distortion while active. Above is the frequency response.
These are tested the same way, with Interface->Pedal->Inst/Mic/Line and Interface->Reamp->Pedal->Inst/Mic/Line.
Before I did this, I took the time to make sure the actual knobs were setup to be at 50% at 12 o’clock. On my B7K Ultra the potentiometers were not “Centered”, and the knobs on the pots weren’t centered. So…
This is the “12 o’clock” setting dude to how the potentiometers were built and how the knobs attach. In order to make my hardware B7K Ultra match the plugin, it’ll be necessary to tweak the knobs a bit.
Plugin - B7K vs Vintage Ultra
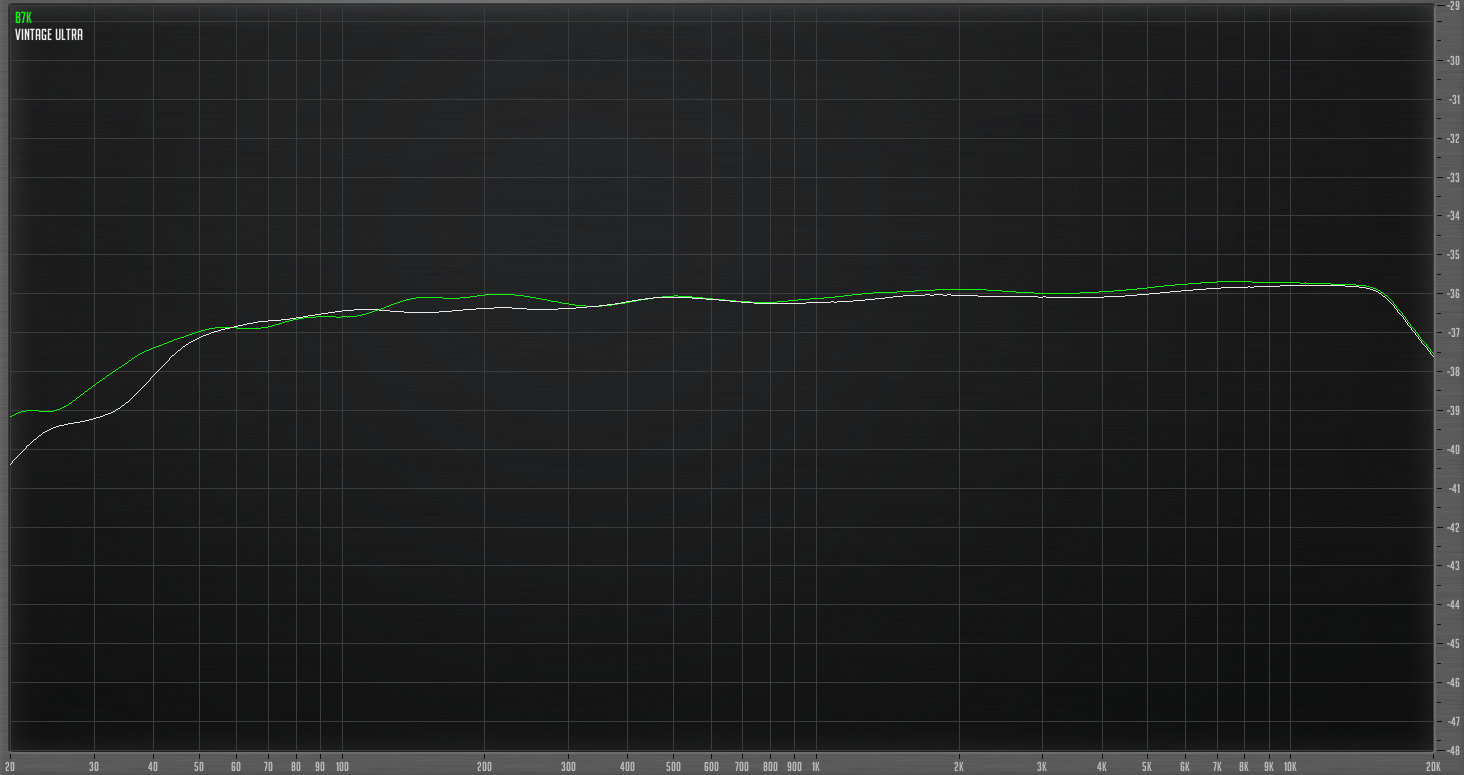
Just so we’re clear, the plugin version’s default frequency response with everything zeroed is the same for the B7U and VDU modes.
Matched B7K Ultra V2
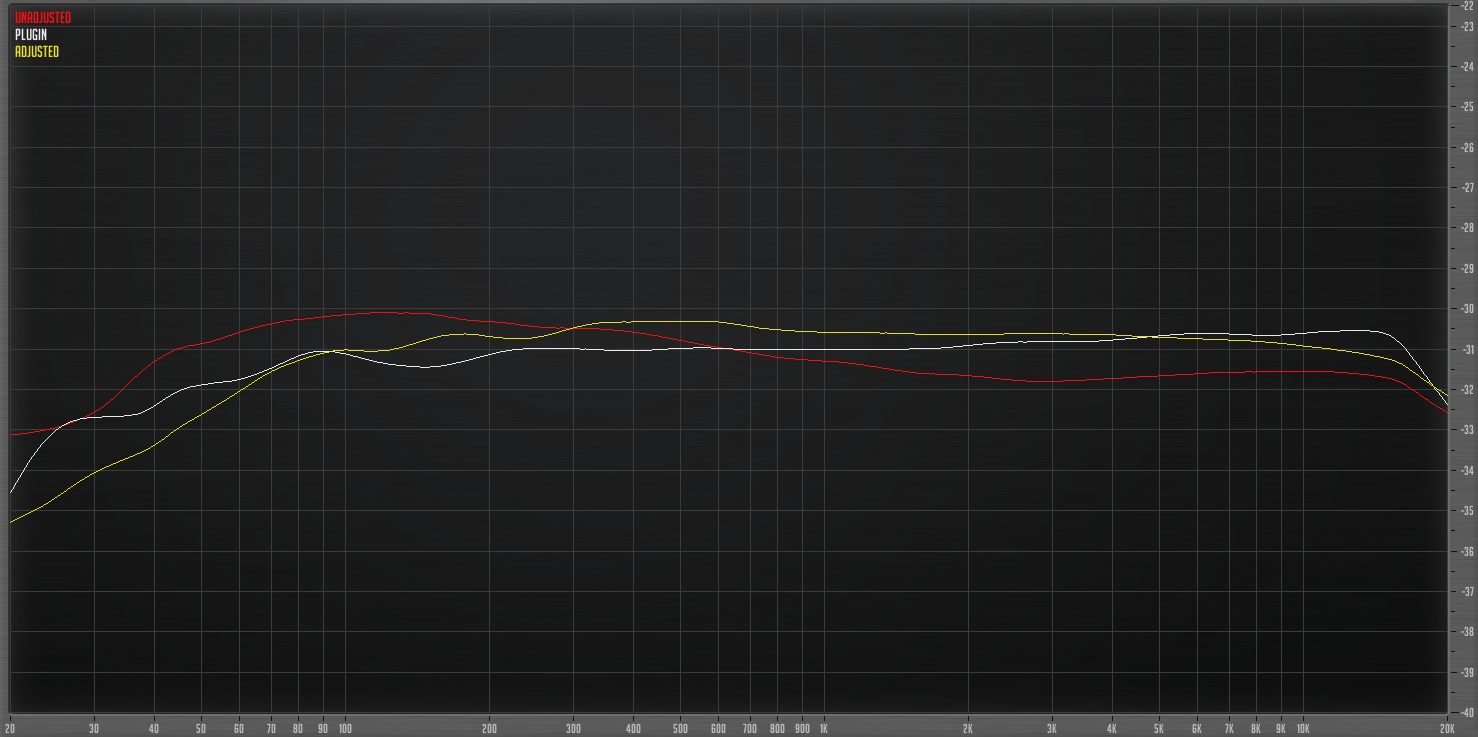

This is the matched frequency response between the plugin, hardware and the un-adjusted frequency response.
It’s all very close. Within about 1.5dB in the worst case.
To get the closest response to the plugin, I had to setup the pedal as shown. This appears to be due largely to the potentiometer’s knurling being slightly off, so the knob doesn’t set ‘just right’ on the pot.
Matched Vintage Ultra V2

This one was easy. It matches my hardware pedal perfectly.
For the next set of tests I’ll be using the Vintage Ultra V2 since it’s the easiest to ‘Zero’.
Testing Part 3 - Live I/O Methods
Now I need to make sure the same I/O methods that were used for the bypass work correctly when the hardware is live. Once this tested, then we can get to the nitty-gritty.
Frequency
There’s no comparison here. The Reamp is inferior with this device.
Noise
Those little warbles in the ‘without Reamp’ sample is a slight hum. The Reamped signal does not suffer from that as much.
So let’s look at the Inst and Line with and without Reamping:
The result here is a tradeoff.
The reamp has no distortion (the device isn’t overloaded).
Without the reamp there is far less noise, but the device is clearly overloaded.
Distortion - Part 1
Without the Reamp, the hardware is clearly overloaded.
With the Reamp, there is no distortion, but the noise is higher (as we learned earlier).
So what happens if we turn down the output signal and don’t use the reamp? Can we get equivalent noise specs and lose our distortion?
Distortion - Part 2
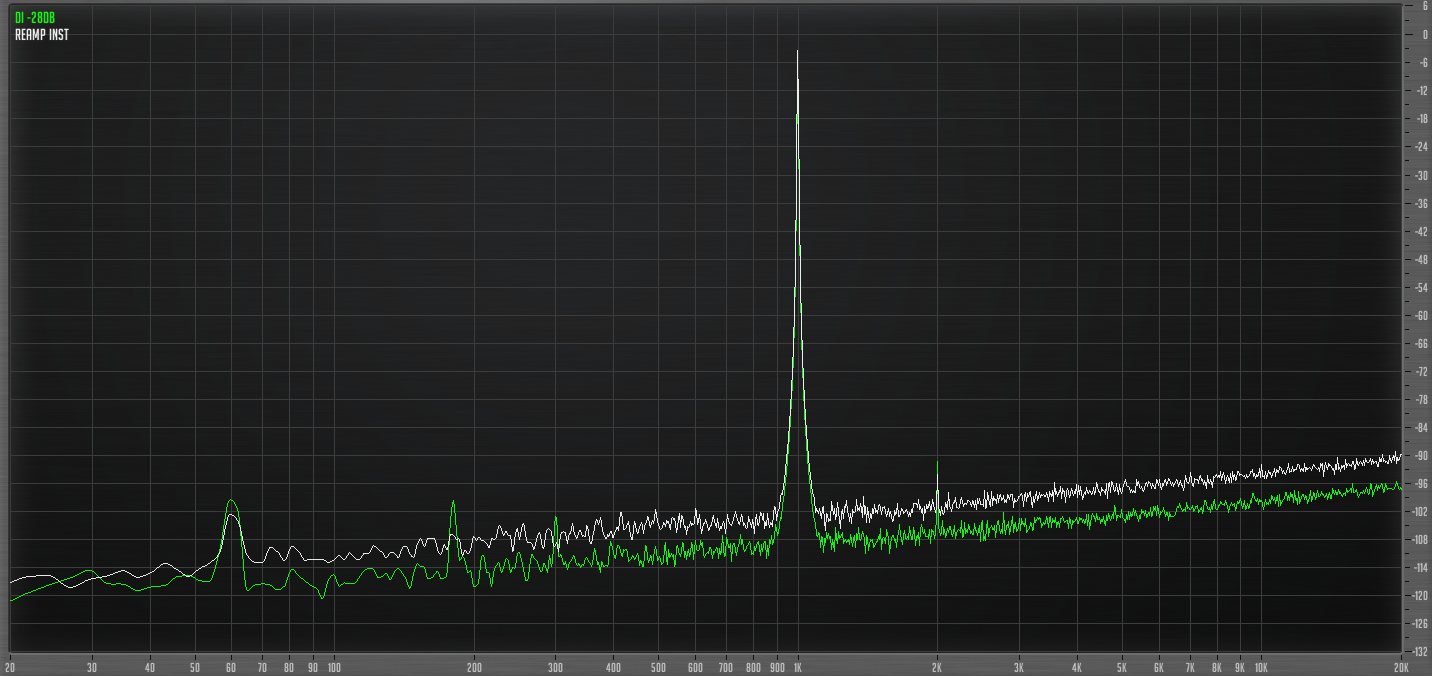
This is outputting a -38dBFS 997hz signal instead of a -10dBFS signal to the hardware, then capturing it as before through Instrument, Line and Microphone inputs on the interface.
Without the Reamp (in this instance), there is no ground hum. The noise level without the Reamp is better. They have equal distortion. (I am using the ground lift on the pedal)
It seems that if we could get rid of the ground hum without the Reamp, and use the -28dB down signal then everything would be set.
So… let’s try something else.
Distortion - Part 3
BOOM. That’s what we want.
This setup is (997hz sine at -38dBFS)->(Interface Line Out)->(Pedal In/Out)->(Direct Box)->(Interface Microphone Preamp)
Notably, this may imply that a Reamp is unnecessary for certain situations. Not all, but some.
Conclusion
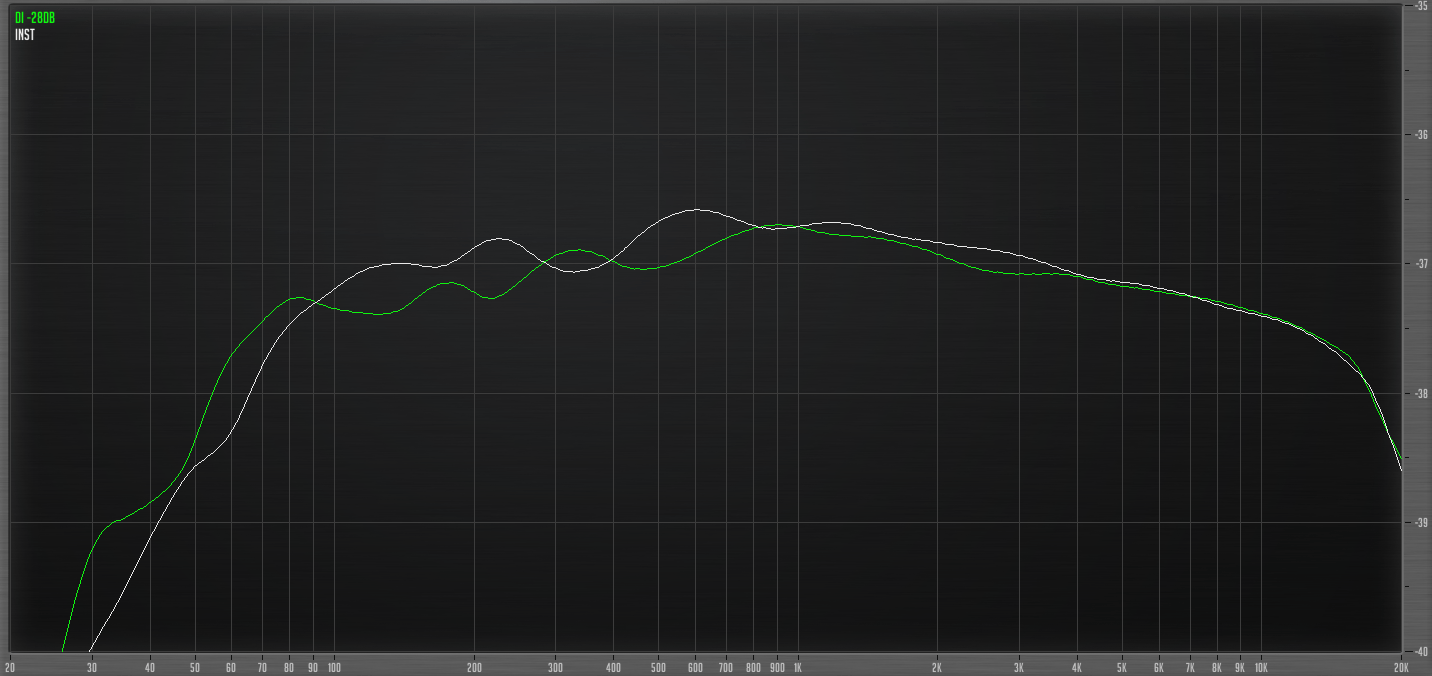
It looks like (997hz sine at -38dBFS)->(Interface Line Out)->(Pedal In/Out)->(Direct Box)->(Interface Microphone Preamp).
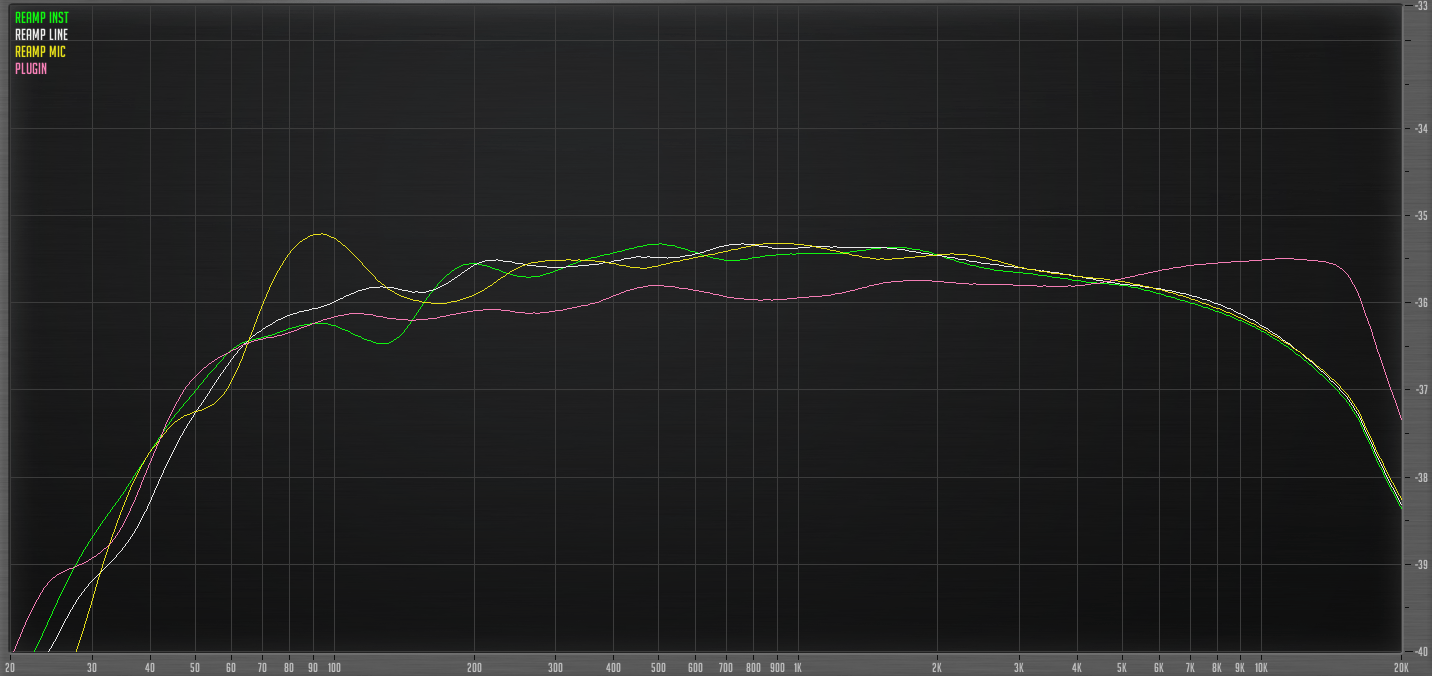
I didn’t mention the frequency response though. The best test method’s frequency response was using the interface’s instrument without the Reamp. The image above compares using the direct box to the instrument input of the interface, all without a Reamp.
Testing Part 3 - Comparisons to Plugin
Sweeps
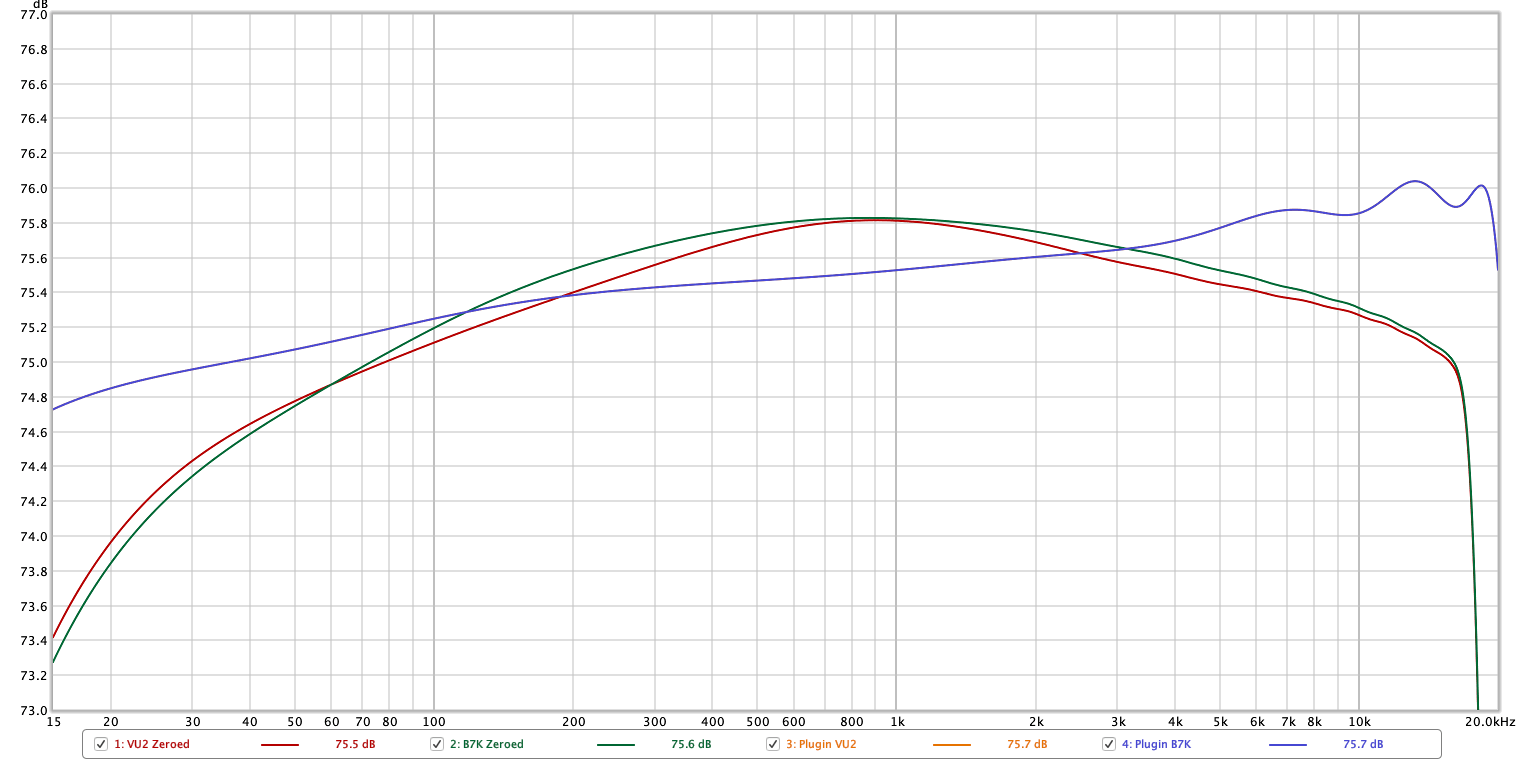
Here we go with the default sweep tests. You can see that the plugin response is identical in the two modes: B7K or VDU.
The hardware pedals themselves have some low and high end roll-off, but a very small amount. From 100hz->0hz is only about 1dB. From 1khz->16khz is 3dB.
That’s a pretty solid match to start. The plugin is clearly cleaner.
EQ

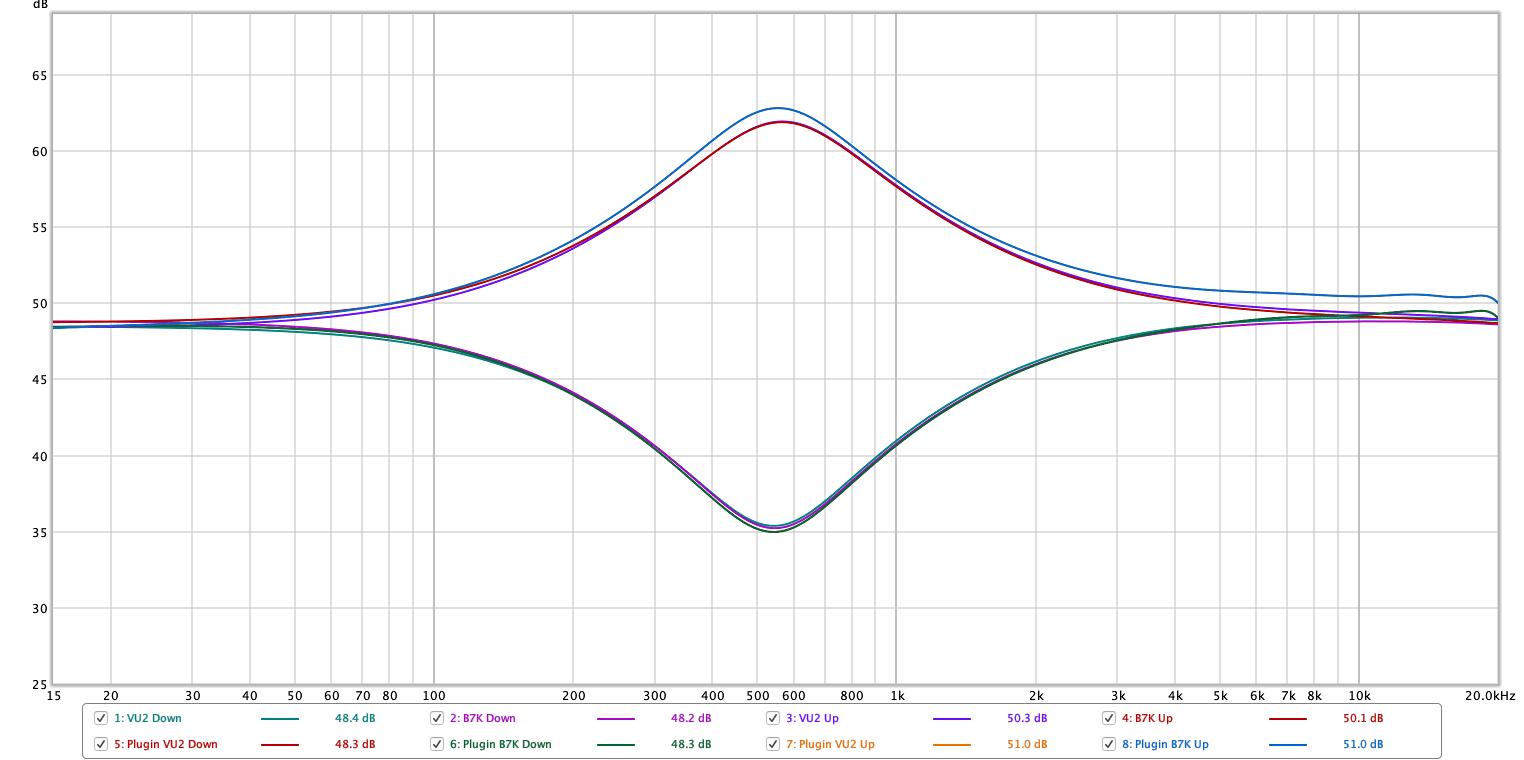
Some notes:
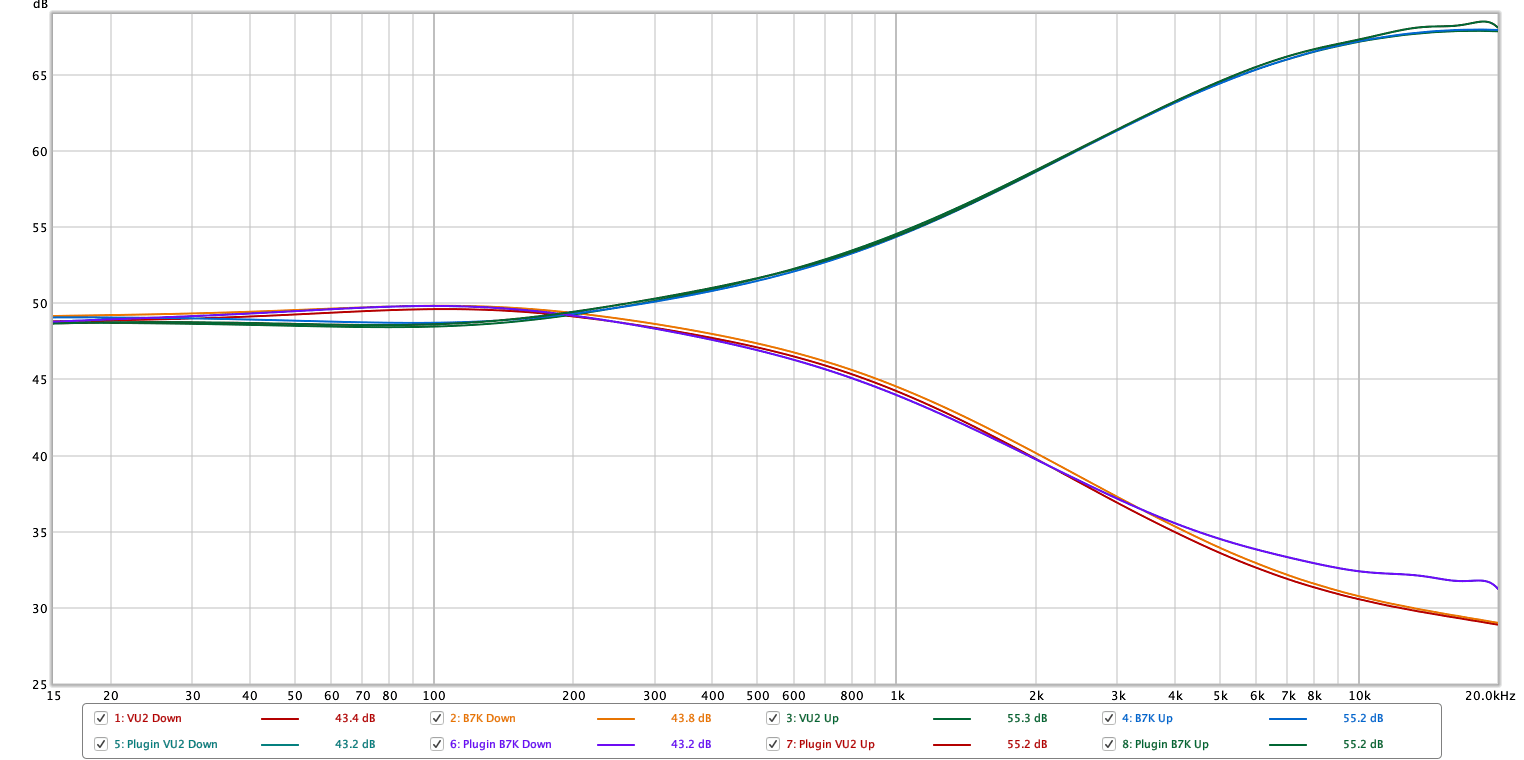
- Bass - They match almost perfectly when cut and boosted. It’s just a high-shelf that looks like it’s centered around 250hz. Measurements show +18dB and -20dB.
- Lo Mids 500hz - They match almost perfectly when cut and boosted. The real center value appears to be about 550hz. Boost is about +12dB, Cut is about -14dB
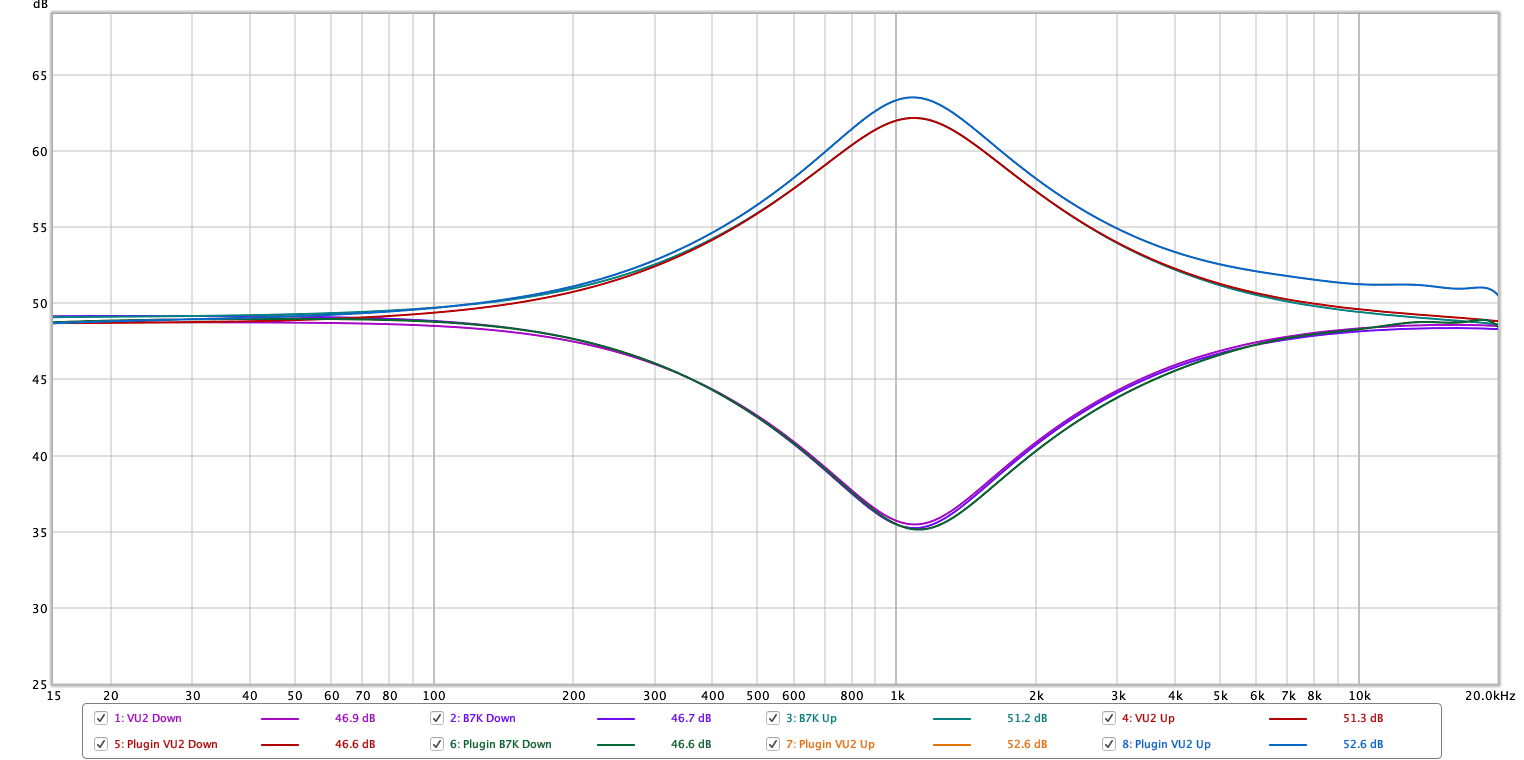
- Lo Mids 500hz - They match almost perfectly when cut and boosted. The real center value appears to be about 1.1khz. Boost is about +12dB, Cut is about -14dB
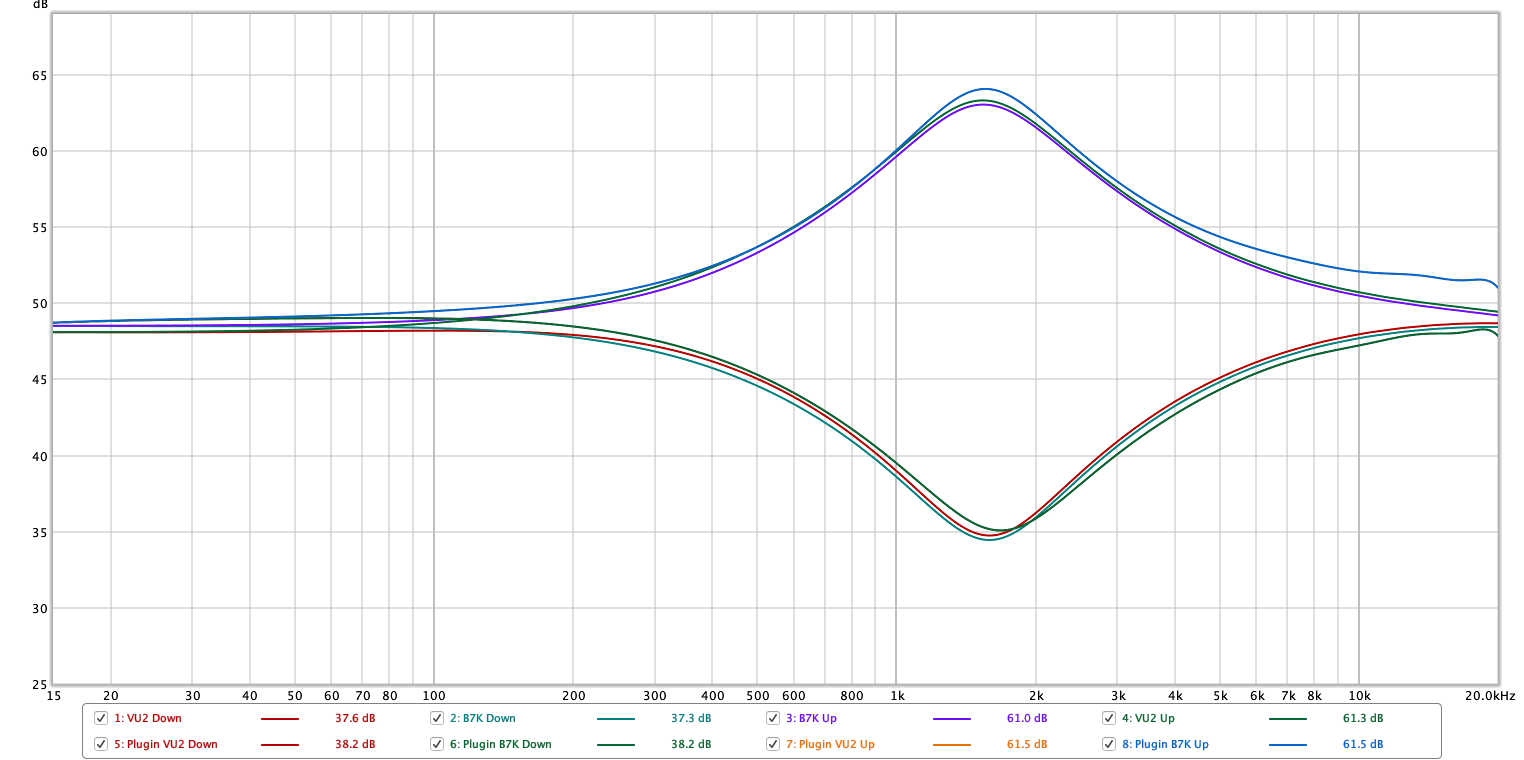
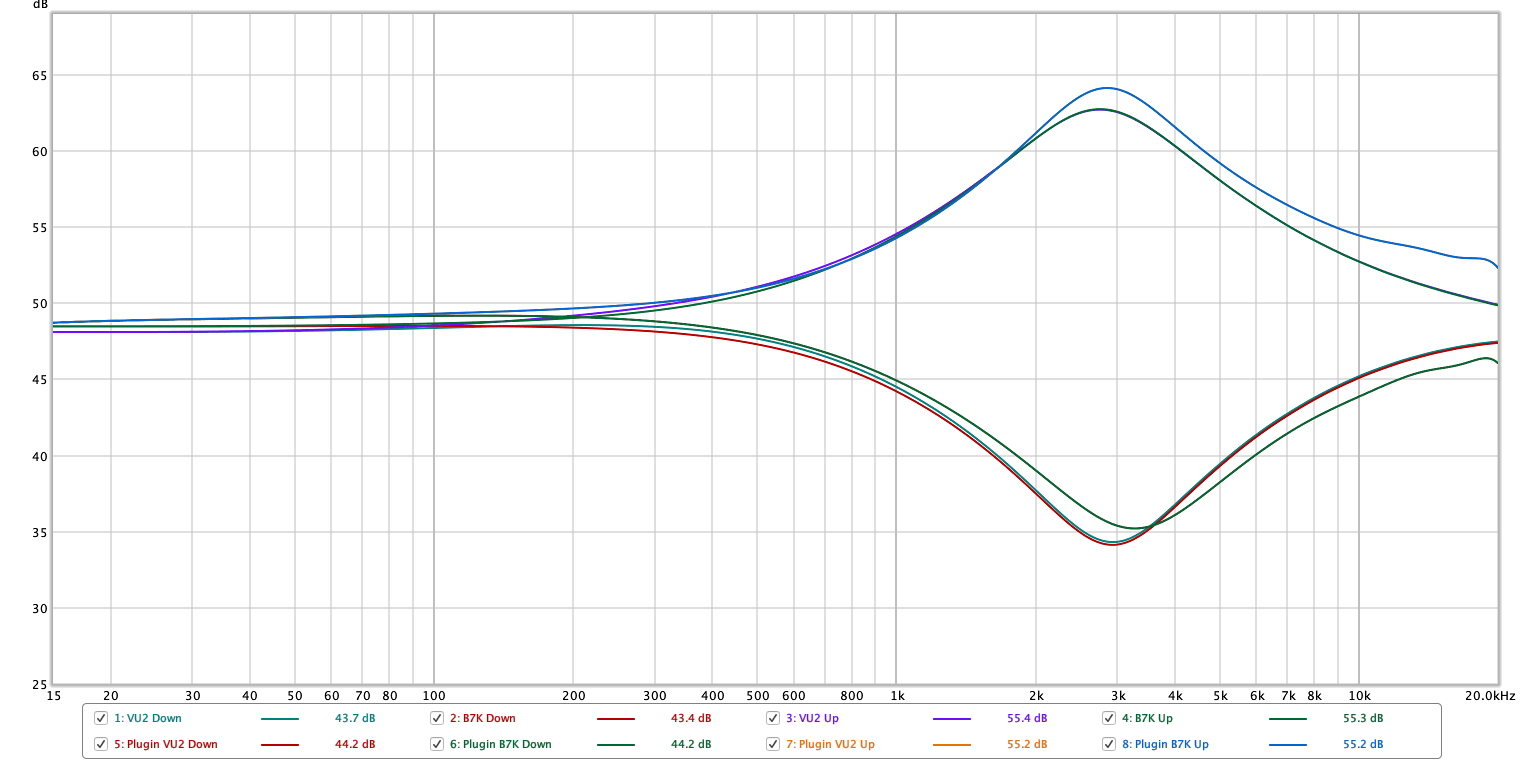
- Hi Mids 1.5khz - They match almost perfectly when cut and boosted. The real center value appears to be about 1.5khz. Boost is about +13dB, Cut is about -13dB
- Hi Mids 3khz - They match almost perfectly when cut and boosted. The real center value appears to be about 2.8khz. Boost is about +14dB, Cut is about -14dB
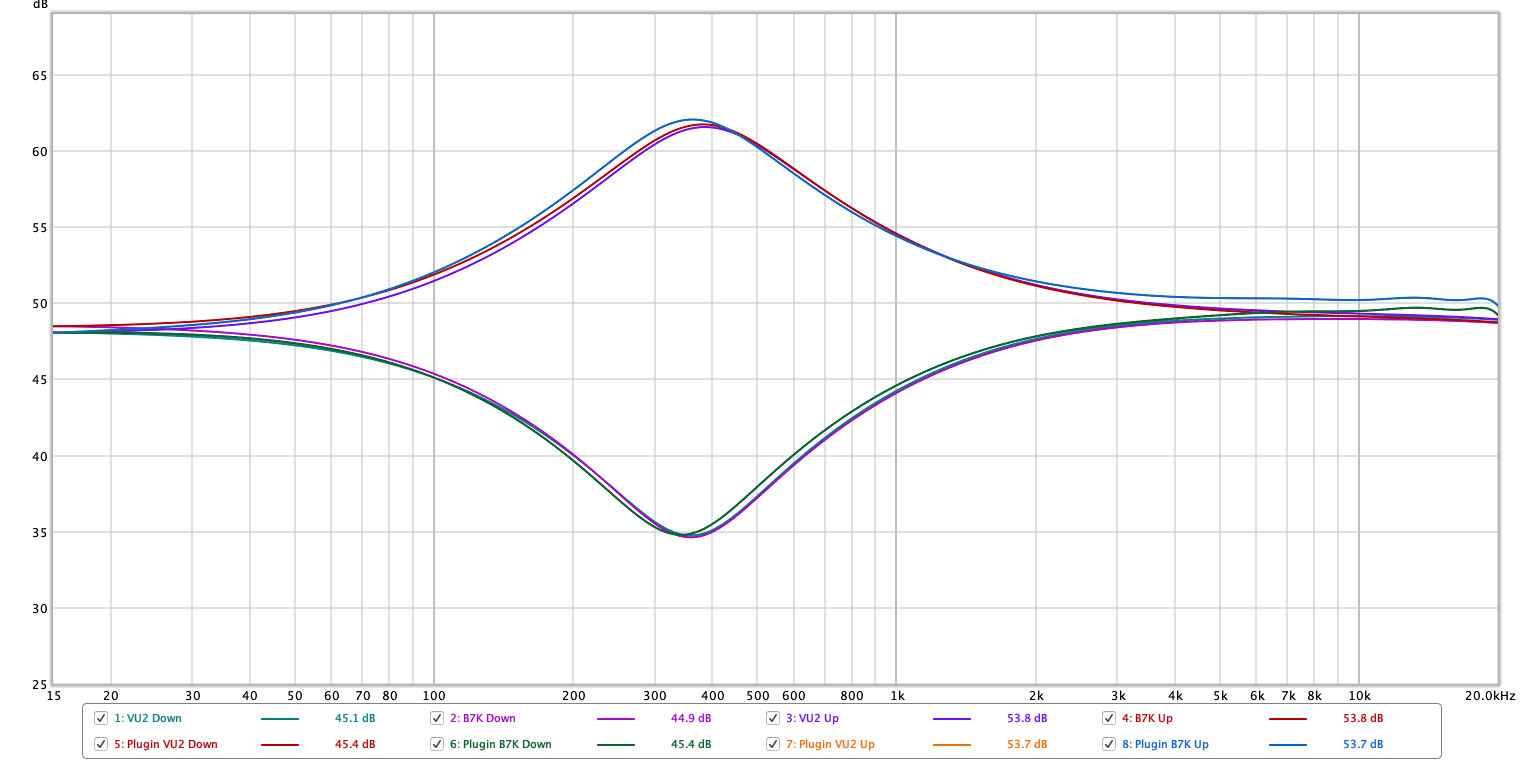
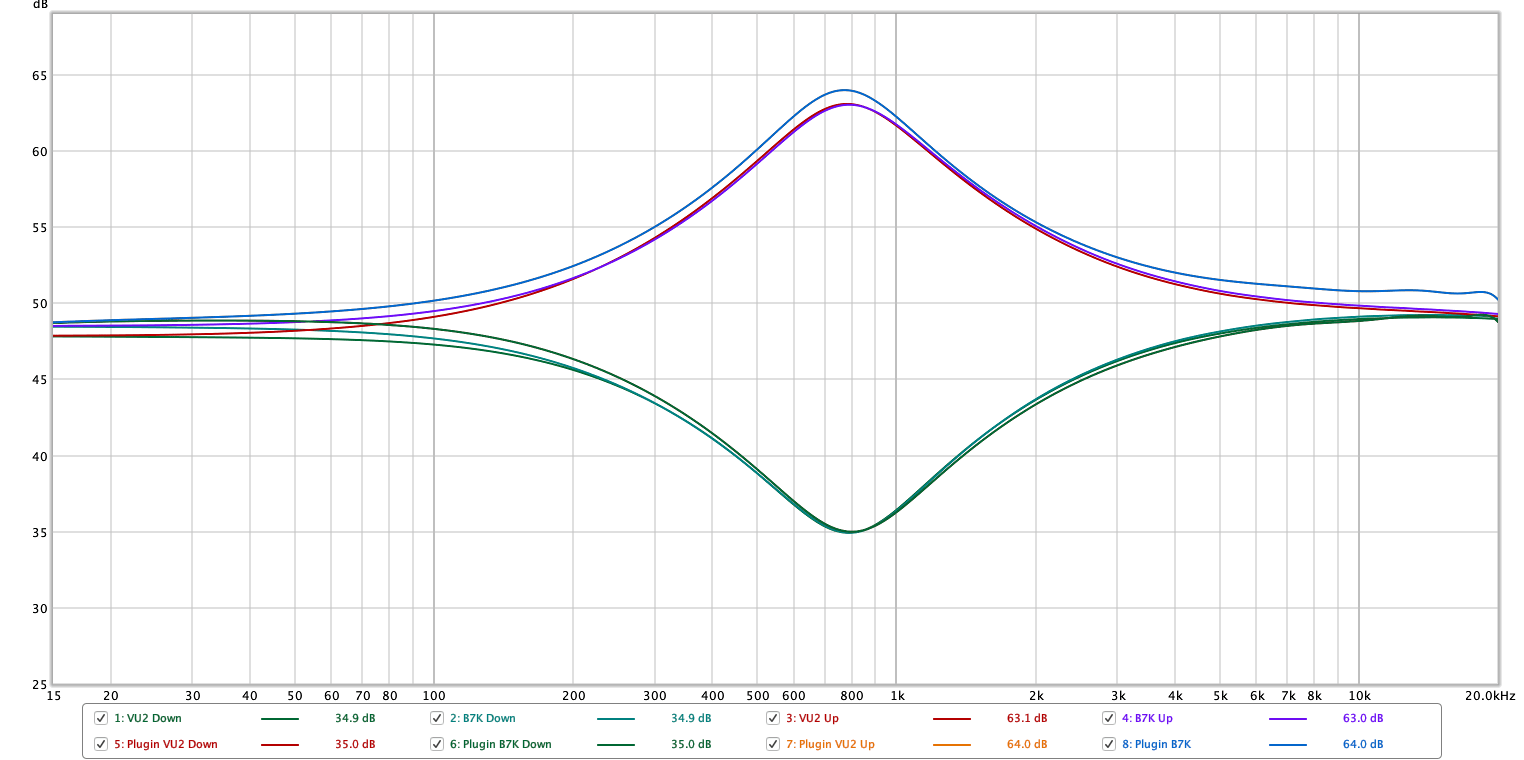
- Hi Mids 750hz - They match almost perfectly when cut and boosted. The real center value appears to be about 800hz. Boost is about +14dB, Cut is about -14dB.
- Treble - They match almost perfectly when cut and boosted. It’s just a high-shelf that looks like it’s centered around 1khz. Measurements show +18dB and -20dB.
Something of note is that what I originally thought was knob misalignment on the potentiometers of the B7K Ultra V2 seems to be component tolerance issues.
I find that somewhat endearing. My B7K Ultra V2 is unique. It’s cute. It’s my B7K and it’s like no one elses.
Heh.
Drive
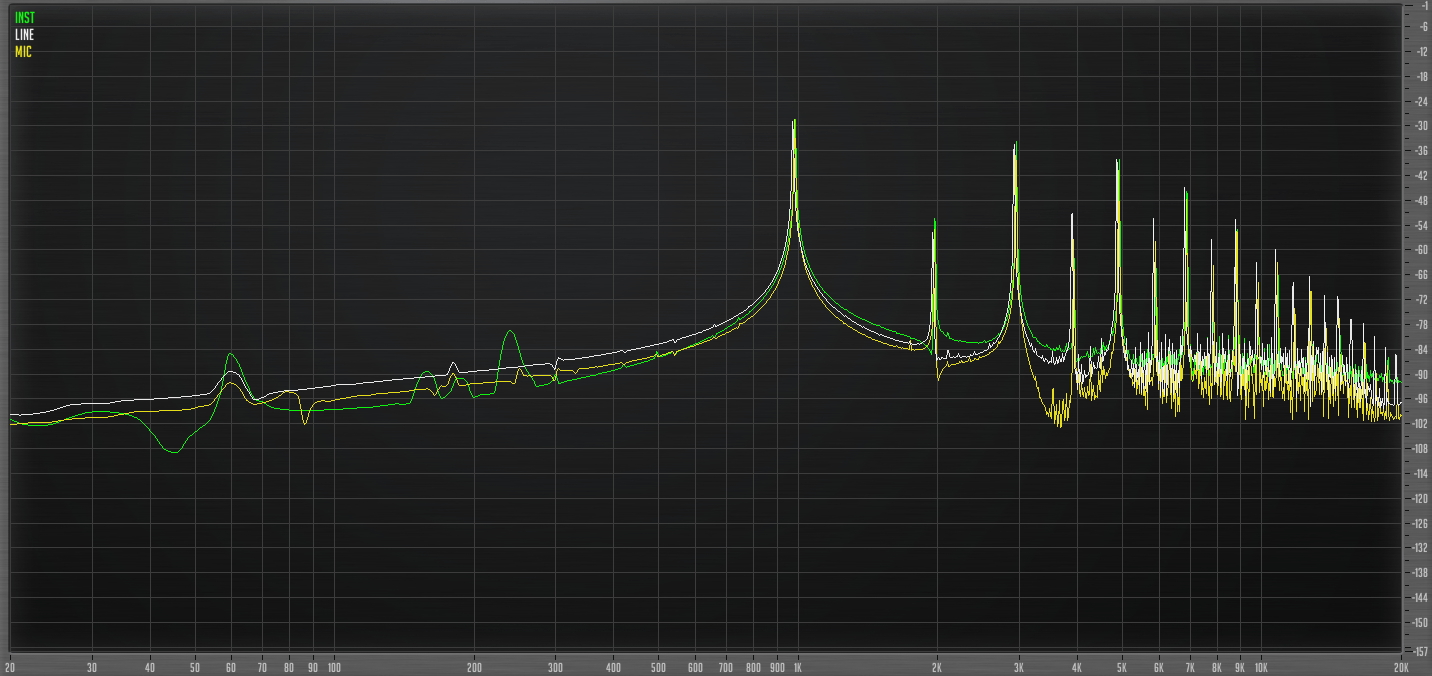
So we have 2 videos above showing some fairly significant differences in the drive. For the plugin I used an 800hz signal to differentiate it from the 997hz signal used for the hardware.
This is with the “Attack” and “Grunt” set to flat.
There’s some fairly significant differences here! The first harmonic (the most audible) is up to 20db different in the hardware! Hopefully I’ve established that the measurement is not causing this extra harmonics. The ratio of fundamental to 1st harmonic is also constant, which tells us that the input level is not the cause either.
The hardware has much stronger early harmonics, and software late harmonics. This is evident in both the B7K and VU2 versions.
I’m somewhat surprised with this result and retested this numerous times. The results are consistent.
The most important thing here is that there’s no aliasing, and it sounds nice. (The hardware shouldn’t alias, since it appears that only the cabinet simulation is digital).
Attack
This is a tough one to test. Due to the distortion caused by the Drive control we get a bit of a warped frequency response, and for that matter the Distortion mode may also change the frequency response as well.
THe animation above shows the VU2 hardware vs the plugin in VDU mode, then the B7K hardware vs the plugin in B7K mode.
There’s one time through slowly of each so you can see it, then 4 quick runs of each so you can see the “movement”.
It’s basically impossible to tell what we’re looking at here in terms of reverse engineering. This test uses a sine sweep, but a pink noise test shows the exact same. If I were trying to figure out the exact filter being applied before the drive stage, pulse-train + stepped sine test probably would show more… and be A LOT more images.
The thing I’m trying to show here succinctly is that the plugin and the hardware are very close.
Grunt
Same stuff as above.
Plugin and hardware are within 1dB of each other. The hardware does have more “grunt”. If you check out the examples, this becomes somewhat evident. It sounds like quite a bit more than just 1dB to me, but since this is a pre-drive parameter there’d be a lot more studying to do to find where the major difference lies.
Cabinets
The hardware currently can load one IR, and the plugin can load up to 2 IRs.
The plugin goes a step further and gives you freely configurable microphone placement along with control of the cab’s tweeter level. Here are the mics available:
- SM57
- Beta 52a
- Sennheiser e906
- Sennheiser md-421
- Neumann KM184
- Beyer Dynamic m-160
- Royer R-121
- Yamaha Subkick? (This can be made with almost any speaker, I’m assuming this is the popular Yamaha pre-made model)
Very cool feature, and definitely something that you win over the hardware.
Real Examples
I thought that I’d try something new this time. Instead of duplicating the video content in the article, the video is the sound examples.
I have 2 basslines per pedal/mode. Since the EQ’s are identical, I set the EQ to taste and then demonstrate 3 different drive levels. This is to help you hear the difference between the hardware and plugin.
I recorded the bass signal into a Pigtronix Infinity Looper then output that to the Hardware and to the Software (via Radial JDI).
Conclusion
The Darkglass Ultra plugin is not a perfect recreation of the hardware. It’s close. The Vintage Ultra mode is particularly difficult to hear differences between with my hardware.
The B7K Ultra on the other hand is much different from the software. I much prefer my pedal to the software. The software doesn’t sound bad, in fact it sounds cleaner and brighter. I like the grittier sound of the hardware and the fact that my pedal in particular seems to output a much deeper low end.
I’m a big fan of the hardware, and the software comes darn close. With the middle range drive settings the software sounds quite a bit brighter, so take that as you will.
I know you may be expecting me to tell you to that I think the software is awesome or not. There’s no clear winner here, and that’s the good thing. I LOVE the hardware pedals, and the software offers a slightly different flavour in the same vein.
Support Me!
This post took 56 hours to research, photograph, write and edit. If you appreciate the information presented then please consider joining patreon or paying me for my time spent bringing you quality content!
