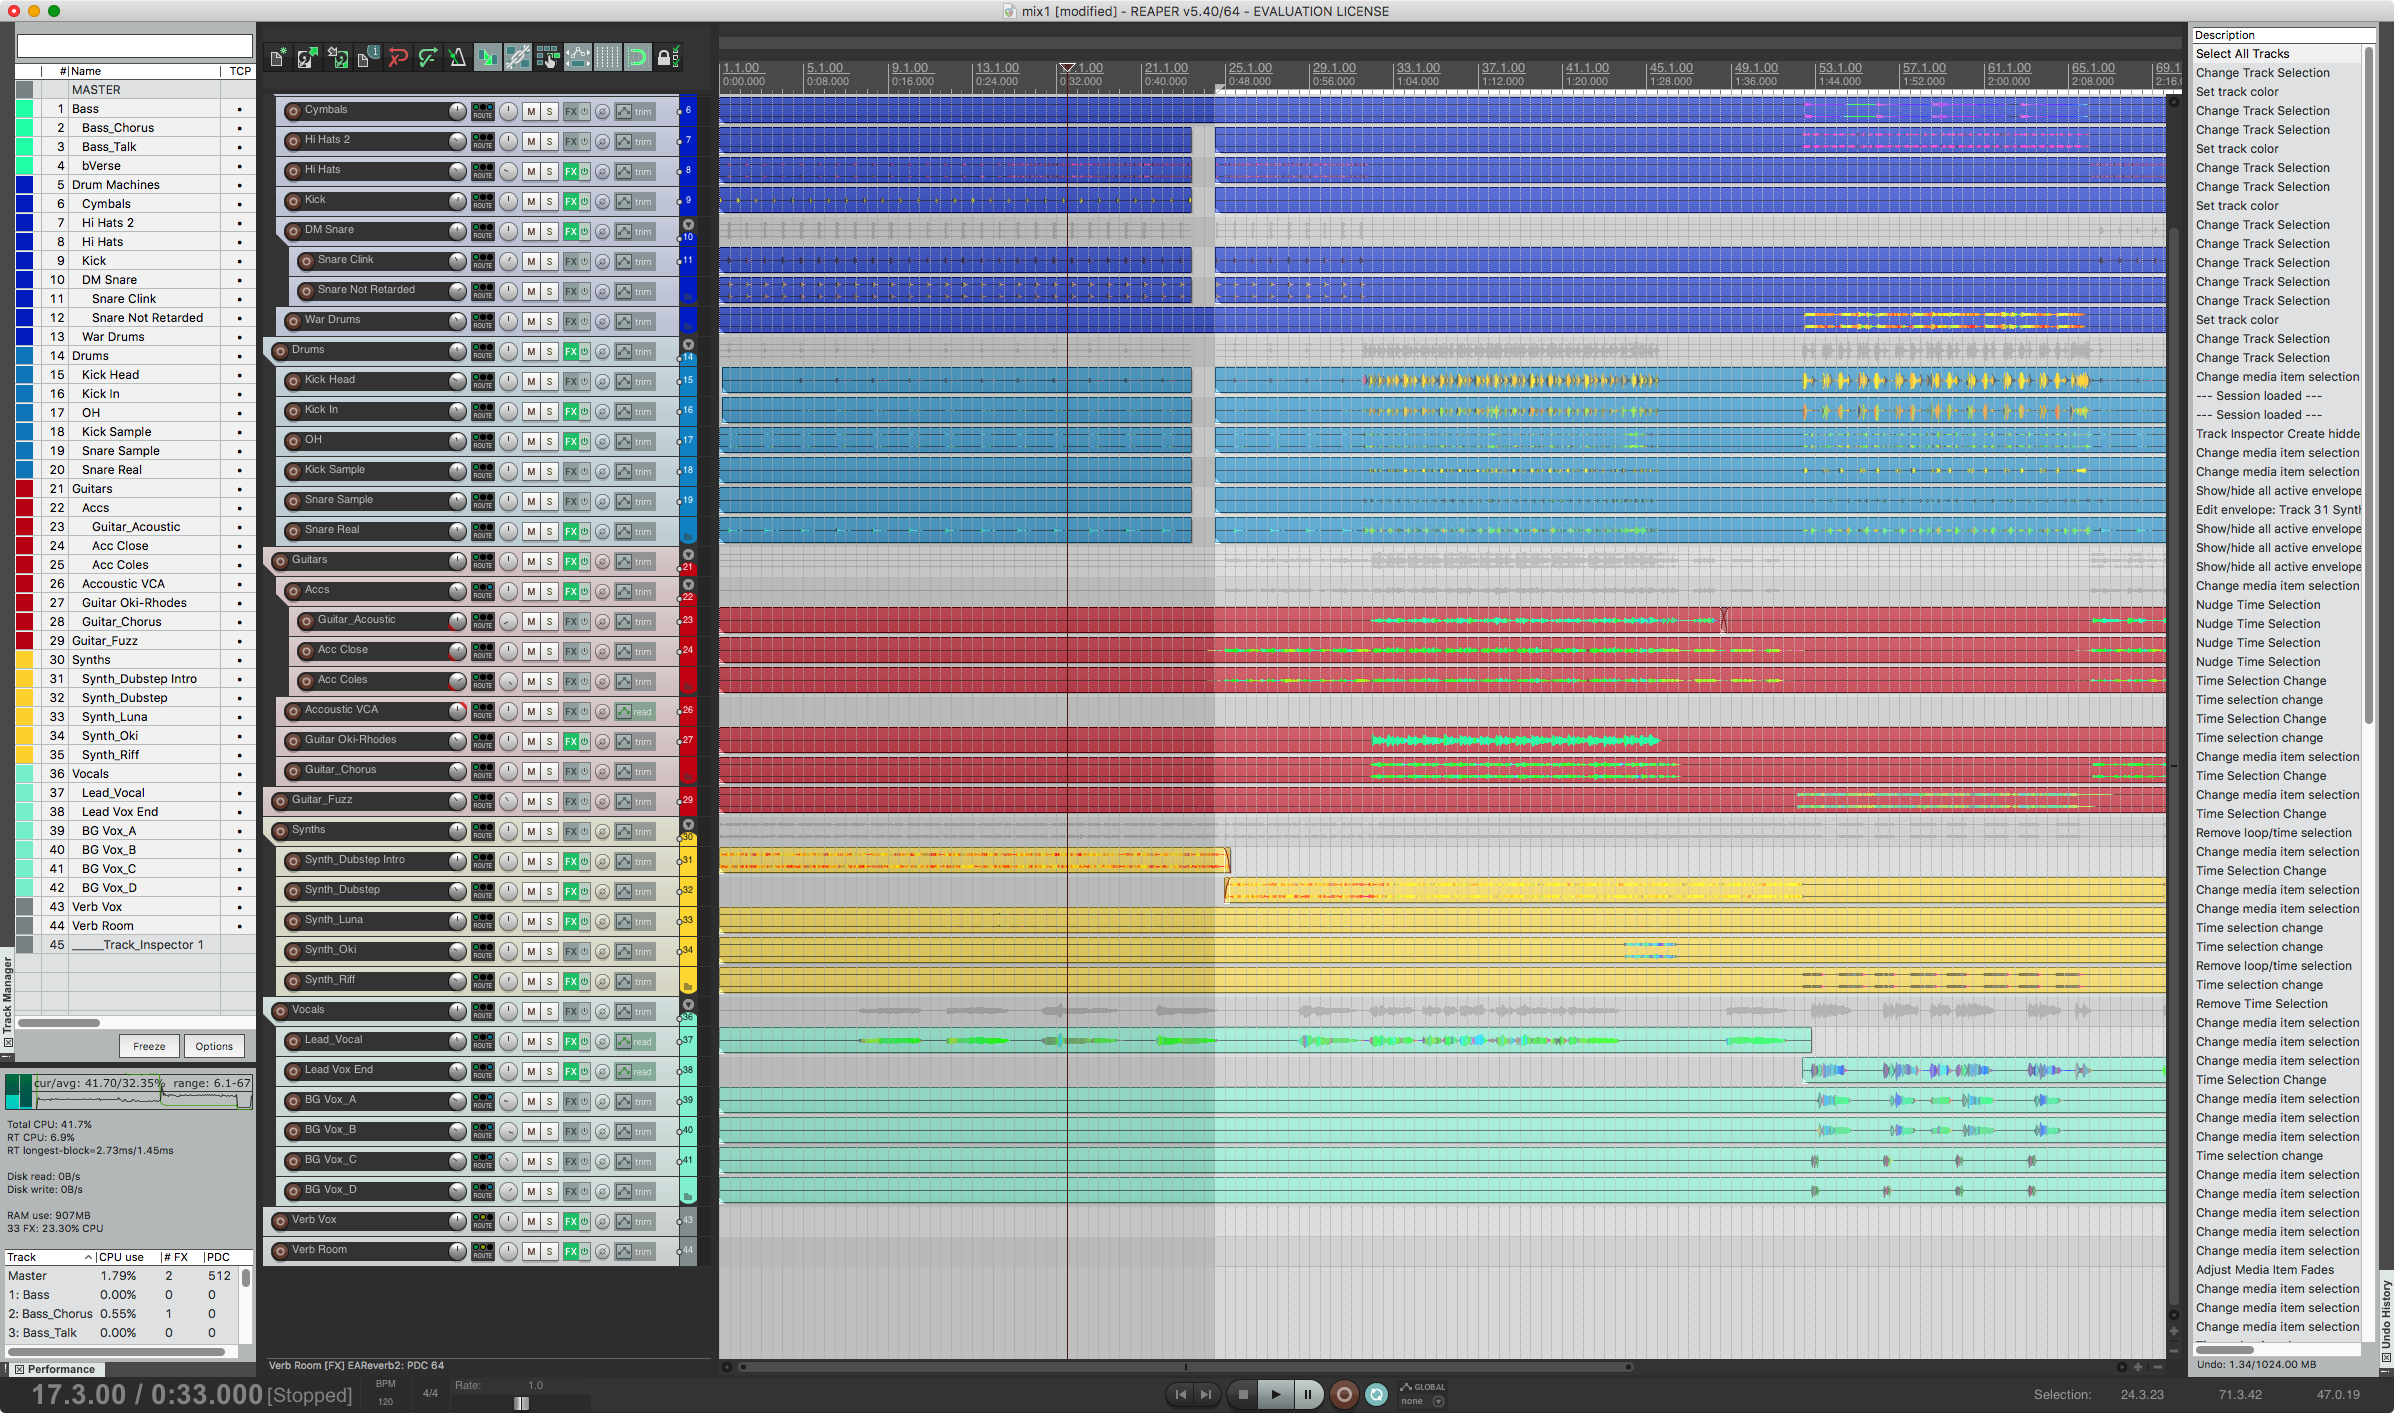
I’ve been using Reaper for about 1 week now. If you follow my blog then you May know how much I hate Reaper. I couldn’t even muster the discipline last time to go through with trying it.
This time I getting there though. So if you click-through, then you’ll find a pretty sizeable list of some cool stuff that Reaper offers.
(You can expect the vitriolic post to follow soon enough though… this has been a tremendously painful piece of software to figure out.)
Contents
- Introduction
- Routing
- Stretch Marker System
- FX dry/wet
- Undo
- Automation
- Editing
- Project Management
- Actions List
- Multi-channel recording to a single item
- Folder buss system
- Spectral peaks & Spectrogram
- Sub-project
- JS plug-ins
- Rendering
- Pre-Release
- Portable Install
- ReaPack
- Super 8 Looper
- SWS
- HeDa!
- Radial Menu
- Kenny Gioia
- Support me!
Introduction
Reaper gets a well deserved bad rap for being difficult to understand, having an awful UI and UX, and having an overzealous (and sometimes very annoying) community.
Despite those things, Reaper offers a huge amount of customizability and an unparalleled featureset. The community that is vexatious outside of the Reaper forums is a massive help and a driving force in developing Reapers second/third-party feature additions. If you have the patience (a lot of it), and the time, then it is possible to utilize the available resources and features to turn Reaper in to nearly the perfect DAW for whatever you do.
I will be including an embedded Kenny Gioia video in sections when I think it’s helpful. He’s an excellent example of how amazing the Reaper community can be.
Routing
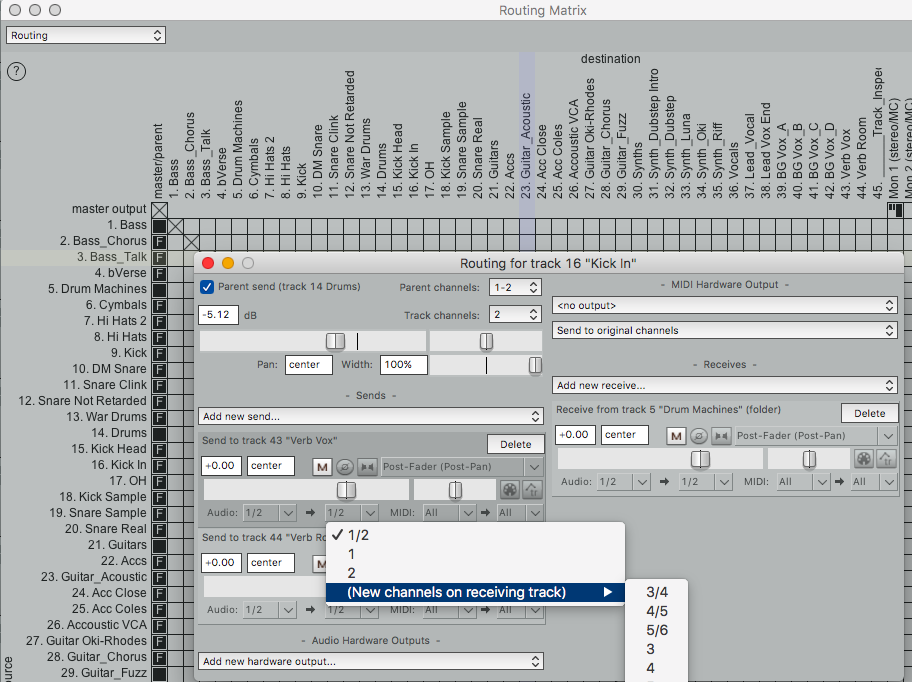
Routing in Reaper is fantastic. You can route nearly anything to anything. There is no distinction between audio, midi, stereo, mono, 24-channel or whatever. If you want something to go somewhere, then you can probably do it. You can even create gnarly ear-splitting feedback loops if you desire.
I saw it described as every track in Reaper being a 64-channel multi-format mixer. That’s about right.
Let me cover a few of my favorite routing features
Send and Receive routing
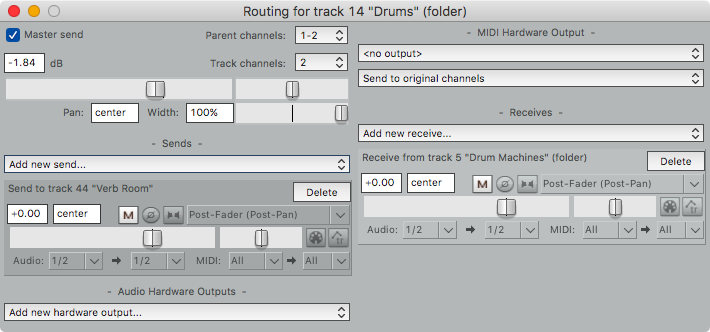
Sending things to places is the core of routing. Reaper’s send and receive dialogs make complex routing much simpler. Every send has a number of options as shown and can be excluded from being sent to the master/parent.
A big win here is that Reaper has receive dialogs too. You can select a track and see what is being sent to it as well as what it is sending. Receives seem like they should be such an obvious feature, but rarely is it implemented in another DAW. Large projects and complex routing situations make receives a lifesaver.
Sidechain routing
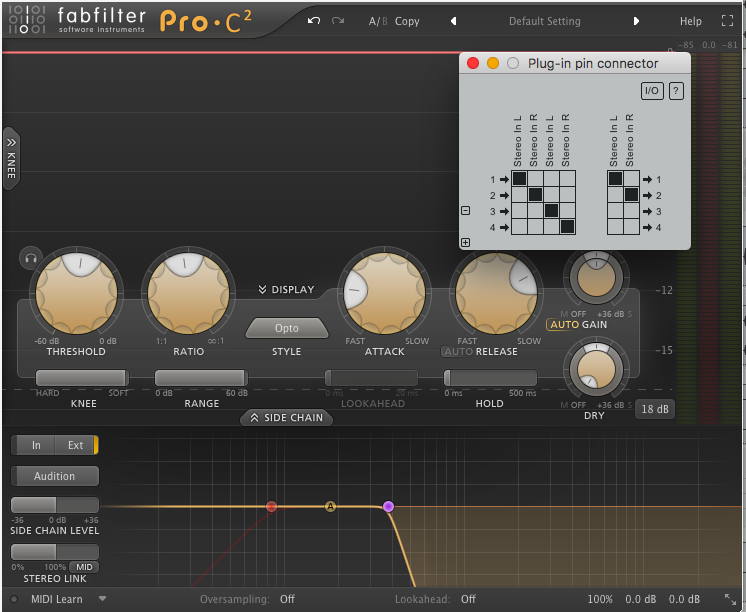
You can send any signal in Reaper to a plug-in. Simple. Well, it should be simple, but this is actually a pain in the ass in other DAWs.
In the above image, I’ve created a send from my “Kick” track to “Guitars” on 3/4. Every track in Reaper has 64-channels of I/O. The signal from the “Guitars” 3/4 buss is being routed to the sidechain input in Fabfilter Pro-C 2. Simple to do, but not obvious to figure out. Regardless, it’s a very powerful system that lets you do some rather complex and neat things.
You can also use Parameter Modulation to modulate signals. Be sure to read that section.
Routing grid
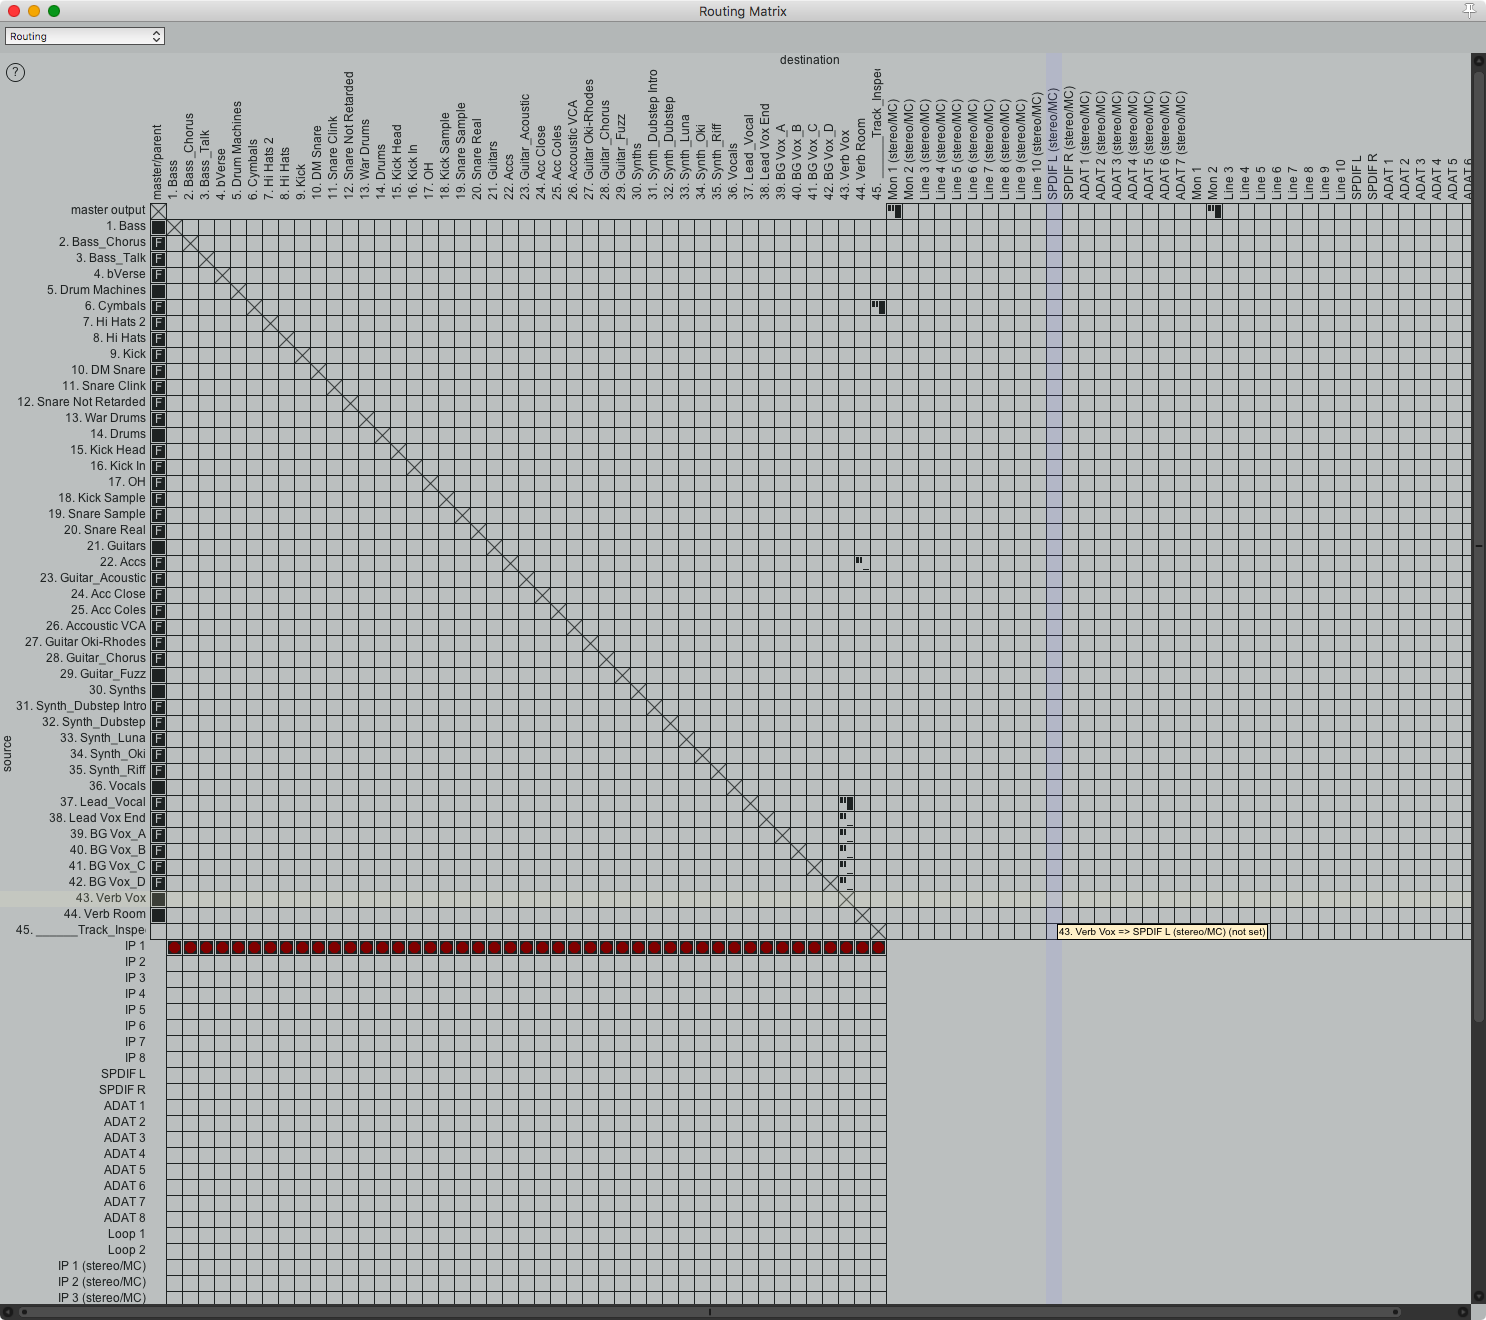
The routing grid makes routing things to places much simpler to do and more importantly easier to see. If you want to know what is going where, or setup routing in a large project, the routing grid is indispensable.
I also love using the routing grid for assigning I/O to tracks. Much better than messing with menus.
Stretch Marker System
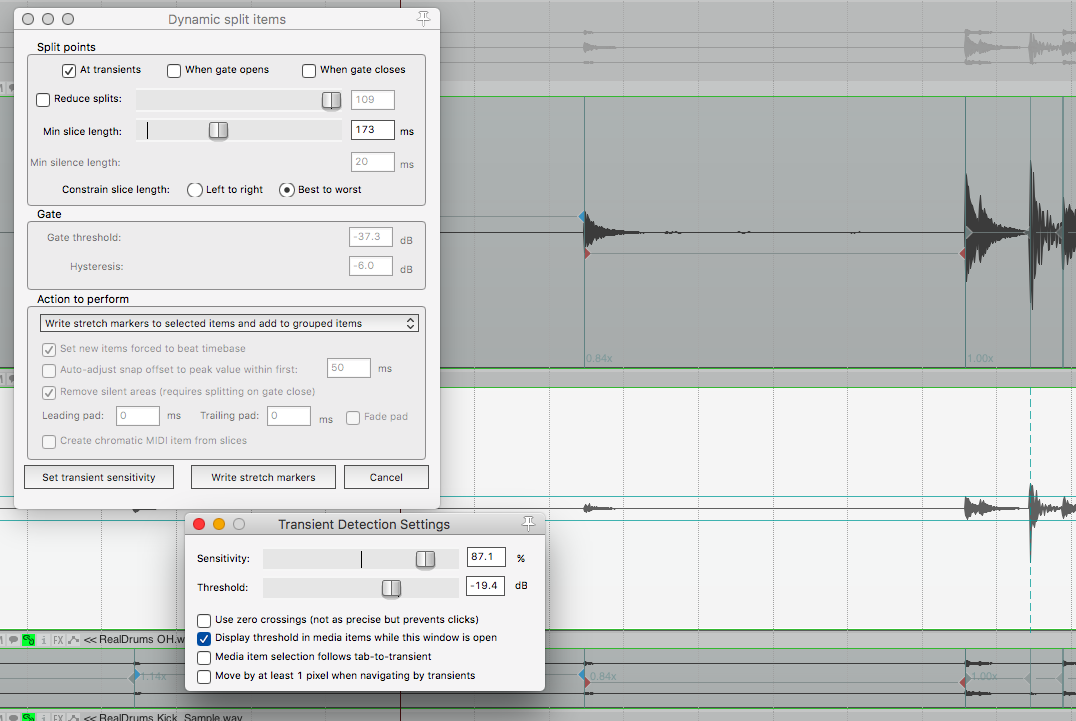
Reaper has an “Audio Warping” system like most other products, which it calls “Stretch Markers”, however I feel that Reaper’s system is on the top of the pack. Here’s a few reasons:
- There’s a visual indicator of the speed change
- Markers can have increasing/decreasing values rather than a simple linear scaling between markers
- Stretch Marker creation using the Dynamic Split window offers a lot of ways to deal with problematic material
- Pairs/selections can be moved easily without hunt-and-peck selection
- Markers can be edited via their time location OR their rate.
In the above image you can see the horizontal lines connected to the blue/red diamonds on the top item; those indicate the speed change of the associated section. On the bottom track you can see the long horizontal line that’s being used to set the threshold for creating new markers. The appropriate dialogs are also shown.
FX dry/wet

Every single plug-in in Reaper has a dry/wet knob. Right there in the upper right corner. That is so awesome. Some DAWs have it, and the rest should be deleted from your hard drive.
Undo

Reaper has the most complete Undo system of any DAW that I have experienced. Nearly everything is undo-able down to track/item selection, cursor position etc… and it’s configurable.
Some DAW users are still clamouring for their mixer to have undo… Reaper is already a generation or two ahead of that.
Besides the complete implementation of the undo-stack, Reaper also has Offline and Branched undo.
Offline Undo
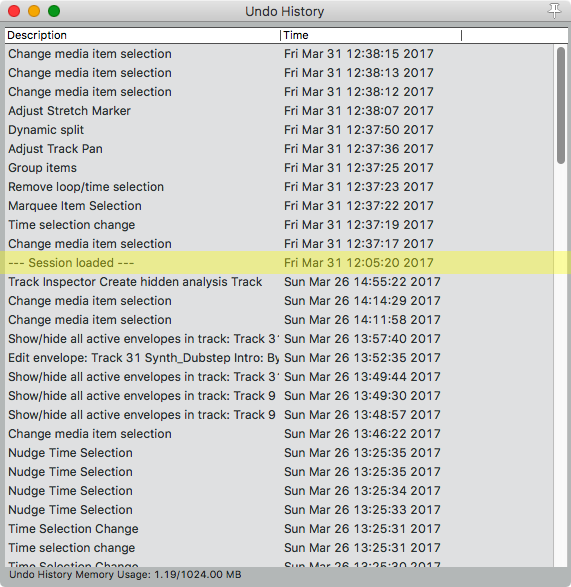
The undo-stack of a project can be saved with the project. When you re-open your project, you will retain the undo-stack as it existed when you saved. If you have project versioning or backups saved automatically, it’s saved there too if you desire.
Note in the image that it shows “Session Loaded” as an undoable action. You can even track when you worked on a project this way!
Branched undo

Branched undo is one of my favorite features. It’s not turned on by default though.
In Reaper’s Undo History window, a branch is indicated by a (* n) next to the branching node. So for instance if we see an item like “Toggle Track Solo (* 3)” that means there are 3 branches from that project-state.
So let’s look at what the above animation represents:

So what happened here is I did the following:
- Load Session
- Add New Track
- Rename Track
- Undo
- Undo
At this point I’m back to the original “— Session Loaded —” state. I’m going to do 2 more actions, which will create a branch.
- Remove Tracks
- Add Multiple Tracks
- Undo
- Undo
At this point we see that we’re now at “— Session Loaded — (* 1)”. The “(* 1)” indicates that if we wish to Redo, then there is one alternate branch available to what we see. You can click the branching node and cycle through the alternate histories.
Any point where we undo, then do something other than redo, a branch will be created. You can experiment with a project all you want, undo, experiment more then back up and go to your previous experimentation state. Great feature.
Automation
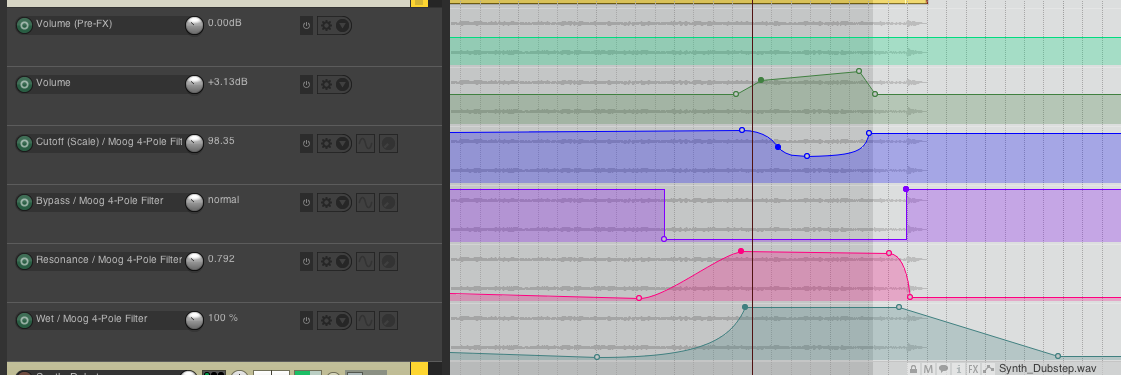
The automation system is Reaper is quite nice. While there are implementations in other DAWs that are certainly on par, or perhaps better, Reaper does offer a comprehensive automation system that surpasses many other DAW products.
Latch Preview
Latch Preview isn’t a unique feature, or even particularly revolutionary (some consoles had similar functionality nearly 40 years ago!), yet somehow a majority of DAWs out there lack this important automation workflow.
Latch preview is simple, it basically allows you to temporarily disable automation so that you can try different/new values. If you find a value that you like, then you can use the associate actions to write that value to a selection, to the start, to the end, combine, etc…
Volume adjustments
There are so many ways to automate volume in Reaper. This may sound daunting, but it is in fact a well-designed and useful setup.
Here’s the following ways you can automate volume in order of signal flow and what they do:
- Media properties - direct adjustment of the volume of a media item
- Item Volume handle - flat adjustment of the volume of an item in the arrange view
- Take Volume envelope - automation of the volume of a single take (which is contained in a media item)
- VCA Pre-FX - a VCA pre-fx slave point can be assigned to control the volume at this point.
- Volume Pre-FX - automation for volume before the FX chain
- VCA - A VCA slave point can be assigned here for a VCA master track to control the volume at this point.
- Track Volume envelope - the fader that you see in the mixer
- Trim envelope - This is a secondary automation envelope that is applied on top of Track Volume. There are various uses, but it allows you to add changes to the Track Volume envelope without editing it. These changes can be written permanently to the Track Volume envelope if desired.
- Track Trim - If in trim/read automation, this allows the track fader to control the overall level of the track. Volume automation is not shown on the fader and instead you can trim the written automation with the fader.
From there you can route your track to another track for yet another layer of volume options.
Note that Reaper includes a complete VCA implementation, which I’ve not given its own section to.
Parameter Modulation
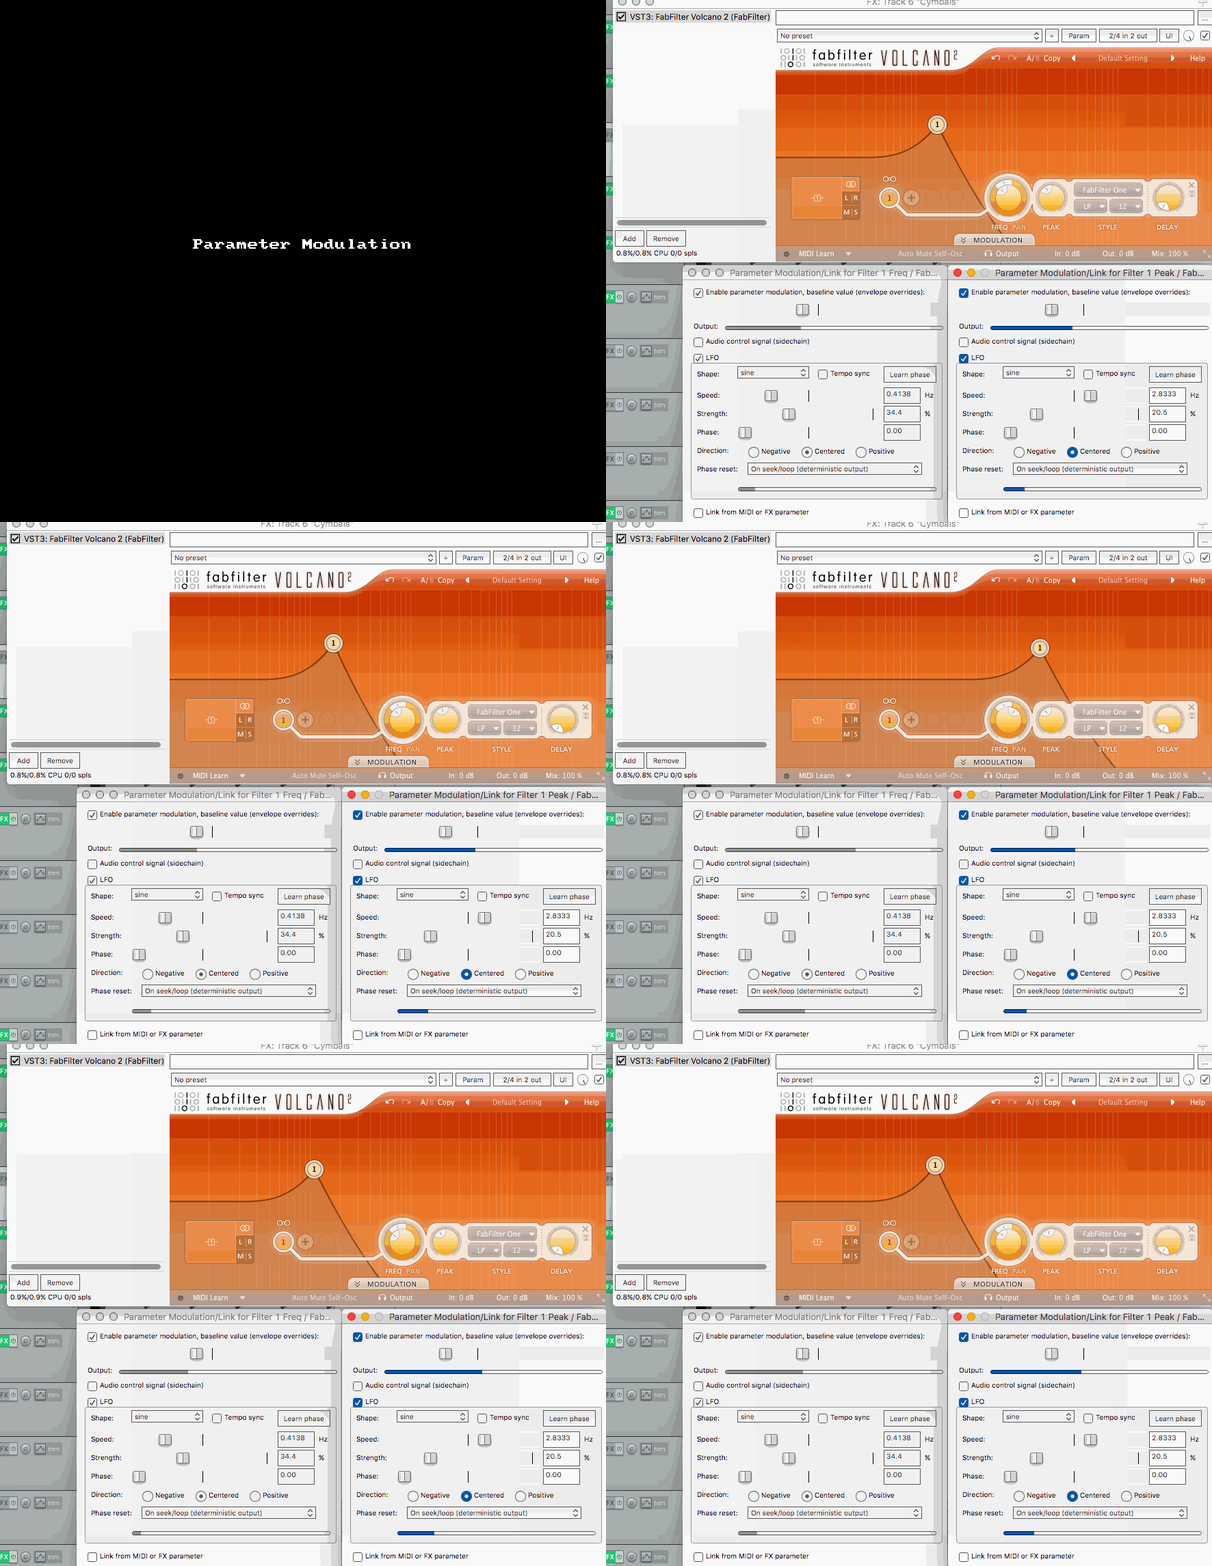
Reaper has a mini-modulation system. You can modulate any published parameter of any plug-in by one of 3 signals:
-
LFO - A fairly decent LFO that you can modulate a parameter with
-
Audio Signal - The signal that you choose (remember that you can route almost anything to anywhere!) is fed through an envelope follower and turned in to a control signal. Basically you can ‘sidechain’ anything!
-
Link from MIDI or FX parameter - Link allows you to link 2 parameters of any plug-ins on the same track. Since some of the Cockos/JS plugins have meters as parameters, you can drive one parameter by some very interesting sources! You can even use this and JS/Lua to create your own modulation sources.
Automation search
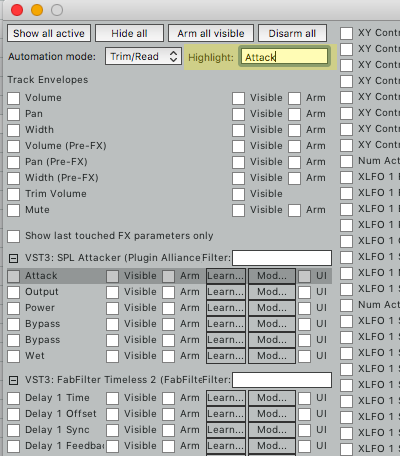
Reaper’s automation window has a search feature. I love it!
I highlighted in yellow where you search, and the grey highlight is the result of typing in the “Highlight” textbox
Editing
Besides the plethora of actions that allow you to create your own precision editing system, Reaper also has a number of features that specifically make editing audio easier.
Free Item Positioning
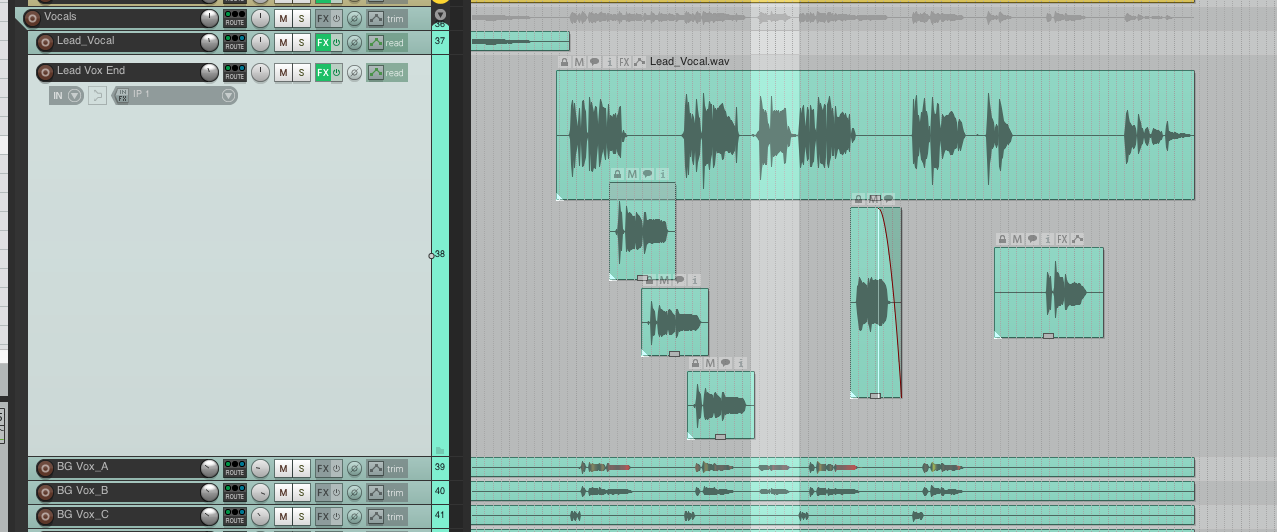
What if you could place media items anywhere on a track, like each track was essentially its own free-form project? In Reaper you can.
FIPM allows you to put a media item at any vertical position on the track. Exceptionally useful for things like vocals or guitar where you may have many overlapping takes that need to play at the same time through the same FX.
Maybe this sounds confusing, but I think the image should clear it up. Those media items are all one one track, and can be placed/resized vertically anywhere.
Note Every track in Reaper is damn near its own 64-channel mixer. Media items can be routed to any one of 64 the ‘track outputs’, which then can be individually routed out to anywhere you want. One track could serve as a 64-track free-form project all on its own…. if you were crazy.
If you are creative, there’s many things you can do with this functionality to better organize your project!
Take/Media Properties
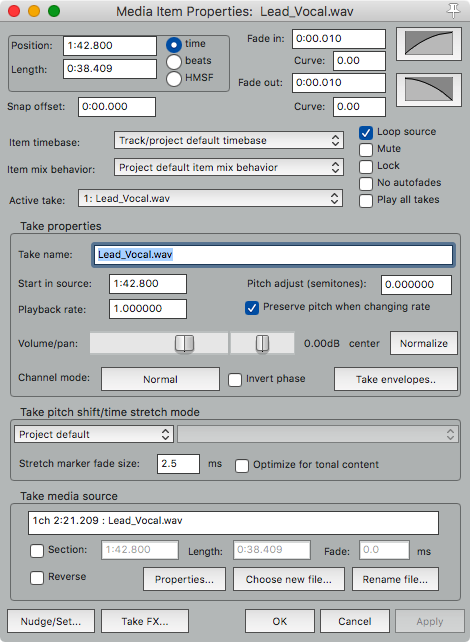
Every item or take in Reaper has a plethora of options. Things that you would have to painstakingly automate, or use multiple tracks for, in other DAWs are a simple media item setting in Reaper.
There is real convenience with the media item properties.
Take/Media FX
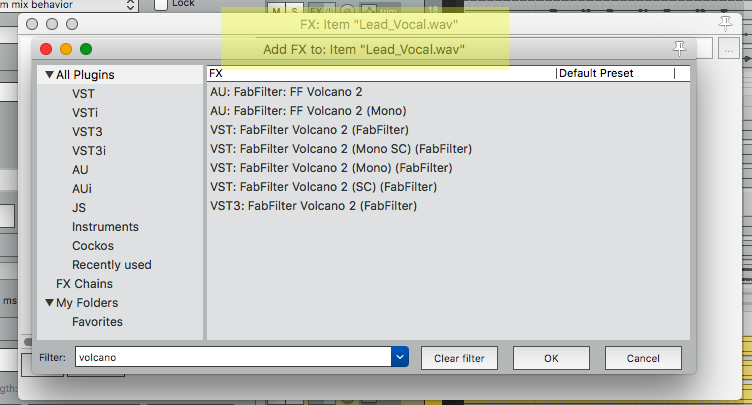
Any media item or take in Reaper has its own FX chain. This means that instead of having to automate bypasses or duplicate tracks to have an effect on just one syllable or note, you can simply split the item and apply the FX.
Combine this with Free Item Positioning and it basically makes the ‘automate bypass’ workflow totally obsolete!
Propagate
Propagation features in Reaper allow you to apply changes from one media item to to media items with similar names. So if you have duplicated a guitar clip in various places around your project then decide you want some delay effect on just that clip, you can instantly apply that new item FX to all other items with that name.
Project Management
One of the things that first annoyed me about Reaper was project navigation. Zooming, Scrolling, Jumping to time, Jumping to tracks etc… Eventually I learned that Reaper has easily the most powerful project navigation system of any DAW.
Media Bay
The Media Bay is a searchable/filterable list of every file, item, FX, item group and take comp in the project. If you know the name of something, or what plug-in is on it, you can find it quick. Not only that but this is your one-stop-shop for managing all of these things.
I strongly suggest checking out the User Guide for more information on the things that you can do, or just watching Kenny’s video.
Track Manager

The Track Manager gives you a quick overview of what tracks are in the project, where they are visible, how many FX there are, current PDC etc…
If you want to quickly find, show or hide tracks, this is where you do it. I always have the Track Manager open for navigation of projects. It allows me to quickly jump to a track or tracks and/or filter the arrange view to just those tracks.
Like most windows in Reaper this is dockable, which means it can always be visible and ready to use.
Track view set
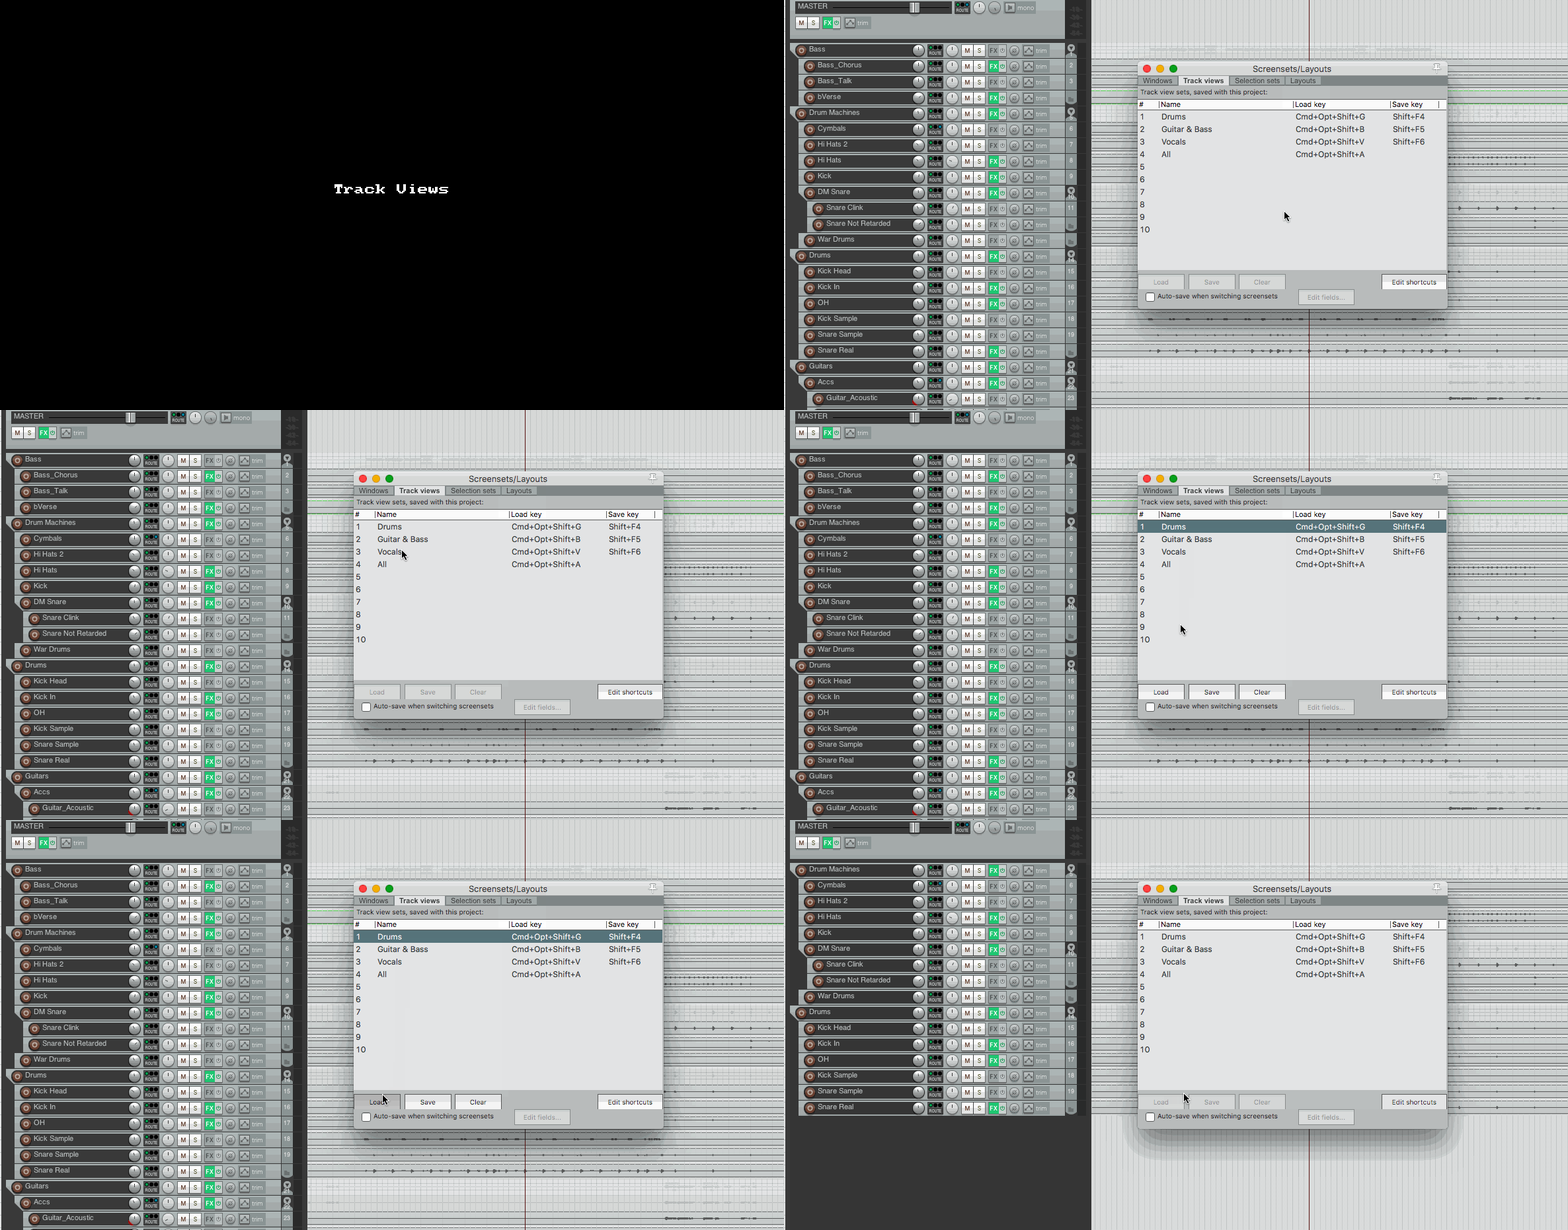
So you use the Track Manager and Zoom tools to work on some portion of the project and you find yourself referring to that frequently. Great, you can save that view (with the shown options!) and instantly recall it later.
In the animation above, I’m using the cmd-opt-shift-g/b/v/a keys I setup to cycle through viewing certain tracks in the project via shortcut.
What is saved/loaded has a number of options as well
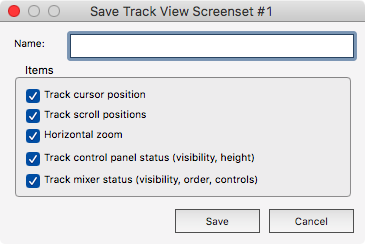
Awesome.
Selection set
Not only can you save your current view, but you can save selections of items. Item grouping is great, but item selection sets are a big enhancement. You can hotkey any selection for quick editing and then go back to what you were doing by just clearing the selection. This is a fantastic feature.
Track notes and empty items

This is just kind of a trick. You can create an empty item in Reaper, add a note to it, then stretch it to fit your whole track.
Voila! Your empty bus/aux/whatever now is labelled in the arrange view.
Project versioning
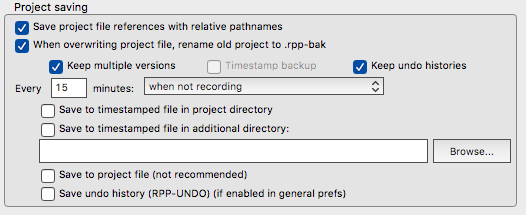
Reaper can automatically create dated project files everytime that you save. Automatic backups can also follow this convention.
Of course, these can all have their own off-line undo!
While this feature can use more disk space than you might be used to, disk space is cheap and this feature may save your ass one day.
Actions List
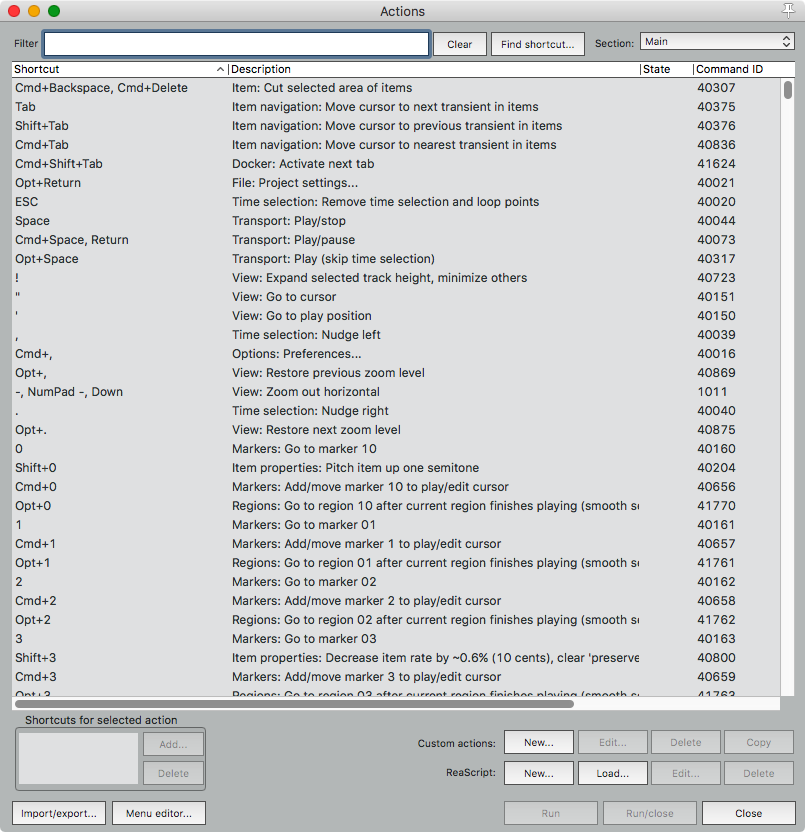
I love the Actions List. It’s so fast and convenient to find, assign and use(!) action. A quick press of “?” opens it, then you type. You can also select “Find Shortcut” and press the shortcut to find it via keypress rather than name.
From there you can do a multitude of things:
- Run the action
- Assign the action to a keyboard shortcut
- Assign the action to midi
- Create a custom action - a custom action is a series of actions executed in sequence. Since there are so many fine-grained actions, it’s very easy to create your own actions that do complex, but common, actions. A great inclusion to this feature is that you can ‘Consolidate undo points’. ‘Consolidate undo points’ turns your sequence of actions in to a single-undo node rather than filing your undo stack with all those commands.
- Custom actions can have meta actions like loop points, prompts and focus main window.
- Custom actions can include scripts
- Create, load or edit a custom ReaScript
- Access the Menu Editor
- Import/Export actions
- Setup alternate shortcuts for when recording is active. This means that you can setup neat workflows for re-recording, live-editing, and various other features that are only active while you are recording.
There are sections for various midi editors and the media bay.
I can not overstate how good the Actions List is, but there is yet one more feature that integrates with it…
Cycle actions
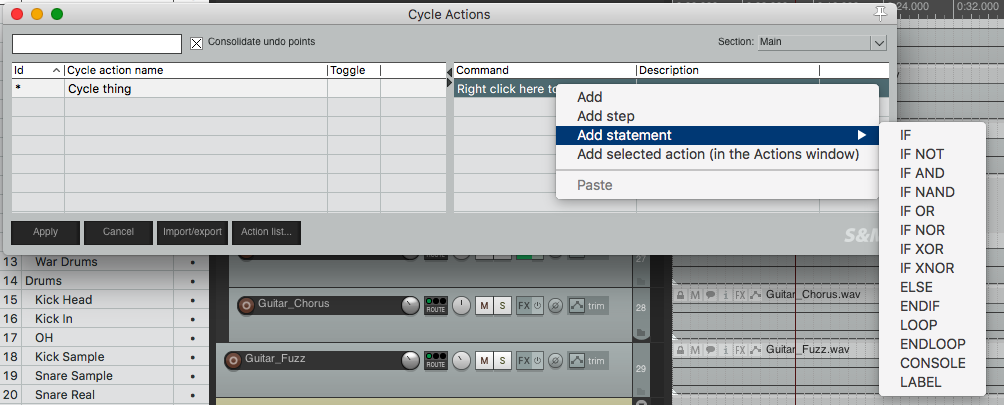
If you install the [SWS extensions](http://www.sws-extension.org, which you absolutely need to, then you will have the “Cycle Action editor…” under the extensions menu.
Cycle actions allow you to create a single action that loops through multiple actions with a single keypress. These actions can include logical steps (If X then Y else Z), console commands, other actions, states of actions and more.
Cycle actions allow you to create complex and reactive actions that are context sensitive, respond to the environment and self-reflective. Go find a video or read a tutorial about how Cycle actions work. It can turn complex workflows in to simply “press X 5 times, move item, press X again, select items, press X again, move mouse over fader, press X, select automation points, press x 3 times, etc..”
Hell, you could map out an entire session to just pressing a single key if you were omniscient!
Multi-channel recording to a single item
Reaper supports recording multiple channels of audio to a single media item. When record multi-channel instruments this workflow can greatly simplify things compared to working in other DAWs.
Remember as well the whole thing with each track in Reaper having 64-channel free-routing as well. Your 4+ channel item can be routed out to multiple tracks for easy mixing. The items can be exploded or collapsed as needed, or hidden differently in the tcp/mcp. Just watch Kenny.
Folder buss system
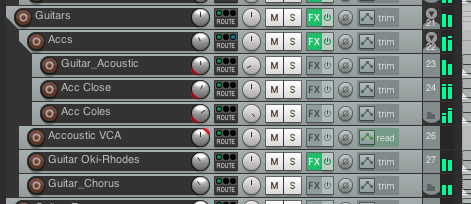
Bussing audio in Reaper is done two ways: through folders or through multiple sends to a single track.
The folder system is great. You can easily create hierarchies of tracks feeding through multiple folders. Editing is linked to media items, and controls are linked to groups, so the folders do not get in the way of contextual grouping.
I prefer this system to the traditional system with aux-sends or ‘bus tracks’. It adds a visual indicator of routing (which can be complex in Reaper if you choose), and it also lightly enforces project organization through routing mechanisms.
Spectral peaks & Spectrogram
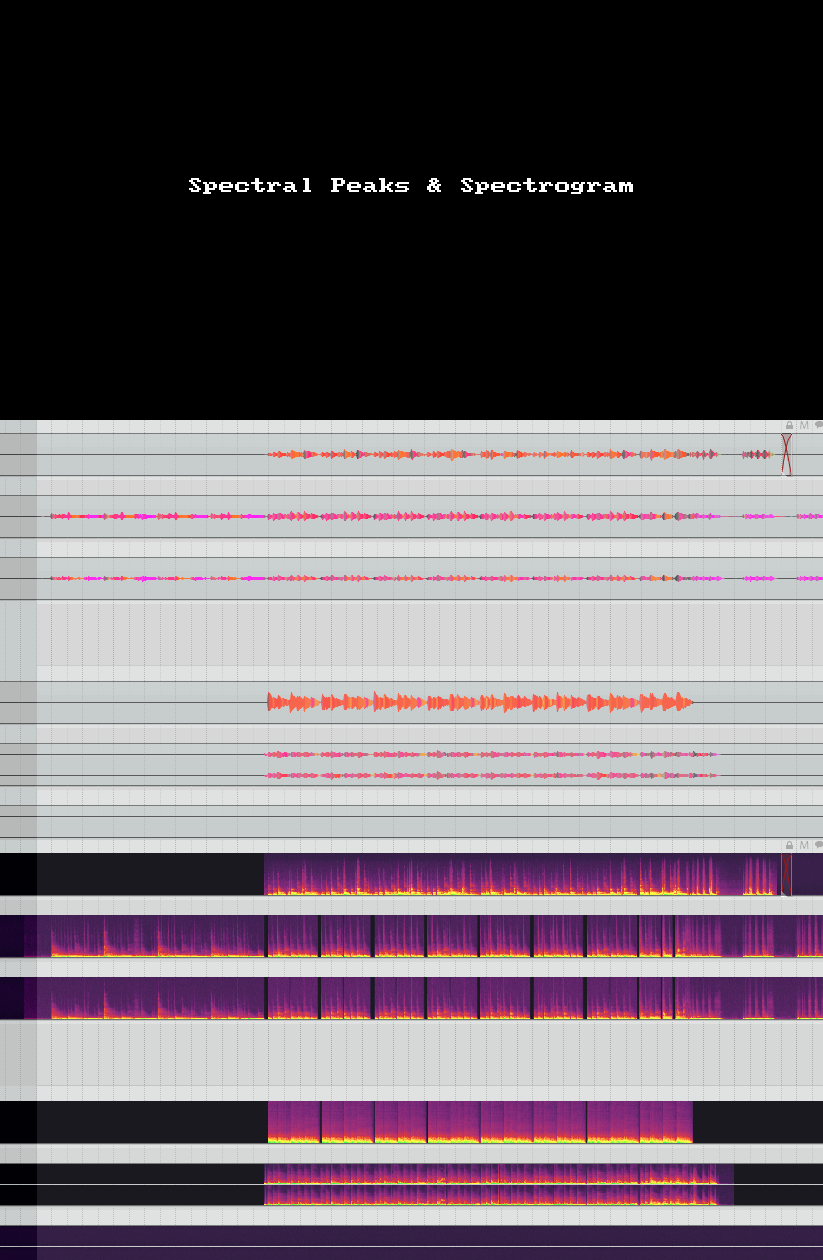
Recently Reaper has gained 2 new features that I really like that change how audio is visually represented in media items. These can be applied globally or per-track.
Spectral peaks
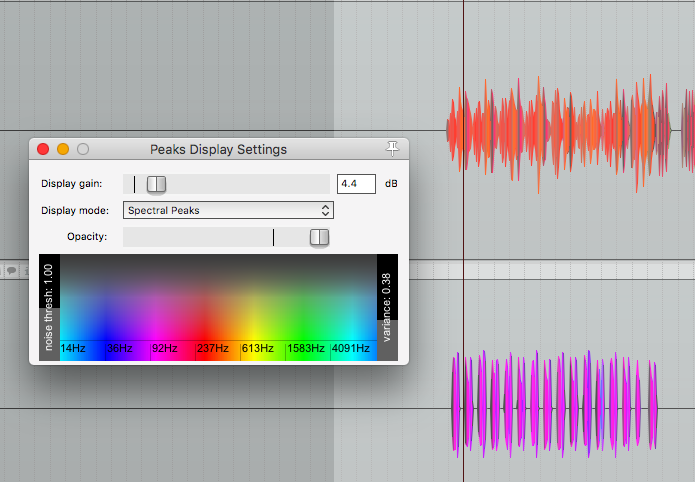
Spectral peaks draws the waveform as you would normally recognize with amplitude represented vertically, but also visually encodes frequency data via colour.
Take a look at the items above, I have 2 items here: an acoustic guitar and an electric bass.
- Top track - Mostly orange/red. According to our settings, the fundamental on most of the track is ~250hz.
- Bottom track - Mostly purple. According to our settings, the fundamental on most of thet rack is ~100hz.
We can visually identify the top track as our Acoustic Guitar, and the bottom as the Bass Guitar.
Another Example:
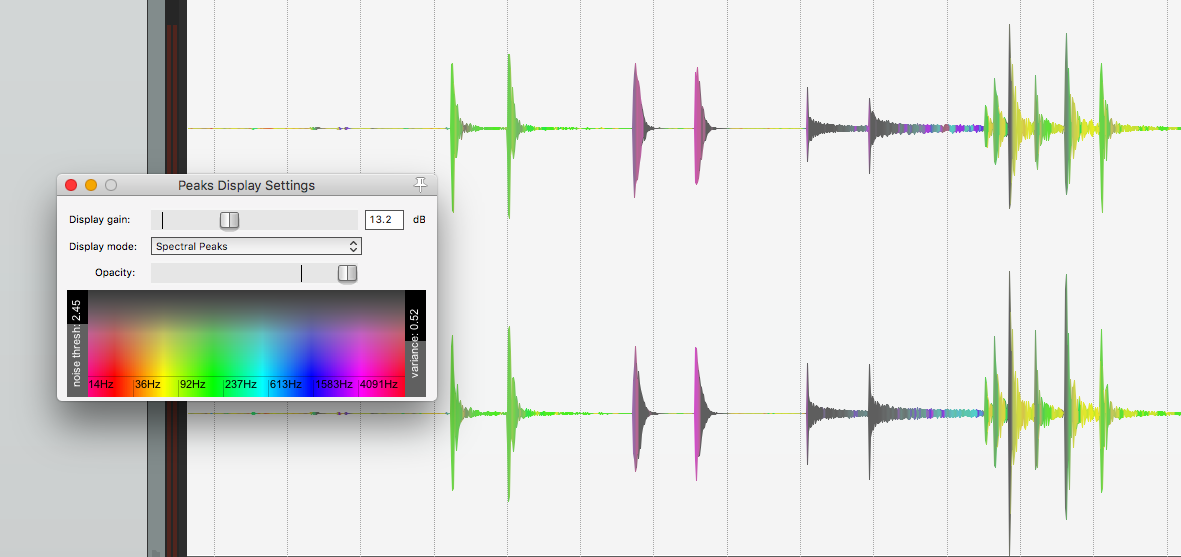
Here in this file I have hit the following drums
- 2 kicks
- 2 closed hats
- 2 ride
- 5 floor toms
- 1 kick
Just looking at the graphical representation, once your used to it, you can have a very good idea of what is happening without hitting play.
Spectrogram
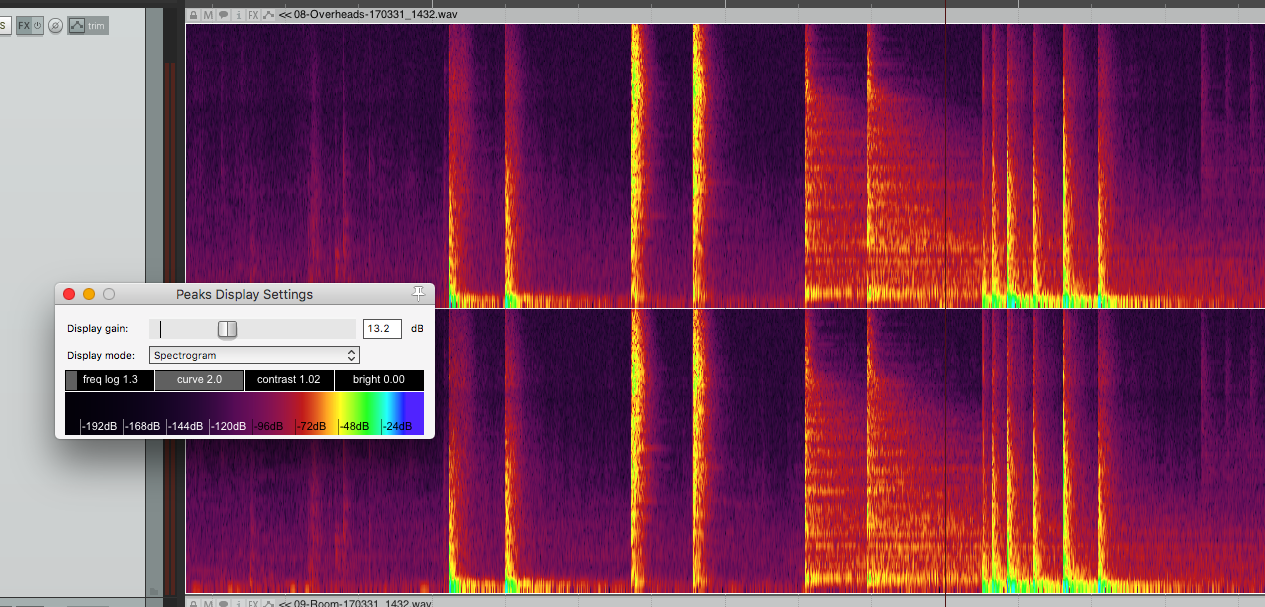
The spectrogram encodes frequency vertically and amplitude via colour.
Above I have the same thing as in the Spectral Peaks drum guessing game. It’s easy to identify what has: low-frequency information (kick), high-frequency with short sustain (closed hat), high-frequency with long sustain (ride), low-frequency again (floor then kick).
Though in this example the floor/kick are more difficult to sort. I find Spectral Peaks to be much more useful, but it’s always nice to have a Spectrogram handy.
Sub-project
An item in Reaper can refer to another full project. You could easily do all your drums in one project, guitars in another project, bass in another etc… then sequence them in yet another master project as if those other projects were just their own media items.
Sub-projects also have value for mastering as you can simply drag a whole project in to your project as if it’s just another media file!
Sub-projects are yet another feature that can allow you to work with very complex tasks simply.
JS plug-ins
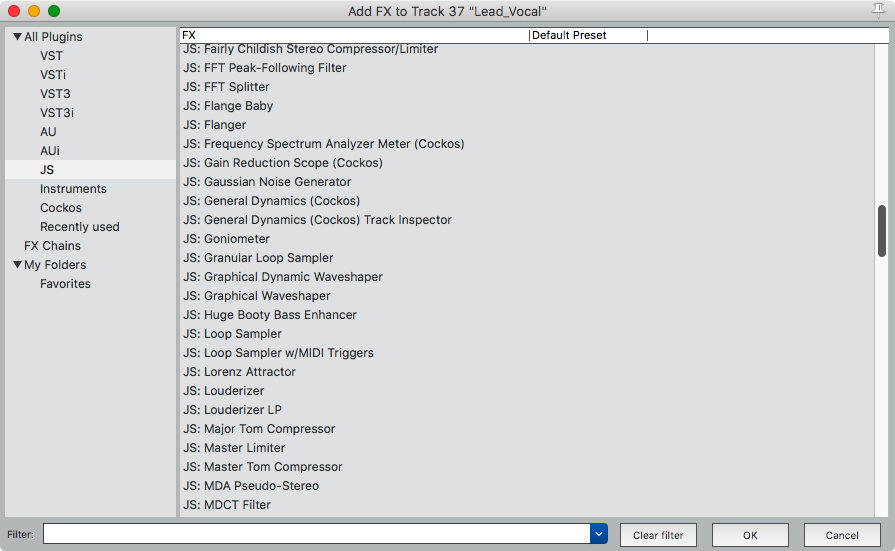
Jesusonic is basically a DSP programming language for rapid prototyping of effects/synths. Reaper comes with a big selection of useful JS plug-ins, and it’s very easy to create your own quick processors if you are capable.
Using JS, you can create your own plug-ins in real-time right in the DAW.
Rendering
Reaper has some amazing rendering capabilities. I’ll cover a few…
Render queue!!!
Reaper has an extremely useful feature called “Render Queues”. Essentially you can create various scenarios to be rendered, then render them all in one go.
The magic here is that each item in the queue is based on the project state when the queue item is created. So you can go and turn down the vocals, create a render item, go mute vocals, create a render item, turn off master-FX, create a render item, etc… and each one of those will be rendered at that project state. The project renders exactly as it was when you created that item, and ignores any other changes made after that item is created!
Render queue items also respect all render settings at that time as well, so your render items can include various stem rendering, formats and more.
You can also use the Render Matrix which allows you to render certain items based on their relation to regions/markers.
I suggest watching Kenny’s video to really see how awesome this feature is.
Region Render Matrix
Time and track selection can be handled quickly through the Region Render Matrix. If you use regions (which are markers with length) in your project, then you can select to render those specific areas separately and select which tracks of those are rendered.
See the above video for more information if you want.
Stem Render
Reaper can render stems quite well, and combined with the render queue and render presets you can setup some complex stem rendering that you can repeat in only a couple clicks.
Selected Items
If you do any sampling work, video games or foley then you will greatly appreciate the ability to render selected items. Items can be selected and rendered individually. Simple, but surprisingly missing from many other DAWs.
Consolidate
Consolidation is the process of creating homogenous media that can be imported in to another program. Basically it’s like rendering stems, but Reaper has a separate method of doing this more efficiently.
I think that the dialog above explains most of the capabilities presented.
Consolidation can also be done using the “Stem Render” capabilities of the normal render dialog if you need more complex features.
Pre-Release
The Reaper team releases frequently. Beta versions (called pre-releases) are publicly available and often include various experimental features that may not make the next stable release cycle.
All users are encouraged to aid with the shaping of new features and tracking down of regressions. I much prefer this type of development over the private-beta and 2+ year release cycle many other DAWs use. Due to this, Reaper users get new features and bug fixes far more frequently with seemingly fewer regressions (as far as I’ve experienced and read).
Portable Install
Reaper and all of its settings can be installed to a single folder. You can easily keep multiple setups in various folders, or throw it all on a thumbdrive to take to someone else’s studio.
Of course, you can also put all your plug-ins on that thumbdrive too and have a fully portable DAW (depending on the licensing of your plug-ins)
ReaPack
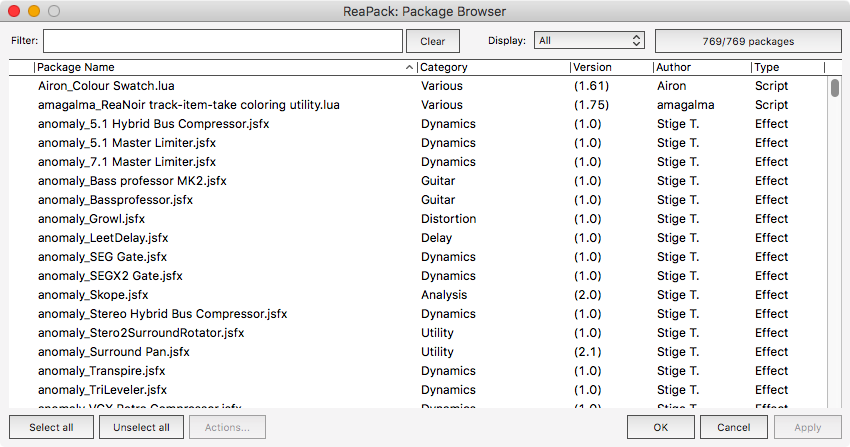
ReaPack simplifies the process of finding scripts and tools for doing complex tasks in Reaper. A package manager for your DAW… what a lovely thing.
Now only if this handled plug-ins too.
Super 8 Looper
I use guitar loopers when I decide to screw around and make my own music. Super 8 Looper is ugly as sin, but it works and I’m glad it’s there.
It’s actually rather cool.
SWS
SWS is nearly everything Reaper should have, but doesn’t. I can’t even begin to explain how many great features SWS has, as that would require another post (which I may do!)
SWS is a set of essential extensions that is so complete and packed that it requires its own manual. Perhaps you think that is an awful thing, but it’s highly unlikely that you would use many of the the extensions. The few that you may use though will probably impact your Reaper experience in big ways.
Here’s a few cool things that SWS can do for you:
- Cycle Actions - see the Cycle Action section for more
- Mixer Snapshots - Quick access to various mixes of a single project
- ReaConsole - a command line for operating Reaper
- Hundreds of actions
- Colour utilities
- Custom Mouse Cursors
- Extended Zoom&Scroll capabilities
- Contextual Toolbars
- Loudness analyzation and logging - thorough loudness measurement and logging with export capabilities
- Complex tempo manipulation tools
There’s many more things included. SWS is fantastic.
HeDa!

I want to specifically mention HeDaScripts for Reaper because I think ‘Track Inspector VIP’ and ‘Loudness Graph VIP’ are amazing.
Yes, they are a bit ugly, but they are also highly functional.
I have an action setup that selects the current track under the cursor and opens a floating ‘Track Inspector VIP’. I can instantly have a thorough channel strip with excellent metering at my finger tips just by pressing ‘Q’.
The ‘Loudness Graph VIP’ script is also a unique and highly functional addition to Reaper. Check out the HeDaScripts for more about it.
Radial Menu
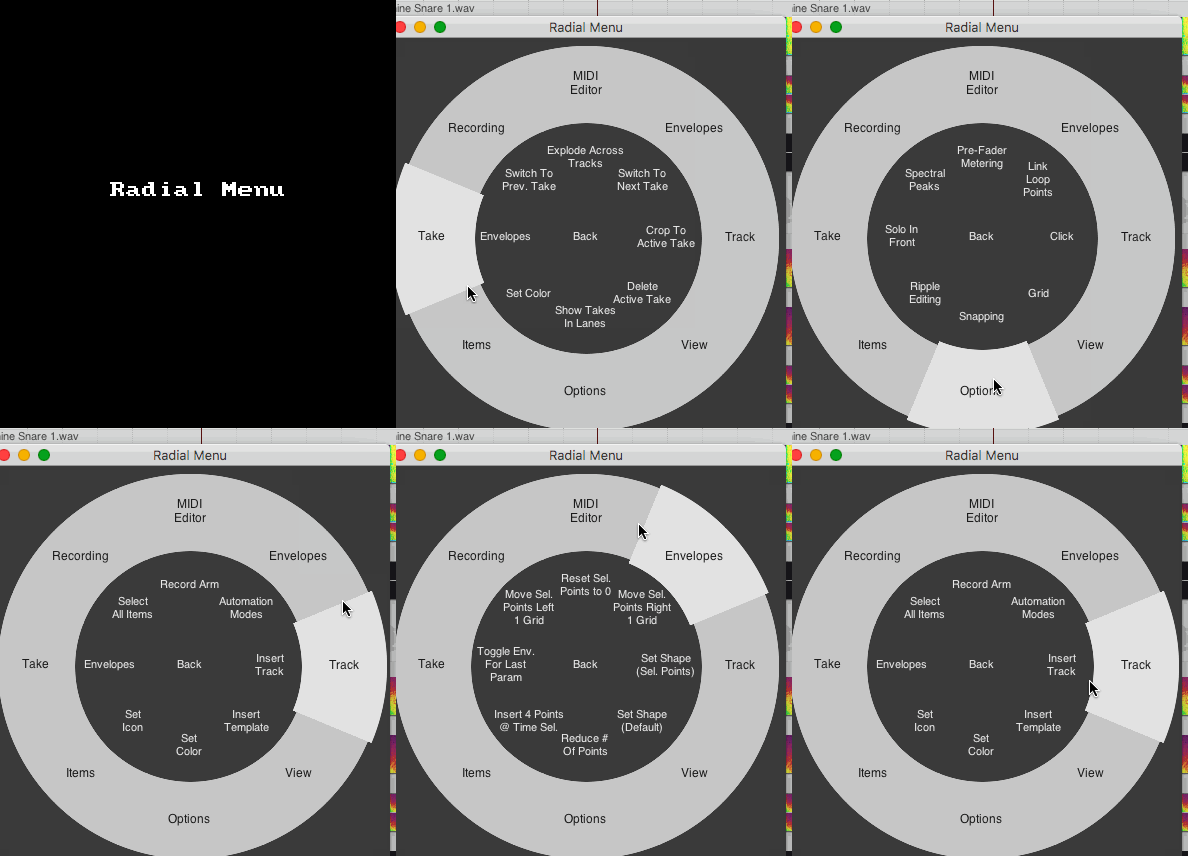
Radial Menu is very useful. It allows you to quickly select from a list of context sensitive and user-defined actions without the traditional menu navigation.
I wish every menu on my computer was a radial menu. Of course, this is available and easily installable in ReaPack.
Kenny Gioia
I will tell you right now that if it wasn’t for the Reaper Tutorials at Kenny Gioia’s site, I would have never written this post. I wouldn’t have lasted another 2 hours with Reaper even.
I am quite proficient with a number of DAWs, but Reaper’s default setup is *terrible*. The user guide is pretty awful. The mutation of terminology is pervasive. The presentation is not confidence inspiring.
Thanks to Kenny Gioia’s tutorials, I was able to quickly learn things in Reaper that I would have never even thought to look for. I usually hate video tutorials (since I can read way faster than I can watch), but Kenny managed to create clear and concise videos that are packed with information.
If there’s one features of Reaper that really stands out for me; It’s Kenny.
Support me!
This post took 12 hours to research, photograph, write and edit. If you appreciate the information presented then please consider joining patreon or donating!
