Some DAWs have macro controls that let you control many parameters with 1 control. Reaper has this capability, but with a lot more flexibility.
In the following tutorial I’m going to show you how to control almost any parameter in your project with a single slider. Not only that, but you can setup a fader to control all those parameters too!
Click through for the full tutorial…
Contents
Multi-parameter control
Reaper does not natively allow you to link 2 FX parameters across tracks. You can easily link 2 parameters on the same track, but across multiple tracks it’s a bit of a hack. It’s an easy hack. Here’s the idea:
- Setup a track with ReaControlMIDI to send 14-bit CC out
- Create a Midi send from our ReaControlMIDI track to the tracks with parameters we wish to control
- Setup a midi link from the 14-bit CC value to the parameter we want to control
- Repeat as necessary.
Why 14-bit?
Midi CC gives you 7-bits of values to use to control a device. 2⁷ = 128. That means there’s 128 possible values between the minimum and maximum range of your control. This can make it difficult to set a precise value and sometimes make for nasty sounding movement/automation.
Midi also offers 14-bit CC. 14-bit CC combines 2 CC messages to create a single 14 bit control value. 2¹⁴ = 16,384. That’s significantly more potential values. More precision to set specific values and much smoother movement/automation (depending on the plug-in!).
The downside is that 14-bit CC uses up 2 CC values, and not all CC values can be used for 14-bit CC messages. This is rarely an issue, but if you have very complex projects it can be.
For the purposes of this tutorial we’re using 14-bit CC because it’s just simply better.
FX Setup
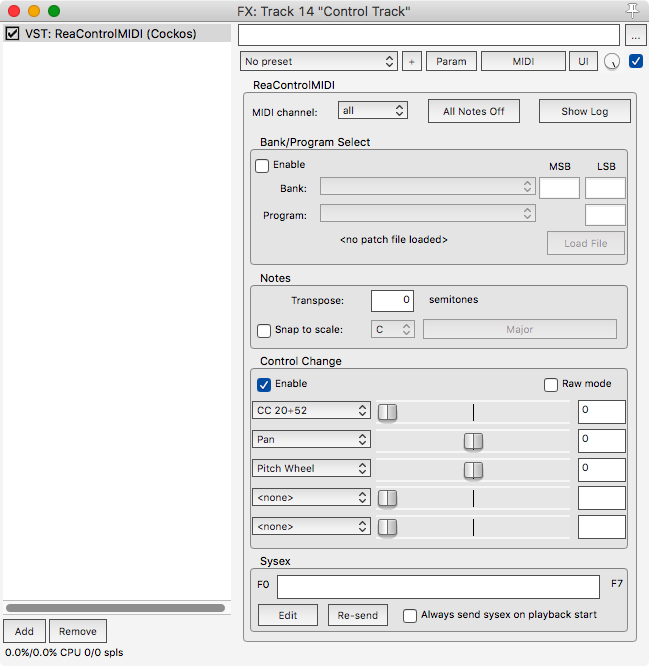
The key to this whole setup is ReaControlMIDI. It generates the MIDI signal that we send to other tracks, and link to FX Parameters.
You can have ReaControlMIDI setup anywhere, but I suggest using a new track with just ReaControlMIDI on it. 1 ReaControlMIDI can control up to 5 parameter bundles.
The only parameter that’s important here is to enable the “Control Change” section. I strongly suggest using 14-bit CC values. The 14-bit CC Values look like “20+52” or “3+35”. This notation indicates the 2 CC messages being combined to create a single value.
Routing Setup
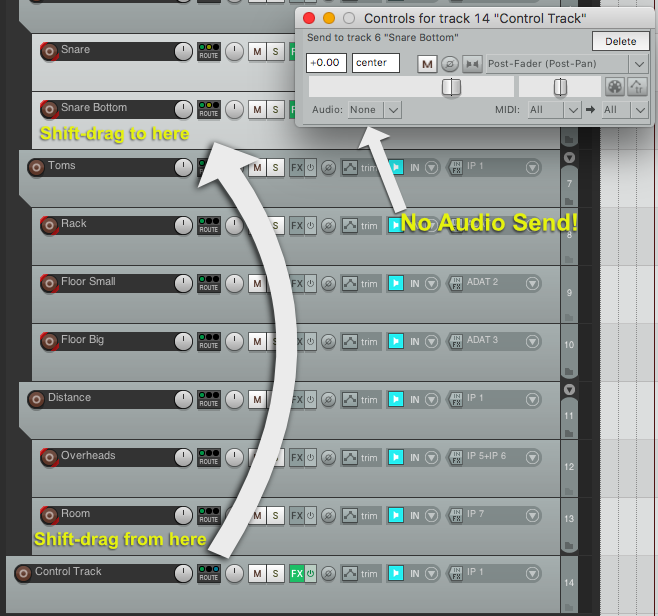
Once ReaControlMIDI is setup, we need to route that MIDI stream to the tracks that contain what we want to control. The easiest way to do this is to select the tracks you want then drag from your ReaControlMIDI track, while holding shift, to one of the selected tracks. When the routing pop-up make sure to set ‘Audio’ to none. We only want to send MIDI.
Holding shift during the drag operation allows you to move a control signal from one location to many, or from many locations to one, depending on if you start from ‘many’ or from ‘one’.
If you know how Reaper’s routing system works then feel free to use other methods like the Routing Matrix.
Modulation Setup (Midi Link)
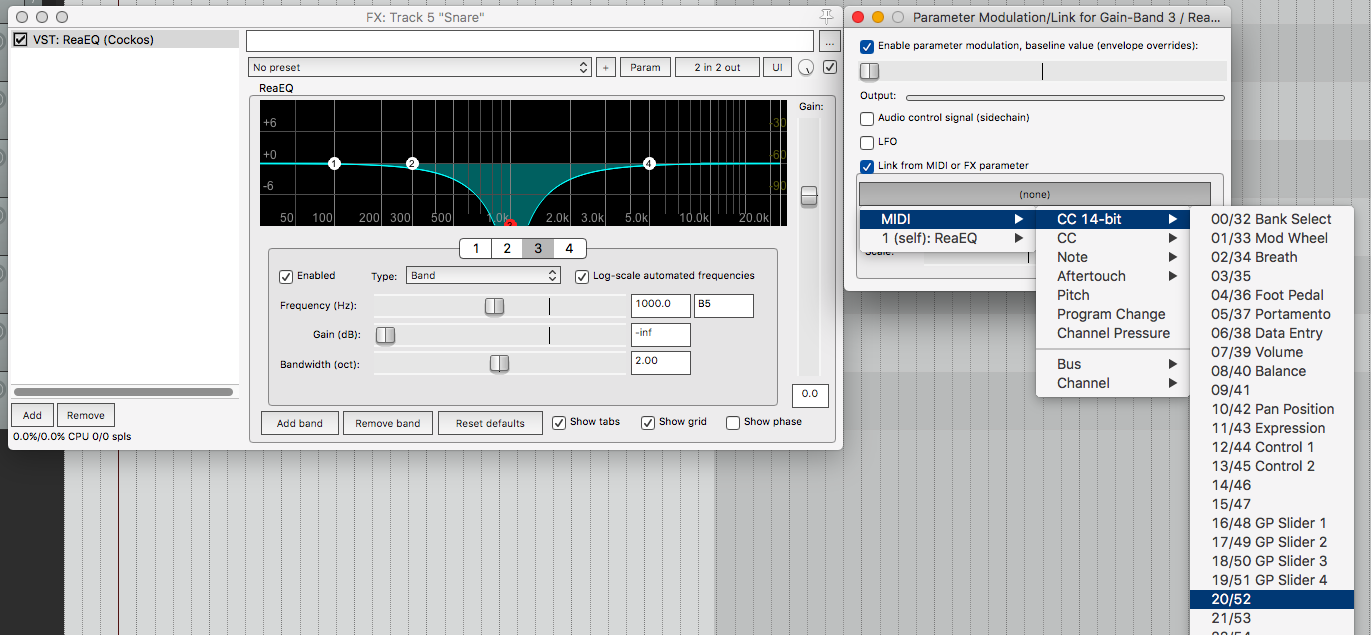
Once the MIDI stream is being send to the track then you need to associate that MIDI signal with a parameter.
- Open your plug-in
- Jiggle the control that you want to affect
- Click ‘Param’ in the top bar
- Click ‘Parameter Modulation/MIDI Link’.
- Turn on the ‘Link from MIDI or FX Parameter’ section.
- Select the 14-bit CC (or CC) value that you setup in ReaControlMidi.
“Enable parameter modulation, baseline value (envelope overrides):” allows you to create an offset between the midi-control input and the parameter. Using this you can set the baseline value for your parameters to correspond to different values from the midi-control signal.
That’s it. Repeat that for any parameters that that you want to control. If ReaControlMidi is sending midi to that track then you can freely setup that CC/14-bit CC signal to control any parameter you wish.
Fader control
Setting up ReaControlMidi to control multiple parameters across your project is cool, but having to constantly open up the plug-in window is tedious.
Reaper’s awesome modulation/routing systems lets you do something cool though: Control a parameter using a track’s fader. So instead of constantly opening up ReaControlMIDI, we can setup a track and simply move that track’s fader to control the CC sliders in ReaControlMidi!
You can use this method to control any modulate-able parameter in Reaper. It doesn’t have to just be in the context of this macro-like control system.
Here’s the idea:
- Setup a track with a test tone
- Route the test-tone to the track with the parameters that you wish to control (to an extra track channel)
- Setup an “Audio control signal (Sidechain)” modulation on the parameter you wish to control
- Assign the routed signal to the “Audio control signal (Sidechain)”
- Adjust the “Audio control signal (Sidechain)” controls to taste.
It’s actually rather simple and you can setup a track template with most of this setup for you already.
FX Setup
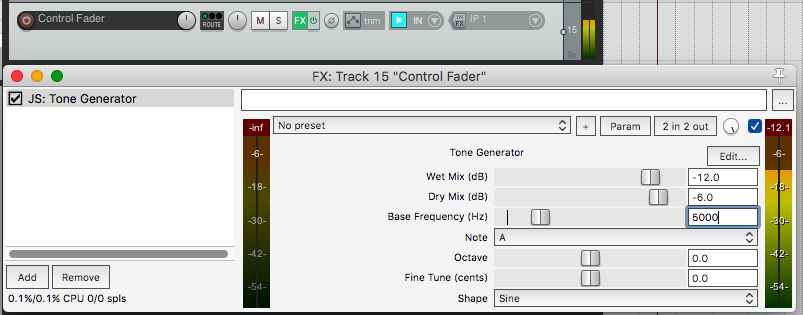
This is our control signal. Create a new track and put on a “JS: Tone Generator” on it.
Sine wave, 5,000hz+. I like to set the Dry to 0, and Wet to -30db.
You’ll see why the Wet at -30db matters later.
Routing setup

Now you need to route this sine-wave to the track with the parameters that you want to control. Alt or Option drag from your control-signal track to the track you wish to control.
Holding alt or option disables the ‘Master/Parent send’ on the track that you’re dragging from, and this prevents you from hearing that crazy noise in your mix. You can manually disable the ‘Master/Parent send’ on your control-signal track as well if you wish.
You want the signal to not be sent to the 1/2 channel on your destination track. 1/2 is what most tracks use for their standard audio I/O. If you’re not doing any other routing then select 3/4 as the destination channel. If you are doing other routing then select an unused channel.
Modulation setup
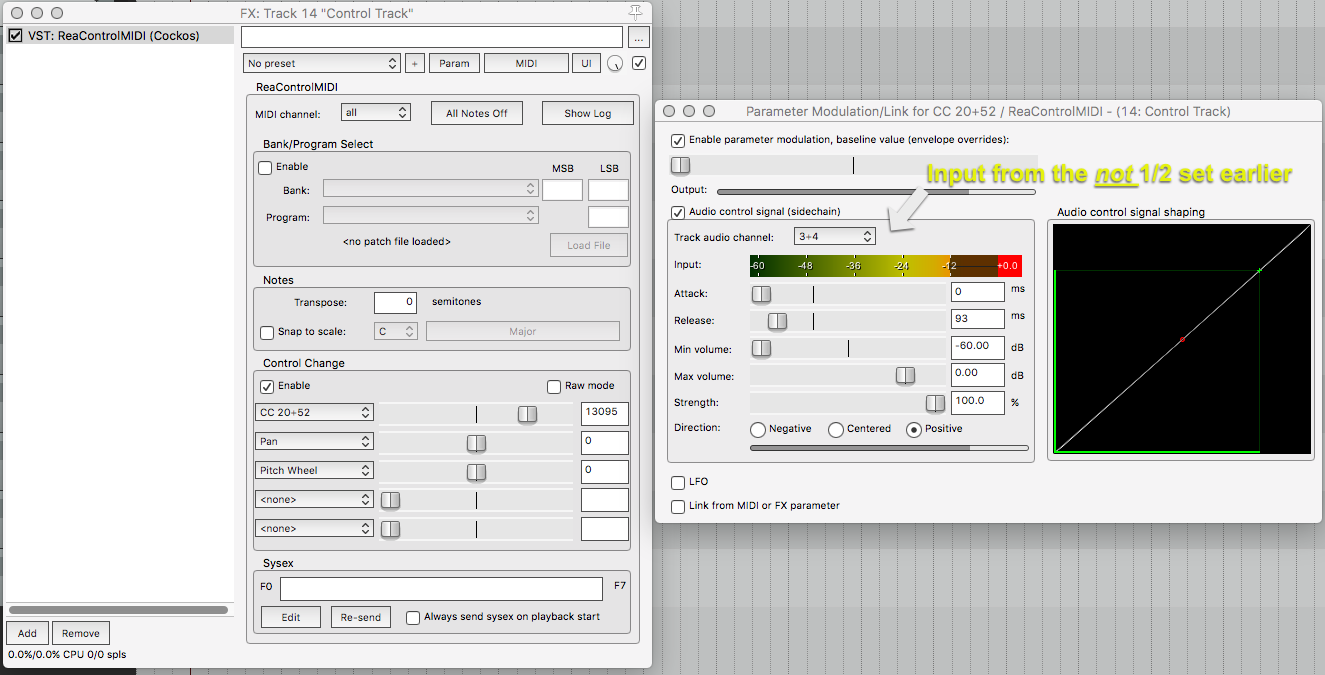
- Open up the plug-in on the track you’re trying to control. This is the track that you sent your control-signal to.
- Jiggle the control that you want to affect
- Click ‘Param’ in the top bar
- Select “Audio control signal (Sidechain)”
- Set “Track audio channel:” to the channel you created the send on. Probably 3/4.
Now the “Audio control signal (Sidechain)” setup is up to you. Here’s the settings that I prefer:
- Attack: 0ms
- Release: 50ms (smoother automation and fast movements)
- Min volume: -60db
- Max volume: 0db
- Strength: 100%
- Direction: Positive
The “Enable parameter modulation, baseline value (envelope overrides):” control at the top lets you set an offset between the control-signal and parameter value.
Using a Min volume of -60db and a Max volume of 0db with our -30db control-signal makes it so the our fader being centered corresponds to the control we’re controlling being centered. You may have to tinker with this relationship, but the ‘centered’ setup I’ve provided should help you understand what’s happening.
If you want the control fader to affect the parameter in an inversely proportional manner, then select negative. ‘Centered’ makes the value centered when the control-signal is at the max volume level.
Special Thanks!
While I did figure out much of this on my own, 2 awesome Reaper users have helped me figure out some details over time.
Kenny Gioia recently made 2 videos on similar topics. Linking FX Parameters on Multiple Tracks in REAPER and Using Faders to Control Parameters in REAPER. While I’m using slightly different methods, I suggest watching these videos as well.
Jon Tidey at reaperblog.net aided me in simplifying some of these methods. He also has a bunch of great videos that you should watch and keep up to date with.
Thanks guys!
If you have any questions, then please leave a comment!
Support Me!
This post took 2 hours to research, photograph, write and edit. If you appreciate the information presented then please consider joining patreon or donating!
