This article marks part 2, and the conclusion of, this review of PSP’s InfiniStrip.
I decided to try something new with this review, which I’ll explain after the break.
Version 1.0.4 was released during this review, and the review applies up to that version. Any further enhancements to the product are not covered in this review. Please consult the PSP website to see if any of my complaints (if any), are resolved and if there are any cool new features that I wasn’t able to cover.
DISCLOSURE - PSP kindly provided this product to me for free as an NFR for review. If you believe this has biased this article, then I encourage you to call it out in the comments.
Other posts in this series
Contents
- Introduction
- Main UI
- Mute/Solo/Bypass
- Chart Explanations
- PREAMP
- FILTERS
- GATE
- COMPRESSOR
- EQ
- LIMITER
- CONTROL
- SPECIAL
- Conclusion
- Meta
Introduction
In this review I’ll be showing technical information that I believe is sufficient for informed readers to get a decent overview of each module.
The text portion will be my touchy/feely personal assessment of the product, possibly not correlated to the measurements. I wrote my notes during use and before any sort of testing, so they may not be completely in line with objective reality.
I’ll be attempting to avoid technical terms in the text portion as I believe that the imagery gives a decent technical overview of each module.
Main UI
View Modes
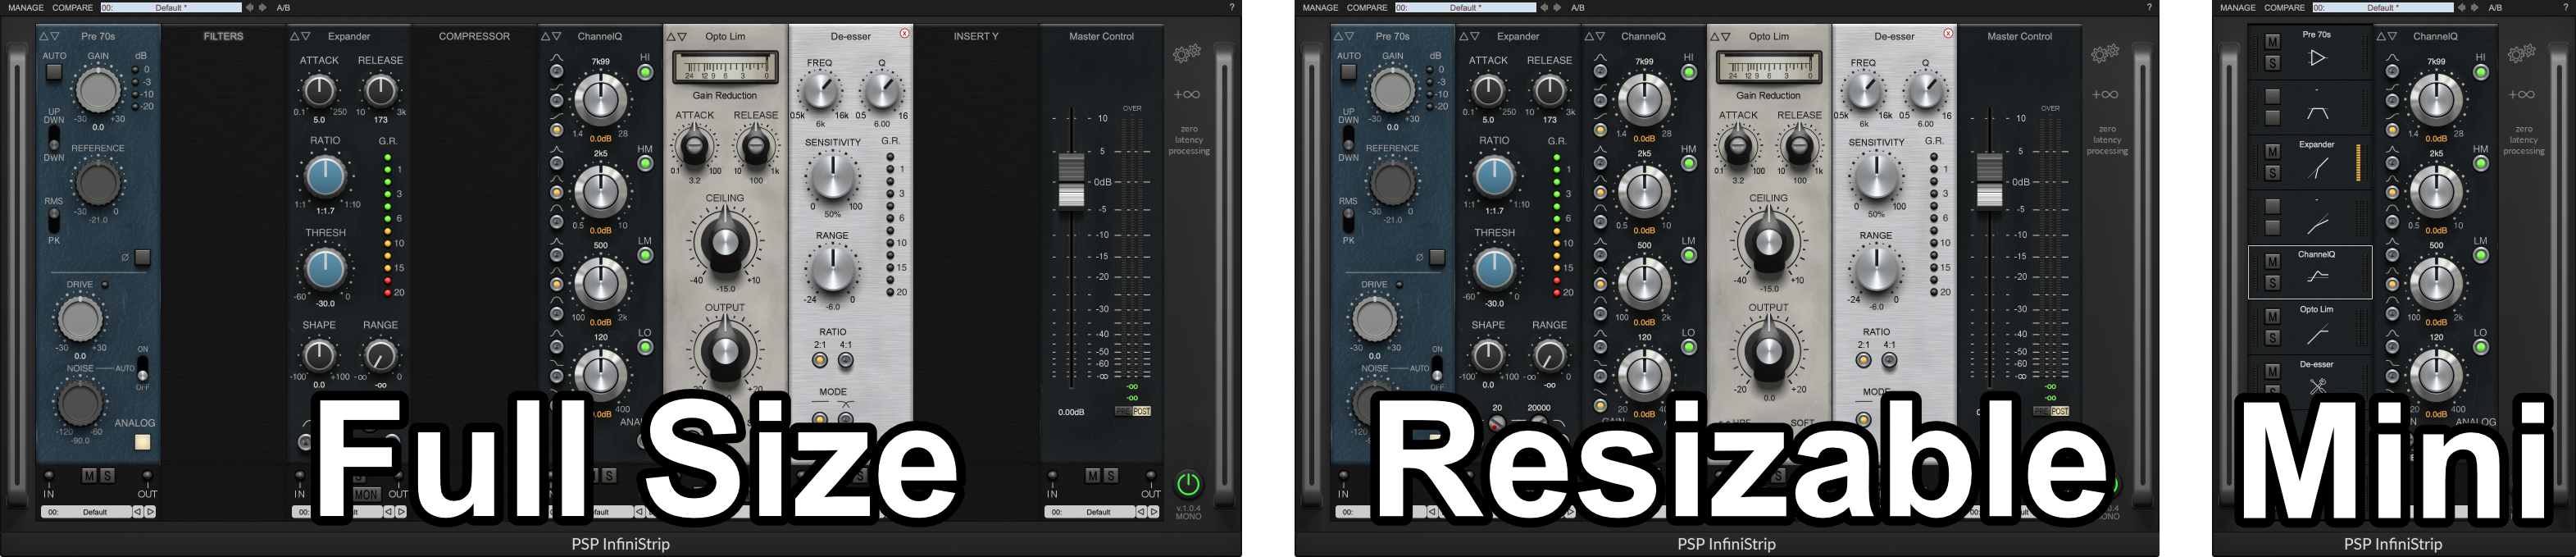
There are 3 view modes available for the channel strip, the above image shows all 3 with the same module setup.
- Full - All module slots are shown regardless if they are filled.
- Resizeable - Only filled slots are show (oddly, this isn’t resizable, it’s automatically resized).
- Mini - Available slots are shown on the left, and a single module is shown on the right. You select the slot on the left to view the module in the right pane.
I almost exclusively use Resizable mode.
A/B and Compare System

InfiniStrip comes with an A/B system that allows you to quickly jump between 2 channel strip settings for comparison. This isn’t a novel feature, and it’s fairly common on modern plugins.
The arrow pointing at A or B (the right pointing arrow to the left of each letter) will save the current setup to that slot. The right pointing arrow to the right of the A or B will recall it.
The unusual and functionally fantastic bit here is that this is saved to persistent storage. If you open up another instance of InfiniStrip and want to pull up A or B, you can do so without messing with presets or other manual “Save to Disk” options.
The downside is that using the A/B system will overwrite any other A/B setups from another instance.
I found that the global and persistent A/B system was a benefit. I found myself using it frequently to quickly grab settings and compare settings for similar instruments or parts. I rarely use A/B systems in other products, but InfiniStrip’s A/B system has found its way into my heart.
The compare allows you to switch between the most recently loaded preset, and any changes you’ve made to it. I almost never use presets other than creating a default, so this wasn’t a feature that I spent much time with.
Preset System

I don’t actively use presets on effects, especially on effects where input level is key to attaining the sound you want. Yes, InfiniStrip’s auto gain feature would help, but I’m not convinced.
The second layer of my distate for presets is how difficult they are to manage and how every plugin has its own convoluted preset management and browsing system.
InfiniStrip does basically nothing to alleviate these complaints. Saving/Loading presets and banks is file save/load process, gross. Browsing presets is a menu.
It does not appear to suppert VST3 Preset features, so even in VST3 hosts you are stuck with the file-browser and menu management.
Luckily, none of these things bothered me. I don’t see any value in using presets in a channel strip unless you have a motown workflow.
Module Presets
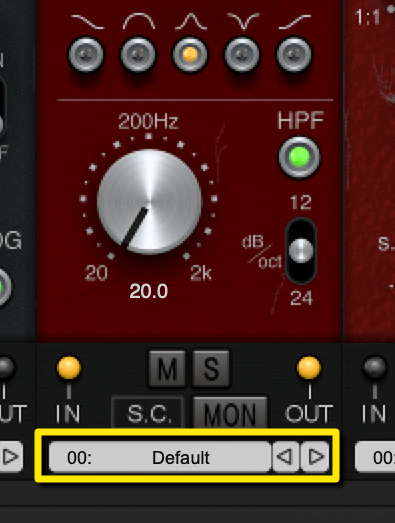
Each module has a selection of built-in presets. They do not appear to be changeable (without a bit of hackery).
I did find myself using them on the compressors in the later stages of my using the product. Once you have a feel for the module presets then you can grab something close to what you’re looking for without doing the knob wobble dance.
I don’t mind having limited slots, but I do wish they were editable.
Adding Modules
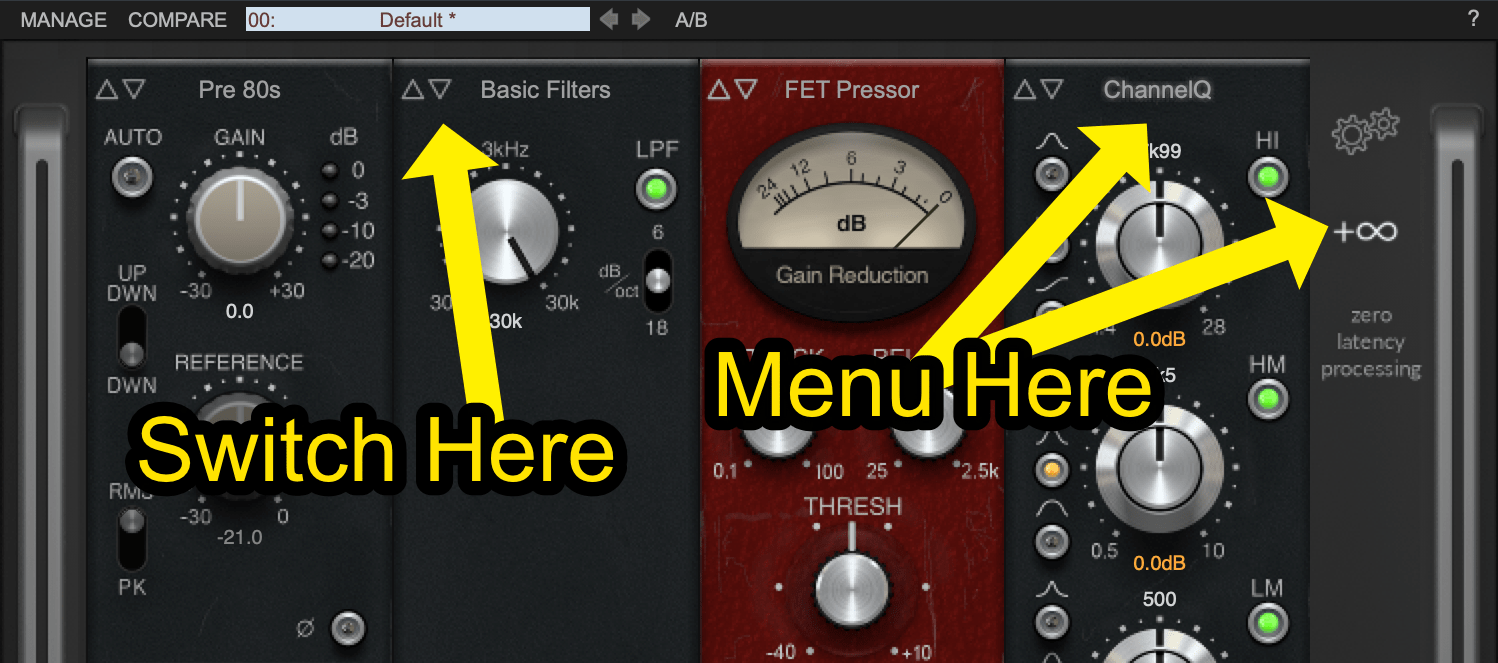
Modules can be changed/added by clicking either the text at the top of a strip, or the infinity symbol on the far right.
The arrow switches allow you to cycle between valid selections for that strip. There are strips for EQ, Filters, Comp, Gate, Limiter, Control and 2 general purpose slots.
If you try to use the arrows on a general purpose slot, it will only cycle between modules of the current type.
The current system works well for the modules that are available. If they add many more modules, I would sincerely hope for a search system rather than menu navigation.
Reordering Modules
Reordering is done with drag and drop.
I HATE it.
- The animation is choppy on my system (and all of my macs in fact, even after updating to a version that’s supposed to improve this issue).
- Click/drag sometimes doesn’t work.
- Dragging too high or too low will delete the module (and there is no undo!).
I have a signal flow I prefer, so I rarely re-order modules. I suspect most users will rarely re-order them. The overall impact of the re-ordering is minimal, but everytime I use it I become frustrated by it.
A system with a currently selected module that you can move left/right with a button and/or arrow key would be preferred by me.
Mute/Solo/Bypass
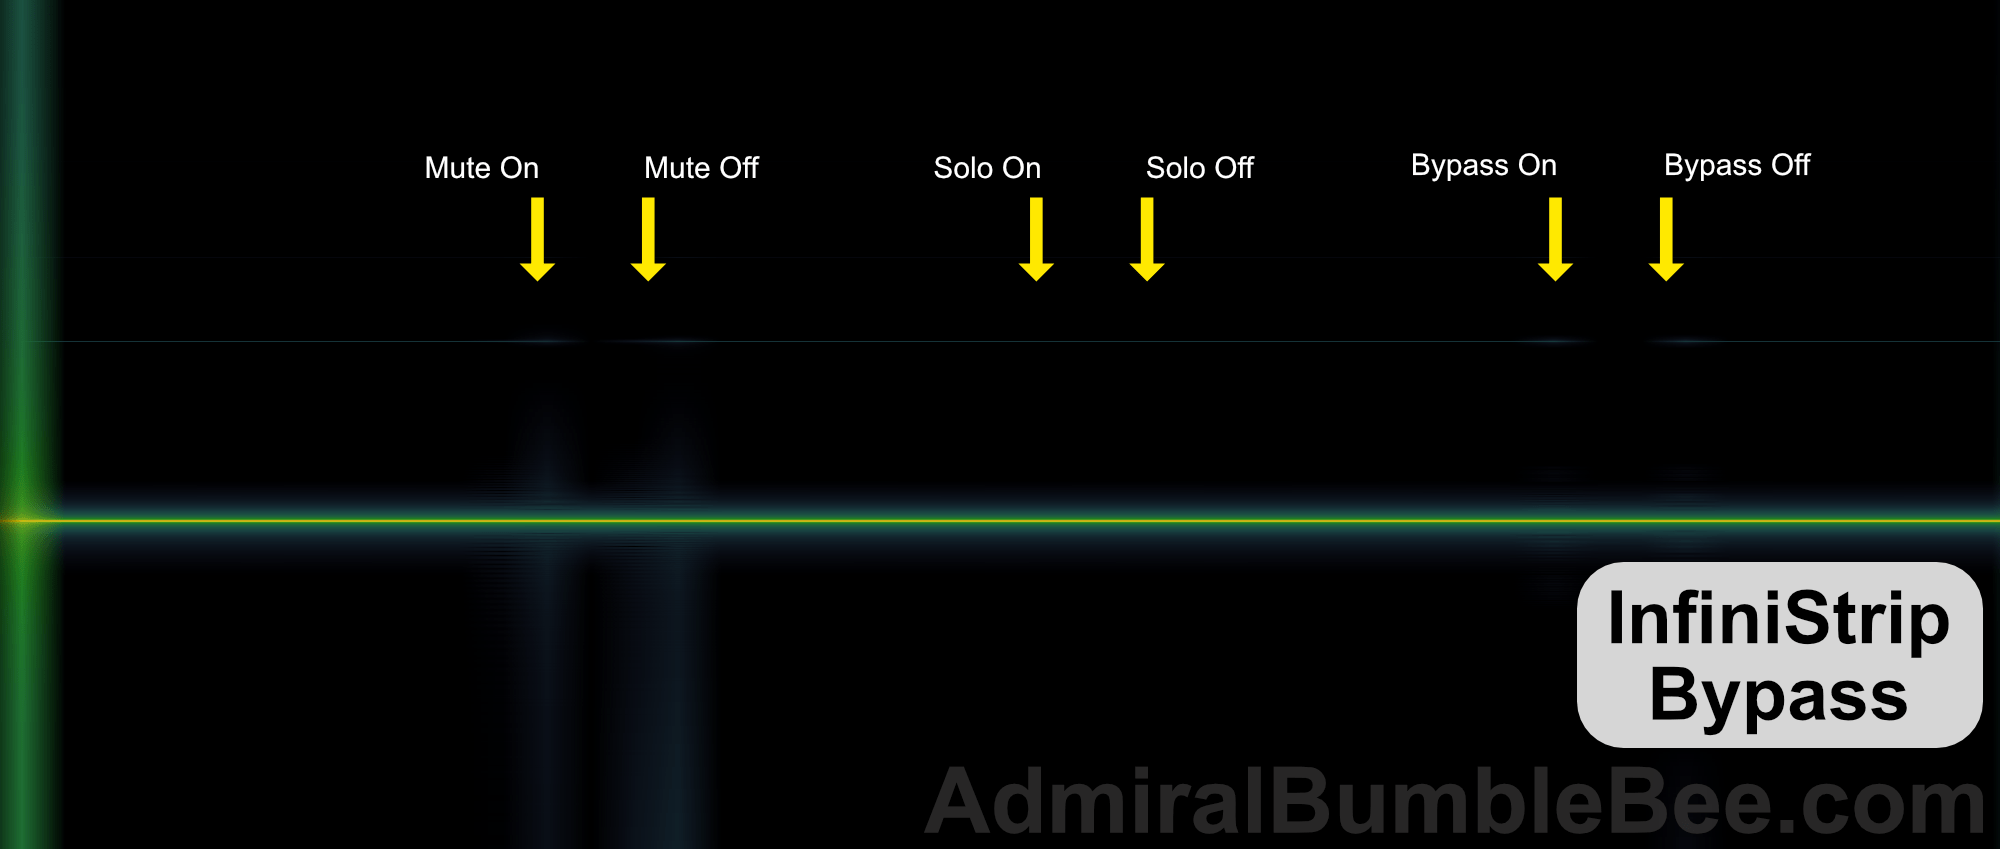
Each module has a mute function to remove the module from the signal flow and a solo function to make it the exclusive processor.
The entire plugin is bypassable internally.
I’ve covered this before. The goal here is to be able to bypass, mute and solo without a “click” or “pop”. If this happened then it would be visible in the spectrogram above as a bright vertical line when the control is engaged.
Infinistrip does all 3 of these functions nicely.
Sidechain
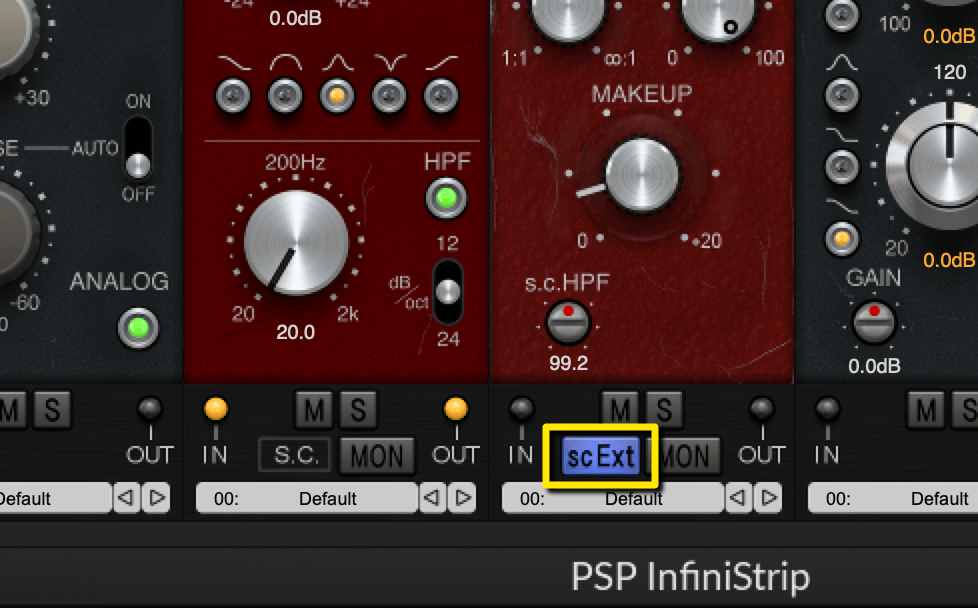
The sidechain system confused me at first.
The plugin sidechaining world is a mess. AU and VST3 have their own methods, which are presented differently based on the host. VST2 plugins use a variety of methods, where the most common is sending your side chain signal to inputs 3/4 of the dynamics plugin.
InfiniStrip appears to maintain a single sidechain signal for all dynamics processors, but what signal goes where requires some detective work.
The sidechain signal is passed from left to right. If you use an S.C. Filter, then that filtered signal is passed in its filtered state to the next processor.
The confusing part (at first!) is that the compressors have their own sidechain filters. So if you use the HPF on a FET Pressor, that high passed sidechain is not sent in its high-passed state to the next processor.
The sidechain signal routing behaviour makes sense. It allows you to manage each dynamics processor with its own high pass filter, but use S.C. Filters to make serial changes to the sidechain signal (useful when you are using some sort of Comp->EQ->Comp flow).
Omitting any sort of explicit routing reduces UI clutter. I initially wished I could route things into the sidechain signal path, however I never once stumbled across a scenario where that was necessary.
All of the dynamics modules have a “Mon” button that allows you to solo the sidechain at that point.
Auto Gain
If you don’t know what gain staging is, first drop by here.
The Preamp models all have a set of tools to automatically set the gain for that module. Generally the preamp strips will be placed at the beginning of the signal chain and supply signal to other modules, but they can and should be used at any point in the chain.
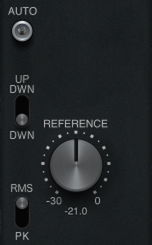
Controls:
- Auto - Automatically changes the input gain to match the reference level based upon other parameters. Clicking Auto sets the gain based on the signal present when the button is pressed.
- UP/DWN, DWN - UP/DWN allows the gain to move bi-directionally while adjusting the reference knob when Auto is on. DWN only allows the gain to be reduced when changing the reference level.
- Reference - The value matched by the auto-gain section. The input gain of the module is setup so the signal is close to the level set by the reference knob.
- RMS/PK - Select between RMS or Peak measurement when automatically setting reference level.
The concept is great, but there are a few workflow worms.
- Gain is initially set by the current level, but gain is only automatically reduced. This results in a few unfortunate circumstances:
- Hitting auto during a quiet part will MAX the gain (+30dB). It’s easy to uncheck “Auto”, but forget to reset the gain.
- Hitting auto during a loud part will bias your gain setting low. Generally if you’re looking to get some Mojo™ out of a module, you’ll want to set it for the average level of the signal so that the louder parts get smashed a bit. Auto does not easily facilitate this. (You have to locate to another part of the track to use auto)
- UP/DWN, DWN is confusing - This is a control that I’ve not seen on another device, and naturally you would think that it changes how the auto-gain algorithm works…. but it does not. It changes how turning the reference knob works relative to the gain knob in the context of the auto-gain algorithm. It’s a good idea, but even after using the plugin a few dozen hours I forgot what the switch did.
- RMS? - I find it strange that RMS is a selection, when ANSI or IEC VU spec is used for so many other products, software and hardware alike.
These complaints are relatively minor. I can count on one hand the number of times that I reached for the auto circuit in the last 2 months. It’s a great feature for learning how the modules react to input levels, but manually setting gain becomes second nature quickly.
Chart Explanations
These are not a definitive collection of measurements. I’ve left out some classes of measurements that aren’t generally applicable to digital plugins or that demonstrate minimal audible effects.
I’ve selected 4 types of measurements to give keen readers a quick overview of what each module is doing.
- 48khz Sample Rate
- All measurements taken with “analog” on.
- Noise off.
- Gain at 0 in module.
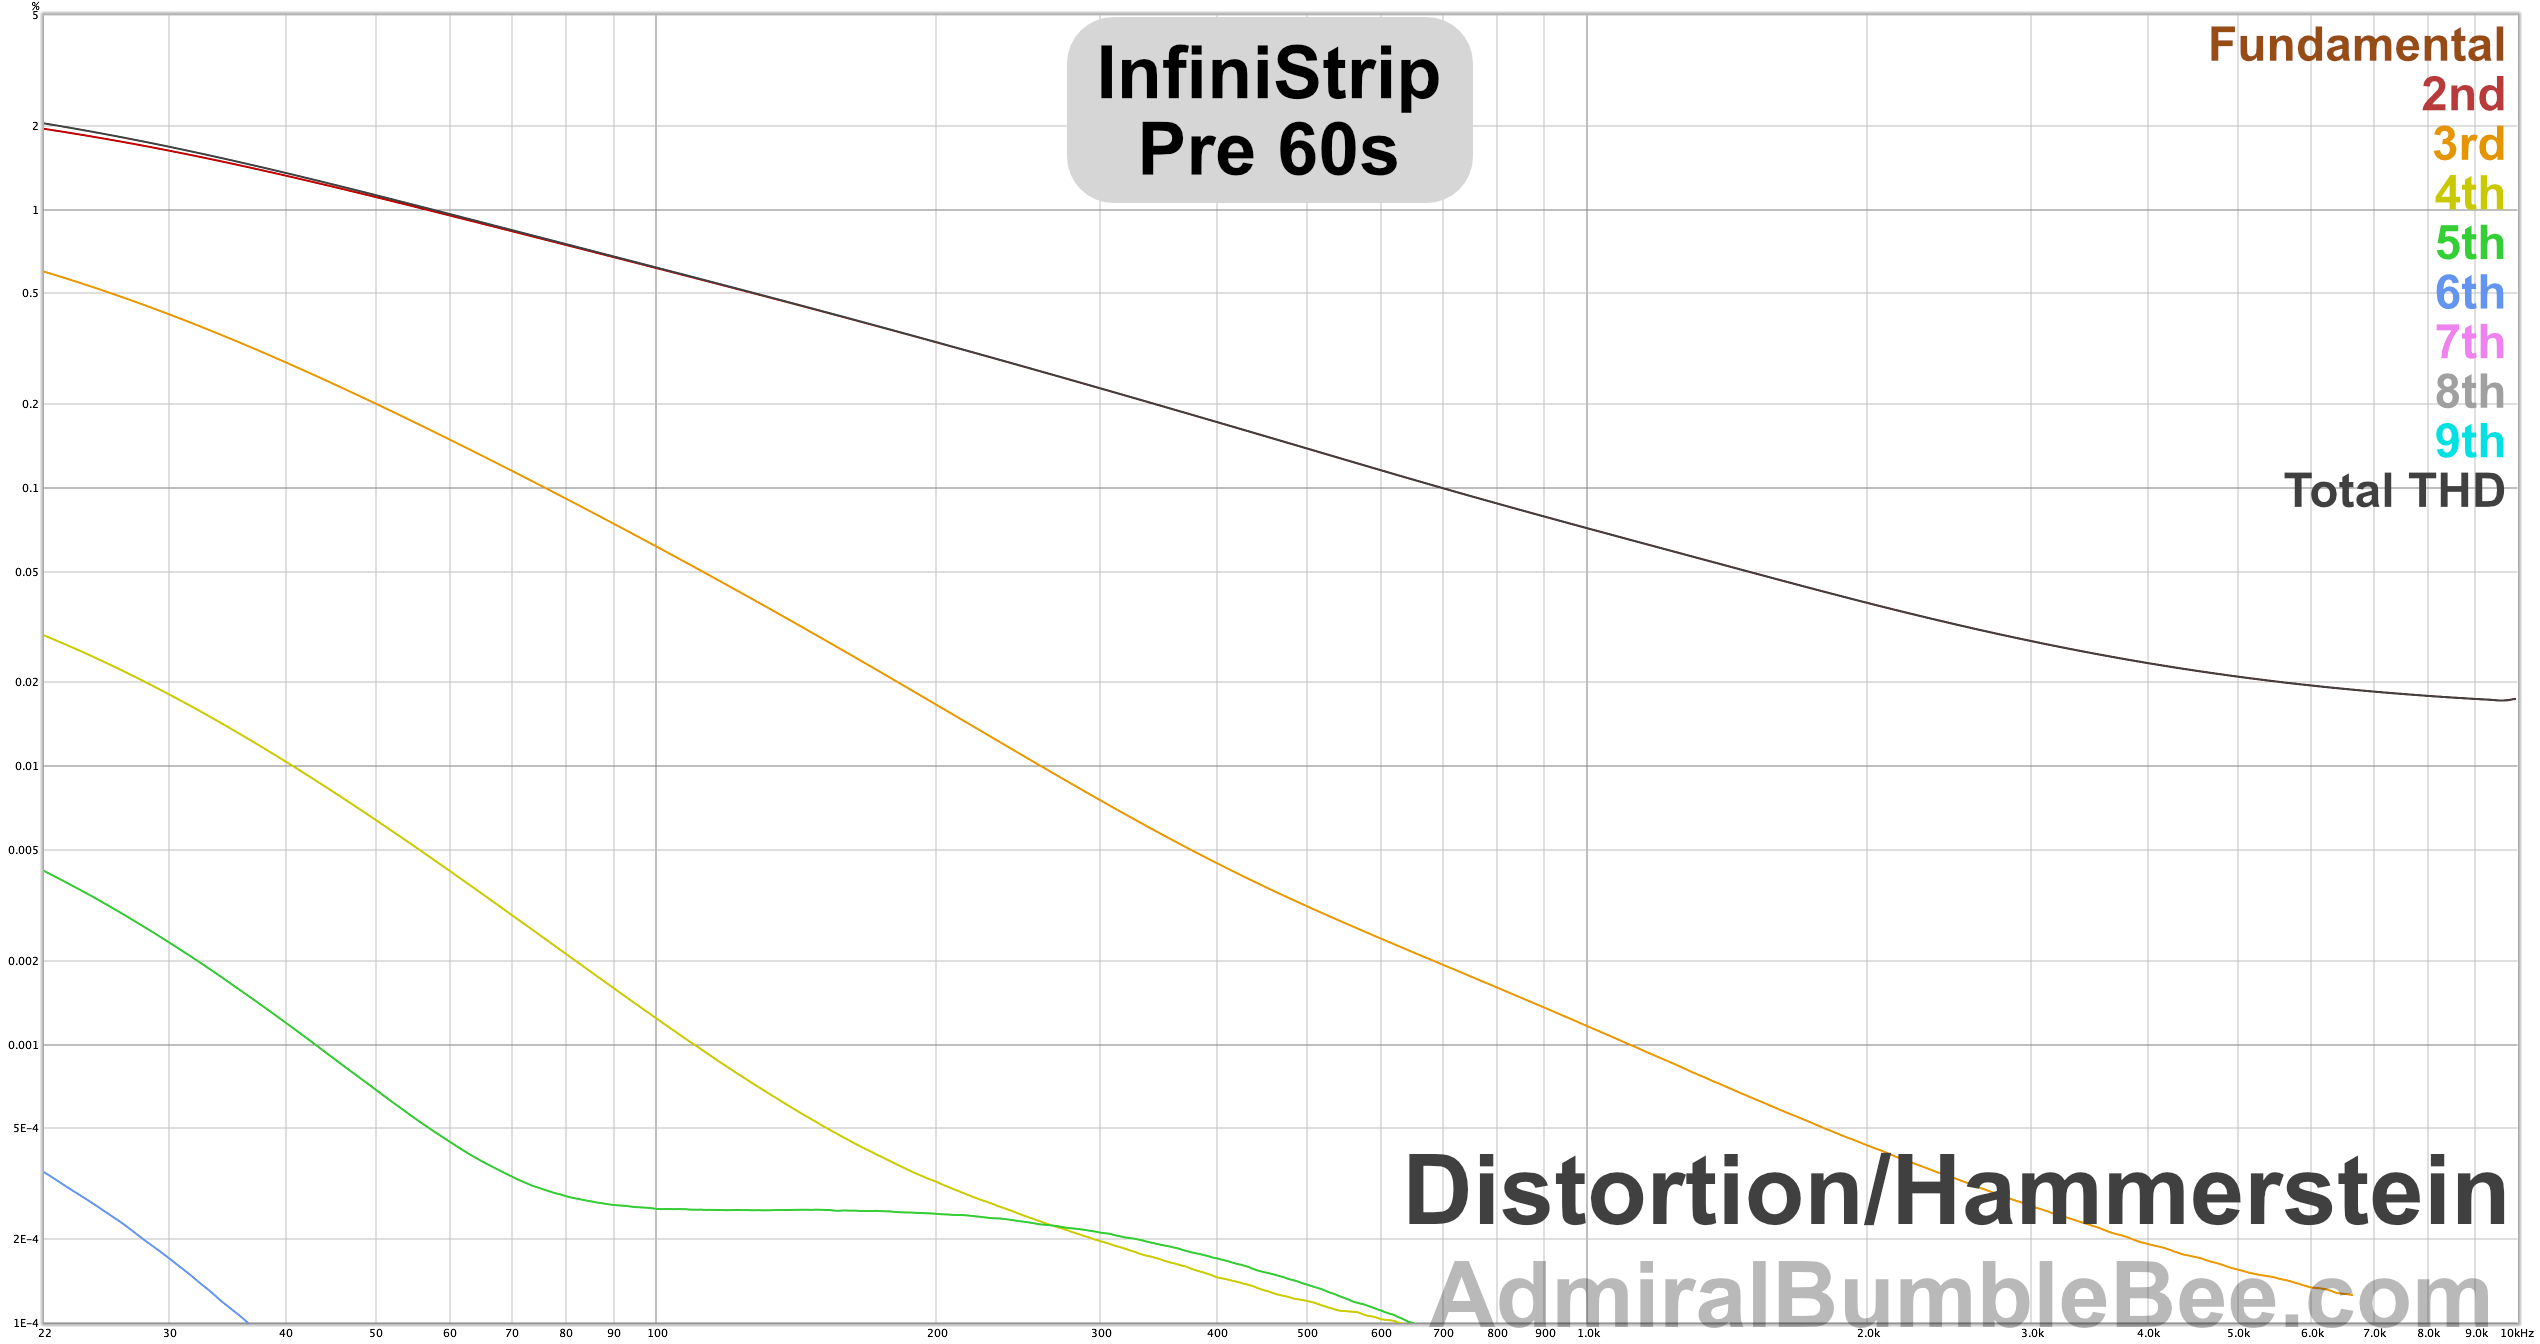
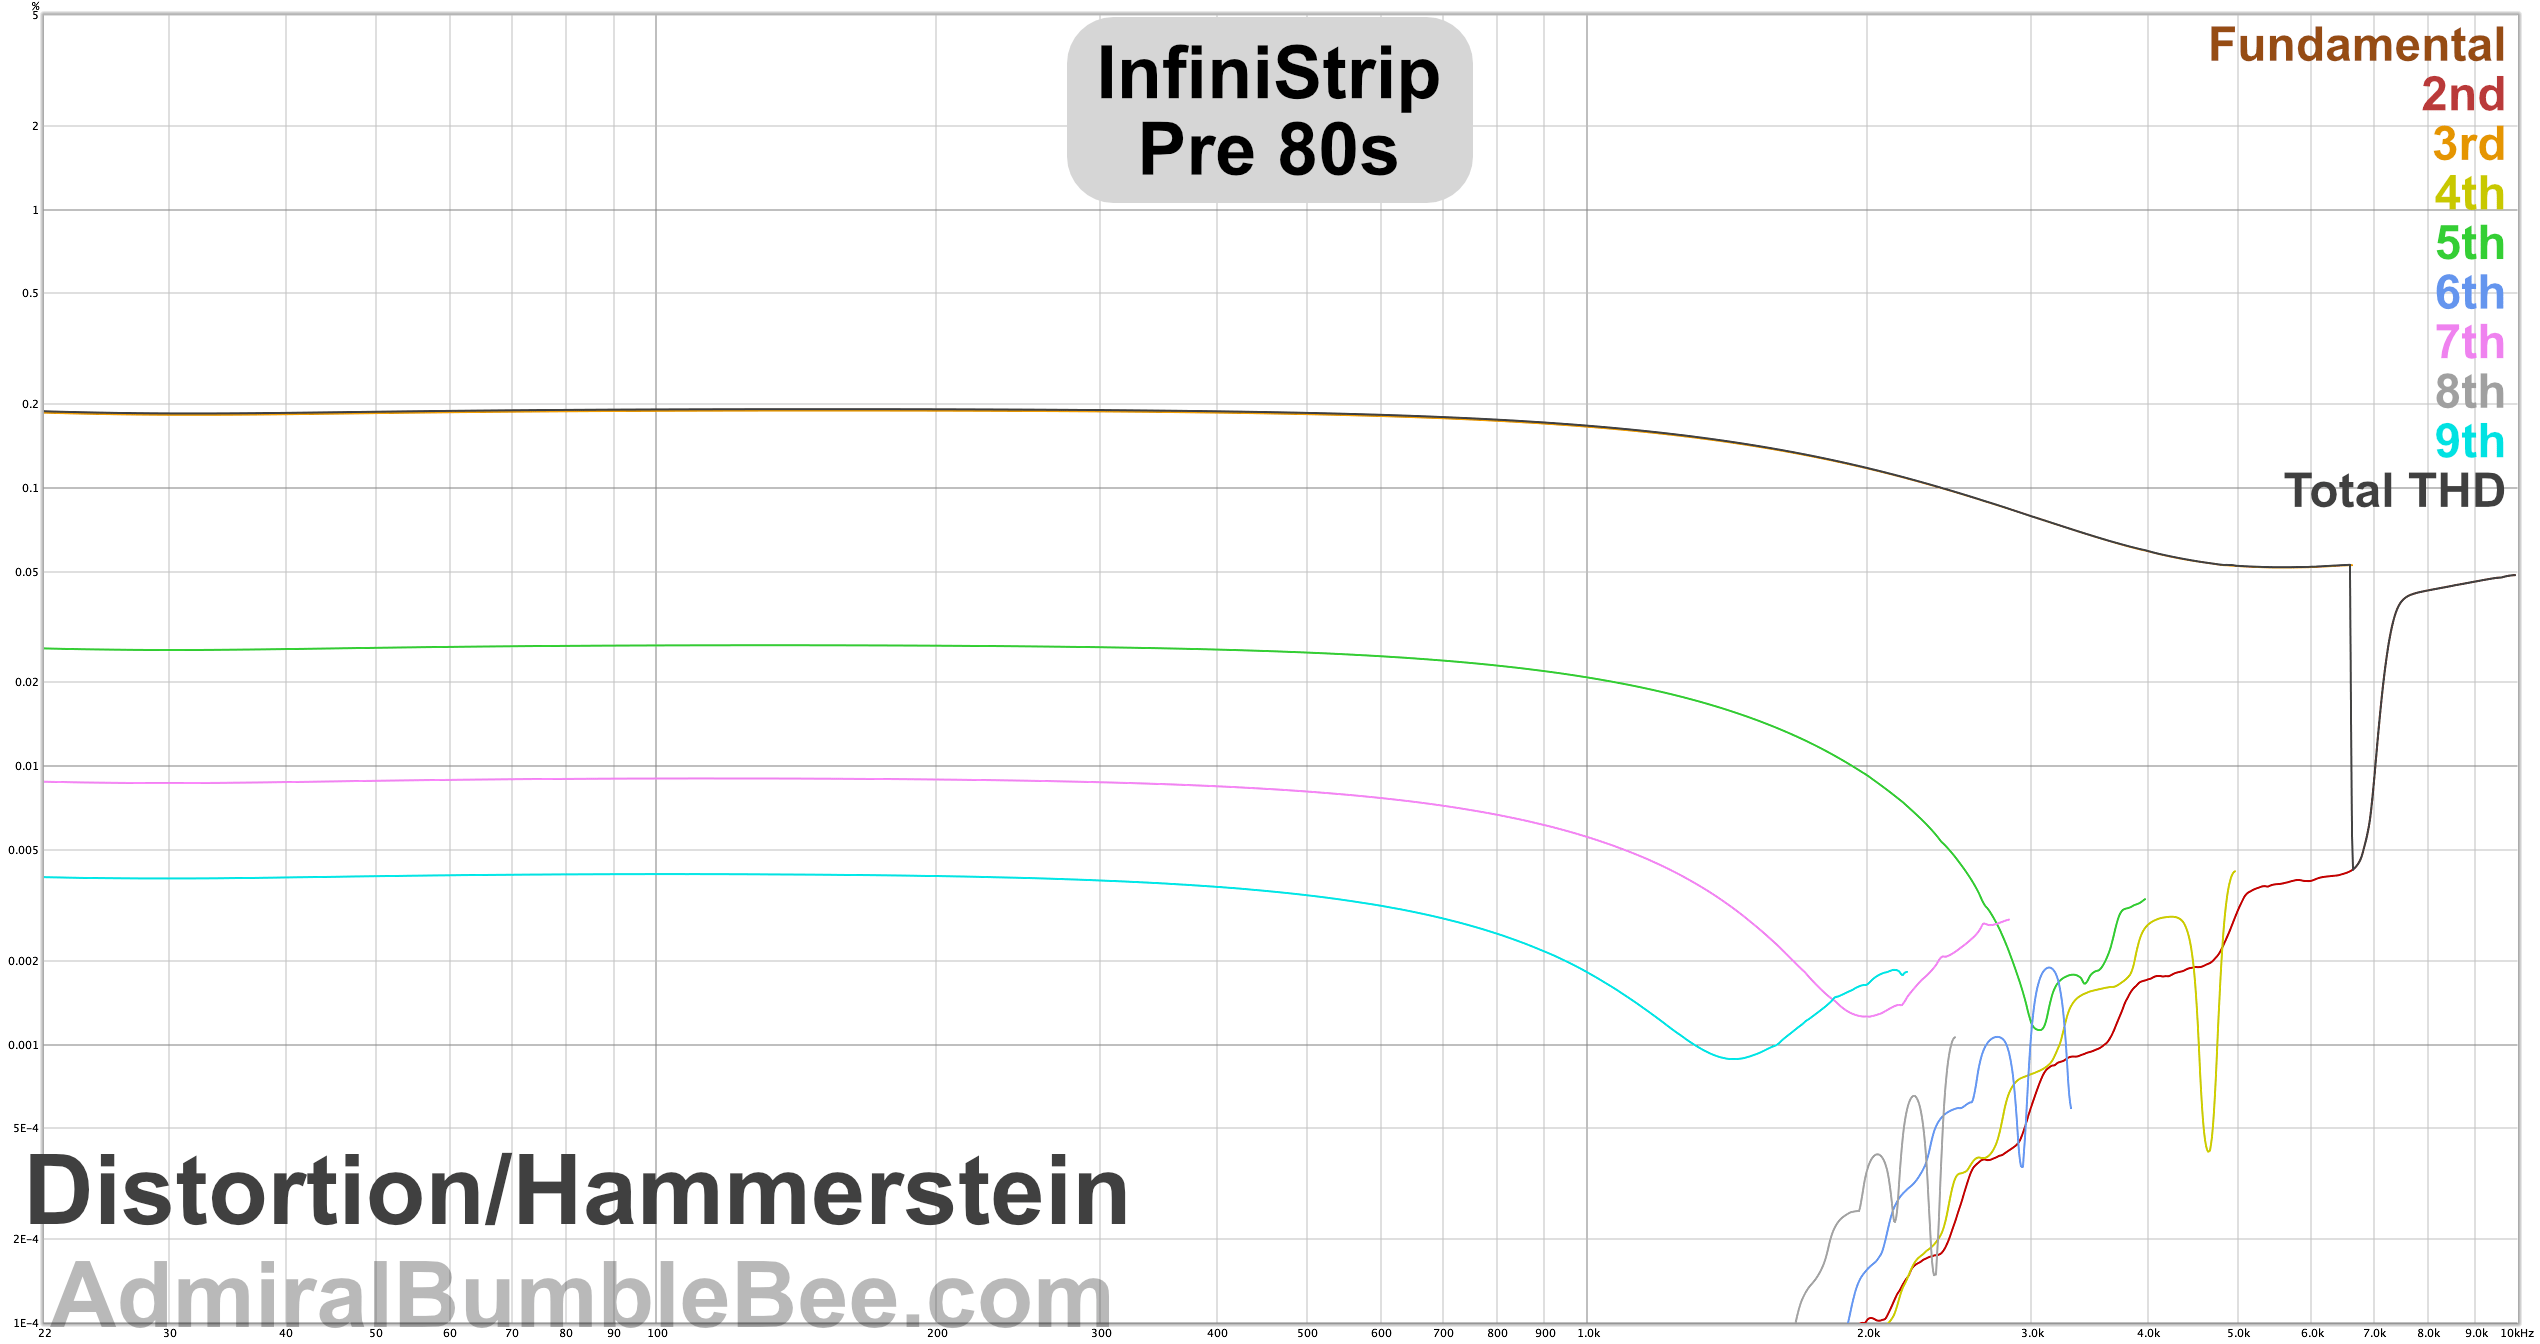
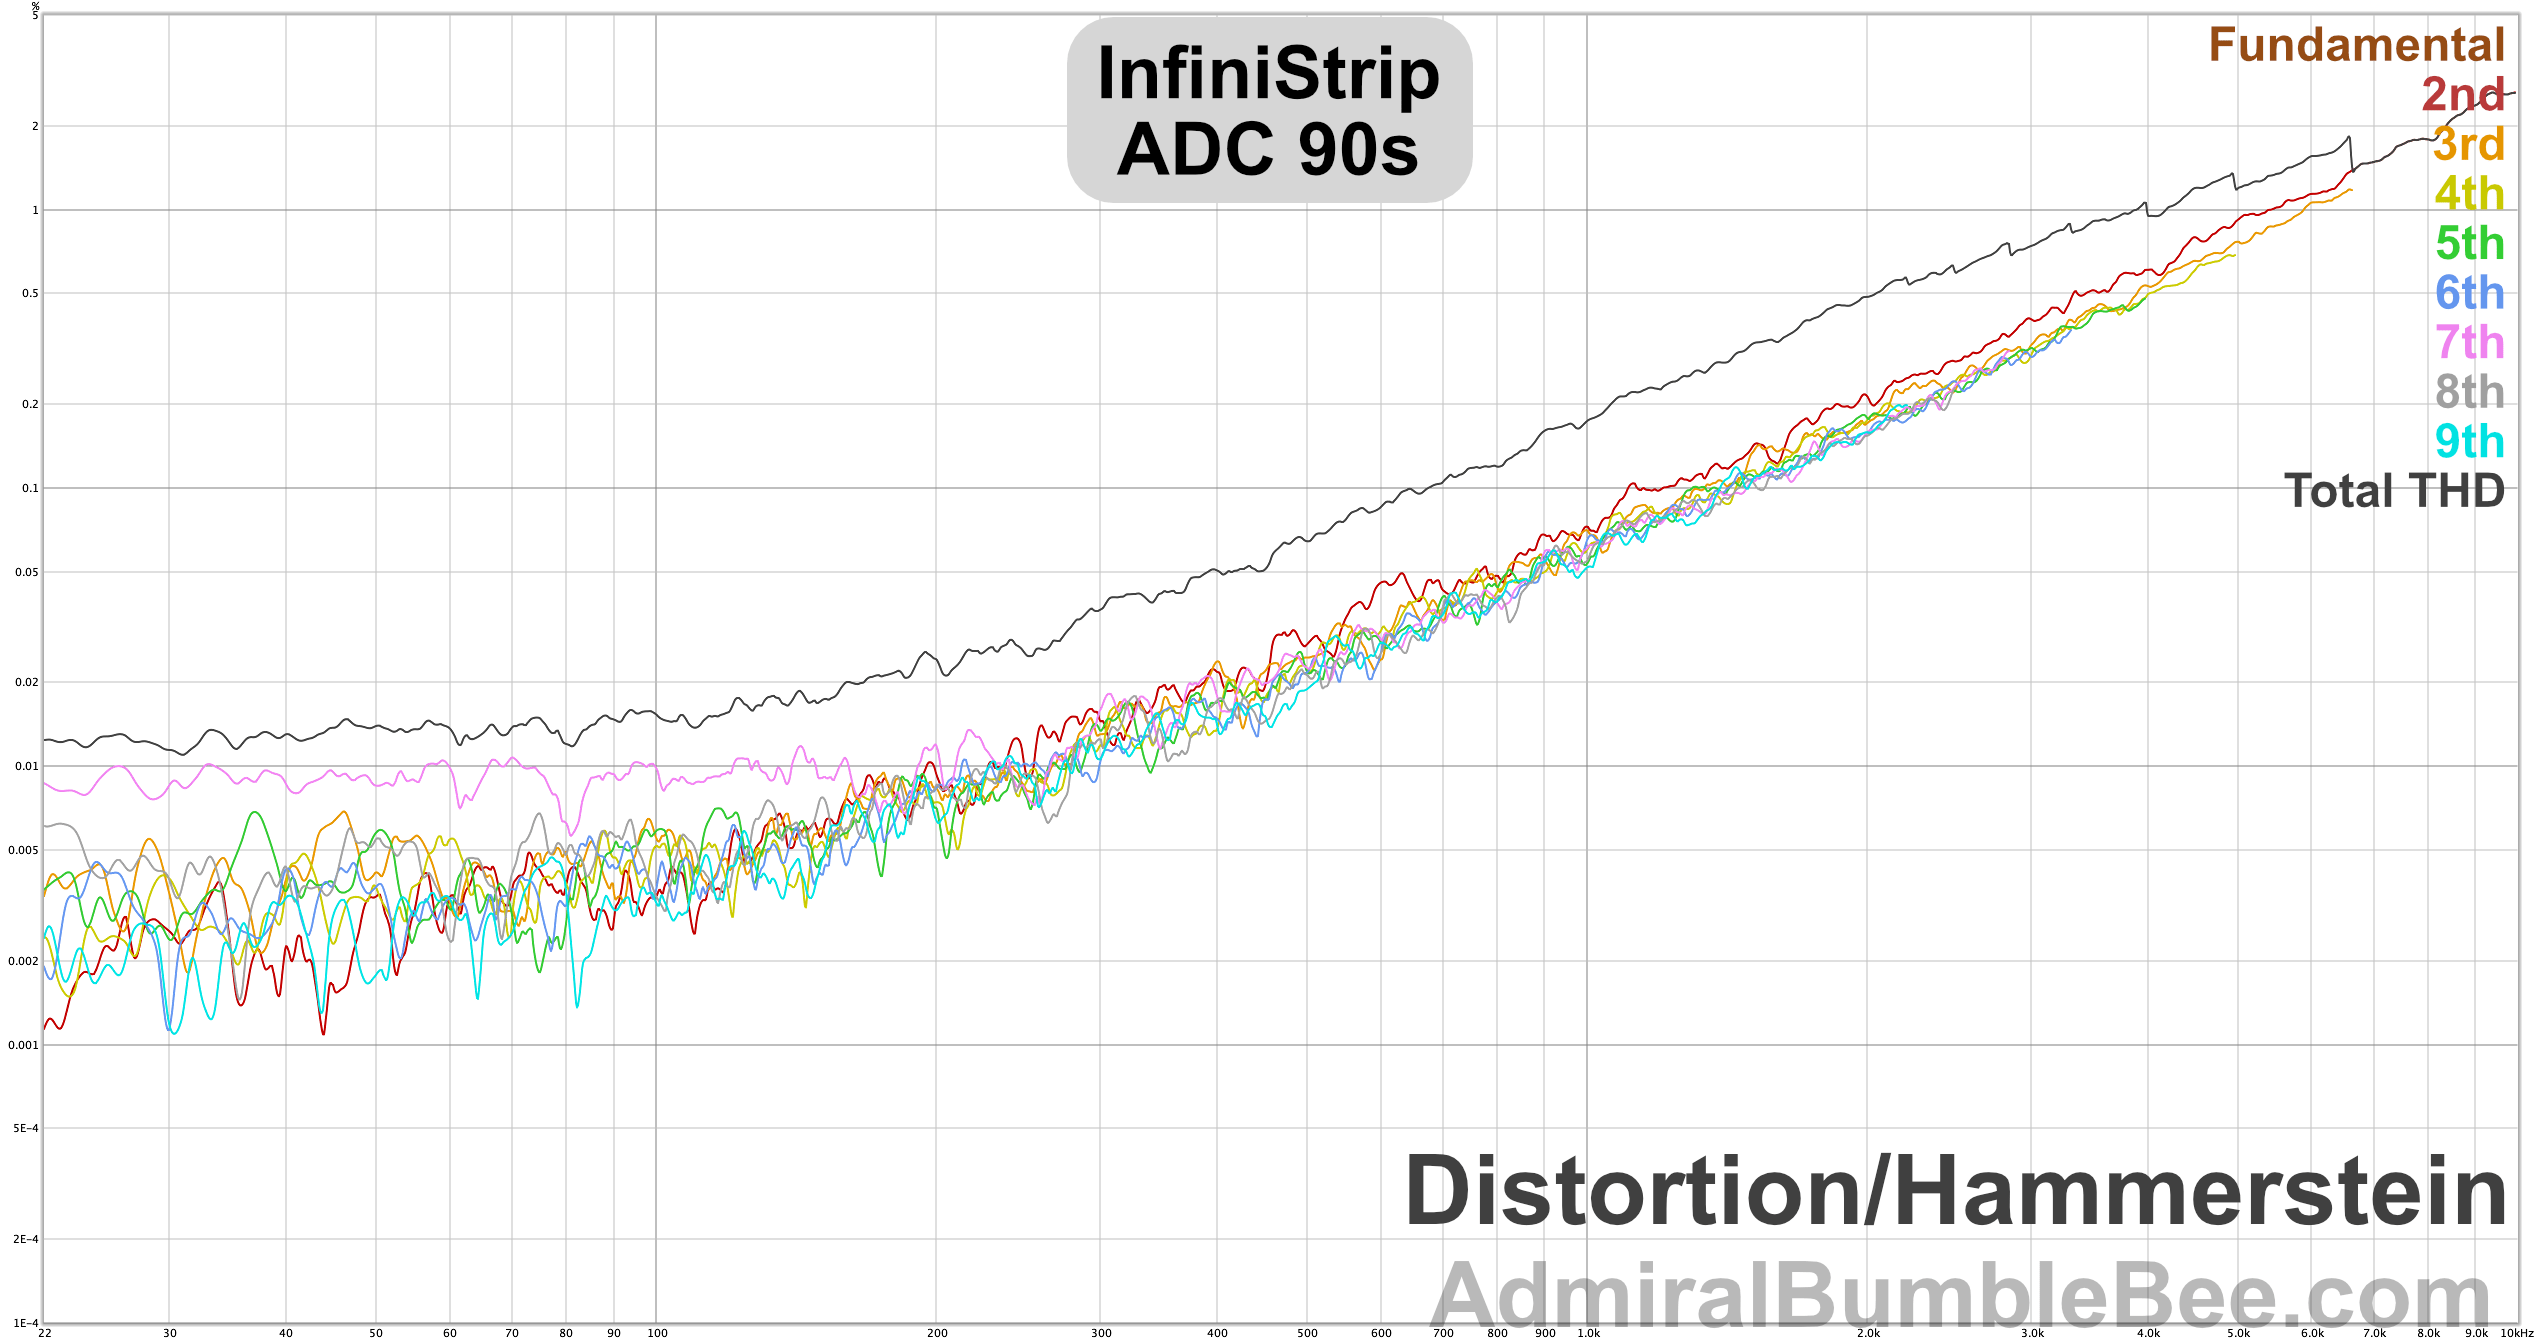
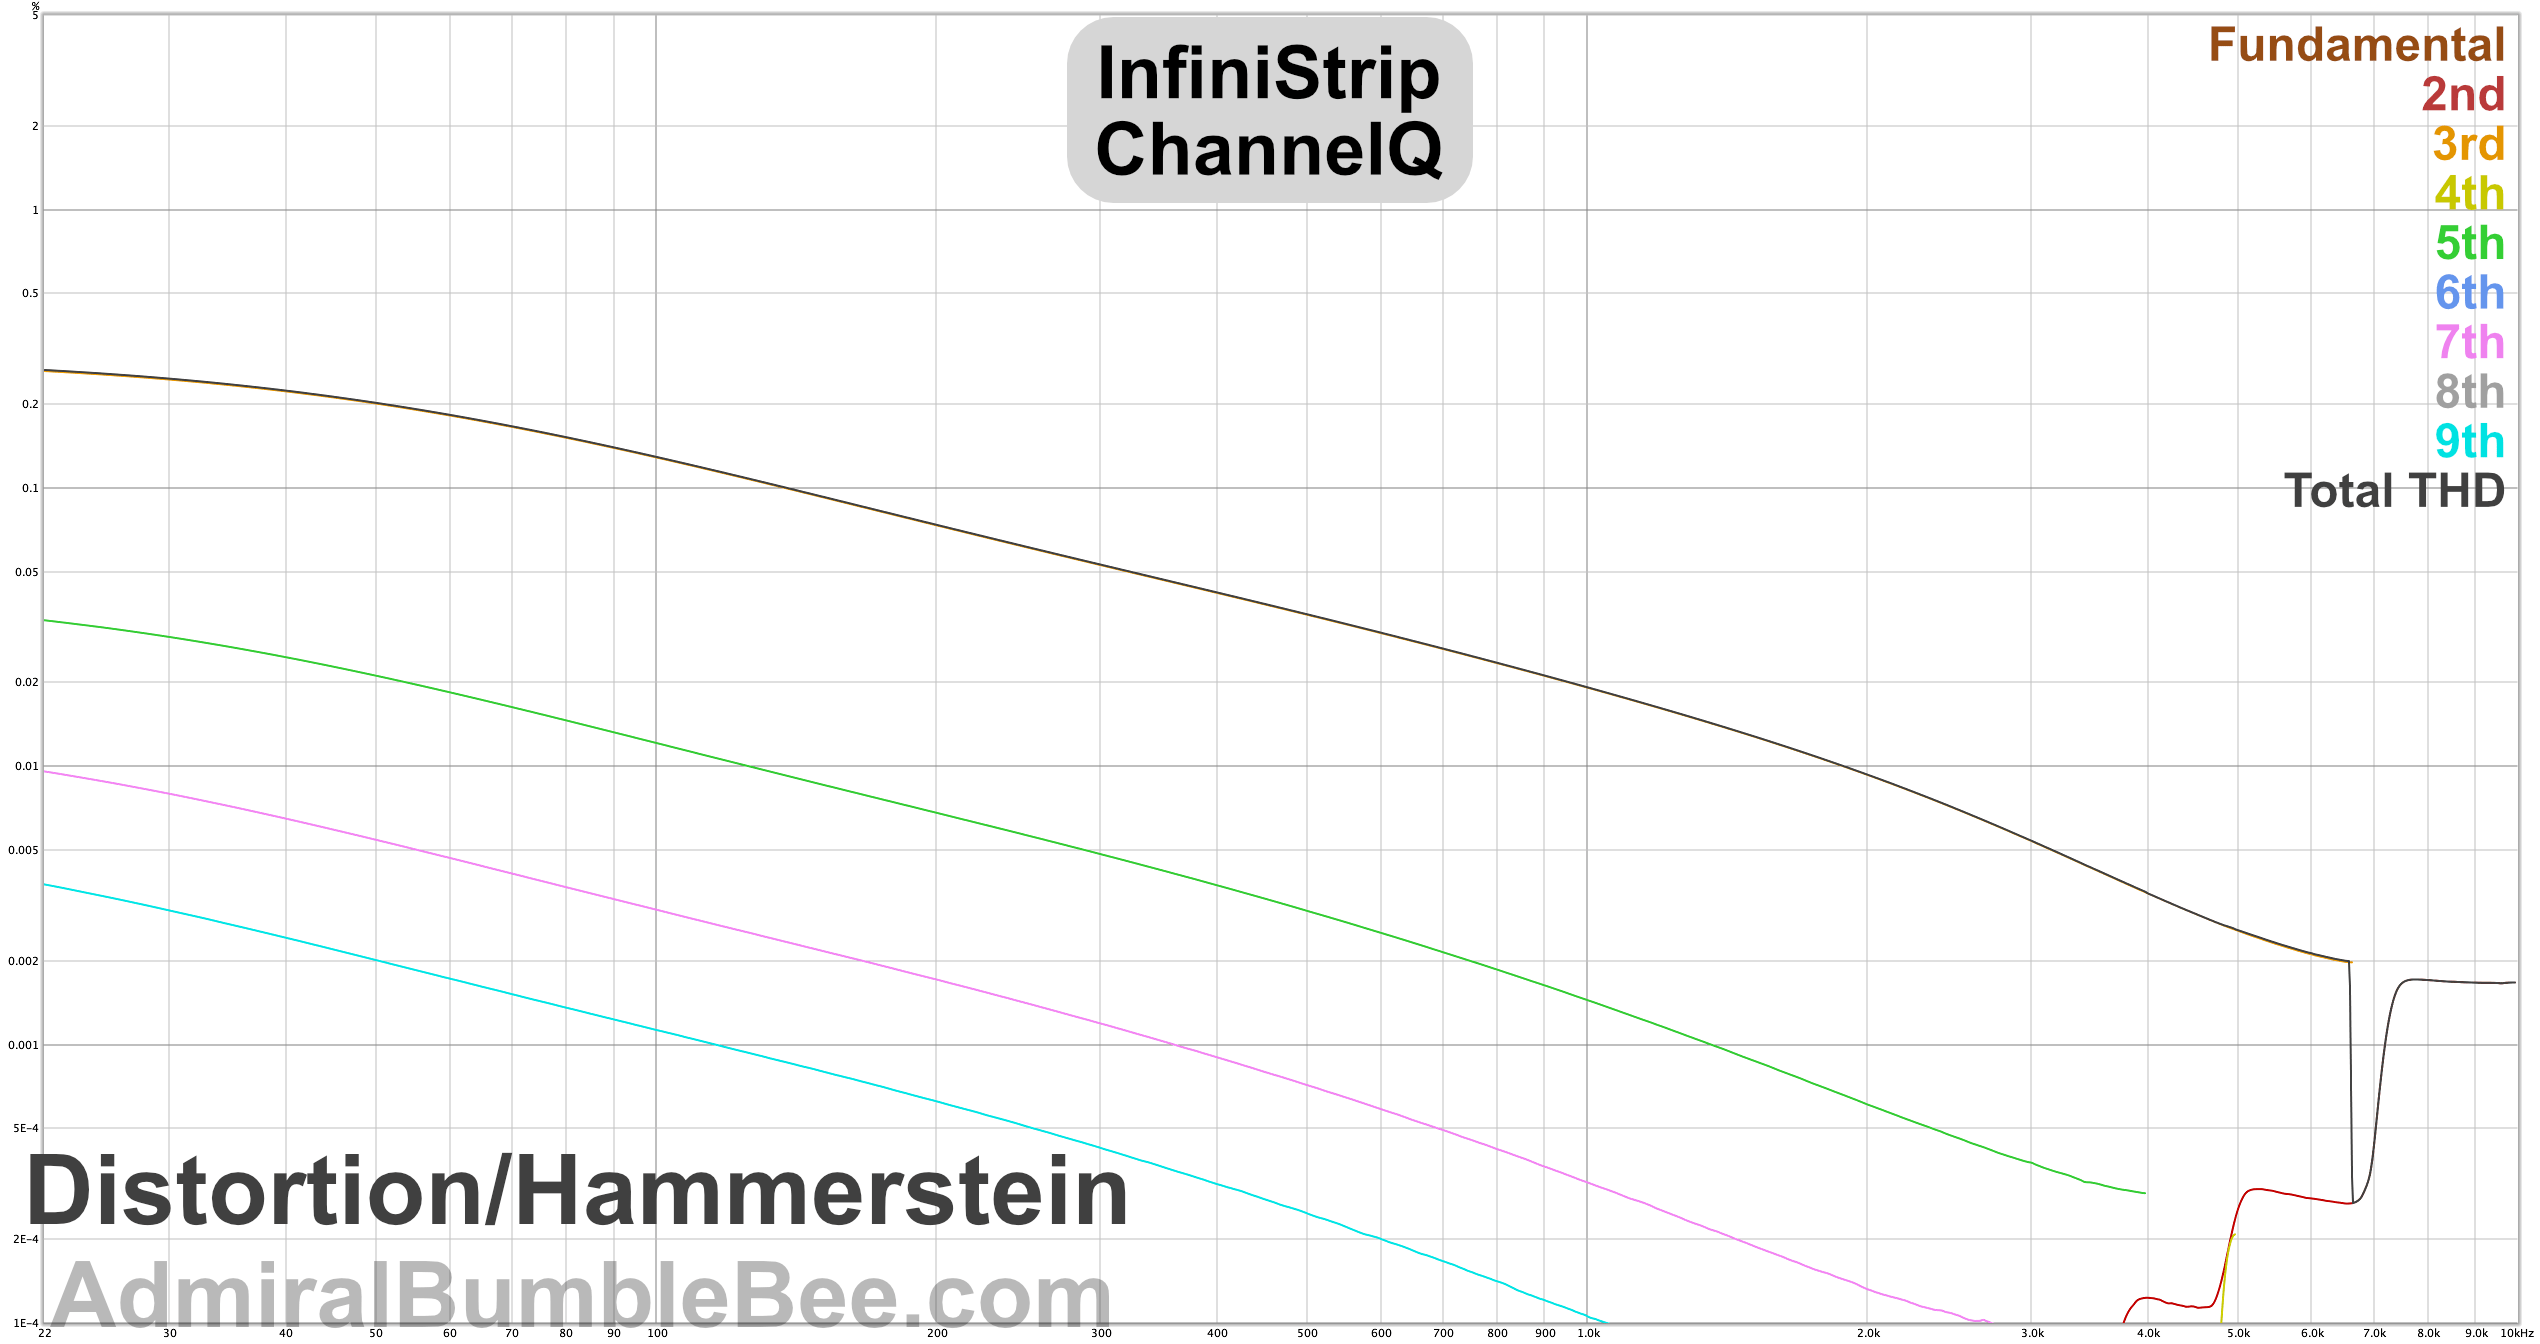
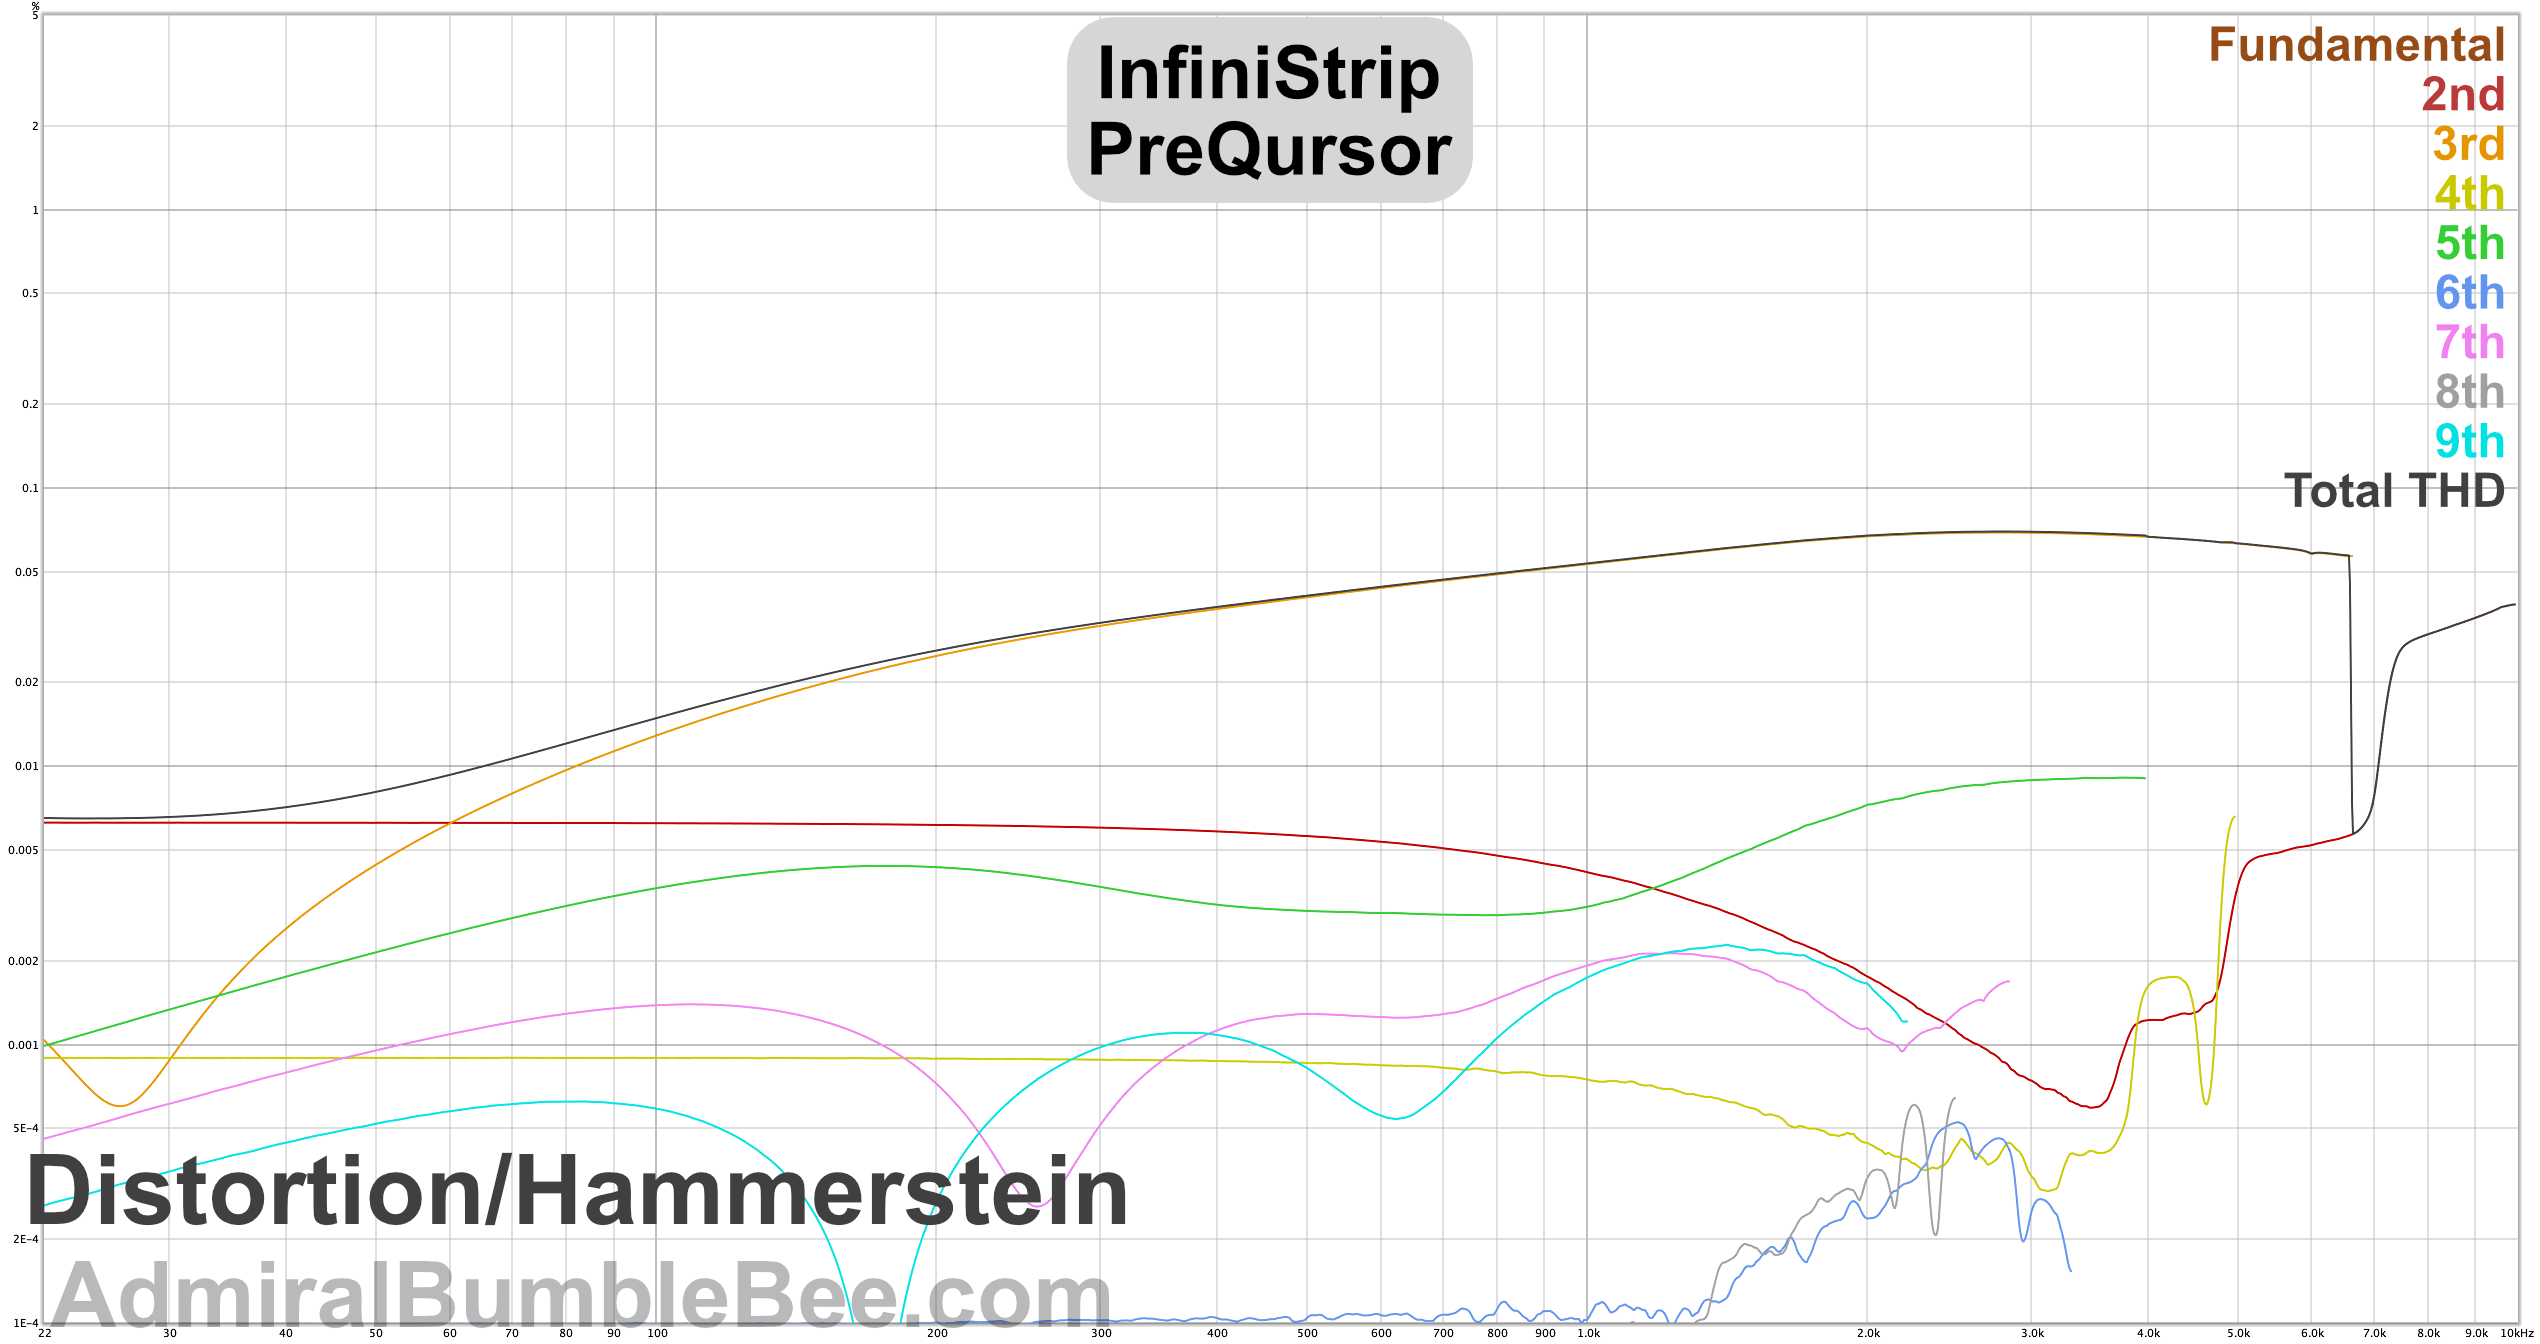
Hammerstein
Generated with REW + Custom Software.
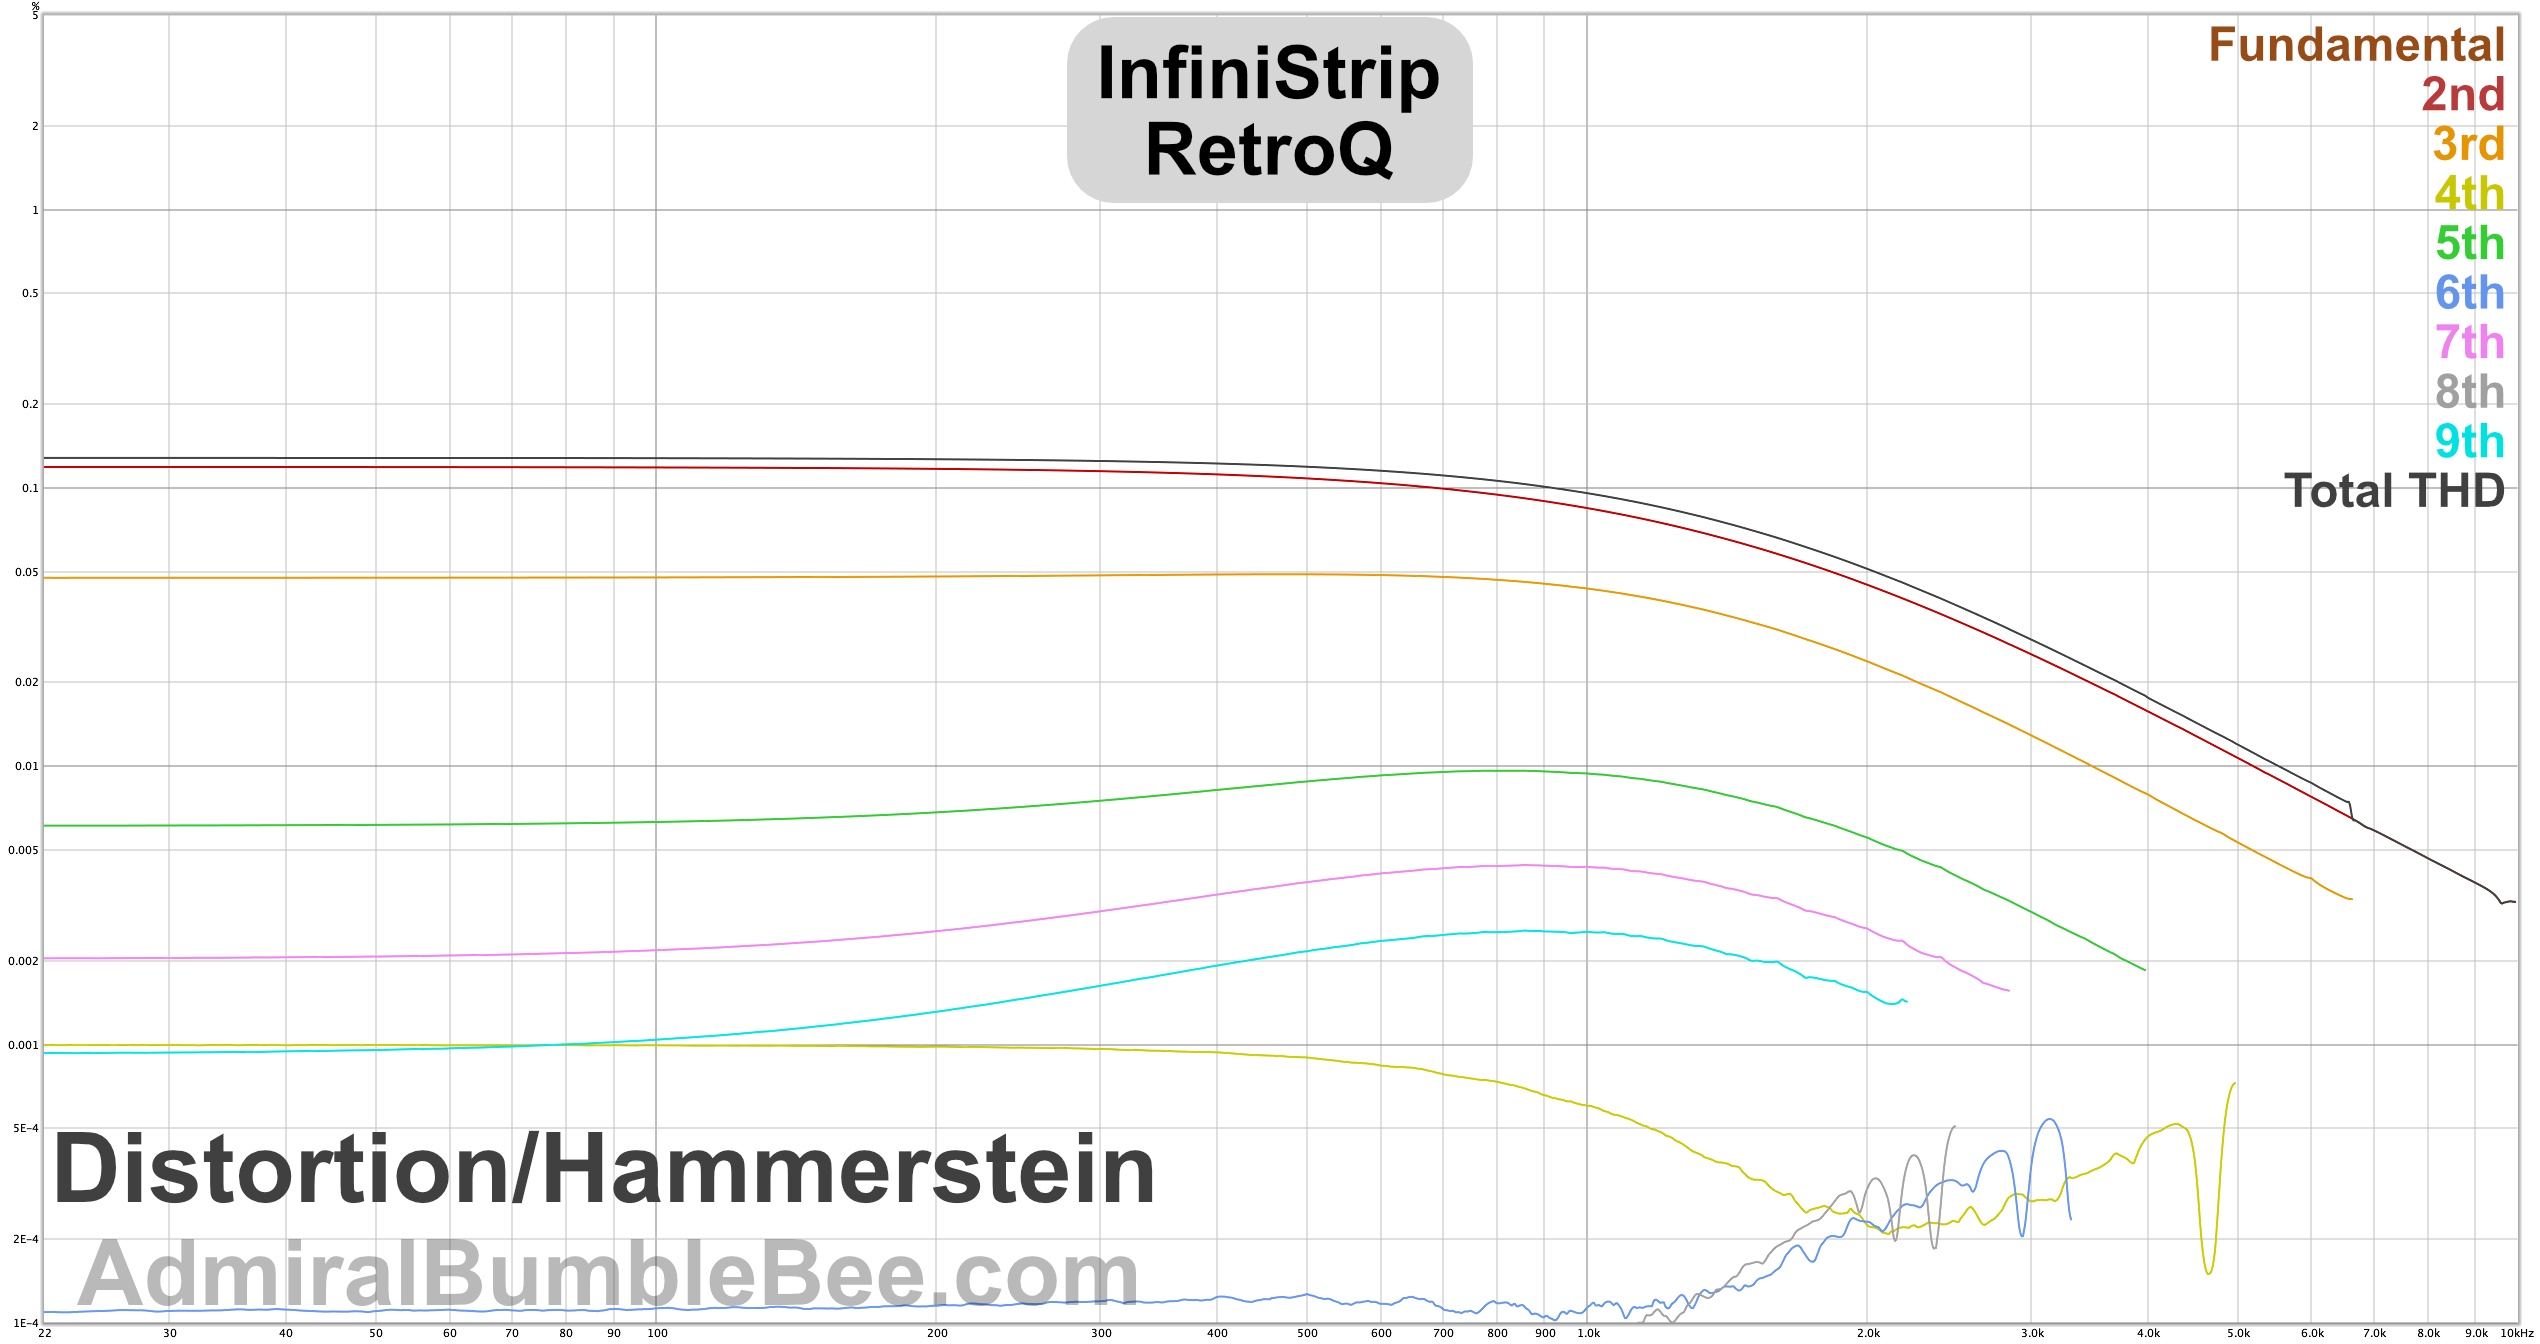
This plot shows the amplitude of each harmonic relative to frequency.
It presents an excellent method of determining the sonic ‘flavour’ of a saturation processor. Most non-trivial processors will saturate slightly differently depending on the frequency (and level) of the source material.
Translating the graph into mildly meaningful words to describe how the device may sound is a long article in its own right. So I will leave this as an exercise for the reader. (my favorite “screw you, that’s too much work” term to put in papers.)
Some processors have saturation that reacts in a dynamic manner. I plotted the first 5 harmonics at with a test signal from -6dBFS peak to -18dbFS peak. None of these processors demonstrated meaningful information in this manner. I did not present these tests since they were not informative (Or the information was so minimal that it was not communicated easily through the charts I created).
All measurements were taken with the “analog” button on.
NOTE - Straight lines aren’t “good”. This is essentially a profile of the processor’s saturation. “Colour” so to say. There isn’t an objective value here.
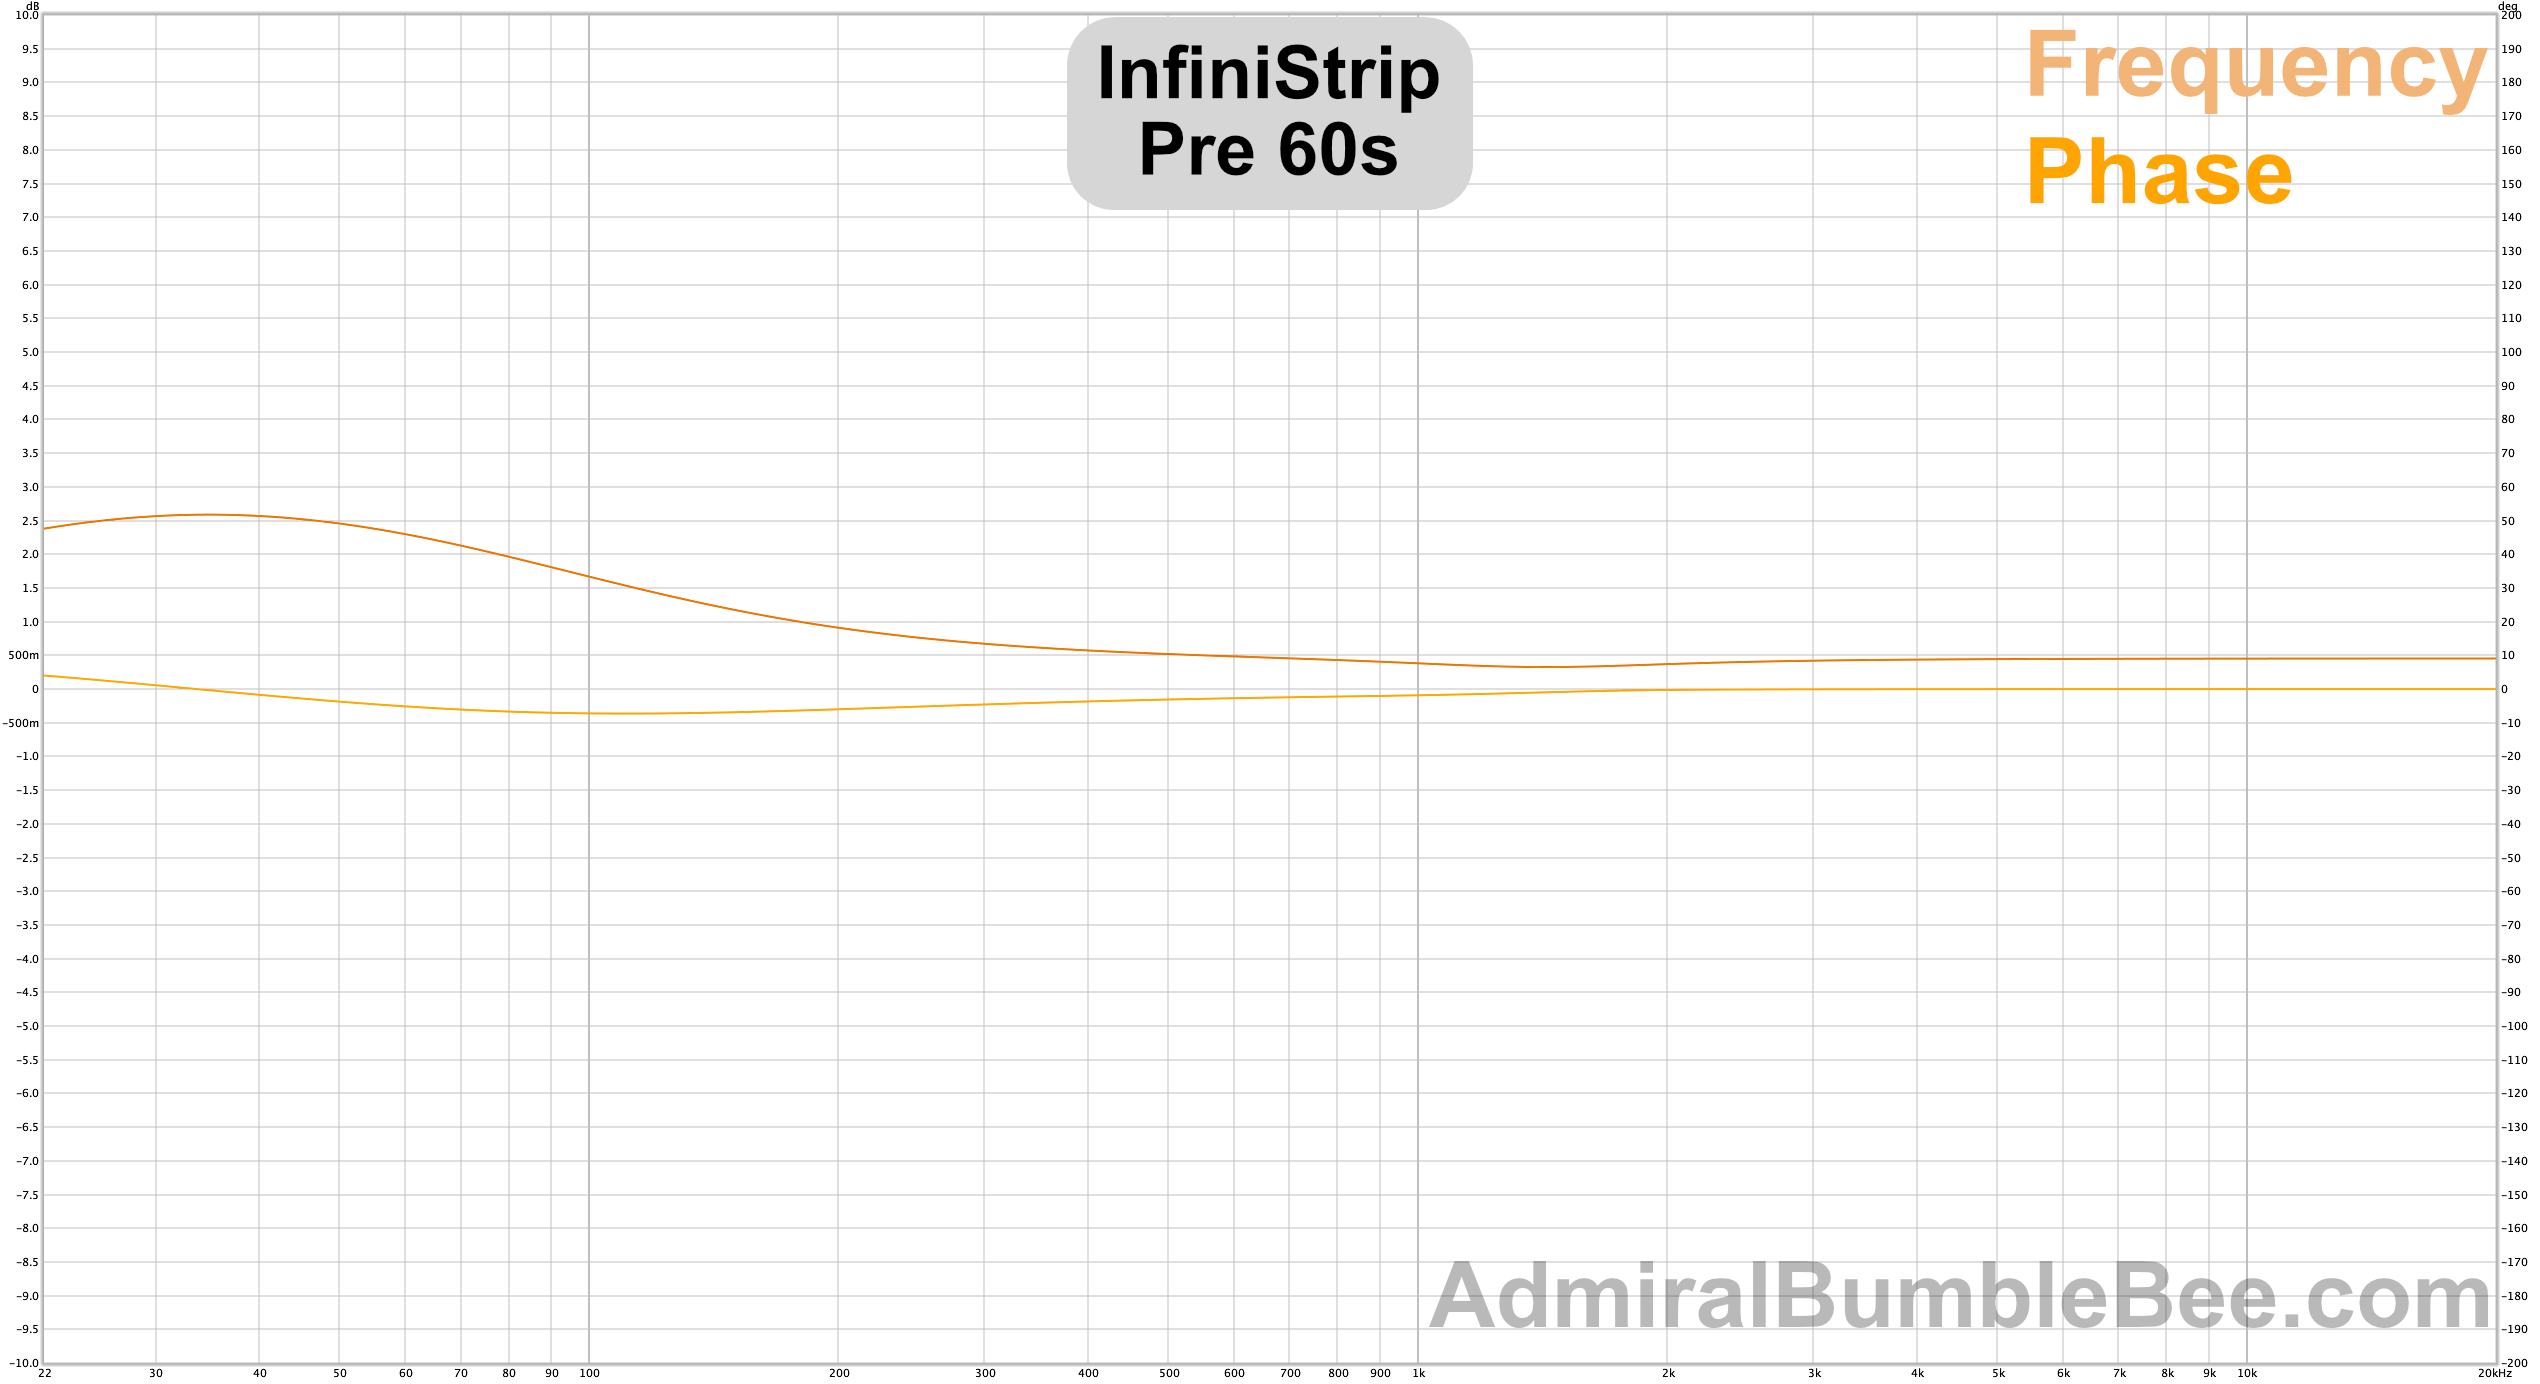
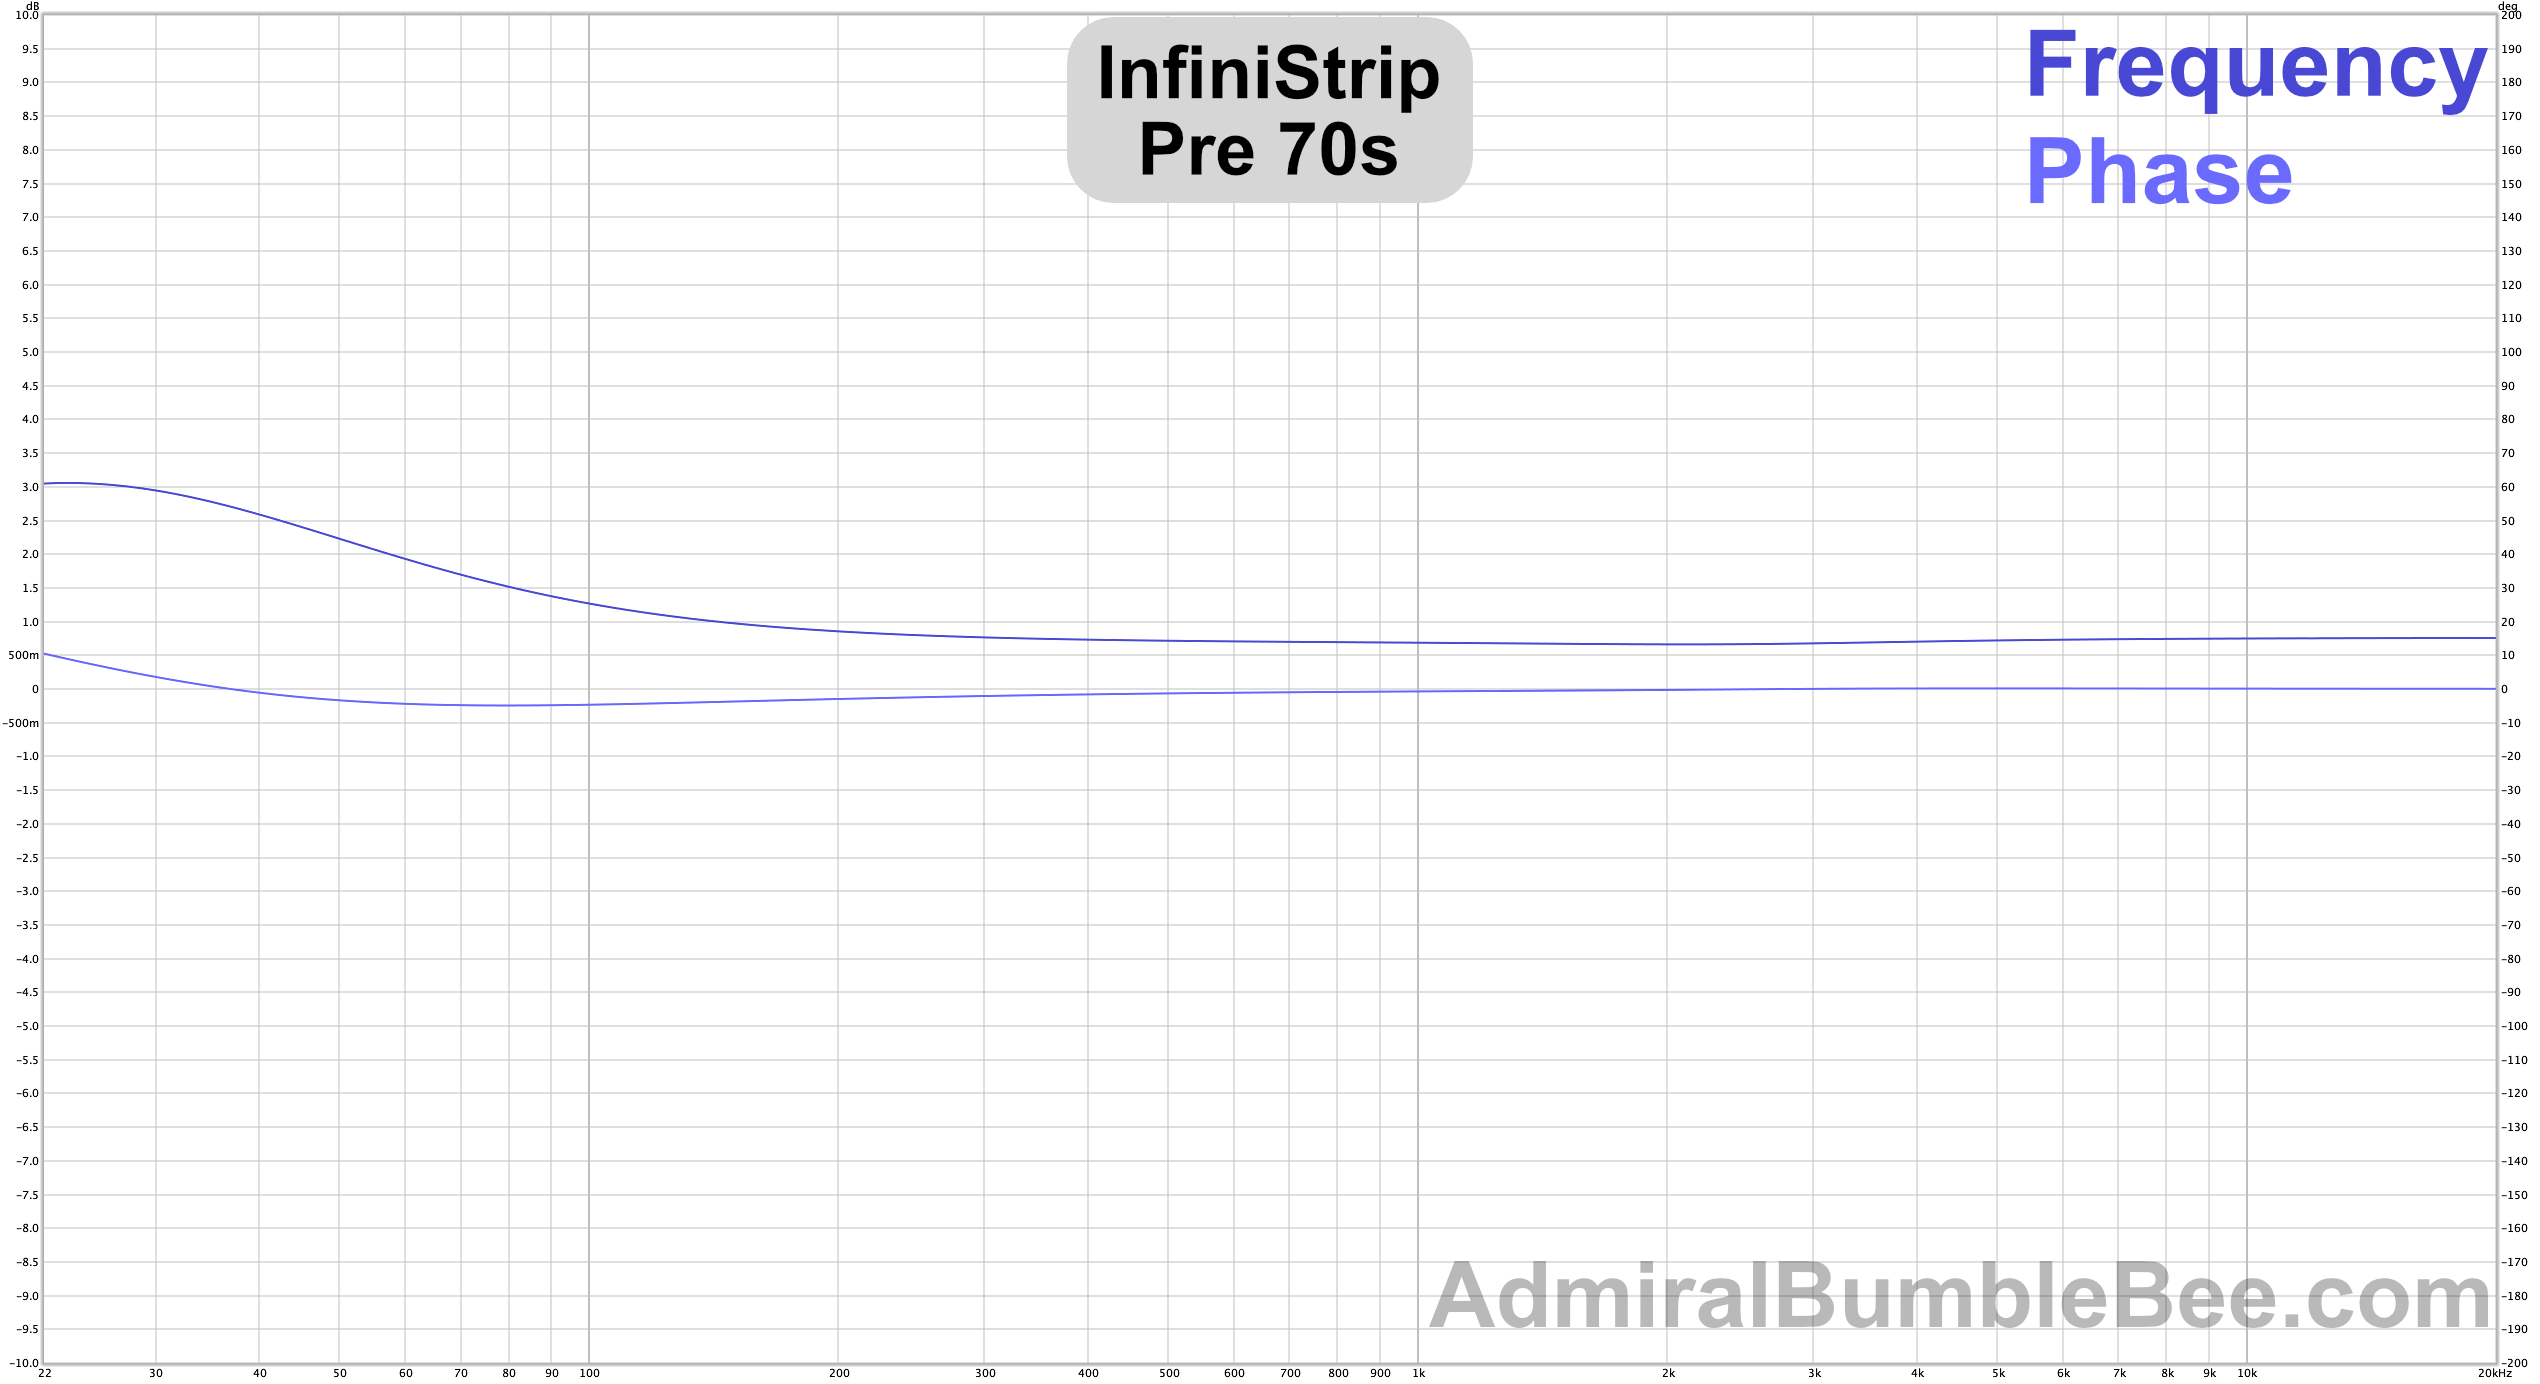
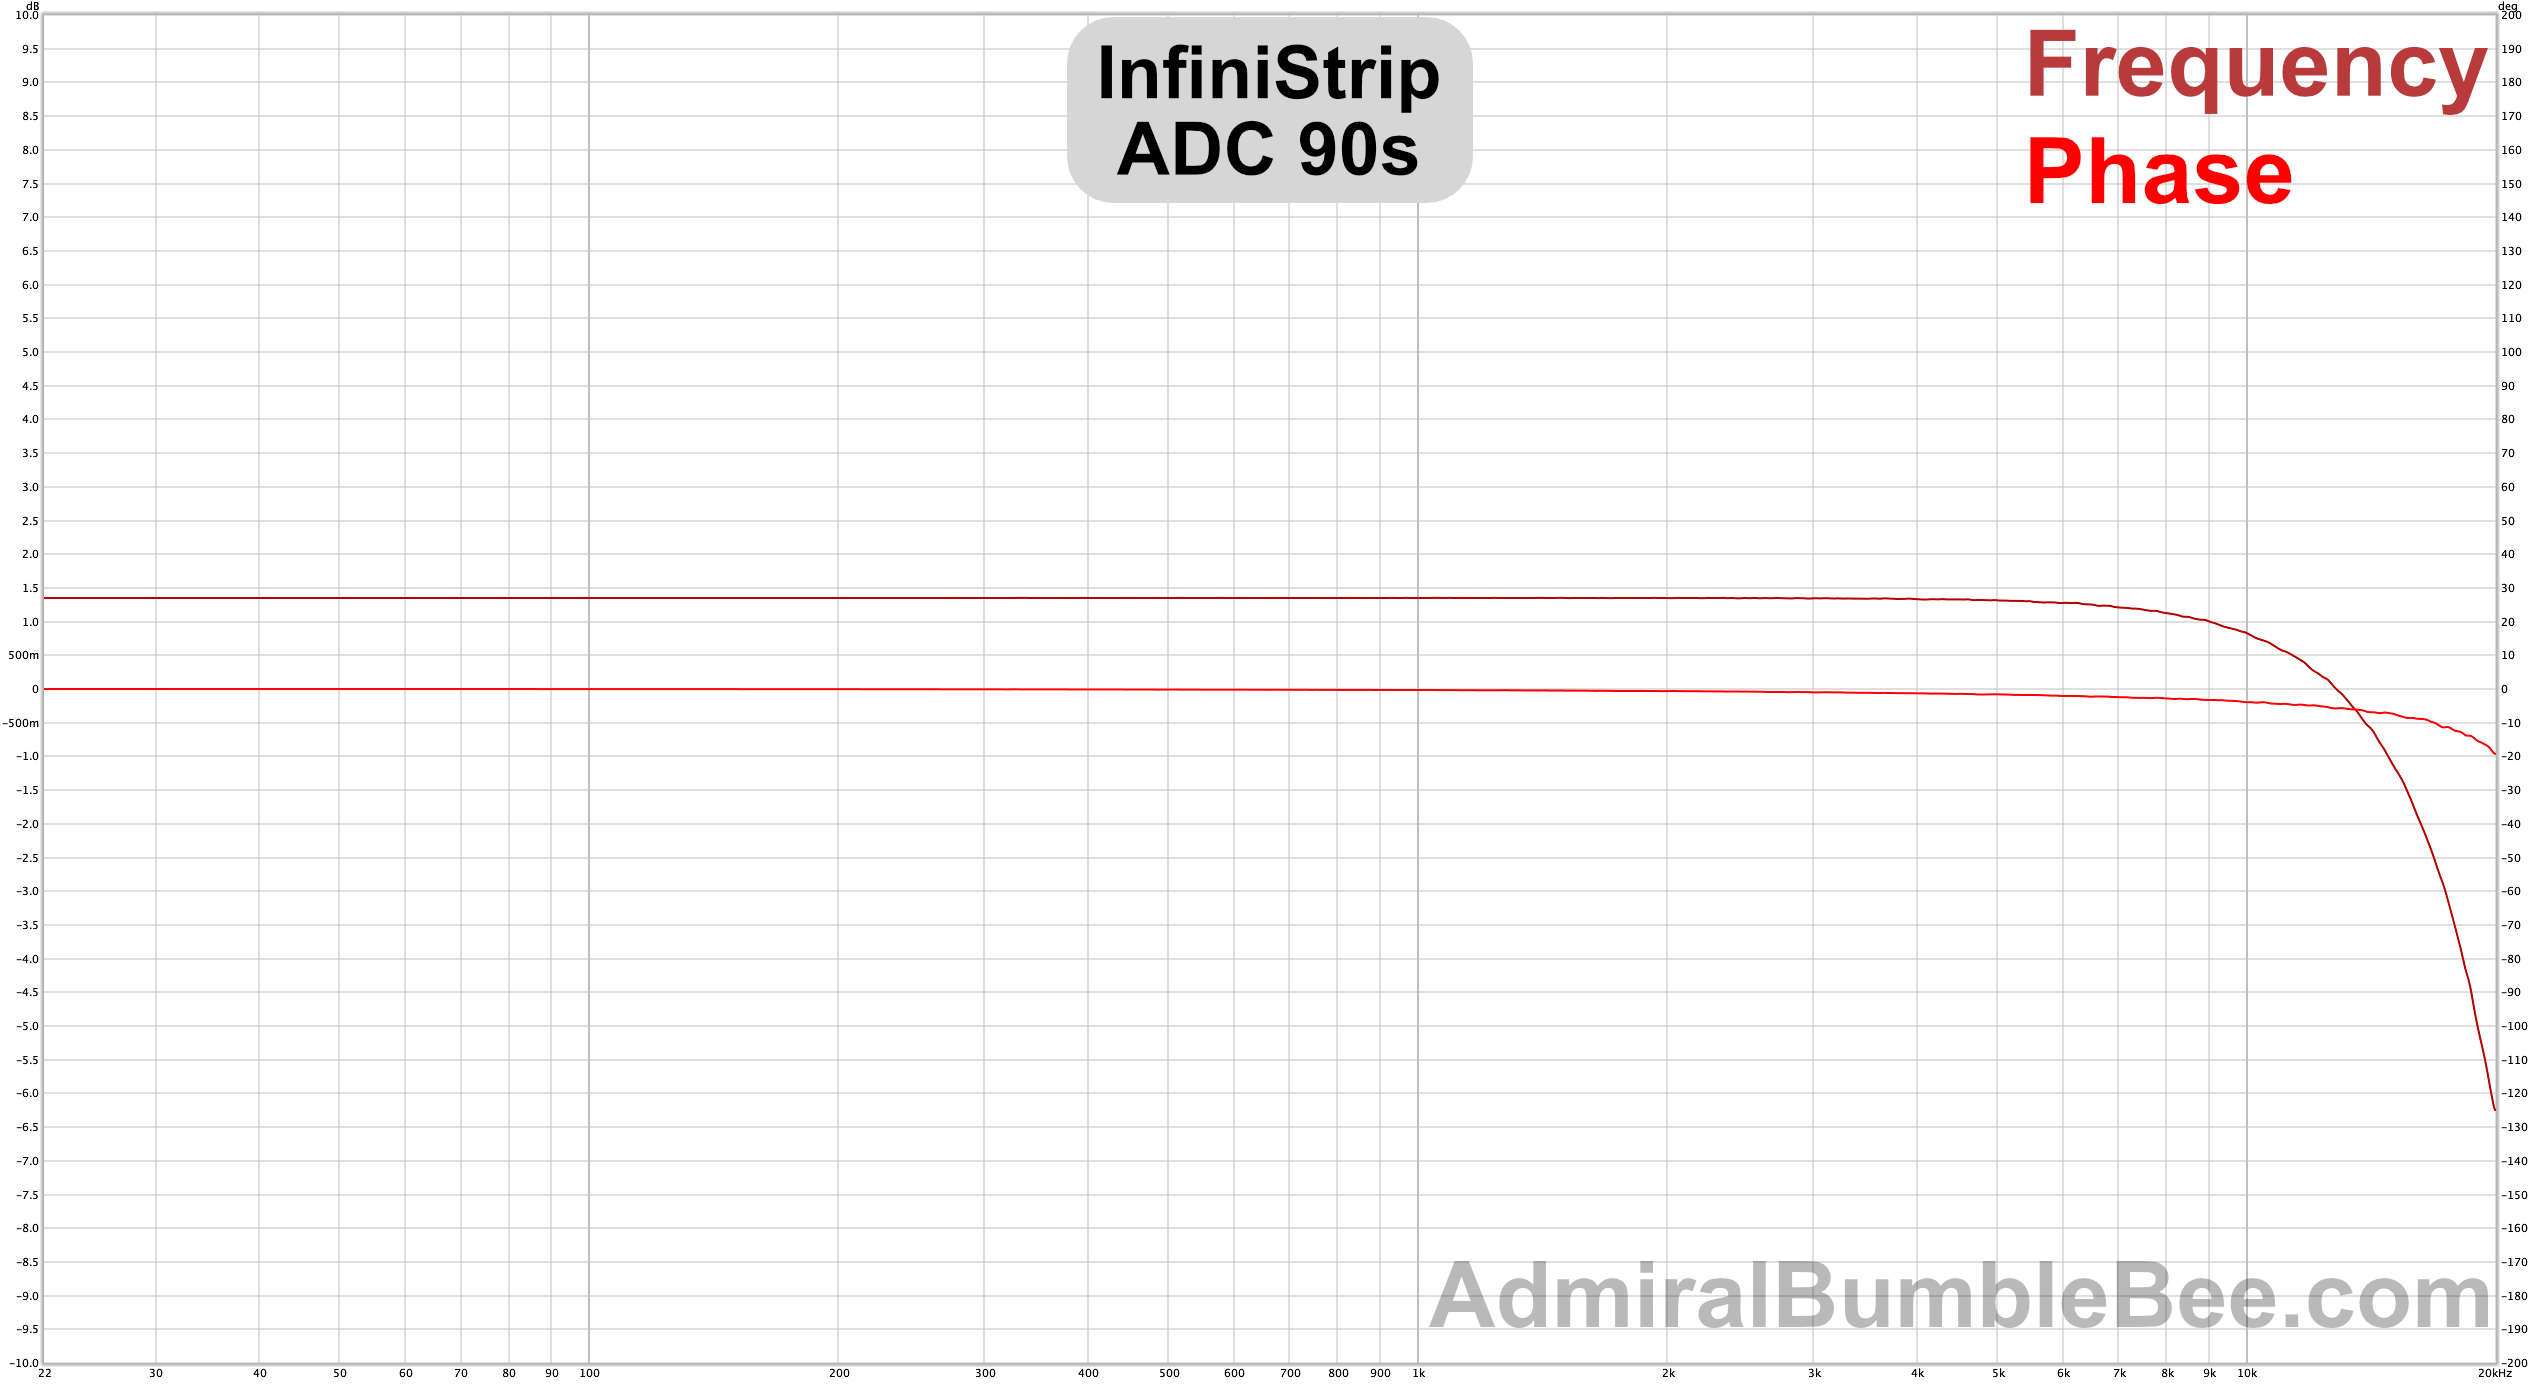
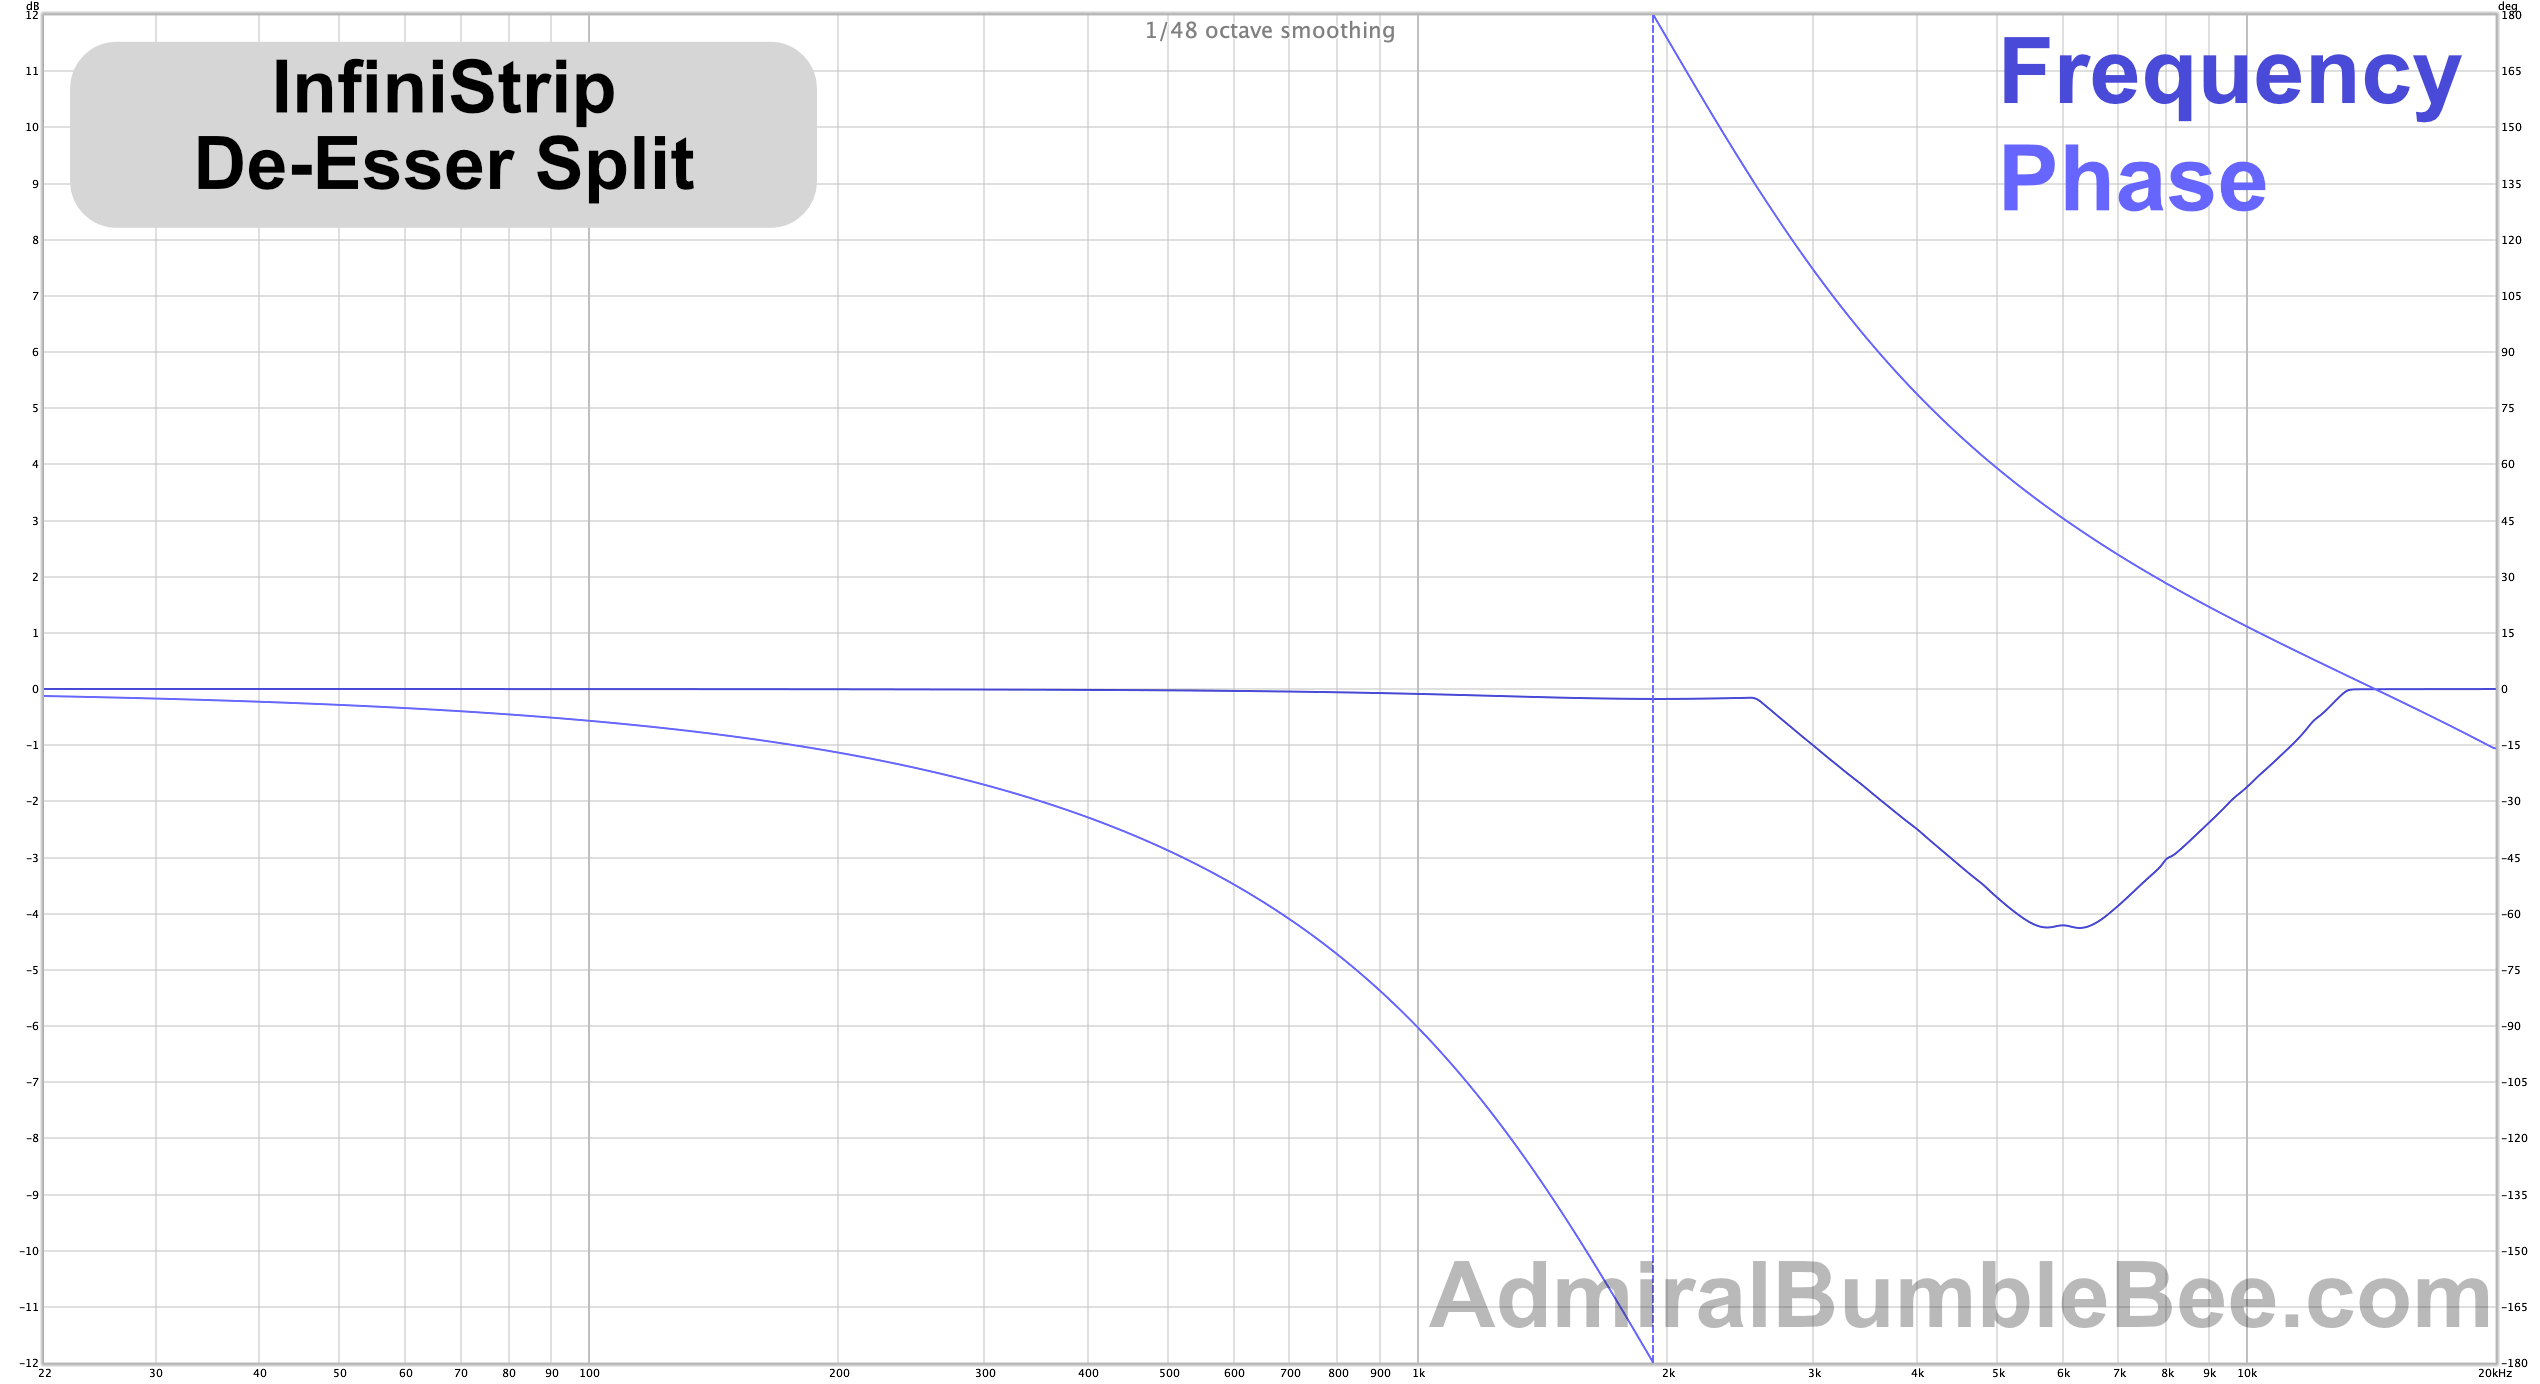
Bode
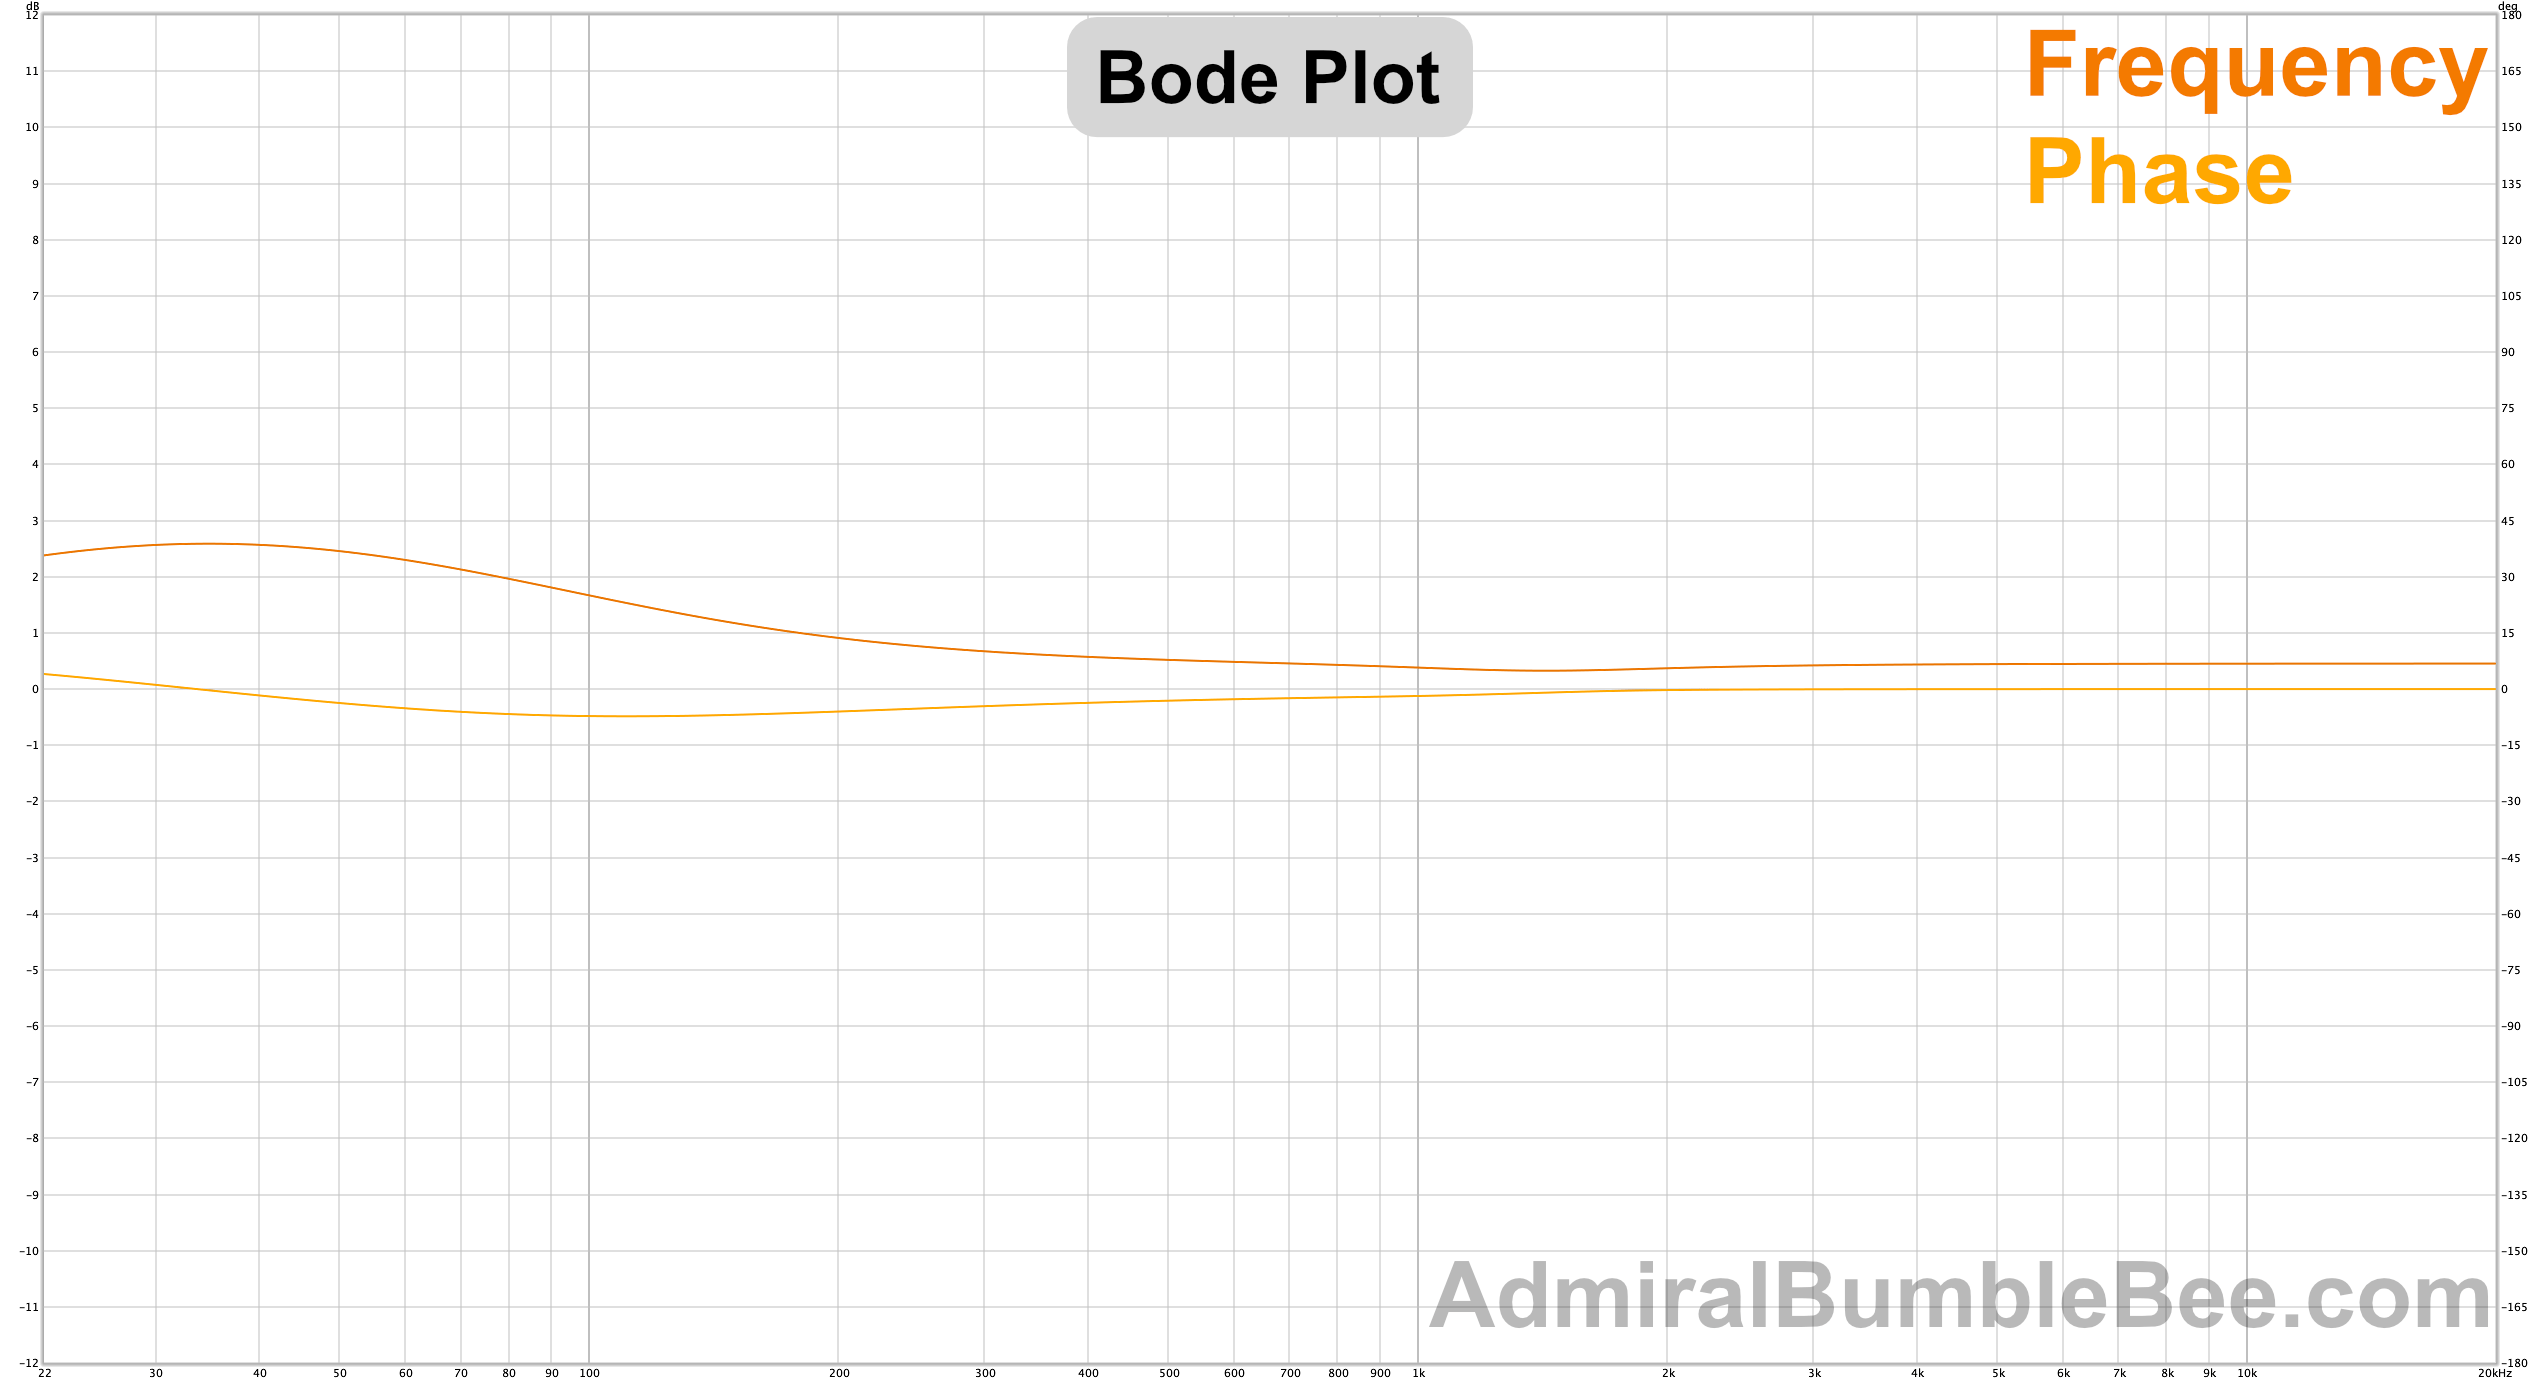
Generated with REW + Custom Software.
In graphs with 2 non-correlated looking lines, the plot shows frequency and phase response of the device for the given setting. Frequency is the darker line, phase is the lighter line.
In graphs with multiple correlated looking lines, the plot shows multiple frequency measurements using varying parameters of the plugin.
All measurements are taken at 0 gain and “analog” mode turned on in the plugin, with a -12dBFS peak test signal.
NOTE: I was careful with settings. If you see that I set a filter at +12dB setting, and the filter exceeds that, then that is the behaviour of the filter.
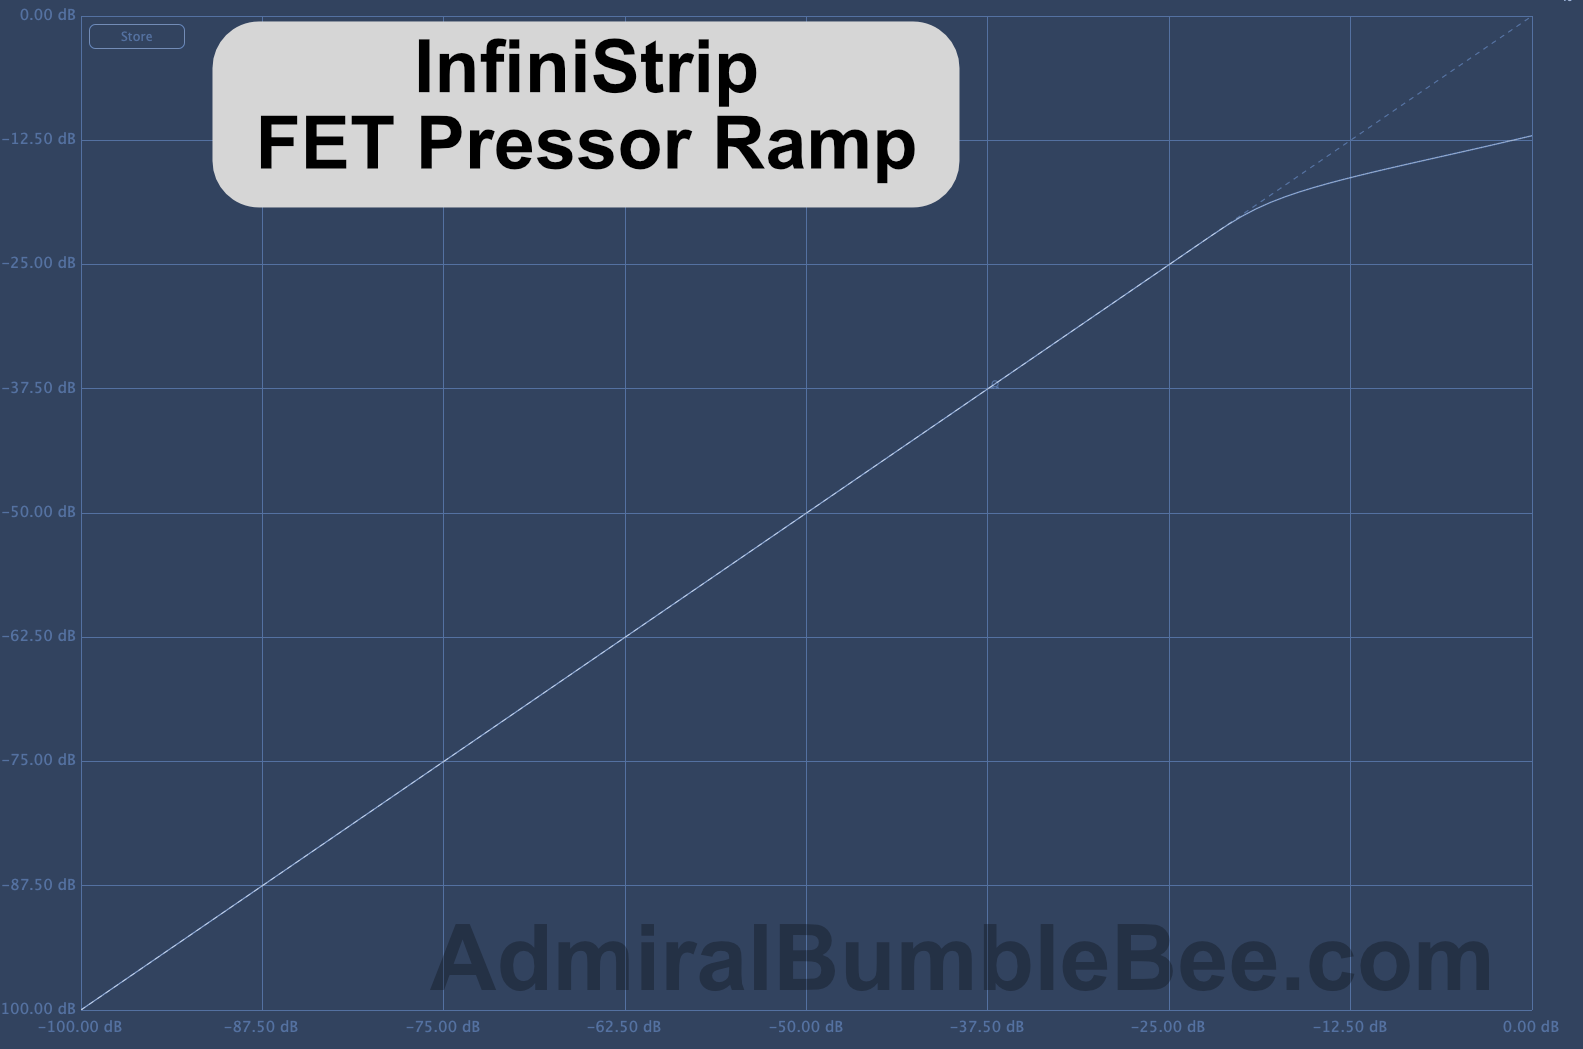
Ramp

This plot shows the response of a dynamics device relative to input amplitude.
X-axis is input level, Y-axis is output level.
A “curve” near where the line begins to break indicates a knee. A knee changes the transition between the “compressed” and “uncompressed” state (along with the envelope).
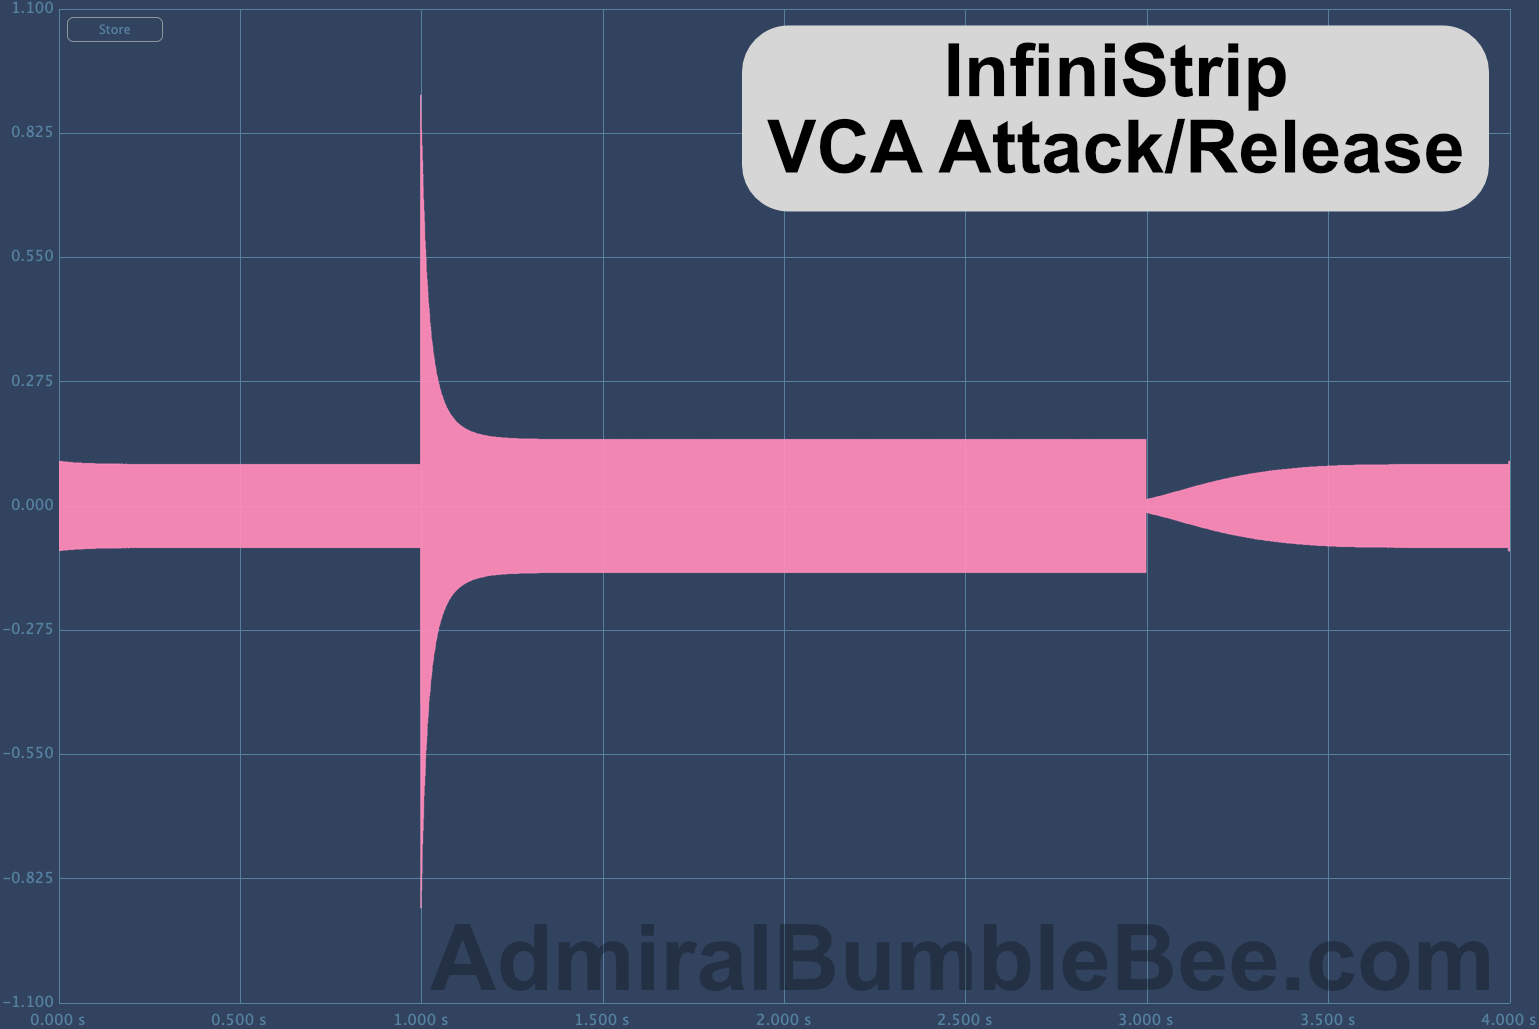
Attack/Release
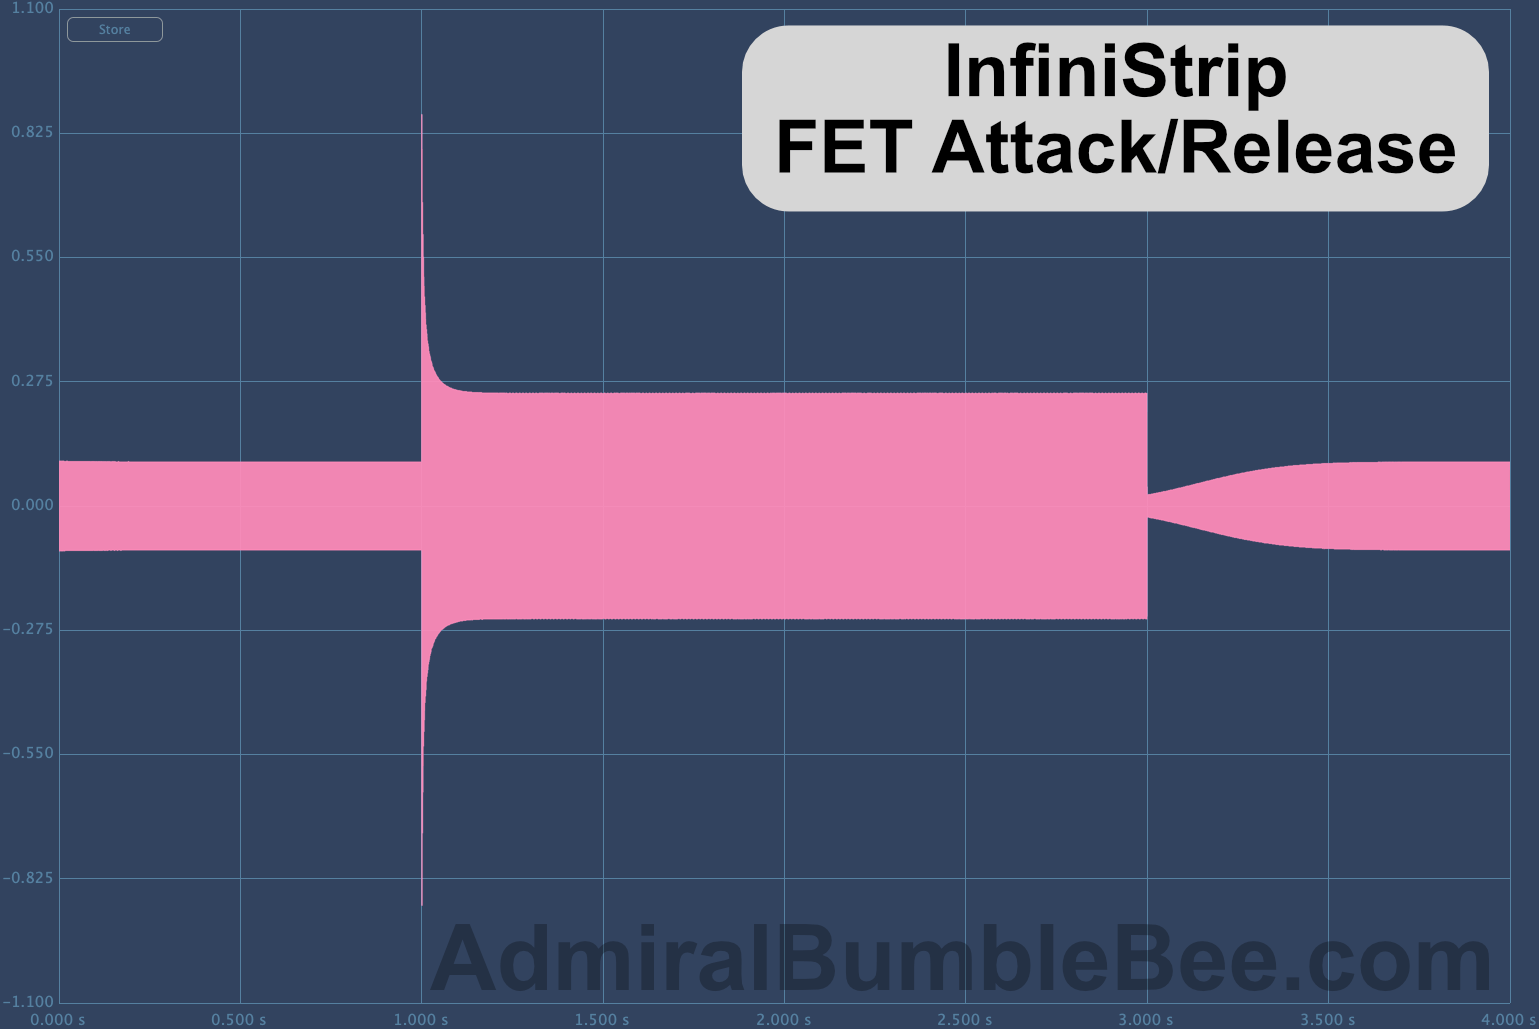
This plot shows the envelope characteristics of a processor.
A 3 stage block of audio is sent through the processor.
- The first ‘spike’ shows the shape of the attack.
- The following block shows the action of the ratio (and related characteristics) relative to other parameters.
- After the middle chunk, the dip and ramp upward shows the release shape.
Envelope characteristics tend to be the most audible and most varying behaviours of compressors, but regardless must be taken into account with the rest of the processor.
PREAMP
All of the preamp modules have the auto gain circuit, and individual left and right channel polarity inversion.
Gain
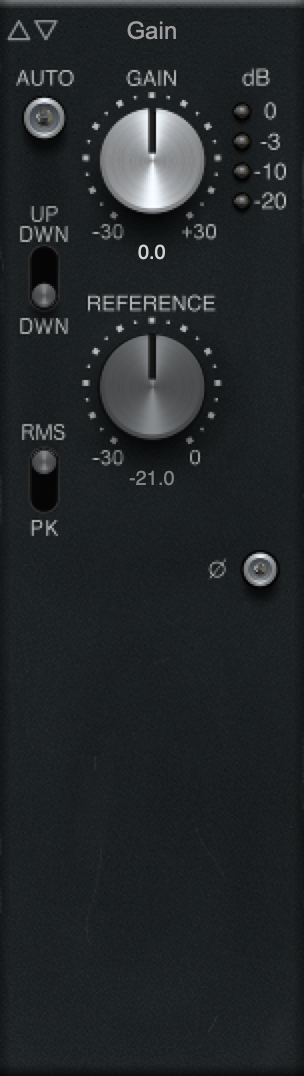
Simple digital gain module. Similar to using a fader in your DAW.
This is the top half of all of the Pre modules.
Pre 60s
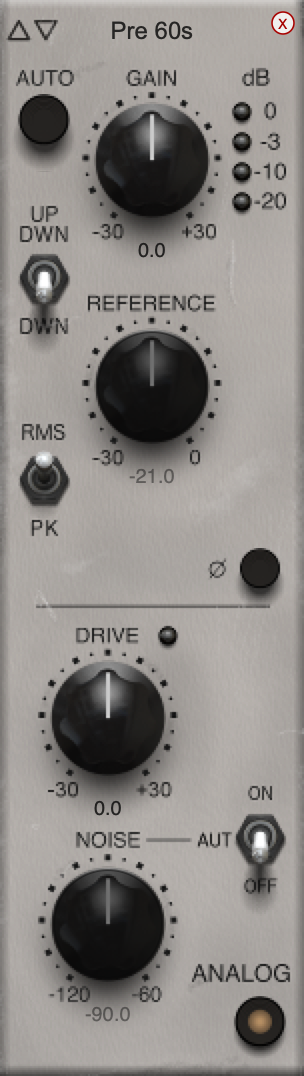
I’m not sure what I expected from the 60’s preamp. I’ve not liked any of the 60s era preamp models or hardware that I’ve tried in the past. They tend to have what I would describe as a “dragging a table on a rough floor” type sound. Farty, if you will.
Higher quality products’ character isn’t offputting by default, but it is a sound that I do not enjoy.
The 60s preamp has that character.
Throwing it on the channel gives the audio a slightly beefier sound. Driving it leads to a wooly character. Lots of low end, not much sizzle.
I ended up using this model the least. I can see value in it for those that want a “classic” vibe, or seeking to “warm” up a sound, however I did not experience much of a ‘warm’ing effect. It makes things sound bigger and heftier at the expense of low-end clarity. That’s a popular sound, but it’s not a sound I gravitated towards.
Charts
Pre 70s

Low end king.
The 70s preamp lends heft to anything you throw it on, and it’s not kind to any rumble or mud in the source. About half the time I felt I needed a highpass while using the 70s preamp.
The saturation is wonderful. This is the preamp I enjoyed cranking the most, but it’s also the preamp that I experienced the most audible aliasing with. I would normally use a processor like this on full drum busses or to increase the harmonic complexity of some guitars, but over time I began to not press it much on anything with meaningful content above the mid range (500-800hz).
I usually work at 48khz, but I started a project at 96khz specifically to work with this module and not be annoyed by the aliasing on drums. If there’s any argument to be made for adding oversampling to InfiniStrip, then this is it. The rich sound of driving the 70s preamp is sometimes overwhelmed by the processing artifacts unless you work at a higher sample rate.
I can’t convince myself to consistently work at 96khz (yet?). The extra processing power is a hurdle, and why pay that price when only a few processors potentially benefit from it?
If I set the drawback aside then I would happily claim this module and the retroQ module are worth the price of the whole product alone.
The aliasing in InfiniStrip with high-drive 70s preamp detracted from my excitement in using the product. I could nearly say that if the 70s preamp wasn’t here, and I didn’t know what I was missing sometimes, then I would value InfiniStrip more. That’s an irrational view of course, but knowing what your missing is bittersweet knowledge.
Charts

Pre 80s
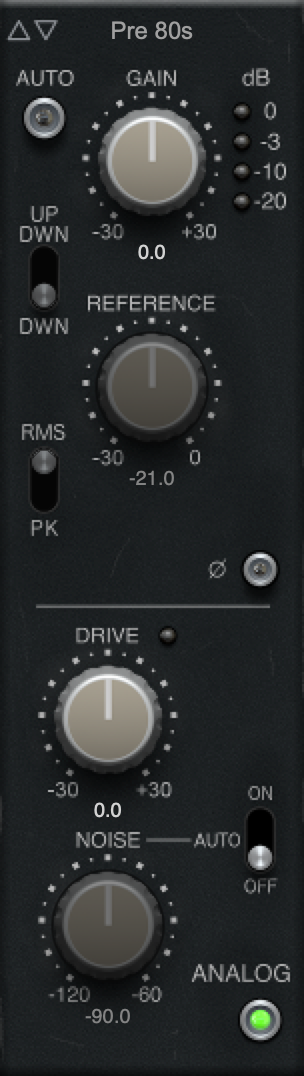
My love affair with the SSL 4k gave me the expectation that this would be my preamp.
The SSL 4k was the defining console of the 80s. I use the emulations from UA and PA hundreds of times a week. It’s plugin crack to me.
The 80s preamp in InfiniStrip did not give me the fix I was looking for.
The 80s preamp is much brighter than I’d expect from a transformerless 4k. It’s not particularly bright, but it is brighter. It saturates slower than any of the consoles that I’d imagine it’s emulating (which is good!) and adds a distinctive low-end sound that’s not present in any popular 80s console that I’m aware of.
It took me about a month of constant use before I warmed up to (sorry) the 80s preamp. When I stopped expecting it to sound like the 80s style preamps I use(d) then I “got it”. I found the 80s preamp to be useful on things where I wanted just a bit of something. Eventually it became the default preamp in my channel strip.
The 80s pre is the most friendly to modern electronic and rock styles. Less density, fewer harmonics, less low-end. The results are subtle at sane levels, but if you threw this on every channel then A/B’d your mix with and without then you will hear a clear difference. One track? Two tracks? I wouldn’t even claim to hear the difference in a level-matched A/B (I tried!).
I wish InfiniStrip had a “global off” that allowed you to turn off all instance of a module that are currently active. I’m rarely reminded of how important small changes can be, but a few project-wide setups with just the 80s preamp gave me a good reminder.
Charts

ADC 90s
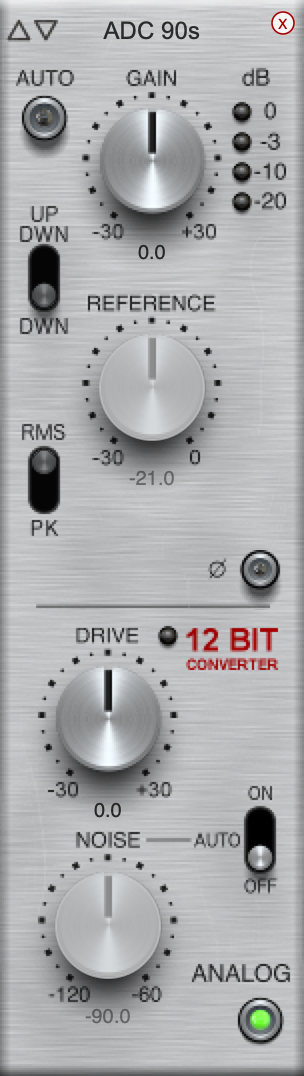
Uh.
hmm.
Hiphop and derived genres? That’s all I see here. That “straight off the mpc/sp” sound.
I tried to find some generalized niche for the ADC 90s, but there was none. It definitely gives that harsh-but-not-shrill 90s sampler vibe, which I know is popular in certain genres, but even in those contexts this would be overkill much of the time.
It’s noisy. The noise doesn’t sound nice. The saturation is inharmonic. The fidelity is minimal.
Do you want that? Perfect. I don’t know of many other products that get this vibe right.
Did I want it? A few times, and I’m not sure if the mix benefited. I find it difficult to convince myself to sacrifice musicality (harmonicity at least) for a throwback. The 90s crunch can be achieved with a naive waveshaper and a low-pass filter in a way that falls in line with modern musical tastes. If you want authenticity then the ADC 90s is an excellent path, but I don’t agree with its existence as a matter of principle.
Charts
FILTERS
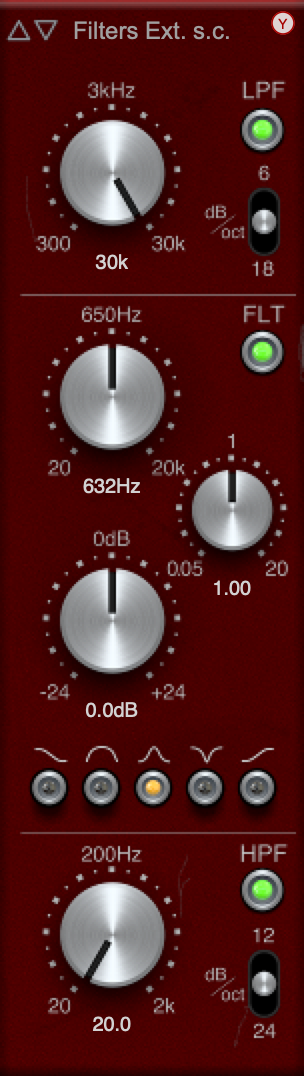
Basic Filters

- Low pass - 6, 12 and 18 dB-per-octave slopes.
- High pass - 12, 18 and 24 dB-per-octave slopes.
I found myself mildly disappointed with the Basic Filters because I often wanted a shallower or steeper slope. I needed a steeper slope sometimes and that broke my “channel strip workflow”. I had to use a different product any time I needed a gentler or more aggressive filter between stages, and that meant putting the secondary product between two instances of InfiniStrip or not using InfiniStrip at all.
I like to use high-pass filters with some resonance. Take away some of the low end, but add a bump just at the cutoff to compensate for the reduction in lower frequencies. I use a similar “trick” on guitars, bass and saw synths with low-passes. Basic Filters (and Pro Filters) do not have a bump or resonance.
Initially I tried to work with the filters as is. A few of the preamp models already add some low-end meat, so maybe my resonant filter habit was unnecessary? Perhaps an infusion of saturation would compensate for any low-passes?
No. I sorely missed having resonant filters or some sort of compensation.
I don’t think that I have used the Basic Filters in the last month. I prefer to almost always use Pro Filters and manipulate the mid-band to do my dirty compensatory needs.
If the basic filters were resonant, I’d be in heaven.
Charts
See the HP/LP charts for Pro Filters below.
Pro Filters

Take the Basic Filters, add an extra band and this is what you get.
For no added fee, we’ll throw in:
- A low shelf
- A bandpass
- A bell filter
- A notch filter
- A high shelf
Versatility that you can write home about.
I’ll spoil the review a bit for you and tell you that I love retroQ, but I reviewed my projects that I used InfiniStrip in and I use Pro Filters more than any other filter in InfiniStrip.
The sheer versatility of it makes it a smart grab when you’re not 100% certain of what you need to do to a signal. There isn’t much “vibe” to it, but it’s a problem solver.
If I were to have a gripe with it, and I do, it’s that it can’t be used in parallel with other processors. If I wanted to nitpick more, and I do, it’d be that I can’t use at least 3 of these. Yes, you can use two (filter slot, X or Y slot), then use an EQ for something else.
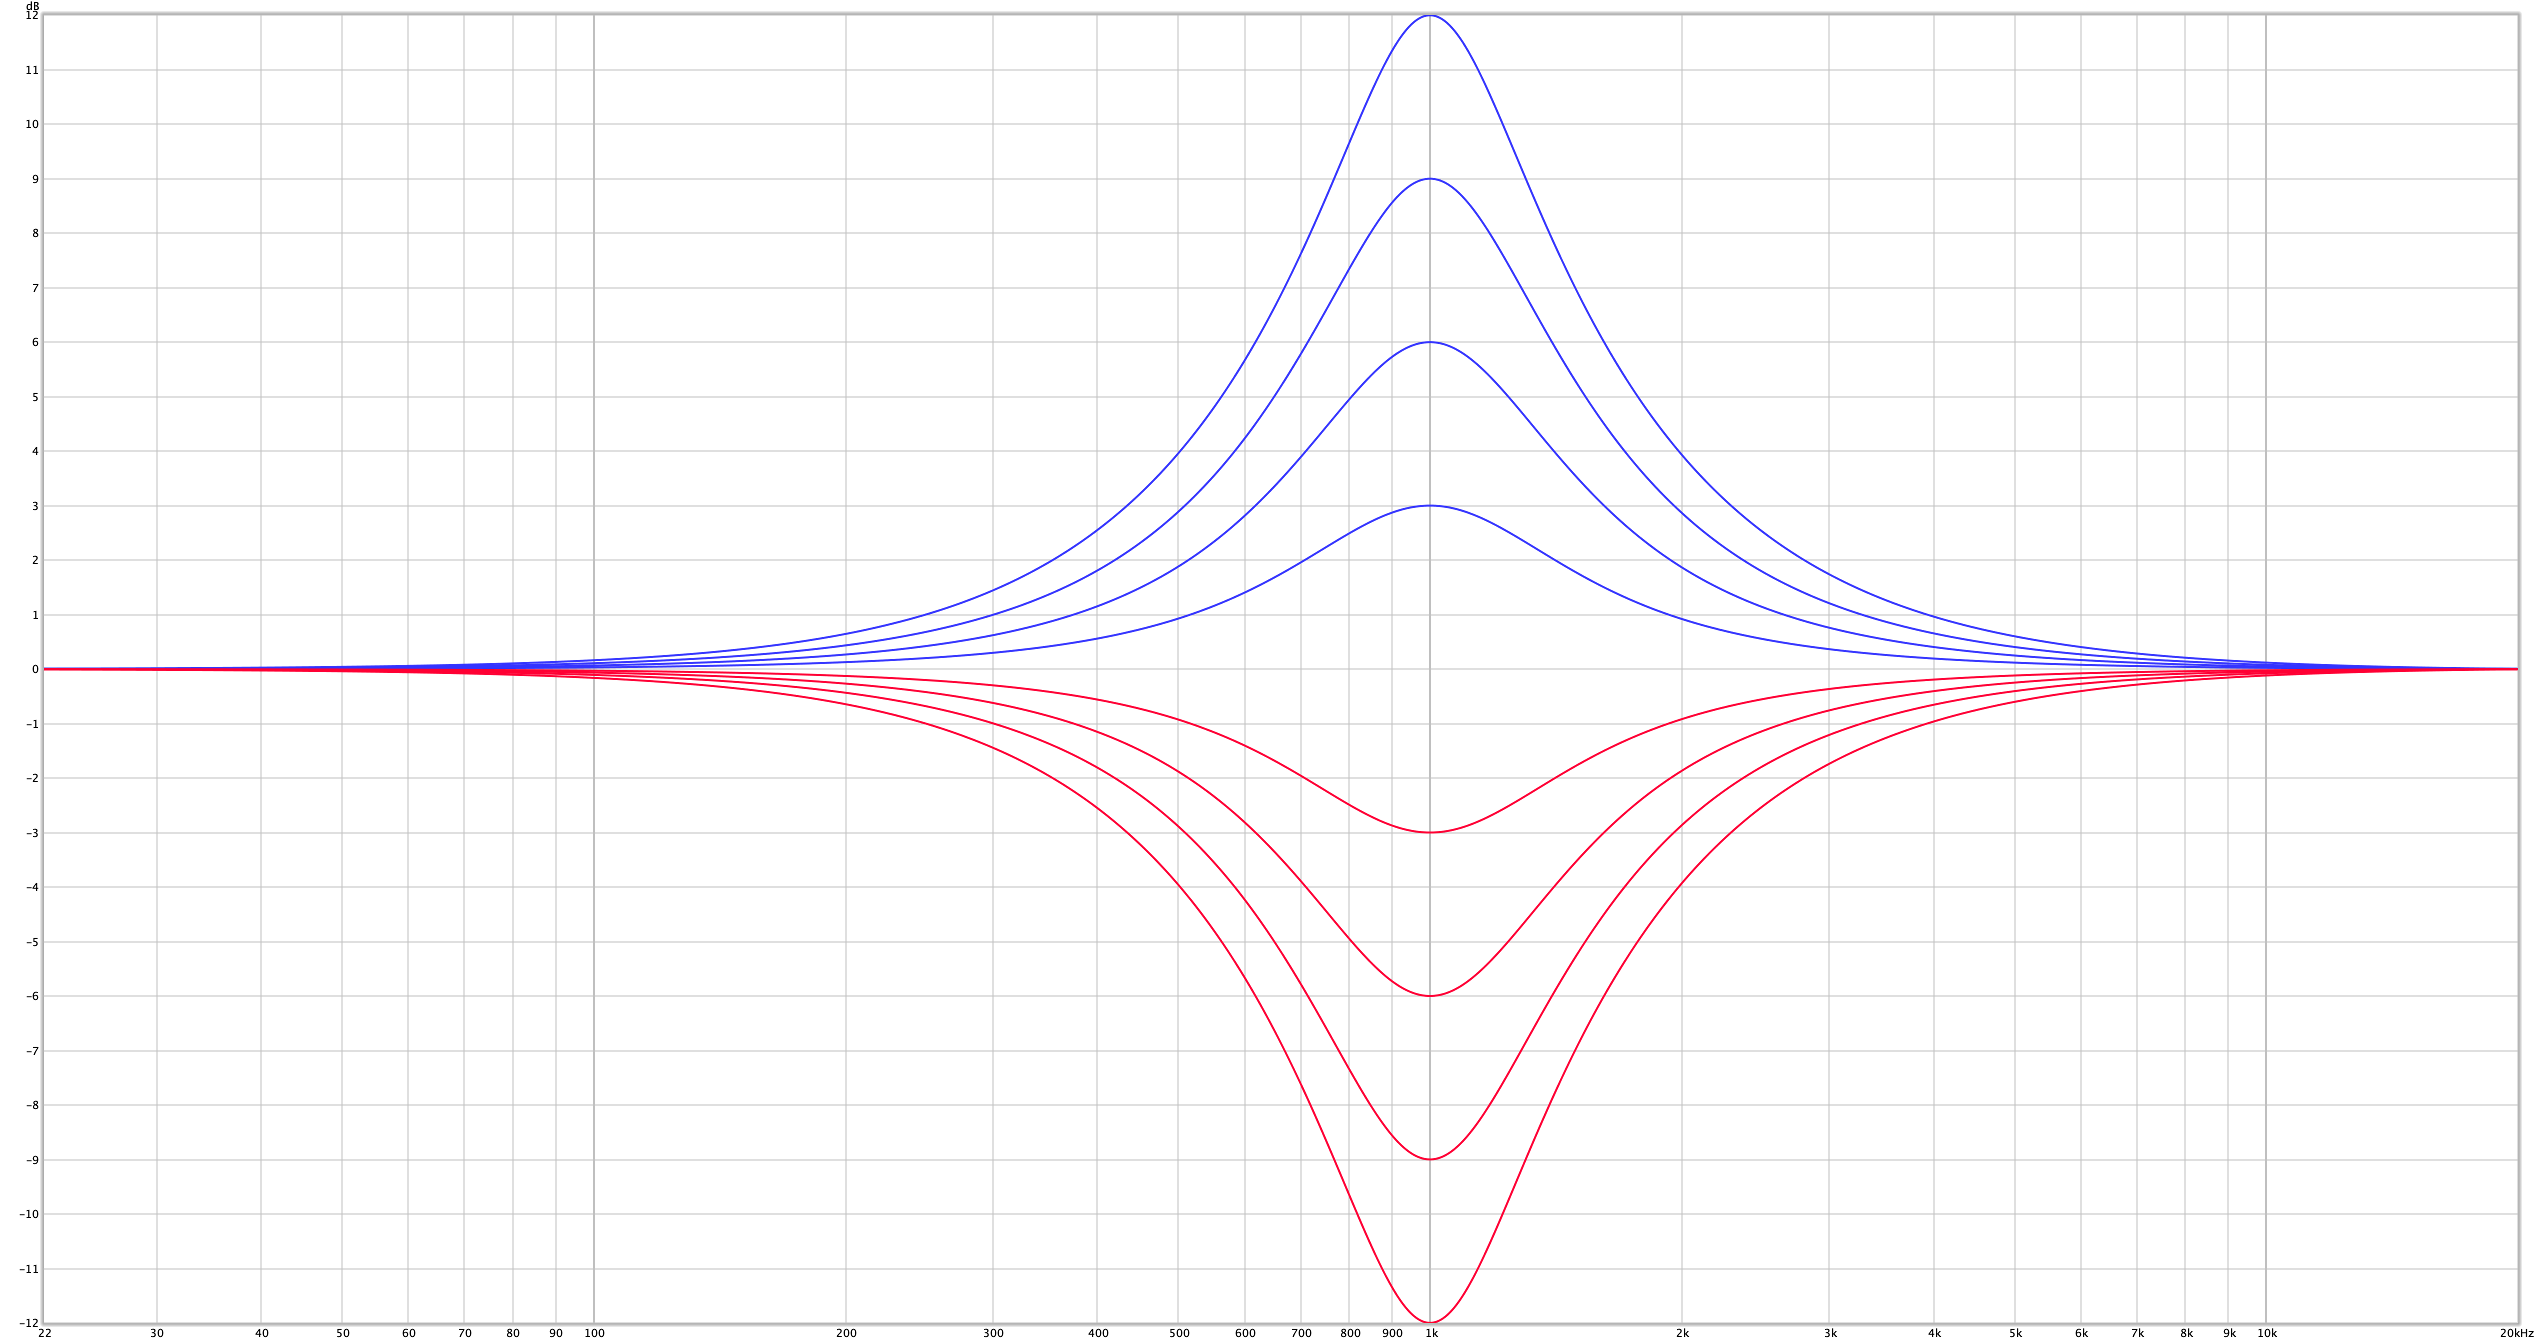
The charts below bare the versatility of this seemingly simple processor.
Some notes on the various filters:
- Notch - Somehow makes almost everything sound better. I’m curious to see measurements. Just throwing a notch in an unimportant area of the signal improves most things. (Note: nope, not that special. The low/high pass effect is notable though.)
- Bell - Wish it was easier to sweep. 20hz-20khz range on a single knob is too much even with fine-tuning modifiers. I would prefer a low/mid/high switch that limited the range of the knob so that I had more immediate control.
- Bandpass - Found myself using this as a combo high/low pass on percussion and electric bass. First time in my entire audio or music career that I found a practical and common use of a bandpass.
- Shelves - Sound weird? I can’t qualify them as bad sounding, but they act unpredictable to my ears. I avoided using them because of this. (Note: Perhaps the slight resonance? Combine with me constantly forgetting the HPF/LPF were ON?)
- Filters - Notable that they default to ON, which caught me offguard a number of times. They should default to OFF.
- Inherits limited slopes from Basic Filters
Charts
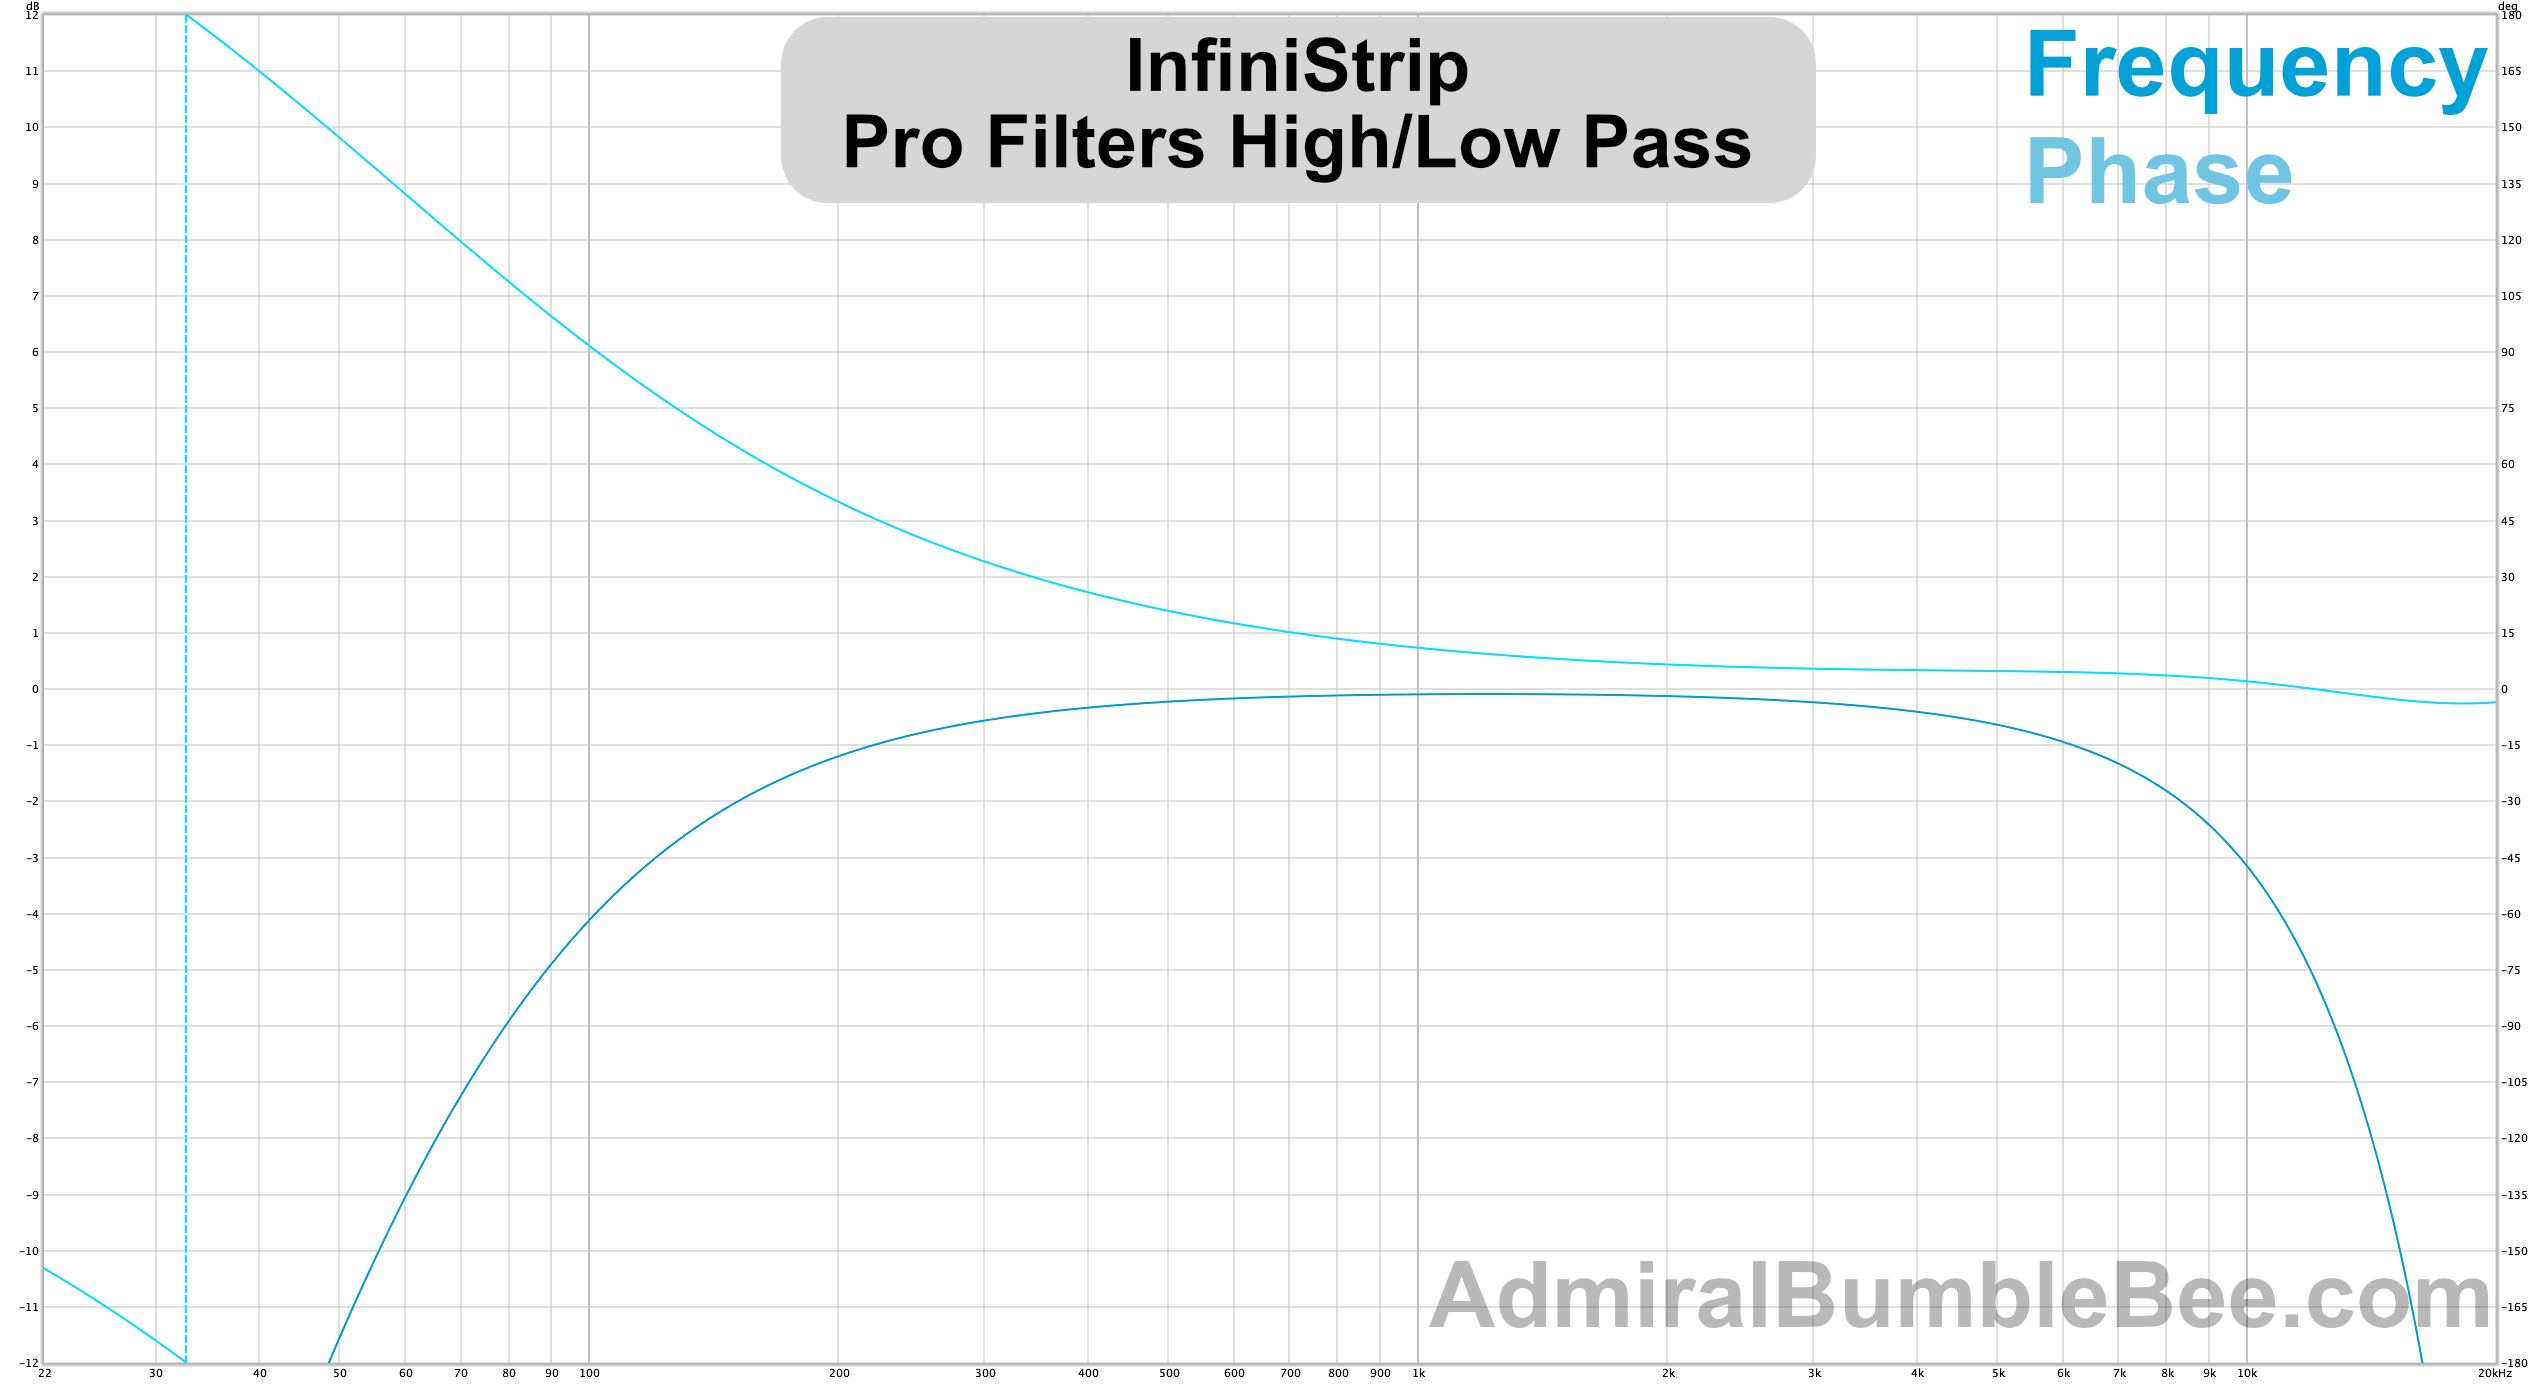
Annoyingly I originally did ALL of these charts incorrectly because of the HPF/LFP defaulting to ON.
- LPF - 10,000hz, 18dB/oct
- LPF - 100hz, 12dB/oct

- 100 hz low shelf, 1q
- 10,000 hz hig shelf, 1q

- 0.25q, 0.5, 1q, 2q, 4q, 8q
- 1khz
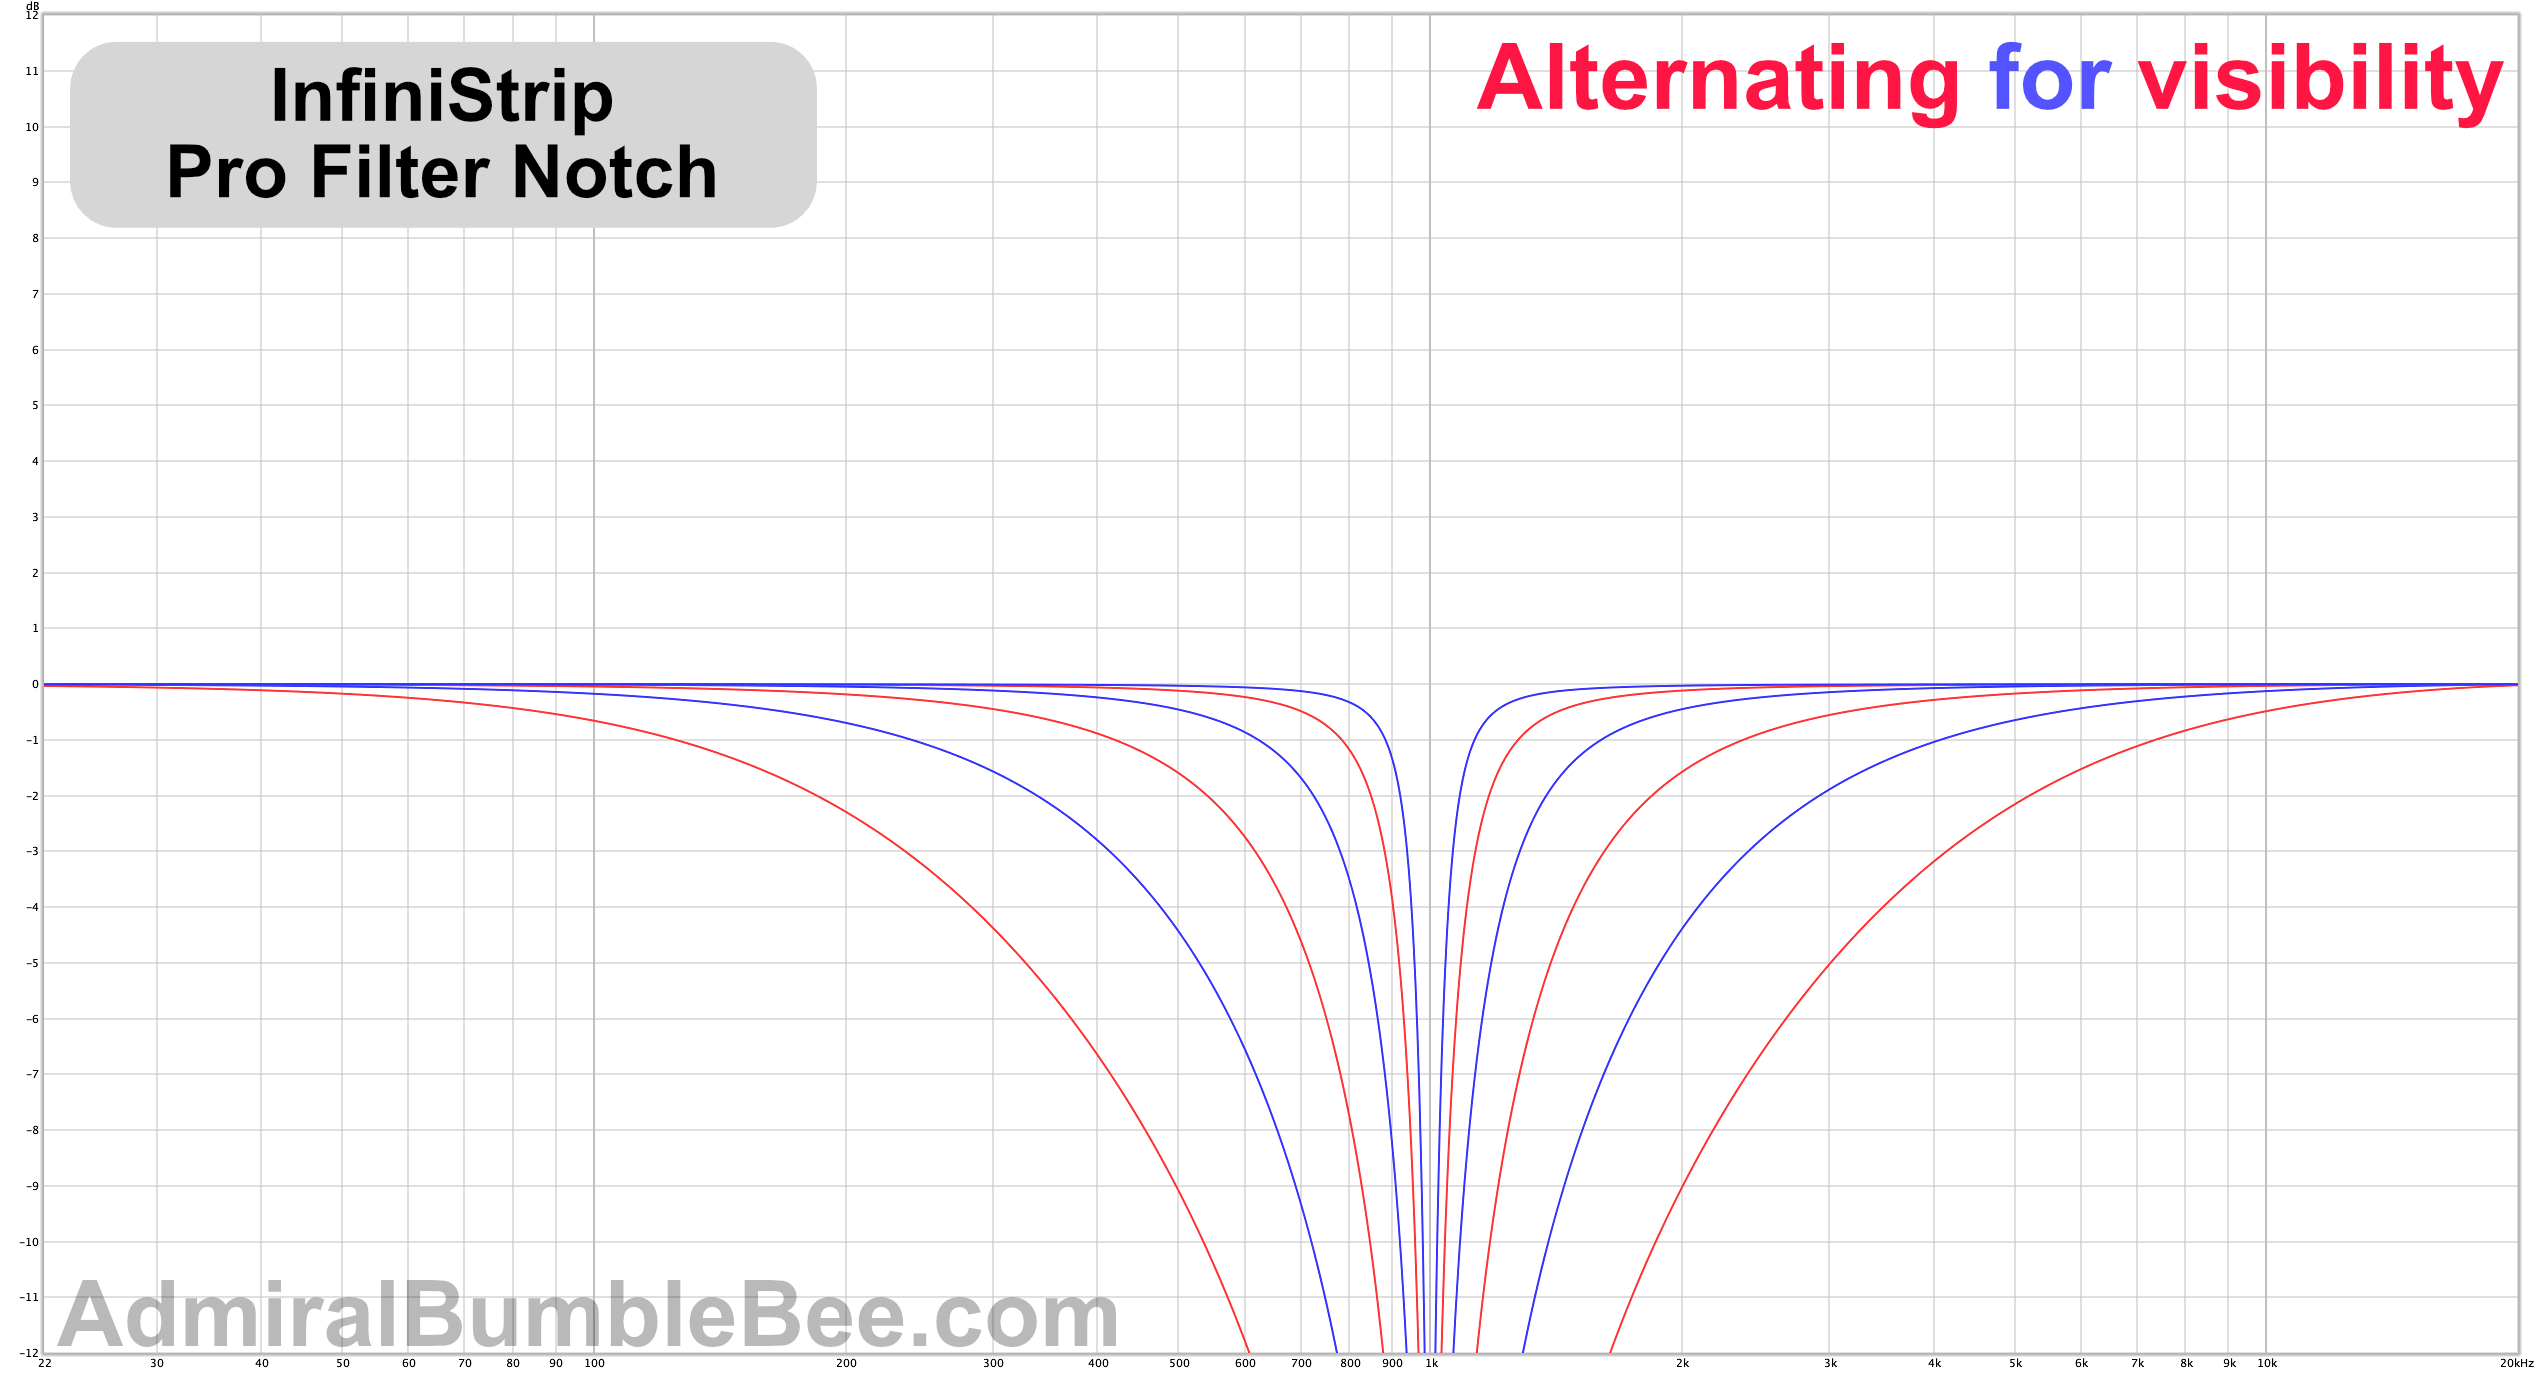
- 0.25q, 0.5, 1q, 2q, 4q, 8q
- 1khz
S.C. Filters
Appears to be identical to Pro Filters, but only affects the sidechain signal.
See the sidechain section for more information on the sidechain signal flow in InfiniStrip.
GATE
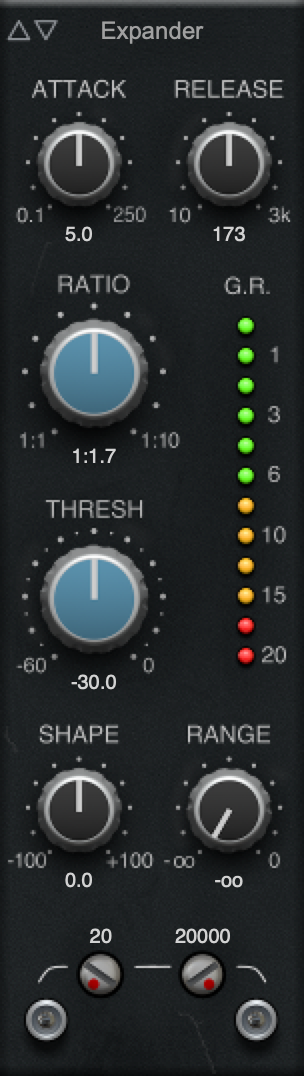
Expander
My beloved expander!
I am a firm believer that expansion should be liberally used when mixing any genre of music. If you’re not familiar with why, then let me take a moment of your time.
Downward expansion (as this processor is), lowers the amplitude of the signal by a ratio, according to the envelope, when it’s below a threshold. It makes quiet things more quiet. There is an envelope though, so it doesn’t simply map values via a ratio! When the threshold is violated, it takes time to make the adjustment. When working in the opposite direction, it takes time to return to no adjustment.
Well-designed expanders are functionally “amplitude” EQs. They allow you to remove low-level signal that will likely be masked by other loud sources in your mix, but remove them in a manner respective to the envelope of the signal. Imagine if you could intelligently make things in your mix not exist when they don’t need to, but without an abrupt change and relative to the signal’s envelope… that’s expansion.
Many mixers focus on spectral components of a mix to “clean up” the mix. It was practice for decades to have expansion and gates on nearly every channel in the mix even if by function of a tape machine or other processing. Common sense would indicate that this was purely done for noise concerns, but the definition of noise extends beyond hiss. Noise is anything that doesn’t positively contribute to the end product, and that often is a natural part of the instrument(!).
A secondary effect is that highly rhythmic parts are exaggerated. A 16th note bassline with appropriate expansion makes the part bounce more. Stabbing chords have more impact. Rap vocals hit harder. Big orchestral chord hits smack you in the face and disappear into the urban wilderness. The distinction between soft and loud is made clearer.
Expansion is that (historically implicit) secret weapon that doesn’t get hyped, but ends up on nearly every great mix in some form. Even adjusting the S/R of the ADSR on your synth is even a form of expansion.
So what about InfiniStrip’s expander? It works just fine.
I usually prefer a hysteresis control or open/close on my expanders. This type of control allows you to change the “on” and “off” thresholds so that the expander works more gently on low-frequency content and/or parts with frequent gaps that are important to retain.
Expander instead has a shape control that adjusts between a logarithmic and linear release shape. The log shape is more apt to close quickly, and the linear shape is gentler and less likely to close. It works fine enough for me.
I’m glad that they separate out the gate section from the compressors. If compression and expansion were part of the same slot type, I’d go crazy.
Charts
The expander is a fairly basic expander, except for the interesting shape knob. It adjusts the release shape to allow for a sharper or more gentle relaxation of the expansion.
I’m generally used to having hysteresis controls (expander opens/closes at different levels), but the shape control is a pleasant surprise and works well.
Gate

Gates… gross.
Gates are essentially downward expanders with a very high ratio. Gates are to expanders as limiters are to compressors.
The issue is that they kill whatever they encounter. Variable ratio/range expansion allows you to make subtle adjustments that blend into the mix, but gates are killers. The range control helps, but it’s still less natural sounding than an expander.
I don’t know of any gates that I’d prefer over a variable ratio/range downward expansion alternative, and InfiniStrip did not change that.
It is one of the better gates I’ve encountered. It has a hold control, the lack of which irritates me in other products. The hold control combined with the gate gets you pretty close to a useable sound on sources like leaky drum mics and heavily distorted guitars. The gentler behaviour of the expander trumps the release shenanigans of the gate for me though.
Charts
Ducker
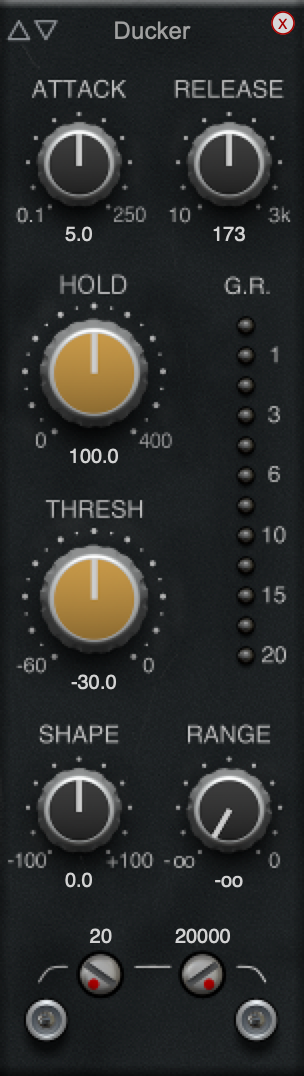
The ducker is the same as the gate but it works in reverse. The main signal is gated when the detection signal exceeds the threshold. The gate operates when the signal is below the threshold.
When the detection signal is too high, the signal is cut.
I find the ducker to be nearly useless. The action is highly reliant on attack/release/shape settings which can change with the program material. If this had a variable ratio then it would be much more useful. A variable ratio would allow the detection signal’s envelope to dynamically adjust the reduction. Such behaviour would allow for more relaxed release settings and a more natural result.
COMPRESSOR
Charts are done with the following settings:
- Attack 50
- Release 200
- Threshold -25
- Ratio 10:1
- Makeup 0
I felt these settings most accurately demonstrated the differences between the products in a single static image.
Opto Pressor
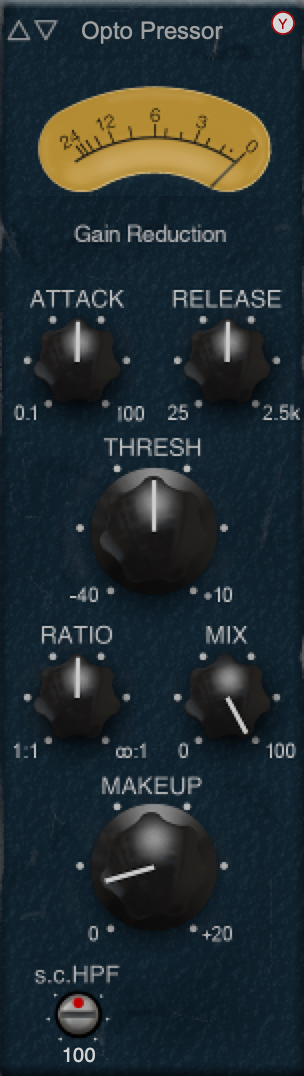
Opto!? I’ve owned a few hardware optical compressors. I have at least 40 plugin emulations (that I can count).
I don’t get a strong opto vibe from Opto Pressor. The attack is relatively fast. The active (deep in compression) behaviour doesn’t feel opto-like. The release stage feels like a VCA at fast settings.
I sanity checked myself multiple times against my favorite optical compressor emulations and this doesn’t pass for opto to my ears.
That said - I don’t care. It’s fun to use! It does well at the tasks you would generally grab an opto compressor for: vocals, bass guitar.
The value of it is dimished by the control scaling.
- About 75% of the attack knob is useless for an opto sound. The 75% position is about 20ms. Opto compressor vary greatly in their attacks (some are very fast), but the general vibe of an opto compressor is historically a slower attack. I don’t give much credence to using processors in a culturally acceptable manner, but I was frequently fiddling with a small amount of knob space to get the sounds I wanted.
- The module presets all use fast attack values that are unbecoming of an “opto” emulation.
- Release knob - Same as above.
- S.C. HPF - turned on at 100hz by default. I don’t know who thought this was a good idea on EVERY compressor, but I object. I appreciate the presence of the HPF, but needing to constantly mess with it is a bummer.
The Opto pressor has a slightly unpleasant fizzy sound if you push it hard. I did some measurements and it appears to be a higher than “normal” amount of IMD, but I was unable to confirm my results in a manner that I felt comfortable presenting.
Now that I’m done complaining: I like it, but I don’t like it as an opto-compressor.
Charts

FET Pressor
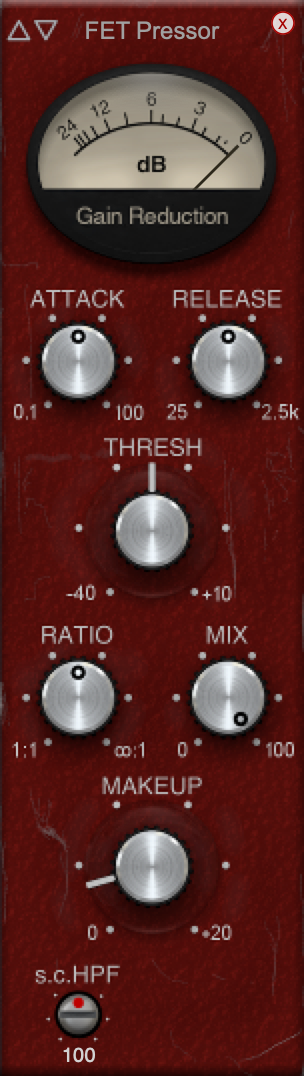
The FET Pressor is the only compressor that feels like the attack knob scaling makes sense, but the release knob scaling is odd! The last 50% of the control is essentially useless for most processing that you’d grab a FET based compressor for.
Getting the release just right to give you that FET sound is maddening. It seems to have a narrow range between 50-80 where it sounds “right” to me. I auditioned it against a number of FET-style emulations and a hardware 1176. It wasn’t close.
If you want that FET snap, the FET Pressor will get you there. It is a bit disappointing if you’re looking for the classic FET sound, but that shouldn’t be a consideration right? We should be looking for the processor that serves the mix.
I didn’t use the FET Pressor much when working with InfiniStrip. I was generally able to get the sound I needed from the Opto Pressor despite the fact that outside of InfiniStrip I use FET and VCA style compressors 90% of the time.
Charts
VCA Pressor

VCA Pressor has a GUI that makes you think it’s trying to be an SSL Bus Compressor. It gets the vibe down for it.
The problem is that once again the Release knob’s scaling makes it difficult to use. Only about 50% of the knob gives you that classic VCA sound, and the rest is far too aggressive for most signals. Compared to any VCA style compressor, the first 50% or so of the release knob is too aggressive.
Another missing attribute is the ratio behaviour. The classic SSL Bus compressor has a knee that’s dependent on the ratio, which makes the 2:1 setting often sound more aggressive than the 10:1 setting. VCA Pressor is a fixed knee. It’s not a problem per se, but it does detract from some of the charm that could be there.
Taken as a “generic VCA-like dynamics device”, VCA pressor is fine. It has the general functionality, but little of the charm. I compared it to some of the well-known VCA compressors on the market and I sorely missed the quirks of other processors. VCA Pressor is a bland imagining of the VCA concept.
I really wish they’d adjust the scaling on the knobs to enforce control behaviour that’s more apt for the type of processor!
I suppose that I simply miss the quirkiness of other VCA comps on the market. VCA Pressor is simple and straightforward. That’s great for some people… it just doesn’t rock my boat.
Charts

Comparison
EQ
- Filter tests:
- 100hz Low Shelf - +12, +6, -6, -12
- 10,000hz High Shelf - +12, +6, -6, -12
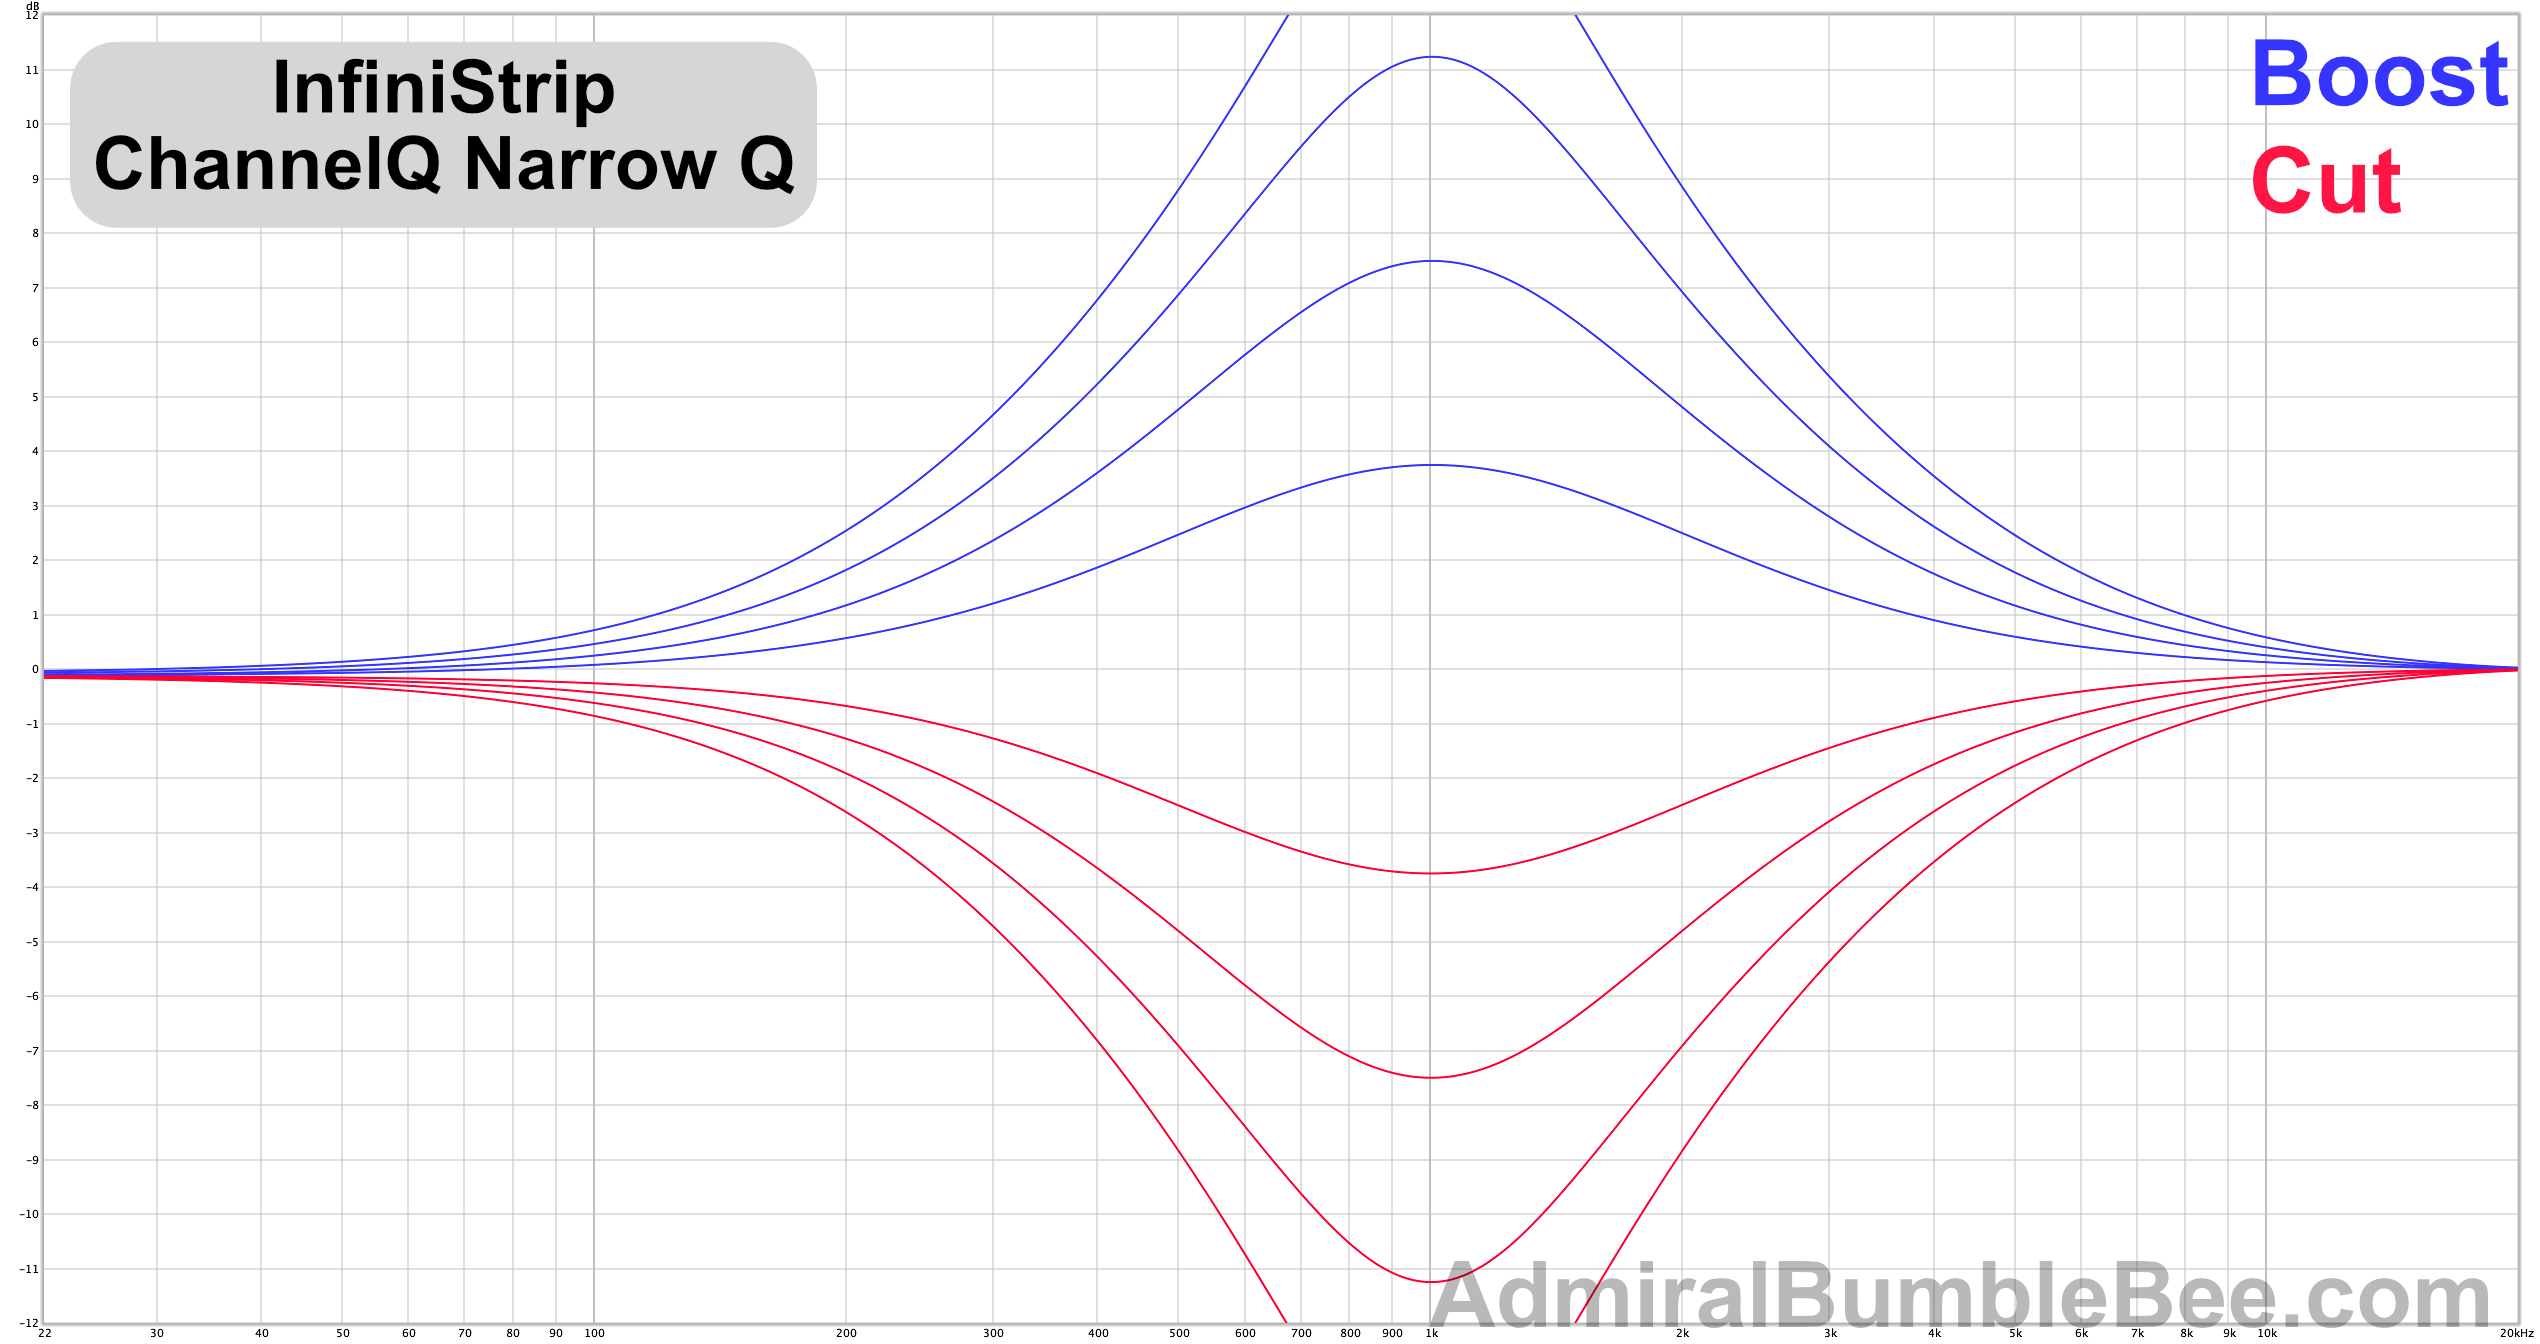
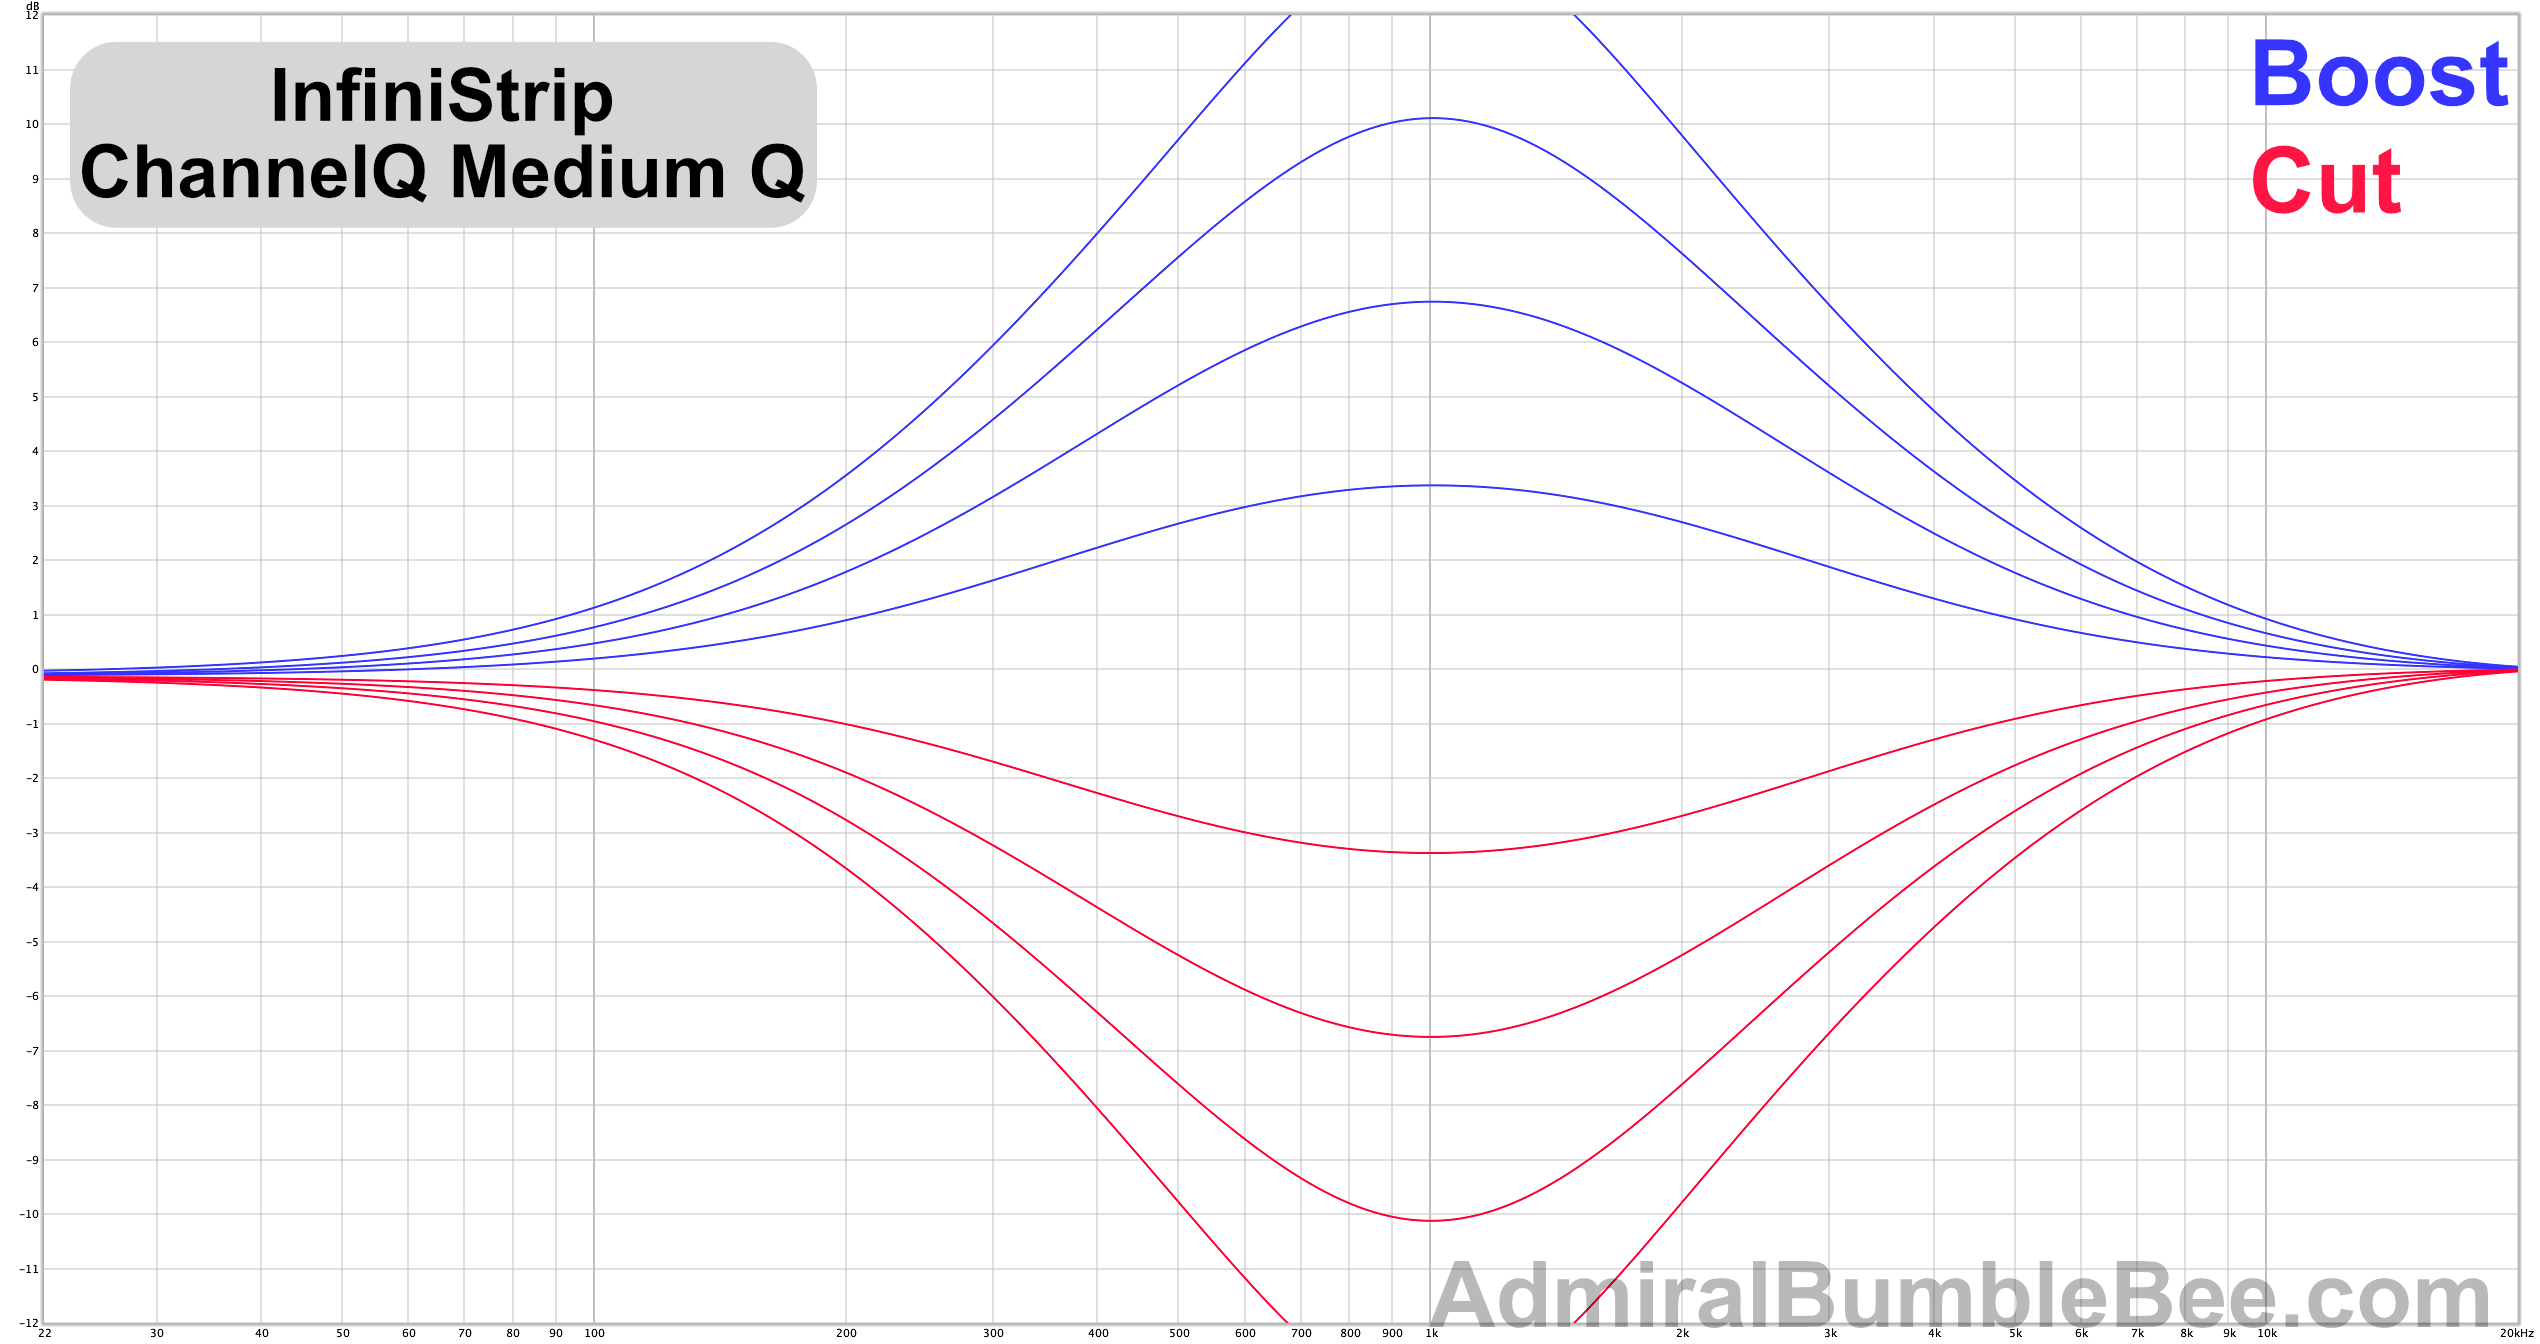
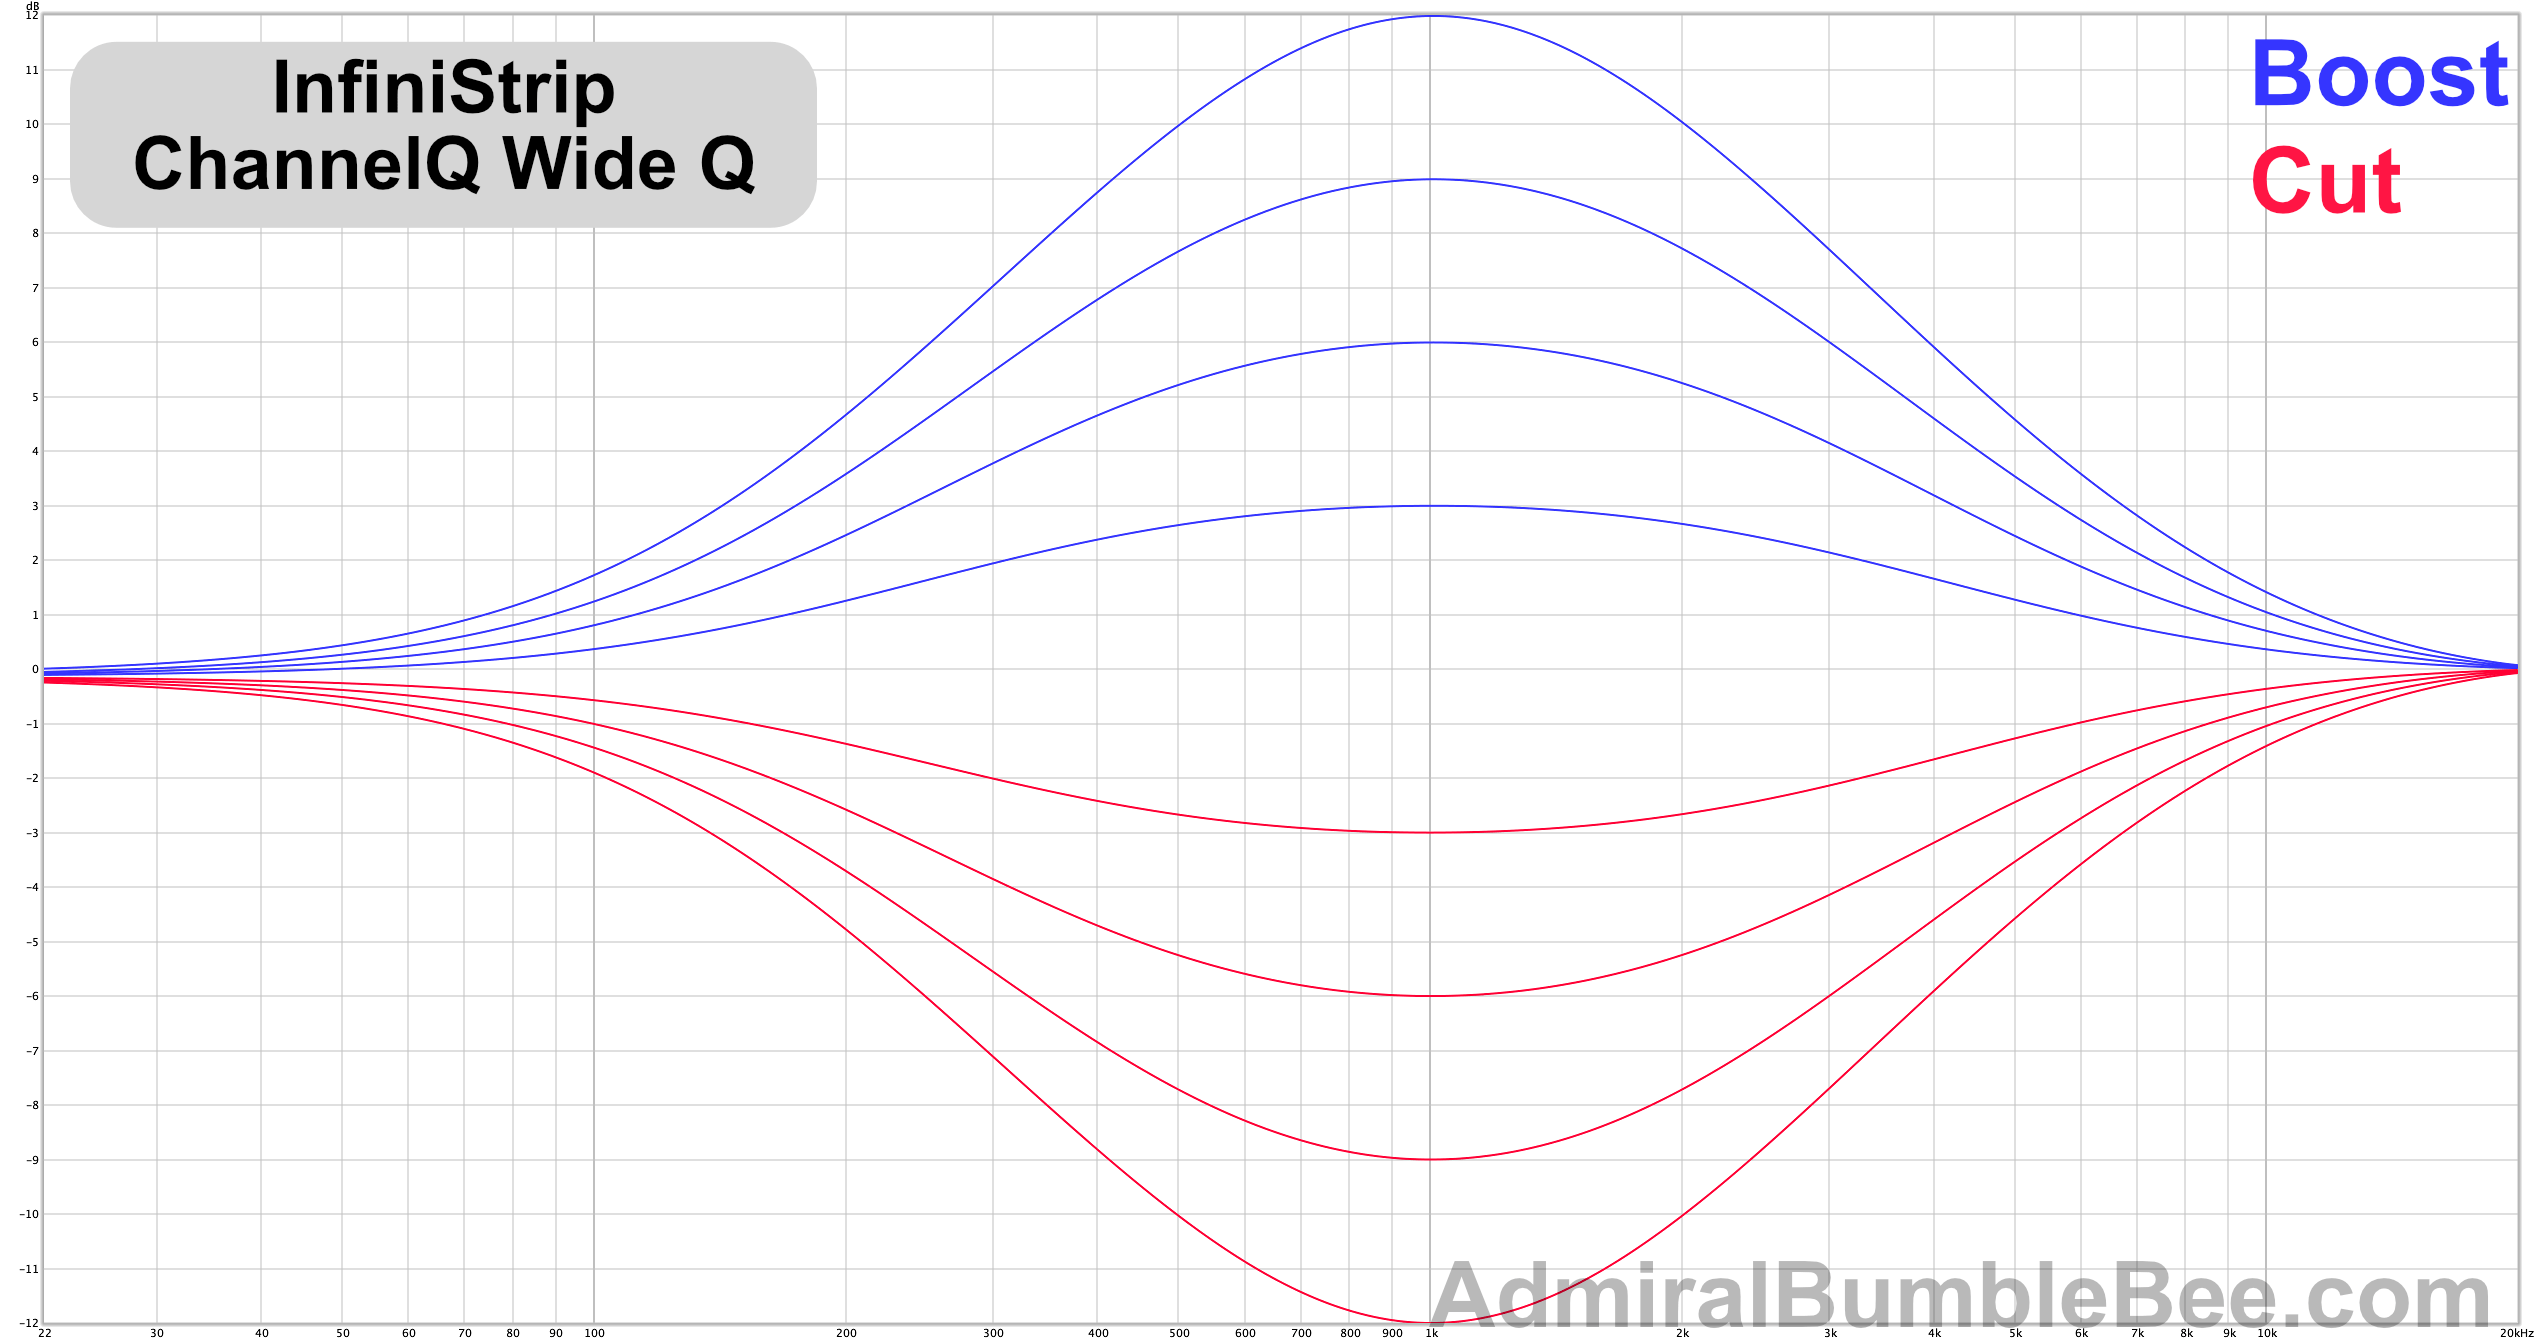
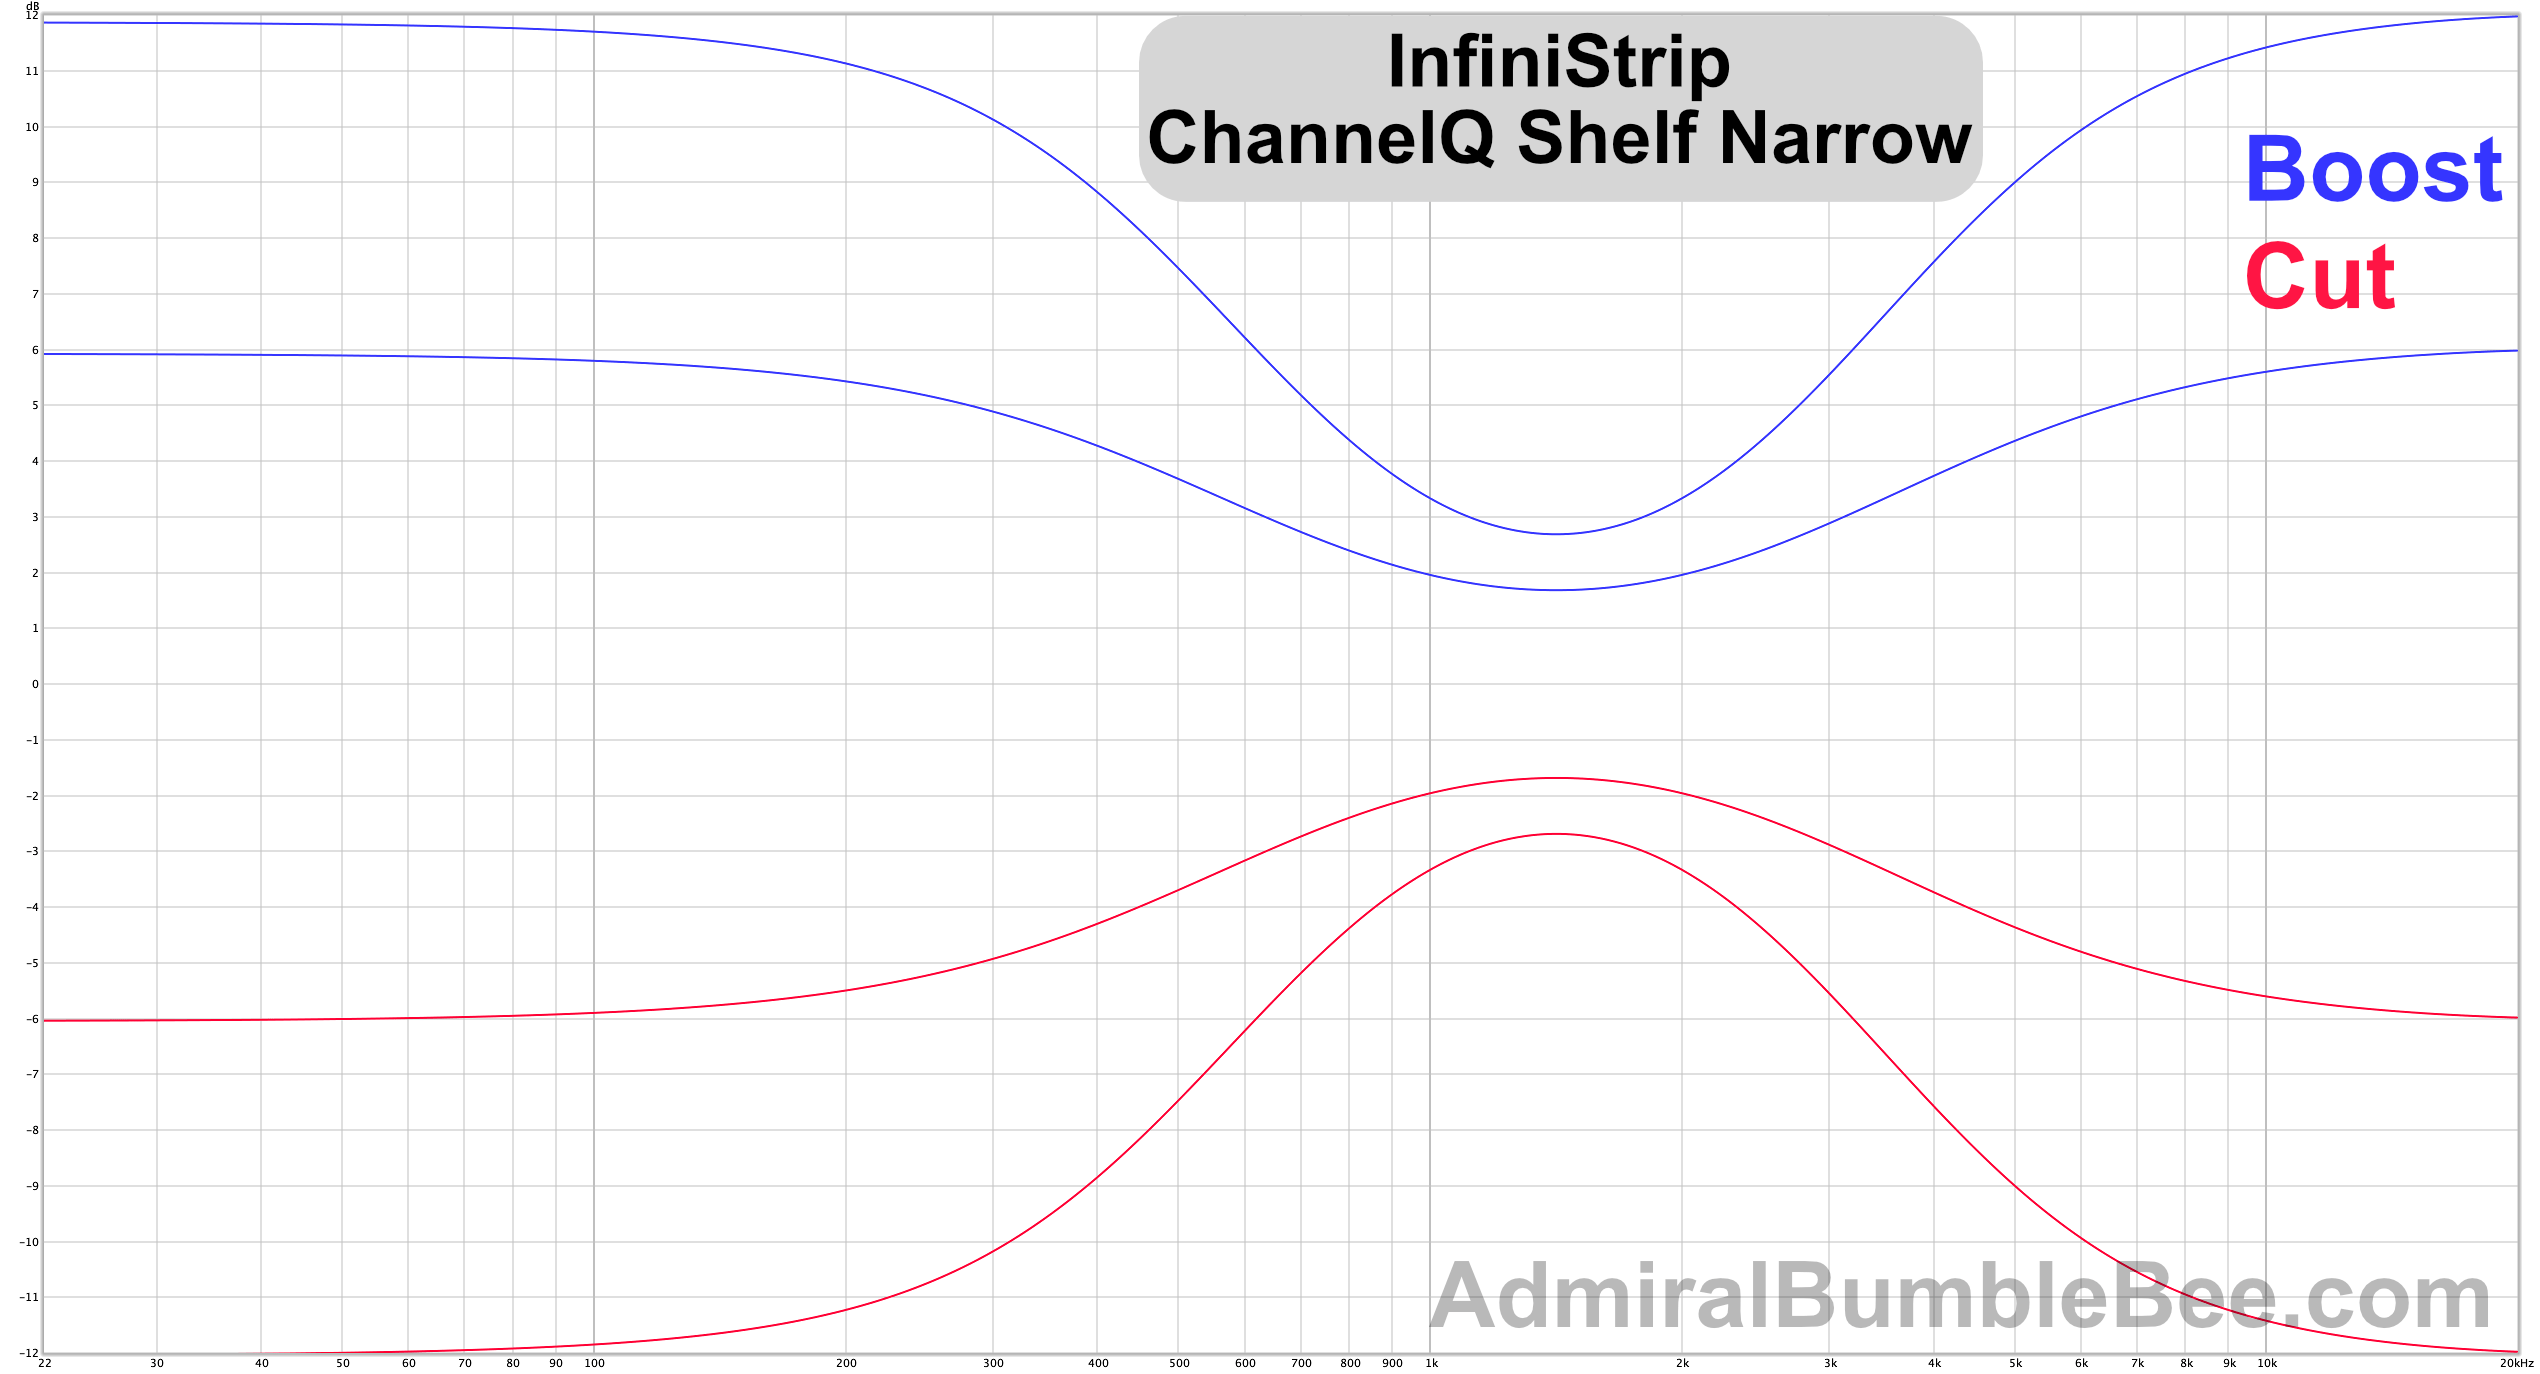
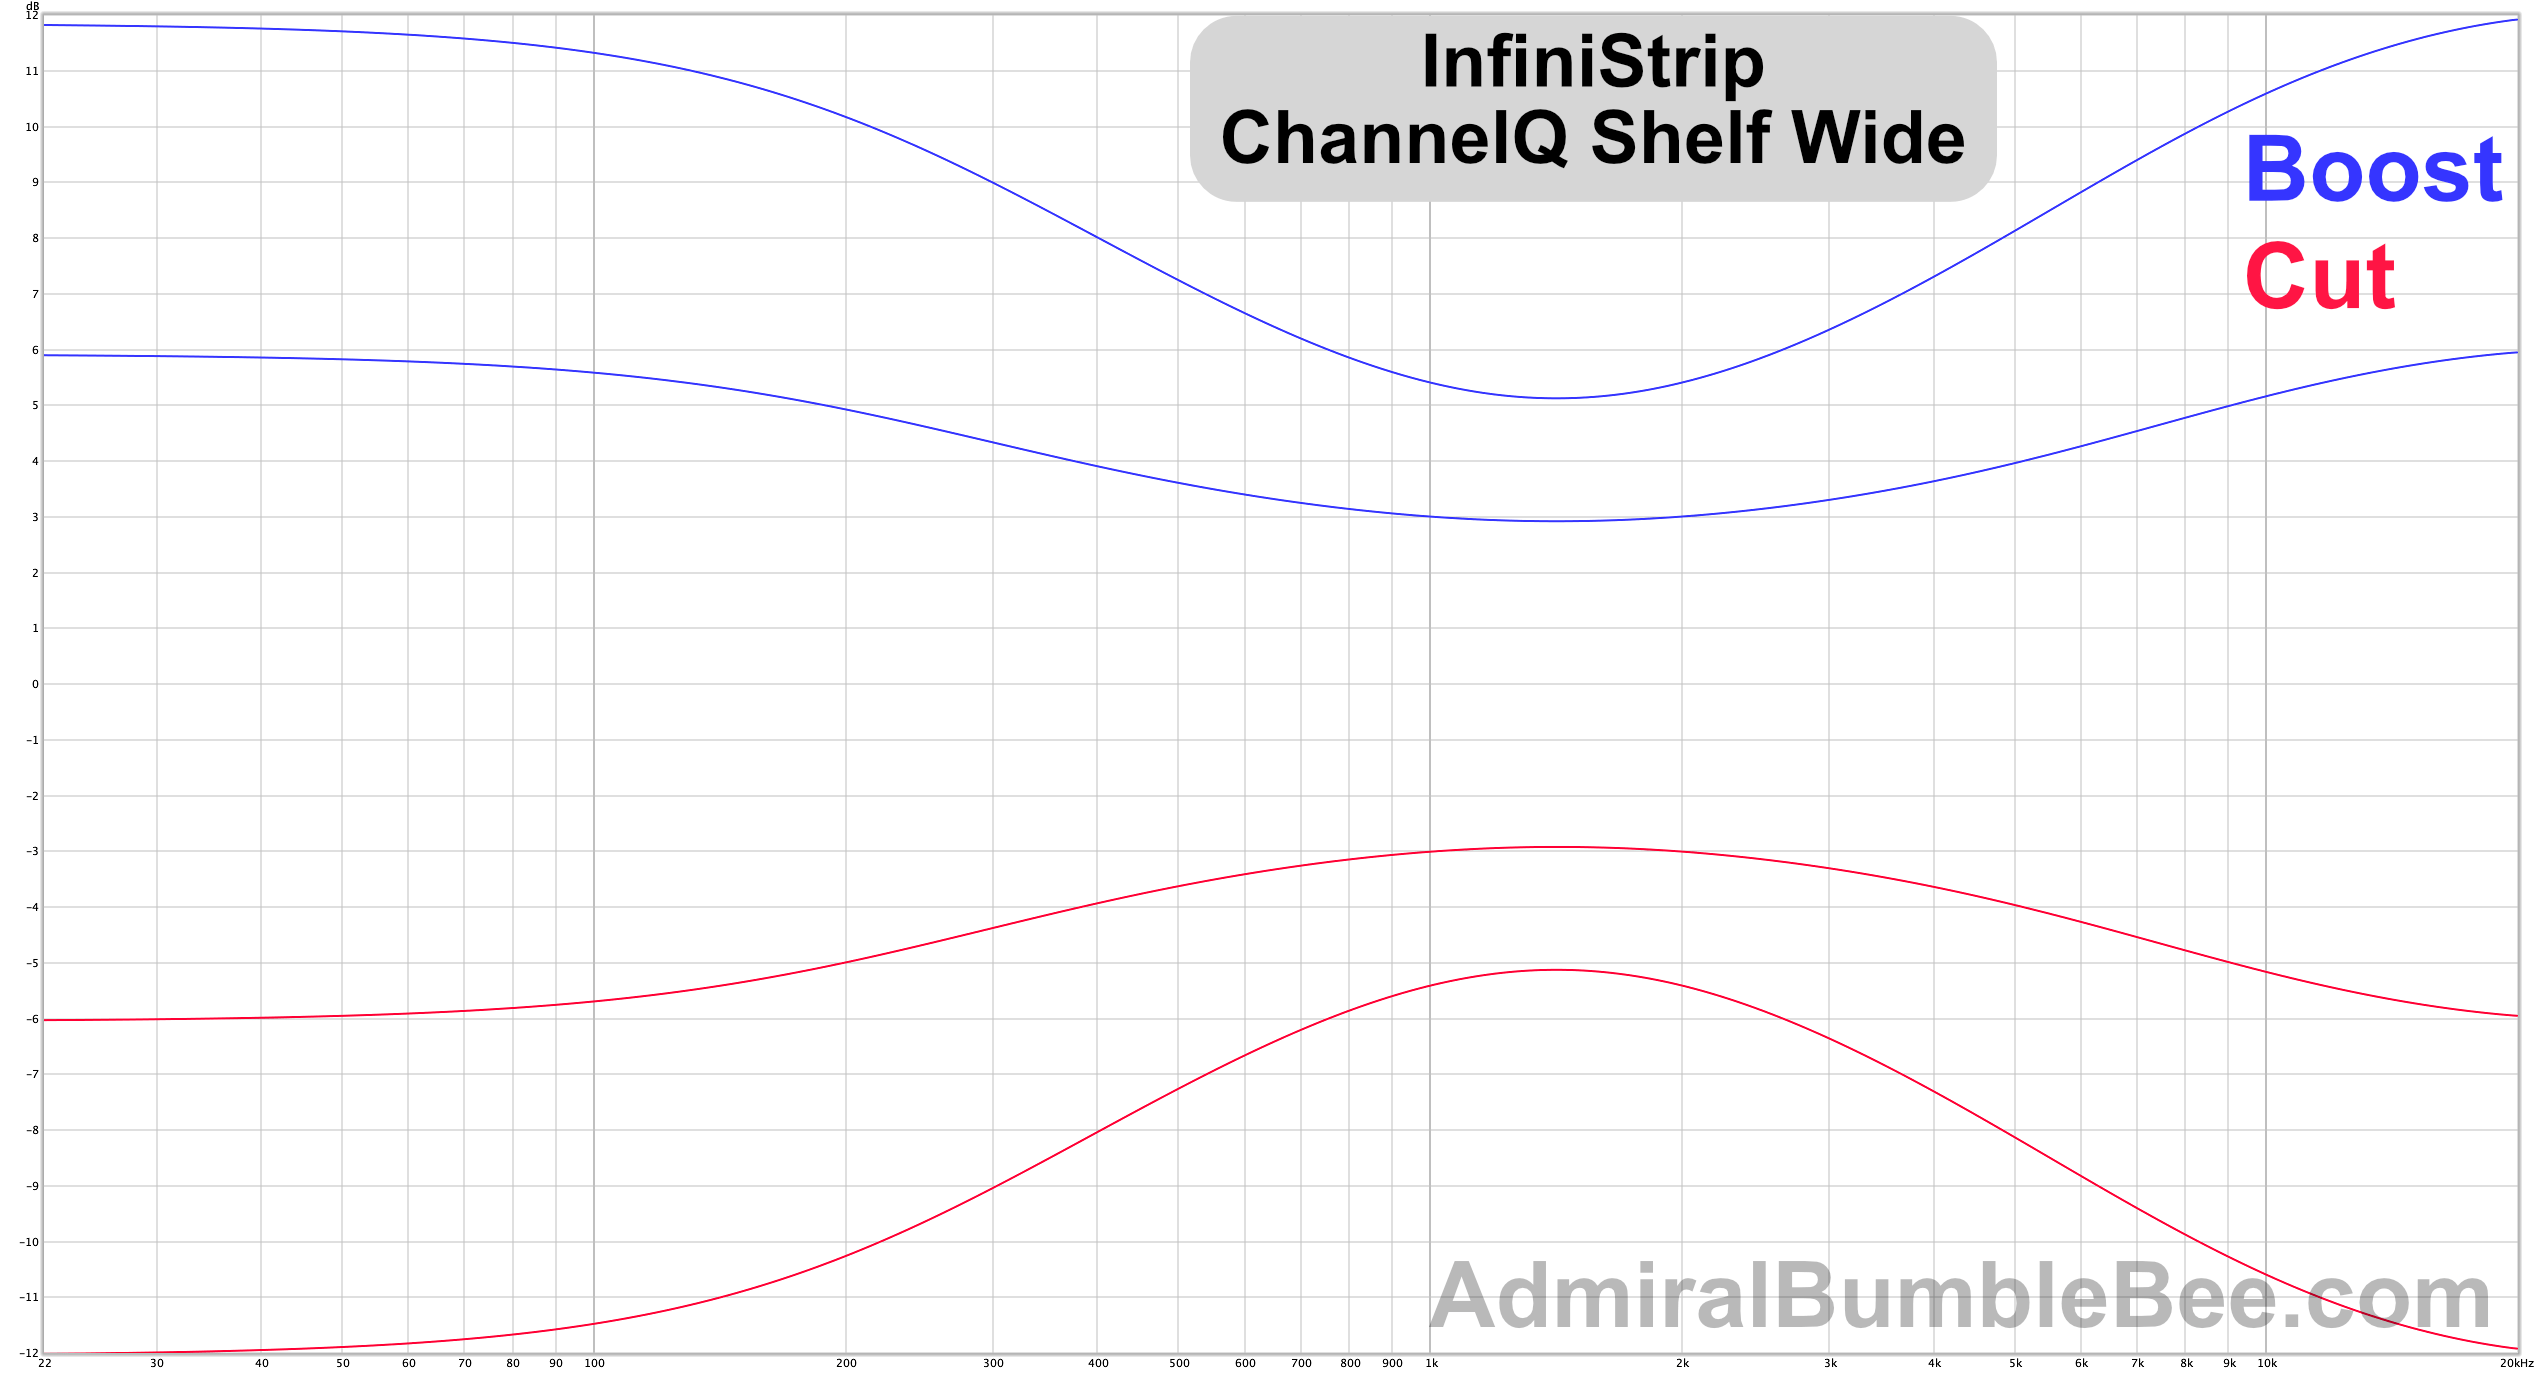
- 1khz at wide, medium, narrow switches - +12dB, +9, +6, +3, -3, -6, -9, -12
- Saturation Tests
- -12dbFS Peak test signal
Shelving filter tests were done with 4 fewer settings so I didn’t drive myself crazy. The point comes across fine.
All tests are done with the “Analog” button in.
-85.16
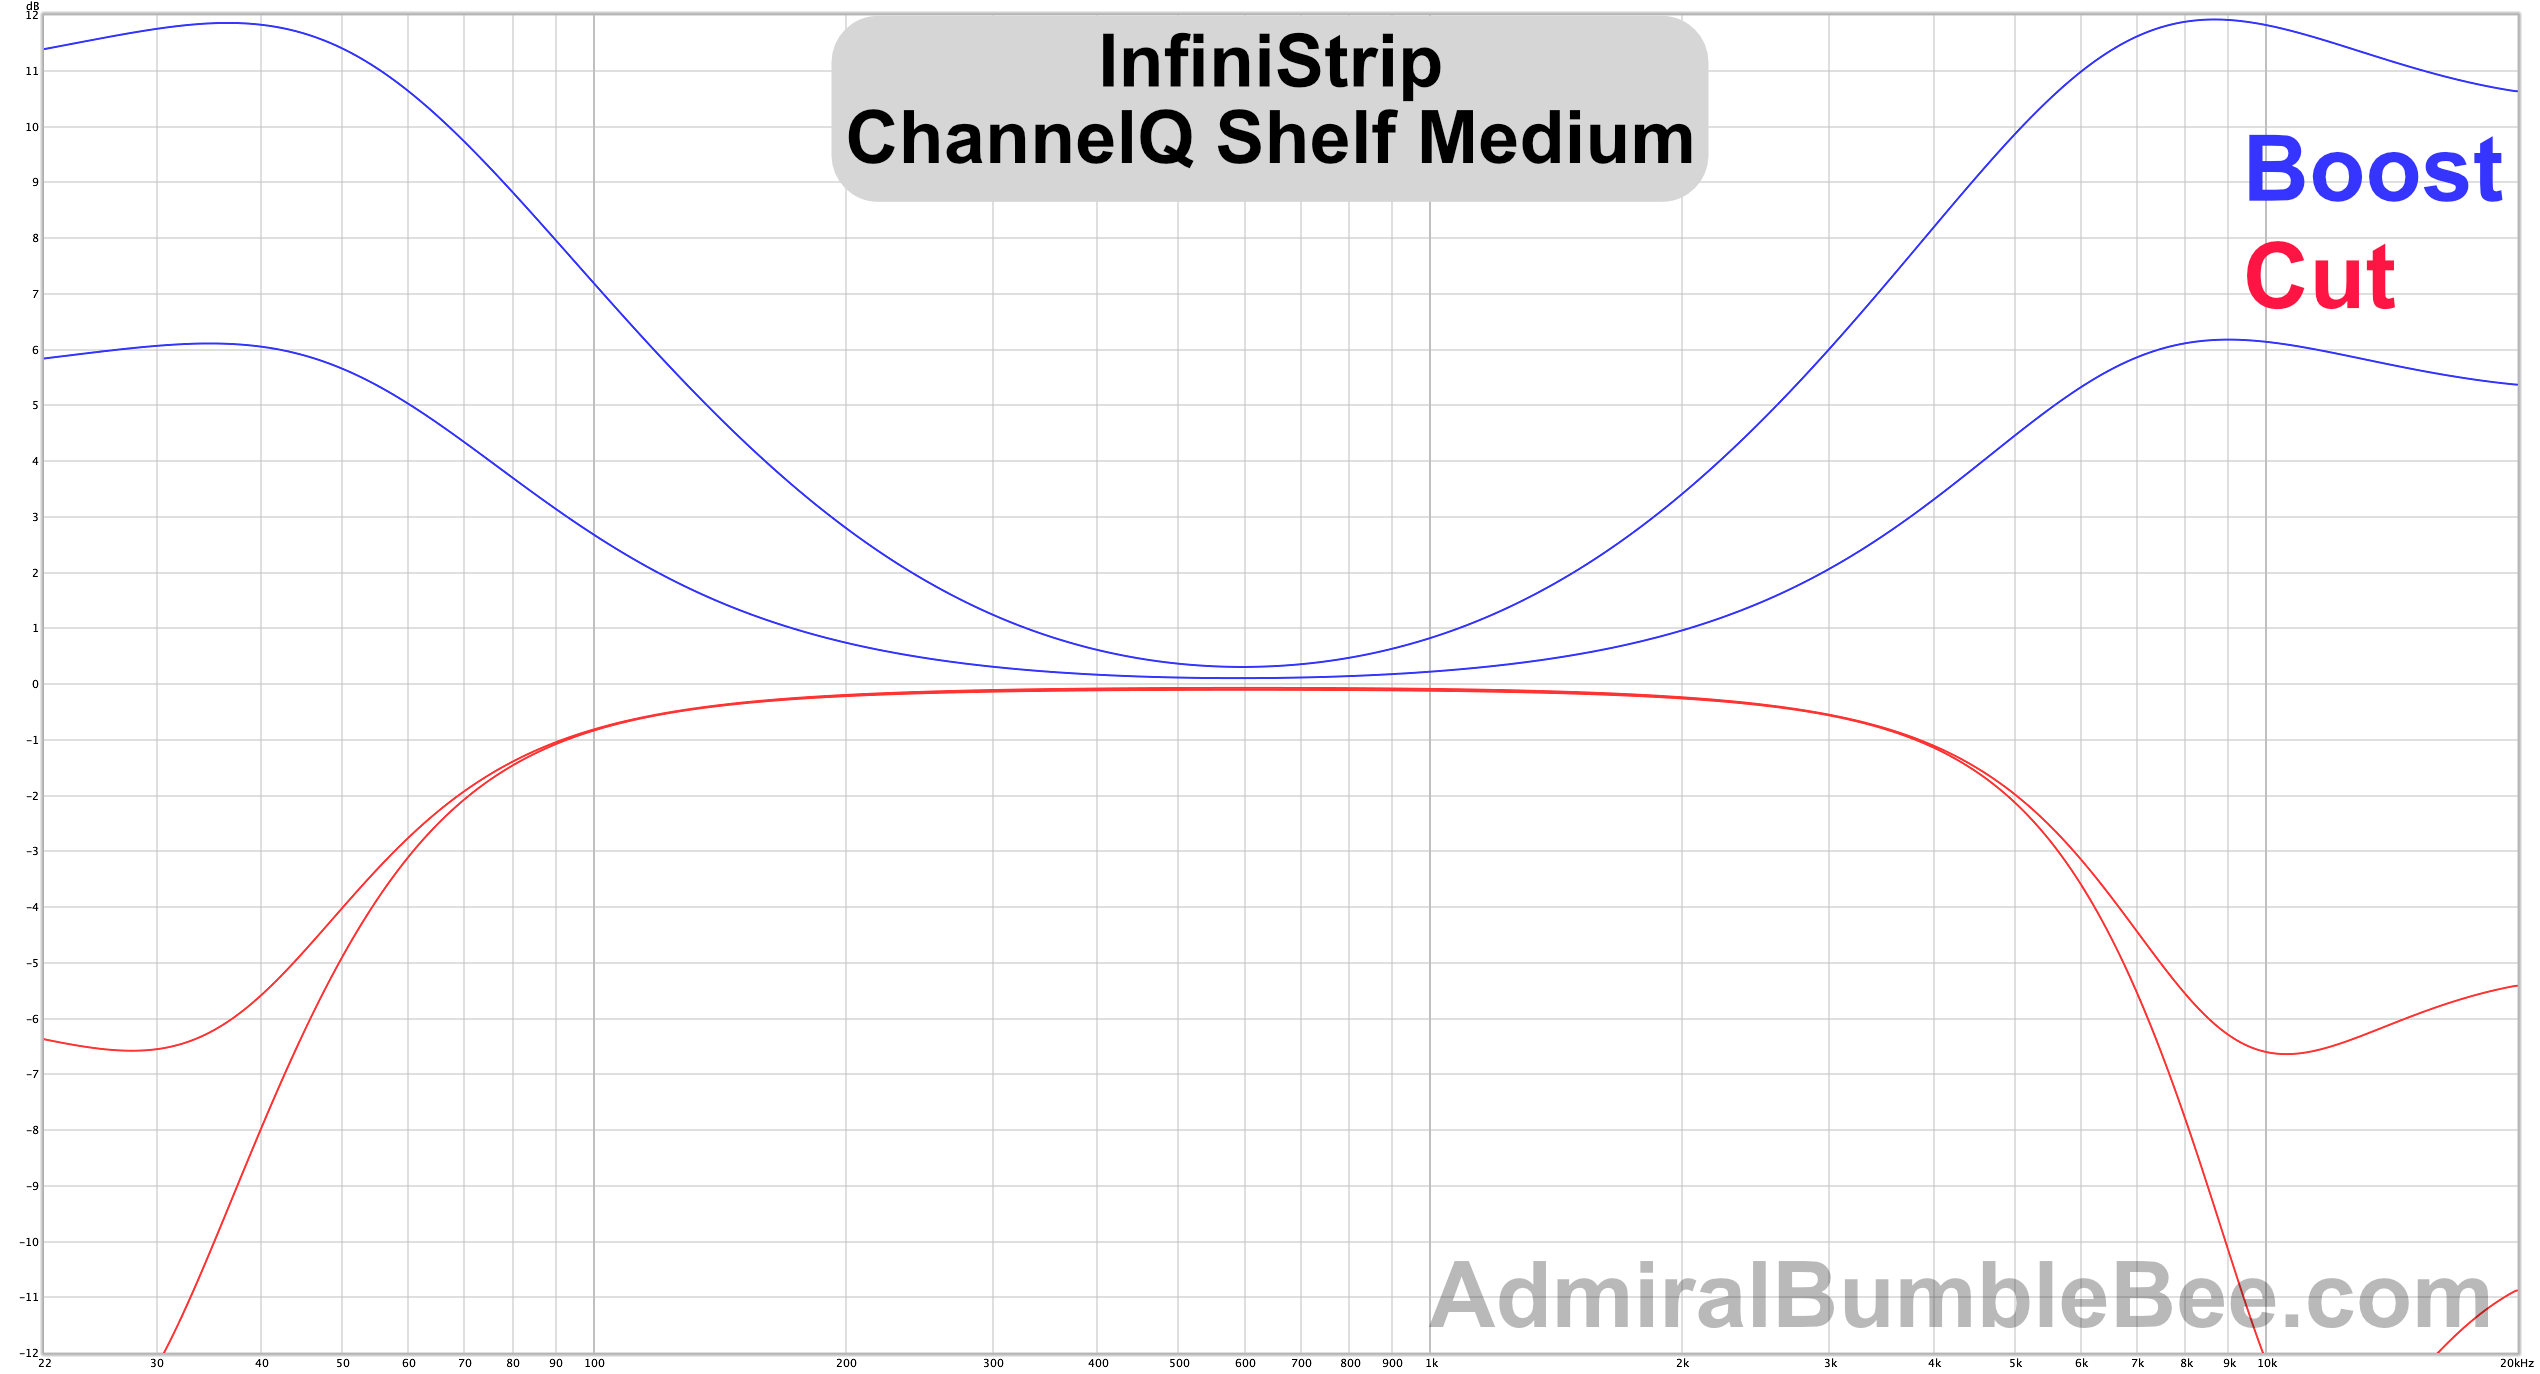
ChannelQ
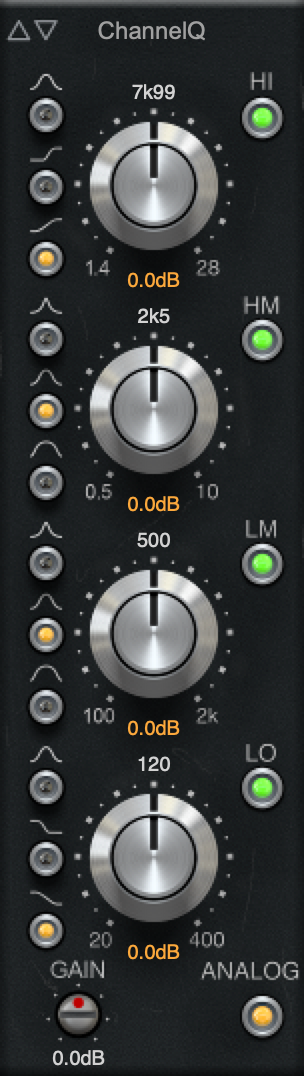
ChannelQ is initially somewhat unremarkable as a bunch of filters.
After I used it for a while, I realized it had some mojo. It has some drive, the filters aren’t as predictable as you would expect from the ubiquitous Pro Q and the control scheme is deceptively conducive to my workflow.
Criticisms:
- Band frequency selection - I’m not a fan of the API style concentric knobs. It’s easy to grab the module and move the module rather than changing the frequency of a band.
- Q selection - The bandwidth switches are close together and evenly spaced. I clicked the wrong switch more times than I can count. It seems like it would be easy, but if you have the plugin in the corner of your screen and try to glance-click… don’t be surprised if you miss.
- “Thins” some sources - Through use I realized that ChannelQ was doing something to make certain sounds thinner. After analysis I noticed that with all bands at 0, it has a ~0.7dB low shelf around 120hz. In use I found this to be great. I frequently prefer this shelf in place on most sources.
- Aliasing - At 48khz, it’s possible to inadvertently end up with that gritty aliased sound if you’re driving your channel strip hard. I would say this happens in <1% of use cases, but I was confused by the behaviour a few times.
- Cramping - The HM and HI bell filters cramp near nyquist. Completely inaudible to me.
Good bits:
- Sectioned bands - Thank goodness for range-limited bands! 100-2,000 and 500-10,000 bands make it easier to select the range that you want.
- Low shelf - I don’t know why, but I love the sound of the low-shelf on this EQ. After plotting it, I saw nothing particularly special about it. Might be the interaction with the drive.
- Familiar control scheme - I don’t like the concentric knobs, but it is familiar.
If ChannelQ had a clearer interface, I would unabashedly praise it. Those concentric knobs nicked my self-esteem a bit too many times though. :)
Charts
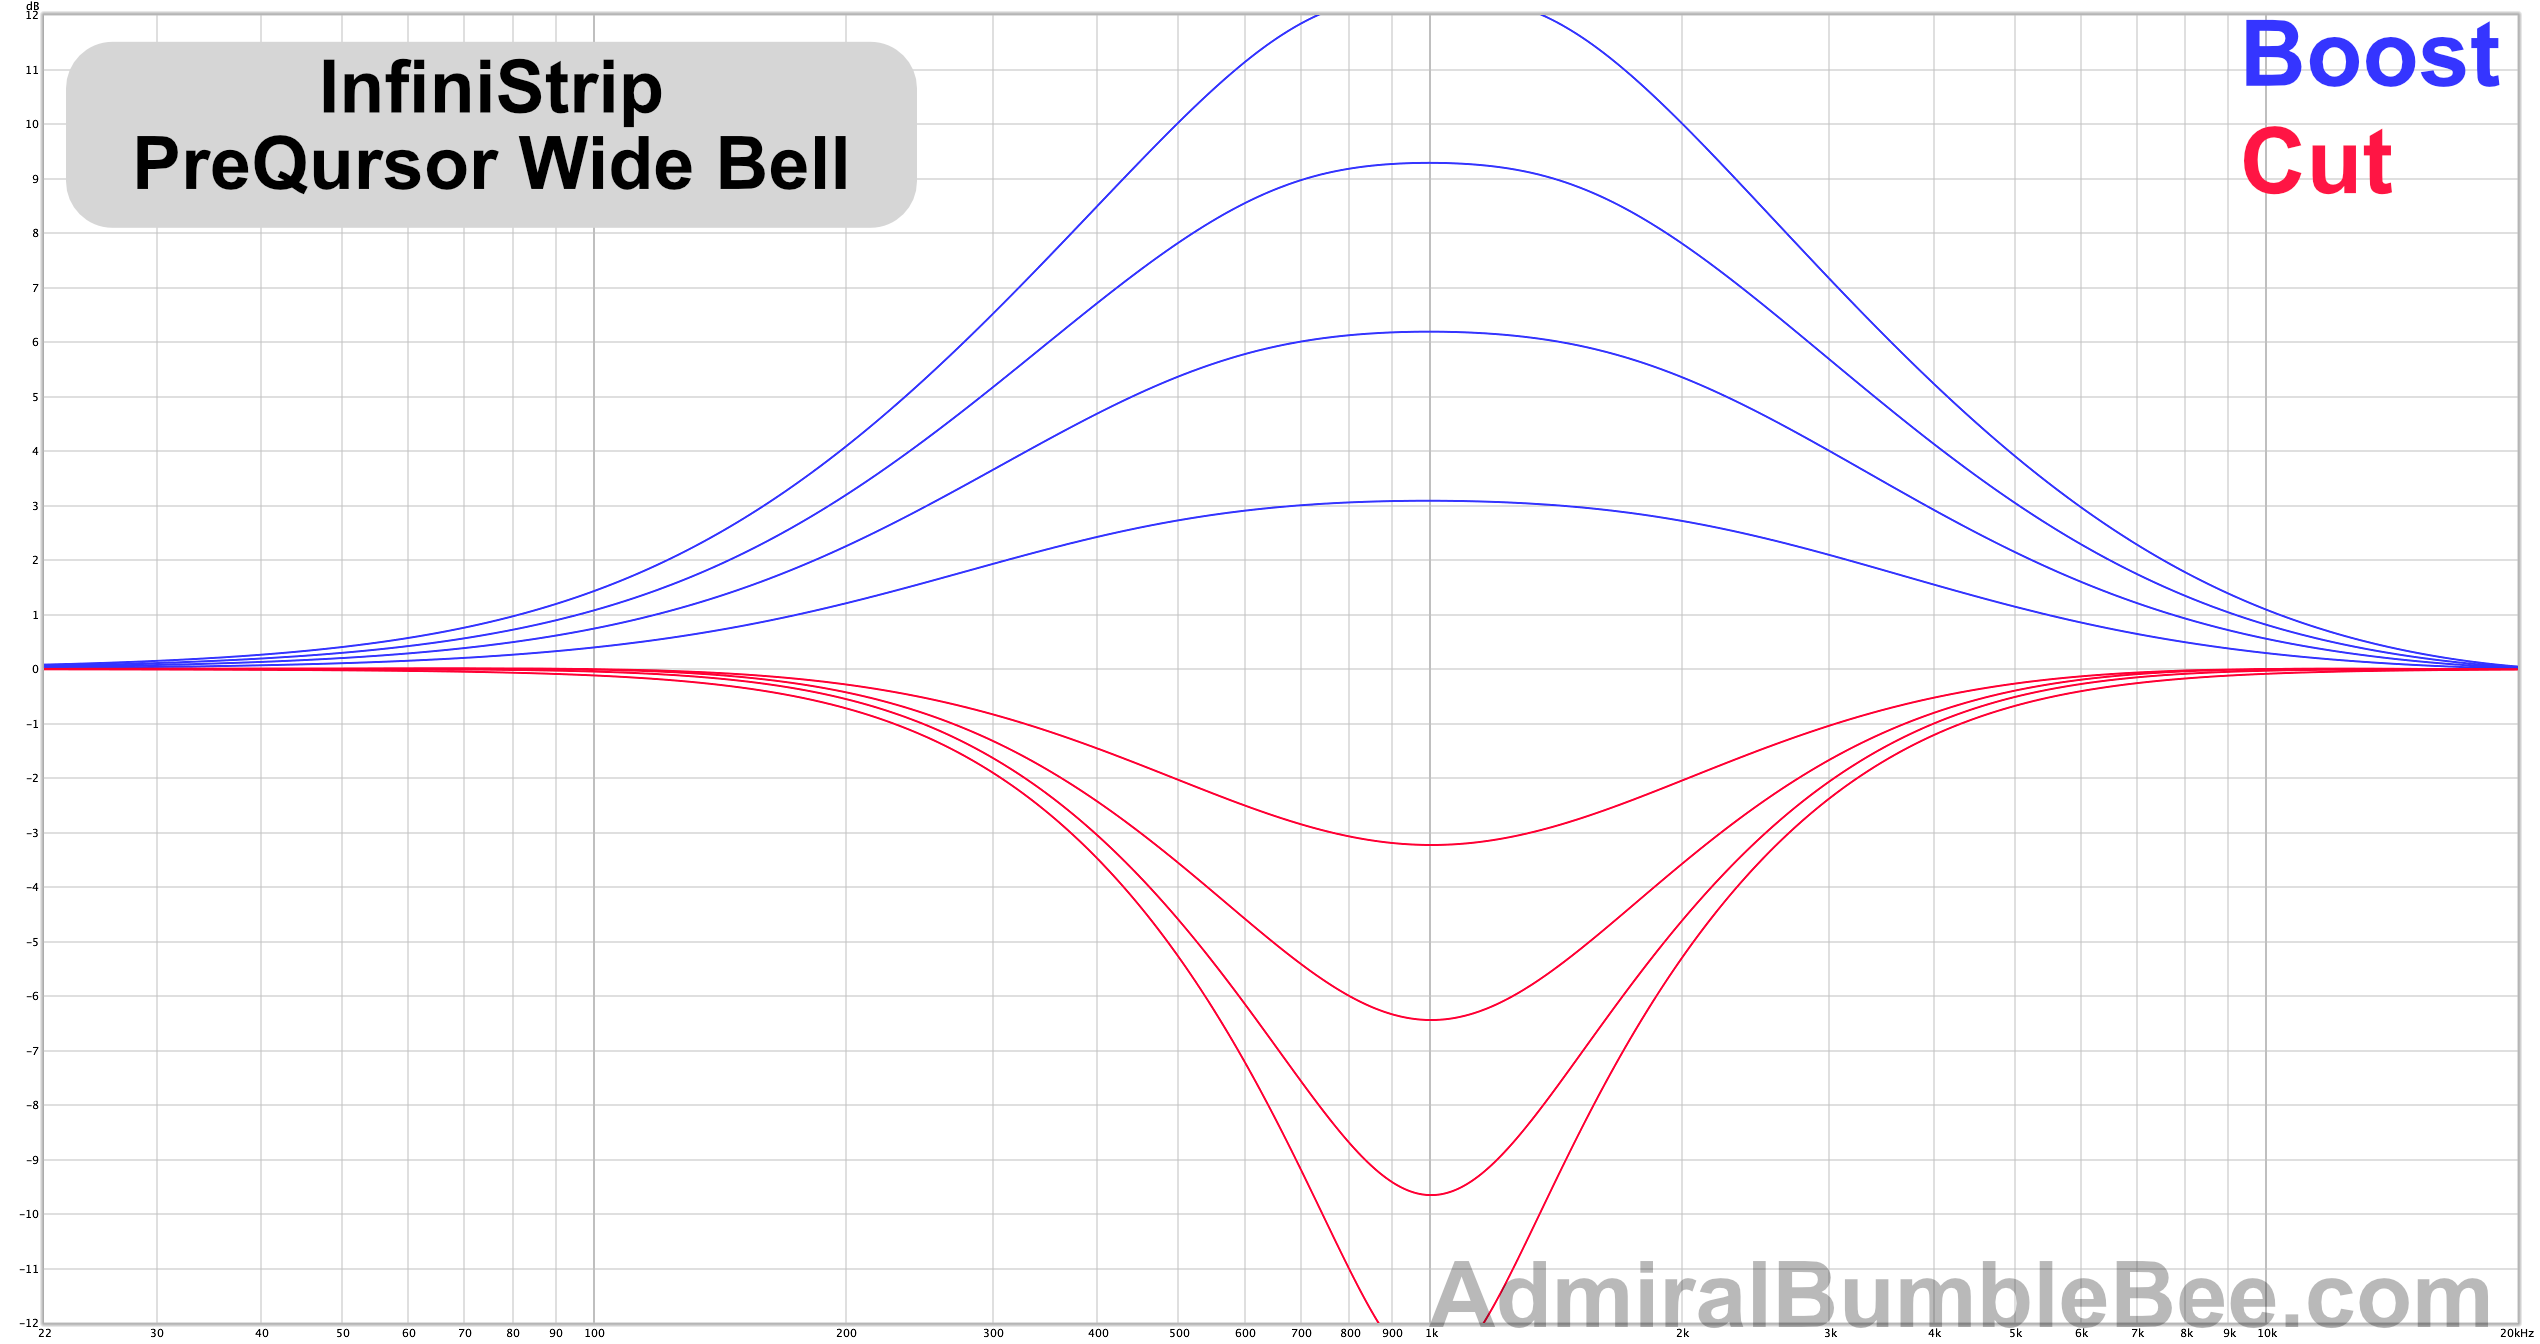
PreQursor

PreQursor is what you might consider as your “surgical” option. I said I’d avoid technical terms, but this is an asymmetrical EQ (and “progressive Q”). Cuts are narrower than boosts.
I dislike the concentric knobs of ChannelQ, but the frequency selection sliders of PreQursor are a step worse. Geometrically there is simply less throw compared to a knob. Selecting frequency was a constant juggle between coarse and fine adjustments. Assuming that we accept this as the “surgical” option, the frequency selection workflow is disappointing.
On the positive side, the saturation of this EQ is incredibly curious! I found myself just using PreQursor as a “colour box” on many occasions. If there was a time to call saturation “musical”, this would be it. It almost sounds like it turns anything into a power chord (on a subtle level).
As an EQ, I used PreQursor infrequently due to the frequency selection problem. It also does not have shelving options.
As with all of the EQs, it does cramp near nyquist. As with all of the EQs, I can barely hear the difference if I’m listening for it, and don’t notice it at all otherwise. They’re not claiming emulation of a specific non-cramped product, so if I don’t hear it then I don’t care.
Charts


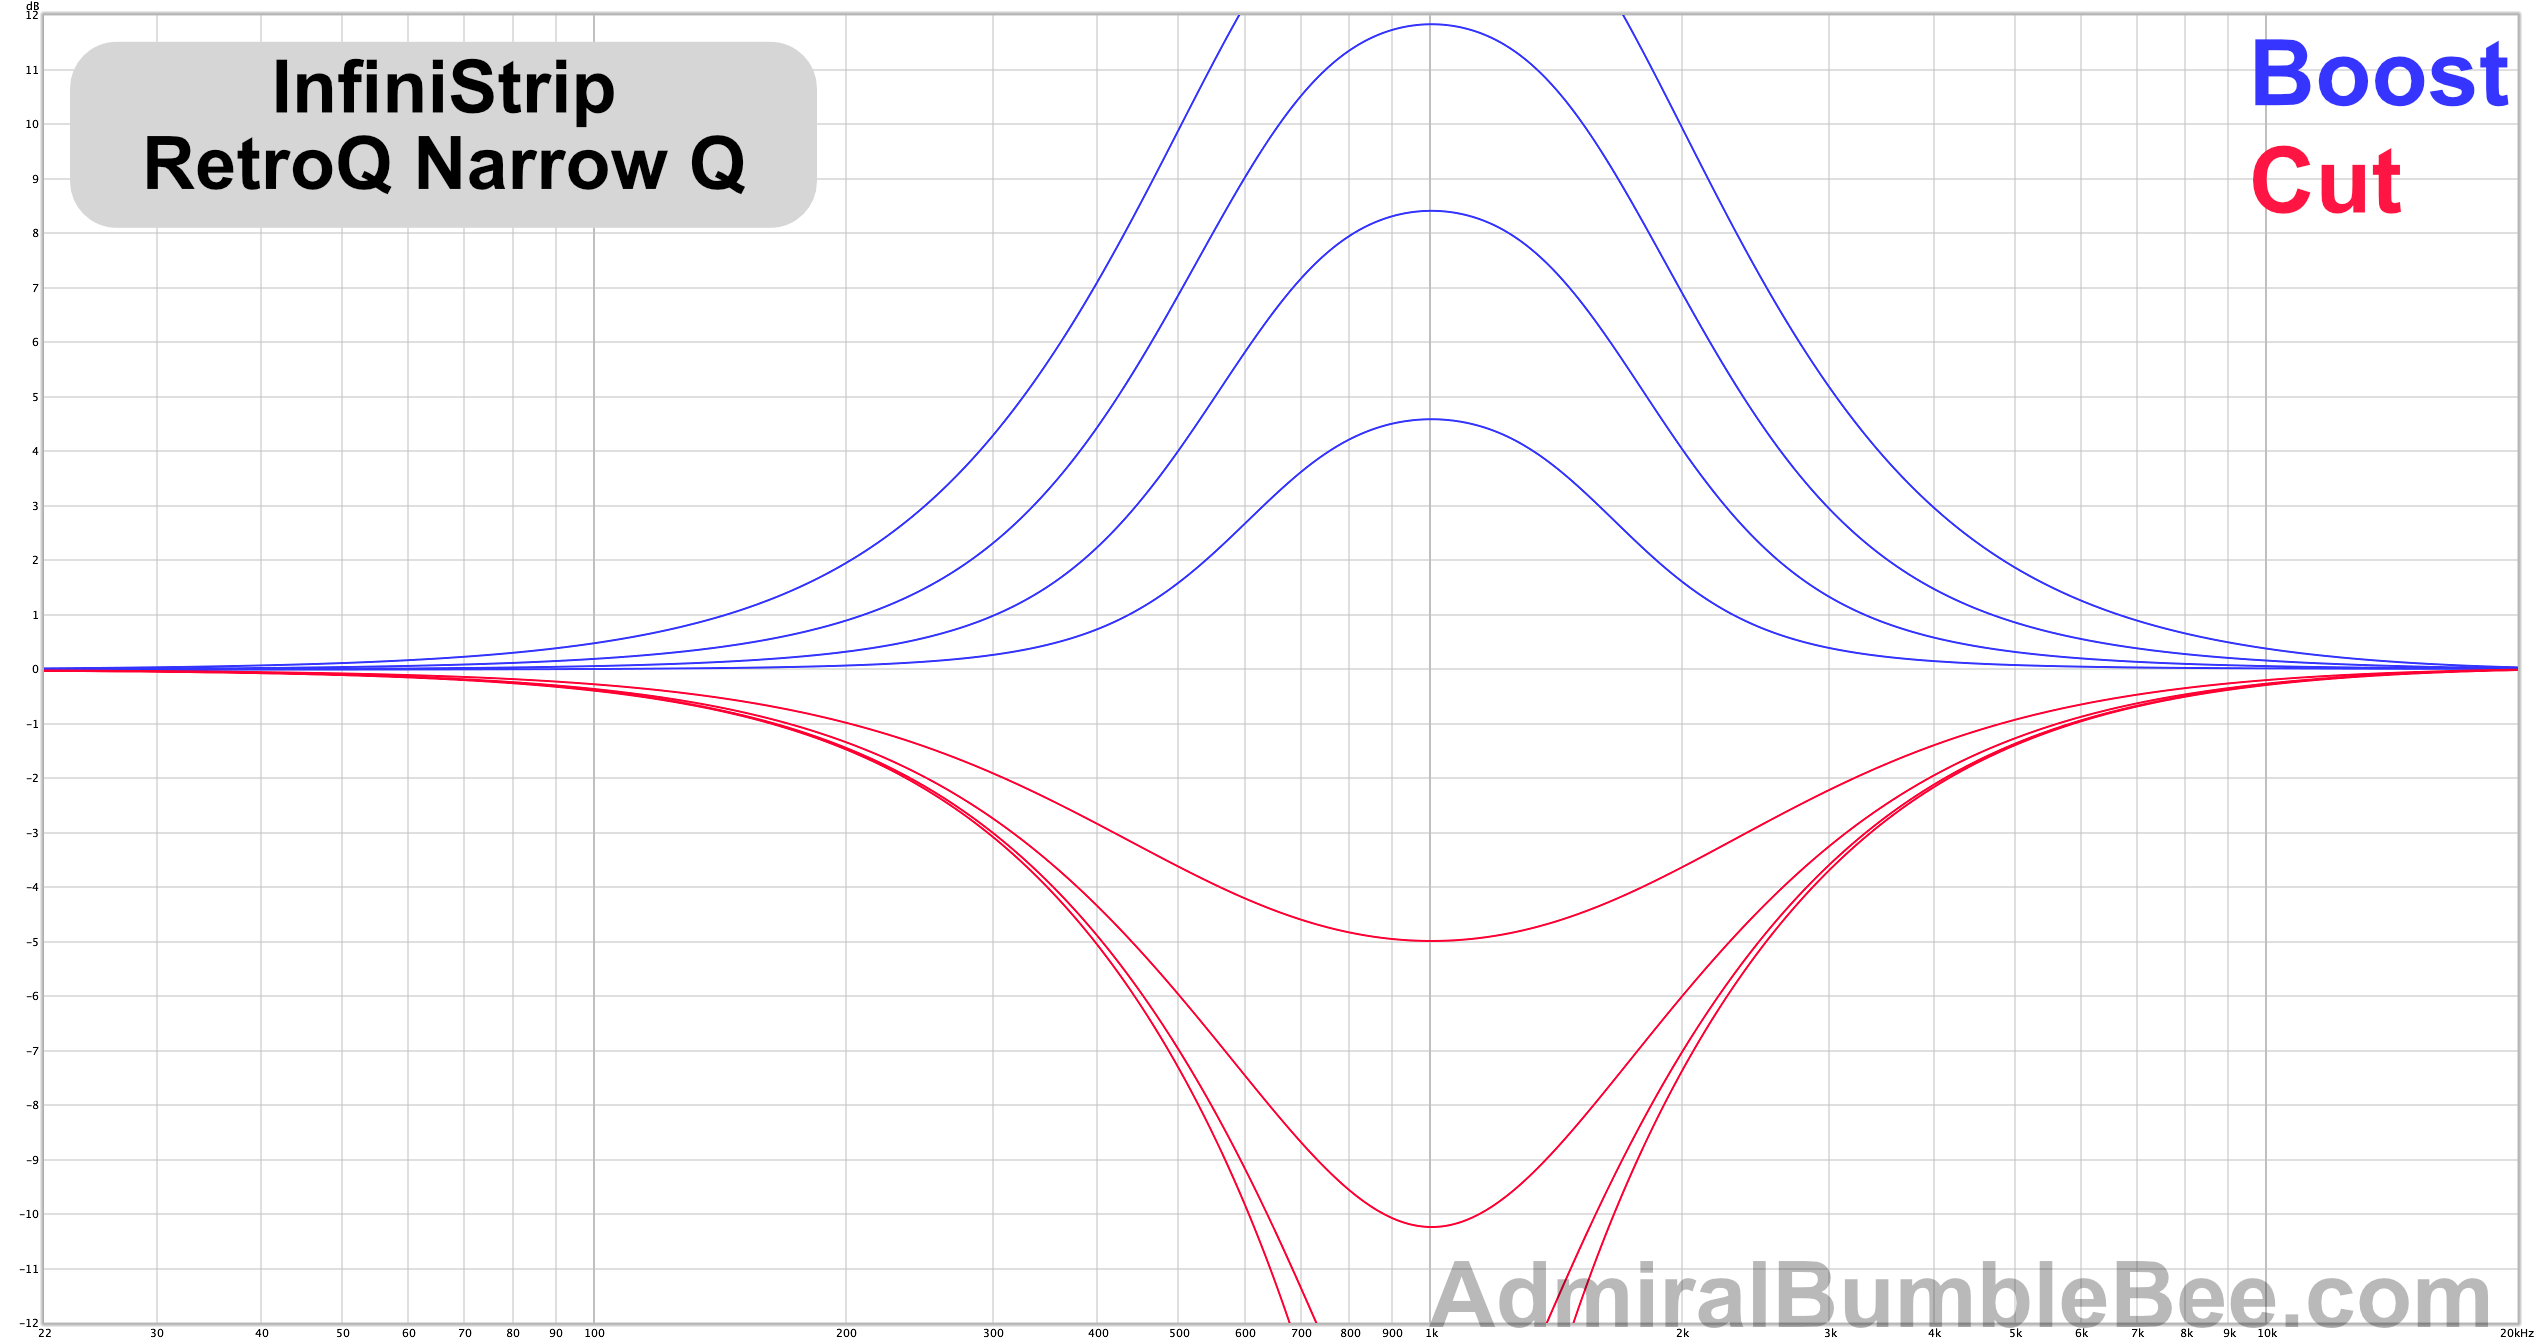
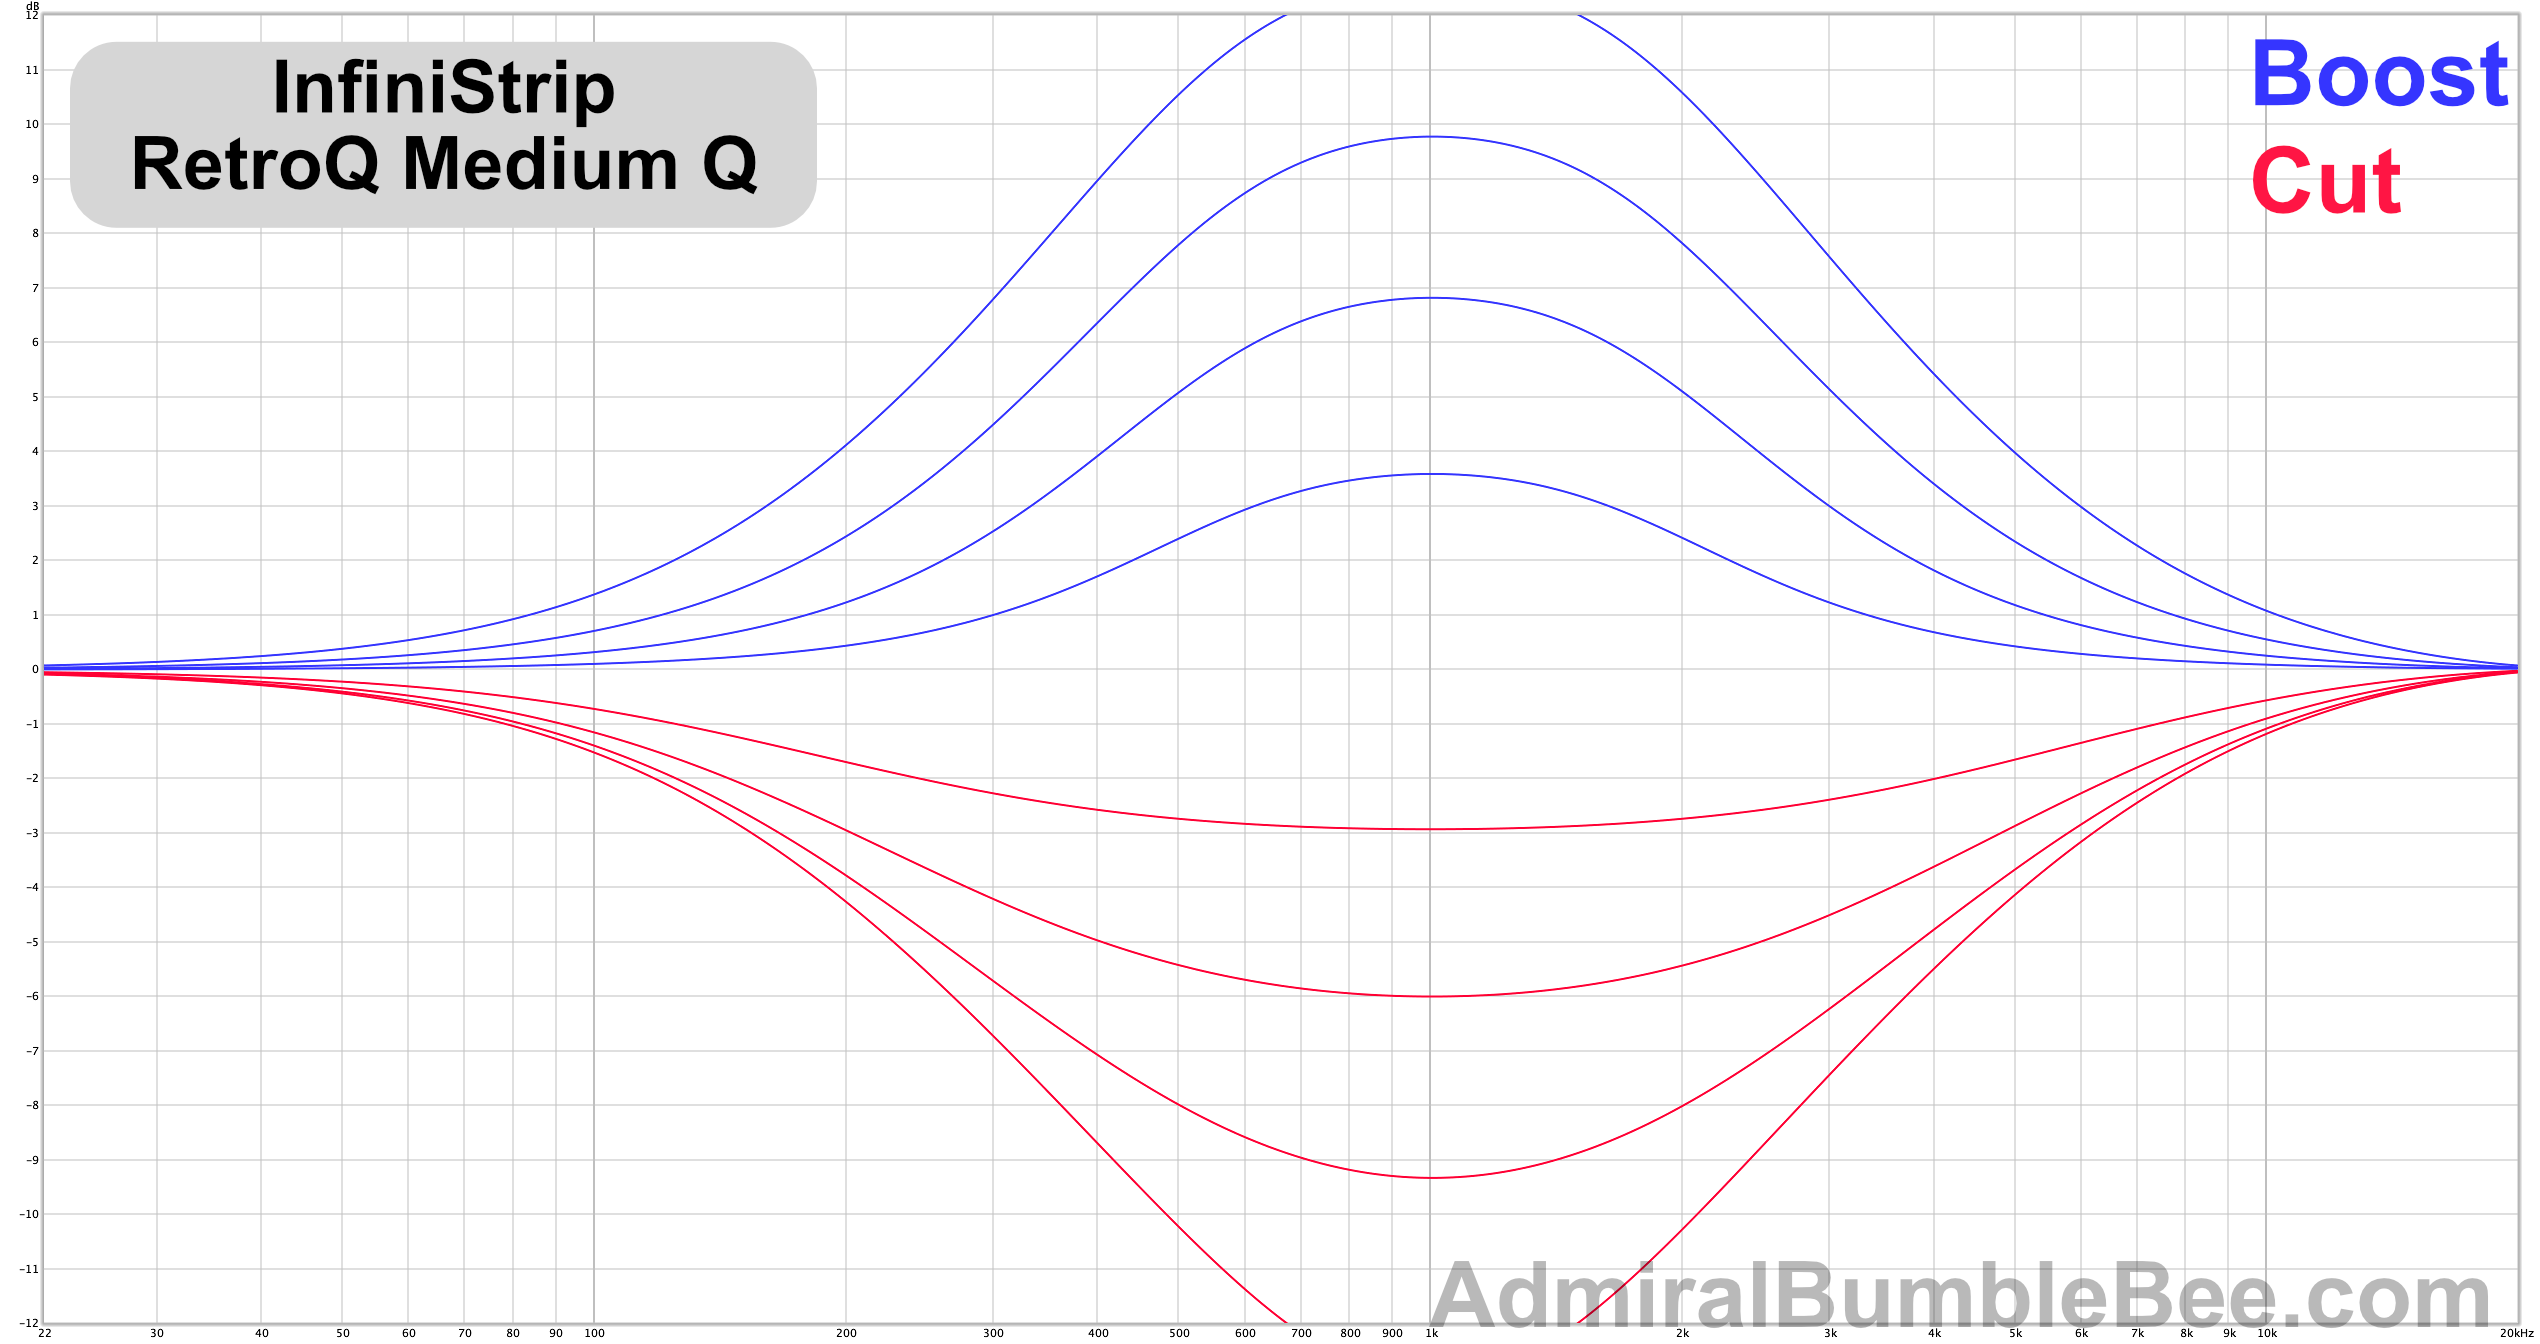
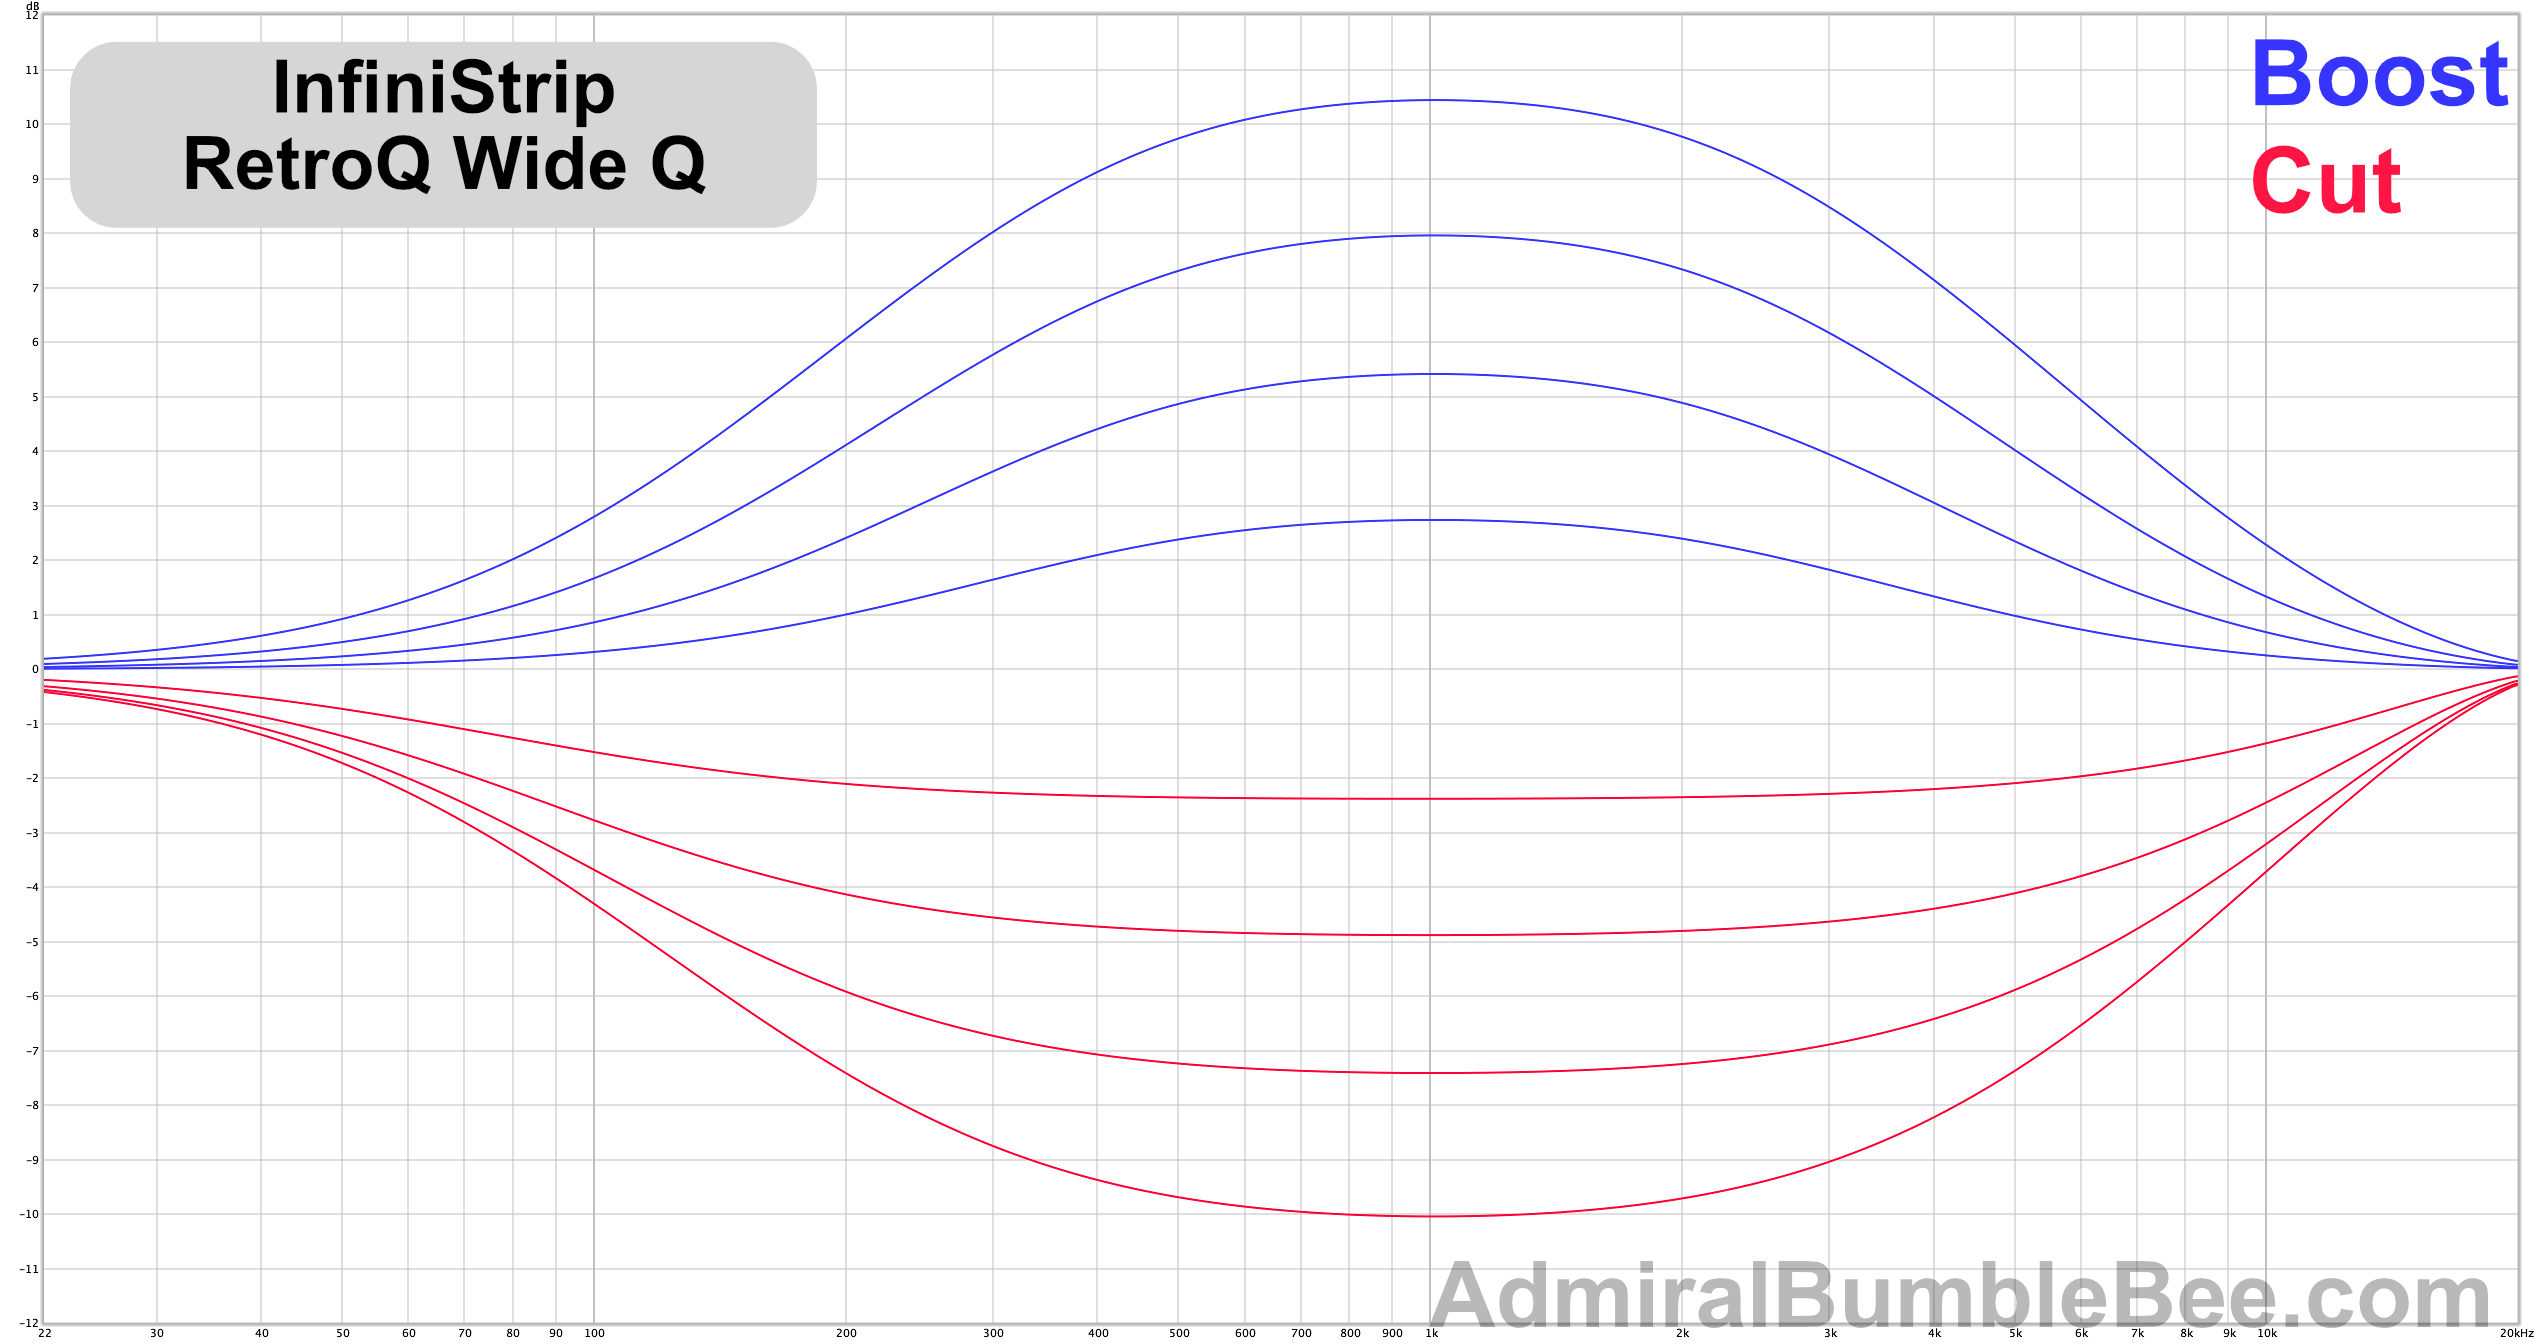
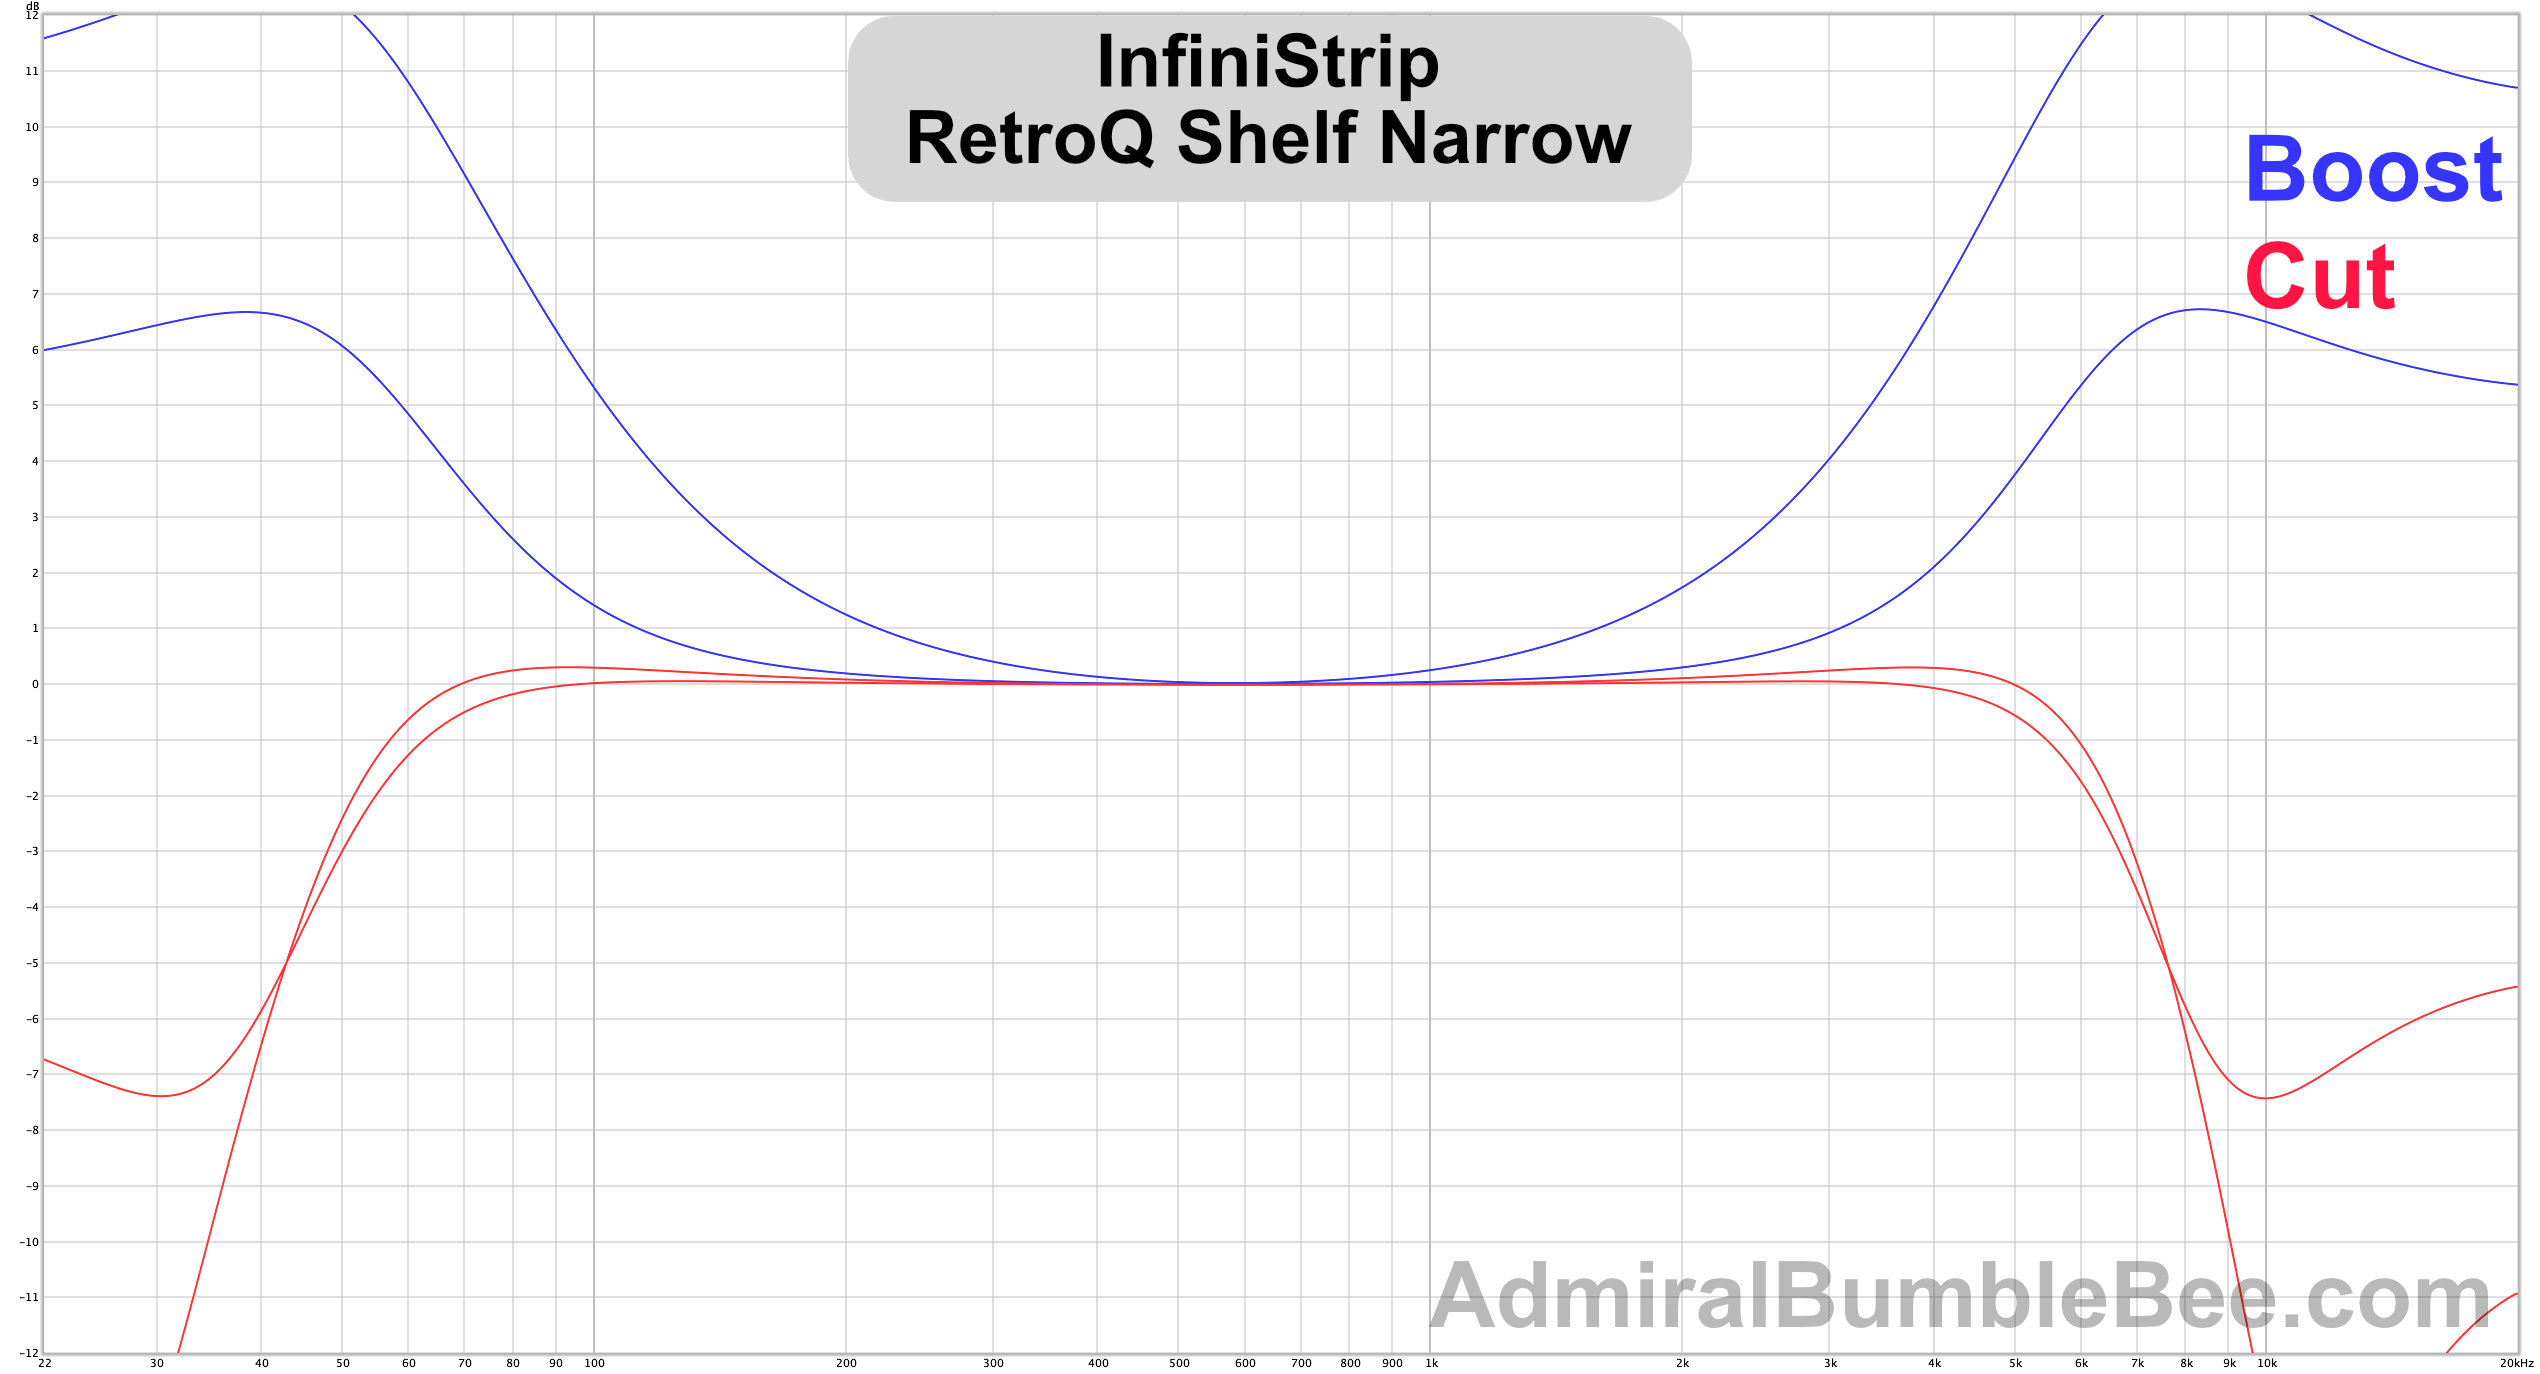
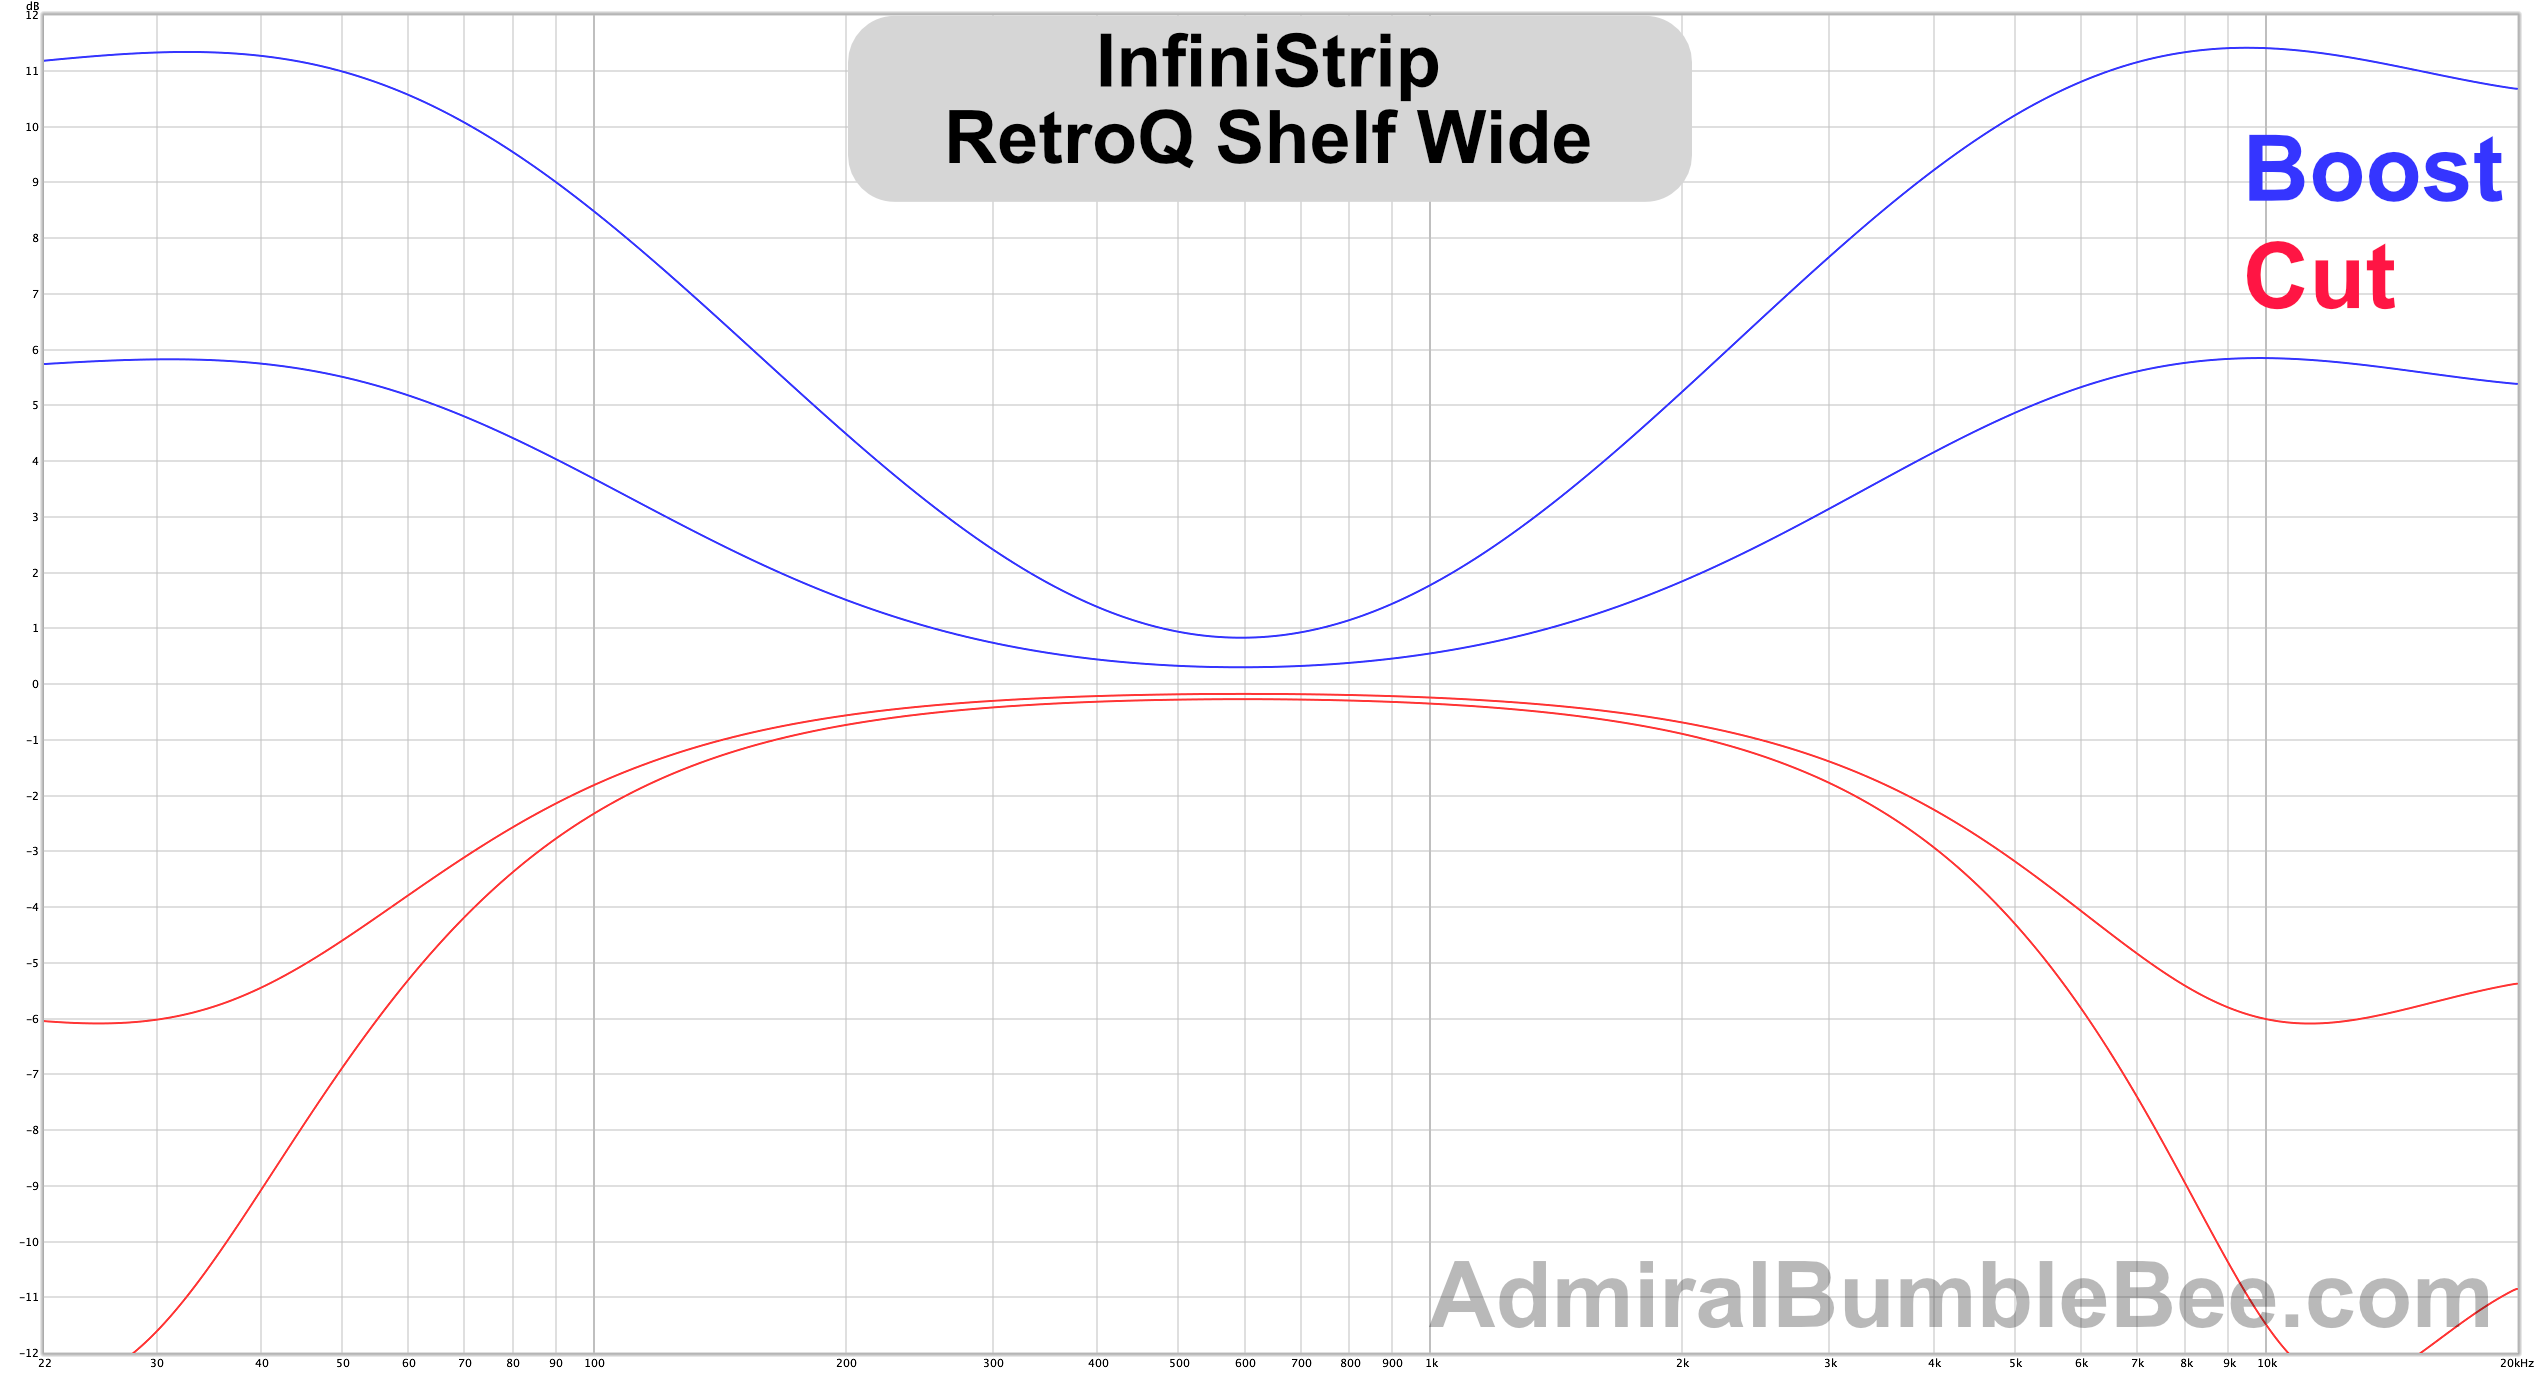
RetroQ

SMOOTH.
RetroQ is my go-to EQ in InfiniStrip. I can’t quantify my feelings about it other than saying that it sounds good where other console-style EQs don’t.
I can do almost anything I want with RetroQ and it sounds nice. Big boosts, big cuts, drive it, small adjustments… whatever.
The Frequency slider is a semi-circle which gains some control room compared to PreQursor. Still mildly bother some, but it is an improvement.
The band indicating lights consistently confuse me. The dark yellow “blob” looks like it’s an LED that’s turned off, not an indicator that the band is ON. The whole band greys out when it’s disabled which makes “OFF” obvious, but ON is conversely not as obvious unless you’re familiar with the grey-out effect.
RetroQ is one of the defining positive factors of InfiniStrip for me.
Charts
LIMITER
Charts are done with the following settings:
- Attack 25
- Release 200
- Ceiling -25
- Output 0
- SC HPF Off
I felt these settings most accurately demonstrated the differences between the products in a single static image.
Opto Lim
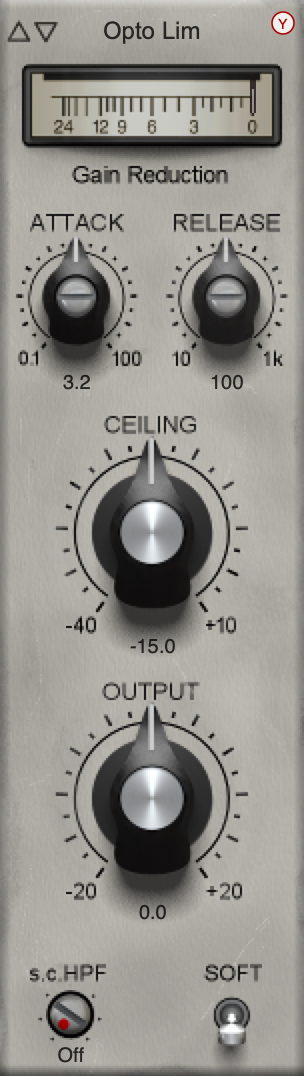
Another Opto device that doesn’t sound “Opto” to me, and yet again it’s still my prefered device of this type of module.
The exact same complaints are present from the Opto Pressor. Attack/Release controls are weird. HPF on by default.
The “Soft” mode sounds more similar to my idea of an Optical Limiter, but not-soft mode is too fun. It adds density to almost anything it touches. Electric Guitars, Bass, Saw Leads, Deep Sub-Basses, Male Vocals etc… Post-analysis, I didn’t notice anything that stood out as particularly unique about it, but in use it manages to be one of the few dynamic processors that can take a deep and/or dense sound and make it denser without crossing the line of obnoxiousness too easily.
I really wish the release knob was biased towards higher values. It is annoying that about 30% of the knob is useful for 90% of use-cases.
VCA Lim
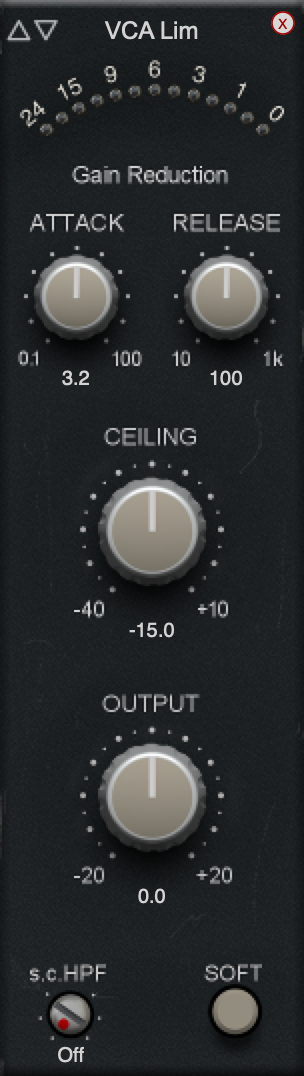
Your typical “limiter”.
I tried VCA Lim on everything, and I did not experience a scenario where I preferred it over another option.
The attack stage has a clickiness to it that I find unpleasant. The release stage sounds awkward at longer values (whhoooOOOOOMMPP). Soft mode sounds pillowy.
The first 50% of the release knob almost exclusively sounds terrible. It gives sounds an unnatural tail that feels like you’re being slapped with a stuffed animal. (did that make sense?) I hear this sound a lot of hip hop and surround styles though, so it might be the key for people deep into that culture.
I spent some time attempting to come up with a contrived scenario where I would prefer the VCA Lim, but I failed. Everytime I tried it on something I was able to think of another (Free) product that fit the bill better.
Comparison
Comparisons made with the same settings.
CONTROL
Master Control
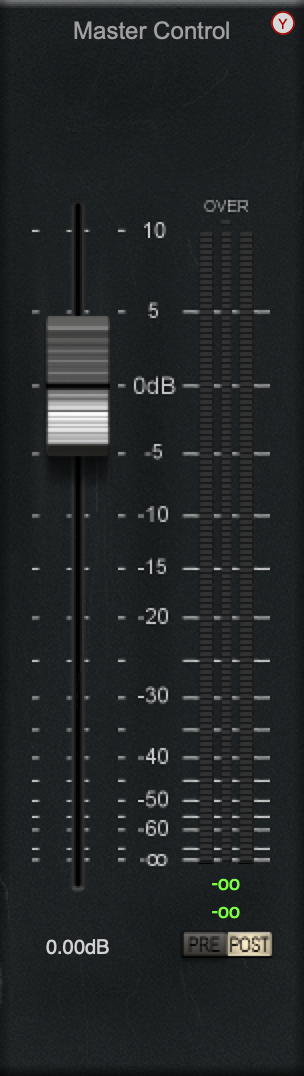
Volume control and meter.
The width control (not displayed) is a nice touch on a channel strip.
SPECIAL
De-Esser
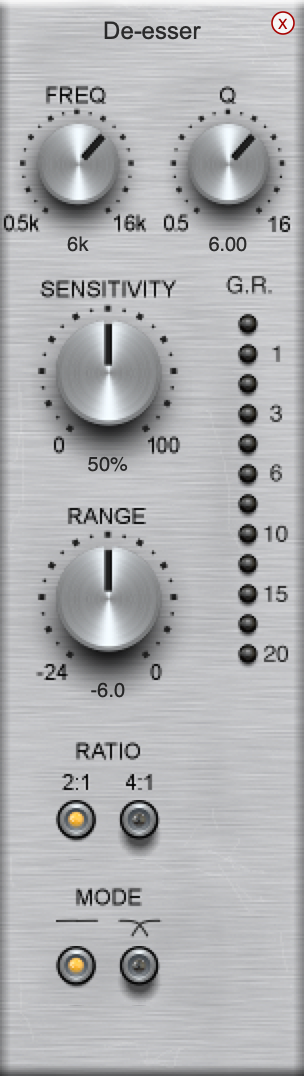
De-Esser is somewhat interesting. It has two functioning modes:
- Full-band - This acts like a compressor with the sidechain signal filtered to make the compressor react to sibilance. The amplitude of the whole signal is changed in response to sibilance (or whatever you tune it for). This is the “clean” mode if your signal has defined areas that need de-essing.
- Split-Band - The signal is split into 2 bands, Low and High. The crossover is always present in the signal. The high band’s amplitude is affected by the dynamics circuit.
When I initially used this I expected a dynamic EQ circuit, but the split-band mode was rather interesting. It works magic on bright cymbals and woodwinds.
I put de-essers in the same class as expanders in terms of “Tools that are exceedingly useful that nobody talks about”. I do prefer to use dynamic-EQ style de-essers over what InfiniStrip’s De-Esser provides, but it is a competent and useful addition to the channel strip as a whole. It’s sufficient about half the time, exactly what I want about 10% of the time and the rest of the time I am conflicted if it’s worth grabbing a more complex de-esser.
De-Esser is easy to control, in contrast with some of the other modules in InfiniStrip. The knobs feel like they center around normally usable values, and their ranges are sane.
Charts

De-Hummer
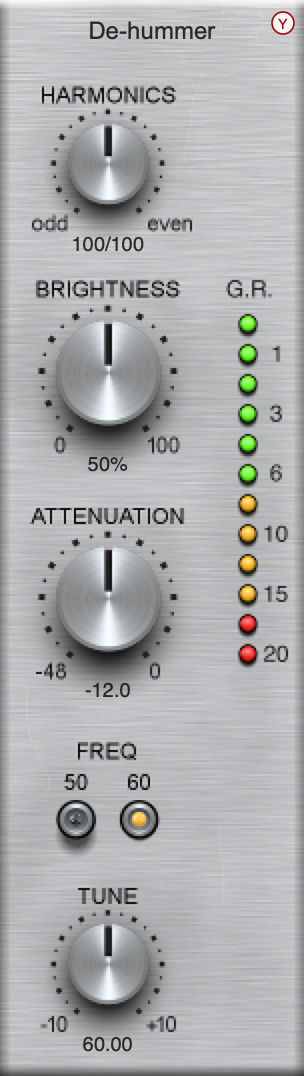
A De-Hummer! Rare sight in a channel strip.
De-Hummer is a series of harmonically related notch-like filters that are tuned to a base frequency that matches the mains fundamental common in most countries (50hz or 60hz).
The brightness control affects the relative amplitude from each filter to the next. Brighter == higher harmonics reduce more. I thought this was a bit silly at first, since most hum is fairly consistent in profile, but after finding some humming sources it turned out to be a useful control!
The harmonic selection allows you to bias the filters towards even or odd harmonics, which I didn’t find useful for de-humming applications. It could have been useful for de-pinging percussion except the freq value isn’t tunable. If freq was tunable then it’d be an indispensible tool for dealing with resonances in pitch-stable sources.
A curious behaviour is that the harmonic relationships change if you switch between 50hz and 60z. I’m not familiar with 50hz mains, so perhaps the shape is slightly different?
I’m happy to see this in InfiniStrip.
Charts
Profile Changes depending on setting
Conclusion
Reading back I’ve noticed that I’m about 50/50 complaining/praising in this review. The reality is that I’ve been happy with InfiniStrip.
If they adjusted the scaling of controls to match the intended function or “vibe” or usable range of the module, and added oversampling then I would insist that this is the best channel strip product on the market that I’ve used.
You may have also noticed in the images that the plugin is not (currently?) HiDPI compatible. On HiDPI monitors it looks somewhat ugly, and I don’t think that this is acceptable in 2020.
Despite my complaints I’ve happily used the product and discovered new things about it over the last 2 months that lead me to enjoy it even more. While working in a fast-paced mixing environment I didn’t notice any of my complaints except the EQ frequency selection frustrations, so I have difficulty lending much credence to my own complaints.
The price is a bit high at $199 when considering comparable products from other manufacturers. I have fewer complaints about many of those products, but I also have less praise for those products. I can’t think of any product I’ve used where I experienced a similar sequence of pleasant surprises.
If InfiniStrip was on sale for $99-139 then I would classify it as a “must buy” if you enjoy the channelstrip workflow.
At the $199 price I would consider demoing it and making sure that you have a series of projects lined up or some time to screw around with it seriously. It’s worth the price, but the value is now offset by the potential market of channel strips in that price range. InfiniStrip does not offer enough versatility for me to recommended it to anyone reading, but it’s close.
I like quirks. I like products with strange, but musical, behaviour. I like opinionated products. I like discovering new behaviours after using the product dozens/hundreds of hours. InfiniStrip offers all of these things and is a functional product at a basic level.
I like it.
Meta
This post took:
- 94 hours of using the product.
- 17 hours of running measurements (and 6 more re-running when I realized I made a boneheaded mistake)
- 4 hours to capture images and setup the outline.
- 3 hours to organize notes.
- 7 hours to translate notes into text on a computer
- 2 hours double checking the manual and other product content.
- 12 hours generating videos.
- 17 hours of testing.
Total of 62 hours + 94 hours of use.
