MFreeformAnalogEQ, MFreeformEqualizer and MFreeformPhase. That’s what I’m going to cover because I was asked by Lorenz at Xarc Mastering.
The Melda system is quite feature-filled, so I’m going to be splitting this review in to 2 parts: Part 1 (this) and Part 2 (coming soon!). Part 1 is going to cover features that are common between the 3 products, and other Melda plugins. Part 2 is going to cover the unique functionality of the 3 products.
I will also be comparing MFreeformAnalogEQ and MFreeFormEqualizer to Harrison AVA Mastering EQ.
Be sure to check out Part 2 as well!
Without further ado… let’s see what these plugins have in common.
Contents
- Further Introduction
- Onscreen Keyboards
- Settings
- Preset Browser
- Metering
- Toolbar
- Processing
- Analyzer
- Points
- Melda & Vojtech & Haters.
- Conclusion
- Support Me!
Further Introduction
I will be doing this review using Reaper 5.81 pre-release and Motu Digital Performer 9.52. I will be using the VST versions in each DAW.
Melda Production products all have a number of common features among their product line. So to make this review easier to read I’m going to cover these things first. The commonality of features depends slightly on the specific product. For instance: multiband products share common features that non-multiband products do not have.
I will be using MFreeformAnalogEQ for part 1 to demonstrate common features.
I requested NFR (not-for-resale) review copies for this review. I did not pay for these plugins, but was given them for the purpose of this review. If you feel that this may have influenced my review, then please e-mail me or leave a comment and lambaste me for my impartiality. I’d appreciate it.
Onscreen Keyboards
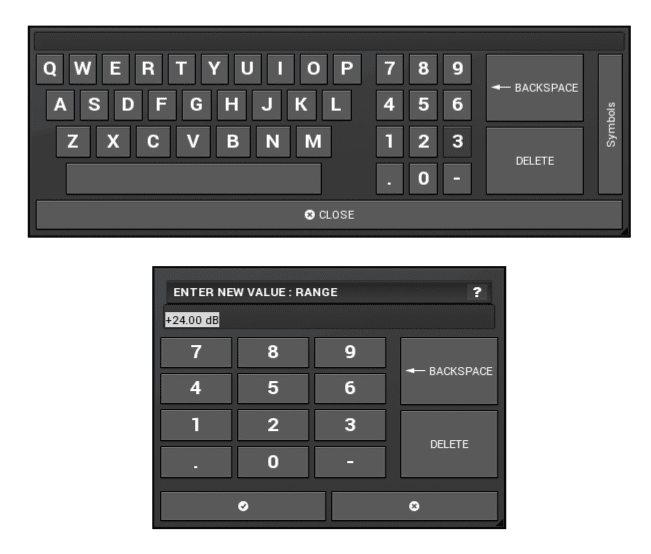
When entering parameter values, you’re often given an onscreen keyboard. These are fantastic additions. In some studio setups it’s not unusual to have a mouse handy, but no keyboard, yet you still wish to enter a precise value or name something.
These onscreen input devices allow you the capability to always enter what you need.
It would be nice if the number pad had more calculator like abilities. Some sort of ‘Audio Calculator’ with delay time calculations, note->frequency functions, log/exponent features, basic add/subtract/mult/div, sample value to DB (and vice versa) etc… I’m sure most users don’t care about that stuff, but I often to go back to my Clojure repl for things like that when working.
Bonus points if they add a RPN mode like my beloved HP-12c. The lisper in me wouldn’t mind a PN mode either. I’m happy as long as there’s no equals sign ;)
Settings
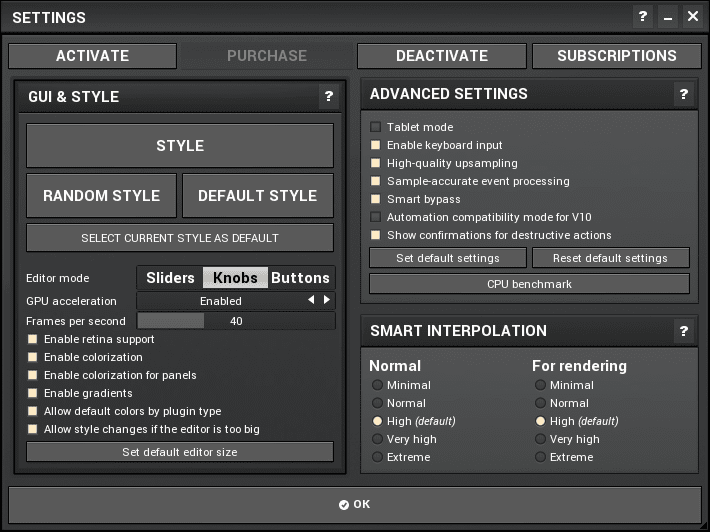
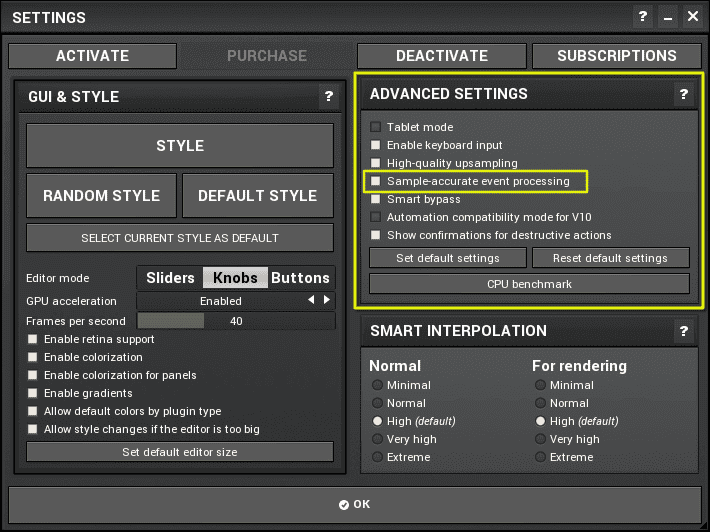
Clicking the settings button in the upper right of the plugin brings you here…
GUI and Style
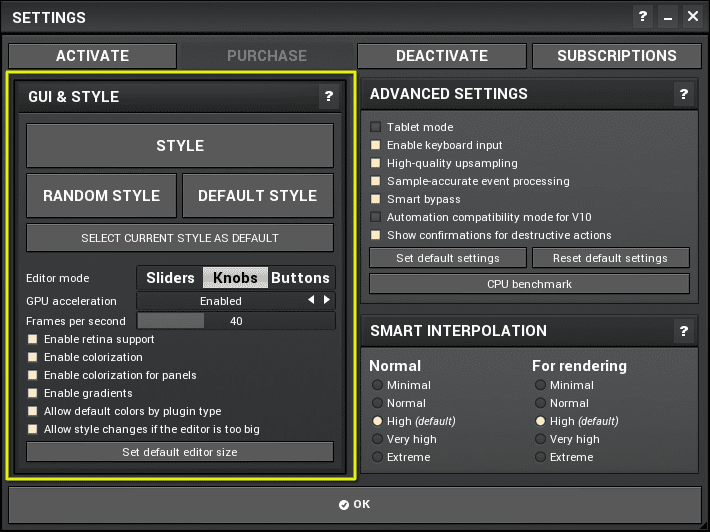
The GUI and Style page allows you to adjust GUI parameters and apply a set of “skins” to the plugins.
The styles simply change the shape and colour of the various GUI widgets to give the plugin a new feel. The widgets can likewise be coloured as desired, and you can save colour presets to re-use.
There’s various options for tuning the GUI’s use of gradients, retina support, FPS, GPU usage and more.
My favorite feature of the GUI and Style pane is that you can switch the main controls between sliders, knobs and buttons. (Buttons are basically small sliders that are put where knobs would be). I really dislike the default knob mode, but the slider setup is rather pleasant to me. Perhaps you like the knobs or buttons instead. It’s awesome that you can choose.
Inside the style window you can adjust if parameters are show as all-caps or only the first letter capitalized. Next to that you can also invert the entire colour spectrum used on the GUI. I love that feature!
I’ve seen folks complain about how Melda plugins look, but it’s not particularly difficult to figure out a Style setup that works for you. It may not be a 3d skeuomorphic masterpiece, but you can get it nice enough to look at for a few hours.
Here’s some styles in action:
Advanced
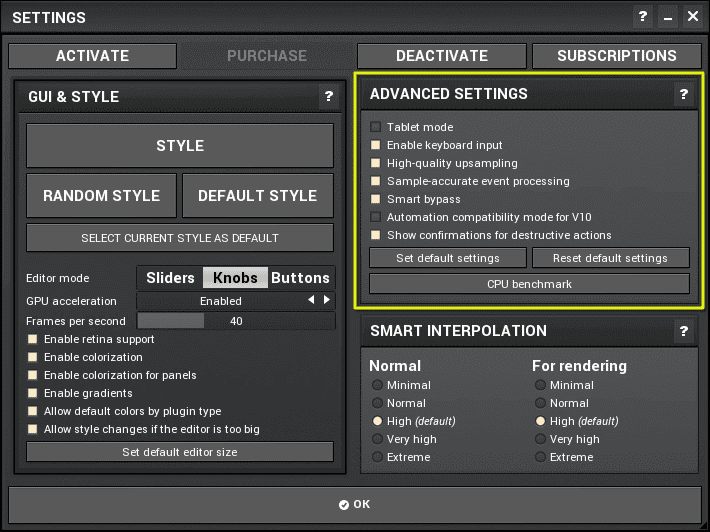
The advanced panel offers you a number of things that you can use to tune the plugins. Refer to the manual for what these settings do.
I’m going to cover a few that I think are particularly cool and useful though.
Sample-accurate Event Processing
Some DAWs and some plugin formats (VST3/AU/AAX) support sample-accurate processing. This means that rather than acquiring data that will change plugin parameters once per buffer, this data is processed exactly at the sample which it occurs.
This functionality is possible in AU hosts, but I was unable to make it work correctly in Logic. It appears that sample-accurate automation is forced in Logic if you have Preferences->Audio->General->Sample Accurate Automation set to allow Plug-Ins. Is this a bug? (Why would you want to turn it off anyway?!) It did work correctly in VST3 hosts like Reaper, Studio One, Cubase etc… obviously only when using the VST3 versions of the plugin.
The result of this is similar to smart interpolation when using automation (though, this depends on how your host interpolates automation… a topic for another day). However it also directly affects the timing of events. Your bypasses happen exactly when you set them rather than at buffer boundaries for instance.
Melda is by far the most prolific creator of plugins with sample accurate automation and I applaud them for that. Once you begin using products with this feature, anything else becomes rather irritating.
Smart Bypass
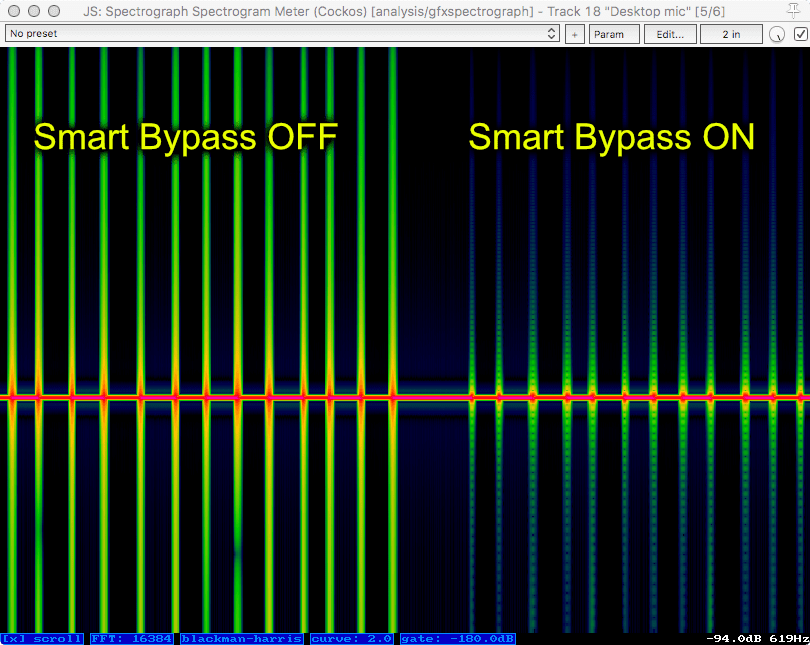
I have mentioned this before. Bypassing a plugin can cause a somewhat bothersome noise if done wrong.
Melda plugins offer “Smart Bypass” which fixes this issue. It does a short crossfade between the processed and unprocessed signal when you use the internal bypass in the plugin. If you use your DAW’s bypass then this feature does not do anything, it’s not possible since the DAW simply stops sending data the plugin.
In the image above you can see the burst of unpleasantry that occurs when ‘Smart Bypass’ is turned off. When it’s turned on the transition between bypassed and live processing is much cleaner.
I love this feature. You should too, and you shouldn’t accept any plugin without it if you ever do any sort of bypass automation.
CPU Benchmark
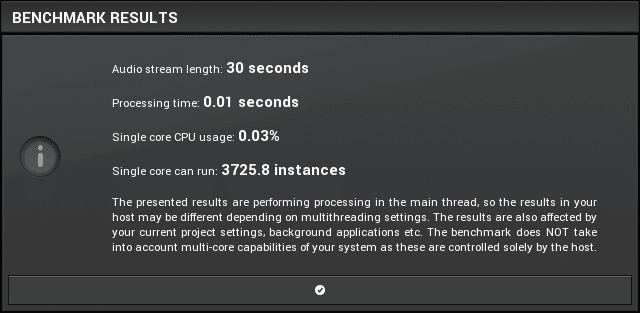
So there this interesting function that (cl)aims to benchmark your current setup to see how many of the given plugin you can run.
Uh.. it’s a neat idea. It just doesn’t give accurate information at all. It even warns you that it’s not taking in to account certain settings (like buffer size, thread allocation, etc…).
As you can see, it claims that I can run 3,725.8 (point eight… hahahah) instances of this plugin. Could I? Not even close. With the most performance appropriate settings I was only able to run a bit over 980 with some variance.
I don’t have a monster computer. I’m testing this on a 5 year old iMac. 980 instances is pretty amazing honestly, but the CPU Benchmark function isn’t particularly useful for the end user. I can see how it may be helpful for tech support to use this function with a user to get an idea of their processing power, but for you and I? Nope.
Smart Interpolation
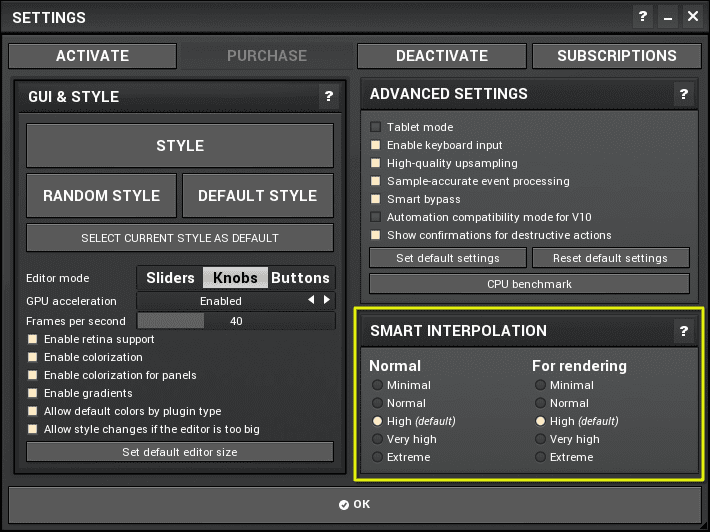
Smart Interpolation lets you adjust how Melda plugins handle parameter change requests and event data (like MIDI) from the DAW or how often the plugin responds to MIDI events.
A cool feature here is that the ‘Normal’ (realtime) value always updates the ‘Rendering’ value to be equal or greater. That protects you from accidentally having a Render mode set to a lower quality, and ruining your renders. You can only render in higher quality.
This feature does not appear to be available when using Logic Pro X.
What is Interpolation?

Above representation is for explanation purposes only. It’s not 100% accurate. Please read further!
Plugins would be horribly inefficient if they tried to get all current parameter changes, then recalculate all of their internal parameters on every single sample.
Melda allows you to fine tune how often this happens. The ‘Smart Interpolation’ function allows you to control how often the plugin gets and changes parameter changes, and subsequently reacts to these changes.
The image above shows the blue bars as how often the plugin will request events and respond to them. With “No” interpolation, it does it once per 2048 samples. That’s when it gets automation data or MIDI data for MIDI mapped parameters.
The various interpolation settings increase how often these parameter change requests are made, and how often they are processed. As you can imagine: these requests and the recalculations that may occur can take some CPU time. The more often they happen, the higher your CPU usage will go.
It’s a very minor increase usually though, and it’s excellent that it’s here.
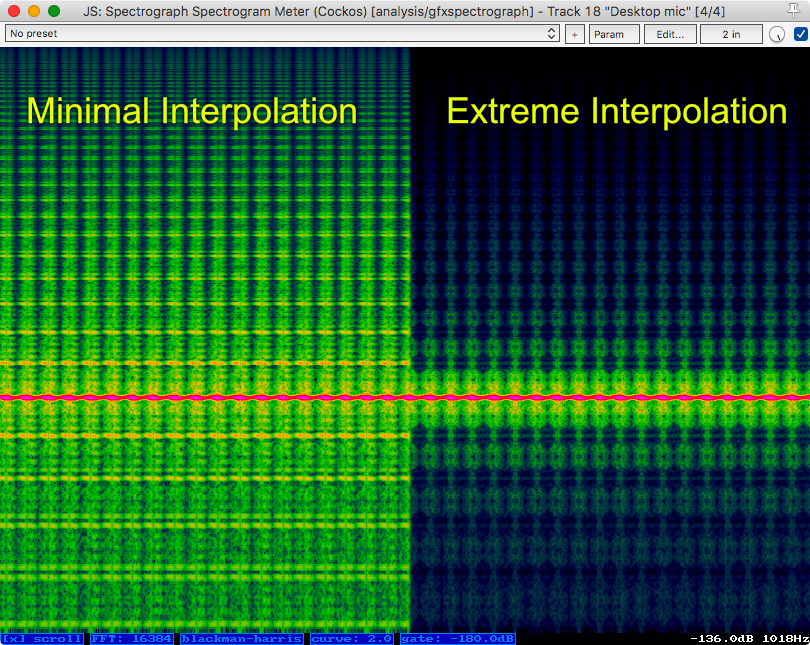
Here’s an example of the effects this can have on your audio…
Interpolation Results
Here’s the setup:
- DAW buffer size set to 2048. (Irrelevant, Minimal setting uses 2048 samples anyway)
- MOscillator outputting a C4 sine wave.
- MIDI LFO outputting cc 1 on channel 1.
- MEqualizer with a band at 1Khz.
- MIDI cc 1 assigned to modulate EQ band gain.
With Minimal Smart Interpolation we can see all the noise resulting from the essentially quantized parameter modulation signal. The EQ band gain is being modulated by the resulting chunky signal that’s only updated every 2048 samples.
The Extreme Smart Interpolation is updating values every 1 sample for a very smooth resulting signal. Thusly we end up with far less noise. Much cleaner.
Extreme mode isn’t necessary all of the time, I’m just trying to show the differences here.
These differences aren’t as extreme in all hosts. It depends on the Host how extreme these settings will affect your audio. The test above was done in Reaper 5.81.
(In the above image, X represents time, Y represents frequency, and colour represents intensity. Black is silent, Red is very loud, green is moderate, yellow is moderately high, etc…)
Preset Browser
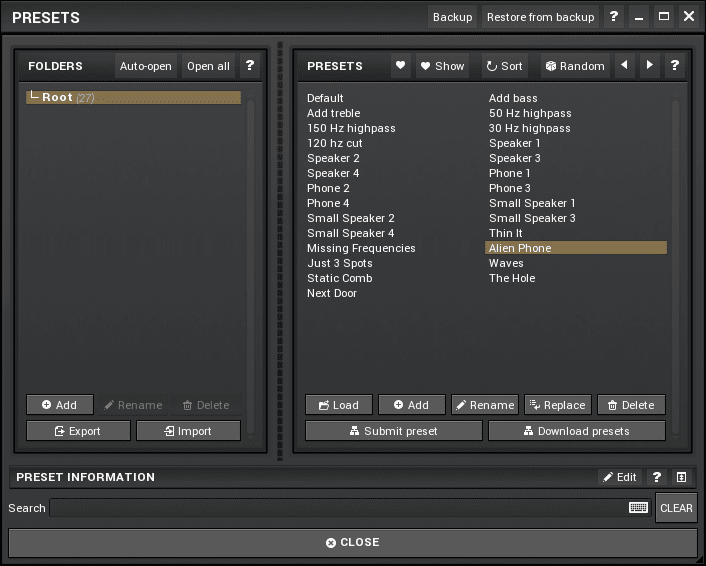
If you aim to be a Melda-power-user, you will spend a lot of time in the preset browser. It’s not just for plugin presets. Various other elements in the software have presets. I’ve noted these in the appropriate sections. Nearly any setting that you’d maybe want to share or use in another plugin can be saved as a preset.
There’s a number of notable features in the preset system that go well-beyond what other manufacturers offer -
- Like/Show Like - You can ‘Like’ presets and filter presets by those that you like.
- Backup - You can backup your presets for all of your Melda products, and restore backups. AWESOME feature.
- Submit preset - Melda has an online repository of presets that you can contribute to an Online Exchange.
- Download presets - In one click you can download all presets from the online exchange for the given product. Very cool. If you are a preset user, this is an amazing feature.
- Preset information - Presets have a place to write information about them. Excellent for personal usage and for sharing on the online exchange.
There’s a variety of “standard” preset browser features like import/load, export, rename, categories etc…
The search feature is a pleasant surprise. Many otherwise-competent preset browsers exclude search. Some have search, but if you search for “phone” you won’t get results for “Telephone”. Melda’s preset search works well and includes substring results. Unsurprisingly I tried things like wildcards and regex, but that was not available.
It’s a competent preset browser system, and that’s a great thing since you’ll be using it a lot if you’re aiming to really dive in to these products.
Metering
There’s a separate meter section that can be separated. Peak metering, stereo metering and a ‘Time Graph’ is available on the products I’m reviewing currently.
Peak metering is exactly what you’d expect. It shows you peak sample levels for input and output. These meters appear to show sample values before downsampling if you have oversampling activated. I was unable to find a way to show post-oversampling peak values.
The stereo width monitor shows you the correlation between left and right channels. If they are identical then the meter shows mono. The further the left and right channels diverge from each other, the more the meter fills. At the top of the meter your left and right channels have precisely inverted polarity relative to each other.
Time graph. It sounds like a movie that’d star Tom Cruise. Except Melda’s Time Graph is way cooler.
The time-graph is a unique addition. This is a digital sampling rectified oscilloscope. Big words, but it shows you the sample values, except it takes the absolute value of each sample. It’s possible to adjust the speed of the sampling which functions as a zoom in/out feature.
The time-graph can display input and output sample values overlaid, as well as a line showing current left/right correlation (stereo width). It’s a fantastic feature. I personally use it as the default metering when utilizing Melda plugins during this review.
These meters can be detached from the main window! This gives you a separate window that you can place anywhere you want, and resize however you want. Amazing feature. Really extra neato.
The metering section isn’t all roses though. I would love if there was an RMS overlay or options for other metering ballistics.
Screen Tearing is also an issue at times…
That’s a pure sine wave. You see that little glitch in the sine wave? This is what happens when the display is not synced with your display’s refresh rate. Screen Tearing is probably familiar to you if you are a gamer, work with video or just generally annoyed by visual artifacts.
It’s a really, really minor issue that I don’t think most users would notice. I just picked up on it while doing some tests and it made me grind my teeth a bit.
Time Graph Settings
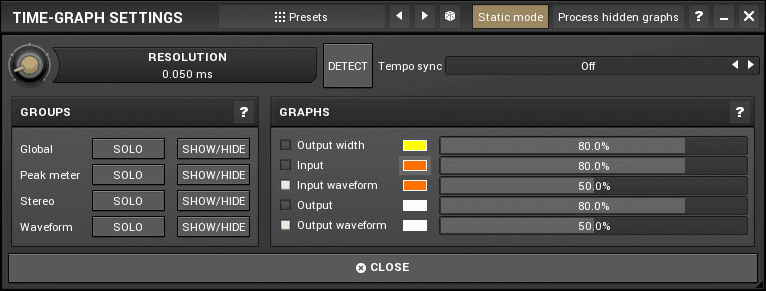
Of course the Time-Graph has settings. Of course these settings have presets, nearly everything has presets. Jeez.
This is where you can solo/hide meters, adjust colours, adjust transparency and turn on/off in/out waveform, in/out level and output stereo width.
You also get a ‘resolution’ knob here that lets you control the update frequency or “zoom”. Much more convenient than using the +/- buttons. It’s possible to tempo sync or detect the appropriate time resolution. I did not find that the ‘detect’ function worked particularly well, as it always gave very fast values that were not particularly useful.
Toolbar
Oversampling

Oversampling: the cause of, and solution to, all of DSP’s problems.
Oversampling is a process where the plugin internally upsamples the signal to a higher sample rate. This reduces nasty side effects like Aliasing and can alleviate some other issues related to Nyquist and Shannon peering their faces in to your DSP process.
Melda offers oversampling on every product as far as I’m aware, from 1x to 4x the current sampling rate. This isn’t always needed, and it can have side-effects (like 4x CPU usage!) that are themselves worse than the problem you may be solving with oversampling. Generally you’ll only need oversampling when you are using a non-linear processes such as compression or distortion/saturation. There’s a few other cases, but if you don’t know what they are (I explain some in other posts!) then don’t touch the oversampling button.
Oversampling isn’t particularly unique in plugins, but something that Melda offers which is rare is the ability to select the type of filter used in downsampling. In Settings->Advanced Settings the ‘High quality upsampling’ function turns on linear phase filters for oversampling. This incurs a latency penalty to your plugin and also uses more CPU.
If you are not worried about the phase-rotation that occurs in high-frequencies due to the use of a minimum-phase low-pass filter, you can turn off high quality upsampling. This allows you to oversample with zero-latency and a reduced CPU usage cost (supposedly).
Interestingly enough, on my system the ‘High quality upsampling’ option used less CPU on my system. It still incurs the 768 sample latency though.
It is excellent that Melda allows you to choose these options. The defaults are sensible and if you are inclined to over-optimize your plugin usage then these options are rather cool.
L/R M/S
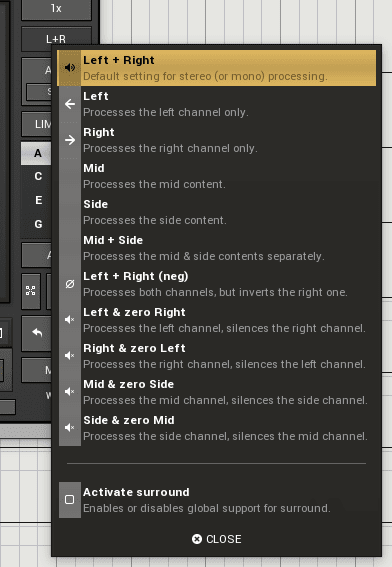
Mid-side processing is all the rage these days. I could rant about that, but I’ll save you right now. Actually… the issue with mid/side is… Ugh. I need to behave.
Melda products allow you a variety of options on how to process your input left/right channels. The menu gives short and clear explanations of what each mode does, so I’ll spare you that.
It’s unique enough that you have so many options on how stereo information is processed (and very welcome, especially for you M/S bandwaggoners), but each plugin comes with surround sound processing settings.

Each channel in up to a 7.1 surround signal can be adjusted. Awesome. Good stuff.
AGC
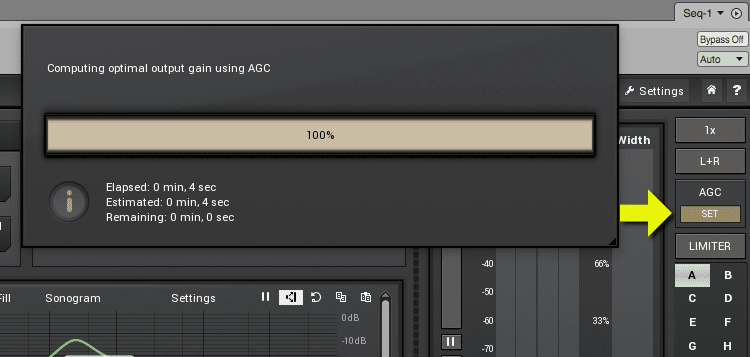
The human ear is sensitive to volume. Almost anything that is louder will sound subjectively better. Melda has a solution for you.
With AGC on the plugin will analyze the input/output levels and set the output volume to better match the input signal. The result is that you can make comparisons without being biased by the processed signal simply being louder (but maybe worse?). The AGC ‘Set’ will set the current AGC value to the gain knob.
The AGC feature also helps with maintaining levels of your mix while potentially making drastic changes to the tonality of a part.
It’s not something that you always need, and in fact if your processor is making big or slow dynamic changes it can be harmful, but it’s a great feature to have.
Limiter
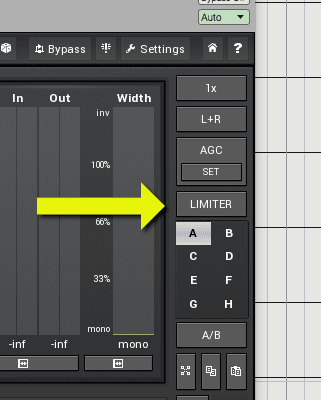
A limiter on every plugin. Neat. It stops the signal exiting the plugin from outputting data above 0dbFS.
This is one feature that I feel isn’t really necessary, and could be replaced by a better function.
If the idea is to simply have a limiter to avoid clipping, then you’ve already personally failed. Don’t do that. Learn to gainstage!. With 32/64-bit floating point busses, there’s no loss of information if you ‘clip’ while in that floating point pathway. Limiting before output doesn’t buy you anything that adding a separate limiter plugin wouldn’t likewise achieve.
If the purpose is to save your hearing in case of a big flub, then a limiter isn’t what you want. Go ahead and try it. Stick a limiter on a project and keep turning it up. It still gets “louder” for quite a while. Yes, there is a limit, but it’s still possible to end up with really loud signals when working at normal mix volumes, despite having a limiter in place.
If you’re mixing along at 0dbVU=83dbSPLa(=-18dbFS) and you get a sudden blast of noise but a limiter catches it at 0dbFS, it will still be very loud. Nearly ear damagingly loud depending on your monitor’s capabilities. It can ruin your entire day of mixing.
What should be there is a fuse. There used to be a product like this, but they’ve disappeared. The concept is that the signal is muted or attenuated to a set level when it exceeds the threshold. A loud burst of noise just mutes the signal. That will project your ears. A limiter will not.
If the point is to help avoid big ear damaging mistakes then Melda needs to replace or supplement the limiter with a fuse.
ABCDEFGH
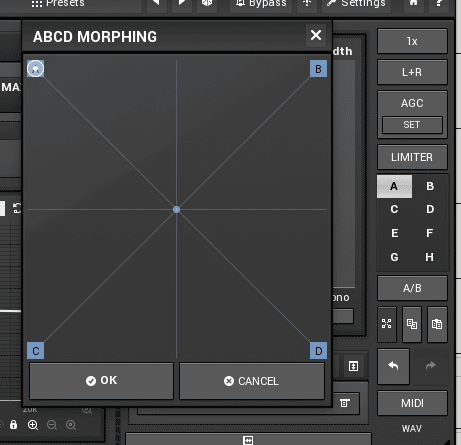
Melda plugins have 4 settings for the plugin that you can save in place. This lets you make changes and quickly A/B them to up to 3 other options. The A/B button selects between your last 2 selected slots. You can copy/paste between slots. Not unusual. Neat feature but not particularly special…
What is neat is the EFGH slots. If you hit the little button that looks like 4 boxes connected in the center, you get the Morphing panel. This brings up an X/Y pad where you can morph between all active parameters in the ABCD slots! Really cool.
Unfortunately you can not automate this parameter morphing panel. That would be really cool. It’s still useful if you have 2 settings and you need to find the ‘middle ground’ between them.
Another problem is that not all plugins expose all of their parameters. Take MFreeformAnalogEQ. It’s an EQ, but the only things that the Morphing Panel lets you morph between are the Gain/DryWet/Saturation parameters. The EQ curve is not morphable (or automatable). There’s similar unmorphable parameters in various other plugins I’ve tested.
If you can automate it though, you can morph between them in the ABCD morphing panel. It’s still a neat function, but it could be a lot more.
MIDI Mapping
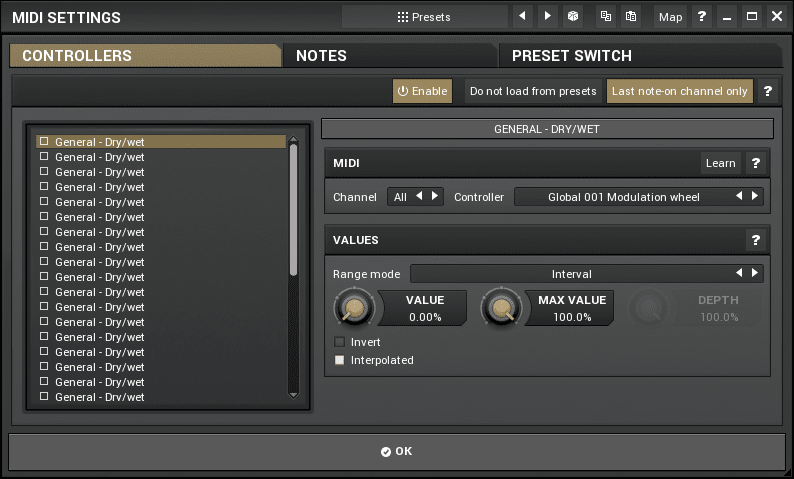
Have a MIDI controller? Want to control your Melda plugin? You’re in luck! They come with a relatively powerful MIDI mapping panel. This has presets available too.
MIDI CC can be mapped to parameters as expected. The range, value and depth of the mapping are adjustable. The controls can be inverted as well, and a lot of other plugins miss this important feature.
The part that I really like is that MIDI notes can be mapped, not just MIDI cc. You can use simple MIDI notes (like from your MIDI keyboard) to toggle parameters, switch parameters and…
You can use MIDI note values to change values. MIDI notes are represented by number from 0-127. Note 59 is a B. Note 29 is an F. You can use these note values just like MIDI cc to control parameters. It’s possible to use set precise parameter values by hitting a key. The mapping can be linear or logarithmic.
The toggle/switch modes let you also go back and fort between 2 precise values (selected via min/max). One of my favorite features is that you can map a specific MIDI note or a “note” (called “All Octaves”). So I can switch a value by pressing a specific F on my keyboard or ANY F on my keyboard, depending on how I set it up.
If your DAW doesn’t support these features already then this is quite the addition. Live performers can benefit from these capabilities a lot. If you do DAW work with any sort of fixed setup or heavily templated setup then these features can be useful as well.
Preset Switching
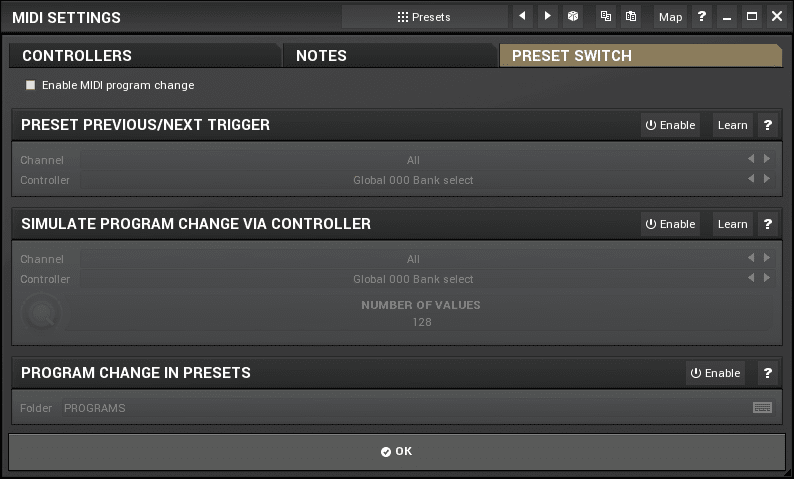
Preset switching is amazing in Melda products.
Most plugins support MIDI program change events to change presets. Melda products do that.
The problem that you may encounter is that your controller doesn’t offer a way to send program change messages easily, or your DAW makes it a pain to program these in.
Melda to the rescue! Melda has a previous/next parameter that you can either automate in your DAW, or you can assign MIDI CC or MIDI Note value (with Special class in the previous/next trigger section in the Preset Switch window in MIDI settings). Aftertouch, Pitch and note velocity can also be mapped. This lets you browse presets easily by turning a knob or pressing a key on your keyboard. It’s a masterfully executed feature.
Program change messages can also be mapped to CC or pitch/aftertouch/note data.
Once again these are some fantastic features for the live performer or someone that composes with a heavily templated setup. The previous/next automatable parameters are great for anyone, but they really shine when doing dialogue or film foley work.
Processing
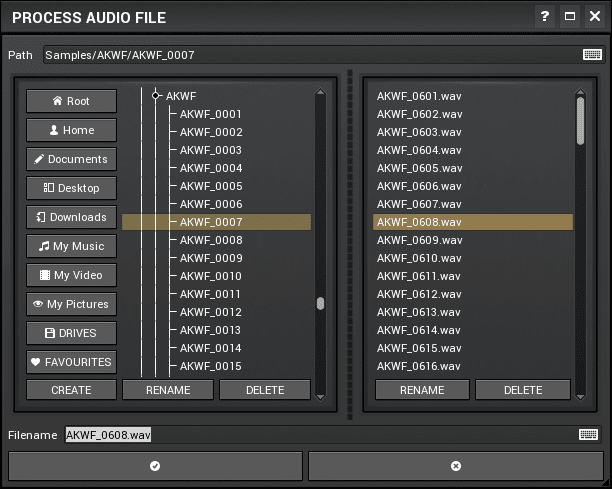
This is a simple feature. You can use the current settings of the plugin to process a sound file.
Yep. That’s it.
There’s no preview function though, which makes this somewhat worthless unless you’re using a DAW that doesn’t let you render clips/regions/items/soundbites with FX. For standalone apps this probably makes sense.
Analyzer
Melda plugins with analyzers, such as what I’m review currently, have fantastic analyzers.
There’s a few notable features that standout from the rest:
- Areas - Little labeled rectangles can be overlaid on the analyzer. So you can quickly identify regions of the spectrum that represent certain sounds or timbres.
- Sonogram - The sonogram is both at the bottom of the screen, and the ‘Sonogram’ button enables an upwards scrolling spectrograph. This is a type of visualization that uses colour to represent intensity on an X/Y graph so that the X/Y space can be used for frequency and time.
- Fill - The bottom sonogram can fill the entire analyzer view. Rather than having to focus on the position of a line, you can identify colours to see the intensity of parts of the spectrum.
The spectrograph/sonogram is particularly useful since it gives you a visualization of the changes over time. Rather than having to focus on a constantly moving line, you can look at an image that shows the changes in the spectrum over a period of time.
A feature that I’m particularly glad is present is the normalize function. It normalizes the spectrum (sets the highest frequency to 0db) so that you have a fixed reference when comparing values. This is on by default which I think is incorrect, since it obfuscates the actual frequency values. I can understand the idea behind having it defaulted to on, but I rather see actual levels since I monitor at a fixed volume.
Area Settings
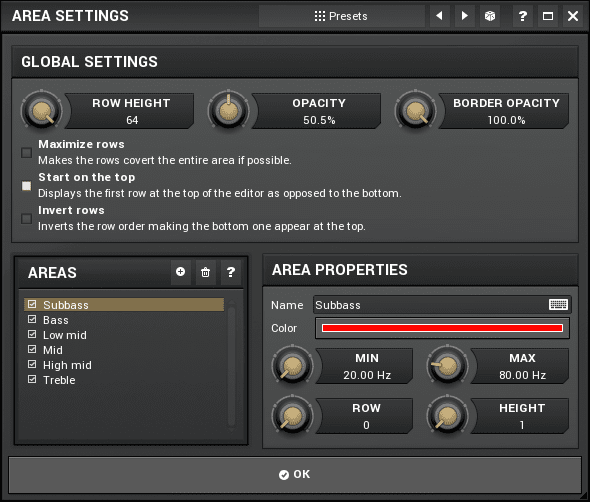
The ‘Areas’ in the analyzer can be easily created in the Area Settings window. There’s presets here… there’s always presets.
This is just a visual editor for creating those ‘area boxes’. Pull up the ‘Keyboard’ preset and have fun looking at that.
I had some ideas about making an algorithmically generated area setup, like “Keyboard”, but the exported presets are XML with a bunch of jumbled nonsense in them.
The online exchange has 25 extra presets for areas at the time of this writing. Some of them are rather impressive. It’s a cool feature (that I’ll never use).
Analyzer Settings
Oh, more presets. Surprise! Presets for multiple windows.
Melda products with analyzer have an amazing array of settings available for them.
I’m half tempted to go through and explain all of the settings, but this review has already taken me a good bit of time to write. Here’s some of the notable things that I found useful:
- Resolution - A ‘vertical zoom’ so you can see lower values in the graph.
- Decay and averaging settings - Often it’s desirable to see a slower spectrum decay and the ‘general’ spectrum of a sound. This is easy to setup.
- Super Resolution - FFT analyzers have an issue with low frequencies. To ‘capture’ them, you need really long FFT sizes. There’s tricks though! Super Resolution allows you to get higher resolution in low frequencies with smaller FFT windows. The downside is that the display becomes a bit choppy. It’s still worth using sometimes.
- Deharmonize - Awesome. This attempts to remove harmonics from the sound so that you can visually track the fundamental frequencies of sources. It works surprisingly well for sources that aren’t particularly complex.
- Peak detection - This shows FFT bins (“frequencies”) that exceed a specific threshold. If you’re trying to find resonances or doing cleanup work this is really useful. It lets you clean up the display to only show information that exceeds a threshold.
- Scientific settings - Not particularly unique, but nice to have. The addition of a 262144 fft size is rather funny. There’s a great selection of window settings as well, which the more inclined users will find useful.
- Sonogram tab - THANK YOU MELDA. Here is where you can change what colour corresponds to a specific level in the sonogram. I have very specific colour ideas about sound, both frequency and intensity. I get really bothered when products use colours that don’t make sense to me.
- Pre-filtering - Another feature I love. You can apply a selection of filters to the analysis. This is extremely useful when working with complex signals.
The 1/3 octave and 1 octave functions don’t use filter banks like some other products do. Filter banks increase time resolution at the expense of amplitude/phase inaccuracies. The ‘octave’ modes simply change the display of FFT information.
I’m going to separate out the graphs section specifically because it’s really cool.
There’s a number of overlaid graphs that you can show. Maximum/Average and Maximum Average, peaks optionally with infinite hold. There’s a ‘track peaks’ feature that overlays a box showing the frequency and note of the main peaks in the spectrum. This can be applied to any of the graph modes.
The comparison graph allows you to copy the current values from any of the other graph modes. So you can capture a graph and then overlay the static image. Excellent for matching sections of audio.
All of the graphs have colour settings, opacity and have their own sonogram/fill options.
Any Melda plugin with an analyzer comes with an analyzer that’s more powerful than many separately purchasable products. If you utilize visual information when doing audio work then this is something that you should explore.
My #1 complaint though is that there’s no compensated analyzer setting. FFT analyzers require time before they can present data. You have to wait at least then number of samples that the FFT size is. So if you have a 4096 fft size (default), then all analyzer data is ~92ms late (depending on the averaging settings). Basically everything you see is going to be ~92ms later than what you hear, which creates a cognitive disconnect that is bothersome once you realize it’s happening.
Some products have compensated analyzers. They publish the analyzer latency to the DAW and delay the audio signal so that the analyzer and audio line up very closely. It’s a very useful feature when you are trying to do detailed work that requires an analyzer.
I can understand why Melda may not implement this, as some DAWs require a stop/start to change plugin-delay compensation. Having this type of switch could cause some people confusion when their track goes out of sync. I personally feel that this is a fault of the DAW and that the feature should be included regardless, if possible.
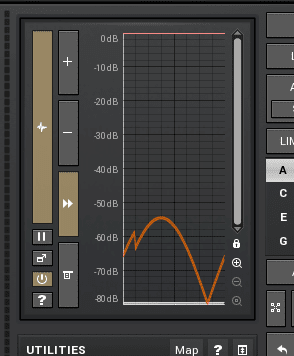
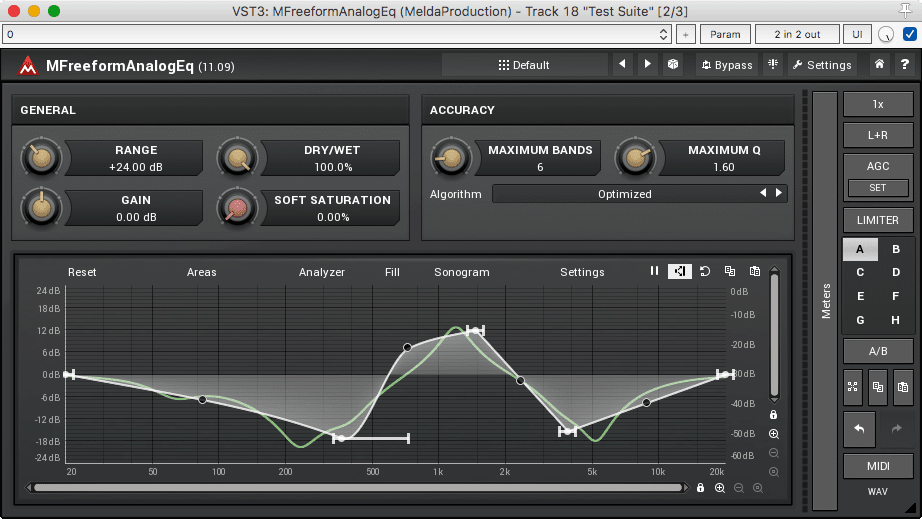
Points
The default mode of the MFreeform series is “draw mode” where you click and drag to draw a point.
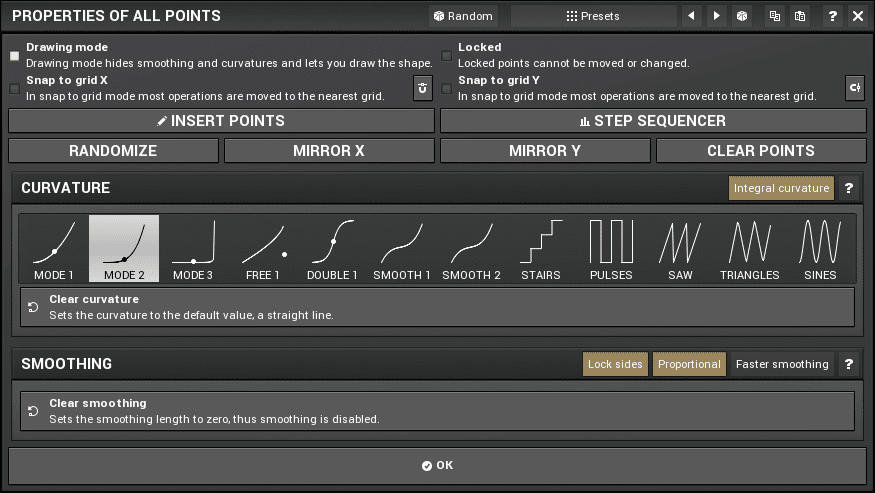
However, there’s nodes behind that beautiful drawing and you can change how they work. A right click on the graph brings up the Points Properties page. I’m going to cover the features here that I find quite notable:
- Mirror Y - You can flip your curve upside down easily. This allows an intuitive workflow where you work to accentuate the worst parts of a sound, then you use “Mirror Y” to instantly attenuate those sections. It’s a great workflow to use!
- Curvature - The way that nodes are connected is variable. Between each node is a little black dot that allows you to change the curvature, and these modes adjust the how exaggerated the curve is when joining two points.
- Smoothing - Each white node has handles that let you change the “width” of that point. The sides of the node can be proportional (relative to the next point, it seems), or matched on both sides.
There’s a number of other features available here, but they’re not particularly useful for an EQ context.
Here’s what it looks like outside of draw mode:
Melda & Vojtech & Haters.
Ok. Here we go. Melda has some serious haters. I can’t just ignore that. Probably 3/4 of forum discussions about Melda products devolve in to this.
There’s 2 main things I see that are claimed:
- Melda copies innovative ideas from other companies
- Melda makes claims of superiority that are unfounded.
Firstly “Melda copies innovative ideas from other companies”. This is superficially true as far as I can tell. There’s a number of “unique” products that have been released by other companies, only to be followed up within a month or two by Melda with a very similar products.
However, I find it supremely hypocritical to fault Melda for this. We live in a market of Pro-Q clones, dozens of 1176 emulations and a plethora of other similar products that replicate other products. When Slate Digital released his Distressor Emulation, people piled praise on it. When Melda released MDrumLeveler there was an outcry because Sound Radix released their Drum Leveler a month earlier.
I find this level of hypocrisy in the community to be somewhat ridiculous. Probably 90% of the plugins released these days are rehashes of hardware or shallow copies of old products. Melda has every right to do this in a modern context as long as they don’t infringe upon any intellectual property laws. Why is it OK for a company to replicate yet another API eq that’s still in production, but somehow wrong for Melda to improve upon a unique digital concept? Everyone is copying everyone these days, but Melda most certain puts their own spin on it with a great deal of extra functionality as we’ve seen.
I’ve heard it claimed that this type of copying stifles innovation, and I agree that this is likely. But Melda most certainly has the most innovative and complete “system” I’ve seen applied on top of otherwise normal plugins. Isn’t that what innovation is? Trying to copy hardware 1:1 and selling it at a fraction of the cost isn’t innovation, taking set of needs and improving on the current solutions is innovative.
Secondly, Melda most certainly does make claims of superiority. This has happened in forum posts and they even have a current advertisement for MTurboReverb claiming that it’s the most powerful reverb ever (or similar, I can’t recall the exact wording).
Is there something wrong with that though? Nearly every plugin developer releases a product because they think they did the best job and that they are bringing something superlative to the market. Some say it, some don’t.
I think that the issue is that Melda doesn’t sugarcoat their claims with phrases like “We think that…” or “We feel that…” or the ubiquitous “(Grammy winning engineer) says it’s the best X he’s ever used!”. They just make their claim. Boom. There it is. They strongly feel they make the best products on the market in some cases.
Are they full of hot air? Maybe. Does it matter? Just try the demo and see. I’ve never held it against someone for having pride in their work. I don’t believe that verbalizing that pride is a sin or a crime.
I’m pretty sure we all recognize how much false modesty is out in the audio industry. I find that far more disingenuous that being verbally proud of your work.
Then again, it’d be great if no claims were made at all, but I don’t think we’ll ever enter that era. Marketing sells and sales put dinner on the table.
Anyway. Your plugins don’t talk. Who cares what the authors claim or say. I use what solves my problems most effectively. I don’t buy products that don’t. The authors can mouth off all they want as long as I get what I paid for, and I tend to find that the most outspoken folks produce some of the best products.
Conclusion
Not all of these features are available in every Melda product, and there are some other features present in other products not displayed here. I’ve only shown what’s part of the products I’m reviewing.
It suffices to say that even if you totally ignore the core functionality of the product, you get your money’s worth. A great analyzer. Great preset management. A lot of customization. Attention to detail everywhere.
I do think that it’d be great if the GUIs were prettier, but this appears to be a sacrifice that’s made for the fully resizable GUI along with the addition of this extended feature set.
If you’re an audio nerd, these plugins are really fun. They give you the tools necessary to do almost exactly what you want, and for beginner/intermediate users they give you a pathway to understanding more advanced functionality that’s often available in other products.
In part 2 I will be covering the actual core functionality of these products. Coming soon!
Support Me!
This post took 14 hours to research, screenshot, write and edit. If you appreciate the information presented then please consider joining patreon or donating!
