Back in part 4 I discussed a few arrangement and composition features in Waveform 9. I made a promise that part 5 would have even more arrangement and composition tools discussed.
And I'm sorry but...
That's what I'm doing today.
"On with it!", he said with a tear sliding down his cheek.
- Good
- Step clips
- Loop handling
- Clip linking
- MIDI Loop Recording and Comping
- Audio Loop Recording and Comping
- Track Presets
- Bad
- Surprise!
- Weird
- Surprise Again!
Other parts in this series:
VERSION - This review is (hopefully) accurate as of Waveform 9.1.1. Further versions may obsolete these views.
Contents
Good
Step Clips
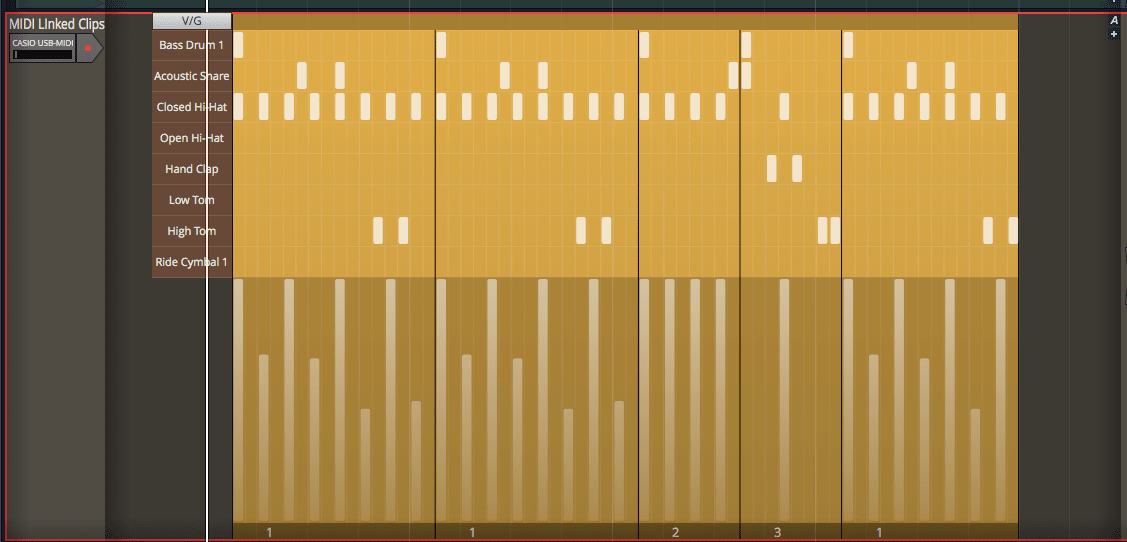
A step clip is a special type of clip that exposes a step sequencer.
Rather than seeing a piano roll, you see a grid with the rows being mapped to 'instruments' instead of notes explicitly. This makes it excellent for writing drum patterns, among other things. The default step clip is setup with drums in mind, which is a nice shortcut.
Each step clip can have a number of patterns, that can be arranged however you want using the footer section.
Each 'note' or 'instrument', as you may call it, is called a 'channel'. A channel corresponds to a specific MIDI note output on a specific channel. There's a handy drawn piano on the bottom with an arrow you can drag around to find the right note. There's a 'Note on Every:' button that lets you easily put a note in the whole clip every X notes. The notes for that channel can also be shifted by the step size, which is a fun feature. Channels can have their steps be randomiz(s)ed, which is a great way to find an interesting groove.
Even though step clips are presented in an evenly-spaced grid, you can apply a 'groove' to each channel or each pattern. This offsets certain parts of the grid behind the scenes to give your pattern or channel a nice groovy swing in the selected place.
The length and velocity of each channel can be messed with using the intuitive 'Velocity/Gate' editor. When you mouseover the clip you can hit the V/G button to get that open. Familiar velocity sliders are then shown, but they can also be resized horizontally to change the length of the note. Excellent.
Step clips can be looped and linked the same as anything else.
Step clips do miss some of the cool things that you can do with normal MIDI clips, but fear not! You can dump a step clip out to a MIDI clip and back to a step clip. Nice... almost
Step clips are super awesome fun. It's not a "proper drum editor", but it's pretty close, and with its own benefits as well. Hooray for Step Clips!
Did I mention they're not just for drums? They're great for setting up a diatonic (notes in the key) set of steps then writing melodies with them, or writing synth parts. It's just a convenient way to work with music sometimes.
Criticisms
These criticisms are for Waveform 9.0.38b.
The Tracktion team may have changed these since I wrote this. During the course of this review I will try to maintain this, but after the review is over it's unlikely I will keep this up to date. Please try the demo yourself first before becoming upset by these things!
- As far as I can tell, the process of arranging patterns is a click fest, since there doesn't appear to be a way to click/drag patterns around.
- Setting channel 'Note on Every' parameter affects all patterns. I think this is poor behaviour since it's fairly rare that you always want an instrument with the exact same rhythm for every parameter.
- Shift applies to every pattern. Ewwwww. Definitely not wanted. IMO this makes the shift feature nearly useless unless you have 1 pattern per step clip, which to be fair, is a reasonable workaround.
- Randomise applies to all channels too. Still not wanted.
- It would be nice if the start time of the step could be adjusted using the left side of the velocity/gate bar.
- 'Render to MIDI Clip' renders the entire clip, but import is only a pattern action. So if you want to make some changes to a pattern in the MIDI editor, there's no good way to get it back in unless you are only using one pattern.
- Import from MIDI Clip resets your note starts and note ends (gates). Unfortunate. This almost totally ruins the use of this feature.
Loop Handling
I'm not a 'loop based producer', though I harbor no ill-will those towards that are. I certainly utilize the concept of looping frequently, and aid the musicians I record in looping things. It's just a part of how music works.
Some folks like to work with canned loops (once again, I think this is a cool and 'artistically valid' way of working) and Waveform makes this rather nice.
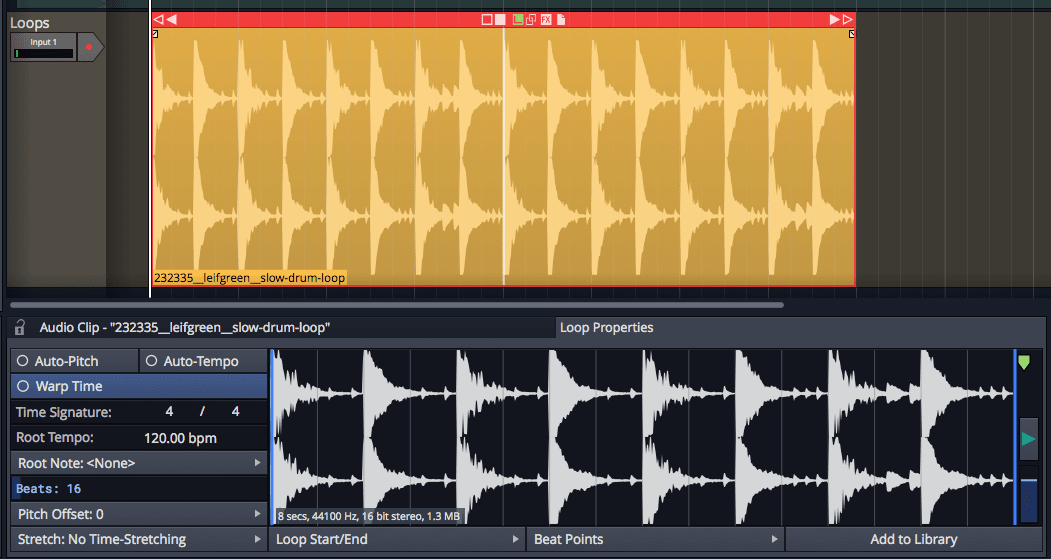
With any MIDI or Audio clip you can turn on looping and then you are given a suite of tools to work with your loop. It can be manually or automatically warped to tempo like you'd expect. The start/stop points can be set. You can offset the pitch. You can automatically have the pitch set.
Waveform tries to figure out the tempo based on metadata and if it can't you can set the base tempo manually. From there the auto-tempo option will keep your loop in time with you track, even if you have tempo mapping active. The 'beats' setting also factors in to adjusting the tempo. The time stretching is done with zplane elastique with a number of extra options available via the gear. Elastique is, IMO, the best general purpose time stretching out there and it's great to have it available in Waveform. If you want to use Melodyne instead, then that is also an option.
The auto pitch function lets you set the root pitch of your loop, then any key changes in your tempo track can automatically adjust the pitch of the loop. Super nice. Unfortunate that it doesn't work with chord tracks or integrate with Melodyne, but it's still useful.
Individual beats in loops can be moved via the warping functionality. I'm not going to cover this entirely right now, but this feature lets you adjust single bits of audio via timestretch, while leaving everything else alone. The markers for the beat warping can be set automatically via the 'Beat Points' menu.
The only downside to the loop handling is that it's not as smart when figuring the tempo as I wish. It doesn't seem to attempt to parse the file name or figure it out from the length of the clip.
As I said earlier, I'm not one to use loops when working, so my opinion on this topic may be under-educated. I still think that Waveform handles this rather nicely and simply.
Clip Linking
This is a feature that some DAWs have, and some don't. The ones that don't are a shameful shame.
At the top of every Audio and MIDI clip in Waveform, there's a single chain link. You can drag this to create a new clip. The new clip is now linked to the place you took it from. Every edit you make to the original clip is mirrored in the linked clip and vice versa. The link even stays despite cut/copy/paste operations.
You can right click the 'link' icon in the clip to select all clips, delink a single clip, or dissolve the entire group of clips.
There's not much about it that's fancy, but it's a fantastic tool. The beauty here is that it's so accessible. Many other DAWs have this functionality hidden behind a second window with 2 layers of menus or require you to copy/paste, select, link, manage links etc... Waveform just makes it a click and drag.
It's just a well-thought out implementation of a should-be-common feature.
Midi Loop Recording and Comping
MIDI Loop recording comes in a variety of forms.
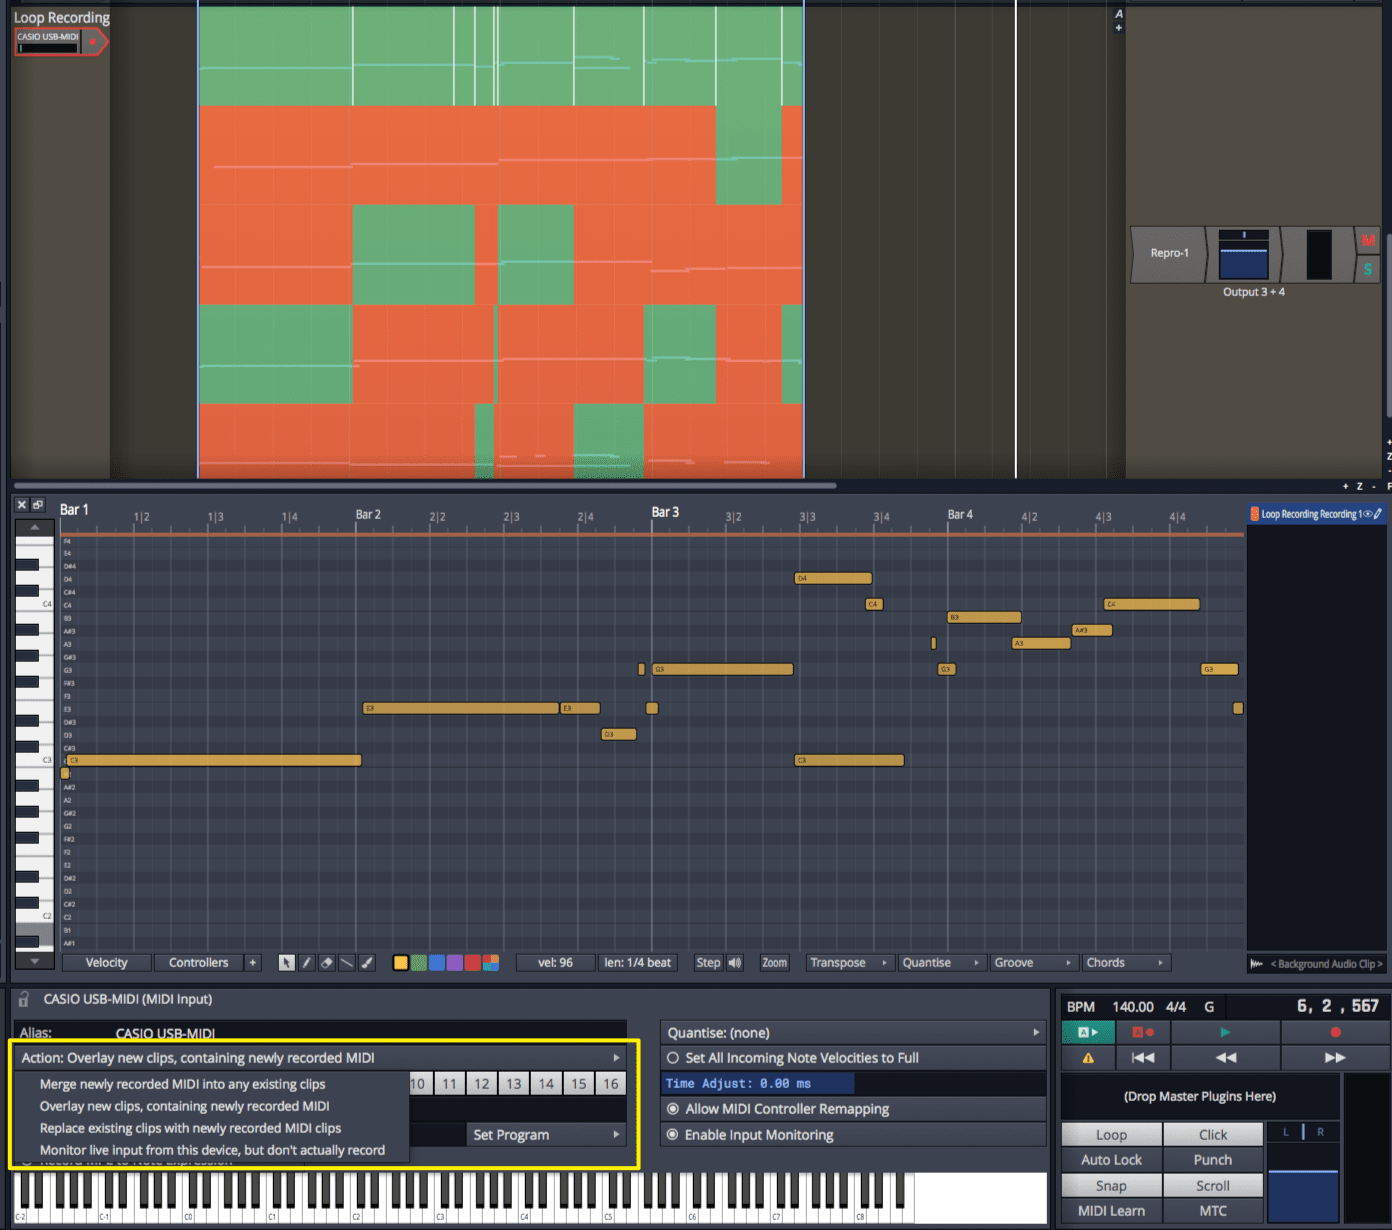
Merge newly recorded MIDI into any existing clips- This lets you add MIDI to the existing clip. So in loop mode you can do things like lay down a kick drum on the first pass, then hi-hats, then snare etc... You can build up the track with each successive loop. Not a unique feature, but it's nice that it's there.Overlay new clips, containing newly recording MIDI- This allows MIDI Comping, which is what the rest of this section is about.Replace existing clips with newly recorded MIDI clips- Each pass creates a new clip, and the old one is removed.
The interesting option here is Overlay new clips, containing newly recording MIDI. When you are in loop mode, then record, each pass is recorded to a new clip. Each of these clips is stored in a 'take'.
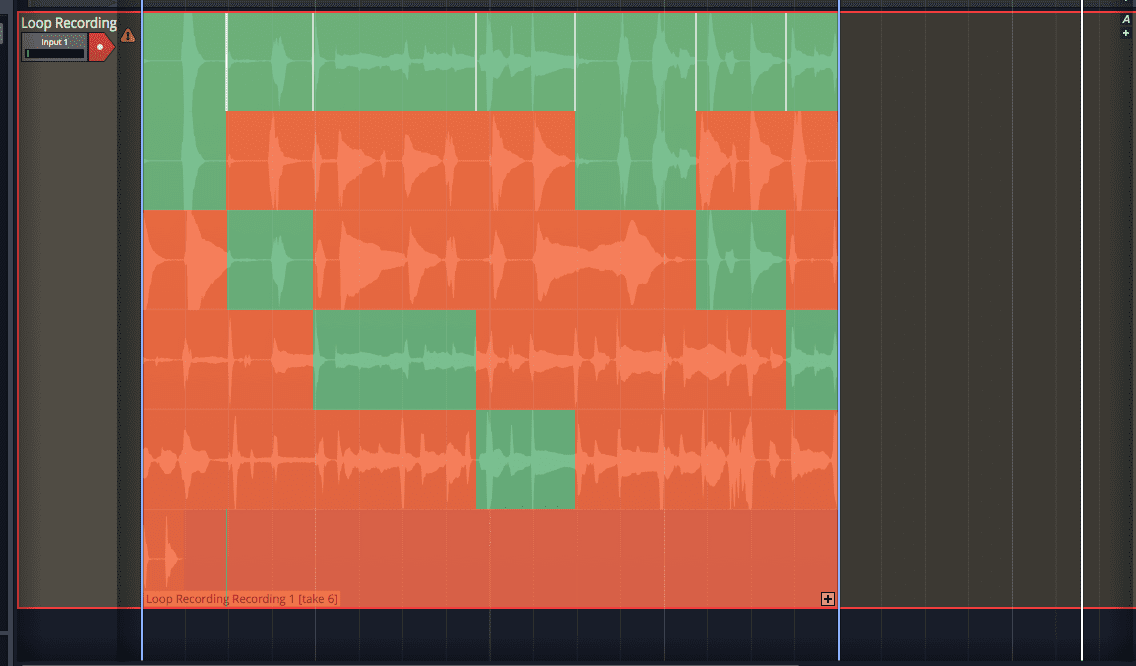
When you're done recording you can press the + button in the lower right to show all of your takes. From there you can click-drag to select sections of each take that will be used on playback as your main 'comp' (or composite).
Takes can be sent out to their own tracks, then packed back together in to a 'comp'. If you need to do some heavy editing of a clip before comping, then this is the way to do it.
Layering then comping isn't a rare feature, or a special feature when it comes to Audio. MIDI comping is unusual though, and it's fantastic that it exists. You can sit there with loop on and hammer out some ideas. When you're done you can select the best ideas with a quick click-drag motion and move on with your life.
Audio Loop Recording and Comping
Read the previous section. Those things you can do with MIDI comping, you can do with Audio comping.
Basically everything is the same.
This isn't particularly special, probably 75% of DAWs have a similar feature now. The nice part is how simple it is, and how easy it is to pack clips together to create a comp if you didn't loop-record it to begin with.
I am slightly let down that you have no access to the takes as clips themselves. You are forced to 'Unpack to new tracks' if you want to do any clip editing or warping or any sort of audio editing. Some other DAW implementations allow you to edit the takes as if they are their own entity, but this comes with added complexity and possibility for errors.
Waveform's audio comping is simple and mostly effective.
Track Presets
Waveform allows you to take a track and create a preset of it. You can have just the Inputs saved, Outputs saved, the Outputs and plugins or the entire track... clips and all. Not too fancy.
The fanciness comes in when you select multiple tracks. You can create a preset of a selection of tracks and have those saved as a preset. A stereo render is created so that you can preview this multi-track preset in your browser. All of your automation, plugins, modifiers, macros, racks and whatnot.
Maybe you have a loop with guitar, drums and bass that you made. You can save that as a preset and drag it in to your project with everything intact so you get the full 'loop experience' but you still have access to the makings of that loop.
I particularly like this because I often record drum tracks with 12-18 mics, then want to use those to lay out a base for a track.
Let's not forget that track presets let you have I/O setups or instrument/effect setups to grab on the fly.
You can also use this multi-track functionality for multi-track instrument setups (like with a sampler or drum instruments). Set up your routing, instrument and effects once, then never again.
My only gripe is that the reverse setup isn't available that I can find. There doesn't seem to be a way to grab tracks from a project. You have to use track presets, which requires opening the project and saving a preset, then going back to your other project. It'd be nice to have track import.
Bad
NOTHING TODAY
Weird
NOTHING TODAY
Support Me!
This post took 7 hours to research, photograph, write and edit. If you appreciate the information presented then please consider joining patreon or donating!
Other parts in this series
- Version 9, Part 0: Intro
- Version 9.1.1, Part 1: Browser, Mixing, GUI, VCAs
- Version 9.1.1, Part 2: Modulation, Plugin browsing, Annoyances, GUI
- Version 9.1.1, Part 3: Macros, UI design, Ghost tracks, Buying
- Version 9.1.1, Part 4: Pattern Generator, Edit Clips, Folder editing, Chord Track
- Version 9.1.1, Part 6: MIDI Editing
- Version 9.1.1, Part 7: Recording
- Version 9.1.1, Part 8: Clip Layer FX, Multisampler, Scripting, Project Management and more
- Version 9.1.1, Part 9: Instruments and Effect Review
- Version 9.1.1, Part 10: Conclusion
- Version 10.1.0
If you appreciate the information presented then please consider joining Patreon or donating money/time.
