
Even MORE DAW testing. This time we reach the darkest, ugliest corner of Automation across DAWs: plugin automation.
This is a very difficult thing to test fairly, so instead I’ll be walking you through how things can work, how you can test them, and how to express your anger in a healthy manner.
Next in the series won’t be automation. :) (Even though there will be more automation to explore…)
Other posts in this series:
- Part 1: Automation and Fades
- Part 2: Automation
- Part 3: Fader Automation Speed
- Part 4: More volume automation
- Part 5: Plugin Automation
- Part 6: Pan Laws and Pan Curves
Contents
- README
- Video
- Processing Types
- Testing
- Complications
- Sample results - VST3/AU MUtility
- Sample Results - Native
- Another Problem - Offset
- Conclusion
- Support Me!
README
I want to be extra clear that I’m not trying to show that or if one DAW is better than another here. I’m showing you how you can learn how your DAW behaves, and that you need to know this because different products work differently (e.g. output different sound for all other things equal!)
When looking at the graphs, don’t concern yourself with the specifics, but instead with the differences between each product.
Some parameters need to be smoothed, the question here is that if we use the same product(s) in various DAWs with the same input, do we get the same output?
Some plugins will interact with different hosts in a different manner. Some plugins won’t support platform features. Some plugins just suck. The only way to know is to listen and test! THIS MEANS THAT THIS ARTICLE IS BY NO MEANS AN AUTHORITY ON QUALITY. I am here to show you nothing more than the existence of differences and encouraging you to investigate your own environment.
Though… I do get excited when one product offers more sensible results then another. Make your own decisions based on your own testing!
Video
4k video, as usual. Experimenting with locations, mics, etc… Having fun, because making videos generally isn’t fun.
Processing Types
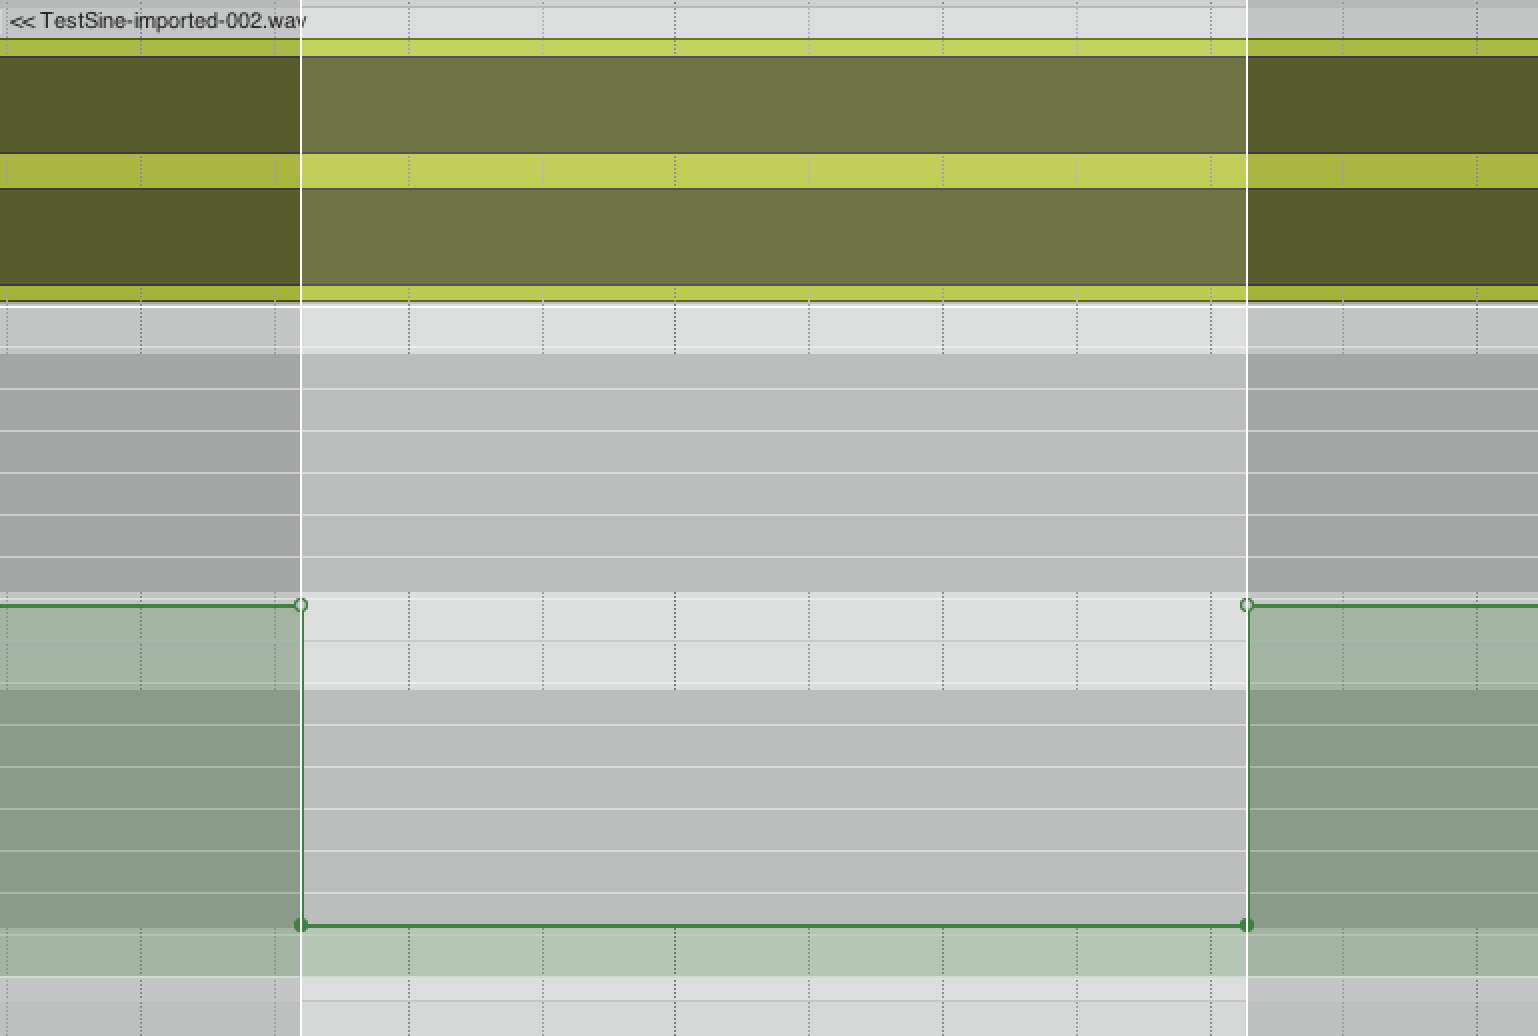
Blocks
Almost all DAWs send a block of audio to plugins. It may be a fixed size, it may be the ‘buffer size’ (as you set in device preferences), but it’s there. (note: that last sentence is important!)
So the DAW sends a block to the plugin and it waits.
The plugin now needs to process that block and send it back to the DAW. Cool. Easy.
Well, except that the plugin needs to ask the DAW if there were any parameter changes. So it does that. It gets one answer. For the entire block, it works off a single value for each parameter. Block size of 1024 samples? 1 parameter change parameter.
You can’t always ask for “Parameter change for sample #2 please”, because the DAW just threw a block of samples at the plugin and took a nap.
As you can see in the graphic above that leads to a ‘steppy’ result, and that will sound awful if applied directly to the parameter. The plugin will need to smooth this. Each plugin will need to smooth its own parameters in its own way. Varied between plugins and maybe even varied between parameters.
Blocks Part 2
The next problem with blocks is the topic of offset. The place that you start playback may vary, and the render selections may vary.
Some DAWs will smartly attempt to send a partial block, so that the next block starts at a deterministic position. Some DAWs will happily start sending full sized blocks no matter where you start.
The problem is that if you have some sort of automation that’s important at sample 256, but you start at sample 257, will you get the same value as if you started playback at sample 255? It’s not guaranteed to happen the same across DAWs and plugin platforms!
Crazy.
Blocks with Parameter History
The next idea is that the DAW can keep track of parameter values, and allow the plugin to ask for a parameter value at a certain time (usually relative to the block? Correct me if I’m wrong here).
That means that plugins which are used to ‘Get block, check parameter once, do stuff’ can work fine. Plugins that need/want more accuracy can continually check for parameter changes as they process the samples in the block by pulling changes off a queue or stack or whatever.
This also results in automation that doesn’t have the offset problem.
This is available in the VST3 SDK, but not many people seem to use it.
Auto-History
An extension of this type is when you can make a function call for a parameter value per-channel->per-sample processed, and the value returned is automatically pulled off a stack of parameter values.
I thought that Reaper’s JSFX worked this way in the @Sample block, but apparently not?.
Sample by Sample
I know of a handful of products that do this, and at least two DAWs that seem to do single sample (or very small block) processing with their native products.
This doesn’t necessarily mean that the plugin is being sent a single sample block, or is making single sample parameter change calls. It could be reading from a stream as needed.
Why doesn’t everything work this way? It’s difficult to coordinate, and it’s inefficient.
-
Coordination - Computers can be used cleverly. Delegation is the name of the game from 2019 and beyond. If you can give a bunch of processes some work to do, and wisely spend your time scheduling and managing them, then you can get A LOT of work done quick. If you have processes hammering at multiple processors with small bits of data then things won’t go so well. Likewise if you try to get a bunch of work done before sending off the next request for work to be done.
-
Efficiency - By turning the ‘work’ into chunks (blocks), fewer function calls are made, memory is utilized more sequentially, cache hits more than it misses and the DAW can spend more time scheduling and less time managing data. “Here’s big chunk of data, now go away. I have big boy work to do”.
That’s not to mention that it might be a lot of housekeeping for the plugin to coordinate calculation of certain necessary meta-parameters and deciding how to properly smooth the necessary parameters.
However, if you’re a results oriented person, then this is the optimal solution. If you’re a practical person or a developer, then it’s not even remotely reasonable for everything to work on a per-sample basis.
Testing
Testing this is rather easy. Take some audio that is periodic or very simple (sine wave, DC, filtered noise). Apply your plugin. Automate the plugin with some selection of automation.
Quicker changes in automation values will result in more obvious transformations.
The test I use is a project set to 100bpm, add a sine wave, automate a 0-> -inf automation at beat 2, then -inf->0 at beat 3.
Utilizing periodic automation or ‘modulation’ will also yield interesting results.
Some products may internally create a ‘max block’, so that anything over that block size is partitioned and processed with that fixed block size. Some products may force smaller block sizes and poll more often. Some products might… do all sorts of hacks!
Complications
Some things require more work than others. If you want to change the response of a filter, then it’s highly likely that coefficients needs to be recalculated. That can be CPU intensive, and you can cheat a bit if you know the to->from.
Then there’s things like block-eating plugins, aka “Latency causers”. They need to have a certain number of samples in before they can output samples. That causes a delay. That complicates everything quite a bit. Totally another article though.
Then there’s hosts that support 3-4 plugin formats. They all get implemented differently to varying degree of specification. I will ONLY be testing VST3 (AU in Logic, AAX in PT) and native plugins.
This is complex
I KNOW THIS TESTING PROCEDURE IS NOT OPTIMAL. I even created my own test plugin, and then I started noticing all the possible hacks to make certain things work, or acceptable tradeoffs that’d ‘break’ other things. It wouldn’t be terribly difficult to create a product that performs “perfect” in nearly every host if I cared. That’s not a particularly good representation of the real-world though.
I tested about a dozen plugins from major manufacturers. I rendered thousands (THOUSANDS) of test files to try and pick something. I settled on MUtility, not because it adhered to specification the best, but because it was the most controllable.
TRY THIS WITH YOUR OWN PRODUCTS! I can’t stress that enough. Firstly, you should never trust when you can verify. Secondly, you probably have different settings and plugins that I do. Give it a shot. 30 minutes of testing can leave you with valuable information about how your software works.
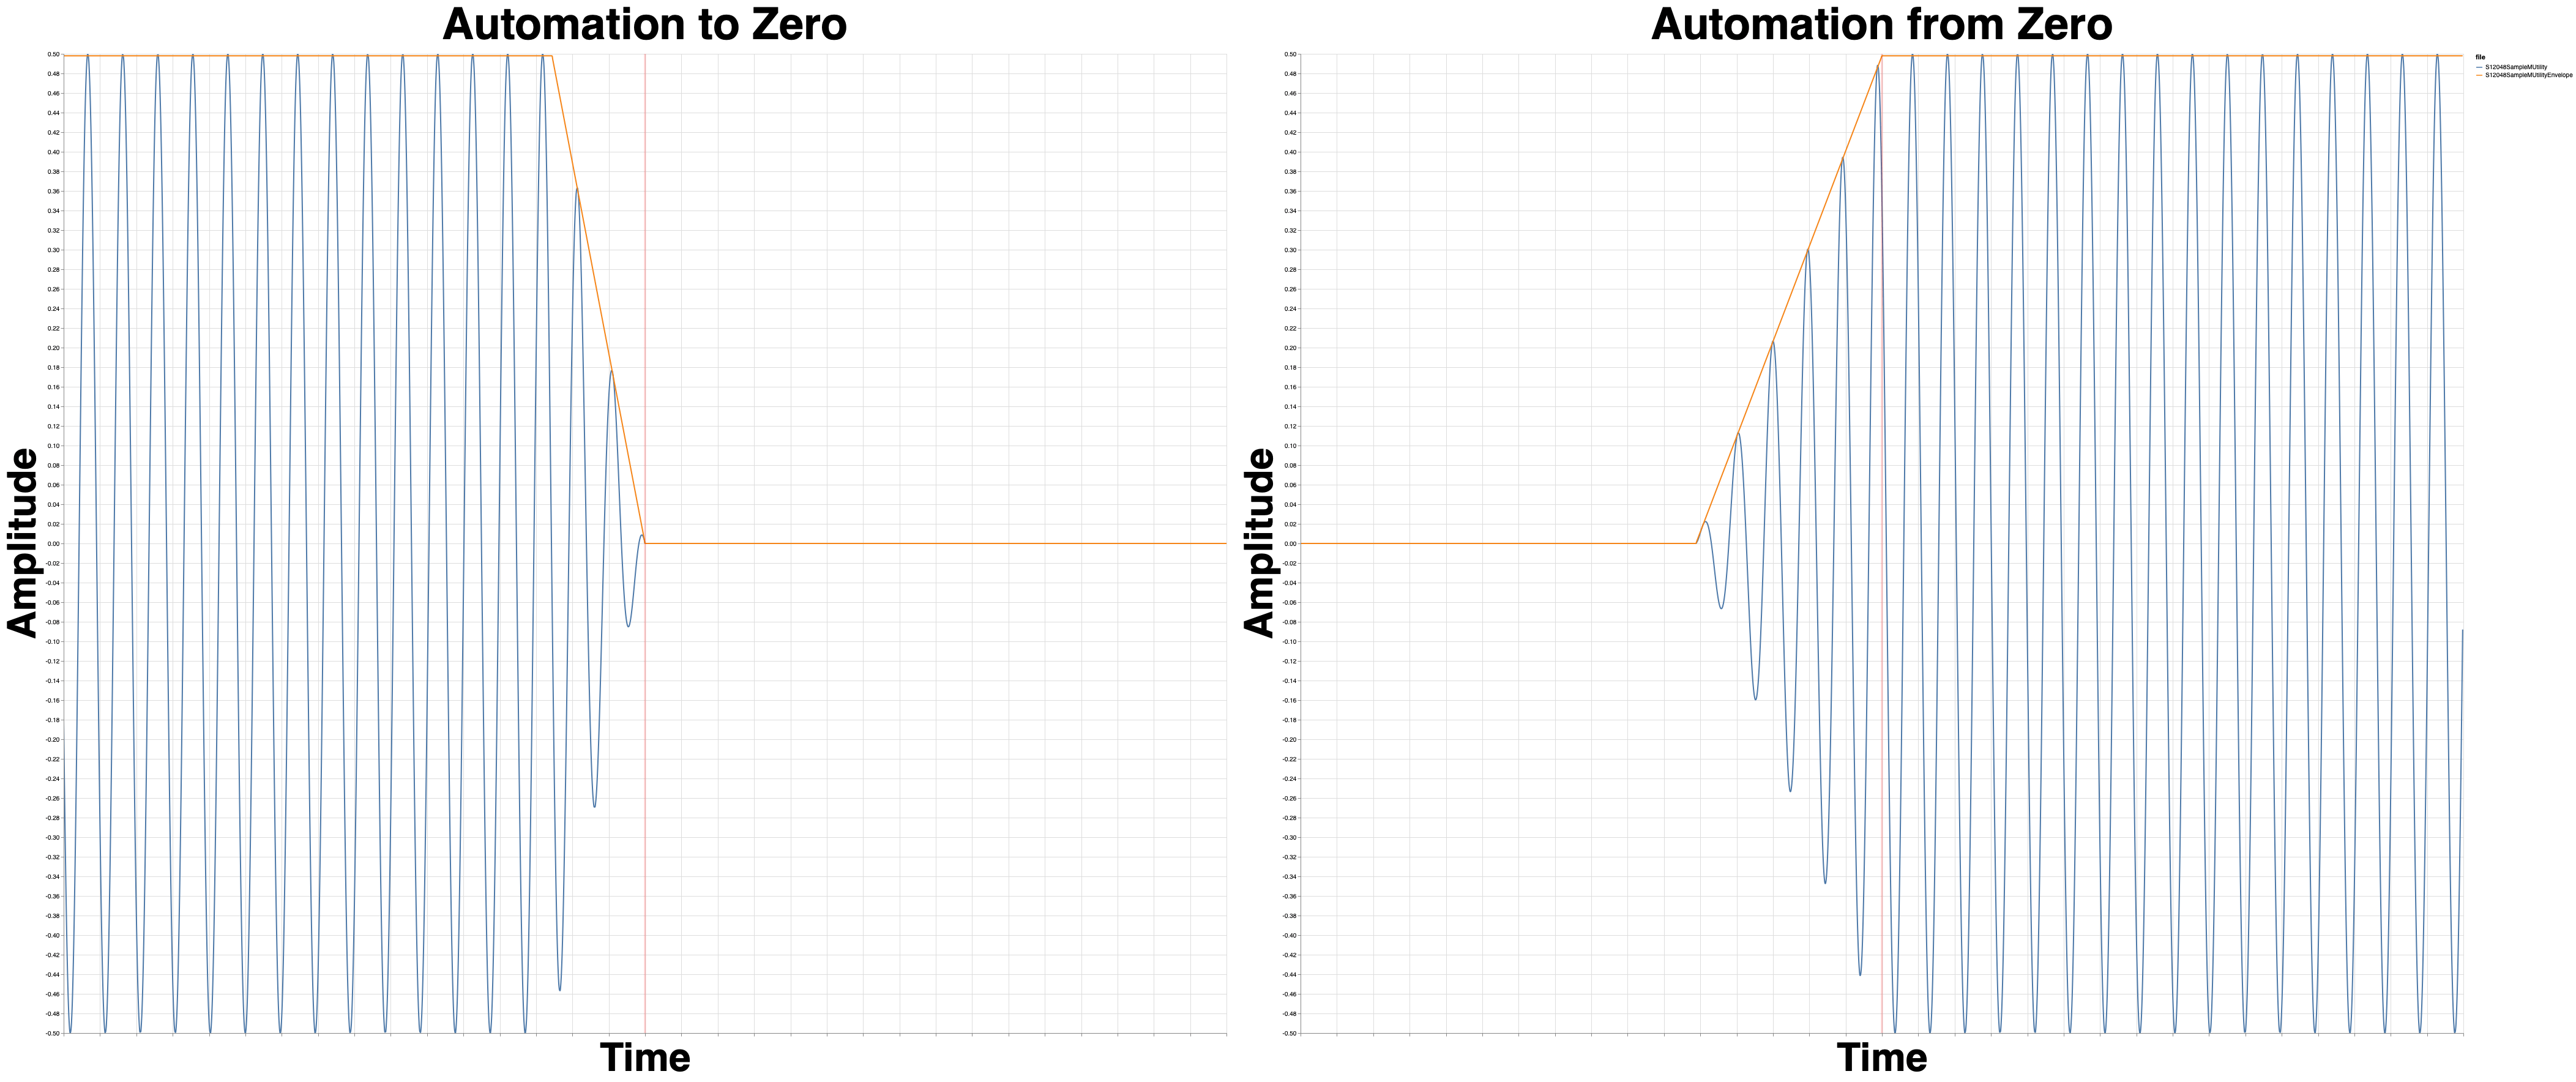
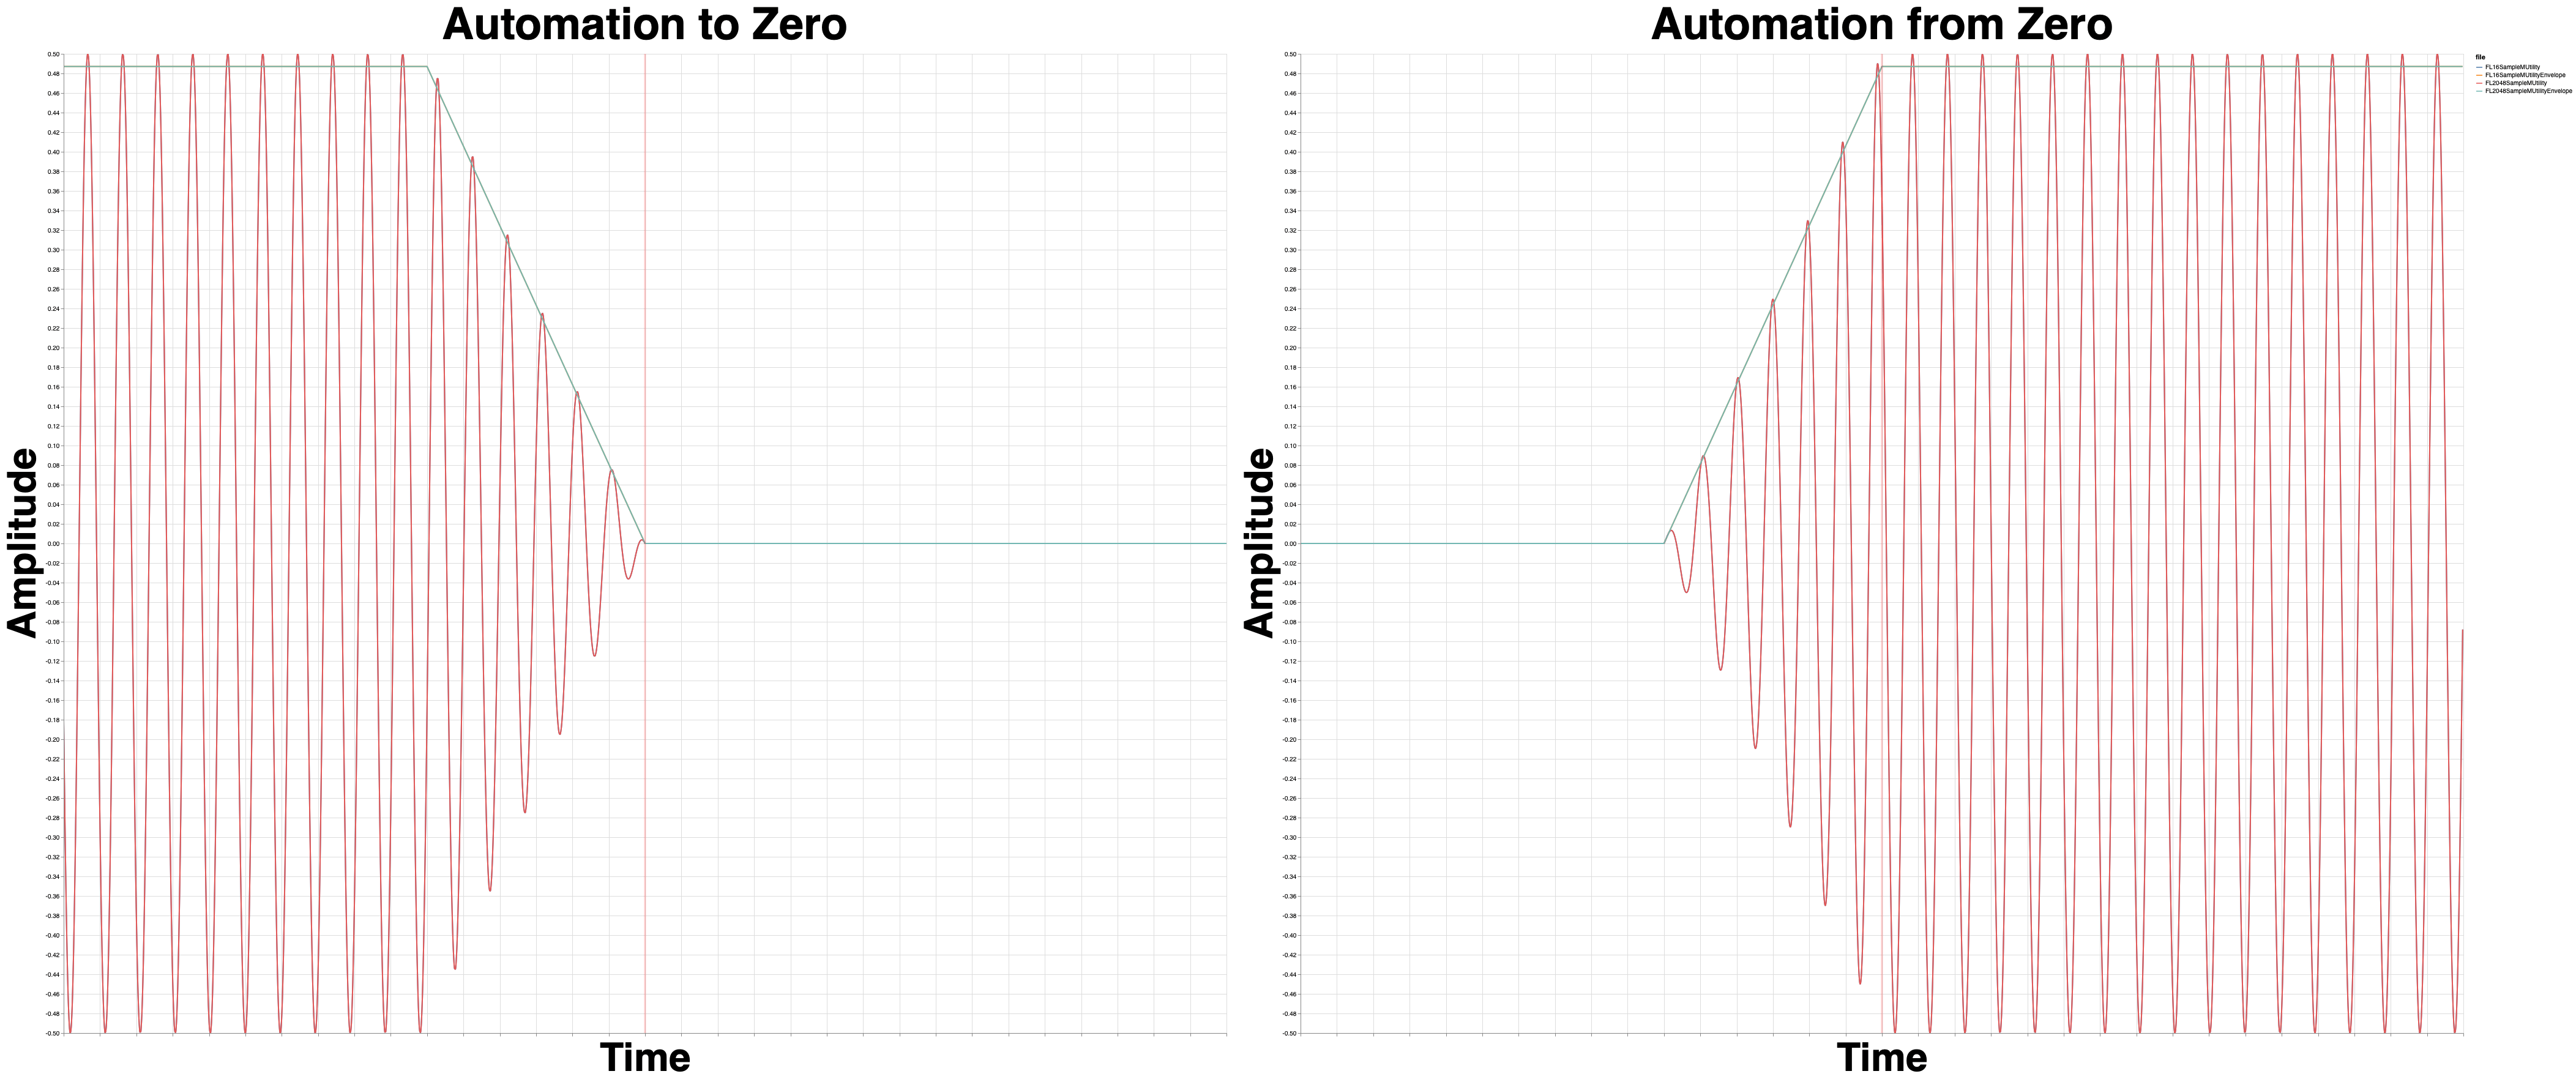
Sample results - VST3/AU MUtility
I’m using MUtility because I know it supports sample accurate automation and it lets you control the interpolation to some level (all Melda plugins do!)
IMPORTANT - Do not judge the graphs alone. There could be some implementation detail that we’re missing based on how the plugin works.
What is important is if/that each DAW performs identically with the same plugin and the same data input.
Reaper 5.979
Studio One 4.5.1
Pro Tools???? 2019.05
4 different renders with the exact same settings. 4 different results. This is rendering using “Online” or “Realtime” bounce. I thought maybe this was an issue with buffer underruns (buffers not being rendered “in time”?)
So I tested it.
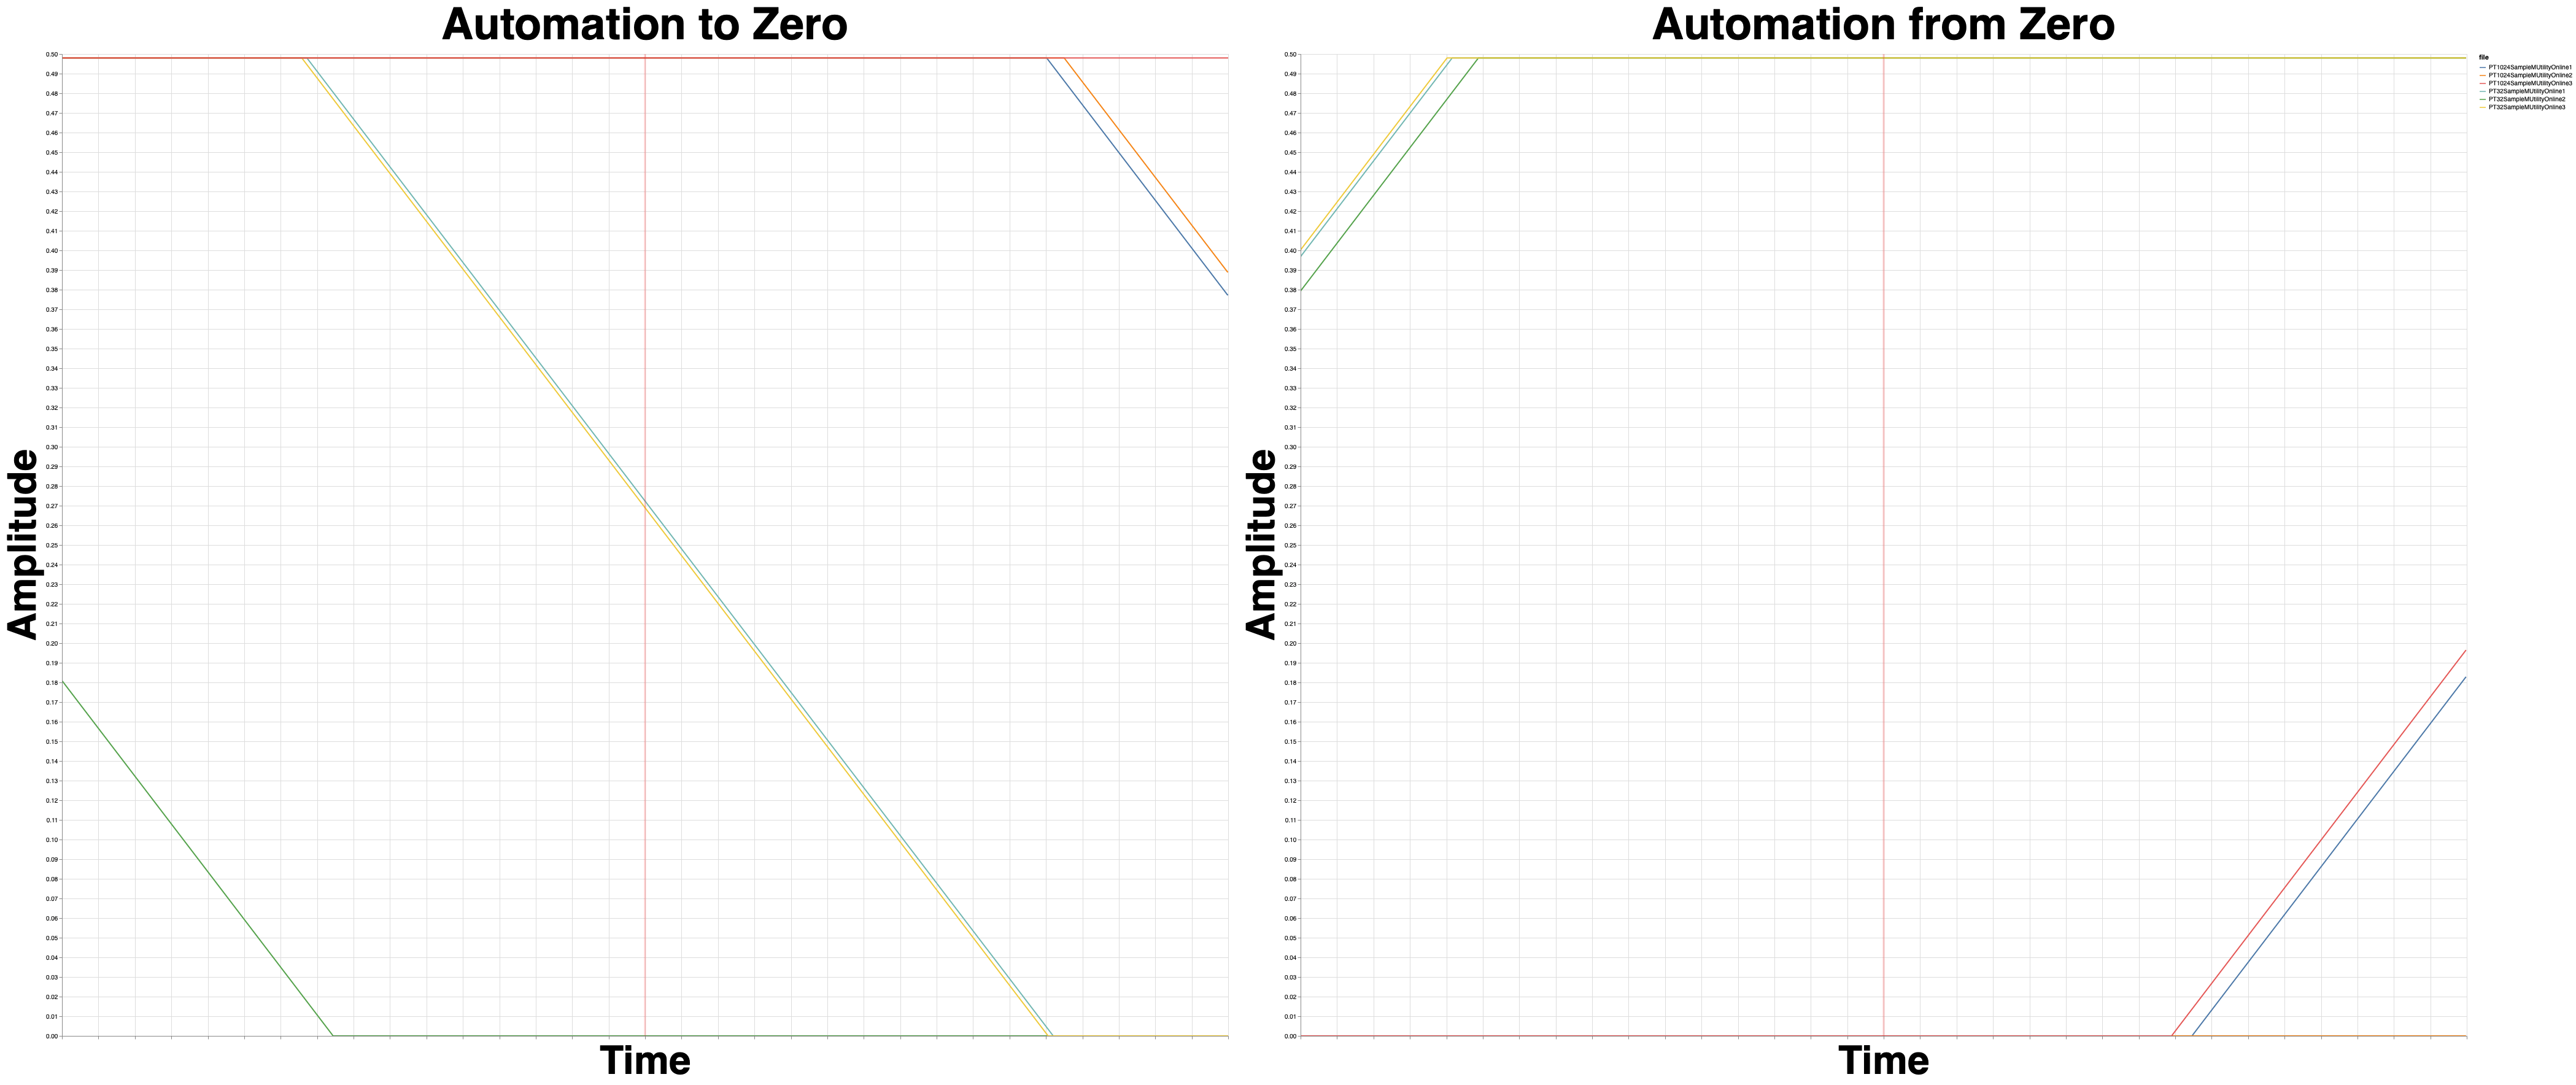
This time I’m showing you the envelopes, not the render for some more clarity.
What you’re seeing here is the EXACT SAME project rendered 3 times at 32 sample buffer and at 1024 sample buffer in realtime (“Online rendering”).
The result is different 5/6 times! We’re not talking some minor difference either. I tried 10 more times and I saw variance up to 100ms!
Offline bounce renders the same every time.
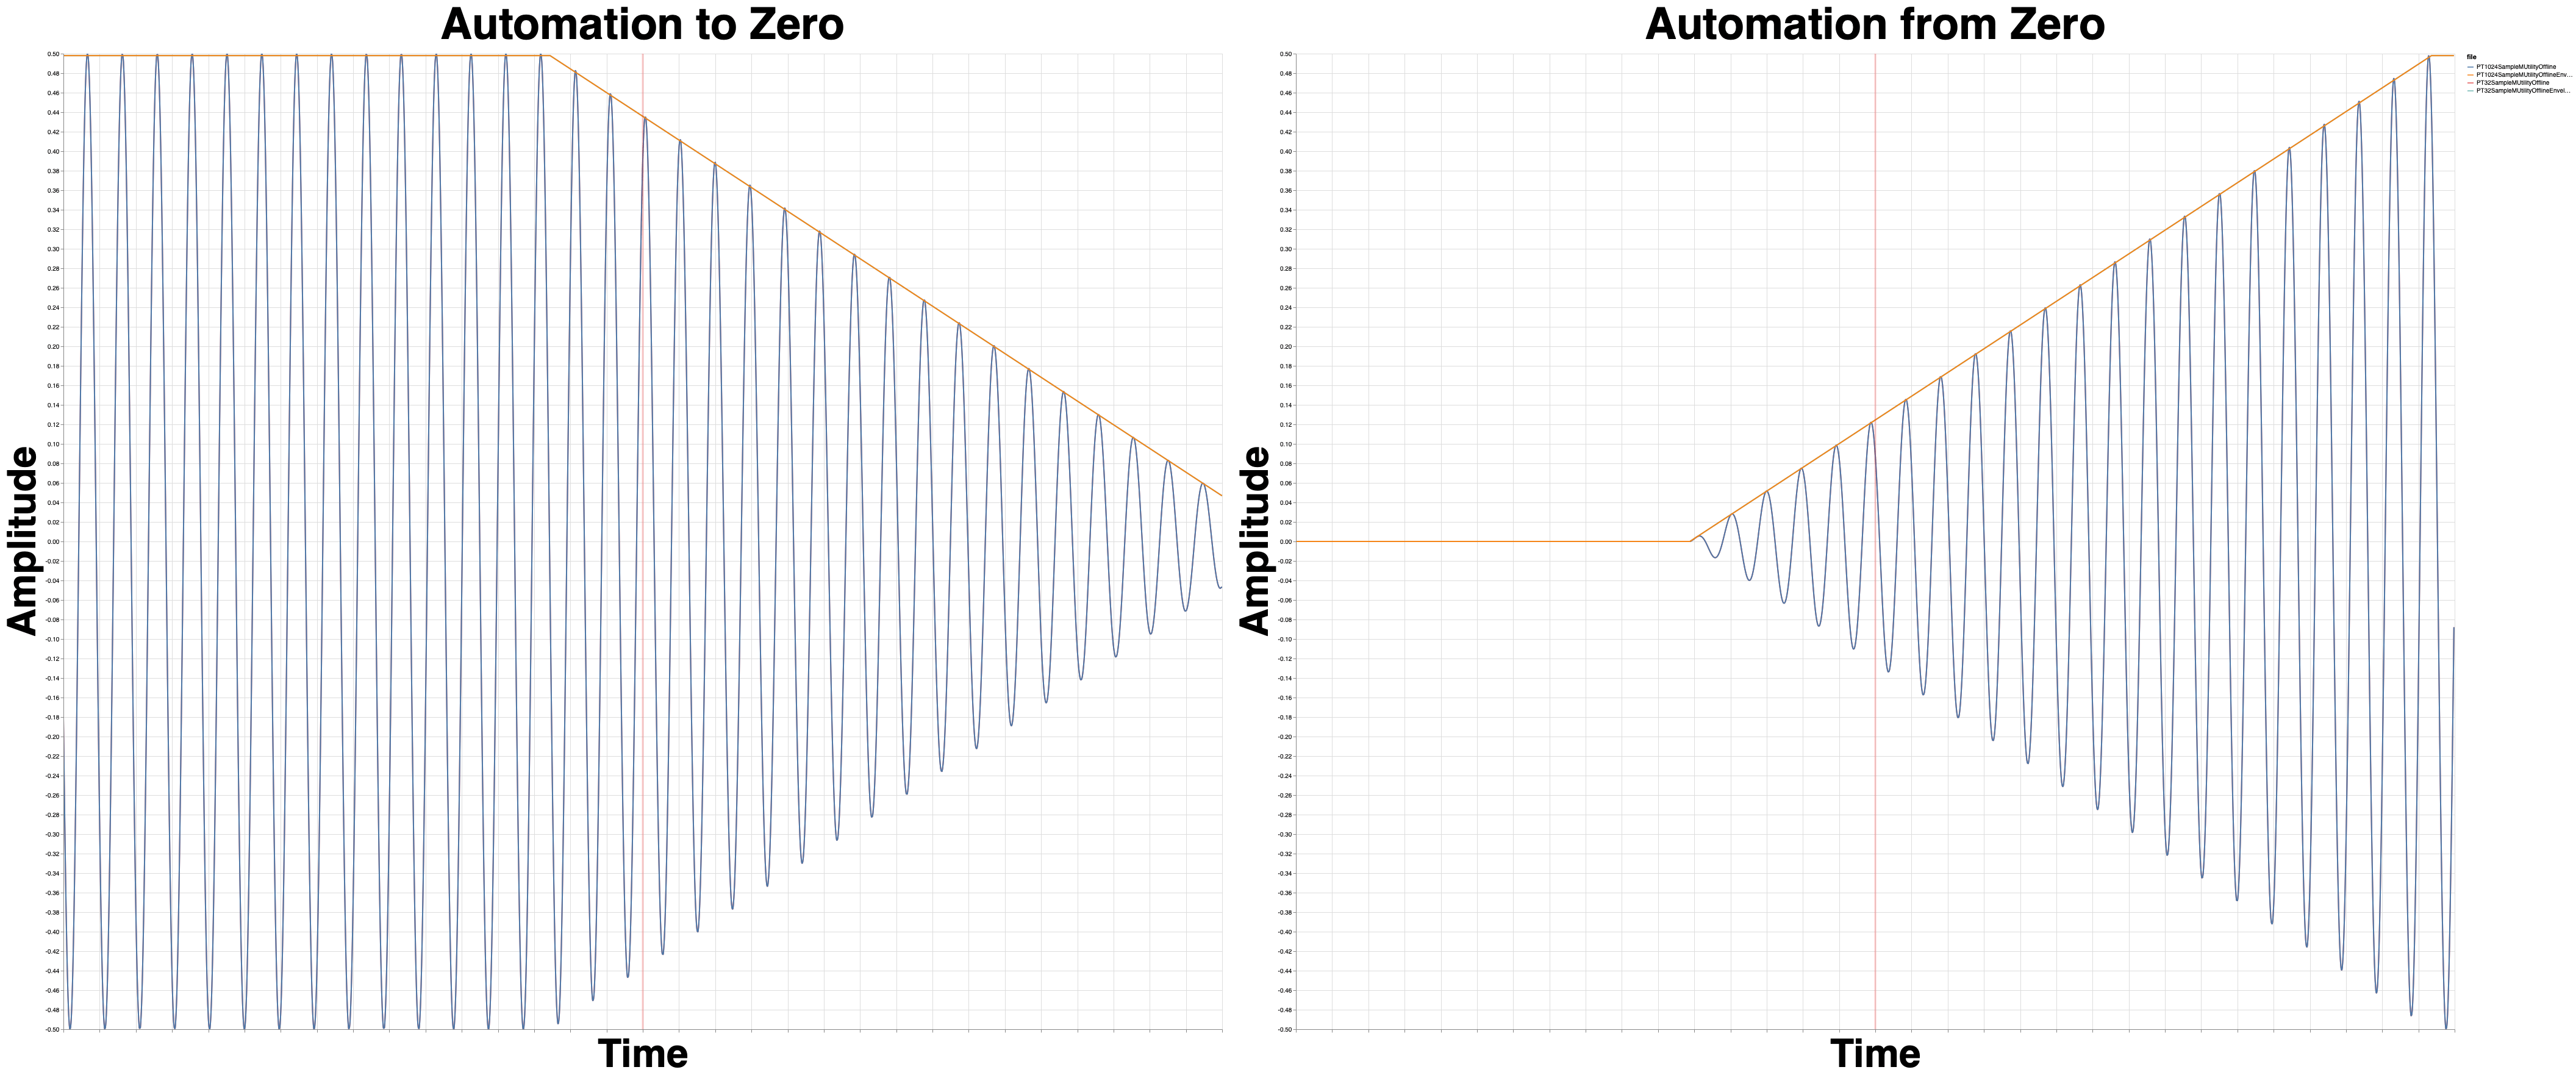
This is the resulting render and envelope. Offline render is identical every time, even when you change device buffer settings. That’s the ideal behaviour.
Digital Performer 10.0.1
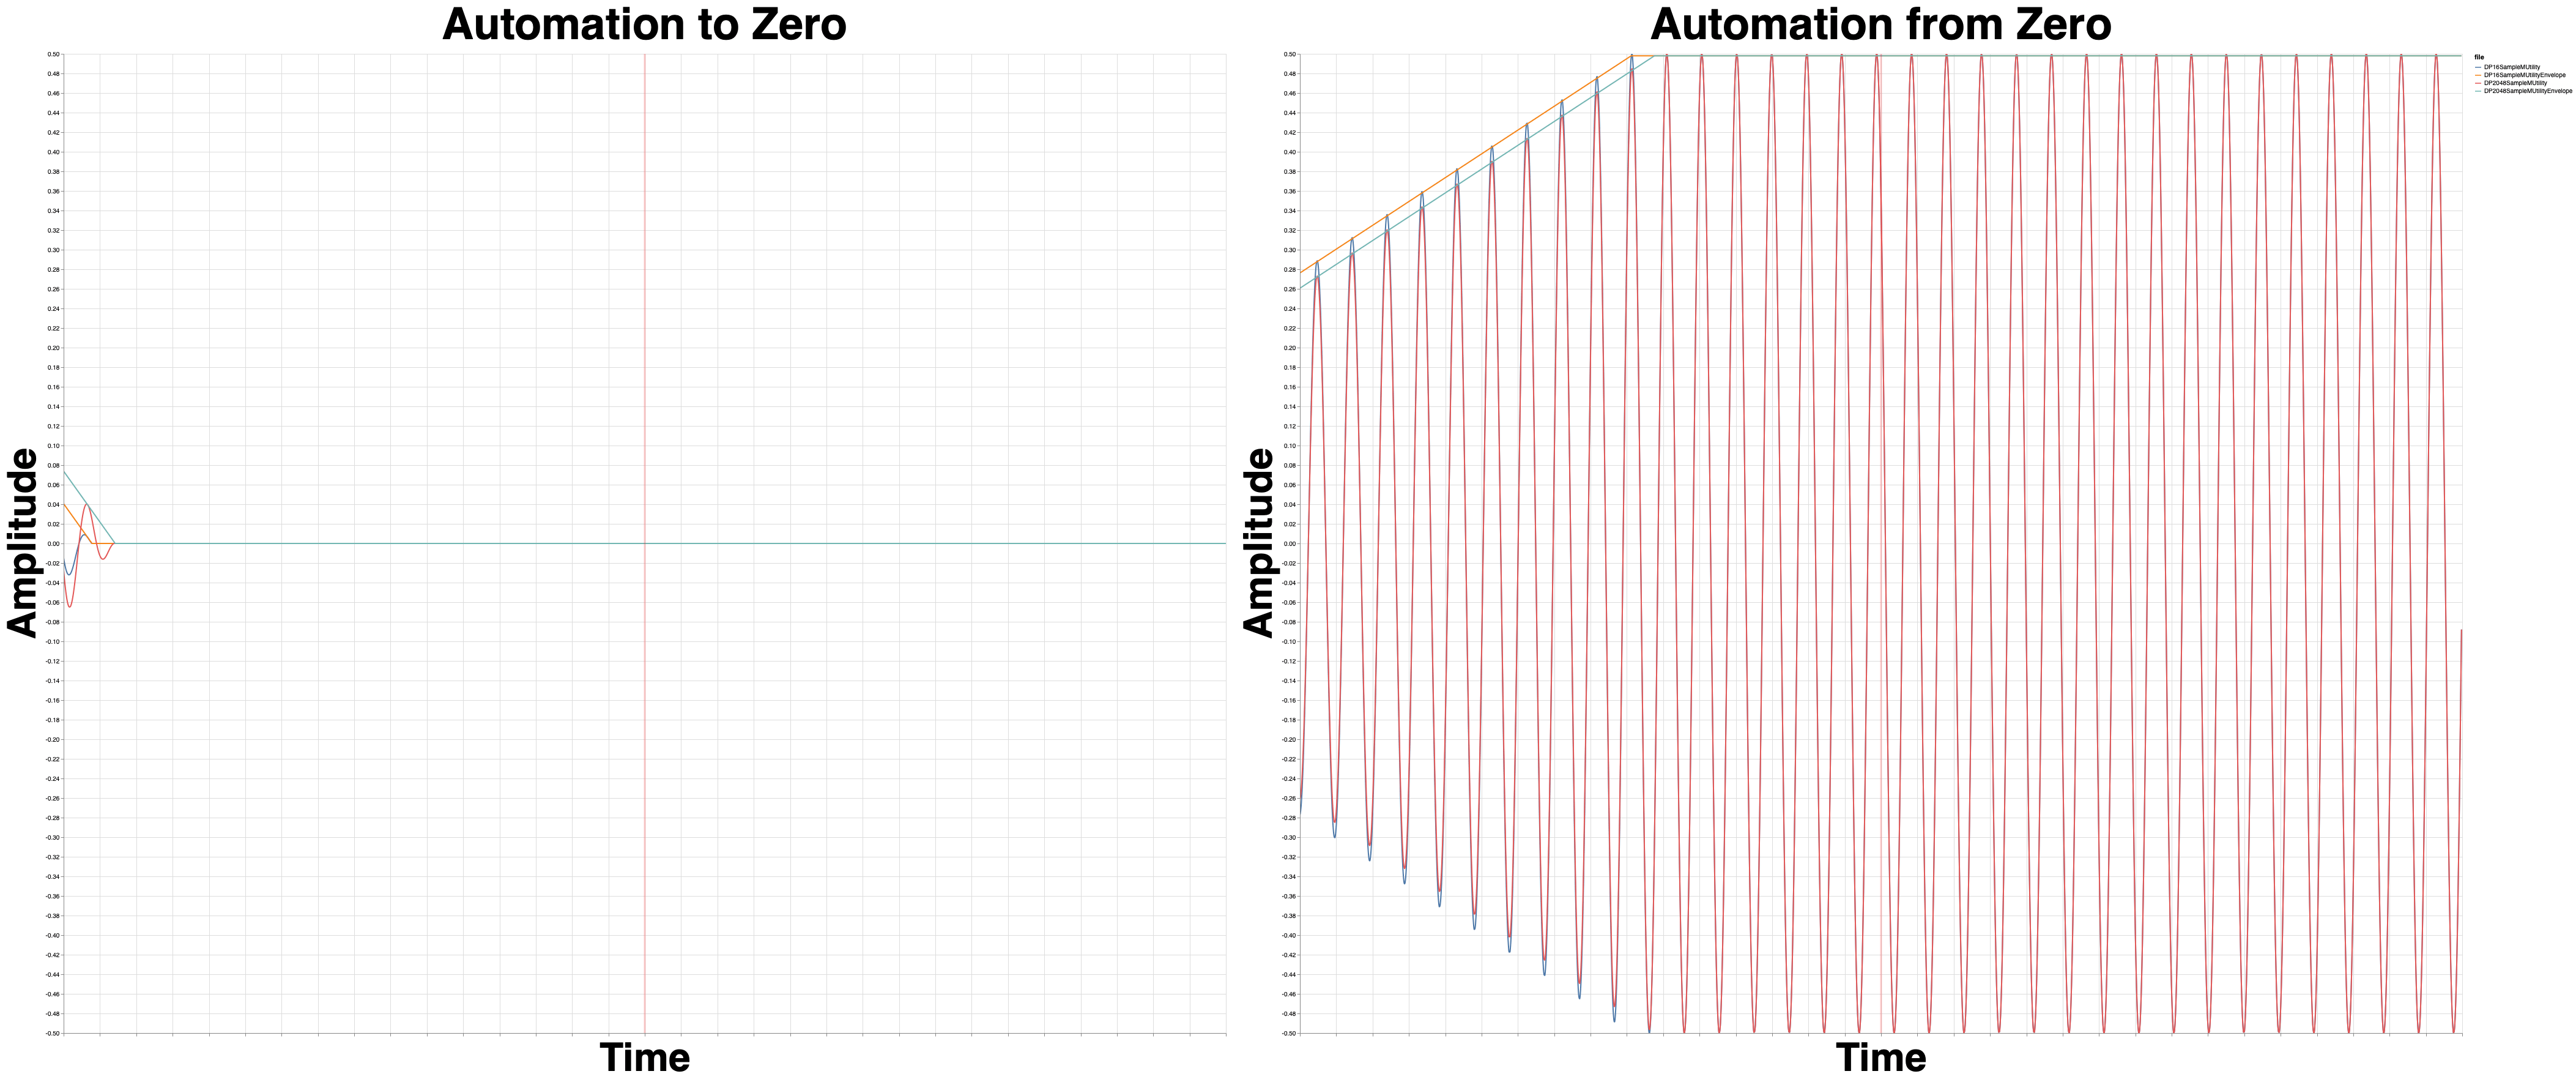
DP renders nearly identically for different buffer sizes.
However, VST3 automation looks a bit funky. I was very careful with the setup of automation points and the render was both off and with smoothing that is uncommon for MUtility.
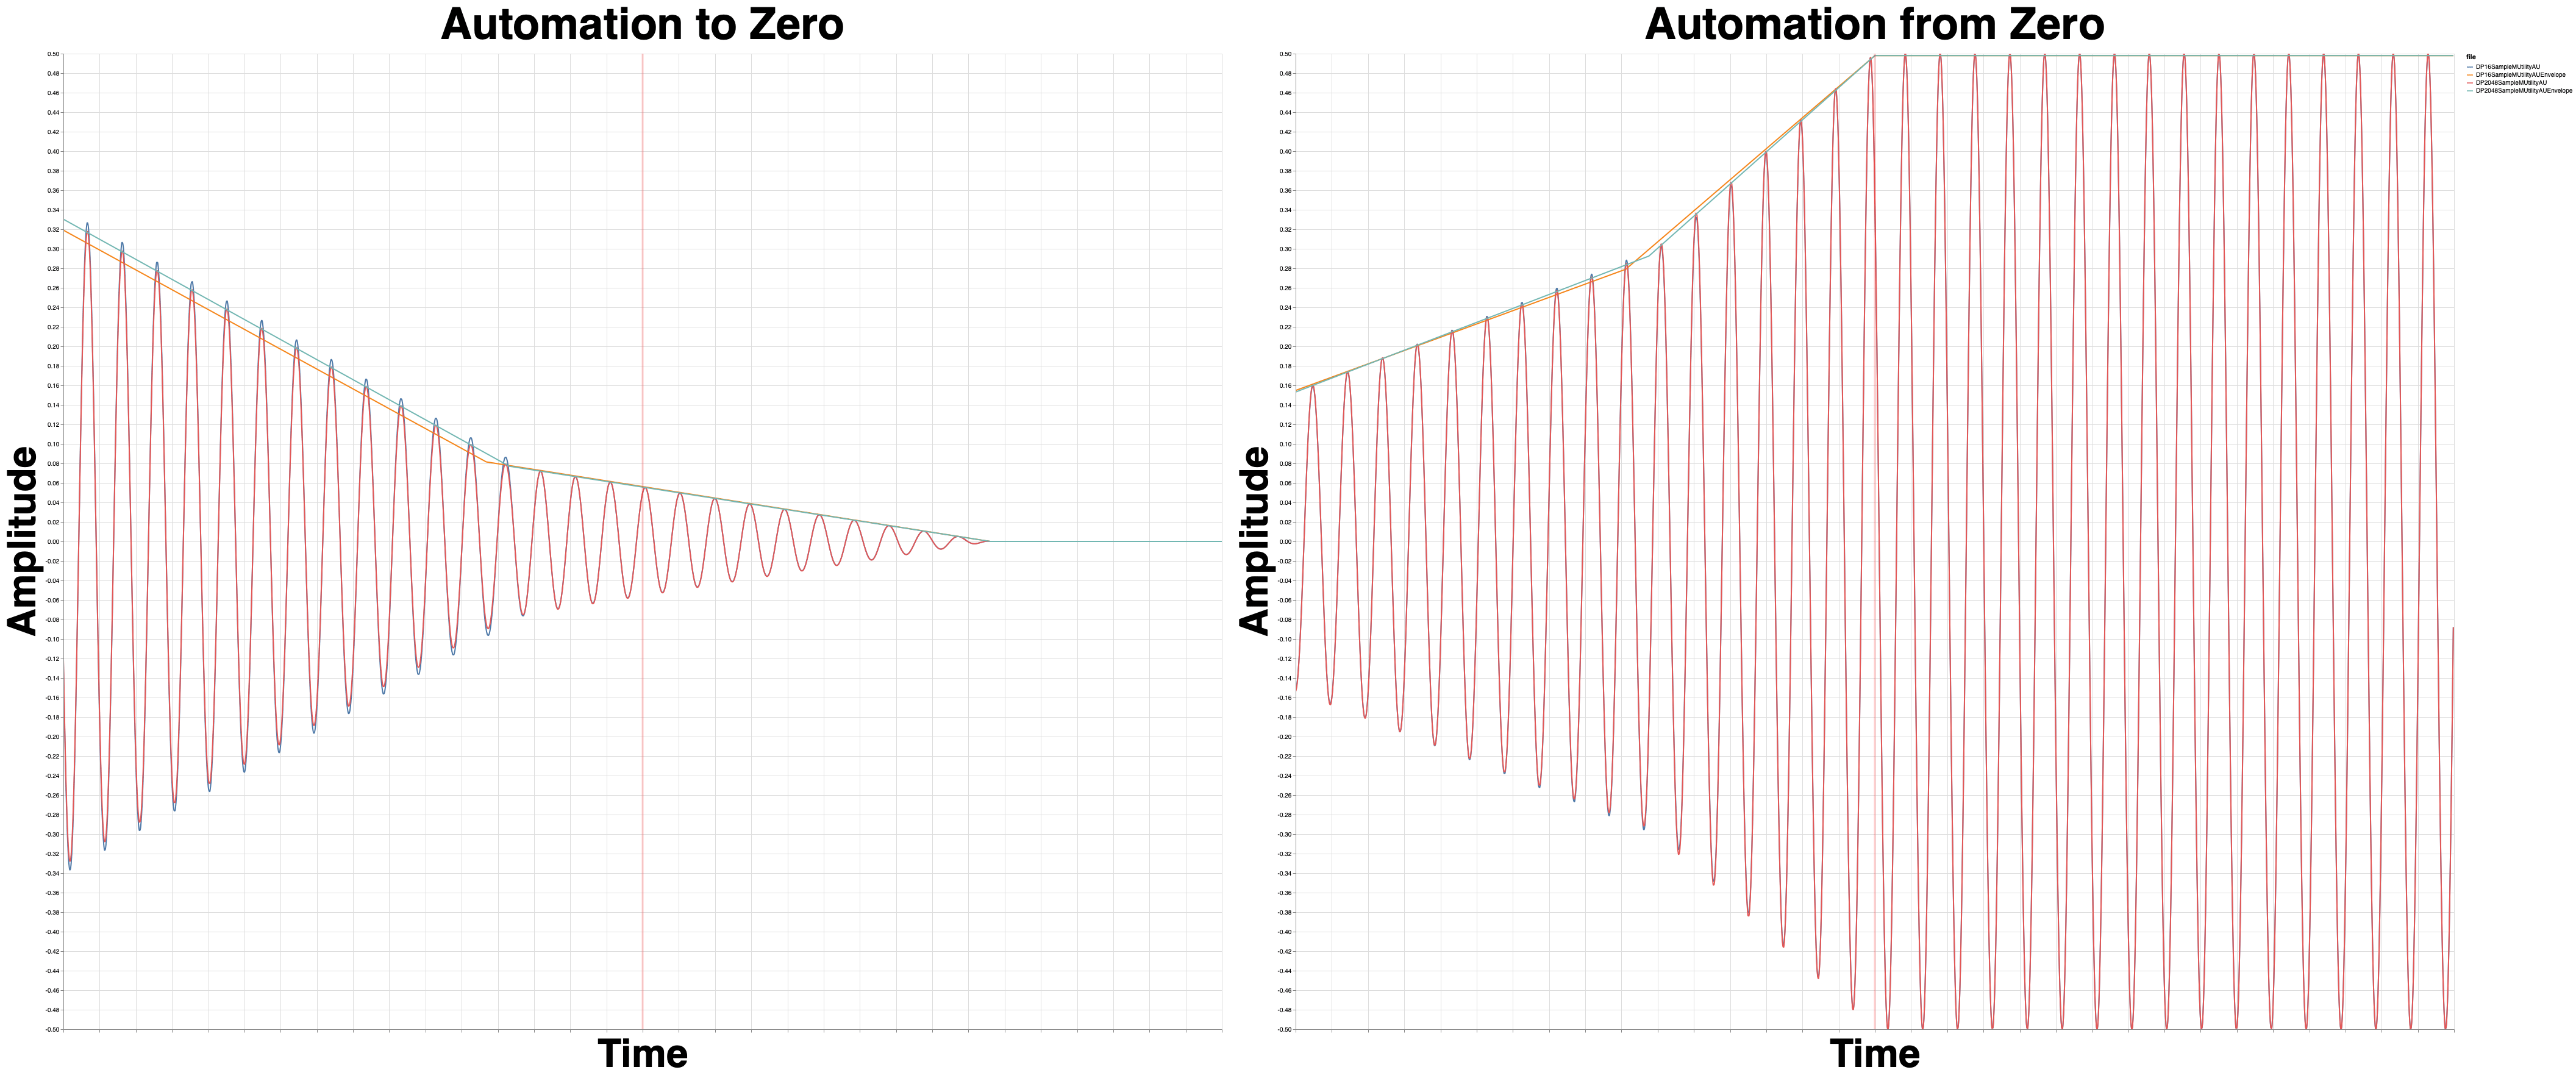
So I tried with AU.
Similar enough results. Slightly different curve. Maybe the plugin? Maybe not?
Logic 10.4.5
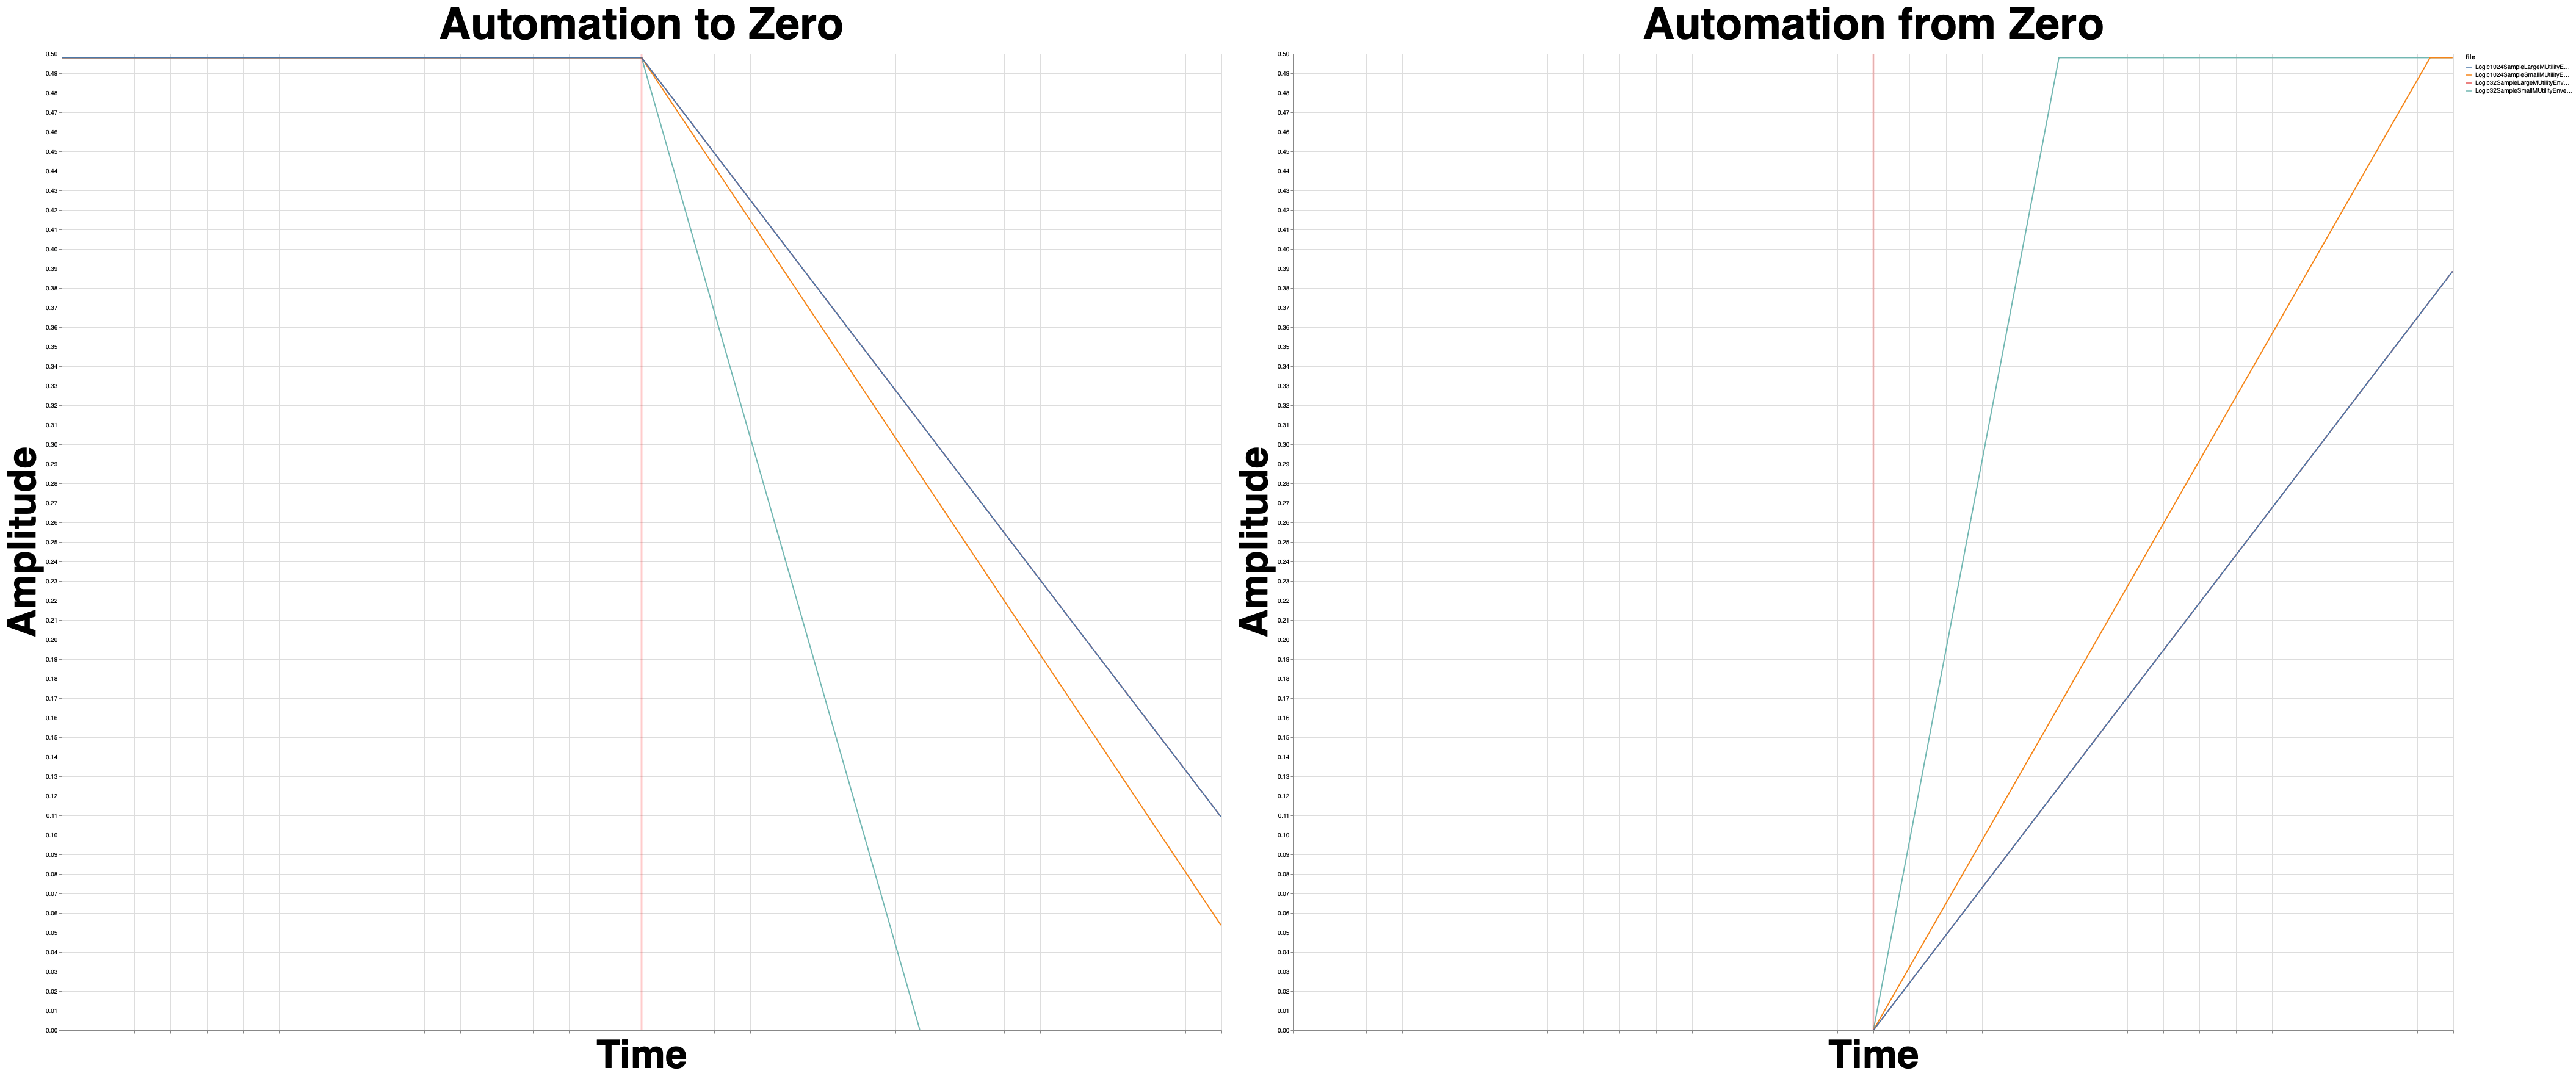
Logic has a setting called “Process Buffer Range” in Preferences->Audio. Does that change how plugin automation renders?
Sure does! Above are the envelopes to prove it.
We have 4 renders, with 4 different settings, and 3 results. (The “small” process buffer range results overlap each other, which you can’t see).
With the “Large” process buffer range, the device buffer affects the result too.
Cubase 10.0.30
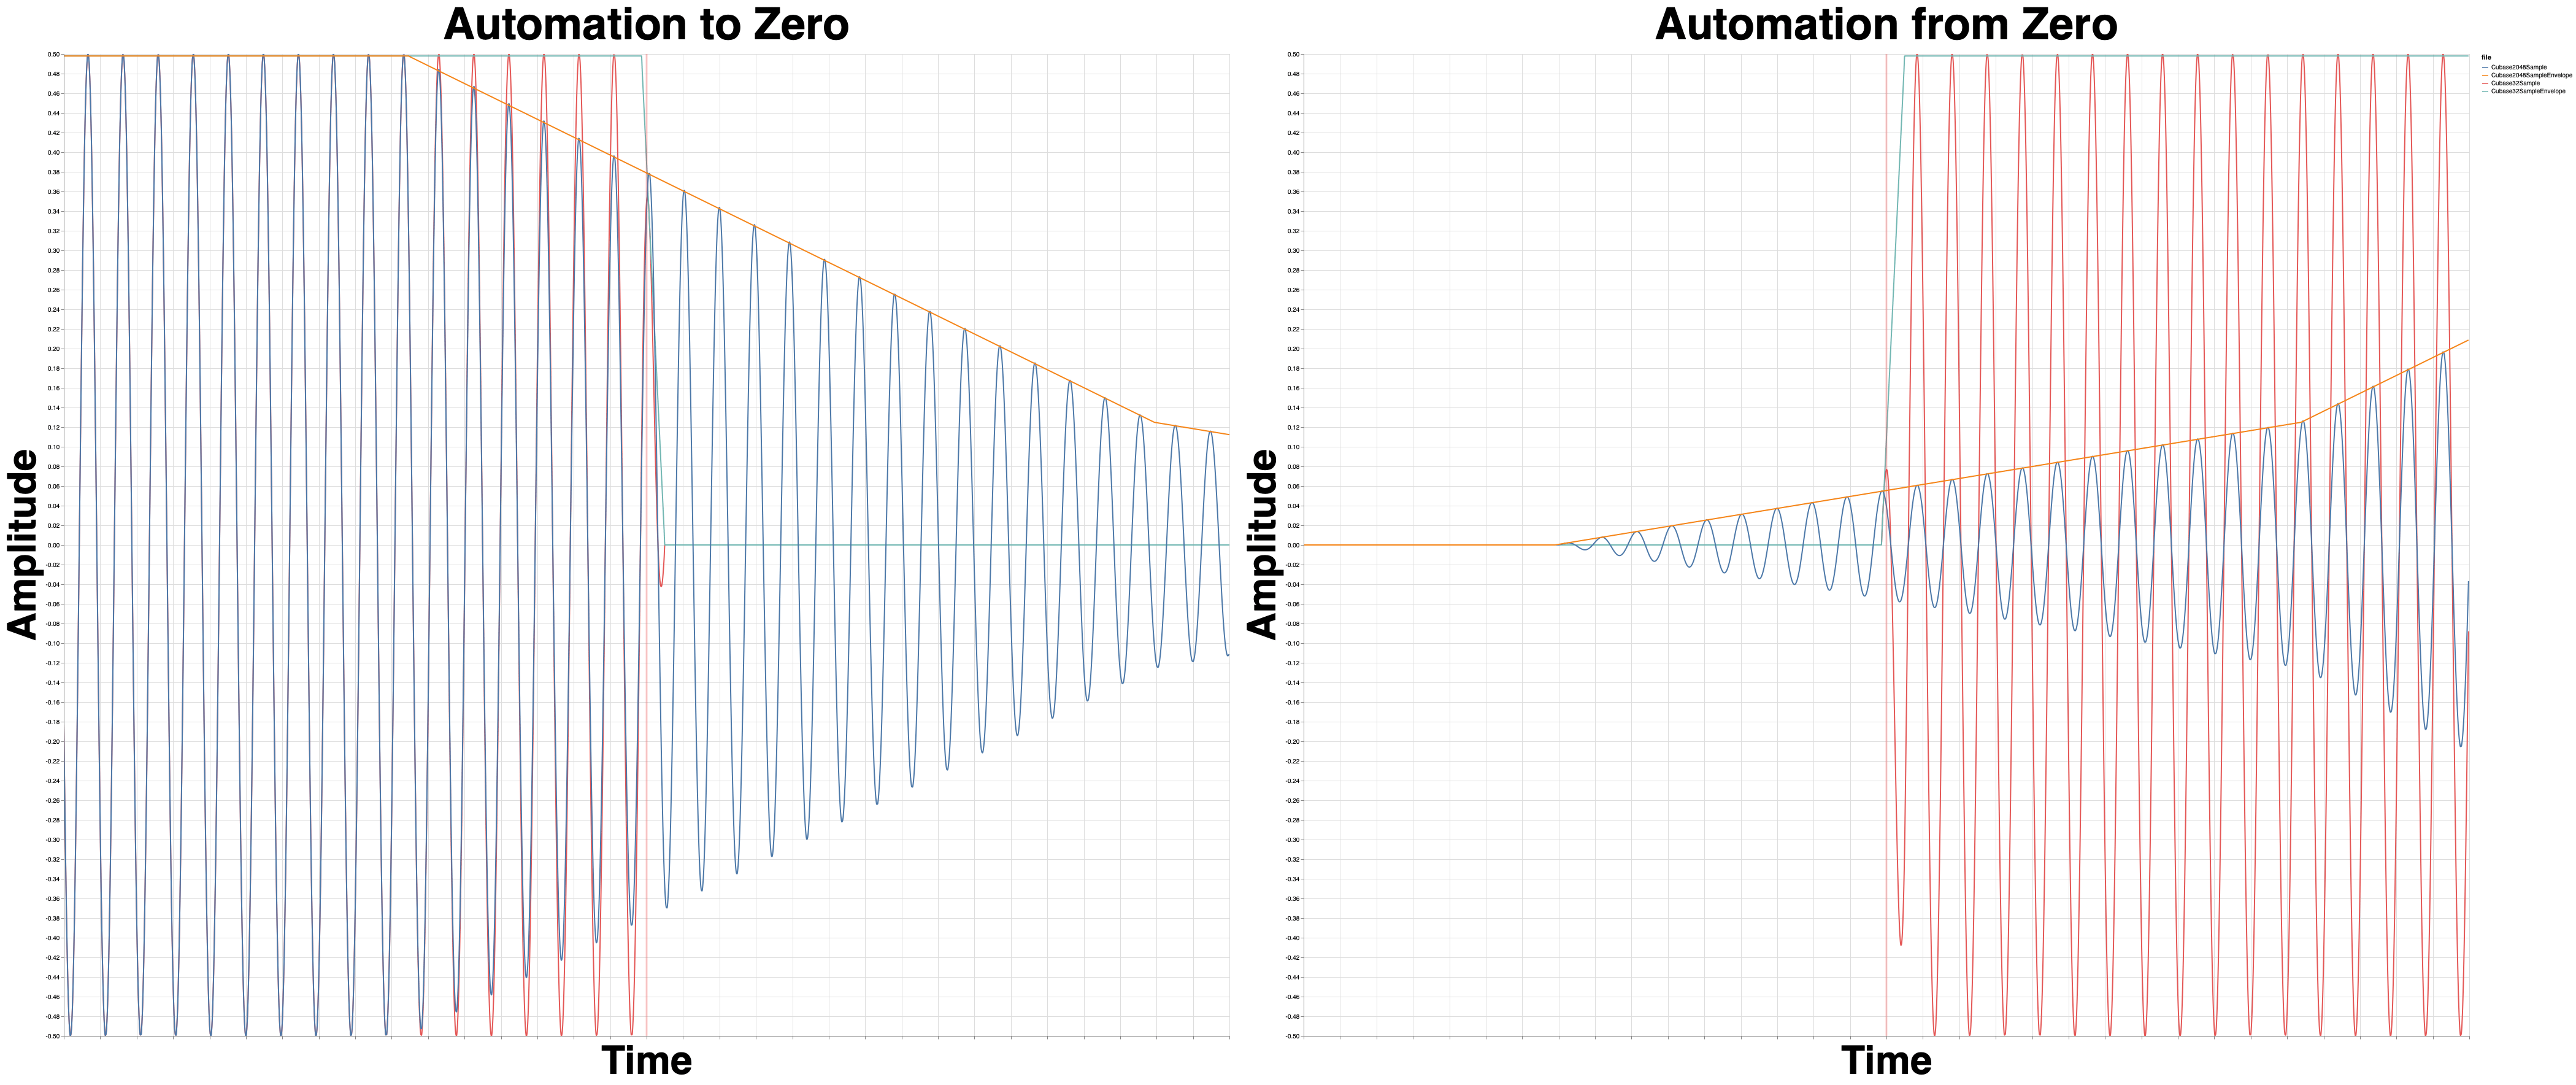
Cubase clearly renders differently based on the buffer size here, in a more extreme way than other products.
Ableton Live 10.1
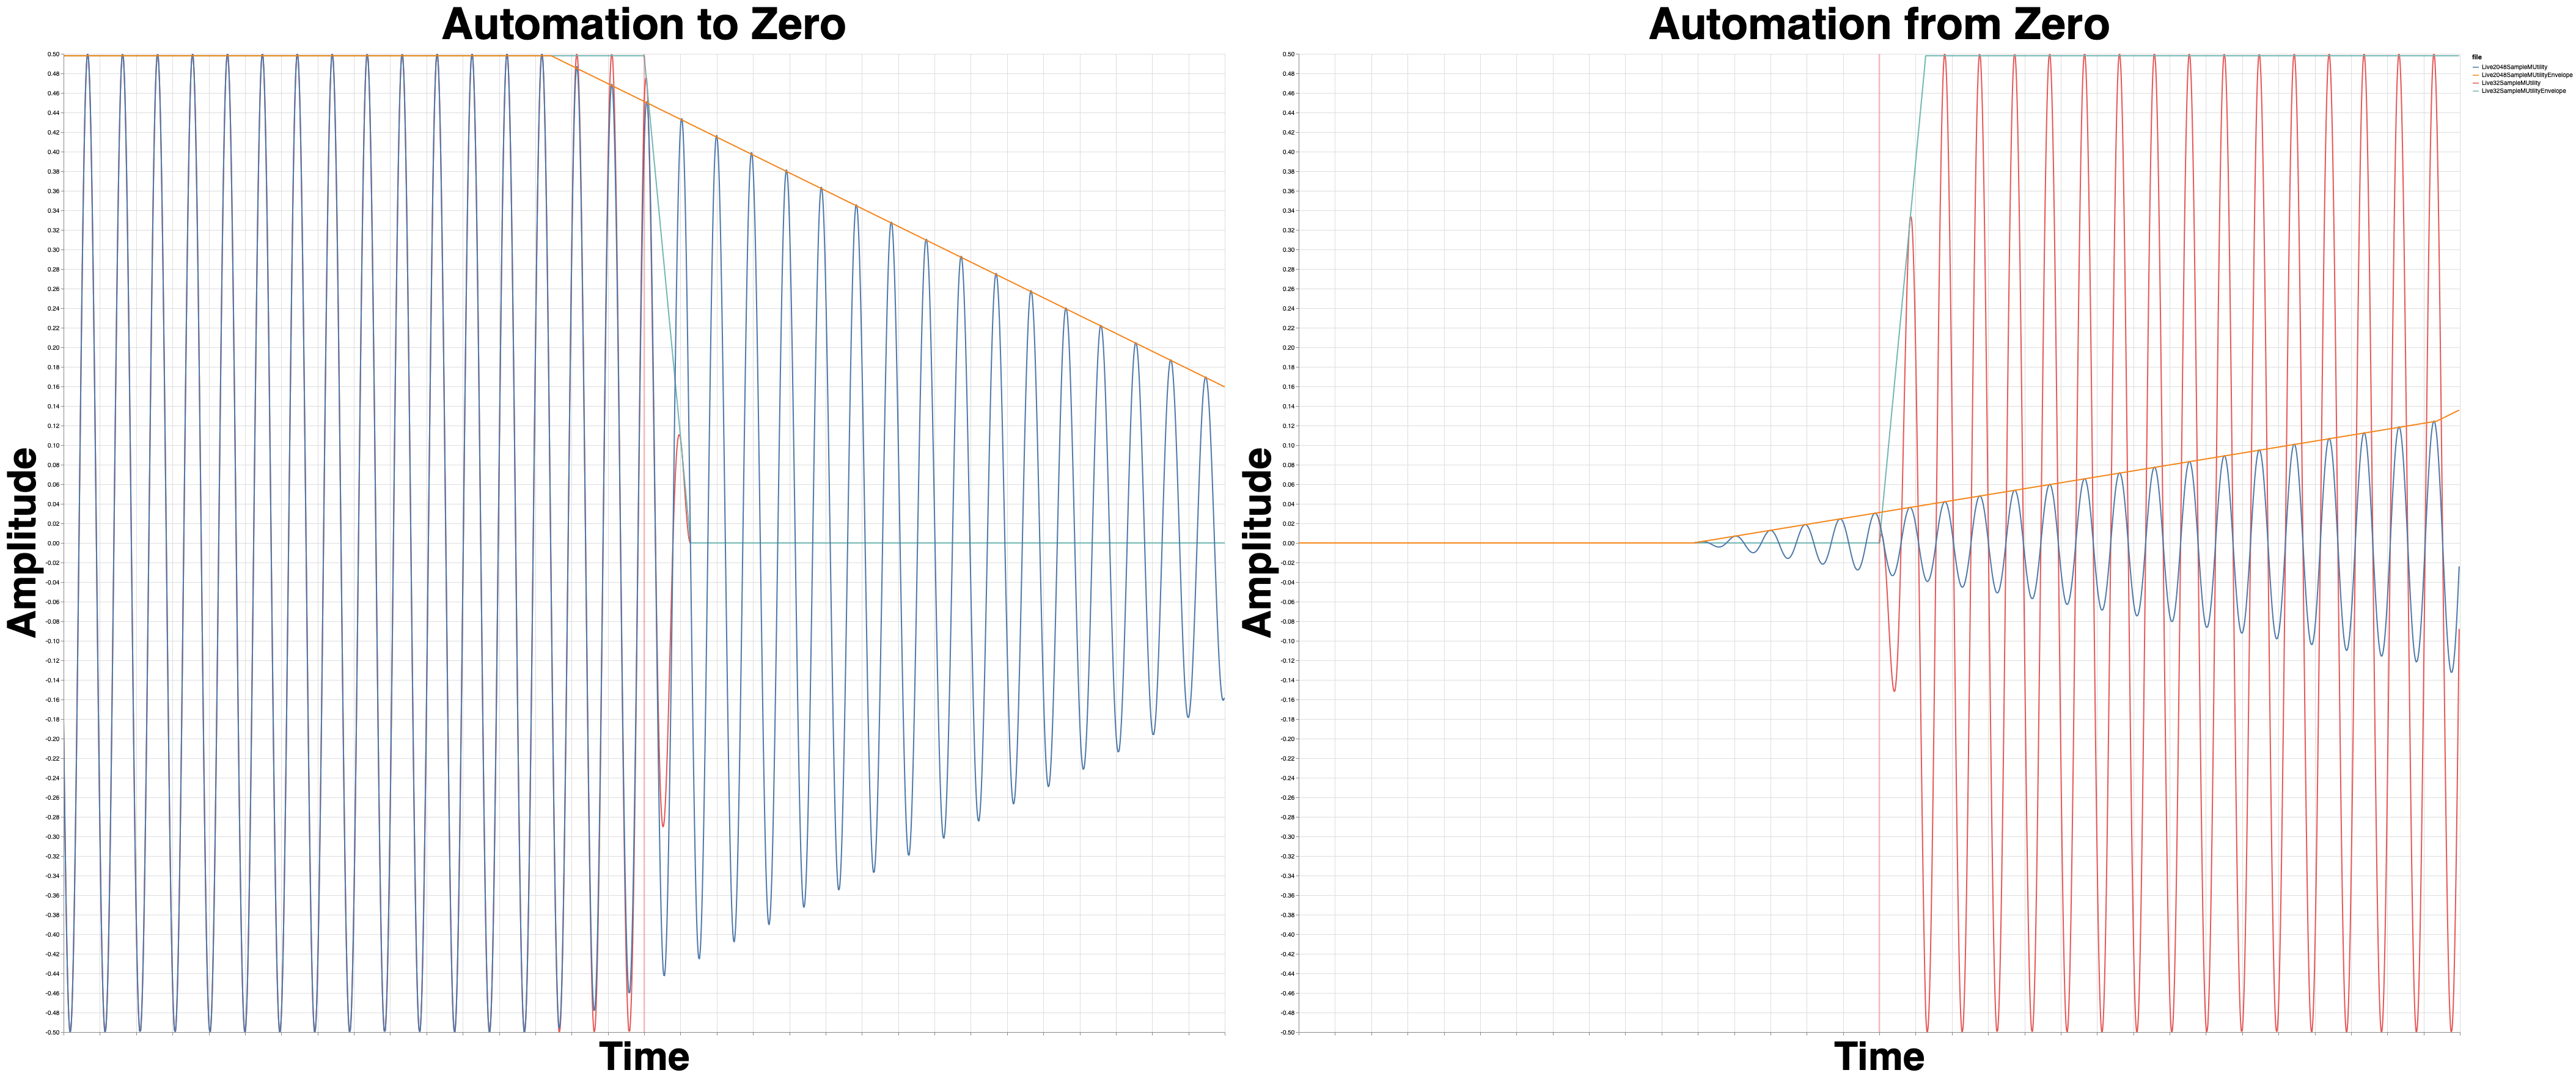
Yet, Live renders differently depending on your buffer setting (at least when using certain VST3 effects!)
As with ANY DAW, this may vary depending on the product used.
FLStudio 20.1.2
FL Renders the same regardless of the buffer size.
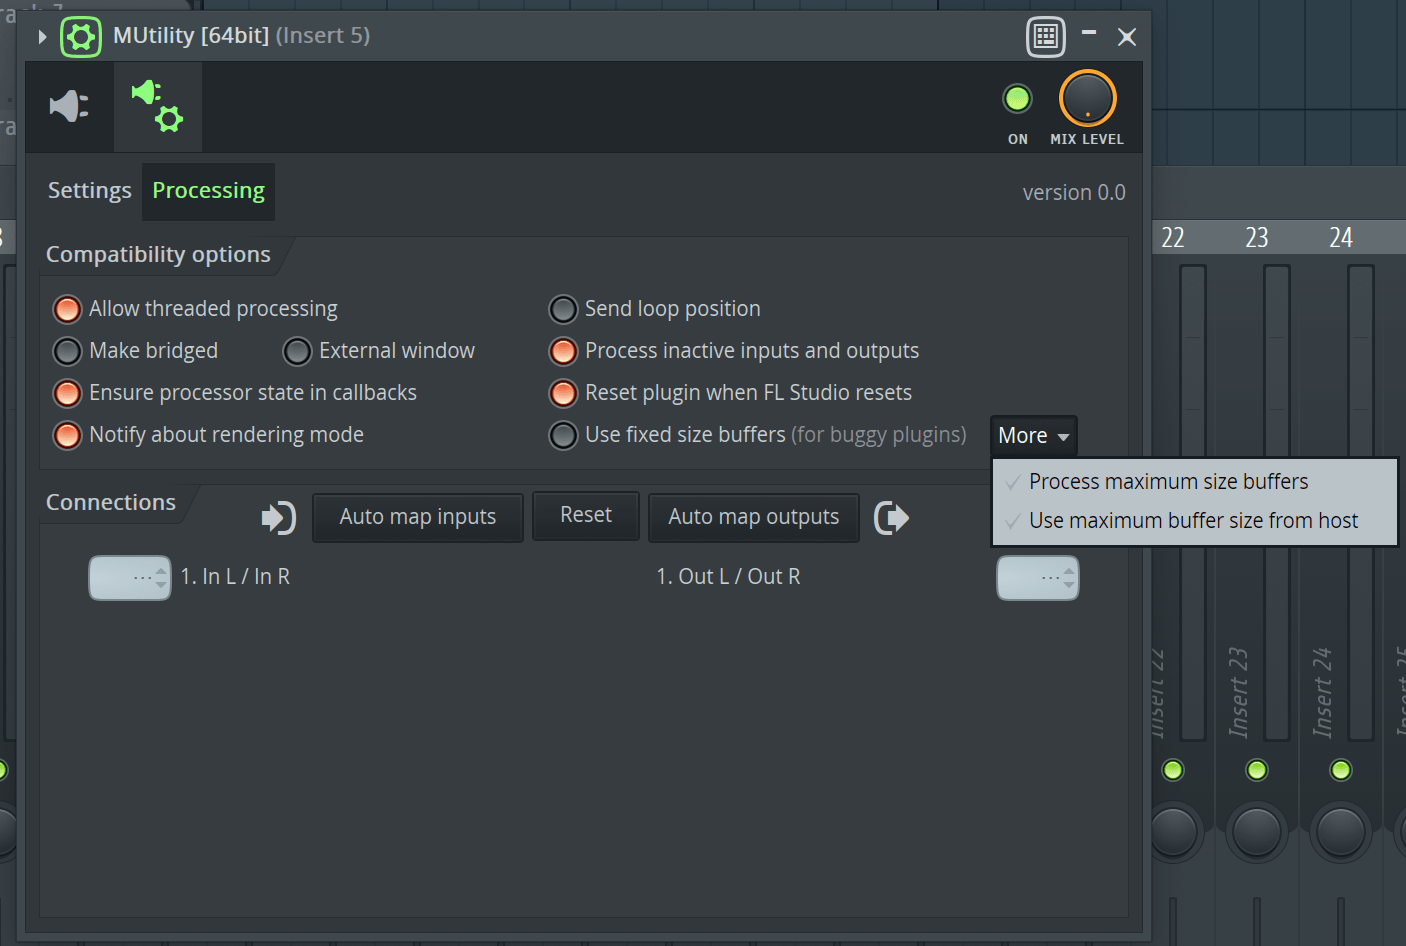
Even better still is that FLStudio has more advanced settings for how it handles plugin blocks.
For plugin developers this is a bit painful though, since FL can send some variable sized blocks and/or partial blocks. The user benefits from this though!
Sample Results - Native
This time I’ll be taking the native “Utility” plugin included with each DAW and giving it a whirl.
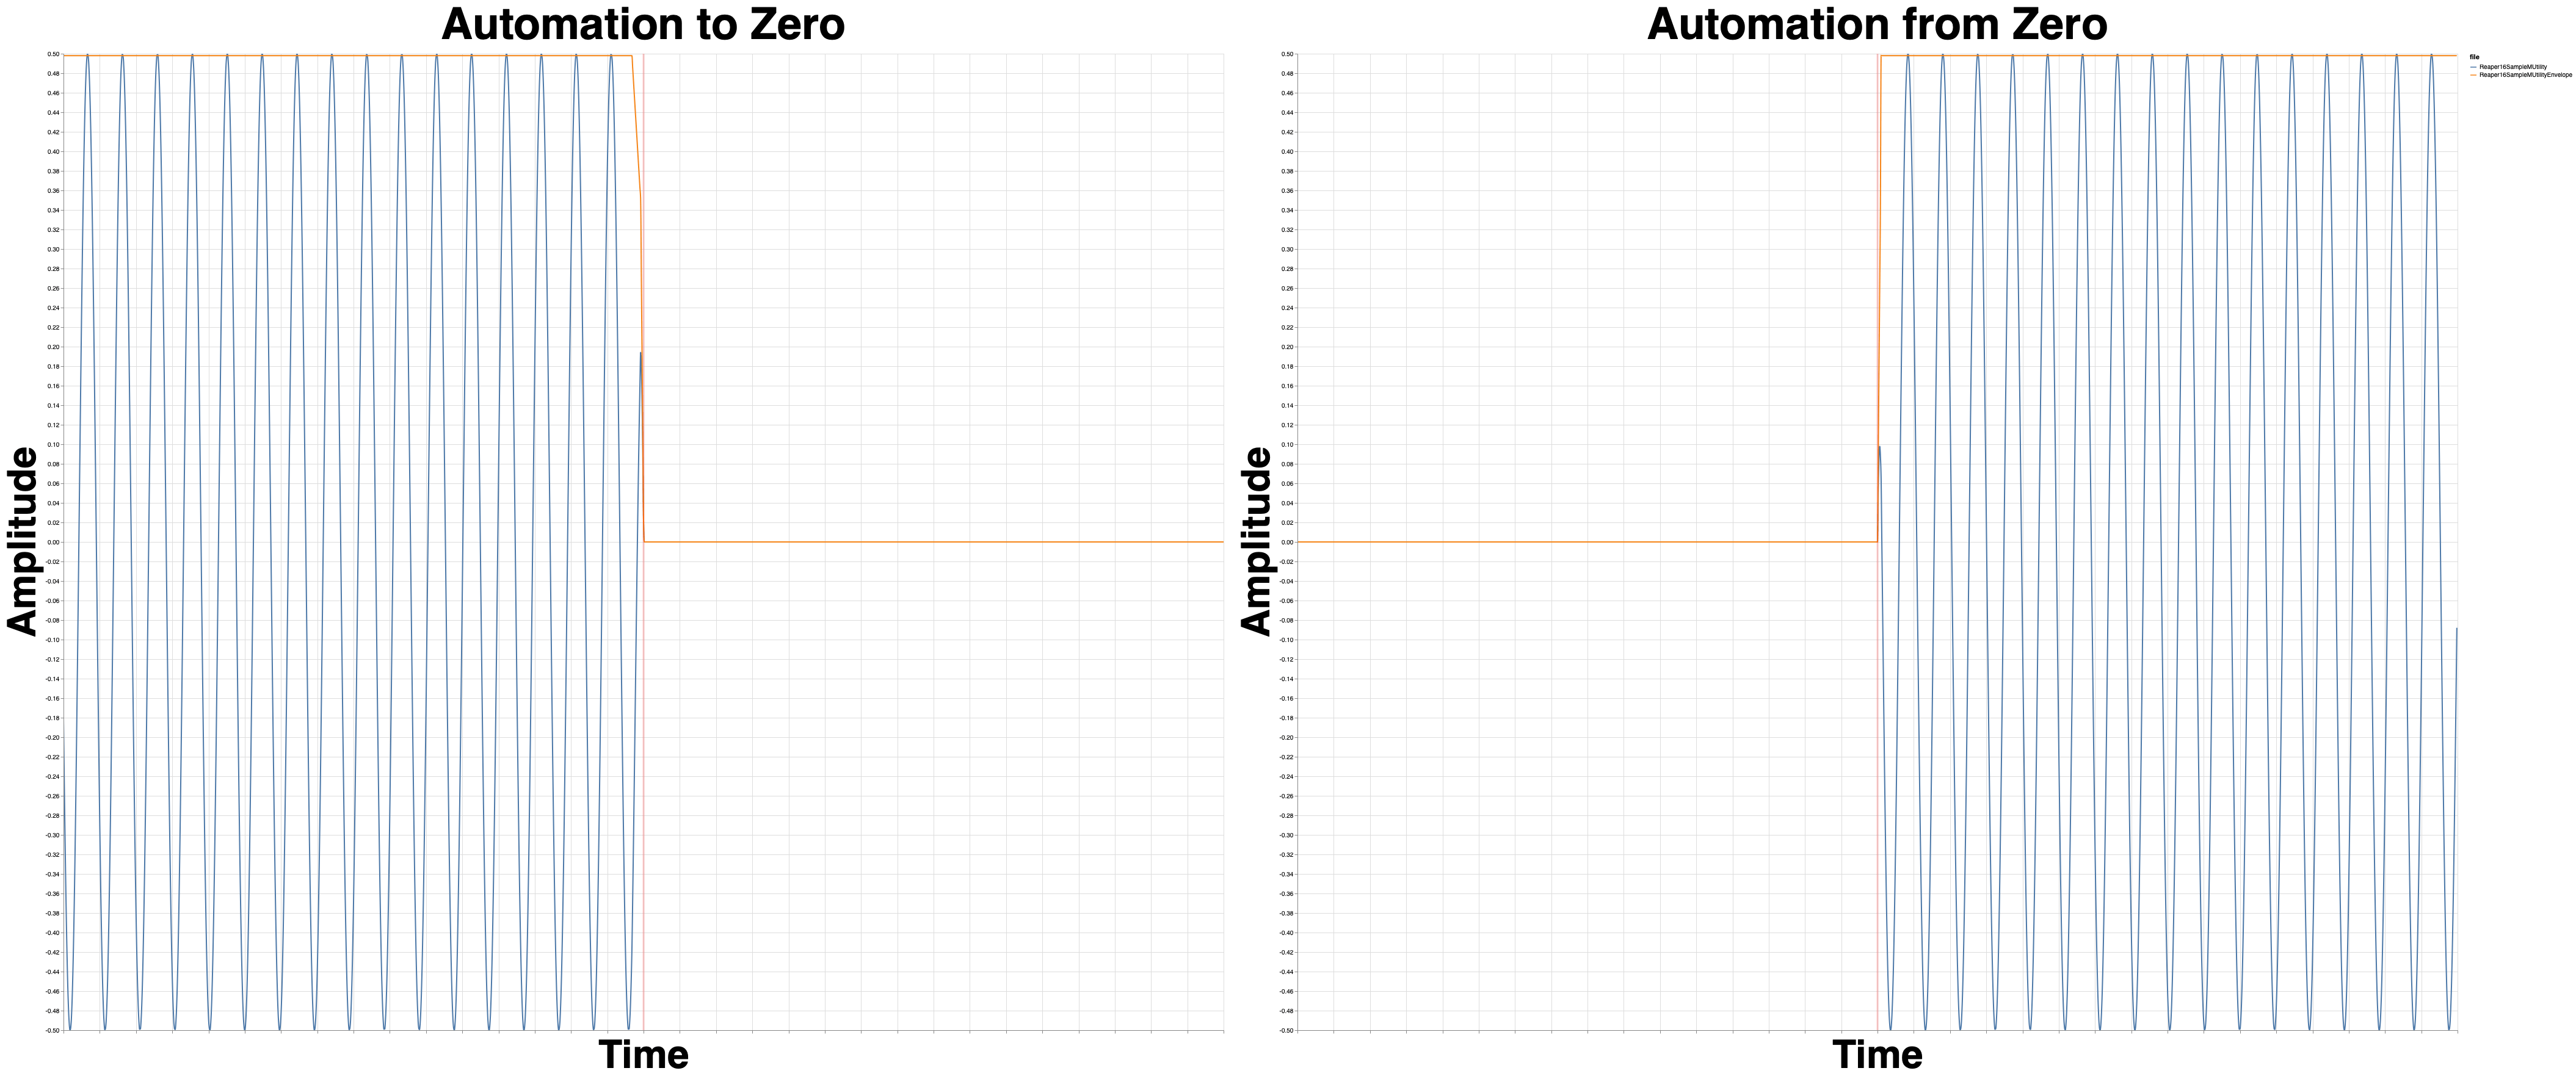
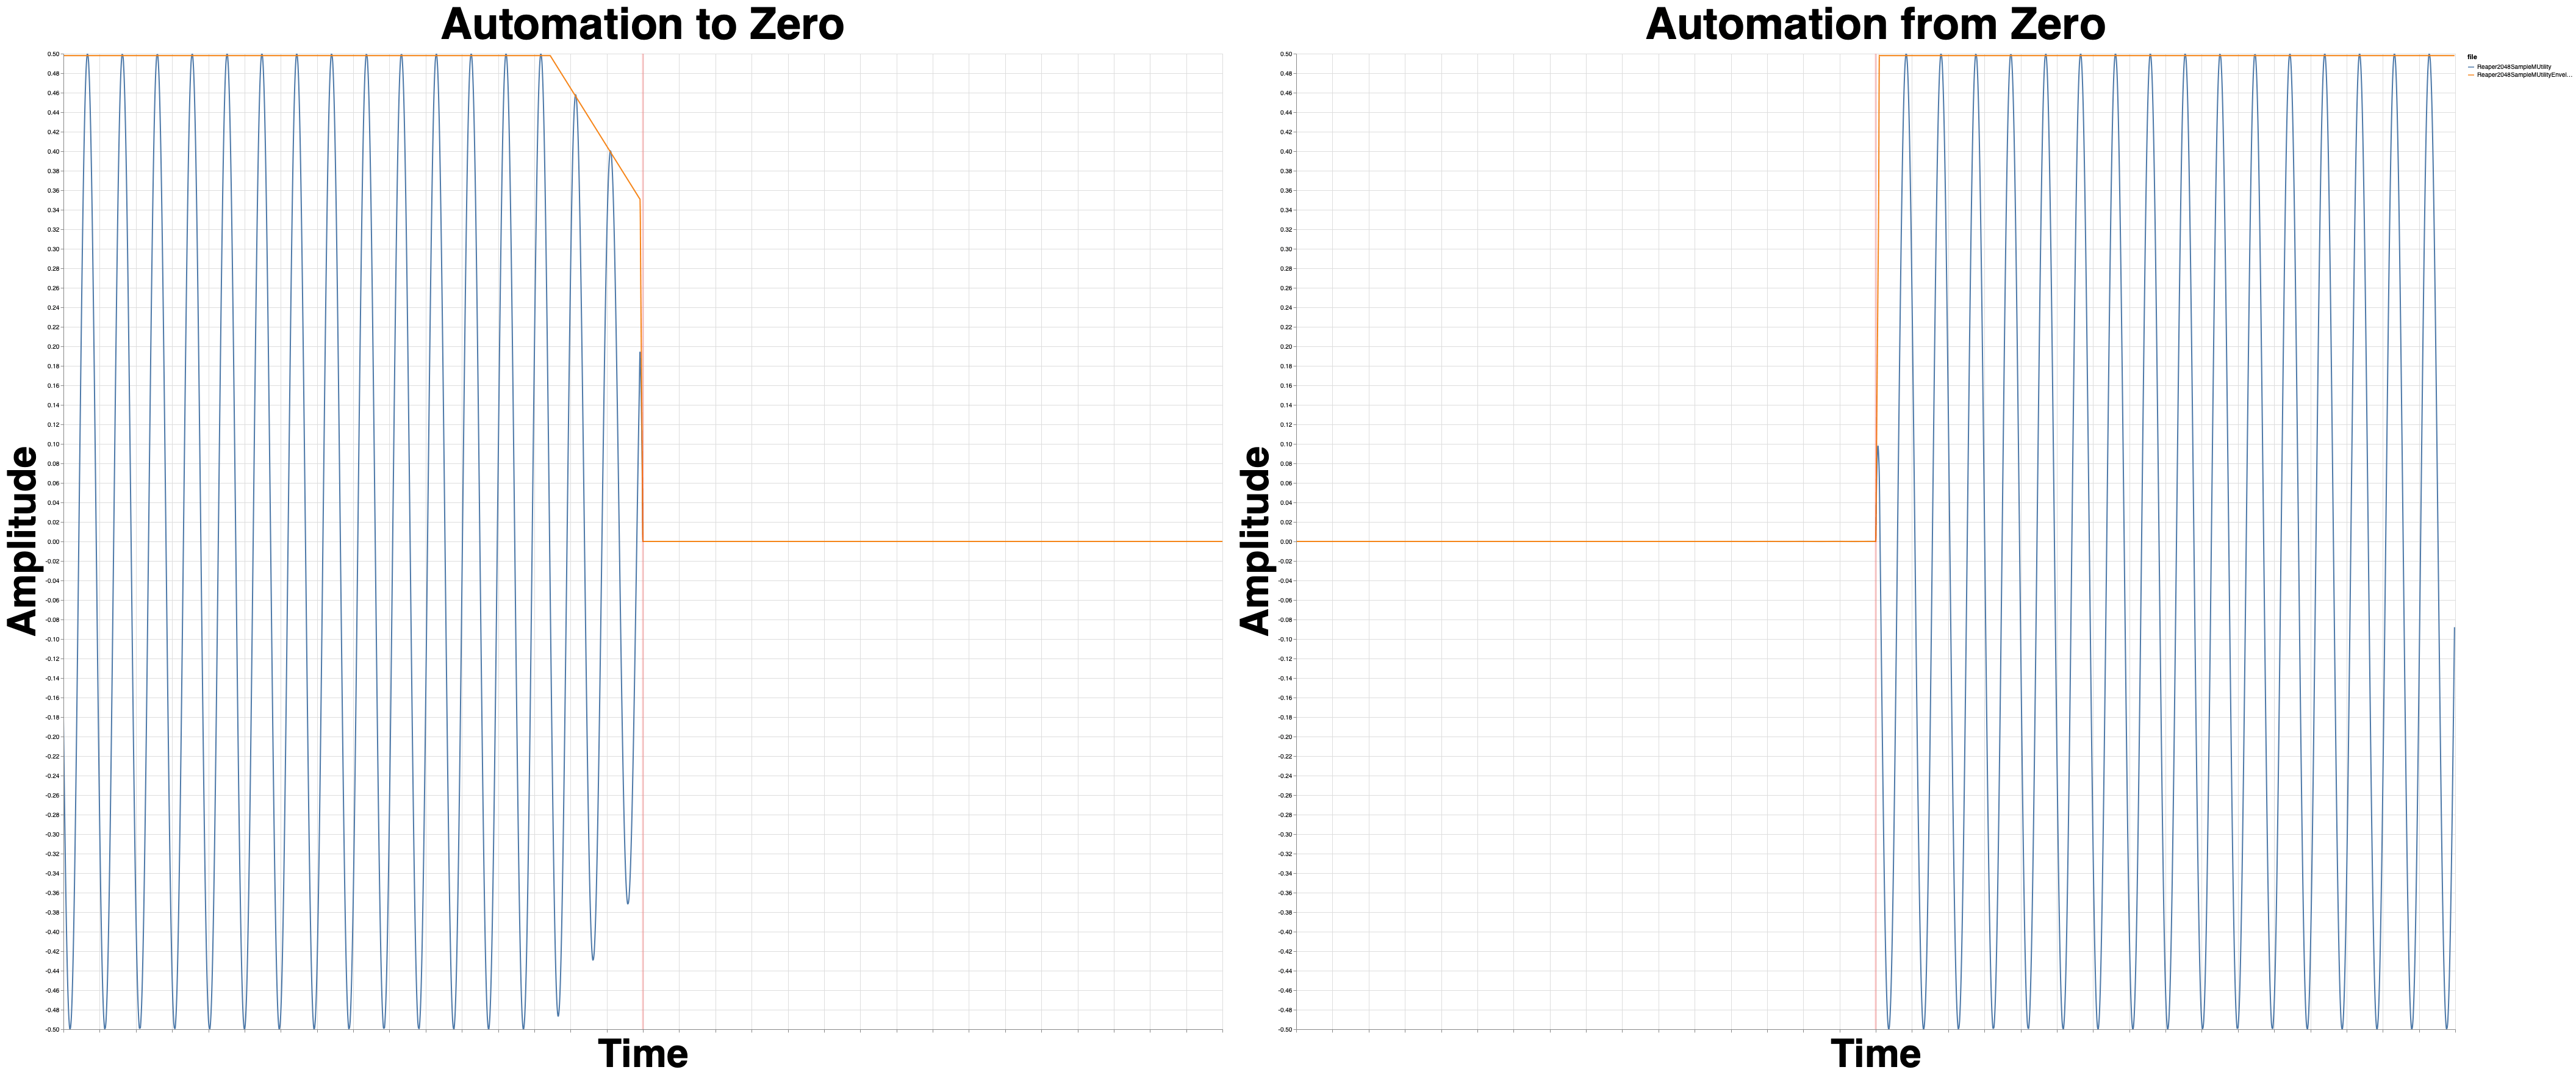
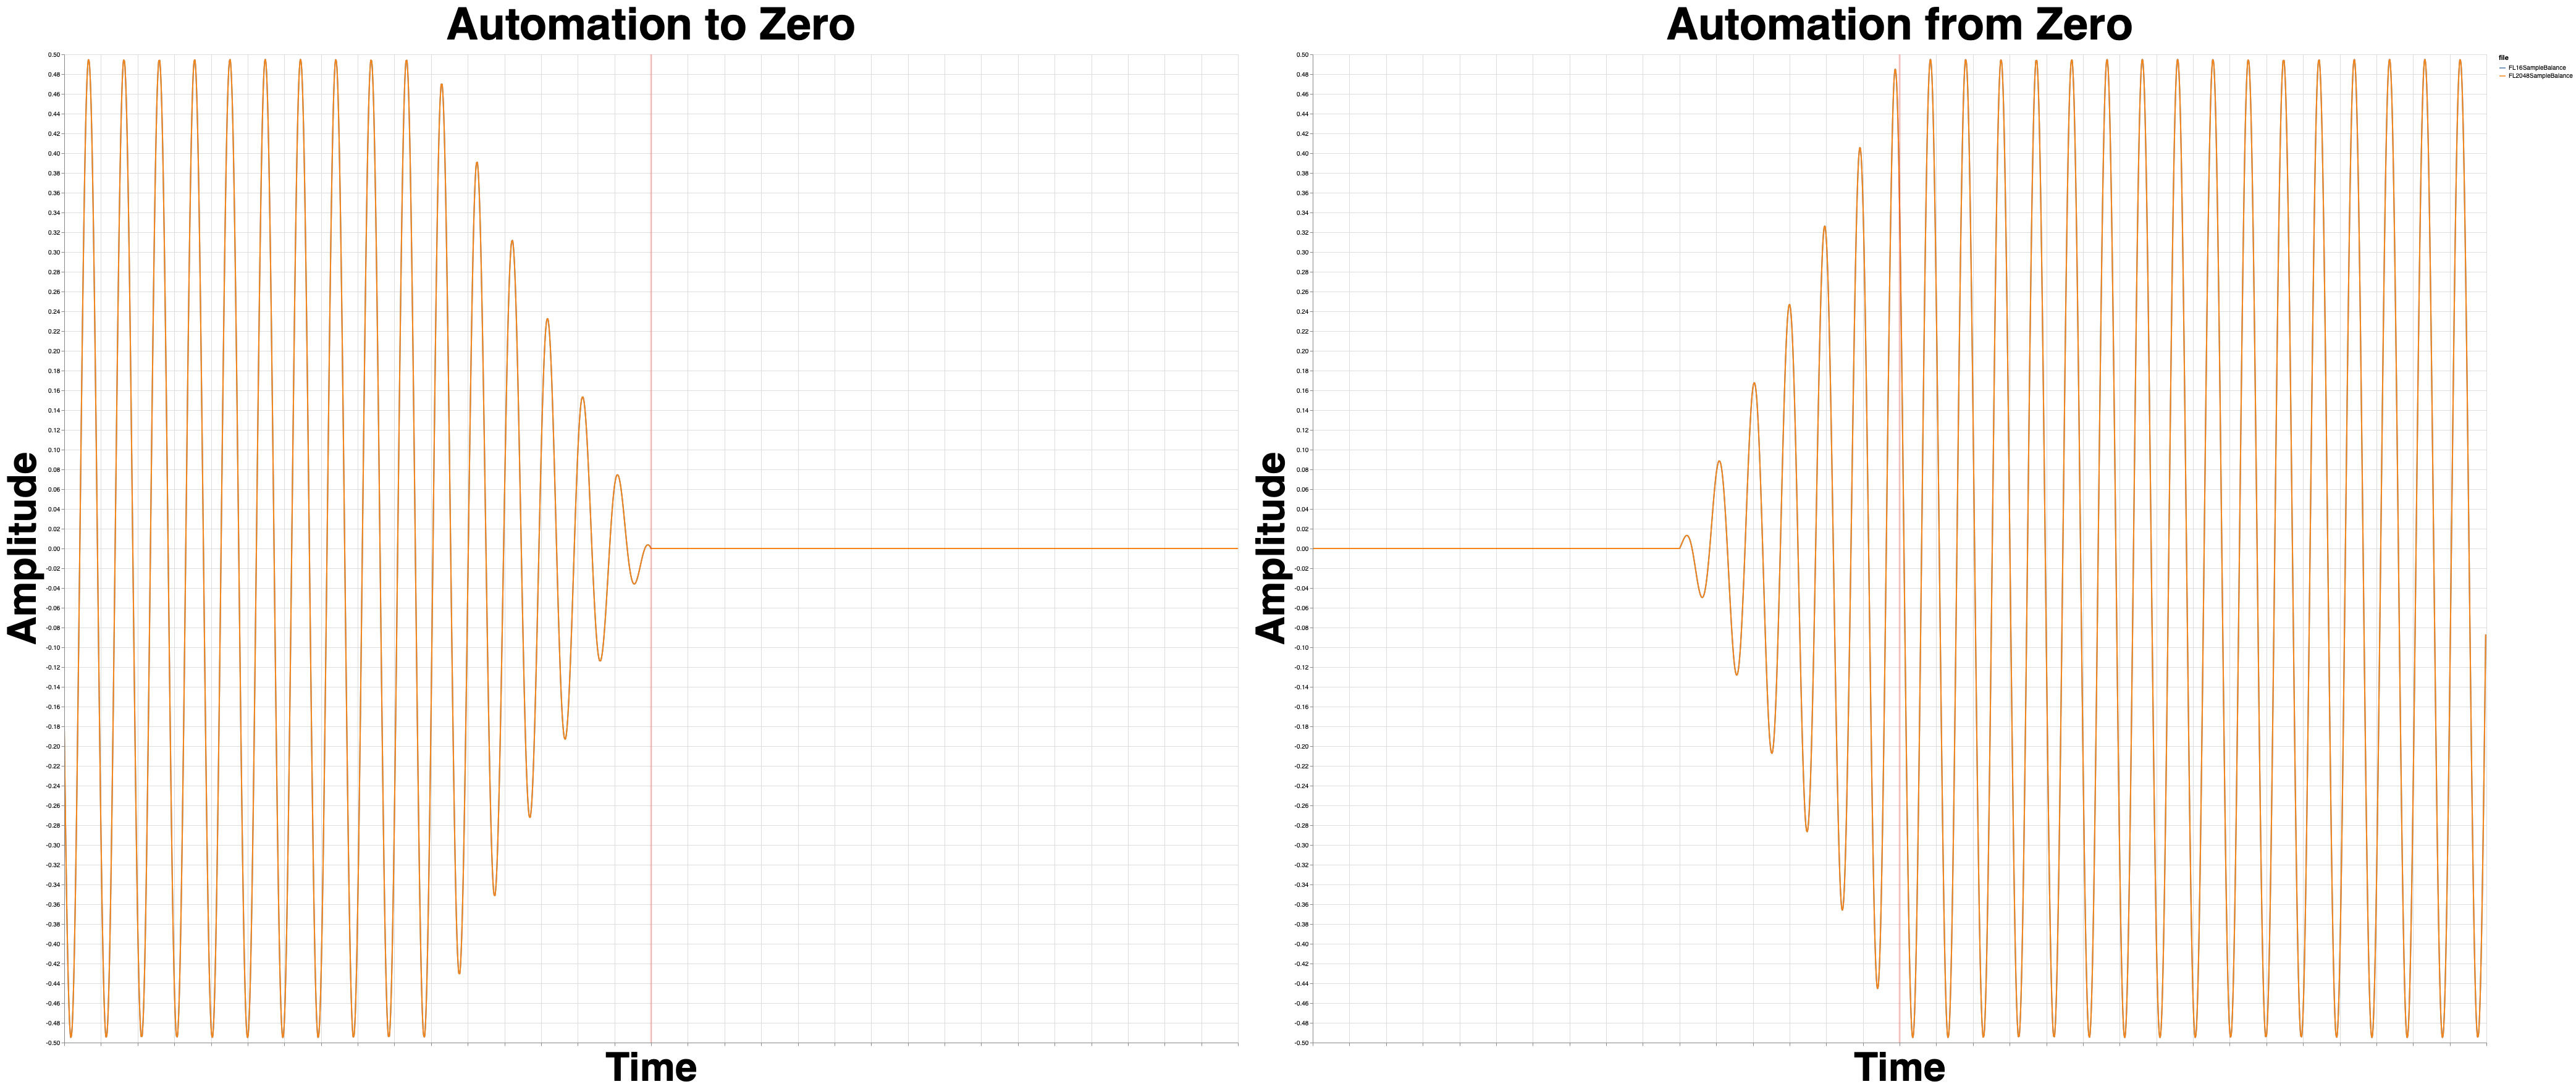
Reaper 5.979
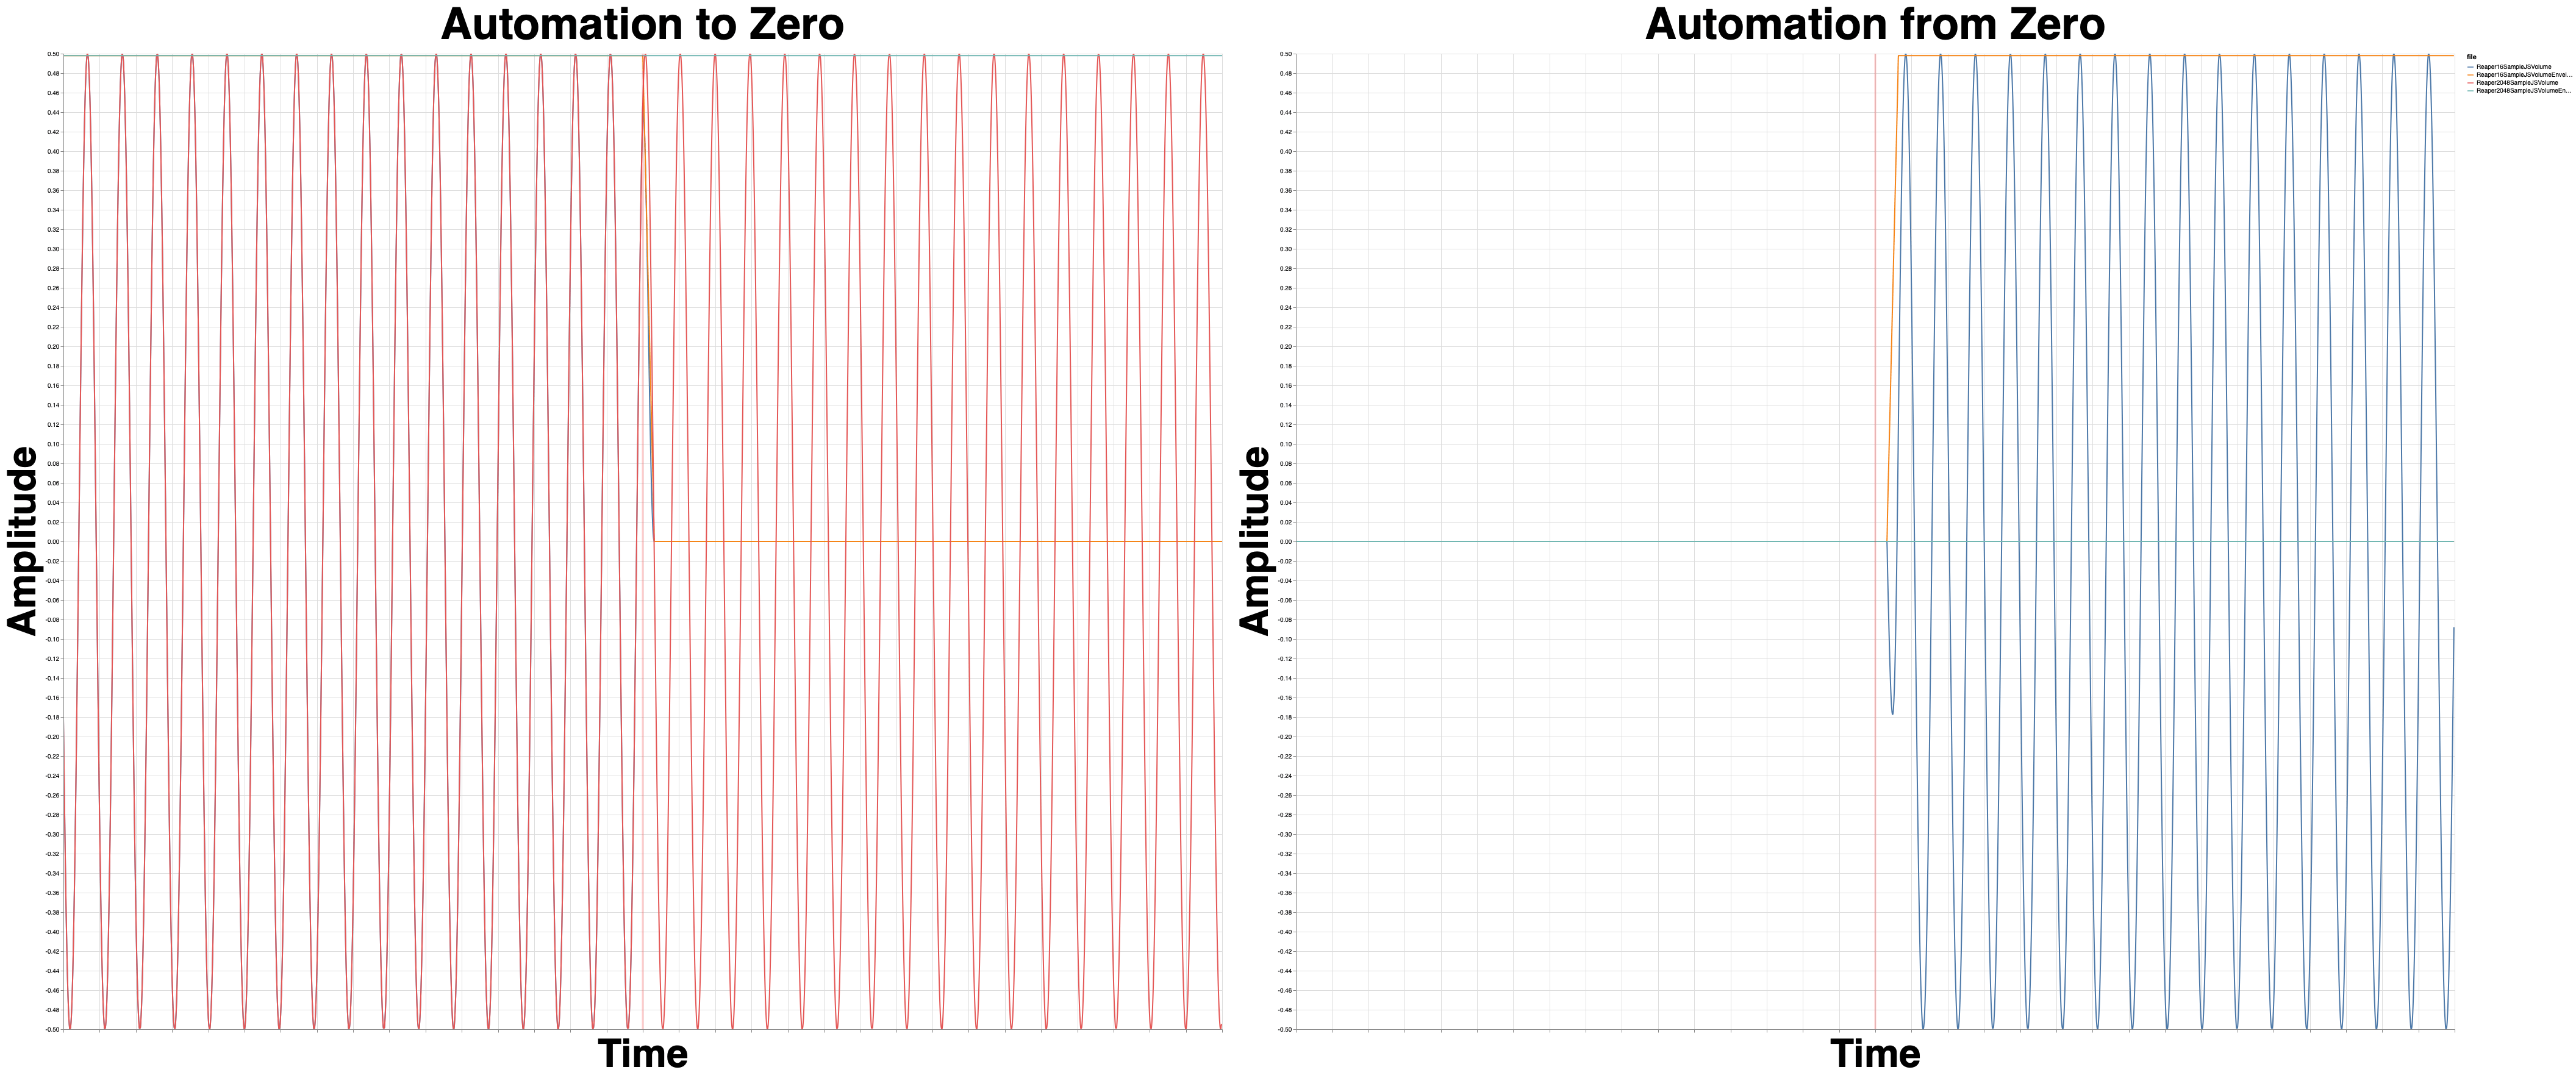
This is the JS Volume plugin. The 2048 sample version is not even on the screen on the right side!
I tried again with this code, to makes sure the slider value was being used per-sample:
1
2
3
4
5
6
7
8
9
10
11
12
13
14
15
16
desc: Volume

slider1:6<-150,150,1>Adjustment (dB)

in_pin:left input
in_pin:right input
out_pin:left output
out_pin:right output

@slider

@block

@sample
spl0=spl0*(2 ^ (slider1/6));
spl1=spl1*(2 ^ (slider1/6));
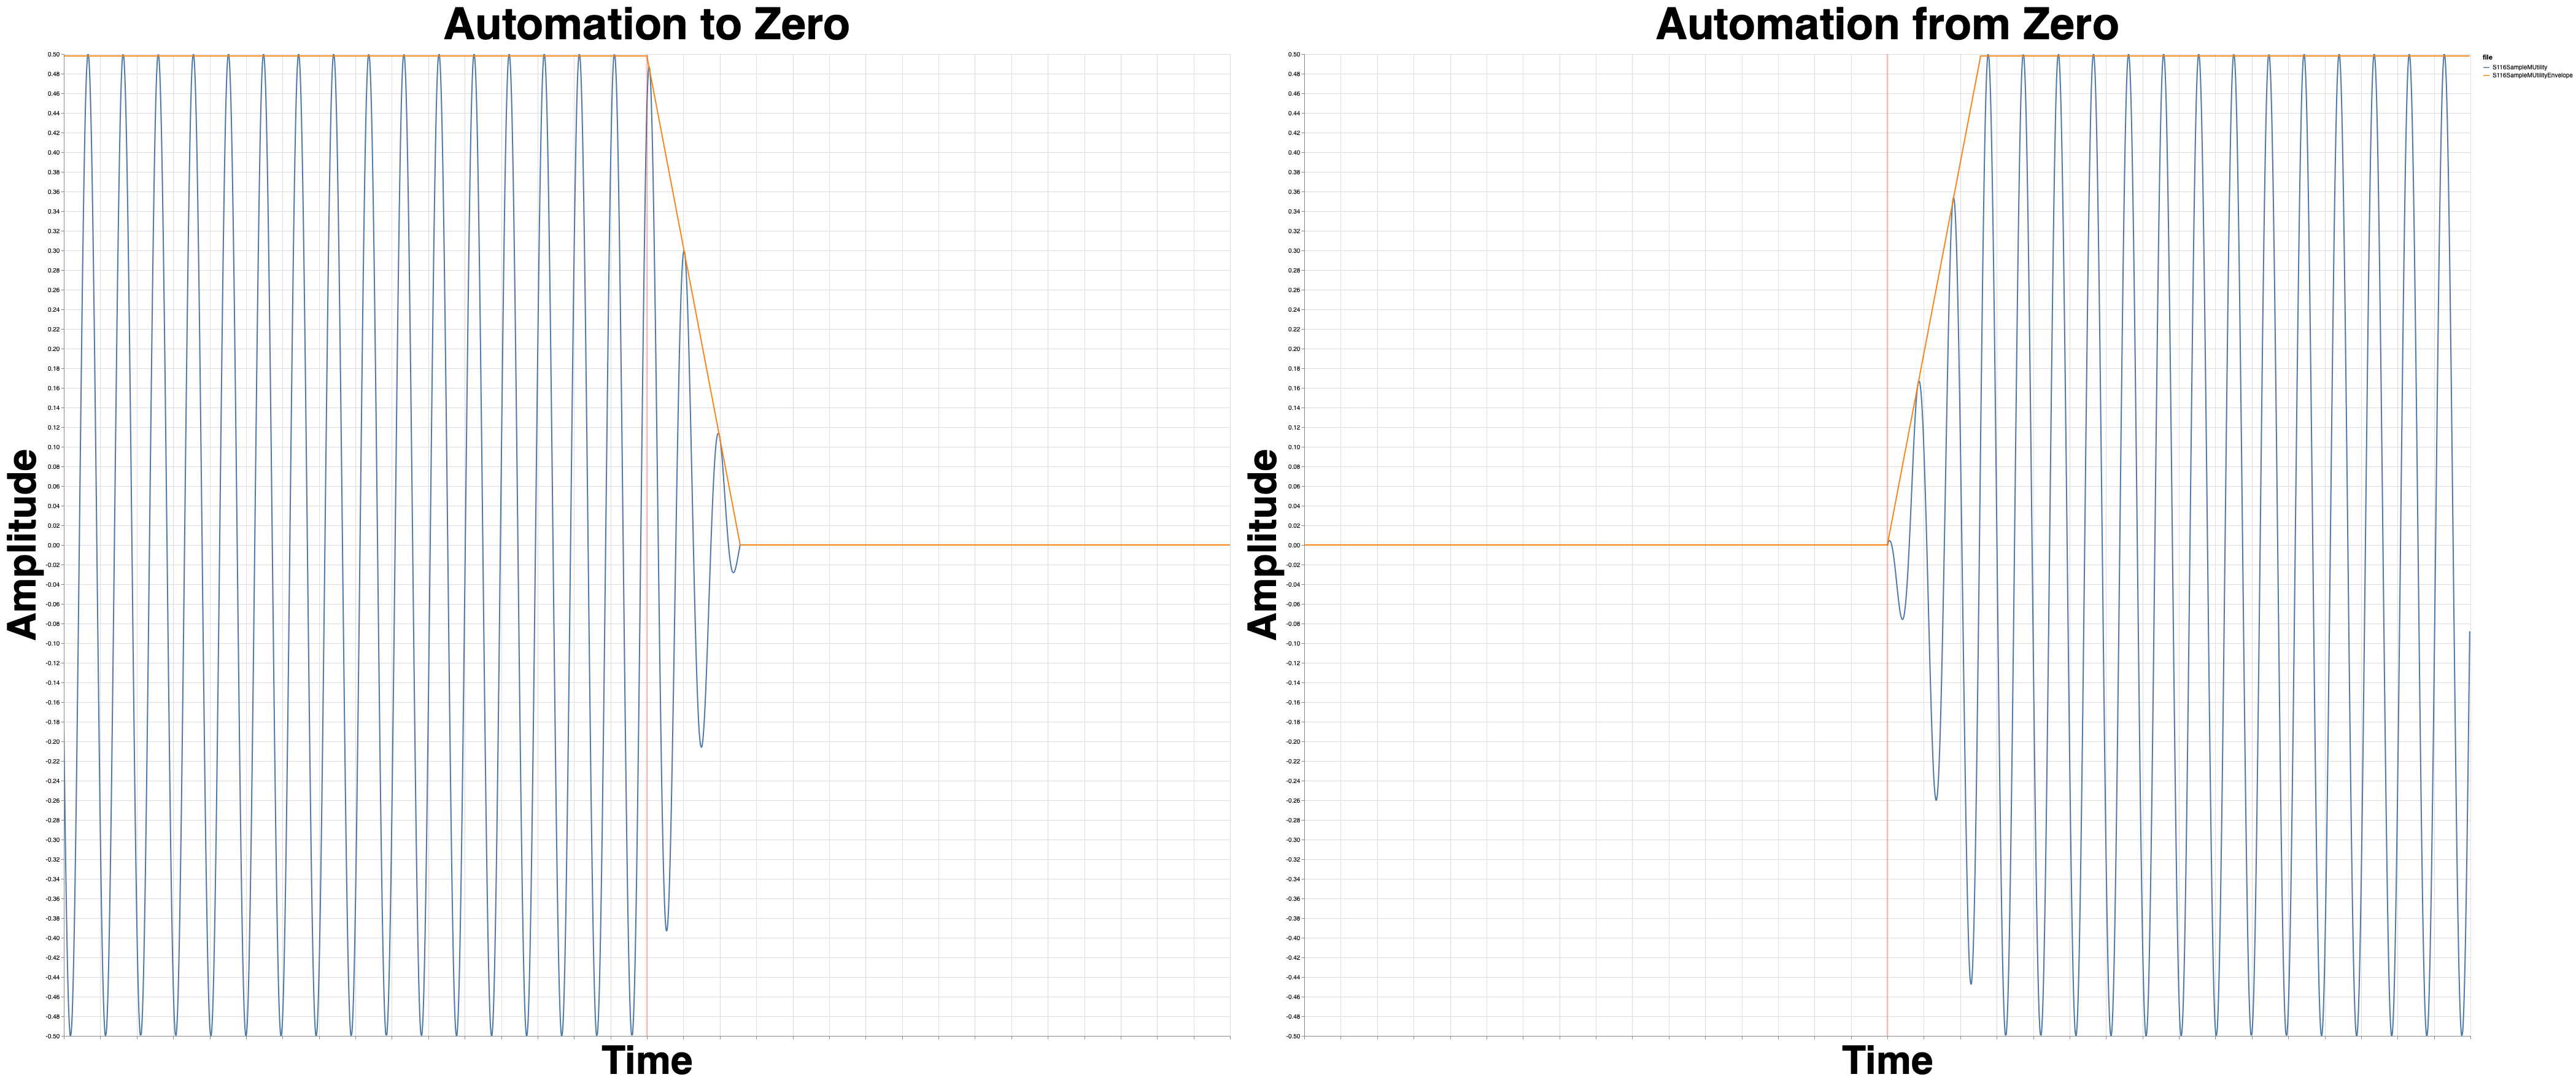
And the results were identical.
So that means the block is still an implicit outer loop, and samples seem to be getting the values retrieved in the block loop rather than the sample processing loop.
I could have screwed this up of course. Maybe someone will chime in. (Justin? Ring ring bananaphone?)
Studio One 4.5.1
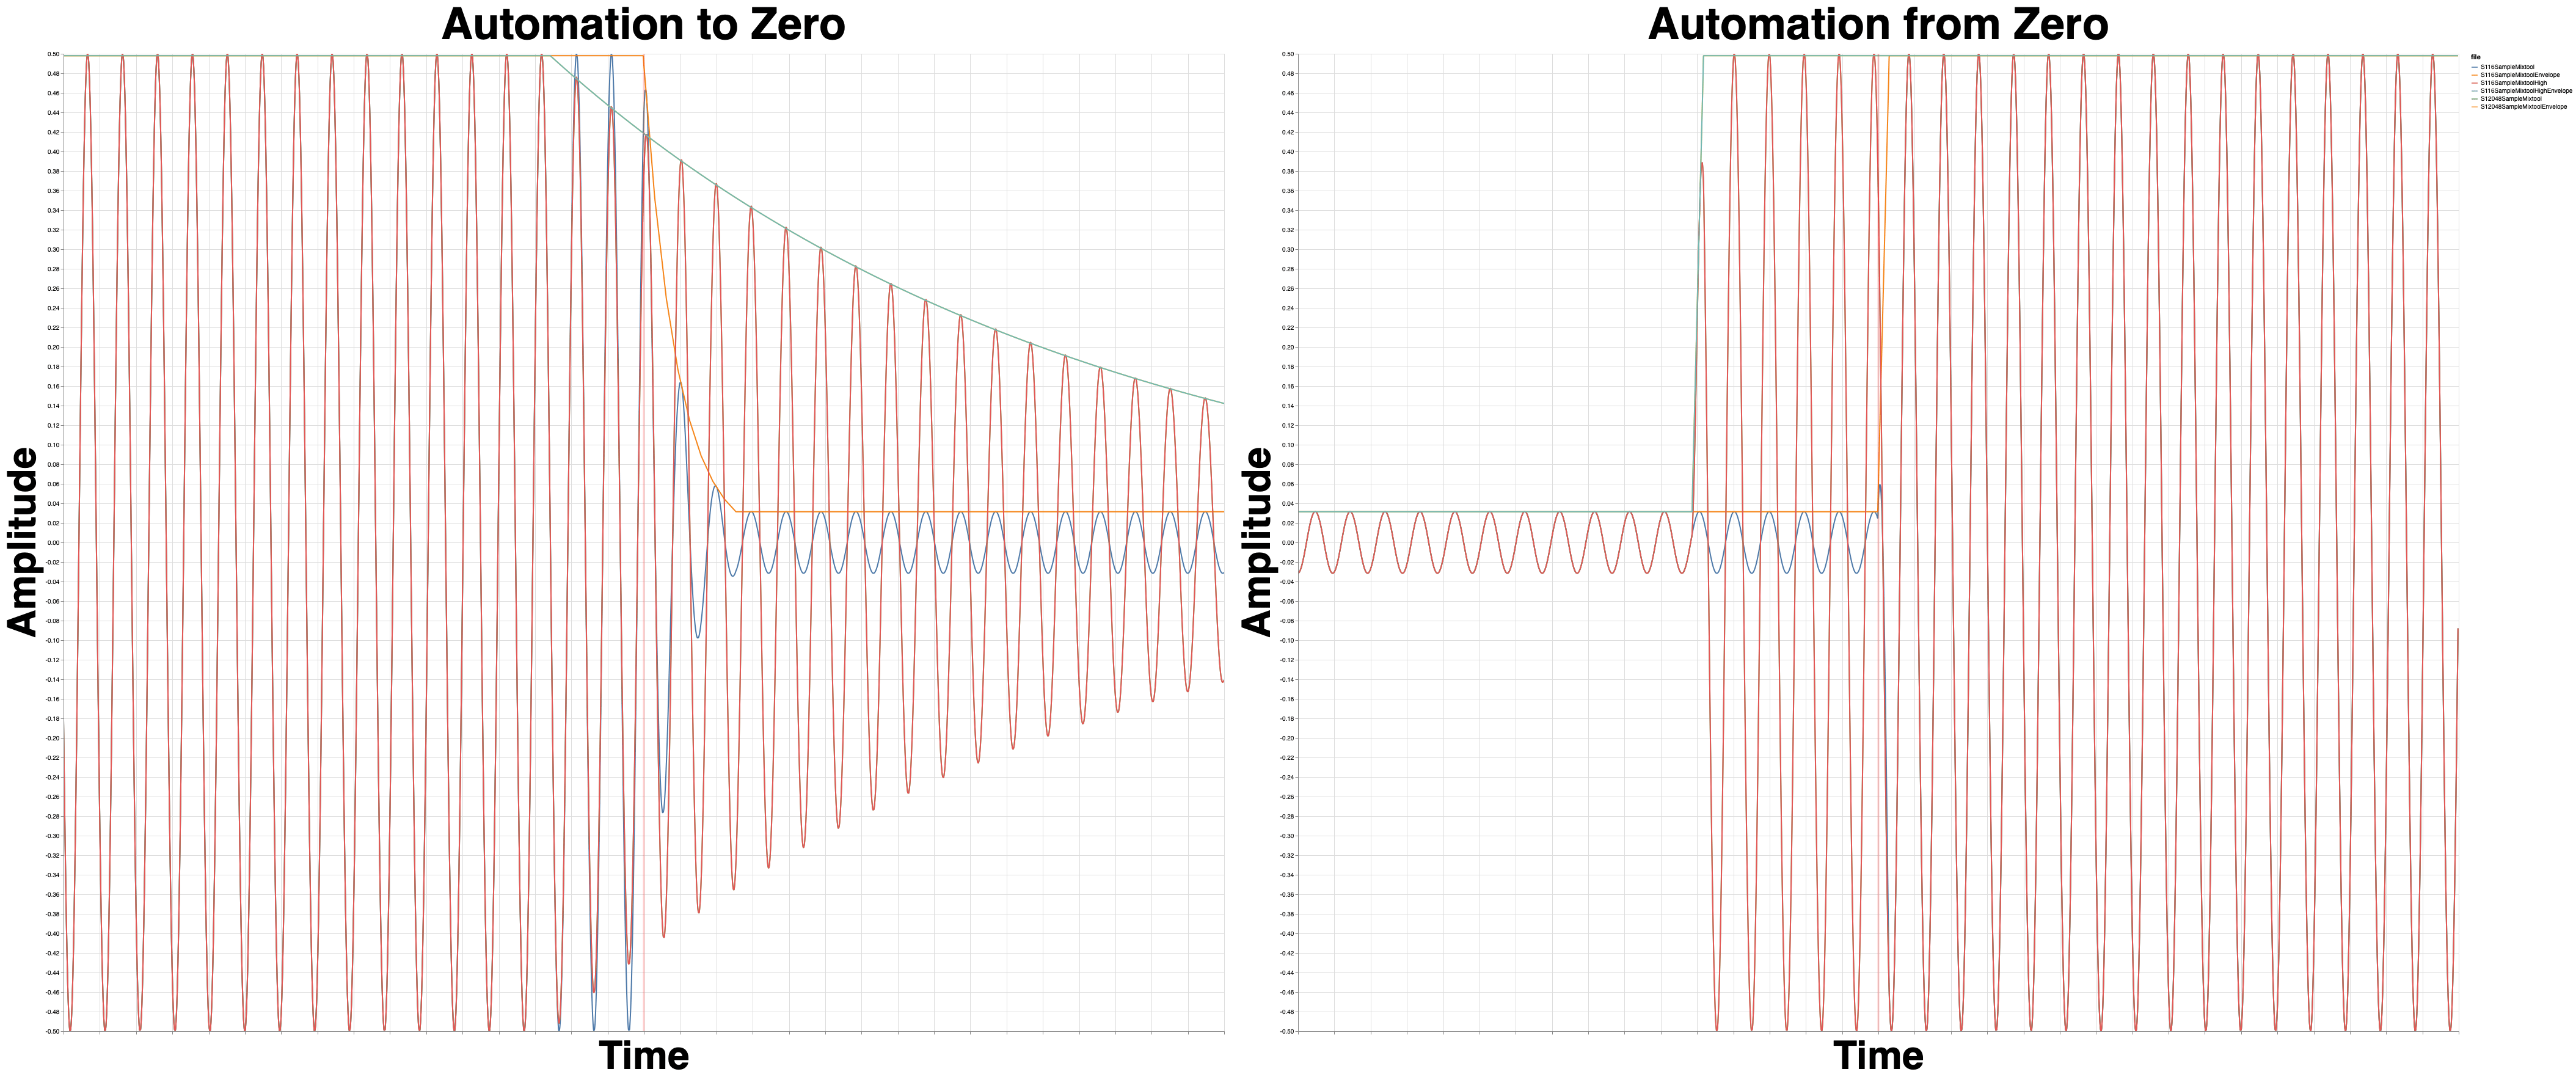
Studio One’s Mixtool doesn’t go down to -inf, only -24dB, so the graph will be a bit weird.
Notably it’s affected by the DAW’s buffer size. Even more notably I changed the “Dropout Protection” from Low to High, and that also affected the automation! That’s why you see 3 overlaid graphs!
So there’s at least 40 different ways that your automation could be rendered depending on if you changed settings at any point in your project!
Pro Tools 2019.05
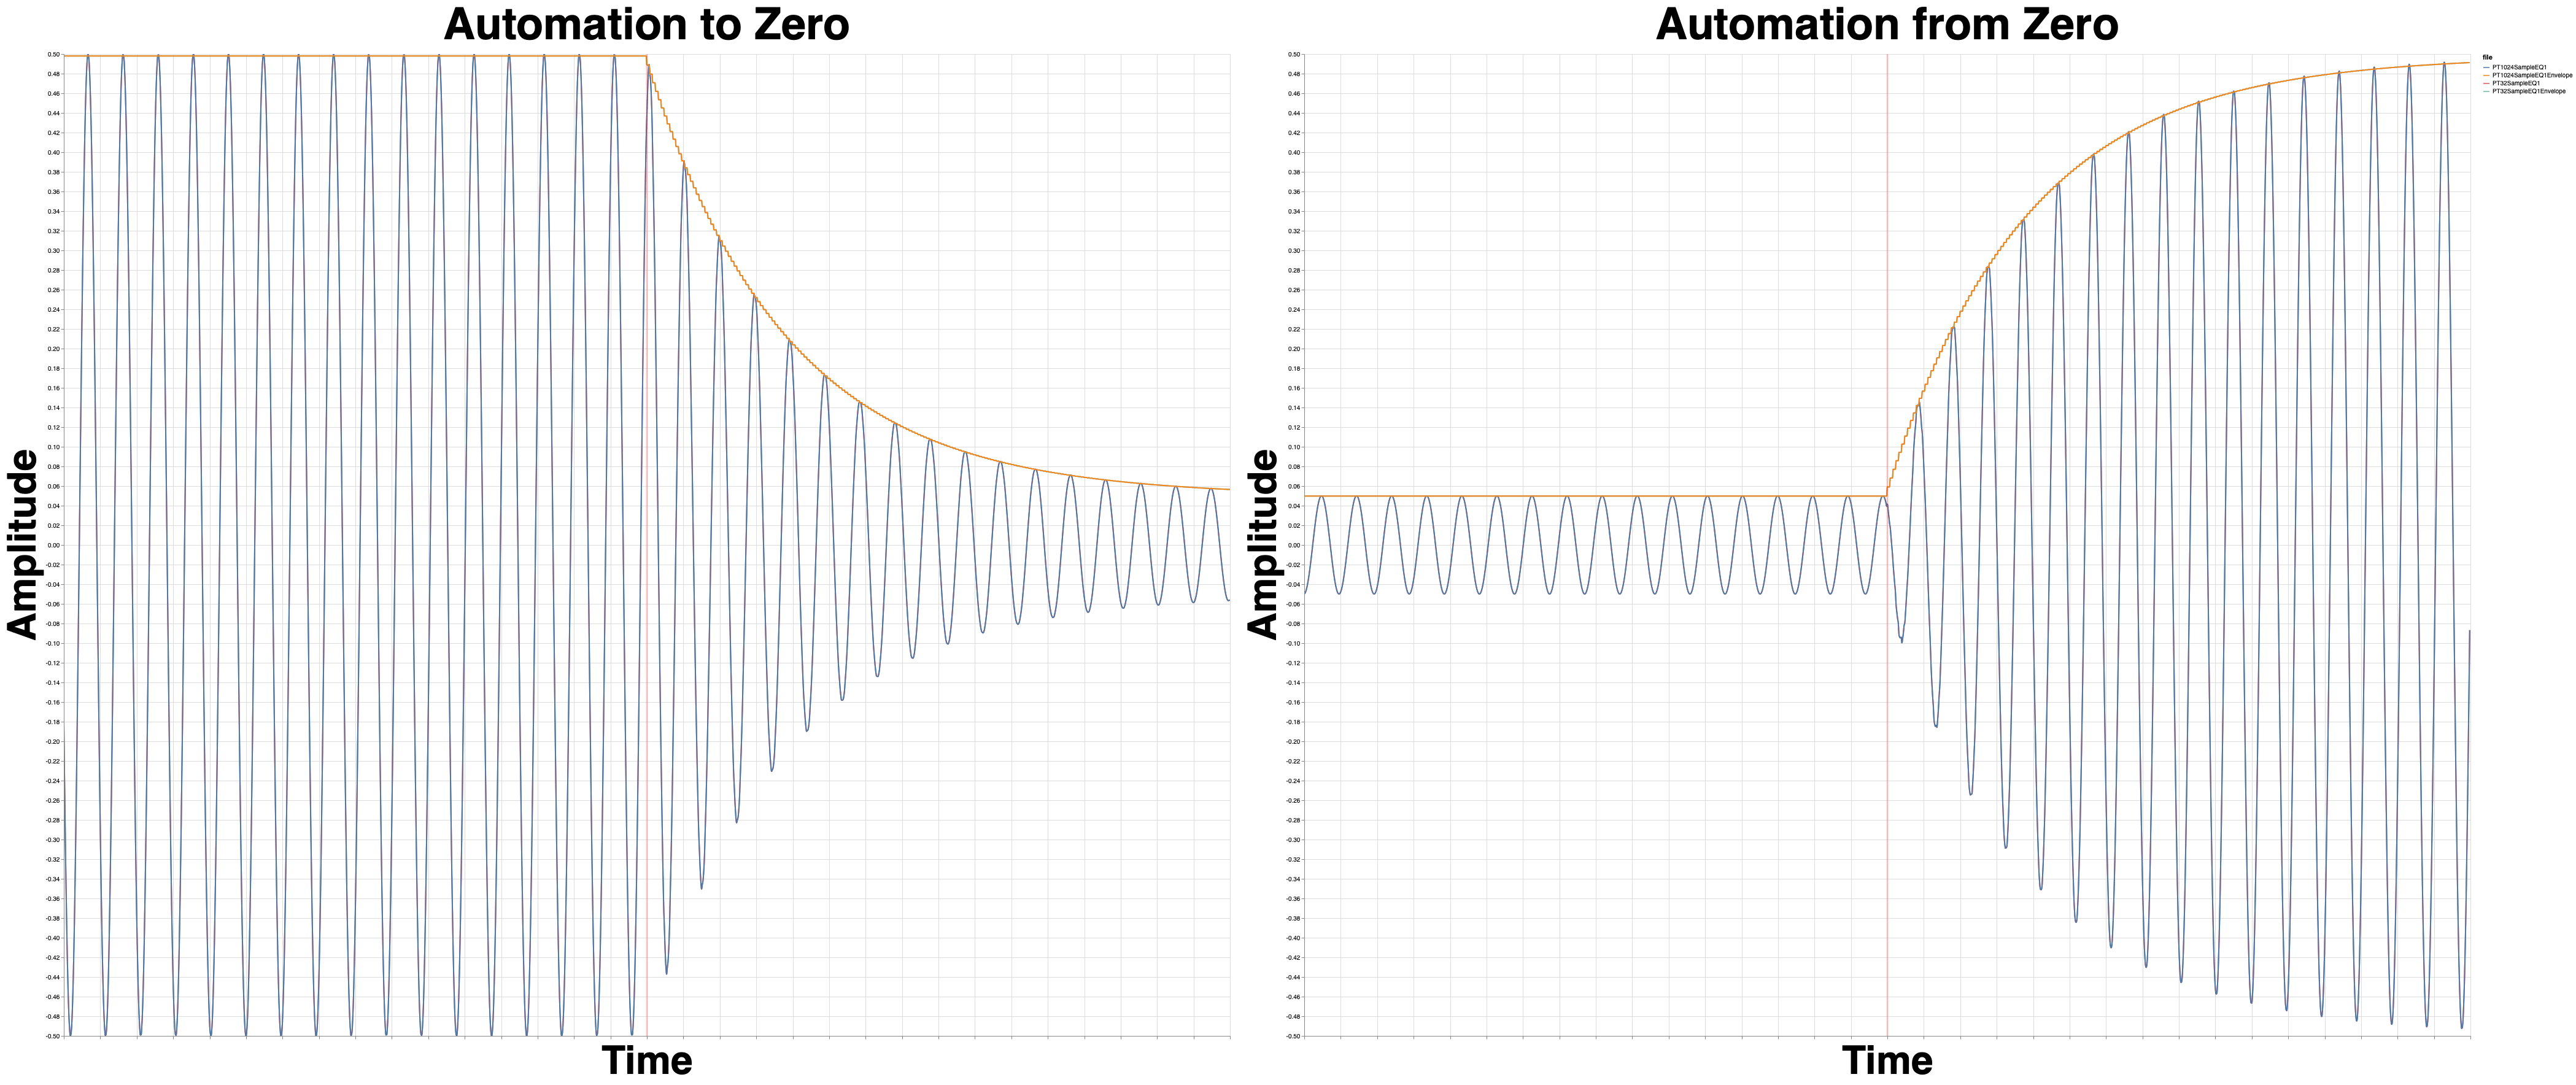
I first tried with PT’s EQ1, and both 32 sample and 1024 sample versions rendered the same. This is the desirable behaviour.
But holy cow! Look at that zipper noise, despite some drastic smoothing attempt? Don’t automate that!
Digital Performer 10.0.1

That’s about as perfect as it gets.
Trim only goes to -40dB, so that’s why you see the residual.
This is the best result of all products. I can also confirm that this behaviour has existed for at least 5 years.
Logic 10.4.5
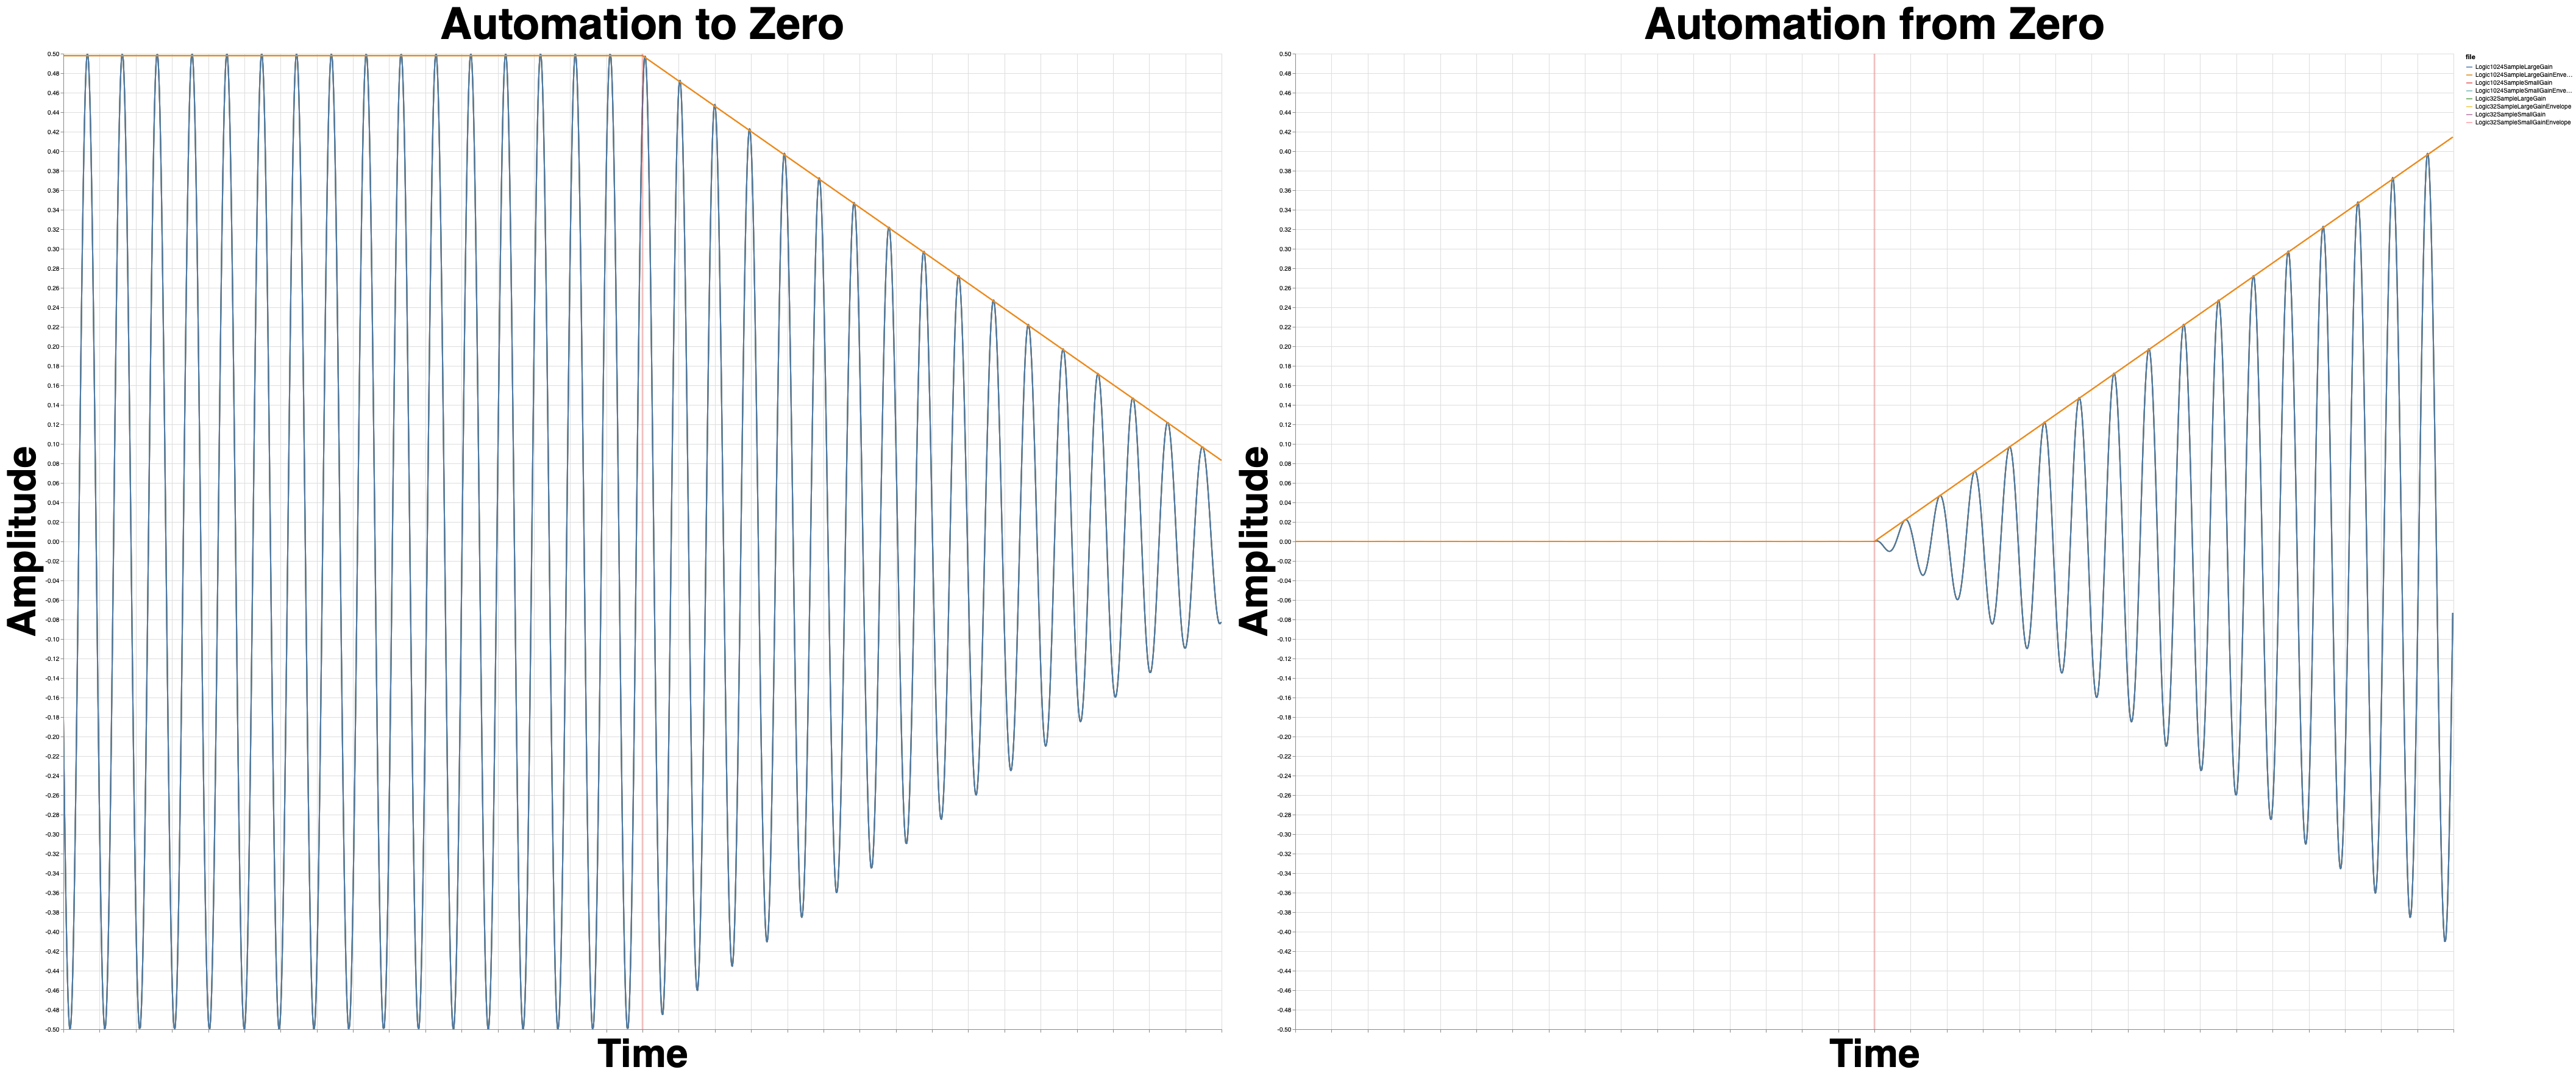
Logic’s gain tool renders the same for all 4 settings I tried. Large and small process buffers and 32 to 1024 device buffer.
Cubase 10.0.30
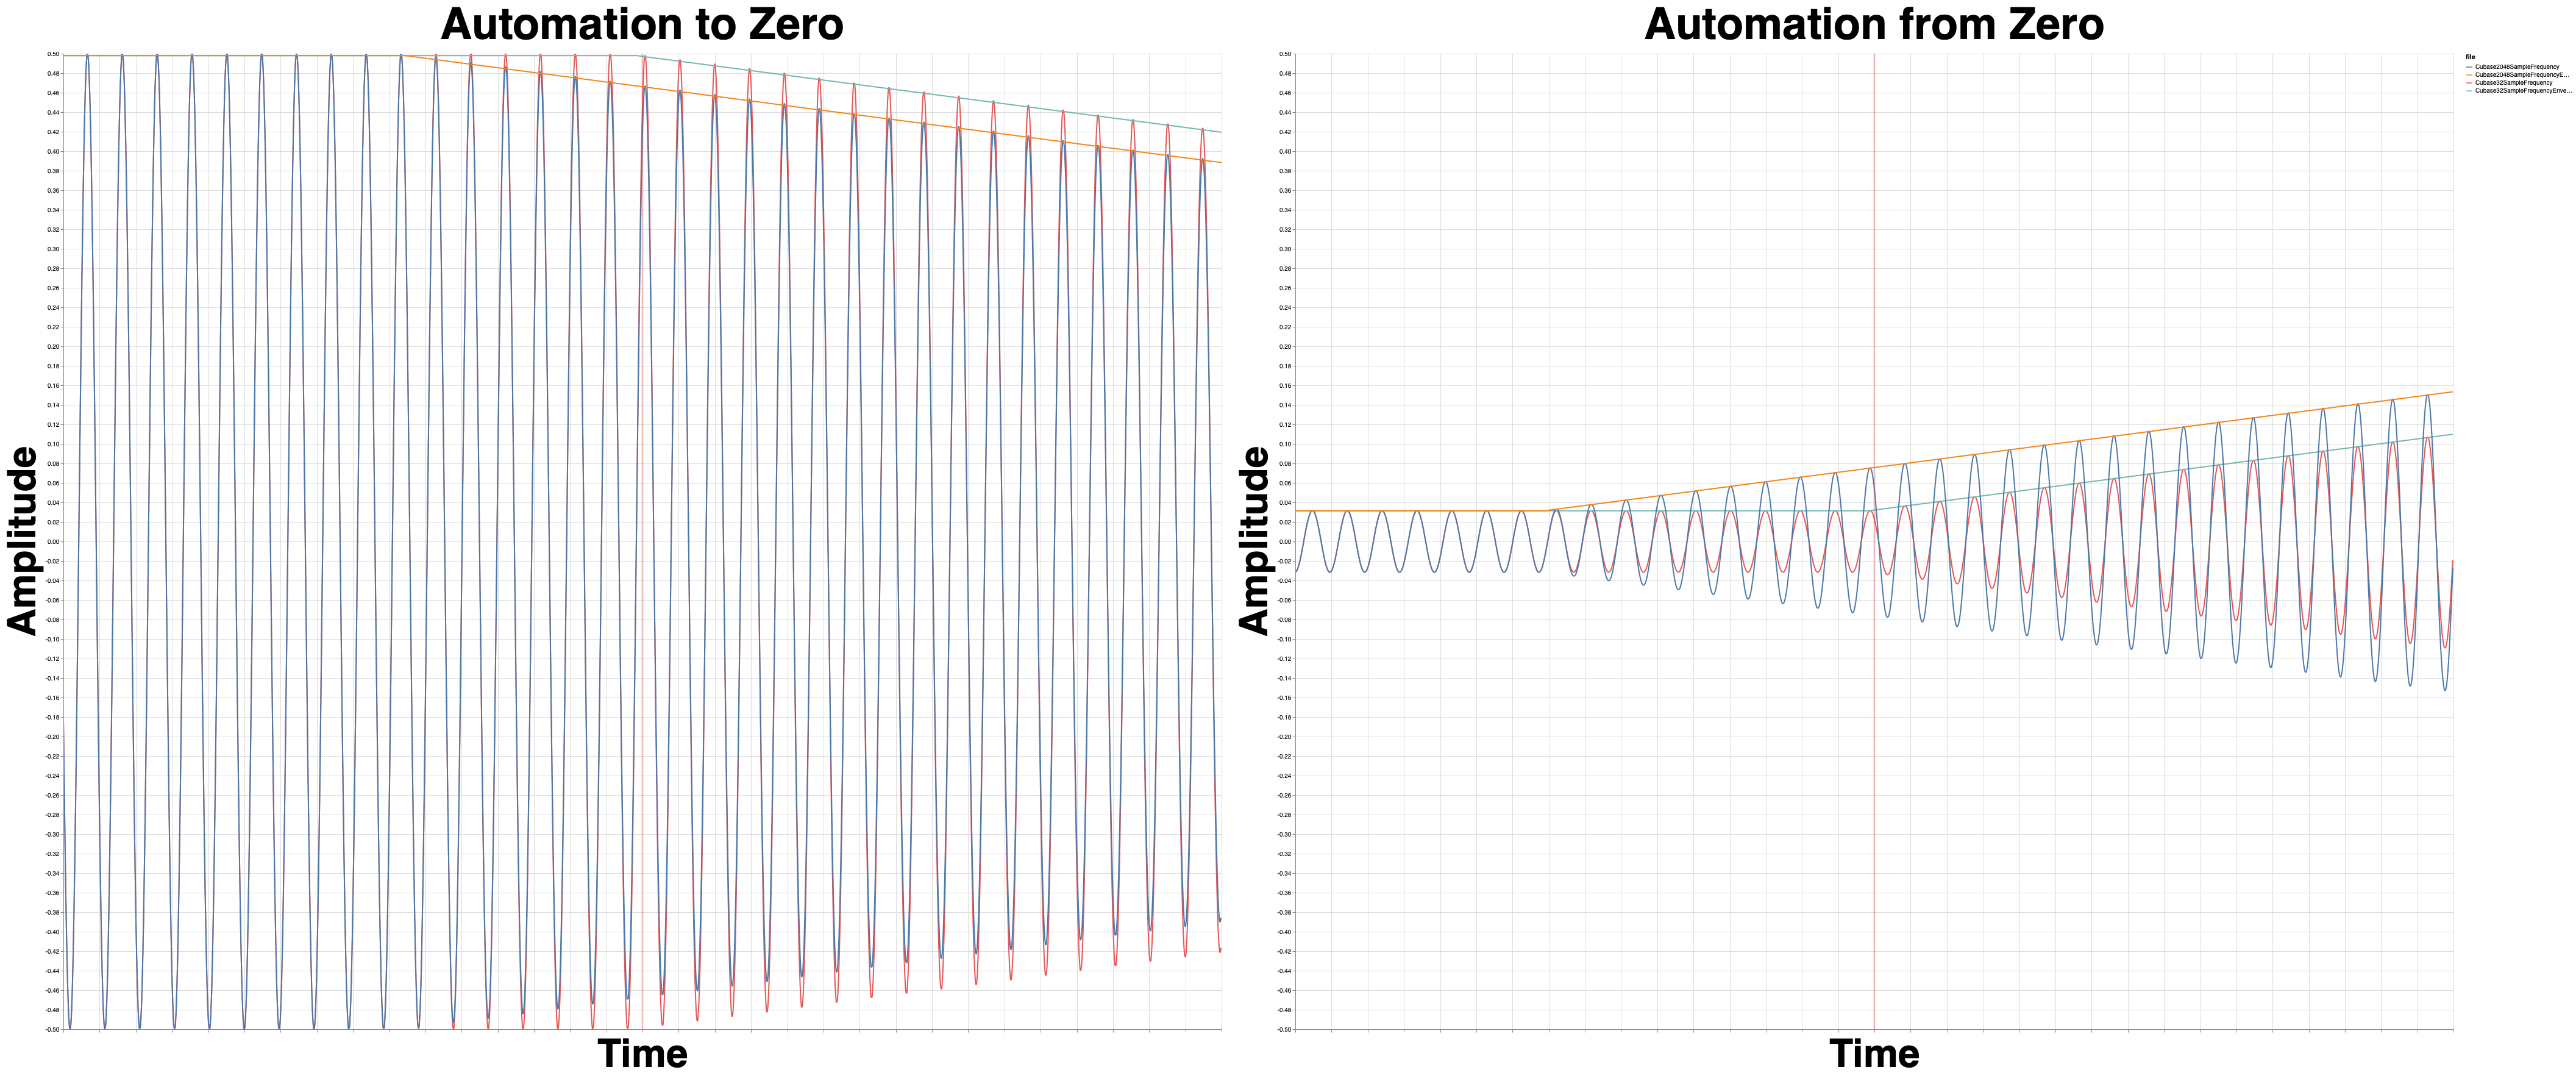
With Cubase I chose to use the “Frequency” EQ in lieu of a proper gain tool.
Not only is that parameter severely smoothed, it renders differently based on the device buffer size.
Cubase not even support it’s own VST3 sample-accurate automation (smoothed or not!) in its own plugins. Hmmmmmmmm….
Ableton Live 10.1
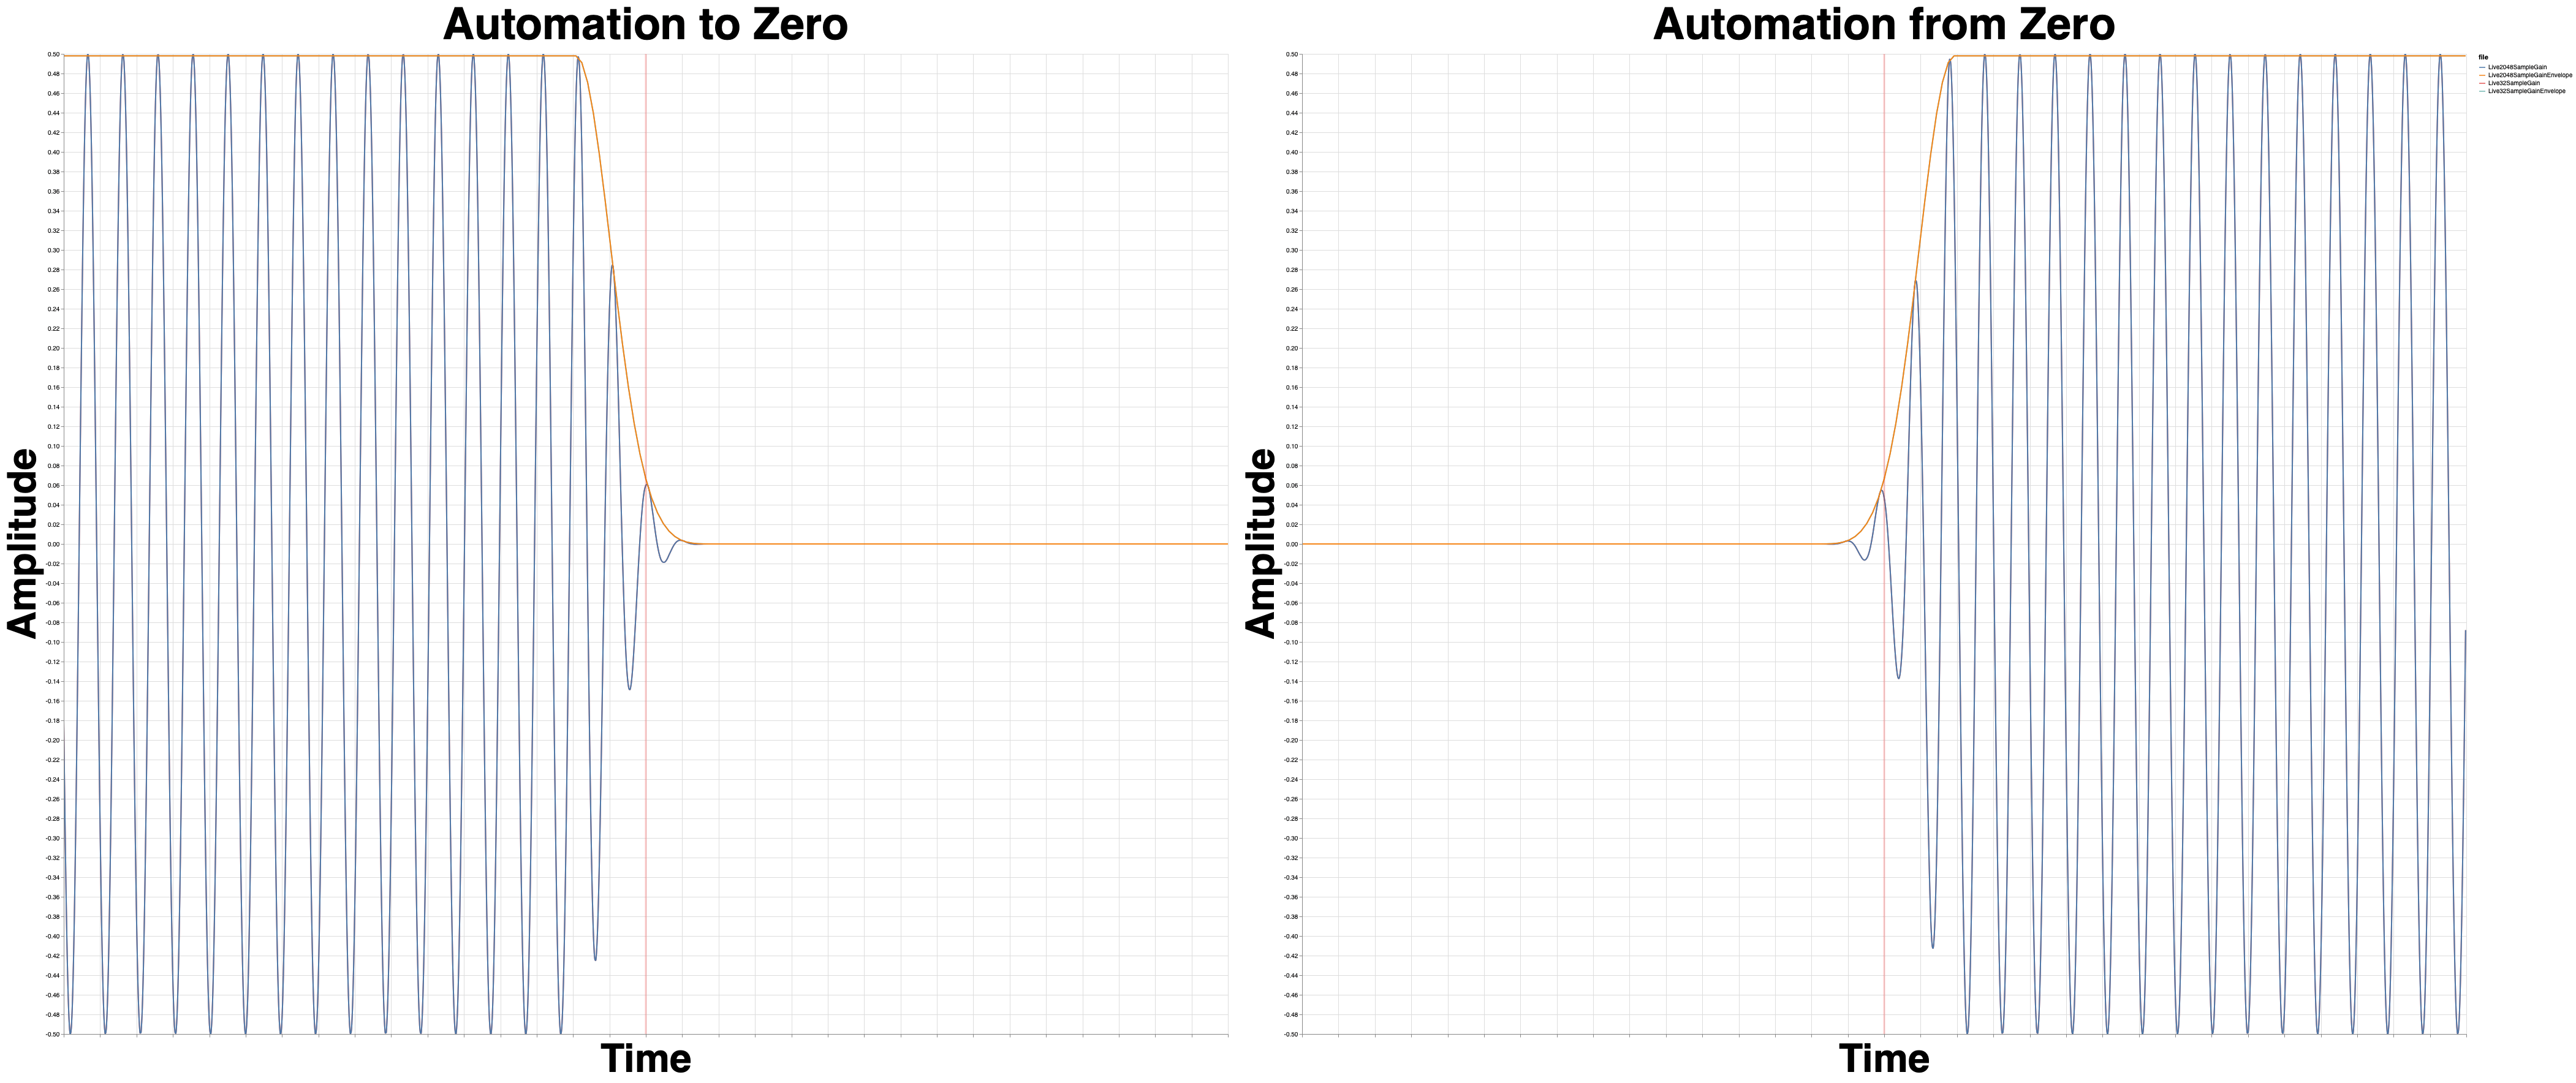
Live’s Native Gain plugin behaves the same for all buffer sizes. (It also has a pleasant and reasonable smoothing curve!)
FLStudio 20.1.2
FLStudio just works, correctly, in this regard. Nothing fun to see here.
This article wasn’t meant to be a competition, but instead an exploration of differences. In this case though, I must just say “Good Job FL”.
Another Problem - Offset
There’s yet another potential issue here!
So if the DAW sends audio in blocks, where does a block start? If you start render/playback at sample 256 and have a 512 sample buffer, does it send a buffer that’s 256 samples to start, or 512 samples?
The distinction matters because of when/where the plugin’s processing block asks for the next parameter change. If you have a parameter change on sample 256, there’s can be a big difference between calling for parameters changes at sample 255, and sample 257. If you’re DAW has block-based parameter changes then starting at sample 255 could mean you miss a parameter change for the whole block!
Now your audio changes based on where you start playback or render!
Tests
Test this one yourself. It’s surprisingly complex, and not every plugin responds similarly!
Conclusion
It would have taken me a year or more of working EVERY day to fully investigate and test this. There are so many factors that come into play, from DAW settings to the individual plugins and then the specific parameter.
The only way to truly understand how things are working is to TEST IT YOURSELF in your own environment. Try the plugins you have, with the DAW settings you use (and change!), using the parameters that you automate.
Just for something as simple as testing MUtility in Logic, there’s at least 90 possibilities for JUST the Volume parameter in MUtility (and I assure you, they are not all the same result!). Now consider every plugin that you have, possibly with multiple types (VST/VST3/AU/LV2).
There’s no way I could come close to a thorough investigation
Ardour/Waveform
I was not able to include Ardour or Waveform this time around. I originally was only going to do the “main” hosts for each major platform: Pro Tools, Cubase and Logic, but I was able to squeeze in some extra content while waiting for animations to render.
This content took way too much time to create due to the complexities of testing various products, developing my own solutions, reading documentations, researching, testing more, rendering thousands of files etc…
Both Tracktion 7 and Ardour are free (binaries for Ardour are paid, at a reasonable price that you decide). I strongly suggest getting them and trying things out.
You might even end up liking one of them!
Support Me!
This post took well over 100 hours to research, animate, screenshot, fail, fail, fail, fail, write, re-write and edit. Then I made the video. If you appreciate the information presented then please consider joining patreon or paying me for my time spent bringing you quality content!