Part 2 has taken a while, but we’re here, and let’s go.
Current using Mixbus 7.0.140
Other parts in this series:
Contents
MIDI
Note that these features below work with MIDI as well.
The Input-based workflow is brilliant if you work in a MIDI-input oriented way, with minimal editing.
Screenshots
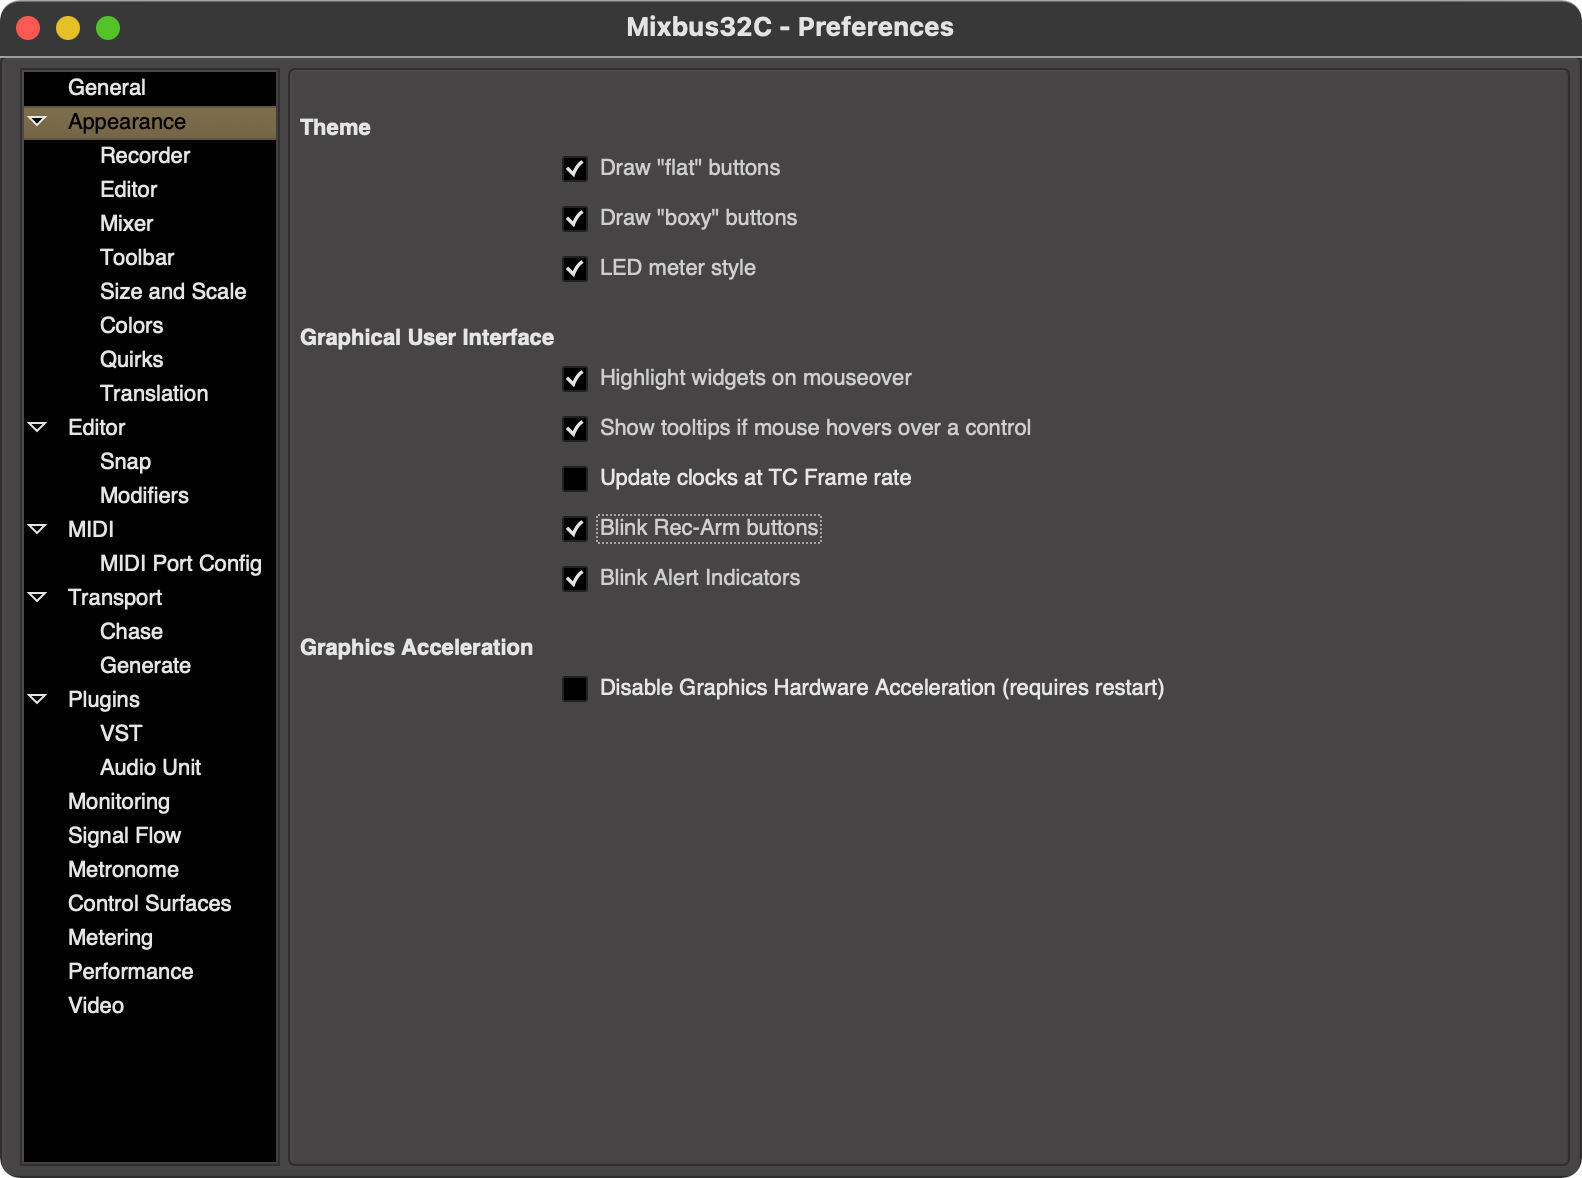
You may notice that my screenshots, or videos online, look different than yours. That is because I have the settings checked above.
What is TapeX
TapeX is not an emulation of the sound of tape. It’s a software-based graphical user interface which attempts to mimic the reel-to-reel tape machine workflow, and then some.
TapeX is presented through the Recorder window.
You get:
- A control bar
- Discard last take
- Arm Tracks
- All
- None
- Auto-input selection
- All-in toggle
- All-disk toggle
- A compact overview of the project in linear sequencer format.
- Record Arm Toggle
- Input selection
- Playlist selection
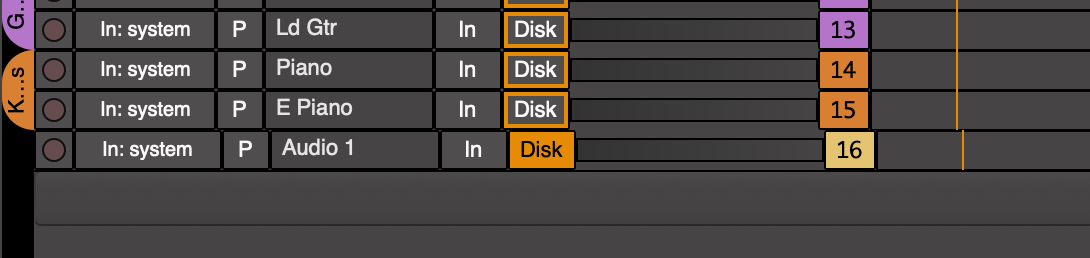
- Track Name
- Monitoring toggles - both can be enabled at the same time.
- “In” is the raw input
- “Disk” is the content already on the track.
- Track Number
- Quick Track add
- A compact set of meters for I/O (not for tracks!)
- Horizontally or Vertically oriented - Vertical orientation displays more meters in most scenarios, but horizontal orientation is likely easier to follow the meters for the average user.
- VU/Peak meter
- The only setting I see for these is
Preferences->Metering->DPM fall-off. The other settings do not current appear to change the TapeX meter behaviours.
- The only setting I see for these is
- Show connected tracks
- Add track connected to this input
- Pre-fader listen - A solo for when using Mixbus’s Monitor section.
- Input Name - This is saved across sessions.
The sequencer area and meters deserve more coverage.
Ardour
Ardour 6.7 has the Recorder window, and it does not appear to differ from TapeX as presented. I might be missing something as I’ve only spent 2 days with Ardour 6.7.
If I am corrected or discover some differences then I will update this section.
Control Bar
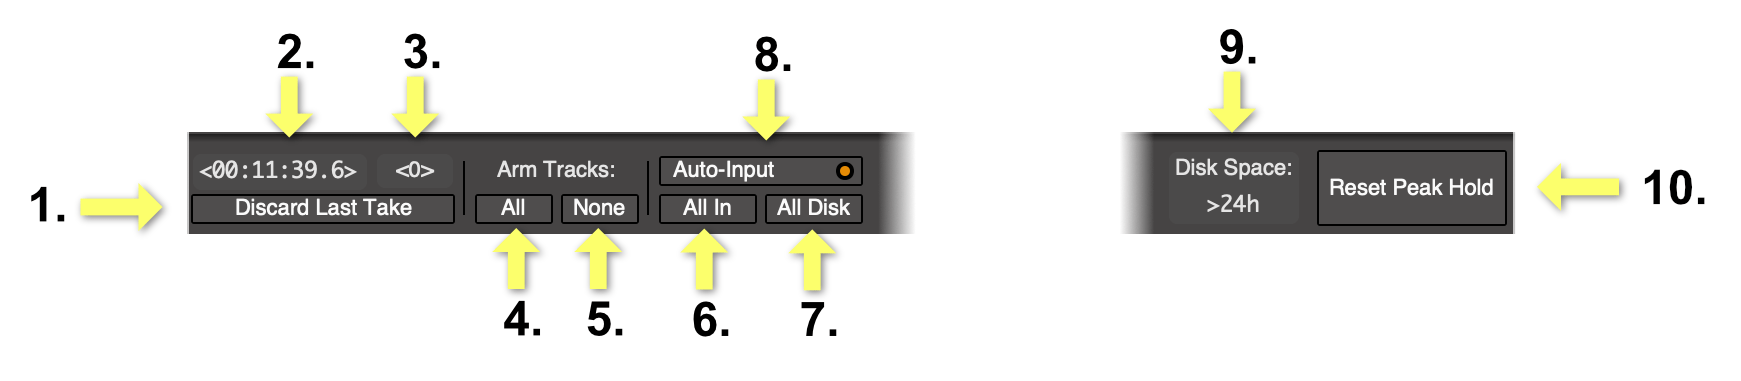
The Control Bar (as I’m calling it) has some handy functions:
- Discard the last take - As of the current version this should be called “discard most recent take”. It appears to only work a single time after a recording.
- Time of recording - How long the current recording has taken place, or how long the most recent recording was.
- X-runs - Number of underruns in the most current or most recent recording. An underrun is when samples are processed more slowly than the sample rate (in buffers or chunks). The driver needs some audio to playback without a glitch, and the DAW is unable to provide it. That’s an underrun. It will cause a glitch in the audio stream that, and that glitch will be heard and/or recorded to disk.
- Arm All Tracks for recording.
- Arm No Tracks for recording.
- All In - Set all tracks to monitor input. (toggle)
- All Disk - Set all tracks to monitor what’s been recorded while the transport is active.
- Auto-Input - Automatically select In/Disk depending on if the track is actively recording.
- Disk Space - How much time you can record expressed in hours. Takes into account current bit/rate settings. This is linear, not for all record enabled tracks. 8 tracks with 1 minute of audio is 8 minutes of audio.
- Reset all peak markers on meters.
Sequencer?
The top section, where what the manual calls the “Tracks” area and “Record Timeline”, is what I’m calling the Sequencer.
I’m not certain that calling this a “sequencer” is appropriate. You can’t sequence anything. You can’t move anything. You can’t edit anything.
You can’t do anything but look, and that’s the point!
It’s a step up beyond what you would get on a tape machine, and a large step down from what you’re used to in a daw. If you need to do any editing you can head to the edit window and work on your project the same as you always have.
You are likely wondering, “Why? WHY DO THIS? It’s so dumb.” The point is that there are a number of recording scenarios where the ability to sequence or edit the project is a disaster, and the primary value comes from a comprehensive overview of what is recording. The recorder view provides that safety along with the information necessary to achieve these tasks.
Live recording is the prototypical task that the recorder window caters to. You want the following things from a “Recorder”:
- Fast input assignment
- Difficult to misplace/misalign audio.
- Difficult to delete audio.
- Comprehensive input monitoring.
- Graphical overview of the presence (not necessarily content)
There are some other smaller design goals, but I see those as the major constraints in a live recording scenario. The Recorder window provides an audio recording workflow within these constraints, while still providing some niceties available in the digital world.
Could they have added a “lock all” button to the editor? Yes. Could they have added a “shrink all tracks” button to the editor? Yes. Could they have added input assignment/track reveal to the meter bridge? Yes. Could …. probably.
I appreciate the simplicity of providing a targeted view for a set of tasks. I can only imagine the havoc it would wreak on (even advanced) users when they click that lock-all button unknowingly.
Alternatively imagine the frustration for live recordists who get told, “Ok, here’s a great way to work live. First do A, B, C, X, Y, Z, make sure you never touch button M, re-arrange your windows to look like this, and then if you want to work normally you have to reverse all of those steps!”. Gross!
Sequencer? Features
Right click on input opens input-assignment
Automatically resizing
As you record, the blocks that represent audio in the record timeline are automatically scaled so that you always see the full recording. THERE IS NO HORIZONTAL SCROLLBAR.
Once again this is something that you might find bothersome, but there are recording scenarios where the operator doesn’t want to fuss with a UI element in order to understand what’s happening in their project. A simple glance is all that’s necessary to see what’s going on - always.
I love this feature, and I wish it was the default for every DAW.
Yes, you need to zoom sometimes, but a project-wide auto-zooming view is indispensable for many workflows, particularly mine.
Input Assignment
I’ve discussed Mixbus’ input assignment before, and it plays in to any discussion about TapeX or the Recorder window.
If you right click any input assignment, then you will be presented with the input assignment window. You don’t get the easy-to-multi-assign benefits of its bigger full-project sibling, but it still allows you to quickly assign your input to almost anything in Mixbus.
I still wish it had a search window.
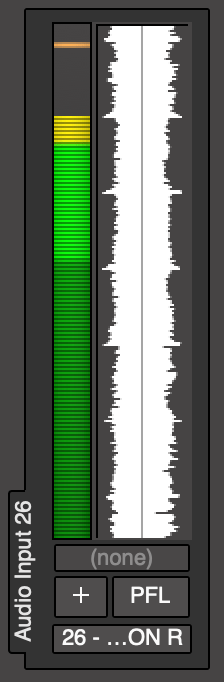
Meters
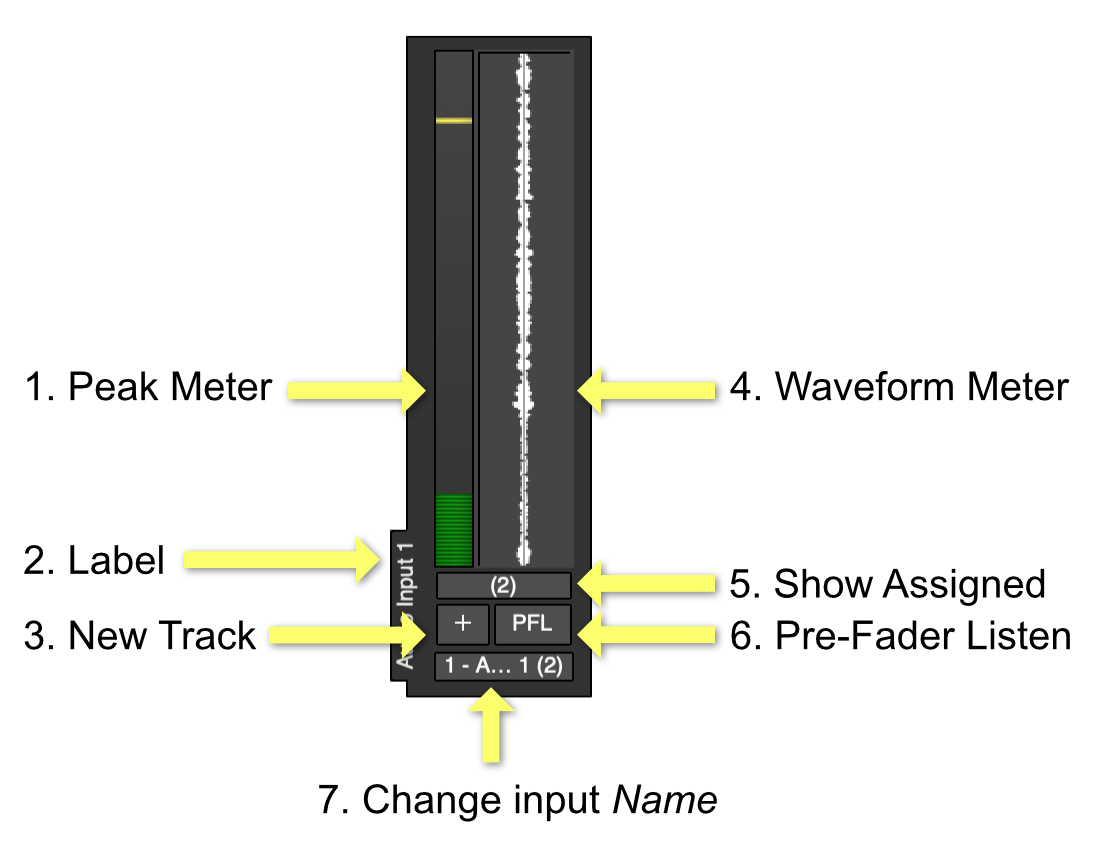
You get as many meters that will fit on your screen in a scrollable container. These meters correspond to audio inputs external to mixbus. Each meter has the following features:
- A peak meter which falloff adjustable in
Preferences->Metering->DPM fall-off. - The track name.
- Create a new track assigned to this input.
- Waveform meter, with temporal clipping indicator. The display window is currently non-adjustable.
- In the Sequencer?, show all tracks assigned to this input.
- Pre-fader listen, solo this input.
- Change the name of the input, persists across sessions.
The meter section allows you to develop a workflow that’s centered around inputs rather than around tracks. Most DAW workflows assume that you have a track, then do backflips to learn about the input assigned to it. The recorder window starts by showing you the inputs and the operations revolve around the inputs as the audio controlling container.
If your tracks outnumber your inputs, then this inversion may not make sense. Anytime there’s a 1:1 mapping of inputs to tracks, or more inputs than tracks, then it makes sense to orient your workflow around the inputs.
I’m particularly enthused about the “Show Tracks” feature. Not only does it immediately tell you how many tracks are assigned to the input, a click narrows the sequencer? display down to only showing tracks assigned to that input. Clicking the button again removes the display filtering. The button turns red when you are currently narrowing so that you know which input assignments you’re looking at, and that the filtering is enabled.
Multiple inputs can be filtered against, so you can say something like, “Which tracks are connected to my DI input and my Vocal mic input?”.
Fantastic feature if you have a lot of inputs.
Complaints
Control Alignment
Controls do not always align in what I call the “Sequencer” view.
This misalignment also appears to affect the playback cursor.
I’ve only experienced this when adding a new track. Re-opening the session fixes the issue.
Waveform Style
The waveform is an indistinct white-on-dark-grey blob.
There are a variety of ways to use a peak-waveform display to indicate more than peak value over time. Frequency can correlate to color, level can correlate to color, outline can be used as an indicator, RMS/VU and peak can be overlayed, etc…
I know of LUA scripts that manage to draw dozens of high definition informative waveform displays in realtime with reasonable CPU usage (without reaching to the C api except to drop pixels on the screen and grab FFT values for a small buffer). Mixbus barely manages that with a simple white blob (the display often stutters for me).
At the very least there should be an outline on to increase contrast or the meters should somehow display the colours of the connected tracks.
Meter Item Spacing
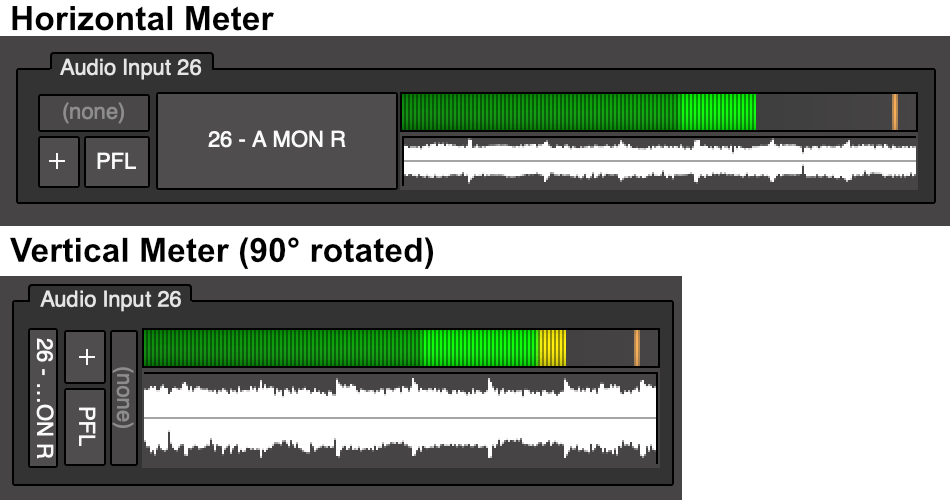
Compare the horizontal (Preferences->Appearance->Recorder->Input Meter Layout) meter to the vertical meter orientation.
The horizontal meter has less height on the waveform. It does not appear to have more time resolution, and in fact seems to be blurry.
The vertical meter has a nice waveform meter, but the labels are difficult to read since the text is abbreviated.
Both of these could be alleviated by reducing the padding in the frame (the tabbed box with the input label). That would allow more room for the names in the vertical meter, and more room for drawing the waveform in the horizontal meter.
I would want the horizontal meter to have more time resolution or a larger time window. More resolution is not meaningful since there’s no time labels. A larger time window would be preferable.
As it stands, if the horizontal waveform drawing was crisp it would be superior in every way but fewer things shown on screen.
Both meters would benefit from being “full size”. I would like an option for the meter to take up all available space for its orientation and have a couple options for changing the time window of the waveform drawing.
Even just adding 4 buttons to the bottom of the meterbridge window would be better!
Meterbridge is Superior

It’s no secret that I love meterbridges. Ardour/Mixbus’ is great. You can adjust metering standards used, it’s resizable, meter values are labeled.
Why isn’t the recorder window’s meter a variance of the meter bridge? Add some buttons on the bottom row, make it input-oriented instead of track-oriented, remove the master channel, add secondary waveform views, done. (I know it’s not that easy to develop, but from a UX experience it is that easy to talk about).
I want different metering standards, or to at least know which metering standard I’m using. I want large meters that I can read across the room. I want value labels.
Tape machines had these things, TapeX should have these things. The meterbridge already has these things… hmm.
Recorder Undo
I suspect this is intentional, but “Undo” does not work in the Recorder window. The target audience for this workflow is likely averse to the idea of accidental undo, particularly given that it’s a reflexive action.
You can use the “Discard last take” button, and you are presented a confirmation dialog.
I can understand this reasoning and I wouldn’t mind it if it was not for a few problems:
- It’s annoying :) I like to use undo.
- If you switch to the Edit or Mix window, undo works normally!
- Particularly problematic if you want to make a quick mix adjustment, you’ve now broken that barrier of protection. Since mixing during the recording session is so common, I’d imagine nearly every user that uses the recorder window will end up in the mixer. If the point of “no undo” is to protect the user, then there needs to be a lock on it, not an implicit disabling of undo.
- “Discard last take” only can discard the most recent take, not the last take from the current project state. Even though it is unable to discard more than one set of takes, you are still presented with a confirmation dialog.
These problems lead me to feel like the “protection” is weak, but at a high cost of fighting the user.
Input/Disk labels sometimes incorrect
I encountered visual states where the “In” and “Disk” buttons in the tracks section did not faithfully indicate the state of that project. No markings, despite In or Disk being enabled and vice versa.
While I found this happening frequently, I was unable to determine how to reproduce it consistently.
Input Monitoring Label
The tooltips, layout and purpose of the Recorder window (and TapeX experience) give you the impression that “In” monitoring will allow you to monitor the input. The input.
What you really hear is based on your Mixbus monitoring setup. If Mixbus is processing audio then you will hear any effects on that channel. You won’t hear the input.
I think that it would be ideal to have a default method of monitoring the input, and not the audio that passes through that channel.
The intermingling of these concepts breaks the imaginary tape/recorder workflow. You now have to pay attention to your mixer and your mixer routing and be aware that the labeling of controls on your “tape machine” is functionally incorrect.
If the control was “Monitor Channel” then I wouldn’t be as bothered, but I would still want a true, easily accessible, per-channel “Monitor Input” function.
Conclusion
This article has been more of an overview than a review, and that’s intentional. These features are obviously useful to the audience that they’re targeted at, and they are executed well.
If you read this article and you think the existence of the TapeX workflow is ridiculous, then it probably is ridiculous… for you.
Despite half the content being the complaints section, I think it’s remarkable and well-done (minus the “Input Monitoring”). If there were physical buttons to press, then it would be a nearly ideal recording environment for me. As far as digital solutions go, it’s among the best I know of.
Meta
This post took:
- 18 hours to use
- 14 hours to write
- 3 hours to struggle with a bug that was fixed in a beta/new version.
- 2 hours to compare to Ardour.
Disclaimer
I chat with Mixbus and Ardour devs often. I was given a license for Mixbus 7 and 32c, however I purchased the product with my own money with intent to use it.
If you feel these circumstances may have coloured the content, please leave a comment below. I will highlight any rational/logic/well-written objection in the post so it will easily be seen by readers.