I’ll be covering parameter modulation and hardware controllers in the next 2 posts. It may seem weird to bunch these things together, but in FLStudio they are linked (pun intended) together.
I’m going to spoil this article a bit, and tell you that this is one of FLStudio’s strong points. Somehow I rarely see people talking about it, or see it used in projects.
Get ready to get modulated!
Other posts in this series:
- Part 0: Introduction to this series
- Part 1: Introduction to FL
- Part 2: Recording and Editing Audio
- Part 3: Piano Roll basics
- Part 4: Advanced Piano Roll
- Part 5: Piano Roll Tools
- Part 6: MIDI Controllers
- Part 7: Modulation
- Part 8: Performance mode and Video FX
- Part 9: Workflow
- Part 10: Effects Review
- Part 11: Instruments Review
- Part 12: Conclusion
Contents
- Software Control
- Hardware Control
- Mobile Control
- Multilink Bonuses
- Controller Bonus
- Evaluation
- Support Me!
Software Control
FLStudio has a a few software based controllers that you can interact with via mouse/keyboard.
Touch Controllers
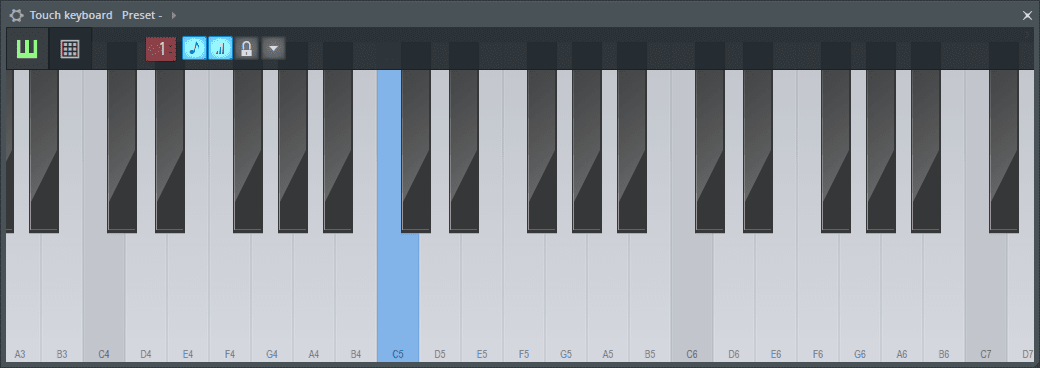
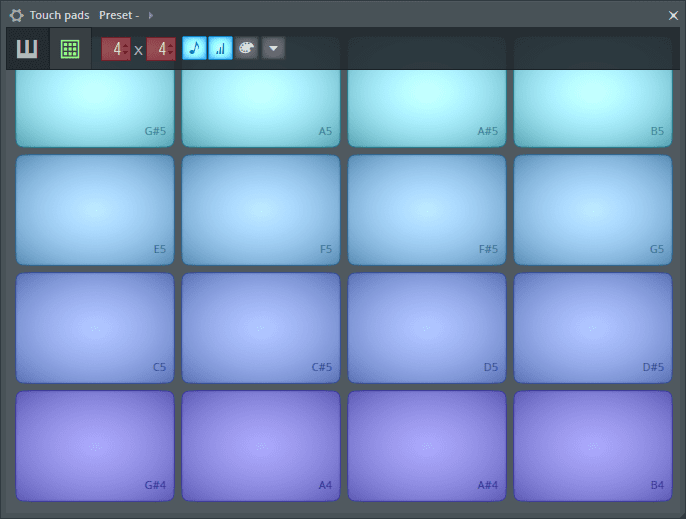
These controllers work via mouse or via multitouch screen. If you have a monitor or screen that allows multi-touch input than you can hammer away at the pads and pianos.
I do not have a multitouch screen to test this with, so I can’t really report very well on how well it works.
They do respond to mouse input though, and there are some decent options for adjusting the layout/look as you can see on the top of the window.
Typing Keyboard
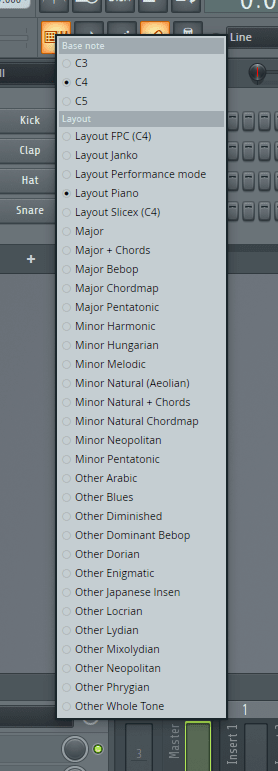
Your computer keyboard can input MIDI in FL. It’s a bit simpler than how it works in other DAWs, because in FL all you need to do is press a single toolbar button.
Now Z will play C, S will play C#/Db, X will play D etc..
If you right click the button you get numerous options. This allows you to change the mapping of computer keyboard buttons to MIDI output. One of the more interesting options is the Janko layout, which makes more efficient usage of the full keyboard than the default layout.
You can also select various scales, which will map each computer keyboard row to the next scale degree with no ‘sharps’ or ‘flats’ used by the row above.
There’s also the Performance Mode Mode… which I’ll cover in another post.
It’s easily one of the best keyboard->MIDI implementations I’ve seen in terms of creative expression, but it does appear to lack some things like adjusting velocity or octave easily. No MIDI CC output or toggles can be done without a workaround either.
Hardware Control
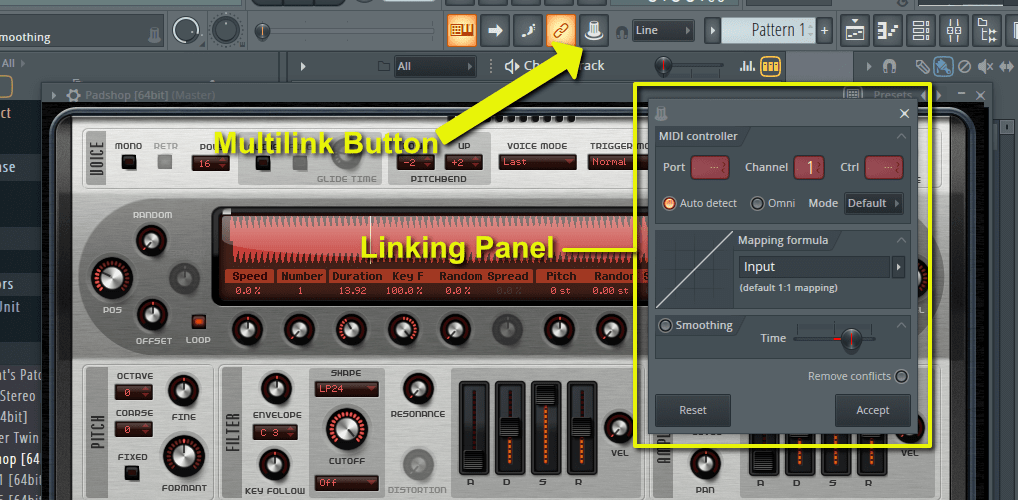
Setting up hardware control is dead simple in FL.
Firstly, you can set up your controller using one of the MANY default setups (the most I know of in any DAW). That’s simple.
Next you can use either the browser, the Multilink button or Native FL mapping.
-
Multilink - Click the Multilink button. Move the control(s) you want. Right click the Multilink button then
Link to Controller. Move your hardware control (or manually set the MIDI values). Set the scaling. Done. -
Browser - Sometimes Multilink doesn’t work. 99% of the time it does, but when it doesn’t you can browse your current project’s generators/effects, find the parameter you want then right click and
Link to Controller -
Native - Native FL plugins and some VSTs will allow you to right click and
Link to Controllerdirectly from the GUI. Very quick.
Mappings can be project wide, or global. (See the manual for information about this distinction. Per-Project links apply directly to controls, no matter what is focused. Global links apply across all projects but depend on the current focus.)
The mapping window has a great formula window that allows you to change the scaling of how your input is mapped to the output parameter. You can use basic math here to map things, and there’s a bunch of useful presets available via the right pointing arrow next to the formula input box.
The smoothing section helps interpolate values to avoid abrupt changes.
Something that I find suspiciously missing is increment/decrement mode. This is necessary to support things like DJ controllers (for various interesting uses) or anything with rotary encoders. There’s an “Inc” mode, but it only increments (increases) the control parameter, with no way to control decreasing it.
The whole process is easy and flexible. It’s great.
NOTE - I have a controller that sense out Active Sensing and this totally breaks FL’s MIDI hardware linking. It’s not common, but open up a MIDI monitor and check. Or if you open FL and you see that knob on your toolbar blinking green constantly, then you have active sensing.
Roving Target Links
Roving Target links allow you to assign a MIDI CC value that always controls your last touched parameter.
If you assign multiple Roving Targets, then they will be assigned in order of touch. So your last 5 touched parameters will all be available to your 5 roving target links.
It’s a small feature, but it can be rather useful for some. I can imagine this may be exceptionally useful for live performances.
Mobile Control
There’s an app for Android and for iOS that gives you a pre-setup application for controlling FLStudio.
To make sure it works you need to click the Enable Image-Line Remote button in MIDI Settings.
From there it’s a one button press to connect to your computer. You don’t need to fool around with IPs or connections or anything. Click to connect and done.
Inside the app you get a transport, a piano, XY controls, drum pads (fruity pad controller), a harmonic grid (with scales), performance mode controls (to be discussed), grossbeat controller, and a mixer. These are the default layouts.
You can create your own custom layouts. So whatever you see by default, you could have created yourself. The Accelerometer in your device can be mapped to CC, as well as the level of the microphone (which is pretty neat!)
The controls work well, with low latency. It’s easy to navigate.
Velocity sensitivity is not enabled by default on the piano, but you can add it via the editor. The velocity output is based on where you hit the key (higher is lower velocity) and not how hard you press the key. I like this method of controlling velocity.
The ‘pads’ have no velocity sensitivity at all.
There’s a ‘trackpad’ controller that should control your mouse cursor like a trackpad, but I can’t get it to work at all. It’d be rather interesting if it did work.
I enjoy that you’re not limited to a single control per page. If you want a grid controller and a keyboard, you can do it. If you want 2 pianos… go for it. If you want 2 grid controllers, then have fun!
The process of creating layouts is a bit tedious, but that’s what you get when there’s so many options. It’s relatively easier than some other control apps that I’ve found, so I can’t be completely critical of the process.
Multilink Bonuses
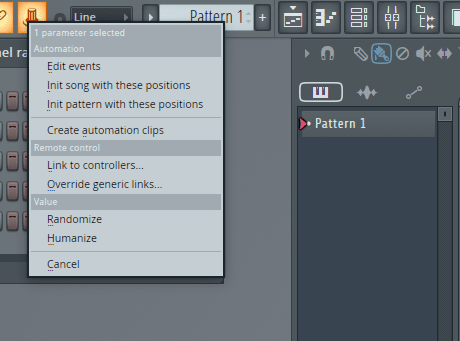
In the toolbar there’s the “Multilink” button. This is your easy ticket to mapping things. You turn a knob, or many knobs and they are captured when this is turned on.
From there you can easily link that parameter, or those parameters, to devices or internal controllers. However…
You can also do more!
Randomize & Humanize
The Multilink function grabs all of parameters that have changed since it was turned on.
From there you can right click the button and randomize or humanize the currently captured parameters.
Pretty cool isn’t it? You can select whatever parameters you want, and only what you want and randomize it or humanize it.
So what are the differences between randomize and humanize?
- Randomize - sets all of the values to new random values.
- Humanize - sets all of the values to a slight random change based on their current values
Pretty neat though isn’t it? Fast and easy to use targeted parameter randomization and “humaniziation”
Initiate with Value

A common issue when working with projects (or patterns in FL) is that you create some awesome automation but the automation actually ends up ramping to the next value from the beginning?
Or you want to do some automation, but you know that everything needs to be set to a specific starting values so your mix sounds right.
It can be a huge pain in some other DAWs to set these default settings… but FL makes it easy!
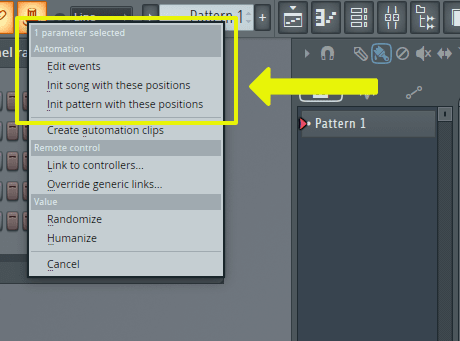
Click the Multilink button, move your controllers, right click the Multilink button and you can now initiate your pattern or song with the set values.
It’s quite brilliant how easy this is. In my projects I find this to be a big annoyance in other DAWs, but in FLStudio it’s extremely simple.
Controller Bonus
Velocity/Release Scaling
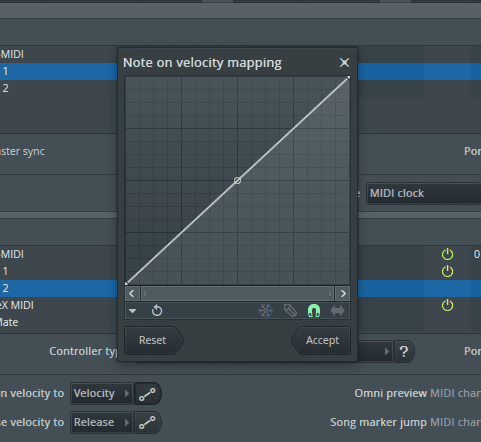
In the MIDI Settings you can individually map the velocity curve and release curve of incoming data.
Every DAW needs this. Some controllers just don’t let you reasonable reach the entire range of velocity. Adjusting velocity scaling can increase the expressivity of your playing, and this is a wonderful feature.
Even nicer still is that you can edit this with curves, draw manually, and do a bunch of strange things (like sequence?!) if you hit that down-facing arrow in the lower left.
Evaluation
Overall the process for dealing with controllers is surprisingly simple and offers you an immediate selection of flexible options for how things work.
For general music making use, it’s rather fantastic.
There is some downside though. If you use a controller that outputs sysex or 14-bit MIDI, then you’re basically out of luck with FL currently. If you want to work with filtering control data or doing programmatic things with your controller data then things become far more complex (well beyond the capability of the average user).
Support Me!
This post took 7 hours to research, screenshot, write and edit. If you appreciate the information presented then please consider joining patreon or donating!