Mixbus is often seen as a program that, after doing all of your work in another DAW, you drop in stems and mix with. I don’t think that this is necessarily the best use of Mixbus, since it’s a fantastic full-fledged DAW in its own right, however it is one of the best aspects of Mixbus.
The mixer in mixbus is not your typical digital summing box. Each channel has a selection of features that optionally can be sent to a mixbus with a number of features that goes to a master bus with a number of features which can optionally go through a monitoring section with a number of features.
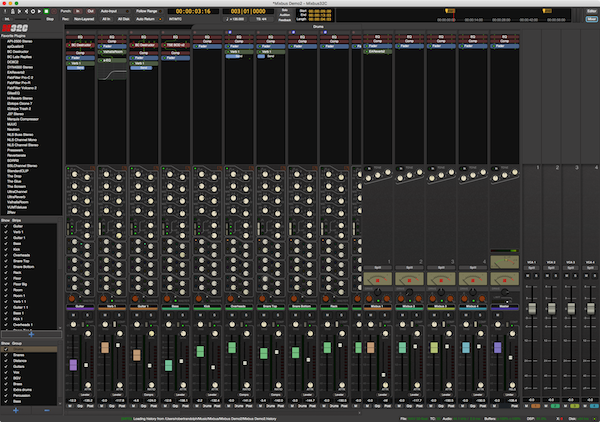
Let’s just dive in and go through what the Mixbus 32c mixer offers.
Contents
Channel strips
Every Audio, Midi and Bus (aux) channel in Mixbus has a channel strip with identical capabilities. Along with the features mentioned, each channel has a trim control that adjusts the input going in to the ‘top’ of the strip.
Mixbus’s channel strips offer a lot of flexibility and capability before you ever need to touch a plugin, so let’s go over what’s there.
Inserts and Settings
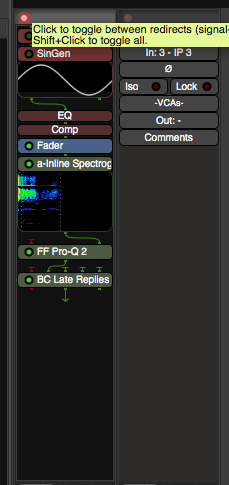
At the top of every channel is the inserts area. This is one of the best parts of Mixbus’s mixer I think. The fader, EQ, compressor and any inserts are easily moved around in the signal flow. This makes it simple to setup post-fader or pre-fader effects, arrange the order of the channel strip or place sends anywhere you need them.
The insert area allows you to open the plugin manager to select plugins. Existing plugins also have access to the pin configuration window.
The insert area can also be toggled to show the channel settings (also called ‘the switcher’).
Settings (switcher)
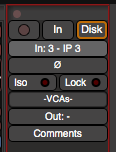
The top bar above the insert panel exposes the settings for the channel. Available are:
- Record enable
- Channel monitoring settings
- Channel input
- Polarity inversion - also check out the polarity optimizer
- Solo isolate - if a channel is set to ‘solo isolate’ then it is not muted when another channel is solod.
- Channel lock - disallows the channel from being changed.
- VCA connections
- Output assignments
- Comments - The comment box shows the first word of the comment, and you store other textual information there.
The switcher contains a number of the things I complain about other mixers requiring you to use a plugin for. Fantastic.
Plugin Manager
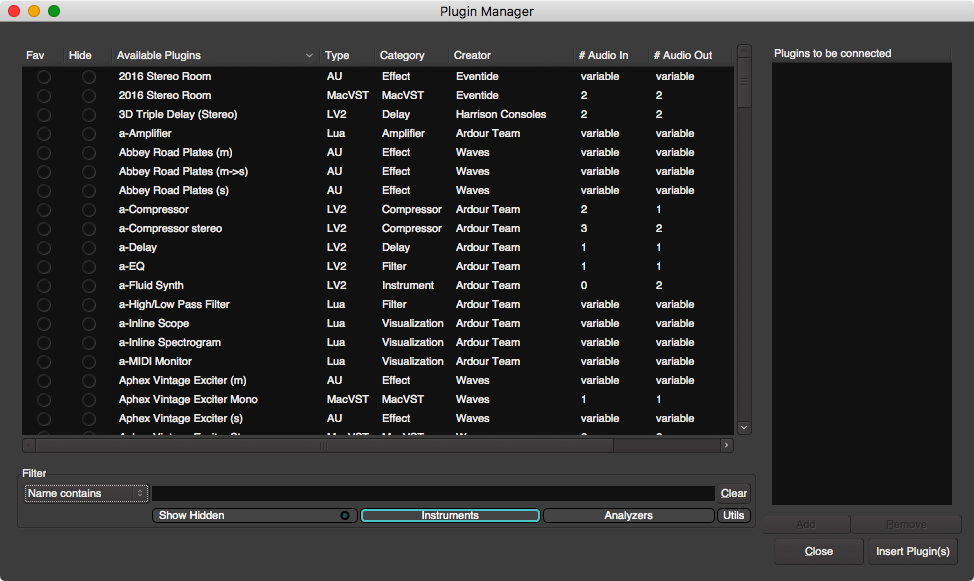
Mixbus has a fantastic plugin manager. It has a search that allows you to search by name, category, author, etc… There are multiple categories that you can filter or show exclusively. Multiple plug-ins can be queued to be inserted at once as well.
The plugin manager also has a favorites function that ties in to the favorites in the mixer list.
One of my favorite features is how easy it is to hide plugins. Most of us have plugins with multiple versions (Mono, Dual mono, Sidechain, 5.1, Extra Double Fancy… I’m lookin at you Fabfilter and Waves!!) and we only ever use one of them. Hiding this clutter is simple. If you ever need one of those then it’s a simple button press to show the hidden plugins.
Pin Configuration
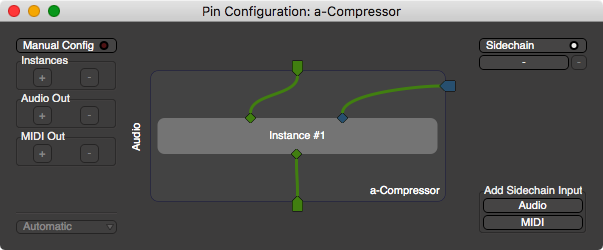
Pin configuration is a function of the plugin support and integrates directly in to the mixer.
Some plugins have more than 1/2 inputs or outputs, can accept midi or have auxillary sidechain inputs. Sometimes you may want to bypass a channel through an insert chain or route audio around a plugin for some parallel processing wizardry.
These things happen in the pin configuration window. Harrison has a great video on how this works, so I won’t spend too much time going on about it.
The pin configuration system is a welcome addition to the strange text-based routing systems that some other DAW’s mixers do.
EQ
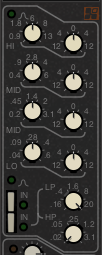
The EQ section on each channel is a 4 band parametric EQ with a low-shelf, bell or helf shelf, high pass filter, a low pass filter. It is a fairly standard digital EQ with fixed width. The width of the filter and shape of the curve does not change given the amount of boost or cut. The width of the filter is approximately a Q of 0.6, or around 2 octaves.
However, it does have a number of issues inherent to such common digital EQs…
Cramping
A common issue in EQs is that as the width of the filter approaches the Nyquist Frequency, the filter begins to exhibit what’s called ‘cramping’.
In the video above you can see how the right side of Mixbus’s EQ response becomes steeper the closer we get to 22khz (at 44.1khz sample rate). Analog EQs do not do this.
When in the shelf-move the EQ does not cramp, only when bell is used.
Edit (October 26th, 2017) - Currently I’m still investigating the ‘cramping’ issue with the EQ. Harrison has been very accommodating and informative regarding this issue. I’ve received convincing evidence that the the EQ performs as expected, which goes against my own testing. So at this point I am assuming there is a bug that needs to be tracked down, since I can still replicate that behaviour.
EDIT (June 7, 2020) - See this article for another view.
High and low pass
Engaging the high and low pass causes a steep high-end cut at 18khz (at a 44.1khz sample rate). This is likely a result of the cramping just mentioned.
This means that in order to use the high-pass circuit (which affects your low frequencies), you will have to accept a steep 18khz low pass on your signal as well.
I believe that this is a bug, or an issue with the emulation. The corner of this filter is sample-rate dependent, which is clearly not a behaviour that the analog EQ can exhibit.
Edit (October 26th, 2017) - Currently I’m still investigating the ‘cramping’ issue with the EQ. Harrison has been very accommodating and informative regarding this issue. I’ve received convincing evidence that the the EQ performs as expected, which goes against my own testing. So at this point I am assuming there is a bug that needs to be tracked down, since I can still replicate that behaviour.
Saturation?
Even with all of the filters maxxed, Mixbus’s EQ offers no saturation. Clearly this is not the expected behaviour of an analog EQ emulation.
Symmetrical and Proportional-Q
This is not an error, but in fact a sign of a good model. The Q of the EQ is proportional to the boost or cut. The shape changes so that larger cuts/boosts have narrower band widths as they decrease/increase in gain.
The boosts and cuts are also symmetrical, which is true to how the analog EQ in the 32c works. The image above is showing the symmetrical cut and boost by overlaying a cut that’s vertically flipped with a boost. You can see that they are identical.
+1 for the EQ model.
Note: I previously had this information incorrect when this post was released.
Compressors
Mixbus comes with 3 different styles of compressor: Leveler, Compressor and Limiter. After the compressor section is a make-up gain to make up for the lost gain from the compression process.
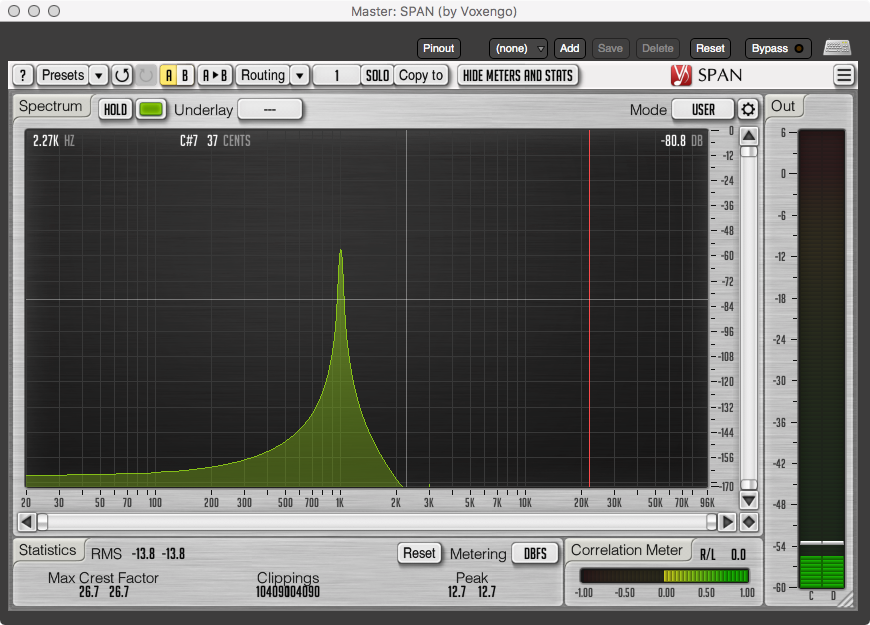
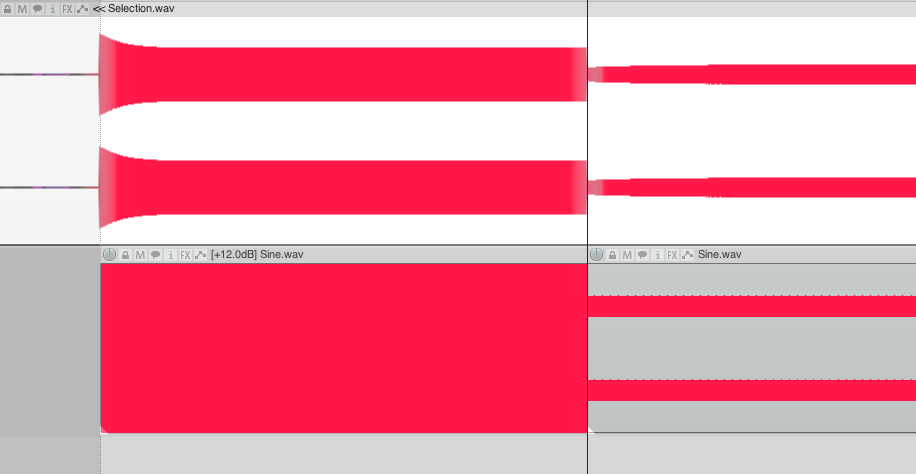
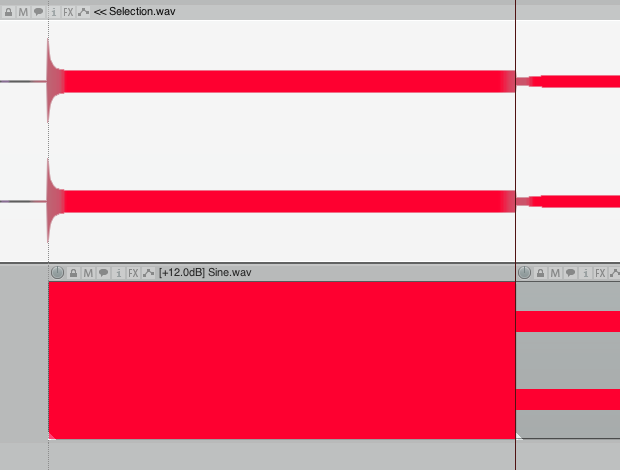
In the following images I took a 10khz sine wave with 2 stages: 0dbFS then -20dbFS. The file was played through the compressors at a -18db threshold with the noted settings and measured. I tried to measure the attack and release times at about 50% of the total curve, but attack/release measurement are somewhat arbitrary. I’m only listing my measurements as a rough guide.
Leveler
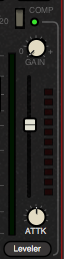
The Leveler has a fixed ratio and release. The attack is variable.
- The Level’s ratio is very low. Given a signal peaking at 0dbFS and a -18db threshold, the leveler reduces the signal by about 7db. That puts the threshold around 2.5:1.
- The release seems to be around 100ms.
- Attack setting at 12 o’clock is labelled at 20ms. This appears to be correct.
- The leveler exhibits no saturation beyond what would be expected from a dynamics processor.
The Leveler is excellent for exactly what the name implies: leveling. Vocals, dialog, bass guitar, etc… Anything where you wish to even out the amplitude of the signal over time. Personally I really enjoy using the Leveler at extreme settings on drum room mics. The low ratio makes for some really fun smashed sounds.
The leveler is the default compression mode on every channel and it’s exceptionally useful.
Compressor
The compressor has a fixed attack and release. The ratio is variable.
- The ratio appears to be correct. The default value at 12 o’clock is 3.2:1
- The release is around 40ms.
- The attack is around 5ms
- The compressor exhibits no saturation beyond what would be expected from a dynamics processor.
The compressor is the more aggressive mode available. With a medium-length attack and a short release, it can create a very aggressive sound and bring out a lot of attack from a signal.
I find the compressor mode to be rather touchy. It’s fairly easy to end up with a way-too-audible compressed sound and not realize it. That aspect also makes it rather valuable for working on sources that require some extra ‘punch’ or attack.
Limiter
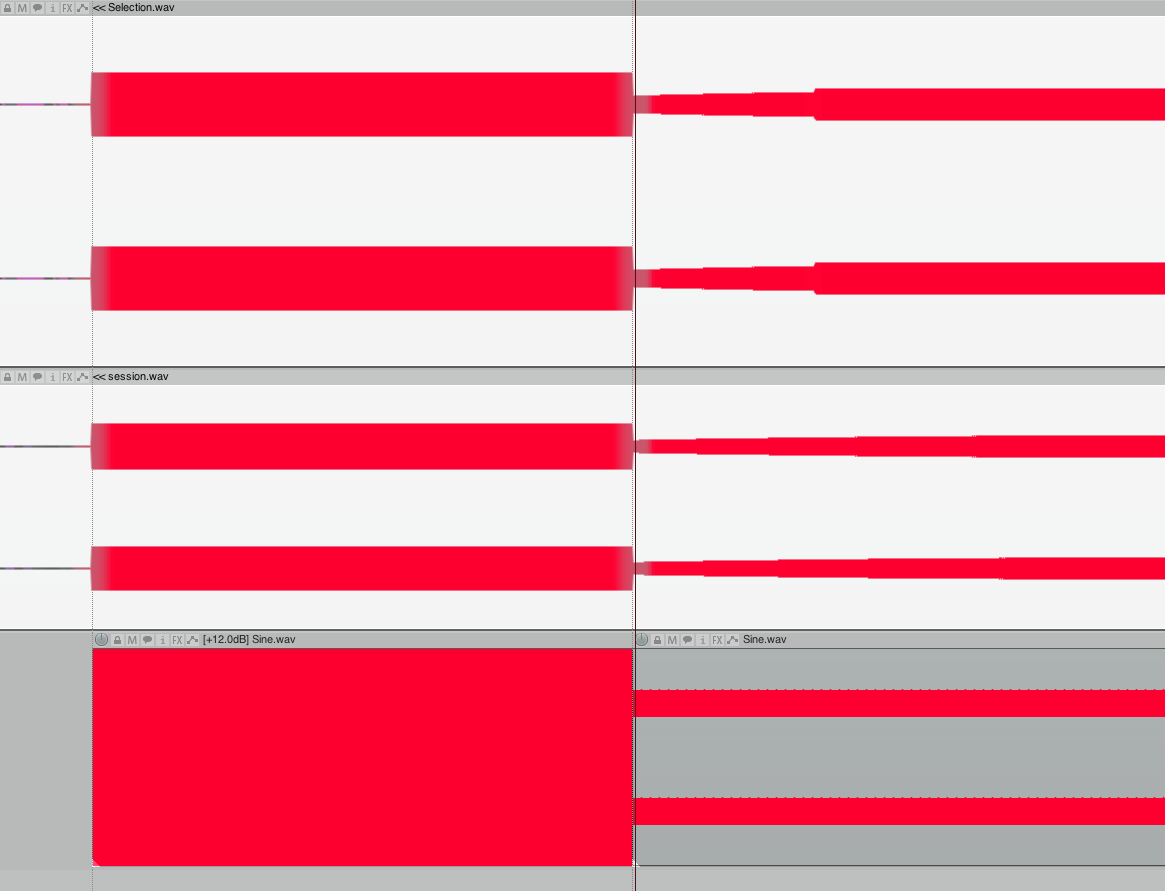
The limiter has a fixed ratio and attack. The release is variable.
- The ratio is very high. >10:1. With an input of -18dbFS, the signal was reduced to a peak of -20dbFS.
- The release is variable with the default labelled value as 15ms at 12 o’clock. The limiter appears to have a 2 stage release. The first stage is a fixed ~200ms, followed by the second stage which is close to the labelled value. In the images above the top is a 1ms release time and the middle is 225ms. You can see the fixed 200ms stage in both, with the top having a very fast hump showing the second stage and the middle having a smooth transition from the first stage.
- The attack is nearly instant.
- The limiter exhibits no saturation beyond what would be expected from a dynamics processor.
The limiter is exactly what you’d expect from a limiter. It doesn’t let any signal pass the threshold. I’ve rarely used it when mixing, but it’s come in handy when trying to tame some very sharp percussive elements that were causing pumping in another compressor down the signal chain later.
Sends

Mixbus 32c has a sends section, which is separate from the normal “Aux Send” that you would expect in a mixer. These are how you route signal to one of the 12 “Mixbusses”.
By default if you simply click one of the mixbus sends, then the signal is sent to the mixbus and to the master. This is a parallel routing. If you hold command (macOS) or control (Windows) then it also bypasses the master send for a direct channel->bus->master serial routing. Each send has a knob that allows you to vary the level of the routing to that send.
As of this writing (Mixbus 32c 4.1) groups only are routed simultaneously if the group ‘gain’ mode is selected.
Given the importance of using the busses in Mixbus 32c, it’s refreshing how easy it is to set up the routing.
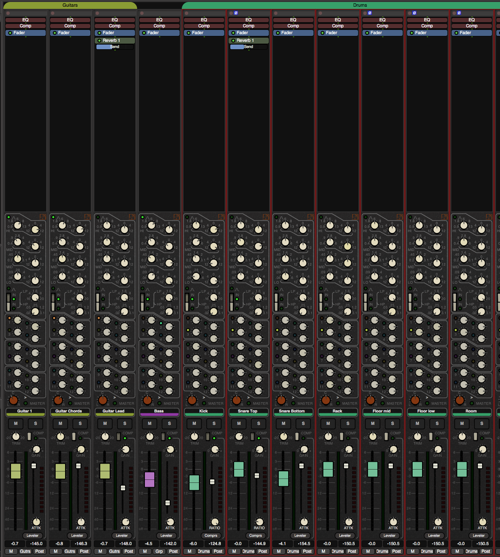
Busses

As it says in the name, Mixbus has well… mixbusses. Each mixbus has the same compressors as the channels. In addition to the compressors it has tape saturation, a tone stack, a VU meter, spill selector, stereo width and a sidechain compressor.
-
VU meter - awesome for getting your input levels right going in to the mixbus. It’s important that you are running around 0vu = -18dbFS or so, otherwise the tape saturation will be overwhelming and difficult to control.
-
Spill - this button allows you to quickly display only the tracks routed to that specific bus. This is a fantastic workflow shortcut.
-
Stereo width - the stereo width knob allows you to vary the width of the signal from 100% to mono.
-
Tone stack - the busses lack a parametric EQ, but they do have a tone stack with a low shelf at ~100hz, mid bell around ~300hz and high shelf around 4khz.
Sidechain and the tape saturation I will cover in their own sections.
Sidechain
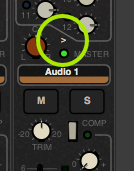
Every channel in mixbus has a sidechain send, it’s the > button that I’ve circled in the above graphic. This sends the audio to Mixbus’s built-in sidechain signal path. This sidechain signal is fed in to the “Sidechain” compressor in any mixbus that uses it.
The sidechain compressor in the mixbus is triggered by the signal on this signal path. This means that you can do things like sending your bass to a mixbus, your kick to the sidechain path, and only have your bass compressed when the kick hits.
The sidechain’s ratio and attack are fixed and the release is variable. The attack is about 2.5ms and the ratio appears to be >10:1.
The built in sidechain is rather convenient since it’s somewhat rare to have more than one sidechain active on a project. If you require more then it’s simple to set up side chains easily using the pin configuration window and sends.
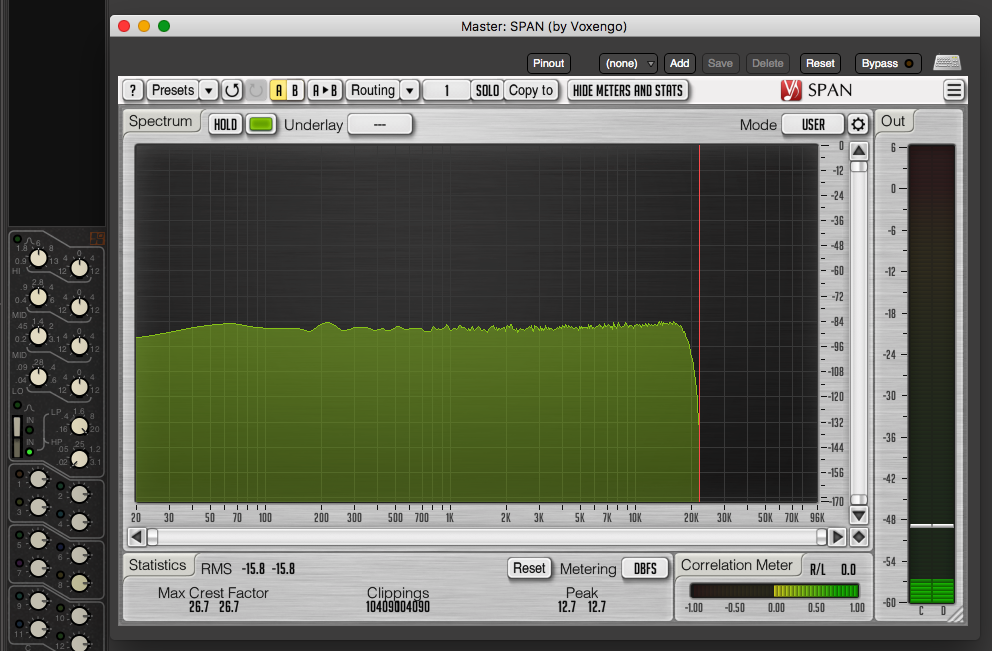
Tape saturator
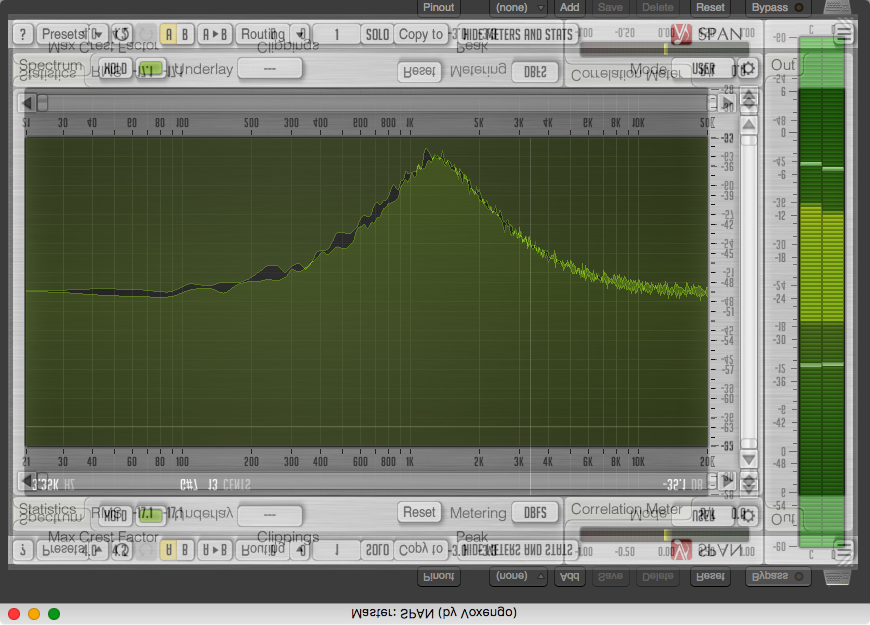
Each mixbus in Mixbus 32c has a tape saturation process. This appears to be a simple saturator that adds odd harmonic content for parts of the signal <200hz, however above 200hz it only seems to add the 3rd harmonic. This is shown in the video. The input signal starts at 100hz with a lot of odd harmonic generation, then above 200hz most of the harmonics past the 3rd harmonic disappear.
Update
The above out information is correct saturation knob values for values above -3.0db. The cutoff for the transition from third harmonic->odd harmonic generation is:
- ~200hz @ -3.0db saturation
- ~400hz @ 0.0db saturation
- ~800hz @ 3.0db saturation
- @ 6.0 saturation you basically always get odd harmonics.
So this means that if you have the tape saturation knob at 0.0, then everything below 400hz will have odd harmonics generated, and above 400hz it will only be third harmonic.
You can also see that harmonic reflect off the nyquist frequency and move left as the input signal continues to move to the right. Both peaks should be moving together to the right, when one of them begins to diverse and move towards the left; This is aliasing. The effect is much less pronounced at higher sample rates.
I do wish to make clear that the aliasing is not the fault of the developers. I doubt that many users would want every single mixbus to be oversampled enough to handle that. It would require a ridiculous amount of CPU processing to handle that. I do think that if you use the tape saturation then it’s reasonable to suggest running your sessions at 96khz+.
EDIT (June 7, 2020) - See this article for another view.
Master
Mixbus’s master channel doesn’t differ much from the mixbusses. It has the same compressors and inserts as the channels and the same tone stack as the mixbuses.
The master channel has 2 additions though: a brickwall limiter and 2 extra meters.
Brickwall limiter

The master section has its own extra limiter with an infinite ratio, very fast attack (<0.1ms) and very fast release (~2ms). This stops any audio above -1dbFS from passing. The limiter is not oversampled, but it is set to -1dbFS so it is unlikely to pass intersample peaks.
The limiter performed very well in my testing and was more than sufficient for most delivery efforts. It’s surprisingly clean for a built-in limiter.
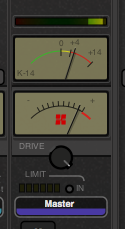
Extra Meters
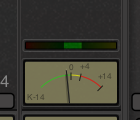
The master channel in mixbus has a stereo correlation meter above a configurable extra meter.
-
Stereo correlation meter - This meter shows you the correlation between the left and right channel. If the meter is all the way to the right then both sides correlate and the signal is heard as a centered mono image. If the meter is all the way to the left then the left and right channels have no information in common and sound very disconnected.
-
Master meter - There’s a second meter on the master channel that can be configured to show K-System, IEC1/DIn, IEC1/Nordic, IEC2/BBC or IEC2/EBU metering standards. This is in addition to the VU meter and peak meter that are standard on the busses.
Having the extra meters is a welcomed addition. Many mixing decisions become easier with properly calibrated monitor levels and gain staging. Combined with the loudness analysis features, Mixbus makes targeted delivery less of a hassle, and ‘normal’ music mixing becomes much easier.
If you’re curious about the various metering standards then start here
Mixer List
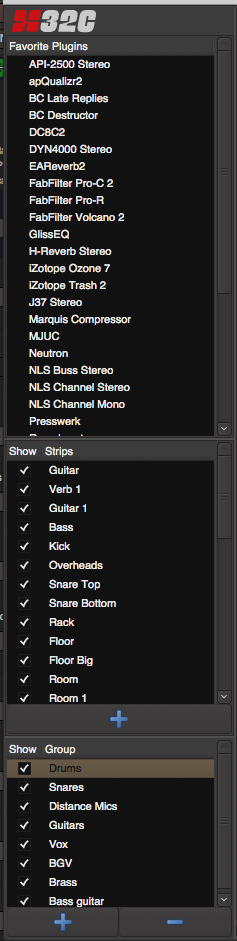
On the left side of the mixer you can enable the ‘Mixer List’. This gives you quick access to your favorite plugins (which you setup in the plugin manager), track visibility and groups.
It would be nice if the track list was searchable to easily filter or find tracks, but as it exists now (v4.1) you can only click tracks one at a time to change their visibility or to jump to a track.
The group selection makes showing/hiding tracks easier when they’re in groups, but there’s no easy way to quickly find a group, hide groups or exclusively show groups.
Monitor Section

Each session may optionally use a monitor section. The monitor selection offers you a number of features that happen after your master channel. This means that you can both have a separate monitoring output, and that your monitor section changes do not affect your render.
Rather than go over all of the features of the monitor section, I’m going to point out a few that I find particularly useful:
- SiP - Solo in place allows you to solo tracks, but instead of muting the non-solod tracks they are simply reduced in volume. The monitor section has a SiP cut section where you can set how much non-solod tracks are reduced by.
- Monitor solo/mute matrix - It’s possible to solo/mute/dim/inv signal paths outside the context of the mix. If you have setup with multiple channels of output, this makes it easy to quickly check a single signal path without possibly doing something that will affect your render later.
- Processors - Plugins can be added to the monitor signal path without affecting the master channel, and subsequently your render. This is hugely useful for checking your mix through a buss compressor or an EQ temporarily, or perhaps having a compensatory EQ for the monitors you’re using.
- Monitor cut - You can adjust your output via a knob or a quick selection menu. This does not affect your mix’s render, so if you wish to temporarily check your mix at -6db, then there’s no fear of messing up your gain staging on your master channel or accidentally delivering a render at the wrong levels.
The monitor section is very useful and I suggest checking out everything it can do int he manual.
VCAs

If you’ve read much of this blog then you know I have a thing for VCAs. I feel that they are a vital part of any mixing workflow.
VCAs don’t pass any audio. They are simply a controller for a group of faders assigned to them. Why is this useful instead of just sending your audio to a group track?
-
VCAs control the fader at the fader level. This means that anything post-fader retains the same characteristics as if you simply moved the track fader.
Take the scenario of having a post-fader Reverb send. If you send that track to a group then turn the group down, the send to the reverb is still active but your dry audio going to the group is gone. This means that your reverb level stays the same no matter how you change the volume of the group.
With a VCA, only the fader value is changed. So the if you pull the VCA value down, the fader’s value itself goes down and the post-fader send is affected the same. Fader to -inf = nothing to the send. Your Reverb level now varies correctly with the level changes as you move the VCA.
-
So you may think, “Ok, so I can solve the post-fader issue by just using grouped faders.” You’re right, you can, but now you run in to another issue; you can’t automate those changes.
A VCA fader is automatable, and it stacks on top of the fader’s value. If you have the channel fader automated heavily, you can still control its relative value with a VCA. The VCA can be automated itself and those changes are combined with the fader’s automation.
Mixbus’s VCA implementation also has a spill control. This lets you quickly hide all tracks that are not controlled by that VCA.
In most DAWs with VCA you can commit the VCA automation to the track it controls (mixing it with the existing automation), but I can not find that functionality in Mixbus. (edit Sept 19: VCA automation does merge when you delete the VCA master, which is not particularly useful at all.) (edit Halloween. VCA automation also merges when you unassign a VCA master.)
The ability to have VCAs that control VCAs is also mixing. I think that this is a vital feature that allows a ‘top-down’ mixing style, which in my view greatly simplifies the process of working with very large projects.
Conclusion
Mixbus’s mixing features seem to be somewhat worthy of the acclaim it gets as a ‘Mixing DAW’.
-
The EQs I find to be basically worthless*. The cuts and boosts are very wide, the cramping is problematic, the phase response near the nyquist is weird (and sounds bad!). The filter section is a problem because simply trying to put a high-pass on your signal causes that massive cut at 18khz (at 44.1k sample rate). I’ve tried to make the EQ work for me, but every time I use it… argh. The EQs do work better at higher sample rates, but they’re still rather wide.Edit (October 26th, 2017) - Currently I’m still investigating the ‘cramping’ issue with the EQ. Harrison has been very accommodating and informative regarding this issue. I’ve received convincing evidence that the the EQ performs as expected, which goes against my own testing. So at this point I am assuming there is a bug that needs to be tracked down, since I can still replicate that behaviour.
Regarding my dislike of the EQ: When using a ~4 band eq I prefer either adjustable Q (fully parametric) or narrower default bandwidth. The EQs are accurate to the Harrison 32c, which clearly has been used to make a number of excellent records. Personally I have difficulty using this style of EQ when working on some styles of music that usually require more ‘surgical’ EQ usage. Despite my best effort I personally was unable to make good use of the integrated EQ section in the channel strips, but it’s entirely possible that you may find them useful.
That said, the x42 EQ from x42 is an excellent option for that work, and a demo is included with Mixbus. The XT-EQ is also an option in some cases, and despite my low rating I suggest checking it out to see if you value its ease-of-use over its limited feature set.
-
The compressors are fantastic. I use the leveler constantly and the compressor mode is rather useful on percussion.
-
The mixbusses sound pretty good, however they become rather grating with cymbals, synthesizers, bowed strings and more. I suspect this is due to the aliasing and in short-testing it is much better running the session at a higher sample rate.
-
The routing features are great. Simple and common routing tasks are a cinch. The pin configuration window is quite useful as well. Simply the act of using busses for mixing I think will improve most people’s mixes, let alone with the ‘gluing’ capabilities of the saturator and compressors.
-
The monitor section is extremely useful.
-
The plugin manager is fantastic even if it’s a bit ugly. Most DAWs could learn a thing or two from it. It would benefit from fuzzy matching (like this), but as an overall experience it’s great.
-
The mixer would benefit greatly from a searchable tracks list.
-
VCA implementation is nice, but no VCA coalesce without deleting the master is unfortunate and no stacking of VCAs reduces the usefulness of VCAs in a modern DAW.
-
Harrison’s marketing claims that “Every resistor, transistor and capacitor is included in the model”. seems unlikely based on my analysis. No saturation, no IMD, no noise, filter cramping, sample rate dependent filter response, identical channel output and aliasing all prove, in my mind, that this is not the case. Does it matter if it’s a perfect 1:1 model? Not really.
While I’m not buying in to Harrison’s marketing that Mixbus 32c is a magical implementation of a revered console, I do agree that it makes the mixing experience much nicer than other products. The basics are at your finger tips. 80% of the things that you need to create a good mix are easily available.
Many other products offer you a plethora of options and yet still make you waste extra clicks on simple routing, getting a simple compressor, sidechaining, setting up a monitor section, routing plugins etc… Mixbus is ready to go.
I can’t say that I’ve made my best mixes ever in Mixbus (yet?), but I can say that I get 95% of the way much quicker, and when time is money: that’s awesome.
NOTE - I highly recommend working at 96khz natively (recorded to, not resampled to) in Mixbus if possible. I’ve mentioned various reasons in this post, but suffice it to say; Mixbus is one of the few DAWs that’s workflow does directly benefit from higher sample rates.
Check out the follow up post I explore the EQ even further in another post, as well as discuss the above mentioned differences between modeling and emulation.
Support Me!
This post took 14 hours to research, screenshot, write and edit. If you appreciate the information presented then please consider joining patreon or donating!