
There may be times where you want to affect a signal based on its current level. Usually this requires some sort of ducking or gating on the effect itself, but using Reaper’s Routing you can do some pretty cool things.
So here, let me explain to you how to route a signal in Reaper depending on the level of that signal.
Contents
The Theory
Basic Concept
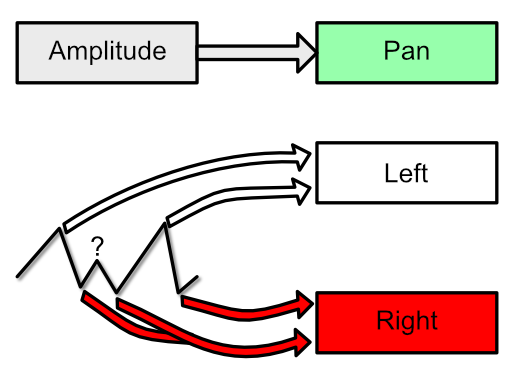
If we wanted to change the routing of a mono signal based on the level, it’s easy! Simply modulate the pan by an envelope follower. The level of the amplitude follower will move the signal left or right based on the level of the signal. Simply route the L and R signal to their own tracks. See the graph above and see how the extremes will be modulated to go to either side.
There’s one problem, it’s not an absolute routing. If the signal is “in the middle” then it will be routed to both sides equally. That’s the ? in the graphic above. So we need to scale the modulation.
Modification
What we want is for the signal to stay to one side, then quickly switch as it approaches the point where it’d start moving to the other side.
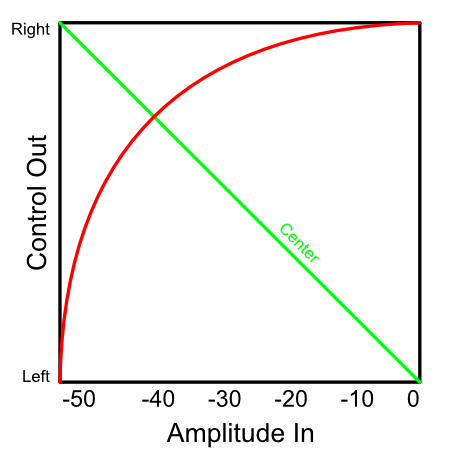
We can achieve this by scaling the output of our envelope follower (parameter modulation audio control). Let’s take a look at the graph above.
First we have a Min Value. This is the minimum value when the envelope follower (parameter modulation audio control) begins to generate a control signal. In the graph that is about -50dbFS. We also have a max value, which is the value at which the highest control signal is generated. In the graph that is about 0dbFS.
The red line shows what the output signal would be relative to the 2 axes. The green line is the point where the neutral (middle value) point is.
So in our graph, from -50dbFS to about -40dbFS, our amplitude->pan modulation would be panning our signal fairly hard left. From -40dbFS and above, it suddenly is panned sharply to the right. There is very little transition period.
Stereo
Often we need to route stereo signals, not just mono signals. So how do we “pan” a whole stereo signal?
Surround!
Surround panning gives us 4+ channes that we can modulate to. This means that we can route our to channel signal to 1/2 or 3/4 of the surround output. 1/2 being “output 1” and 3/4 being “output 2”.
Implementation
2 level routing of mono.
By now this should be at least slightly obvious what we’re going to do. We want to take our signal, turn it in to an envelope that we can modulate pan by.
When the signal is below the “Min Volume” in the parameter modulation, it will be panned to the Left (channel 1) and routed to the “Low” track.
When the signal is above the “Min Volume” in the parameter modulation, it will be panned to the Right (channel 2) and routed to “High” track.
Here are the steps.
Setup the tracks
- Create 3 tracks.
- Track 1 is your input track
- Track 2 is your “low” output
- Track 3 is your “high” output
- Route from Track 1 to Track 2 using “Mono Source 1” as the source and “1/2” as the destination.
- Route from Track 1 to Track 3 using “Mono Source 2” as the source and “1/2” as the destination.
- Optionally turn off Track 1’s Master send
Stop. Let’s make sure this is working. At this point, if you pan Track 1 to the left, then your signal should be sent to “Low”. If you pan Track 1 to the right, then your signal should be sent to “High”.
If this does not work, try again.
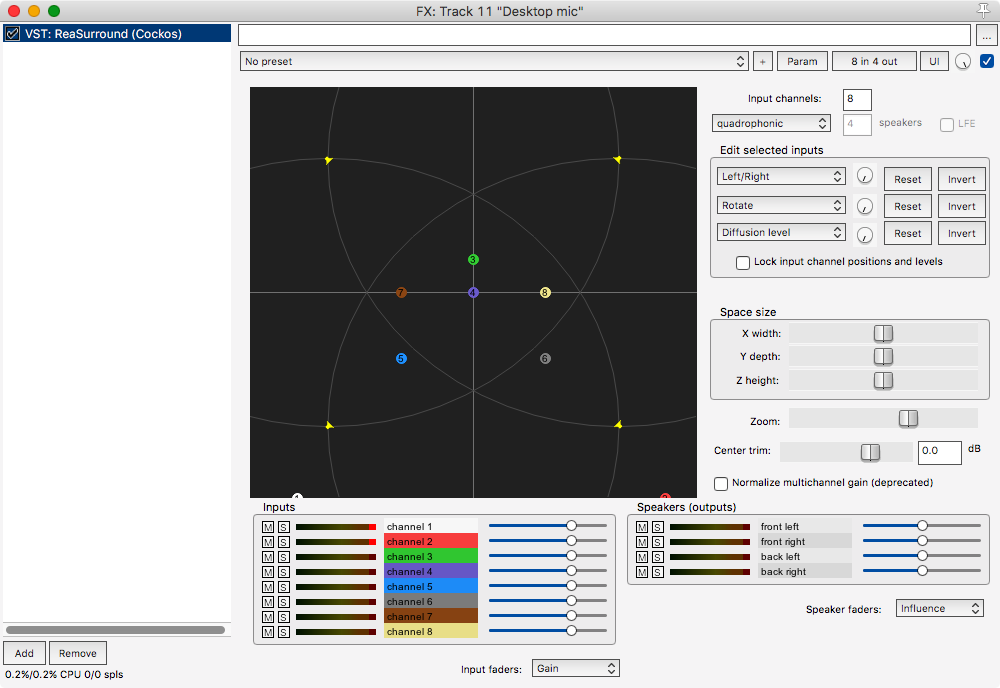
Setup ReaSurround
- Insert “ReaSurround” on Track 1
- Set ReaSurround to input channels to 1
- Set ReaSurround to Stereo
Setup Parameter Modulation
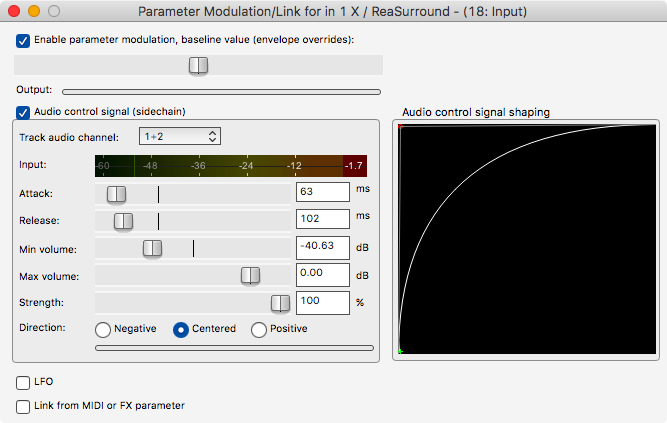
- Set a Parameter Modulation on “In 1 X”
- Turn on Audio Control signal (sidechain)
- Set Track audio channel to 1+2
- Set Baseline to the center value
- Strength 100%
- Direction: Centered
- Set the “Audio control signal shaping” like the above image.
Now Attack and Release should be obvious. Attack affects how long the reaction time is, and release affects how long it takes to settle back down from a high value.
The “Min Volume:” parameter is basically your crossover point.
That’s it. You’re done.
2 level routing of Stereo.
Stereo is a slightly different beast, but no more difficult.
When the signal is below the “Min Volume” in the parameter modulation, it will be panned to channel 1/2 and routed to the “Low” track.
When the signal is above the “Min Volume” in the parameter modulation, it will be panned to channel 3/4 and routed to “High” track.
Setup the tracks
- Create 3 tracks.
- Track 1 is your input track
- Track 2 is your “Low” output
- Track 3 is your “High” output
- Set Track 1’s Track Channels to 4
- Route from Track 1 to Track 2 using “1/2” as the source and “1/2” as the destination.
- Route from Track 1 to Track 3 using “3/4” as the source and “1/2” as the destination.
There’s no checking to see if this is working yet. Try with the mono version first if you are unsure of this routing scheme.
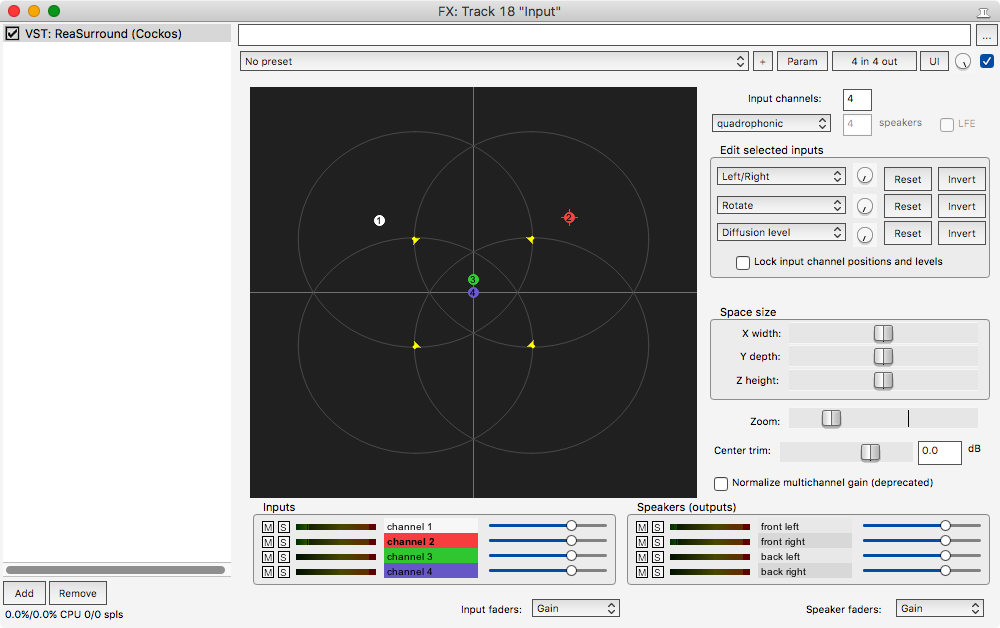
Setup ReaSurround
- Insert “ReaSurround” on Track 1
- Set ReaSurround to input channels to 2
- Set ReaSurround to Quadraphonic
- Move channel 1 outside the “right side circle” (Zoom out if you need) see below
- Move channel 2 outside the “left side circle” (Zoom out if you need) see below
Setup Parameter Modulation
- Set a Parameter Modulation on “In 1 Y” - Note, it’s Y this time, not X.
- Turn on Audio Control signal (sidechain)
- Set Track audio channel to 1+2
- Set Baseline to the center value
- Strength: -100% (Important! This must be negative or your low/high will be switched)
- Direction: Centered
- Set the “Audio control signal shaping” like the above image.
Now we need to link the right channel to the left so that they move together. This is easy.
- Set a Parameter Modulation on “In 2 Y”
- Link from MIDI or FX parameter - 1 (self): ReaSurround in 1 Y
- Offset: 0
- Scale: 100%
Now you’re set. That’s it.
But wait! There’s more
If you need more than 2 levels of routing, then you have 2 choices:
- Repeat the process on your “High” Track.
- Rename it “Medium”
- Have the “Medium” track output to itself when below a value, and to a “High” track when above, just like we explained before
- Do all the routing inside your “Input Track” (Track 1).
- Just add another ReaSurround that takes input from Channel 3/4 and routes it out to 3/4 and 5/6.
- Route 3/4 to a “Medium” track
- Route 5/6 to a “High” track.
It’s not that difficult really. With some experimentation there are some really interesting capabilities.You can even stack routings to the same channels with multiple ReaSurrounds to make really drastic changes.
Of course you can also do some crazy things with LFO modulation, >4 channel routing and modulation of X and Y of channel nodes. This post just explains the complete basics of the concept.
Support me!
This post took 4 hours to research, screenshot, write and edit. If you appreciate the information presented then please consider joining patreon or donating!