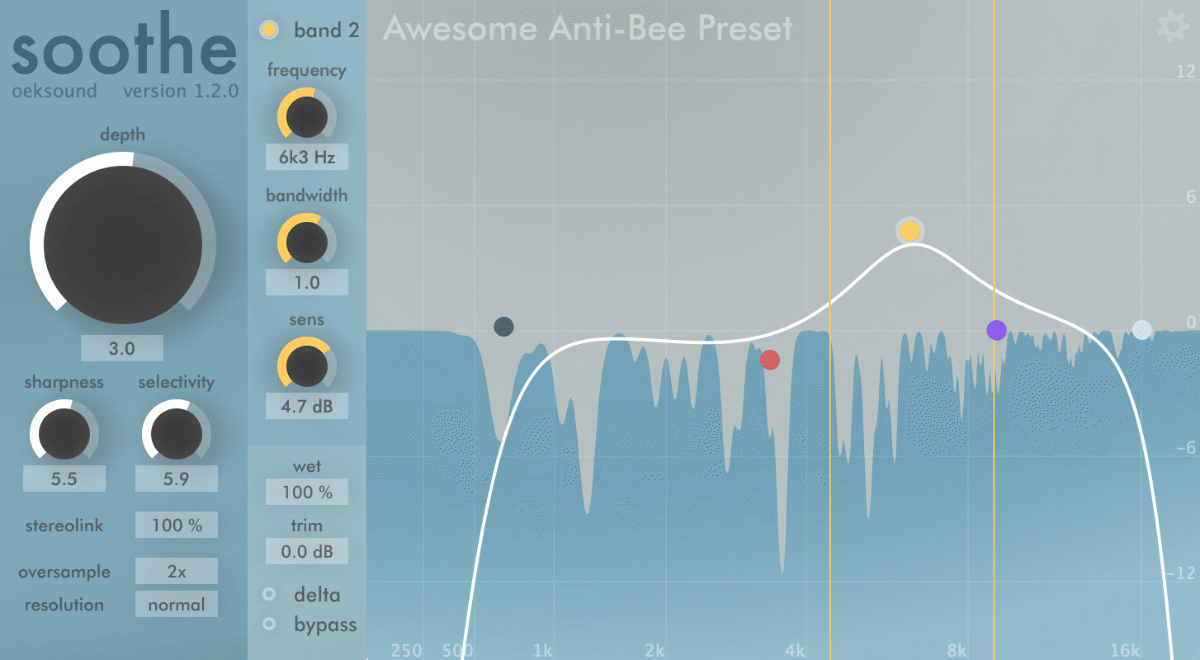
I’m going to be upfront with you, I was (hint?) not a fan of Soothe since it has been released. Every time somebody asked me about it I was dismissive of it, and sometimes I was downright rude about it.
Despite this I have been constantly asked about my opinions about Soothe. A couple of times a week somebody would ask me, “Is Soothe worth it or is it just a gimmick?”
I have been asked this enough times that I finally contacted oeksound and I asked for an NFR review copy. Here we are now.
Is this thing just a gimmick?
Time to get dirty.
Contents
Video Version
Yes, I know that I technically mispronounce “Fourier”. I say it the way that everyone else seems to say it.
Precursor
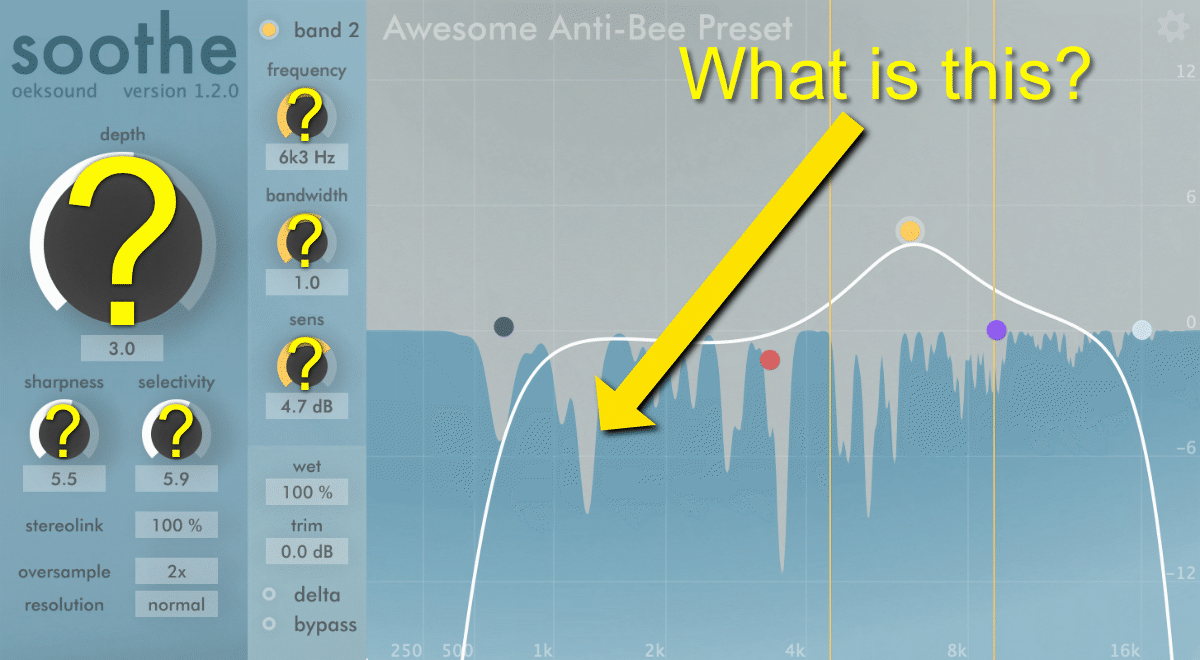
Before we start talking about what Soothe is, you first need to understand some concepts about audio.
I’m going to give you a crash course in the FFT (DFT) concepts necessary to fully understand what Soothe is going to do for us.
This isn’t an explanation of how a particular FFT algorithm works, or the innards of the DFT (which is basically a sine/cosine resonator box), but a medium-level overview of the concepts that apply to Soothe.
Signal Basics
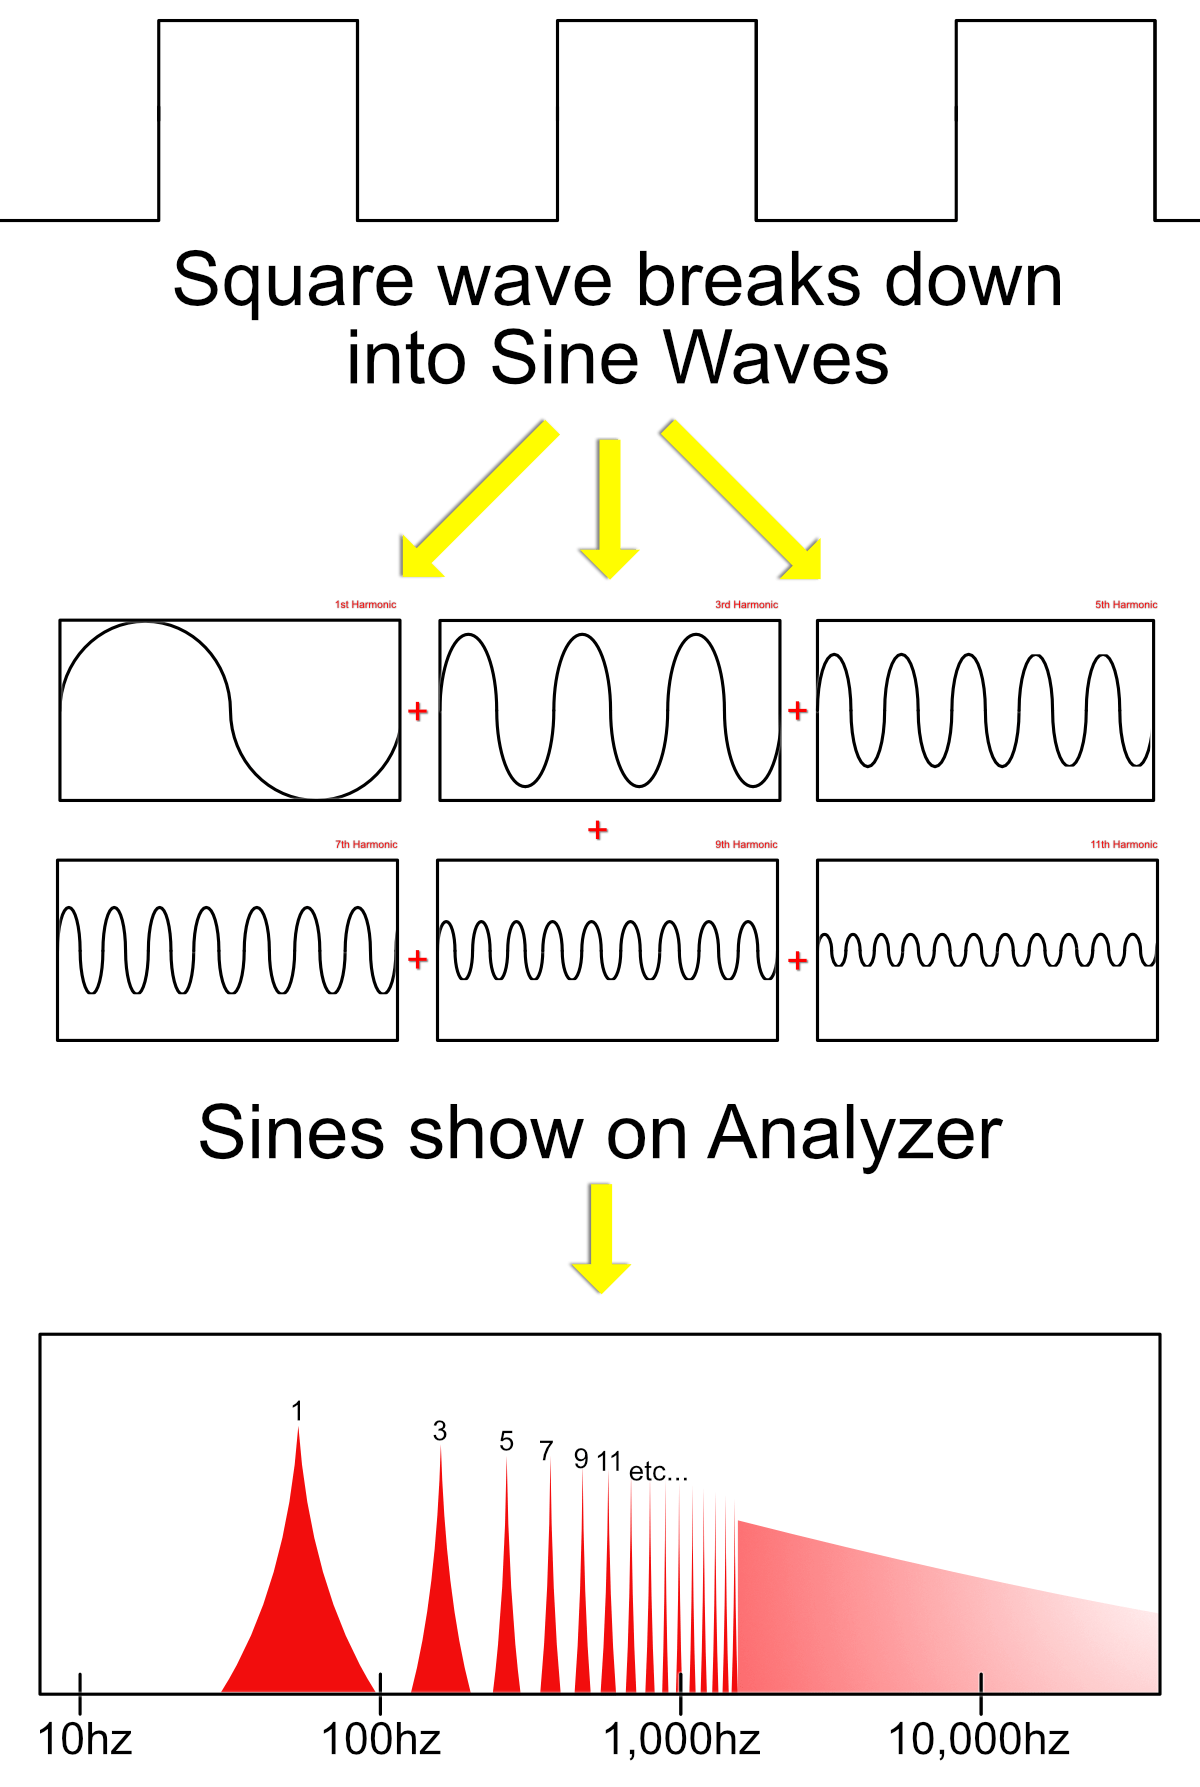
Before we begin, I need you to understand that I’m calling this process an “FFT”. It’s actually an explanation of the DFT. FFT is an implementation of the DFT. In the audio production world, it’s usually referred to as “FFT” because that’s the most common implementation. This is a minor technical note for the more pedantic of readers.
The first thing you need to understand is that every piece of audio that you hear can be represented by a summation of sine waves.
If you have ever used an audio analyzer on a signal then you have seen this in action. The horizontal axis of the analyzer shows you frequencies of sine waves. Each of those little peaks represents the level of a sine wave that theoretically may represent one of the sine waves necessary to be summed to create the whole signal.
Soothe uses FFT analysis to break down which sine waves theoretically might be used to construct the signal that you are hearing. That is exactly what the FFT process does for us: it gives us a breakdown of what sine waves can be summed to create the signal that was analyzed.
Once Soothe has an idea of what constitutes the signal in terms of sinusoidal components, then it can begin to do its work.
FFT - Windowing
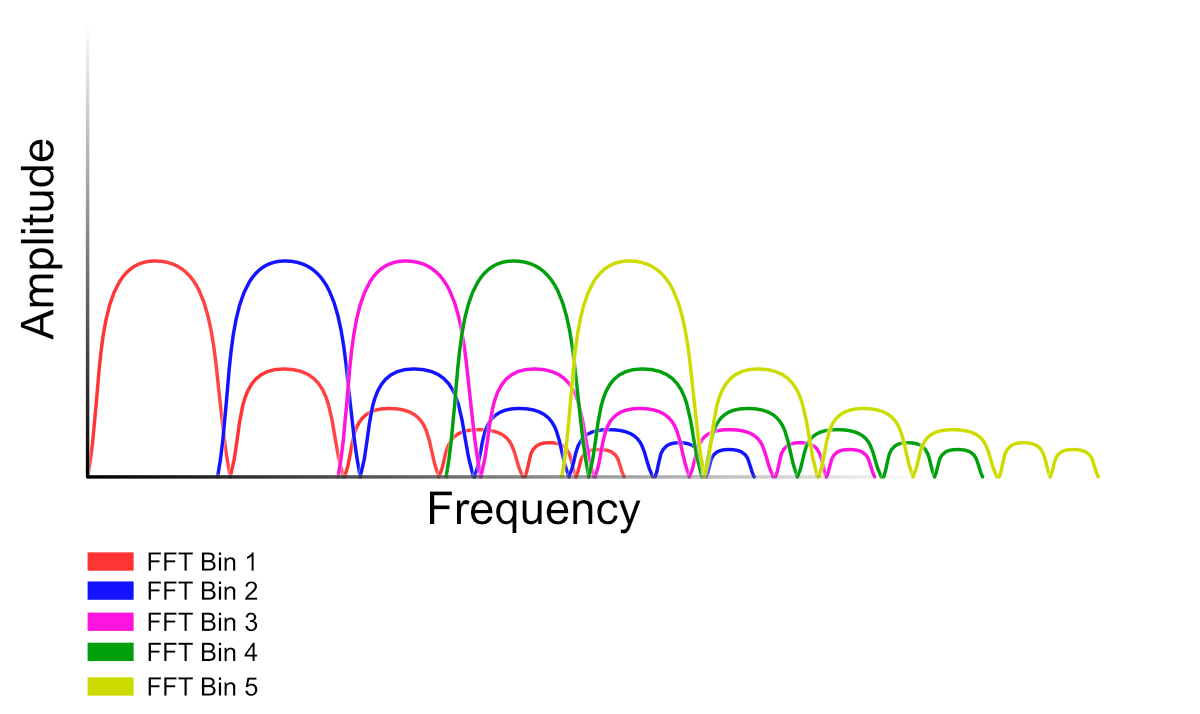
The FFT process analyzes the input signal and then creates data called “bins”. These bins contain information about the level of the frequency range that the bin represents.
So there might be a “100Hz bin” and a “200Hz” bin, etc…
These bins aren’t “precise” by default, so what is called a “window” is applied. I’ll get to what exactly this window is in the next section.
If you look at the graphic above, then you might be able to see a problem with this basic type of analysis if we want to know ALL of the frequencies happening. The analysis has what are called “lobes”. If you try to look at the FFT bin labeled “one”, then you will see that it not only responds to the primary frequency range but that it also has these little blips that extend across the entire frequency spectrum.
By time that we attempt to look at the green FFT bin “4”, we have the lobes of three other bins affecting our results.
We can fix that though.
The video above is showing us the difference between a “rectangular window” (the ‘default’ method) and what is called a “Hann” window (named after Julias von Hann). This is a drawing, so it is not perfectly accurate, but it does illustrate the differences.
With the Hann window you can see that the lobes do not interact with the other bins nearly as much, because they have been reduced in amplitude. This is what we desire. This ‘interaction’ is called leakage, because at the word implies, there is less leaking of those unwanted lobes into the other bins.
There are other types of windowing functions, but like all things in life they come with trade-offs…
The main tradeoff is that the lower our side-lobes are, the “wider” our main lobe is (the signal of interest). The rectangular window has the narrowest main lobe, but the most obnoxiously loud side-lobes. As we use windowing that reduces our side lobe, our main lobe will increase in width (meaning that it will span a wider range of frequencies).
I did some analysis and decided that Soothe uses a Hann or Blackman window, which are the most reasonable choices for side-lobe reduction without ending up with a massive main lobe. Since Soothe makes decisions based on these bins, it’s important that the main lobe isn’t too large or it would become “innacurate” (This may become more clear later?).
After e-mailing the author, it was confirmed that the Hann window is used. (I didn’t even ask about that actually! He gives thorough responses to questions. I like Olli!)
FFT - Windowing - The Problem
If you remember from the signal basics section that any signal can be represented as a sum of sine waves, then it naturally follows that any signal that isn’t precisely a sine wave must consist of the sum of more than one sine wave.
If that doesn’t make sense then let it sink in. If our signal isn’t exactly one sine wave, then it must be more than one.
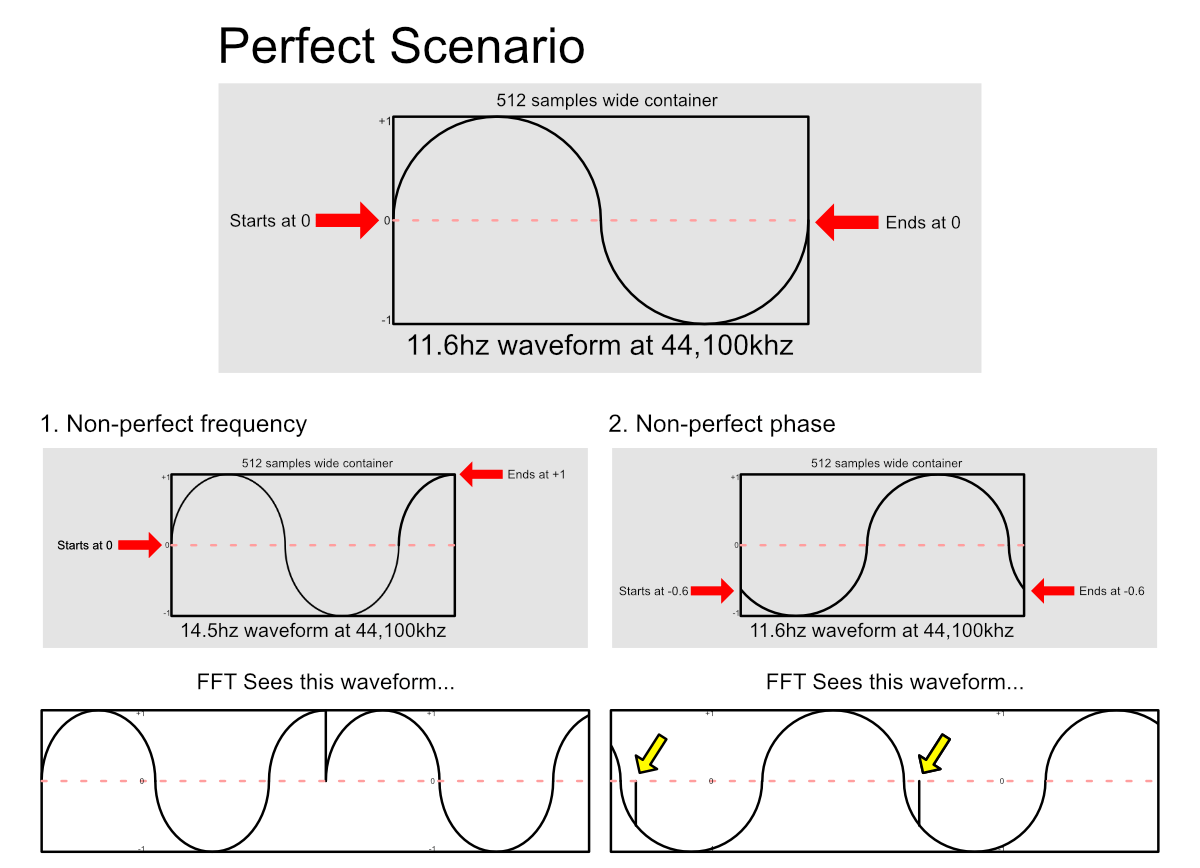
The FFT takes a chunk of the audio, and the audio that it takes may not start and begin perfectly at the centerline (0). As far as the FFT is concerned this is exactly how the sound repeats. It doesn’t care if we’re feeding it a perfect sine (which I’m assuming that we are for all of these examples).
If you look at the image above you can see that if we can capture a sine wave that is just perfect so that it begins and ends at 0 when the block begins and ends, then everything is okay. However if things aren’t just perfect then we have a problem.
In fact, since there’s an infinite amount of variation in how the sine may be shifted, and an infinite number of frequencies (not everything is whole numbers!), it’s actually extremely unlikely that our sine wave will be perfect. We have a “1 in infinity” chance of that happening. That’s pretty unlikely!
The first and most obvious scenario is if we have a frequency where the sound does not cycle exactly in the amount of time that the FFT window provides. In this scenario the sound will at least end at a non-zero point. In this case the FFT thinks that this is a periodic signal and it ends up “looking at” a signal that has a fairly major discontinuity. If you look at the “FFT sees” section you can see how we have something that looks sort of like a sine wave but with a sudden jump in it. Since we know that anything that isn’t a sine wave will consist of multiple sine waves, then we know that the FFT will see the signal as many sine waves and will give us a poor result.
(Technical note, it’s better to say that it’s assumed that the signal beyond the FFT block is zeros, but I think this method is easier to visualize.)
The second situation is if we have a sine wave that will fit perfectly in our FFT box, but it does not start and end at the exact point. This will result in little glitches at those endpoints as you can see in the “FFT sees” section.
An entrepreneurial audio engineer may think, “Well I will just fade those ends so that they end at zero.”
It turns out that…
FFT - Windowing - The Solution
This far we’ve explored towards these 2 ideas:
- All signals can be represented by a sum of sine waves.
- All signals that are not precisely a single sine wave, will be composed of more than 1 sine wave.
We can extrapolate further:
- The less “sine-like” a signal is, the more sines it will take to represent that signal.
That last one is a bit dangerous, since the idea of “sine-like” is not always intuitive. For the purpose of this discussion you can just use your eyeballs to see what looks “smooth and sine-like”. However in the future it is only possible to make this determination by looking at the full decomposition of the signal and seeing how many components the decomposition contains (e.g. “how many sines it took”). The fewer signals it takes to compose our complex signal, the more “sine-like” it is. It’s a bit of logical backpedaling, but for our purposes it’ll work.
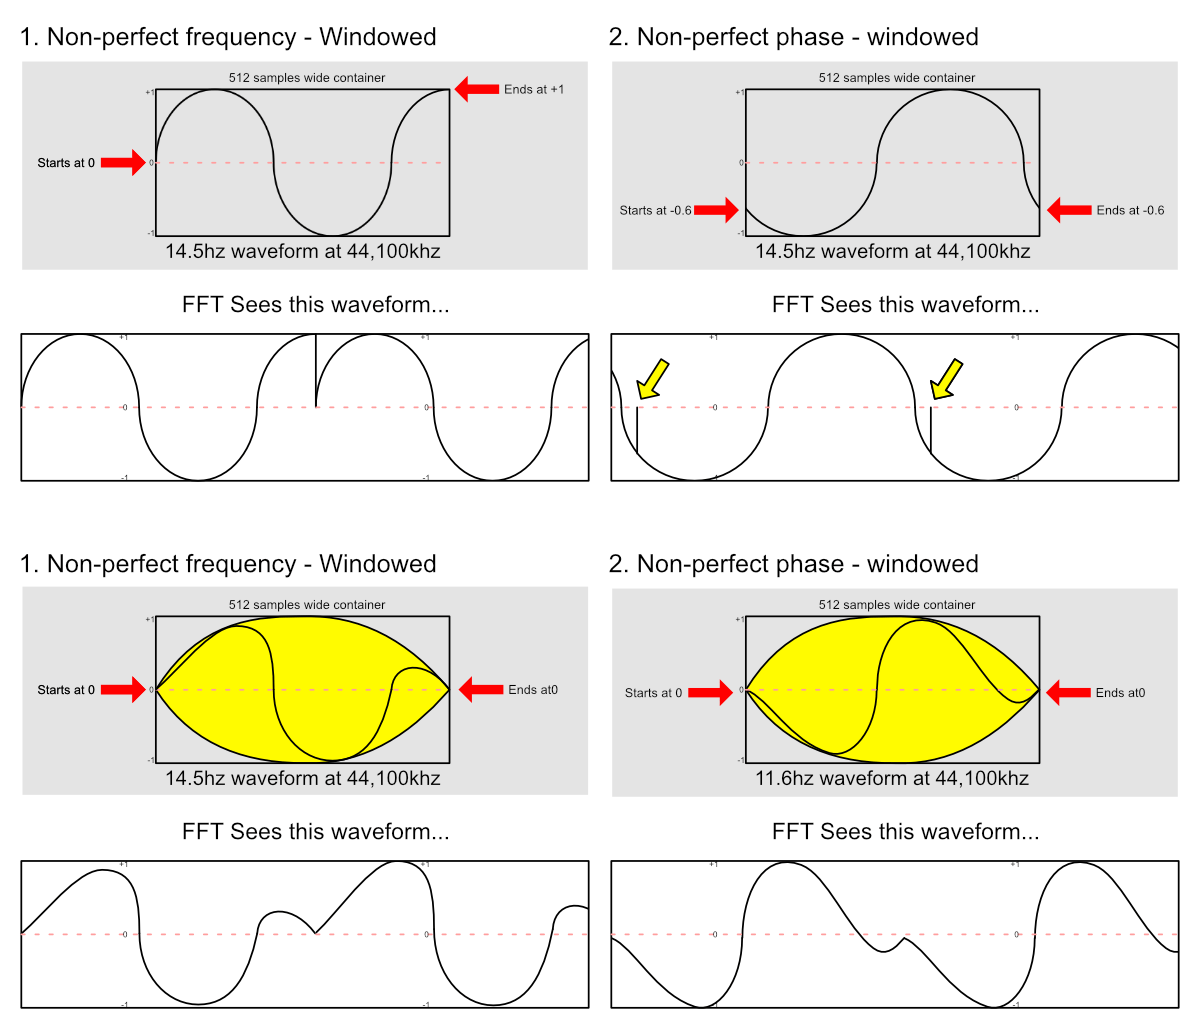
Returning to the picture above we can fade the beginning and the end of our FFT block so that it ends and begins on zero.
Once we take that signal that we faded and turn it into a periodic signal, it no longer has those sharp discontinuities at the boundaries. If you look at the “FFT sees” portion, you will see that the FFT sees a signal that is more “sine-like”.
That solves a lot of our problem! However you will notice that our resulting signal doesn’t look exactly like the nice pure sine wave that we want. We didn’t totally get rid of the issue of having our beautiful sine wave become cut up. We just made the issue less severe.
The shape of that amplitude modulation (the fades) determines what the window is called. Different fade shapes == different windowing. It’s really that simple!
If you head back over to the first section on windows, then you may recall those “lobes”. They will not disappear, but the various windowing types will affect the side-lobes in different ways, and our “main signal”s width will also be affected. Some windows will make a simple sine look really wide, some will look narrow.
Generally the more ‘sharp’ the main signal is, the more intense the side-lobes will be. Tradeoffs everywhere… we’re always making compromises!
(Hopefully you remember that since the “default” window (e.g. nothing, a.k.a. a ‘rectangular window’) has massive side lobes, it will also have the most precise representation of our main signal. Compromises man… jeez.)
FFT - Overlap
FFT analysis processes the audio in chunks. This is necessary because frequency is directly tied to wavelength. Lower frequencies take longer to complete a cycle within higher frequencies do.
In order to “capture” lower frequencies, it is necessary to analyze a chunk of time where it is possible to recognize such frequencies. If it takes a signal 2400 samples to cycle at a 48kHz sample rate, that means that it takes 20ms. That translates to a 50Hz signal. To completely ‘recognize’ such a signal, we would need at least 20ms to do so for a single cycle.
This is what FFT sizes do. Often called “block size” or “window size”. This value controls how large of a “sample” that the FFT analysis uses.
You may be realizing a problem right now, “If the analyzer is only analyzing every 8096 samples, then how does the analyzer show things that happen over time without looking ‘blocky’?”. Or maybe your question is wondering about the temporal resolution of the analysis.
We solve this by using what are called overlaps.
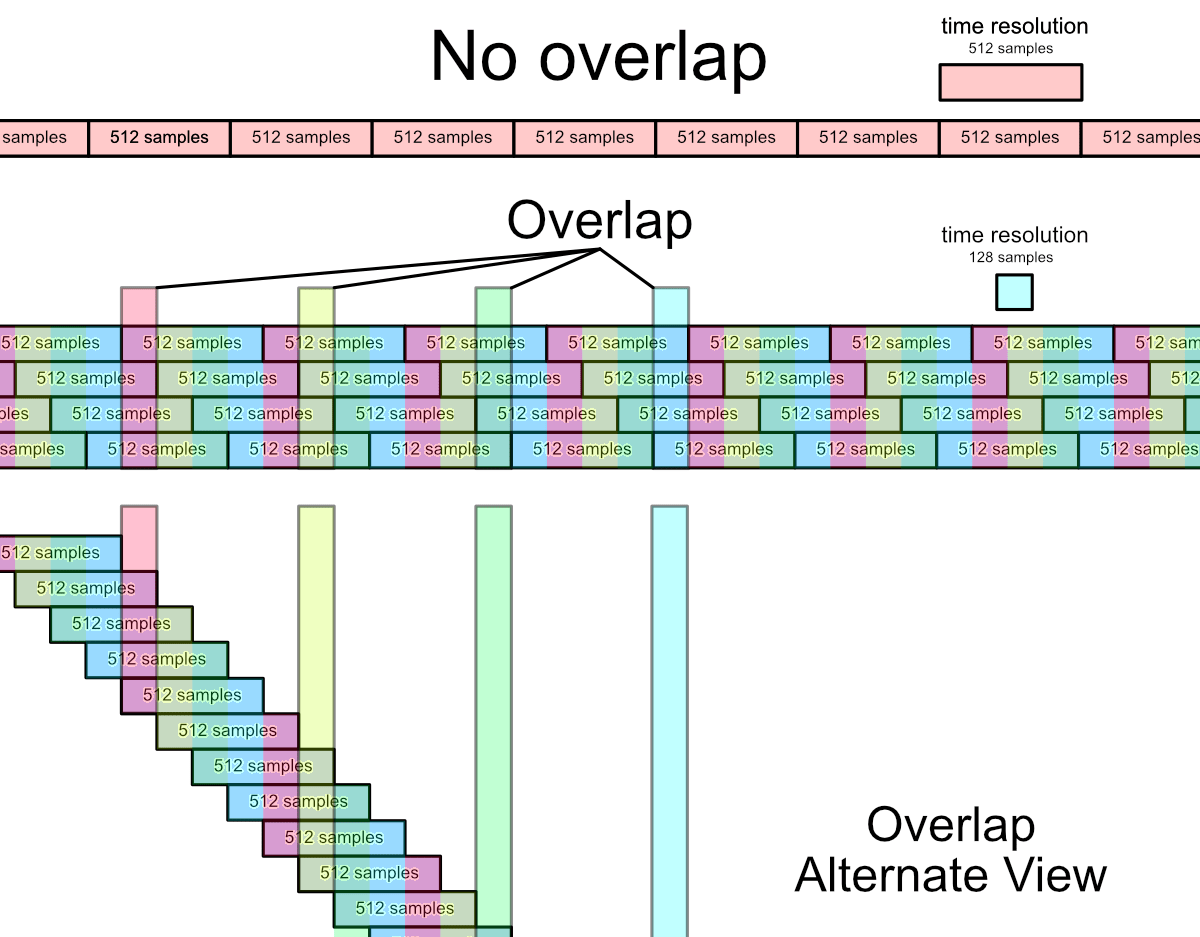
In the image above you can see how overlaps would occur, and hopefully it also gives you an idea of how we can increase the time resolution of our analysis.
Rather than attempt to take a signal every 512 samples, in this example we take a new block of 512 samples, but we do it every 128 samples. This means we have overlapped 4 times.
This means that we get data back four times as fast. In a sense, you can think of this as the frame rate of our analysis.
It doesn’t increase the frequency resolution, but it does increase how often we see updates.
Soothe Basics
You may be wondering why I went through all that rigmarole above, and it was specifically to help you understand how would even be possible that Soothe works. The intuitive idea that you may have come up with is potentially full of holes, and I wish to make it fully understood that the concept behind Soothe is sound. (pun intended)
Soothe gives you a threshold parameter (“Depth”). It then uses in FFT, likely explained, and any of the bins that exceed the threshold create a filter that reduces the level of that frequency area in the original signal, at that specific time.
Another way to say this is that Soothe takes any frequency peaks that pop above this imaginary threshold and then it squashes them with a dynamically acting filter centered at that peak.
Of course something so simple would not be applicable for most use cases, so there needs to be some parameters that allow you to fine-tune how this processor works.
So I am going to break down what certain sections do for you.
Left Panel
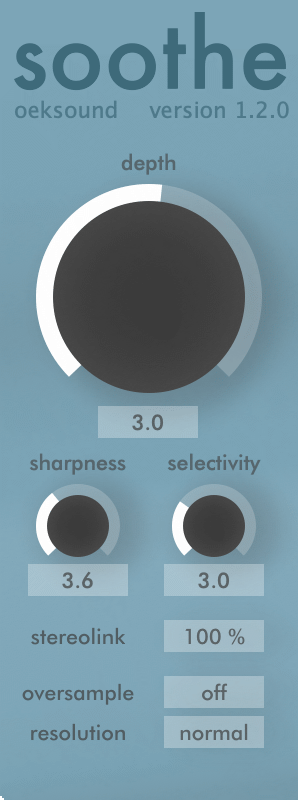
The left panel offers us a few perimeters so let me go over what these do for you.
- Depth - The depth parameter is our threshold. The higher the depth parameter is said, the lower the imaginary threshold is set, so the processing becomes much more sensitive to the level of peaks in the FFT analysis.
- Sharpness - Soothe generates filters to respond to the FFT analysis, and how narrow those filters are is controlled by the sharpness parameter.
- Selectivity - The peaks that exceed what we set with our depth parameter are then filtered even further by the selectivity control. The higher the selectivity control is more “picky” Soothe is about which peaks, that passed the depth process, it uses to generate the reduction filters. (Functional Programmers look aside, we’re talking about audio here!)
- Stereo Link - The stereo link parameter controls if the processing is independent to each stereotype channel, or if the filters are applied equally to both channels. 100% applies the filters equally to both channels.
- Oversample - The oversampling parameter allows the plug-in to process the audio at a higher sample rate internally before outputting it at your projects sample rate. A higher sample rate allows the generated filters to operate better when the sharpness is set very high.
- Resolution - The manual says, “increases the temporal resolution. With resolution on high or ultra, soothe will refresh the reduction filter it uses internally more often.”. As I explained earlier, this means that the FFT block overlap is probably higher. I expected high to be about 8x and ultra fo be 16x. The author of the software confirmed this via e-mail: “The default overlap ratio is 4x, with the higher resolution settings being 8x and 16x.” (I’m very surprised I got this right.)
Right Panel - Part 1
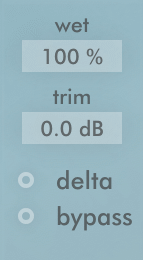
The lower left-hand corner of the right panel has a number of very useful options:
- Wet - The wet control does what it implies; it allows you to mix the unaffected signal with the affected signal.
- Trim - Trim lets you change the volume of the affected signal.
- Delta - Delta is a neat control that allows you to hear what is being processed, rather than the result of the processing. When you press the Delta radio button you hear the difference between your original signal and the process signal, so you end up hearing the inverse of what the filters are doing. This is a very useful feature to let you hone in on particularly annoying areas. Turn on Delta and then make your signal sound as awful as possible, and when you turned Delta off you will have rid yourself of the terrible sounding bits.
- Bypass - Bypasses the signal… but it’s not very good
Right Panel - Part 2
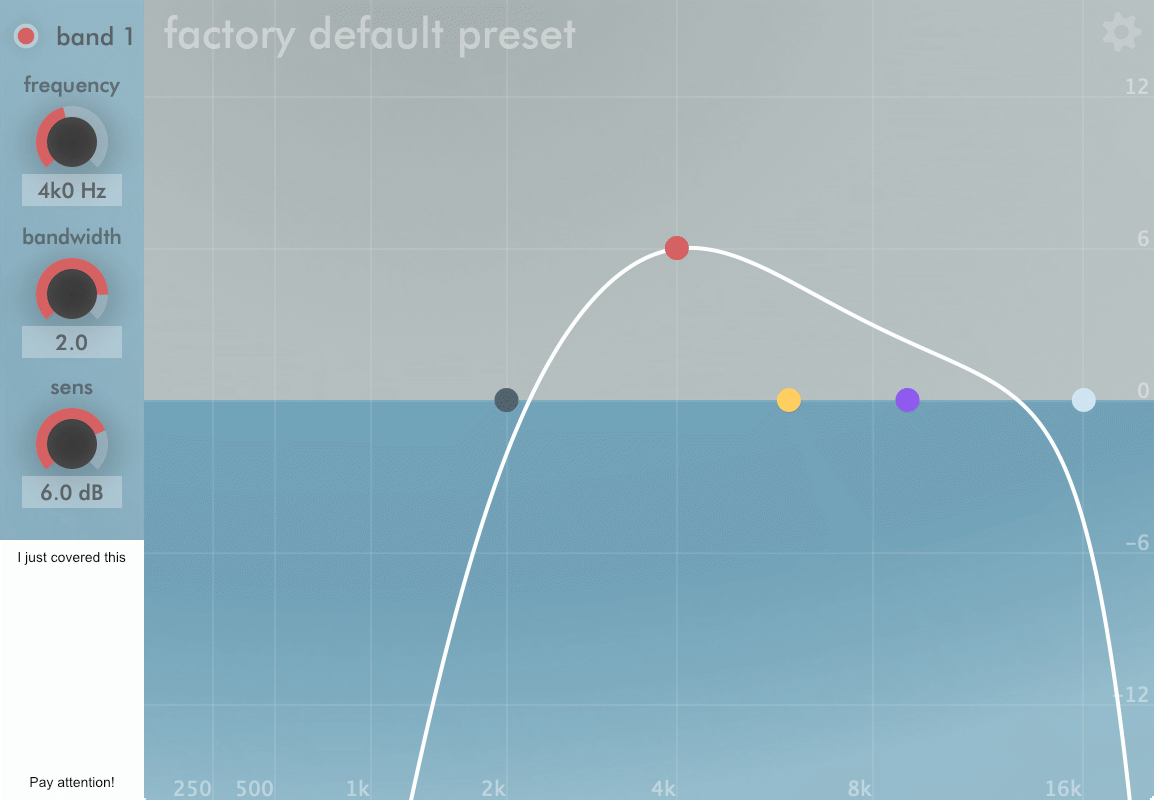
Soothe listens to your signal, then it processes it. It is important to recognize that these are two separate processes: the listening process, and the processing process.
This means that Soothe can change the signals that it listens to without messing with the processing signal, but apply its dynamic processing to your original signal… and that is exactly what it does.
In the right panel you are given a four band equalizer that allows you to equalized signal that Soothe listens to. This works just like any other equalizer that you may be familiar with: you are given a high pass in a low pass, and two bell bands.
By changing the signal that Soothe listens to you can make it more sensitive, or less sensitive, to specific areas of the signal. For instance if there was a singer with a lisp that you wanted to tame, you could boost the 2k to 4k area so that Soothe acts primarily on that region and leaves the rest of the signal mostly alone.
This is not just for boosting either, you can reduce certain areas so that Soothe is less sensitive to those areas.
Remember this processing only applies to what Soothe listens to. The signal that passes through is only affected by the dynamic processing.
Testing
Let’s run Soothe through a couple tests to see if we can learn anything about it.
Sweep
The sine test is a simple test where I run a sine wave that sweeps around in frequency.
The purpose of this is to see how well Soothe tracks frequencies, and see if there are any gaps in its detection.
We can see here that Soothe does not have any gaps as the sine wave sweeps across the FFT bins. This is a good sign, and it shows that there is some overlap of the FFT bin windows as was described earlier.
With some further testing I have discovered that the overlap is approximately 75%, and I addressed the developer about this and was told that it was 4x. That value translates fairly close to my tests.
You may notice something else rather curious about the animated image above; while my sine wave input is a fixed amplitude, Soothe reduces the sine wave at a varied level. As the frequency of the sine wave increases, Soothe appears to be decreasing the level more.
Let’s investigate that further.
Fletcher Munson

Soothe recognizes that the human ear does not have a perfectly flat response. It takes into account the ubiquitous Fletcher-Munson curves.
The result is what you see above. Soothe is more aggressive as the frequencies become higher, so that the resulting signal is more pleasant.
I was not aware that it did this until I started running some signals, and this would explain why it does not sound as harsh as I expected that it would.
The graph that you can see above is the frequency response of running a sine sweep through Soothe. Higher frequencies are more aggressively reduced with a little bit of deviation from 5.5kHz and higher.
Sine Spikes
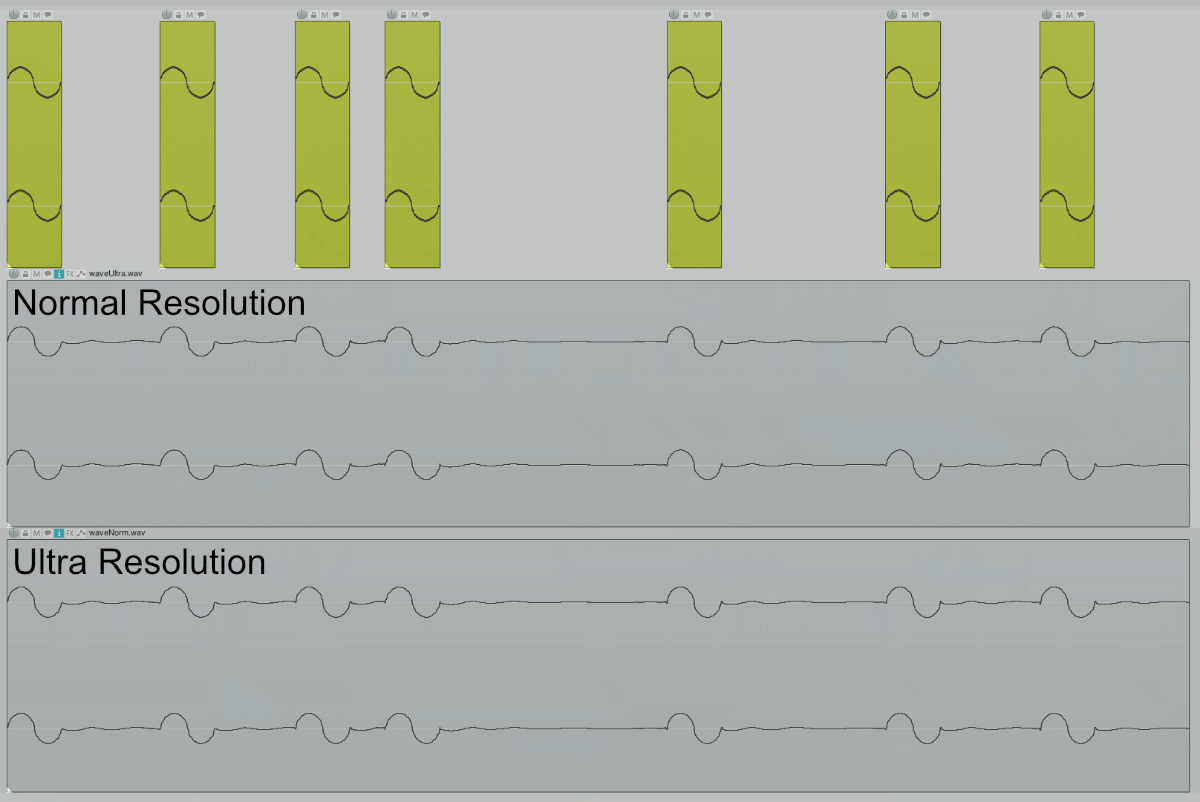
1kHz sine waves randomly placed. The top row is the input. Middle row is Sooth with default settings (depth to 40) in normal resolution mode. Bottom is default settings (depth 40) in ultra resolution mode.
There is very minimal difference. Combining the two signals, with one’s polarity reversed gives a null to -85.6dBFS.
I attempted a few other tests similar to this, which I wont reproduce here. They all consisted of regular intervals of one period signals separated by n-periods. So, one wave, one wave’s worth of silence. One wave, two wave’s worth of silence. One wave, three wave’s of silence etc…
These gave the same results.
I e-mailed the author. He responded within 3 hours with a very detailed response. First is what I sent, followed by his response (there were multiple things in the e-mail, this is the excerpt that applies):
| My E-Mail. |
| I attempted to test the effect of the Resolution parameter in Soothe. As I understand, it increases the temporal resolution of the reduction filters (as explained in the manual). I assume that this is the rate and which the filter response to changes in the FFT bins, or perhaps the averaging of the FFT itself. I decided to double check this by using two test signals: a 1.5kHz sine wave being muted every cycle (I also tried permutations of 2, 3, 4, 5 etc.. cycles), and alternation between 1.5kHz and 3kHz sine waves every 2 cycles. I also tried various sine sweeps (from 1Hz up to 100Hz modulation between 1.5kHz and 3kHz). I achieved nearly identical results with the 3 resolution modes. I was able to match the modes (comparing normal-normal, normal-high, normal-ultra). This is using the exact same settings, but only changing the resolution parameter. |
| Olli’s Response |
| On normal resolution soothe has FFT size of 4096 samples. That’d mean, that on Fs=44100 there is 4096 / (44100 / 1500) = 139.31972789115648 cycles of 1.5kHz frequency already. If you turn it on and off with a constant rate during one block of FFT, it actually forms a new waveform, and should appear as a constant spectrum. So changing the resolution parameter shouldn’t have much of an effect, since the waveform stays constant. Perhaps a better way to see how the resolution affects the processing is by running sound sources that have a lot of transients in it, say, drums. You could also synthesize these, for example with sine waves with abrupt onset and short exponentially decreasing windows. The key here is to have such transient happen only every so often, and not in every FFT, like it would in a musical excerpt. A click track could be easy to setup for this to see the difference. |
Ok… The tests that I specifically e-mailed him about most certainly falls into this. I haven’t shown these tests because they are clearly worthless.
The test I’ve shown above (which I didn’t discuss with him, since I thought it wasn’t particularly relevant) shouldn’t. I could be wrong of course, and I think it’s best to default to that assumption.
Let’s try a snare drum and see.
Snare drum Resolution
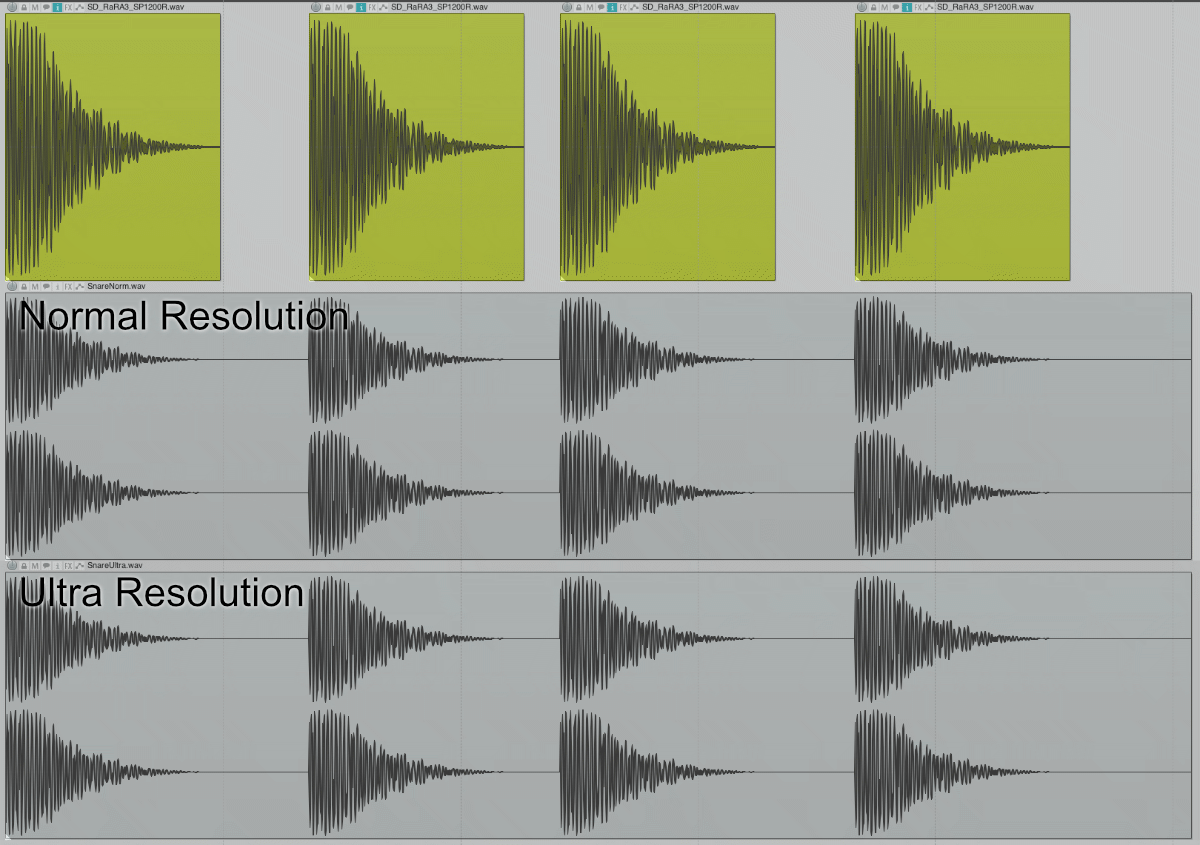
Once again I’ve used default settings with the depth at 40. The snare sounds are some very sharp piccolo snares loaded into an E-mu SP-1200 and rendered out. The samples were normalized, then Soothe was applied with normal and ultra resolution modes.
This time the “null” (summing normal + ultra with polarity inverted) was -34.7dBFS.
This is a much better result, however it’s clear that the difference is minor. It’s very unlikely that you’ll hear the differences between the modes usually given that their differences are buried so deeply.
When using Soothe it seems to be best to default to “Normal” resolution, and only use Ultra if you can very clearly hear a difference. I tried dozens of audio files, besides these tests, and I only found one thing that I could hear a very clear difference: slap bass guitar. Ironically enough, despite hearing the difference I didn’t like using soothe on that file.
Snare drum Oversample
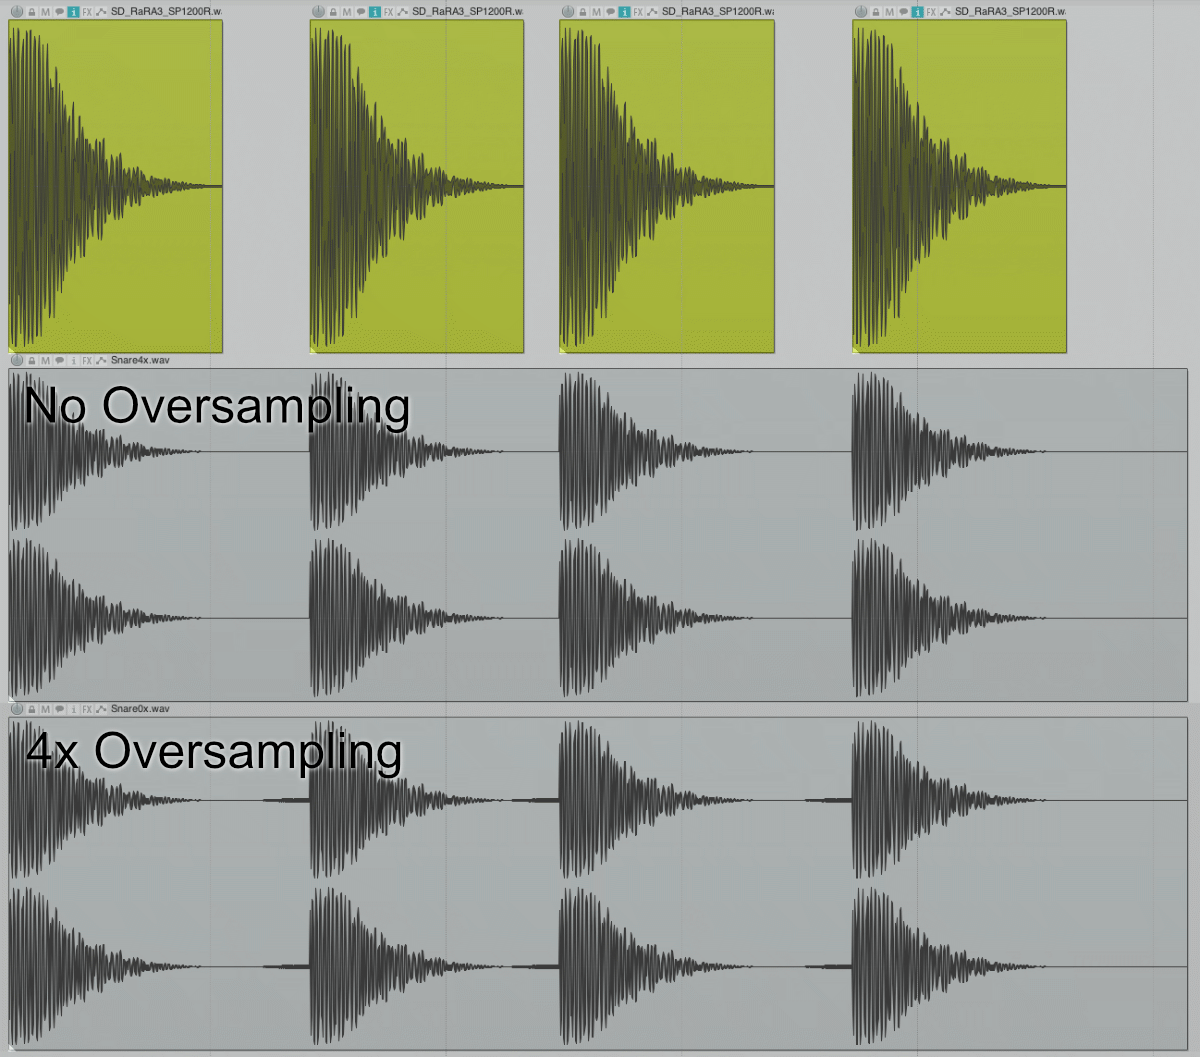
This is the same as the Snare test above, except I cranked the sharpness up to 10.0.
The “null” result was -37.4dbFS (kinda funny actually, look at the previous value).
I’m not convinced that this parameter is totally useless, so instead I think a sine sweep should be tried so that we can abuse the whole filter range
Sine Sweep Resolution and Oversample
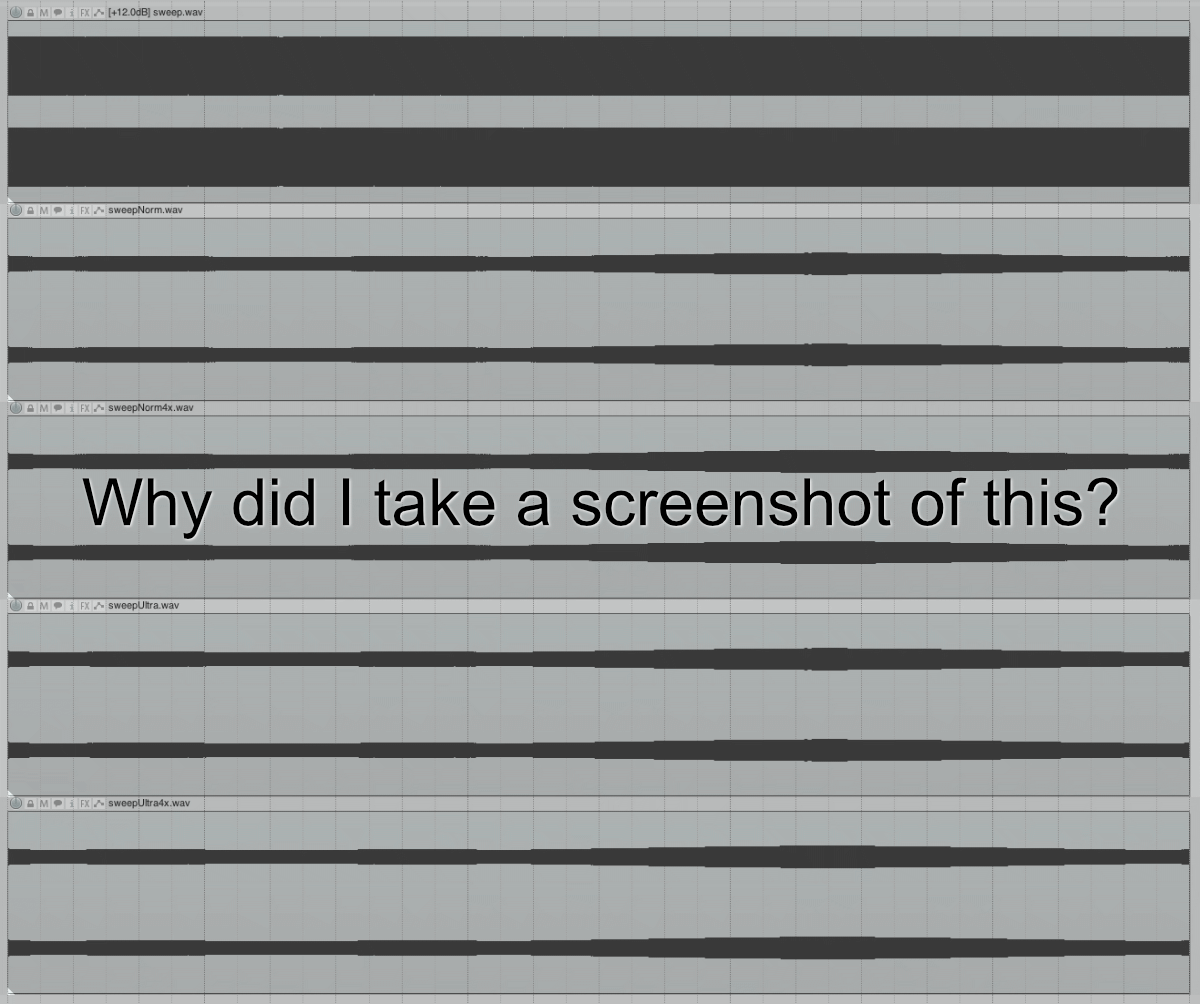
I couldn’t help myself but to try this real quick with both oversampling and resolution parameters. This is a sine sweep that goes from 800Hz to 20,000Hz to 8000Hz in 10 seconds.
Depth at 25.0, Sharpness at 10.0. Selectivity at 0.0. All bands off.
So here’s the ‘null chart’ showing the peak minimum difference. (The highest value recorded when summing X + -Y). Lower numbers indicate more difference.
| Normal 0x | Ultra 0x | Normal 4x | Ultra 4x | |
| Normal 0x | X | -57.9 | -54.0 | -54.0 |
| Ultra 0x | -57.9 | X | -54.3 | -54.3 |
| Normal 4x | -54.0 | -54.3 | X | -60.2 |
Some notes:
- Oversampling appears to make the largest difference in the lower frequencies in this test. (The sweep shows the least difference at lower frequencies). This is not show in my table above, but I was able to visually verify this by watching the meter during the sweep. I did not expect this.
- Resolution appears to make the largest difference in higher frequencies in this test. (The sweep shows the least difference at higher frequencies). This is not show in my table above, but I was able to visually verify this by watching the meter during the sweep. Resolution is more about temporal resolution, and high frequencies are “faster”, so this makes sense.
The result of these handful of non-exhaustive tests is that the resolution and oversampling parameters are very unlikely to be worth the CPU cost in the majority of cases. Not all cases, but most.
I feel that if I can not find a significant difference with a sine sweep, spaced signals or practical transient based signals, then using up to 14x more cpu (4x plus ultra) isn’t usually going to be worth it.
Parameter Test
I have curiosity about how some of the parameters react to normal use, so this is where I do some testing on the parameters.
Bypass Test
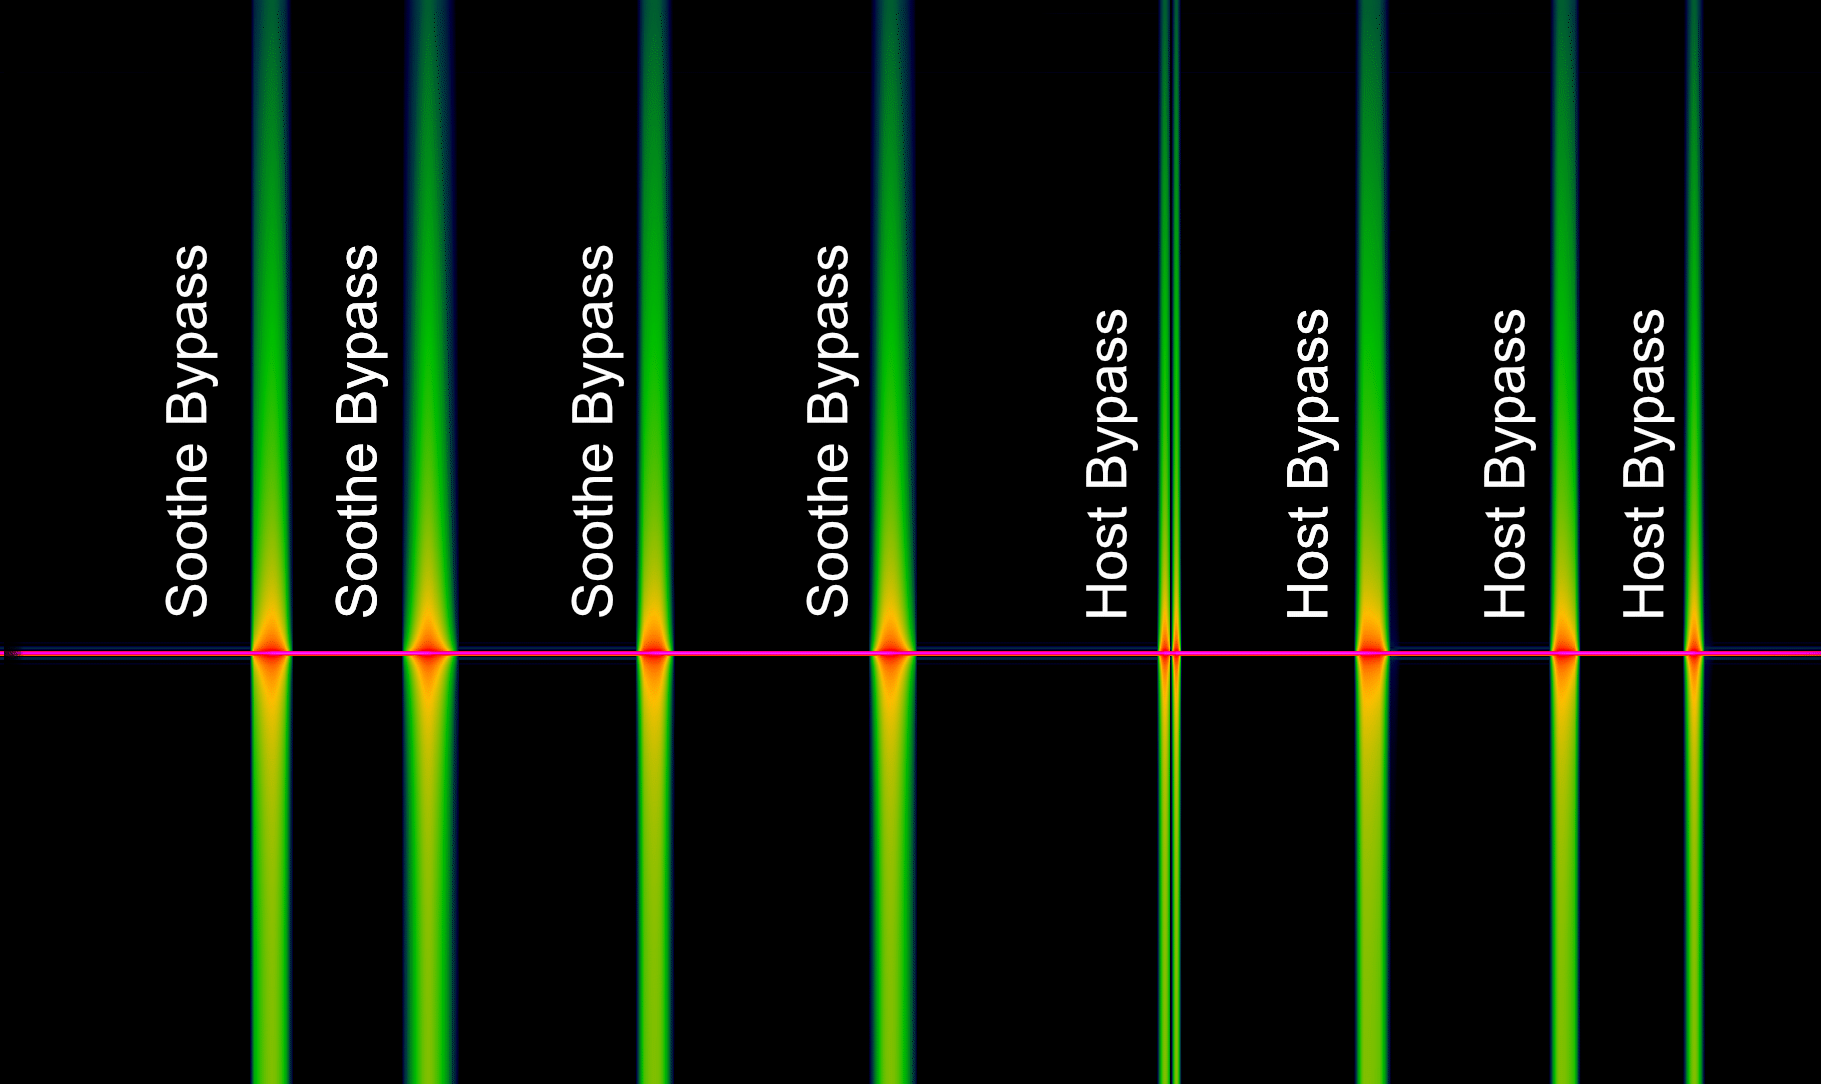
I always suggest that people do not use the host’s native plug-in bypass for automation, because basically all plug-ins do not work with it very well. You will end up with a slight pop. Usually it is better to automate the plug-ins “Wet” parameter or something similar that simply turns down the volume of the process.
In this test I run a 3kHz sine wave through Soothe, and then I measure the output with a spectrograph.
Due to the reasons that were described earlier, this sudden turning off of the signal will cause our analysis to be overly reactive. We are purposely creating a sudden discontinuity in our signal when we bypass it.
That doesn’t mean that this test is invalid though! The “pop” or “click” is audible.
We can see above that Soothe’s bypass does not differ from using the host bypass. We still get a little click in there.
It is possible for any plug-in to bypass any pleasant manner. As an example I will demonstrate how Goodhertz Wow Ctrl (a fairly complex processor!) handles bypassing:
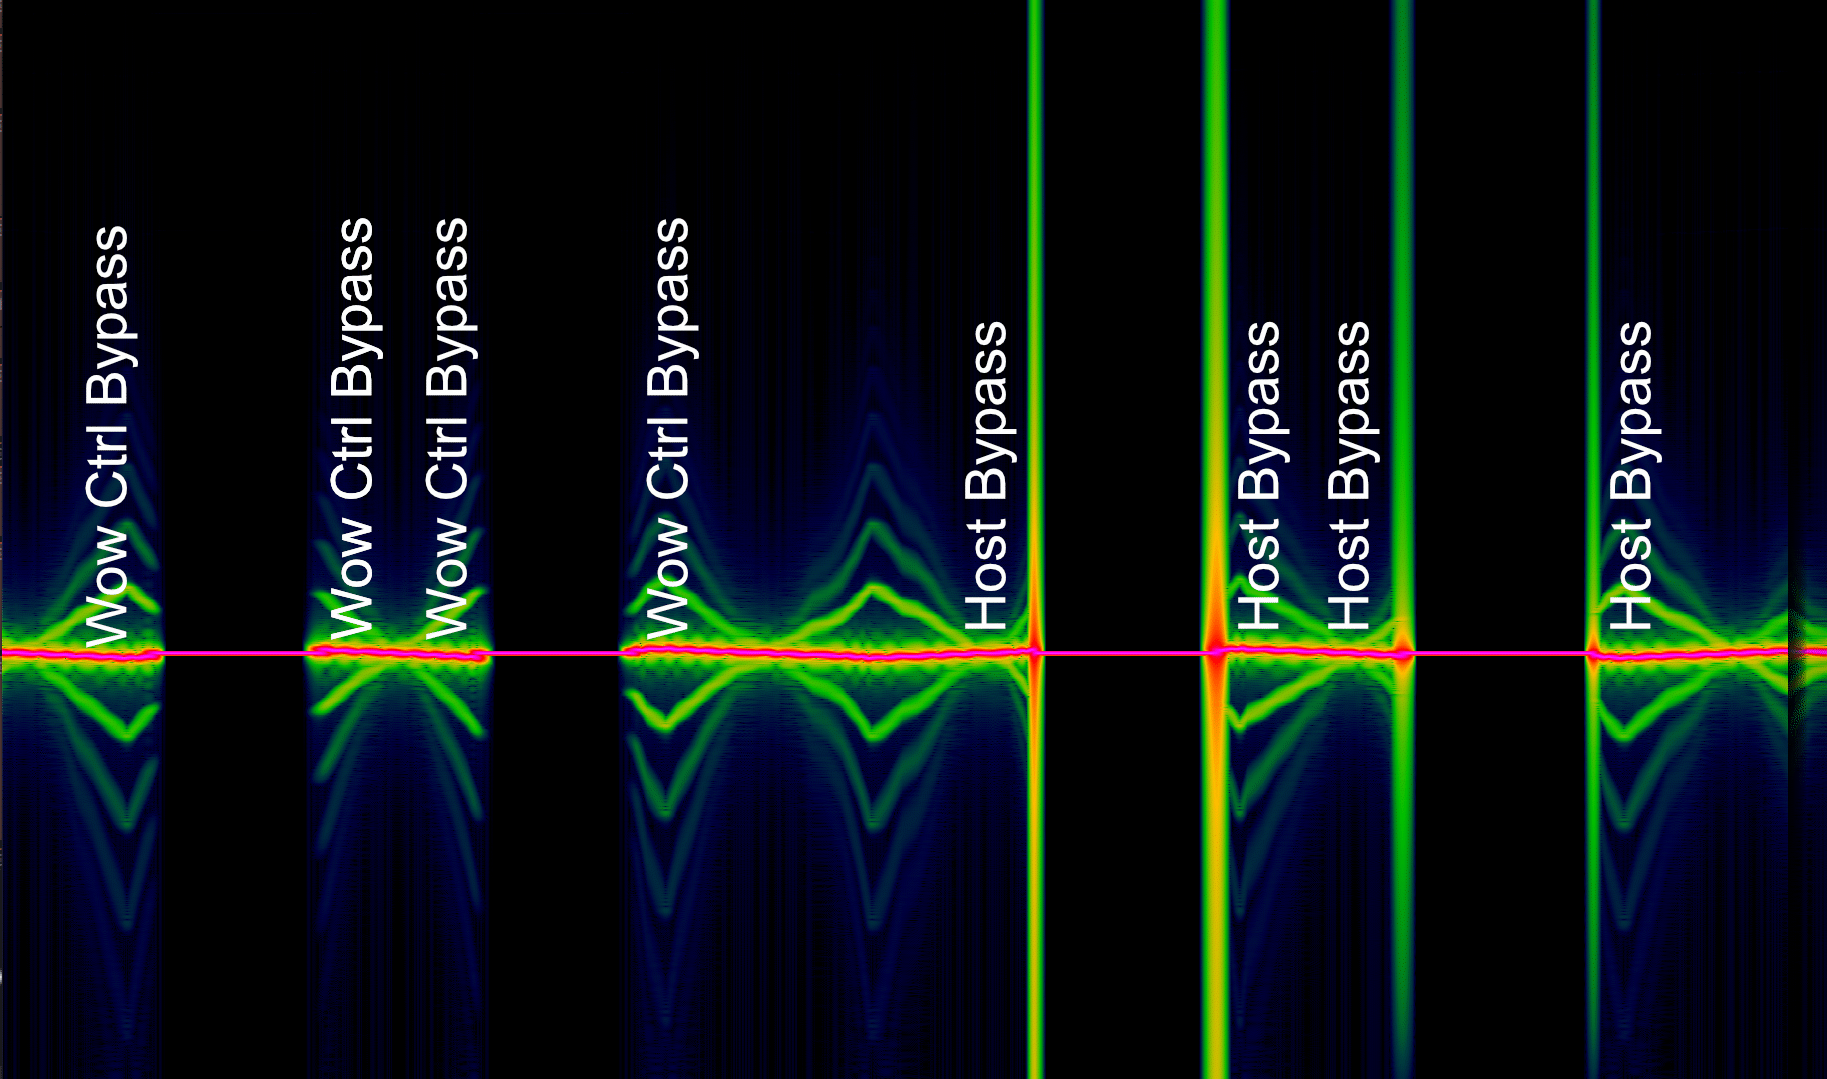
Look at how clean that is. When Wow Ctrl bypasses there is no click or pop. It sounds beautiful to my ears, and it looks beautiful in the analysis window.
Soothe is a complex plugin, so I know that the developers are more than capable of getting this right.
Then again, I suspect that many people will never even try to bypass this plug-in in their project. I strongly warned against holding this against the product too much unless you plan on using the bypass feature a significant amount.
Selectivity

Remember that sweep test from before with the funky curve?. I was curious if the selectivity knob inflenced it.
It appears that this is the case. This was tested with a sine sweep using the default settings, with all bands turned off. Selectivity at 0, then at 10.0.
It’s reversed of how I expected though! I thought that higher selectivity would have less curve. In retrospect that was a pretty dumb way to think.
Turning up selectivity makes it more ‘Fletcher-Munson like’.
Sharpness

More sine sweeps. This is just “for fun” because I’m curious what’ll happen. I suspected that sharper filters not be compensated for their peak reduction, so this is a test to check that.
This is default settings, switching sharpness and selectivity between min and max.
It’s pretty clear that the sharper filters give deeper cuts, along with affecting a narrower frequency range.
That fuzziness on the blue line is an artifact of the testing. It’s not indicated of Soothe’s operation.
Real World
OK DUDE, WE GET IT. NERD STUFF. RIGHT. HOW DOES IT SOUND?
I was extremely unconvinced by Soothe the first time I tried it, and after watching various videos. After spending some time with it, fully reading the manual and abusing it I have come to rather like it.
The comparator above has a few examples of:
- Distorted guitar - This is something that I think everyone that works with guitar encounters; it’s too bright, so you EQ it, and now it sounds dead. I thought that I would try Soothe on something that wasn’t particularly awful to see what would happen. Once again I’m surprised at how well it tames the brightness of the guitar without completely killing it like a static EQ would.
- Fizzy Guitar - Anyone that works with guitars ends up in this situation. A bright guitar with that nasty fizz in the background (or foreground, EW!). It clobbers any attempt at vocals. Soothe doesn’t fix this. The best I could do was de-brighten the guitars and push the fizz back. I’m pretty happy with that.
- Unprocessed washy drums - Hi-hat problem in left, stereo link 0
- Distorted Bass - I have no clue why I tried this. It seemed fun.
-
Mix - This is the whole mix of drums/bass/guitar with and without Soothe. The most notable thing is that the “Soothe” version feels like it has A LOT more room for vocals without feeling dead or like there’s a high-midrange dip.
-
Sibilant dialogue - This worked incredibly well to reduce sibilance in some purposely sssssibilant dialogue. Very impressive.
- Sibilant Singing - Ignore my post-lunch singing. It’s awful. Soothe once again worked brilliantly (and very easy to setup)
I threw together these samples in about 15 minutes. Just drum overheads, one take on two guitar tracks and one take on drums. I purposely tried to make the guitars sound awful, and the drum overheads were placed far too close. The difference that Soothe makes is subtle at times, but it manages to solve the issue that I was aiming to solve without impacting the signal.
These files are all normalized to the same Lufs value(-18dB LUFS Integrated), which makes the changes even more subtle. The Talk and Sing examples have up to 20db of reduction in some points(!!), yet they don’t sound significantly different outside of what was targeted. Impressive.
CPU
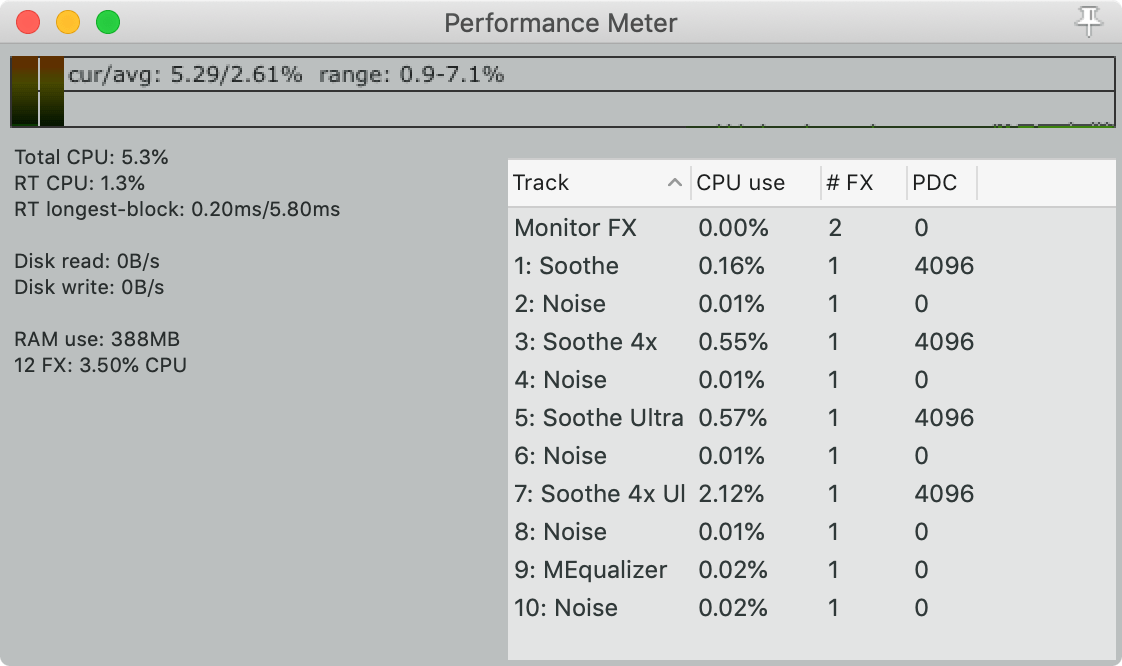
Since plain “CPU” usage numbers don’t matter, I’m showing the CPU usage relative to the freely available MEqualizer with all 6 bands active.
All processors have pink noise running into them. Soothe is setup with the default preset.
As you can see, Soothe is a bit CPU heavy. It can use up to 106x the processing power of MEQualizer. With the default settings it’s about 8x more processing intensive.
As I think I showed above, using the High Resolution and Oversampling options is rarely worth the extra processing, so the ‘106x’ value is rather sensationalist. You can certainly expect Soothe to be somewhat of a more CPU intensive product, but you also shouldn’t be using very many of them in a project.
For what Soothe does (dynamically controlling dozens to hundreds of filters), it’s surprisingly CPU light.
Conclusion
I know it may seem like there is been a lot of technical discussion that is totally worthless for common production, but I think that it’s important understand how Soothe works and the parameterization of the product.
When he gets down to it Soothe simply just works. It analyzes your audio using an FFT, then spawns filters to dynamically reduce areas that exceed the ‘depth’ threshold. Soothe isn’t going to let you do magical things to lower frequencies, since it’s primarily targeted above 500Hz, but what you can do in that range is reduced the most annoying problems that you may encounter for any sort of audio production.
IS IT A GIMMICK? - NO. It is not a gimmick even though it is a somewhat novel idea that any audio engineer or producer may gravitate towards to immediately. There is legitimate use here, but it is not something that you will use in every project, let alone in every single track.
The value that you get from Soothe is not that it is an incredible product that will make every single project you have better. The value that you get comes from the fact that it will let you solve annoying problems that are difficult to solve quickly and satisfactorily with common production tools.
And let’s not forget that the product is named SooTHe which demonstrates the sounds that it’s specifically designed to reduce. I assume this is intentional, and I commend the company such a brilliant name.
Is Soothe worth 149€? I really struggle to say yes as a flat answer. If you find yourself working with dialogue frequently than is absolutely a yes, even if you own Izotope RX (which covers some common ground). The real-time ability of Soothe allows you to create a much faster workflow than static editing tools. There’s no ‘search and kill’, you just set Soothe to pick up on the problem frequency areas and let it work. If you hear human voices coming out of your DAW, then you should own Soothe.
If you record musicians (such as yourself) and you find yourself frequently unhappy with the high-end in your recordings then Soothe is worth a demo. If it’s worth €149 will be up to you. I think that it’s potentially useful for certain types of work, and potentially worthless for others.
People that work with orchestral sounds I think will love Soothe. You can pacify those pokey piccolos, vanquish the vexatious violas and herd the highs of hyper high-pitched heralding horns. 100% worth it. Buy now.
For electronic music production, sans vocals, I suspect that Soothe might be unnecessary. Given that you have a great deal of control over your synthetically created sounds, Soothe is a layer of complexity that is rarely necessary.
I came into this expecting to do some research, try it out, and say “Heh, cute, but worthless.” After ~30 hours of use my verdict is significantly more positive. I suspect that almost anyone in a professional audio context will find this nearly indispensable, and amateurs will find it potentially useful.
There are some things I’d like to see improved. Bypass being the main thing. I also found that when switching to 4x oversampling I often ended up getting some nasty static sounds. I wanted to report this, but I could not figure out a consistent way to reproduce it. It may be a host specific issue (Reaper 5.961). I will report this if I can come up with a consistent method to reproduce it. It happened primarily with low audio buffer sizes.
It’s worth your time to put in some effort giving it a shot, especially if you work with any sort of human speech.
Support Me!
This post took 35 hours to research, screenshot, write and edit. If you appreciate the information presented then please consider joining patreon or paying me for my time spent bringing you quality content!
WRITTEN IN VS Code. See this post for more information.