In my Axiom Review I complained about the presets. One of the fine fellows at Blue Cat more or less told me to “put up or shut up” in a very kind way, and (s)he was totally right in doing so.
I didn’t actually give a good constructive summary of how to improve the presets, or how a user could create patches suited to their tracks.
Not all of these are guitar sounds!
So that’s what I’m doing today. I have 10 presets here for Axiom that I took from “real sessions”. I’m going to explain how to use them, how I came to the settings I used, and the tricks I use when utilizing Axiom.
A lot of these tips apply directly to Blue Cat Destructor as well.
Contents
- Introduction
- Pre-requisites
- Late Replies - Early Reflections
- Destructor Tricks
- Destruction
- Axiom Tricks
- Presets
- Conclusion
- Support Me!
Introduction
I’ve written this article somewhat backwards. Rather than diving in to the presets, I’m going to cover general usage and the basic ideas first.
Then I’m going to walk you through the 10 presets one by one. I’ll refer to the previous sections as I go.
The presets can be downloaded below. These can be used in the Axiom Demo as well as the full version.
Here’s the presets by the way
Pre-requisites
VU
First, you must understand the concept of gain staging. Axiom and Destructor are non-linear processors at their heart. This means that if the input levels are not similar to what the preset designer used, then you won’t hear what the preset designer used.
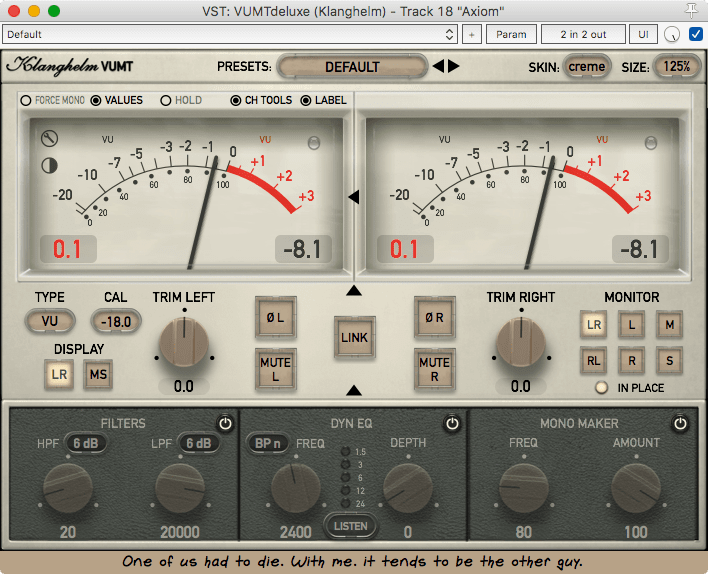
For all of these presets I used a very simple standard. 0VU=-18dbFS. That means that your input signal, whatever it is, is around 0VU when played at its normal level.
VU is not RMS. VU is not peak. VU is not DIN or EBU or LKFS. VU is VU.
If your DAW does not have a VU meter built-in, or if you do not already have an awesome meter like VUMT Deluxe, then you can download the FREE mvMeter2.
I could have used some other metering standard for this, but VU is what I use when I mix, so this is what was used when these presets were created.
If you don’t calibrate your input levels this way, then you’ll get a much different sound than me.
Guitar
For the Guitar presets, what guitar you use and what DI you use has a big influence on the sound.
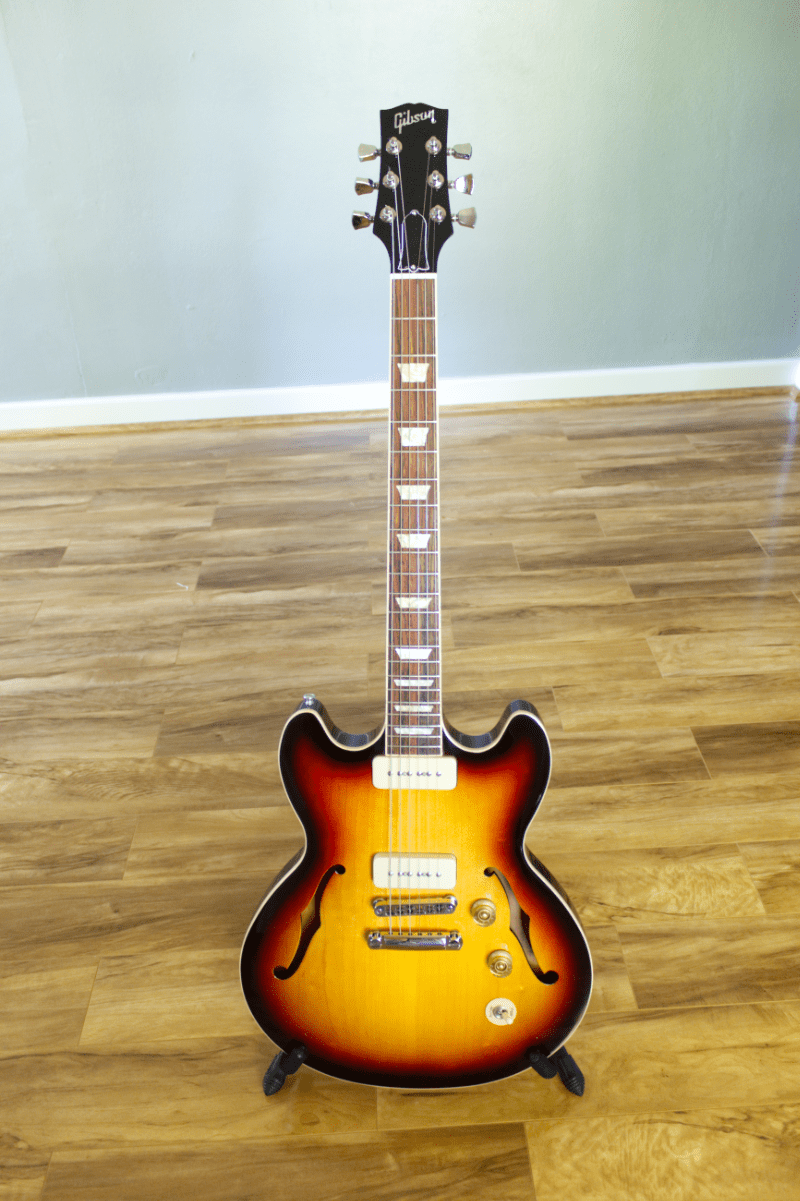
I did not keep track of exactly which setups were used for these, but I did double-check them all on my beloved Fender Jazzmaster and Gibson Midtown.
Some of these presets were created with setups that I do not have access to, specifically active and/or humbucking pickups. All of my guitars have single coils of some sort (I love P90s). I can tell you that the difference in sound between the mixed track and my favorite guitars is way different.
So your mileage may vary. Hopefully some of the tips and tricks will aide you towards tweaking my presets, or the huge variety of default Axiom/Destructor presets for your sound.
For the record…
All of the presets come from recordings in the context of a mix. This is my biggest problem with most of the default presets that come with Axiom/Destructor; they sound awesome on their own, but in a mix they are way too forward and two-dimensional.
I think “two-dimensional” is a bit of a buzzword that gets thrown around too freely so let me expand on it. The default presets lack subtle reverb, comb filtering (from boundaries and multiple speakers), group delay (from microphone distance) and post-amp equalization (microphone) that help make a recorded amp sound like… well, a recorded amp.
I understand that the folks making the presets need to create sounds that WOW people on first listen and excited guitarists, but the ultimate goal is to create a song right?
A big part of this article is introducing some of these “three-dimensional” aspects to the sound. In fact, a lot of the default presets sound a lot better (I think, obviously) using some of these techniques.
Or I could be full of it… you’ll just have to try it out and see.
Late Replies - Early Reflections
I don’t use this in any of the presets below, but it is something that I’ve begin doing recently.
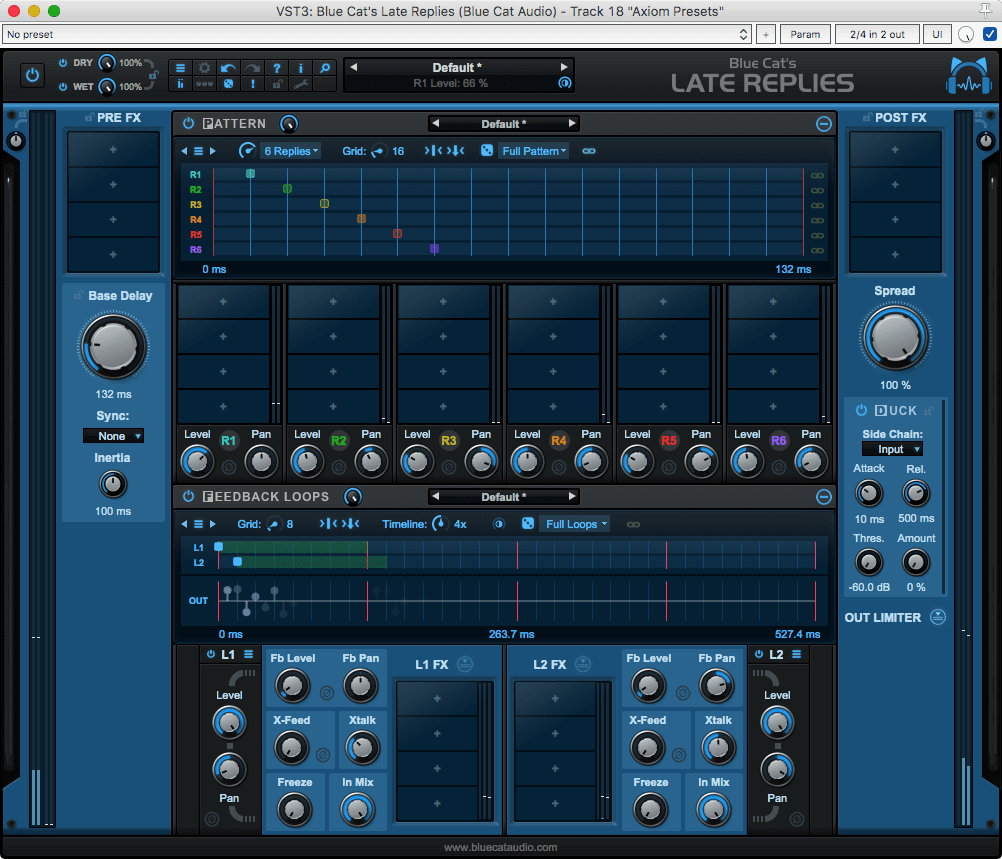
I setup Late Replies with a selection of decaying replies, going from left to right, with light feedback. This simulates the concept of early reflections that help aid in the illusion of ‘recording a guitar in a room’.
Early reflections in reverbs can be rather complex, and the topic of creating any reverb elements in Late Replies would be a post of its own. The act of creating a few very quick and short delays at the beginning of the sound is easy though.
Once you start exploring the use of Late Replies for creating early reflections, I’m sure you’ll slowly build up in to creating your own lush reverbs that don’t clutter up your mix. Late replies is fantastic for that.
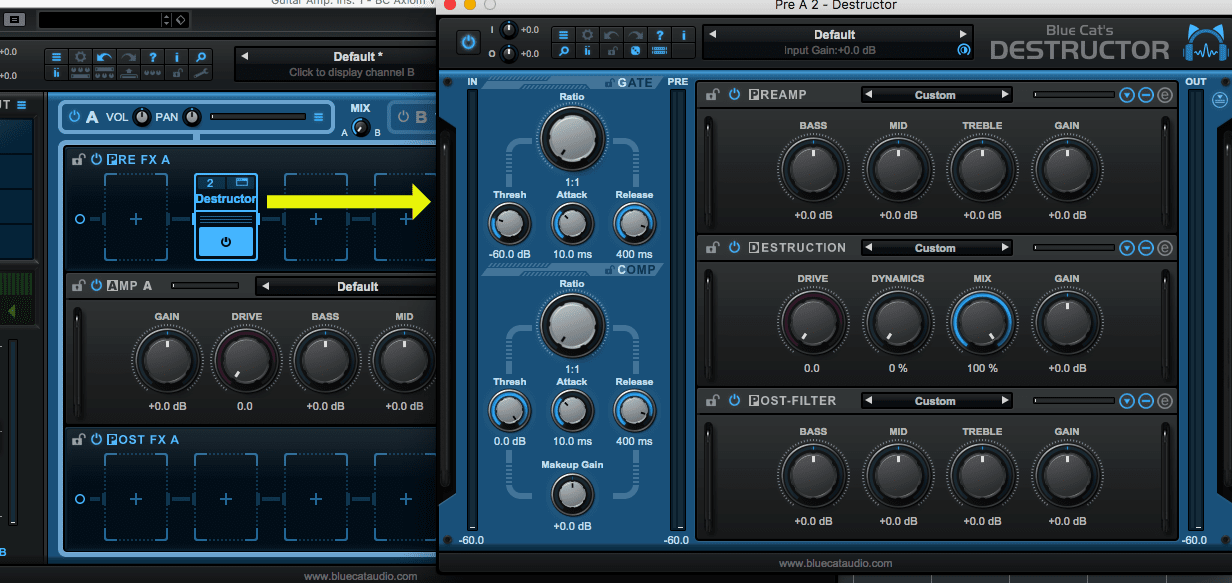
Destructor Tricks
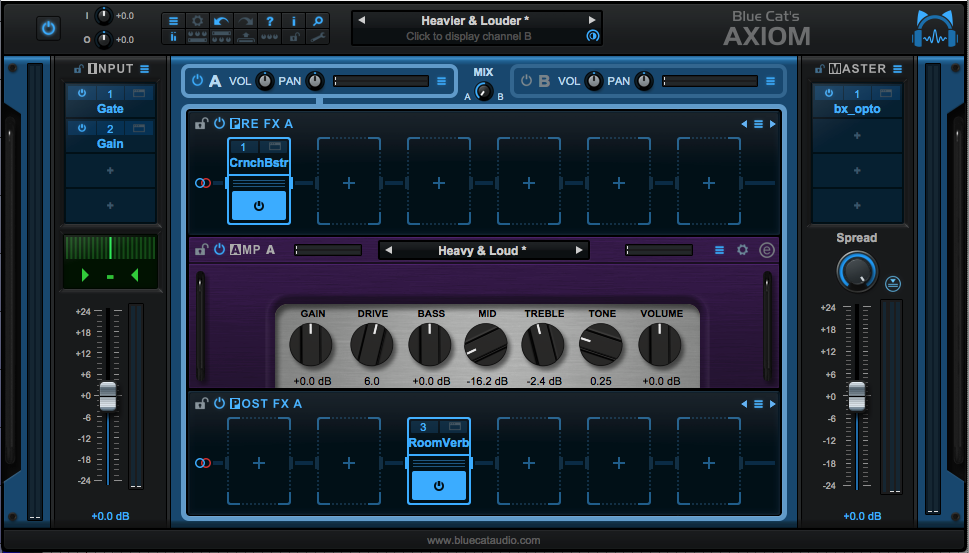
Destructor is the core of Axiom, quite literally. It’s smack dab in the middle of the GUI.
A lot of the sound that you get out of Axiom is going to come from Destructor, so it pays to spend a bit of extra time with Destructor and learn some of the tricks.
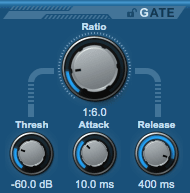
Gate
Compressor
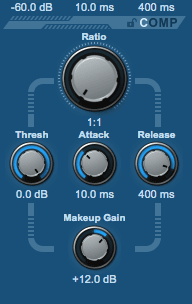
If you need the sound to have a rather static saturation profile, then compressing before the Destruction stage is what you need. If you want that ultra-dynamic feel, then don’t even bother.
Compressing raw guitar sounds straight out of the DI is somewhat hit and miss. They are fairly anemic sounding instruments on their own. I suggest using very short release times and longer attack times (unlike what I’m showing above).
Most of the time you can avoid using the compression stage entirely except for…
Makeup Gain
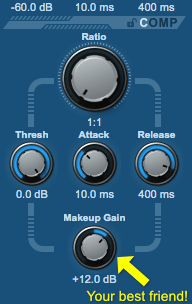
This unassuming knob right here is one of your two best friends for any sort of high-gain or crunchy sound in Destructor.
If you try to make sounds with Destructor just by fooling with the “Destruction” module then you will have knobs and sliders cramped way up near their maximums just trying to get enough grit out of your sound.
Enter the Makeup Gain Knob. Use this to add gain before you get to the Preamp and Destruction stages. If you feel like you’re cranking the drive too much or the Range knob too far, or the threshold slider is too sensitive…. feed some more/less gain in to.
If you’re a guitarist pedal-geek (like me), then you can think of this as your clean boost right before the amp. It’s that really simple little knob that’s the difference between tonal bliss and handheld-radio-like sounds.
The Preamp gain is another important gain stage as well, but with a less ‘clean’ function. To understand which to use, refer to the Threshold and Ceiling section.
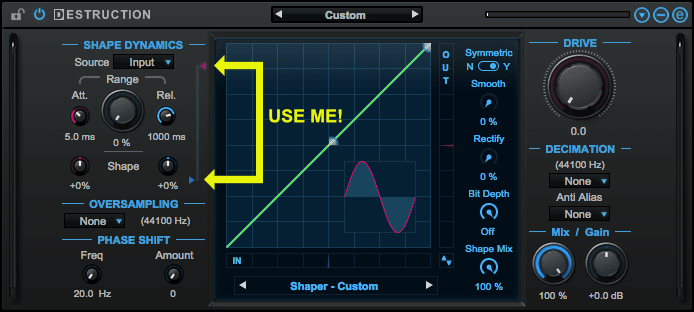
Destruction
Range
The destruction section basically has 2 parts: a distortion module, and a “compressor” that affects the amount of distortion.
The range knob is what affects how much dynamic changes occur to the amount of distortion. If you want that delicate tube-like touch or that blasted tape sound, then careful adjustment of the range knob is what you want.
This much should be obvious if you read the manual. I’m bringing up the range control for a very specific reason:
Automate it.
You can give a chorus section that little extra boost by decreasing the range (which makes the distortion more consistent). You can make your solo more delicate and nuanced by increasing the range knob.
Don’t be afraid of laying down a track with one sound, then going back and automating the range knob to adjust the ‘response’ of the amp to be more appropriate for the feel of the track. You can even simulate the sound of an amp warming up with a very light automation movement across the track on the range knob.
It’s a small thing, but it can make a big difference.
Source

If the default presets are anything to go by, these are probably the 3 most underused controls in Destructor.
Let’s first cover the “Source” control. This is where in the signal flow that the dynamic distortion reacts to. You can use the input signal, the preamp signal, the gate signal, the compressor signal or an external signal.
So here’s what happens when you use the various modes, and why you’d want to use them:
- Input - This is probably the least “amp-like” or “tube-like” or “tape-like” or anything like. If you’re doing any sort of bitcrushing or creative effects then this is usually what you want.
- Gate - In the chance that you are not using any compressor makeup gain or preamp gain, then this is the best place to work from. Often when using high gain sounds that are gated, you can end up with that subtle squeel when the gate opens/closes. Using the post-gate signal makes the dynamics section follow the gating, so the distortion responds to the gated signal instead of the input signal and you don’t get that messy gate open/close sound.
- Comp - The compressor section is probably the most useful, at least I think it is. If you’re using compression on your input signal then you want the amp to respond to your lightly compressed input stage. This is also where you find a makeup gain control which lets you overdrive the Destruction section more.
- Preamp - Using the post-preamp signal is important for a number of clean/crunchy sounds. When you have a preamp curve that accentuates the high-end in any way, you are also increasing the level of transients/peaks in the signal. Increasing the transient material in the sound can drastically change the envelope of the signal and will make your sound “more responsive”.
- External - Not applicable in this article, but this can be useful when mixing. Maybe I’ll cover that another day.
In my experience, comp and preamp are used usually. The only time that I use gate is on really high-gain sounds to help alleviate that gate open/close squeel.
Threshold and Ceiling
Now for the threshold and ceiling. These are the 2 things that your input source triggers, and the amount is dependent on the range control.
So what’s happening here?
- Threshold - This determines where the dynamic distortion effect switches on or off (I’ll explain shortly)
- Ceiling - This determines where the dynamic distortion effect is maxed out.
There’s 2 possible setups that you might use:
- Threshold below the ceiling - The threshold controls when the dynamic behaviour starts. The ceiling determines when its maxed out. If you are using a properly gain staged signal then you might notice that the threshold has to be very low. This is why using some sort of makeup gain is so important. The distance between the threshold and ceiling is “how dynamic” the response will be. The threshold determines when the breakup occurs.
- Ceiling below the threshold - This makes the distortion maxed until the signal hits the ceiling. At the threshold, the distortion is totally off. The louder the signal, the less distortion. Not exactly useful for contemporary sounds, but a cool special effect.
Proper setting of the threshold and ceiling is what lets the range control do its thing.
For that subtle tube-like breakup, set the threshold somewhat low and the ceiling higher. The amount of distortion increases the louder you play and it’s really sensitive to your playing.
If you want a solid-state like feeling then have the threshold below the ceiling, but put them close together. It will stay clean right up till you start to clip that transistor.
A tape-like sound will be right in between the two. A higher threshold, but with the ceiling and threshold moderately close together.
Modern high-gain sounds you’ll want the ceiling at the bottom and the threshold at the top. This setup will have the distortion model pegging the red the whole time. Silky smooth destruction is your reward.
REMEMBER These threshold and ceiling settings depend on the input gain. Gain staging is important. Use the compressor makeup gain or preamp gain. If those aren’t appropriate then load a gain plugin in Axiom before destructor. Be creative.
Phase Shift
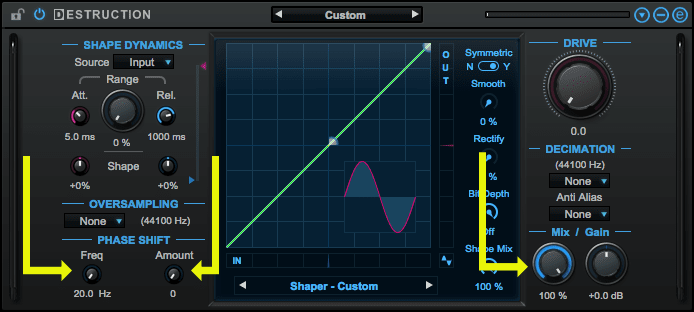
I think that a lot of people will totally overlook this control. It’s nearly as important as the Comb Filters.
It has 3 situational uses:
- To emulate distance - When complex sounds mode through the air, the phase relationship between the frequencies that make up the sound change. If you take a 100hz signal and a 157hz signal, at the start they line up. At 1second they have different relationships. At 1.5 seconds it’s different again, etc… As the sound propogates through the air this continues. The phase shift function can help emulate those extended phase relationships that occur as the sound moves through the air and components of the sound are attenuated at different rates. This effect can be very subtle.
- To change the response of the destruction - Adjusting the phase of higher frequencies can have the effect of increasing transients or decreasing them. Lower frequency phase rotations can also have significant effects on the envelope of the signal.
- To use with the mix control - This is the big one. Rotate the phase of some frequencies but not all of them. Then when you combine that with the original signal, you get a frequency dependent comb filtering effect
If the sound is of the type where mixing in the clean sound makes sense, then utilizing the phase shift can yield some extra realism.
This is also an important control when emulating certain old processors that have preamplification that affected the phase of the input signal.
Preamp
Reset easy mode!
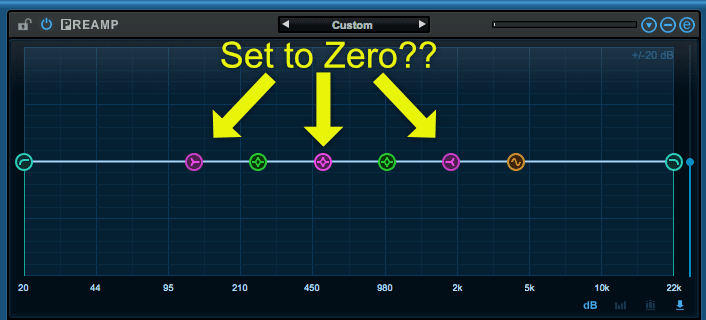
This is something that I feel is a mistake in many of the default presets, but you may disagree with me.
Many of the default Preamp curves are created using the pink nodes. These pink nodes correspond to the bass/mid/treble/tone knobs in the easy mode interface.
The problem that I encounter is that these settings are very important to the overall tonality of the current amp model. If you move the knobs then the sound changes drastically. Most of the presets don’t let you use the tone knobs to ‘change the tone’, but they in fact tend to change the whole sound.
So when you’re exploring Destructor for yourself I highly recommend resetting the Bass/Mid/Treble knobs to 0, and setting the Tone knob to 0.50.
Then attempt to create the best sounding curve possible.
Then adjust the position of the pink nodes so that when you adjust them, they improve the sound without changing it drastically.
OR
Just use every available tool at your disposal and don’t use easy mode at all. That’s my favorite method :) Then you have a lot more options.
Use the Gain!
The preamp section has gain. This may seem like an overlap with the Makeup Gain function, but there’s a subtle difference that occurs when you utilize the Shape Dynamics.
Be aware that this exists, and know how to use it.
Post-Filter
Easy Mode again…
Do it, it’s important.
Use the Gain!
Just like in the preamp, this is important for gain staging.
Comb Filters
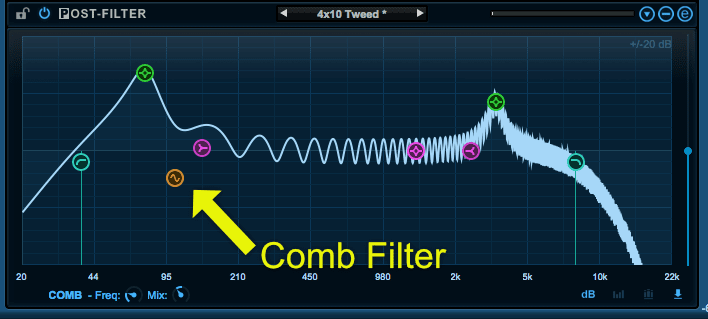
Both the Preamp and Post-Filter sections have a combfilter. It’s the orange circle with a sine wave on it.
Firstly, what does it doing? It takes a copy of the signal, delays it, adjust the gain, possibly inverts the polarity and combines it with the original signal. The gain/polarity of the duplicate is adjusted by moving the filter node up and down, and the amount of delay is adjusted by moving it left/right. Further left means more delay.
Then what? Why would you want to mess up your signal like that?! Because that’s what we’ve been doing to guitars for 80+ years!
There’s 2 notable situations where comb filtering occurs when recording a guitar:
- Near a boundary - If you record a guitar amp that’s on the floor and have the microphone back a bit, then the microphone picks up the direct signal and the signal reflected off the floor.
- Multiple speakers - If you record a guitar amp with multiple speakers and the microphone is back a bit, then you get sound from multiple speakers colliding and causing comb filtering.
I’m sure that most people have heard a guitar sound that just seems really up front, and likewise a similar sound that feels more natural despite having no obvious room sound. That more natural sound is largely from comb filtering (and group delay).
Using the comb filter is something that is rare in the default presets, and I feel that many of them can be improved by either utilizing it lightly or shifting the enabled comb filter to the left.
Give it a shot and listen to the before/after.
Pre and Post emphasis
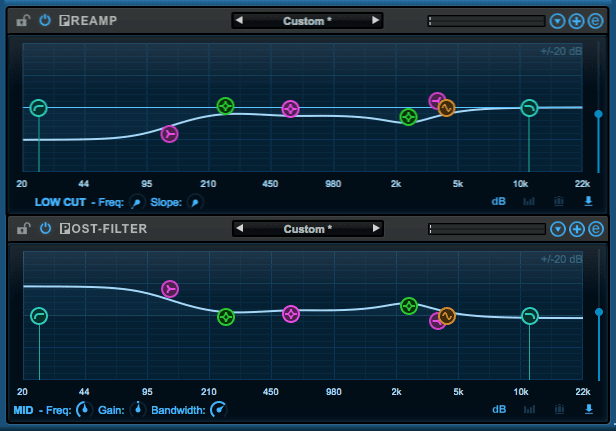
This is a common “trick”. It’s so common that I can’t really call it a trick.
Before some sort of non-linear process, you filter/EQ your signal to emphasize or de-emphasize parts of the signal that you want to be saturated the most… Then after the saturation stage, you reverse it.
It’s almost obvious once you know about it. Emphasize the parts you want to be affected, then de-emphasize them after the effect.
This is actually the core of how guitar amps work, but they don’t have symmetrical curves.
Axiom Tricks
Gain staging
There’s a gain plugin in Axiom. USE IT.
Some of the pedal plugins can be quite useful with very low gain, but you need to feed it a reduced gain signal, then makeup for it after. Throw a -10db gain before, and a +10db after. Now you have a really subtle crunch being fed in to Destructor.
Don’t be afraid to use the gain plugin!
Short Reverb

I’m a big fan of subtle, short reverbs on guitars. <1second length, a short pre-delay and a very low wet amount (unlike what’s pictured).
Even throwing on a short-reverb with a 5% wet can be the difference between a sound that just won’t fit in a mix, and a sound that sits just right.
It’s just another tool to add some of that “three dimensional realism” to your sound.
Destructor
Destructor isn’t just the center of Axiom, Destructor is available in Axiom as a plugin!.
If you’re just not getting enough juice from your setup and you want more distortion (or anything Destructor provides), then throw another Destructor in there!
Destructor is an awesome “pedal”.
EQs
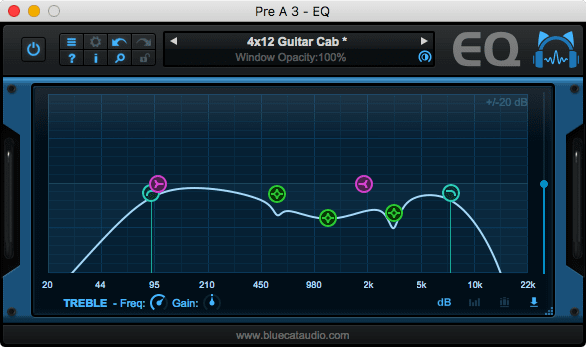
Doesn’t that look familiar? It’s just like the preamp or post-filter. It’s just missing the comb filter.
If you feel like you run out of bands, then you can utilize one of these guys. You can sandwich them between Destructor instances if you need a specific routing.
Don’t be afraid of EQing.
Comb filter
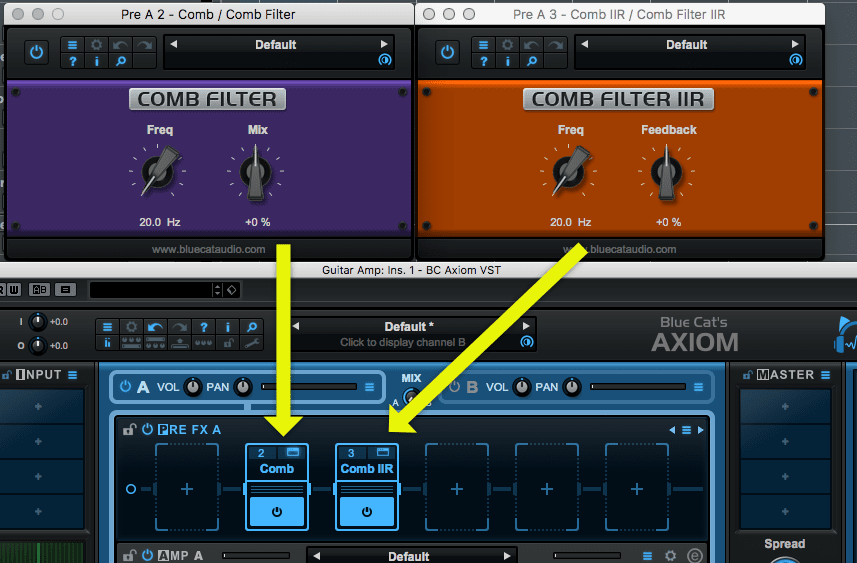
Axiom comes with 2 extra comb filters. These can be really important to creating a realistic ‘miked amp’ sound.
The normal delay-and-mix comb filter is available and there’s also the IIR type.
I strongly suggest experimenting with these on the Post FX section if you’re feeling like the sound feels too “forward” or lacks a sense of realism.
A and B

Axiom has 2 channels. These can be utilizes as ‘real’ A and B channels that you switch between, or they can be layered.
If you’re not utilizing it for the typical A and B channels, then using them to layer is quite useful, especially to create subtle stereo effects. Use the same preset, but slightly modified on the B channel, then pan A and B to the sides. Now you have a cohesive, mono-compatible, wide guitar sound.
Or pan them both center and layer 2 guitar sounds to create a veritable wall of sound.
Presets
Bass Guitar
70sRoundBass
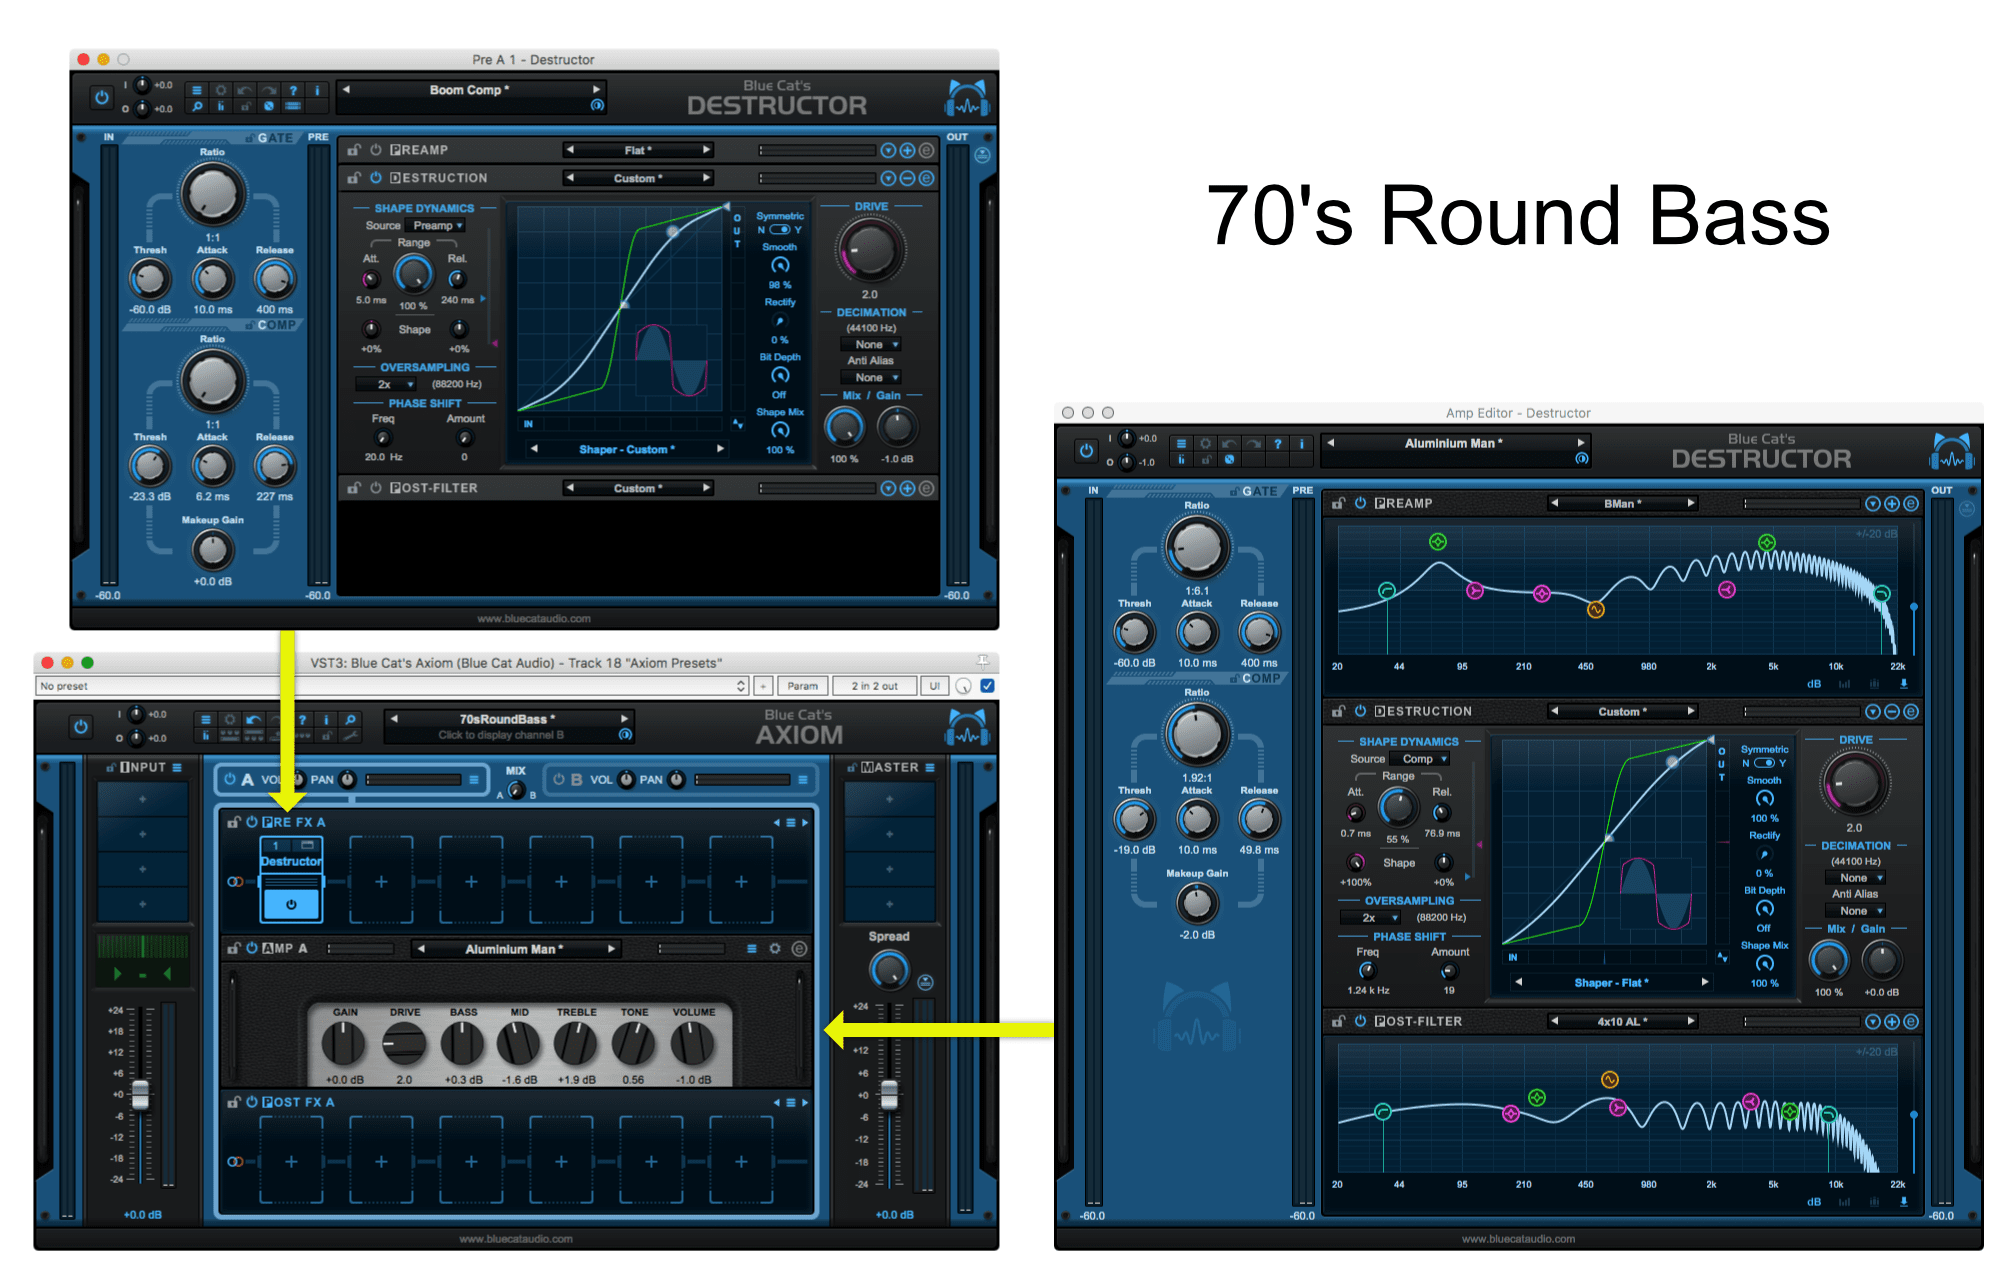
This is the only bass preset I decided to include. Nearly all of the others I have sound vastly different depending on the bass. This one sounds pretty good for most inputs.
The main things of note here are:
- I have a destructor acting as a compressor. A dirty compressor.
- There’s 2 Comb filters in action.
- The threshold and ceiling are really tight to give that feeling of an older solid state amp.
- Phase Shift is being used. This creates some of that ‘roundness’ to the sound from a really lazy input stage.
Guitar
BassTouchyCrunchy
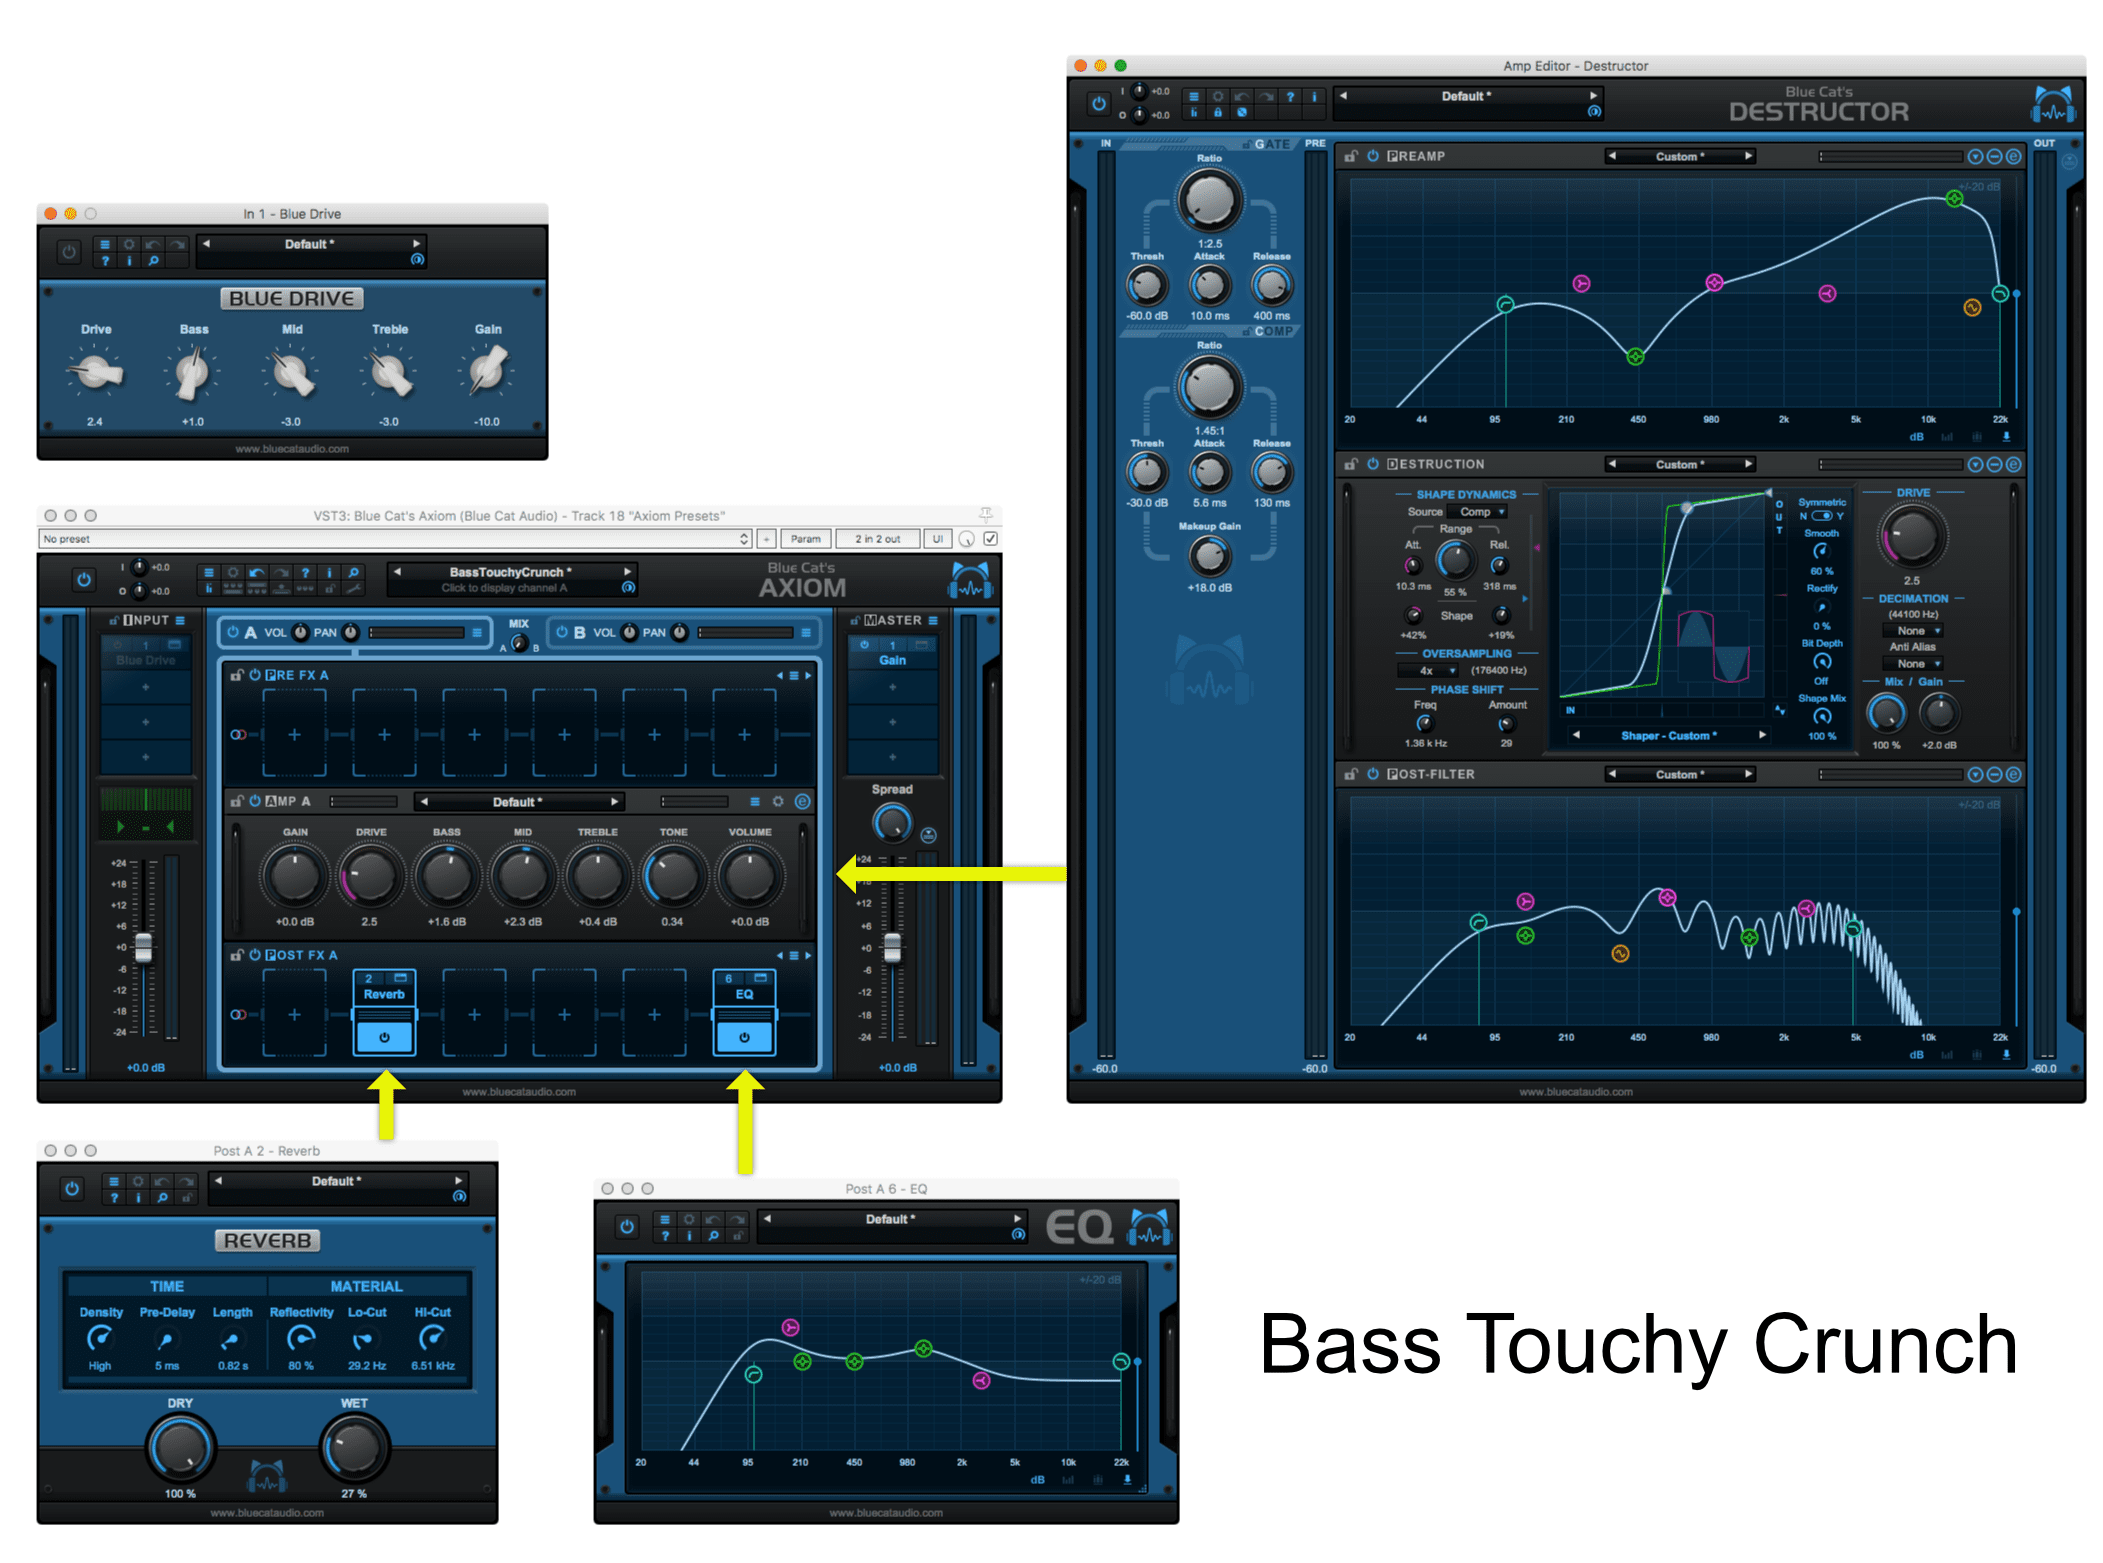
Some of that bassy Fender Twin style sound, but a bit touchier and less bassy. Almost like there’s a starved distortion pedal in front of it, and maybe some of the tubes are a bit old.
The things of note in this one…
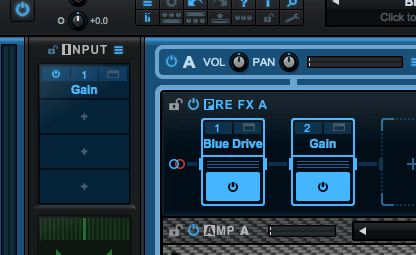
- A ‘Blues Driver’ distortion that’s disabled. Flip this on for some lead-like crunch.
- The Preamp curve is really extreme in the high-end to bring out some of that chimey sound.
- The post-filter compensates for that extreme boost in the preamp
- Comb filter on the post-filter
- +18db gain on the compressor makeup gain
- Phase Shift at 1.3k and 29%. This preset sounds somewhat bare without it.
- A light short decay reverb.
- A post-EQ reverb that brings some of the bass back and compensates for that big preamp boost a bit more.
BreakupTweed

This isn’t as “tweedy” as the name implies. It’s actually closer to a small Hotrod Deville style sound.
This was used in a psychobilly track. The idea was to have a really lively crunchy sound that feels like it’s on a stage in a barn.
- Gain abuse with a Blue drive. I wanted only a very subtle distortion from it, so there’s -15db going in to it and +5db after it.
- Minimal use of the Range control. Not particularly responsive. It’s more of a “modern tube sound”
- Comb Filters in both the pre-post stages. This adds to the feel of being in a room.
- Rather extreme curves sucking out parts of the midrange. That 3.5khz notch was found by just sweeping it around till it sounded right.
- The Threshold and ceiling are inverted. When you hit a chord really hard it doesn’t breakup a lot. You get a lot of the breakup on the sustain.
- Two Reverbs. A reverb with a 3.5 second decay that gives that big room sound, and a 0.65s reverb that makes it feel like you’re hearing the sound from the audience, rather than on stage.
You have to really commit to the ‘on stage’ sound for the rest of the instruments for this to work, but it’s a neat sound. If you don’t like that sound then just cut out the 3.5s reverb.
Heavy 1
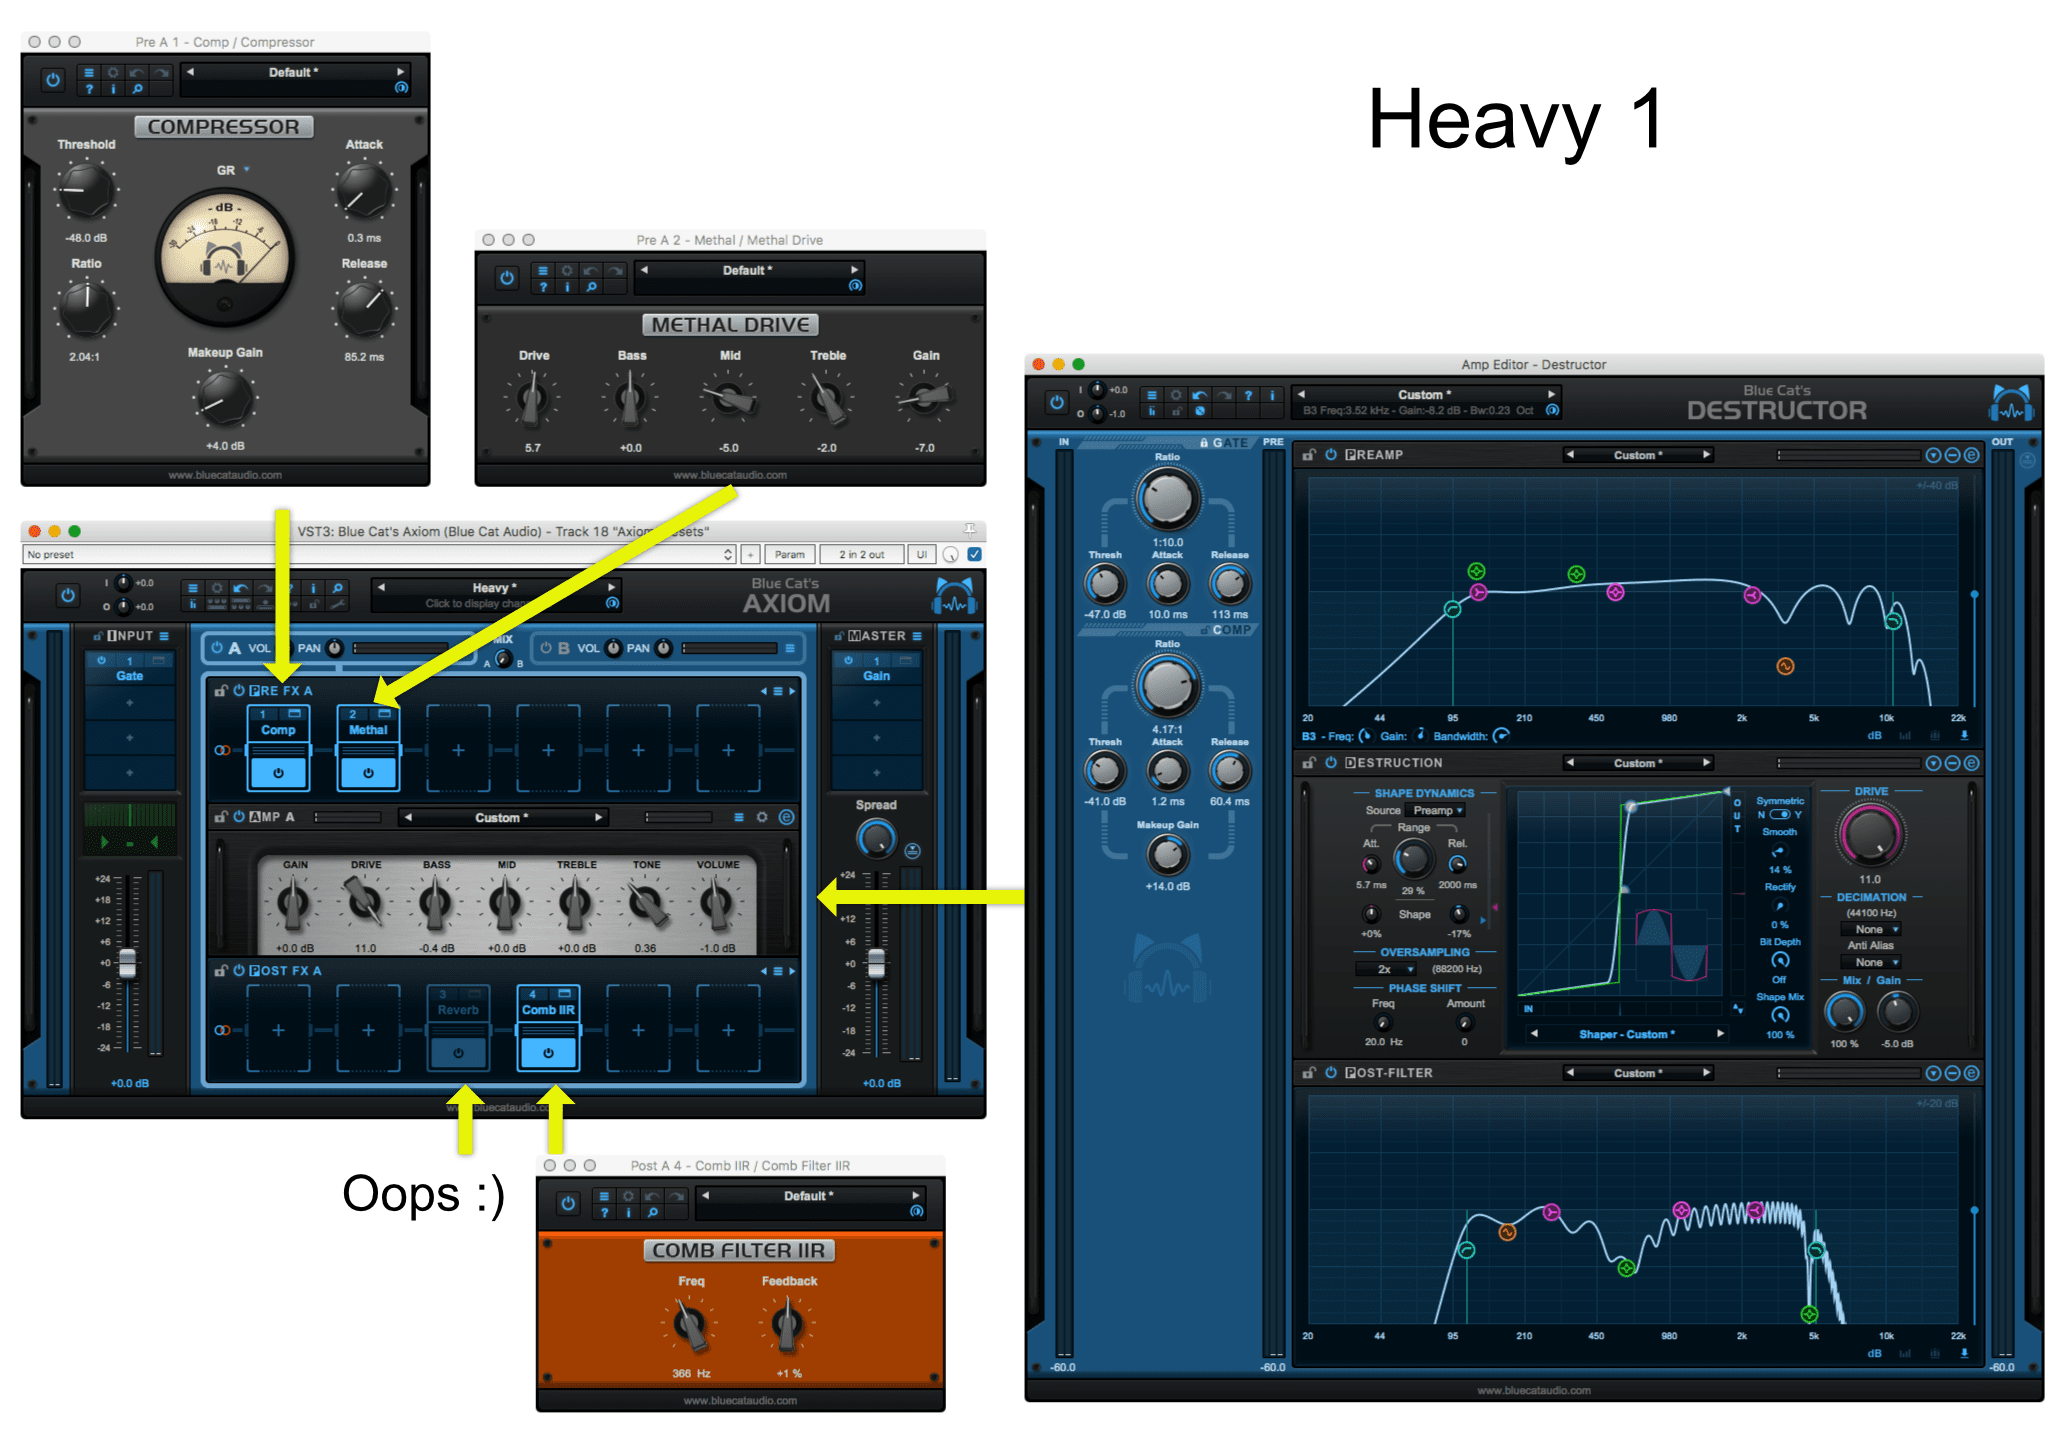
This is your straightforward solid-state heavy sound. More crunch and less wash.
Here’s how I came to it:
- Compressor on the input - I don’t want the amp being “reactive”. I want a solid, consistent distortion. It needs to add sound to the mix no matter how the guitarist plays. Faster (which are always softer) parts and heavy parts (which are usually louder) need to have the same impact.
- Metal Drive - Adds some more fuzz. I’ve never found that I can get a proper high-gain sound with just destructor. A little help is useful. I also have the mids scooped out a bit, which is common in high-gain sounds.
- The drive is maxxed. HIGH GAIN
- The compressor is being used, despite having a compressor earlier. There’s also +14db of makeup gain. You can’t be afraid of adding gain in your signal chain. It is an amplifier, so amplify.
- The preamp stage is fairly flat with a light comb filter on the top end. This was created with high output active pickups in mind, and the source signal was pretty excellent. It doesn’t need much other than some high-end rolloff.
- Very light Range usage for the crunchiness, but the threshold and ceiling are very close.
- The post-filter is basically just a comb filter with some mid cut. Scoop those mids!
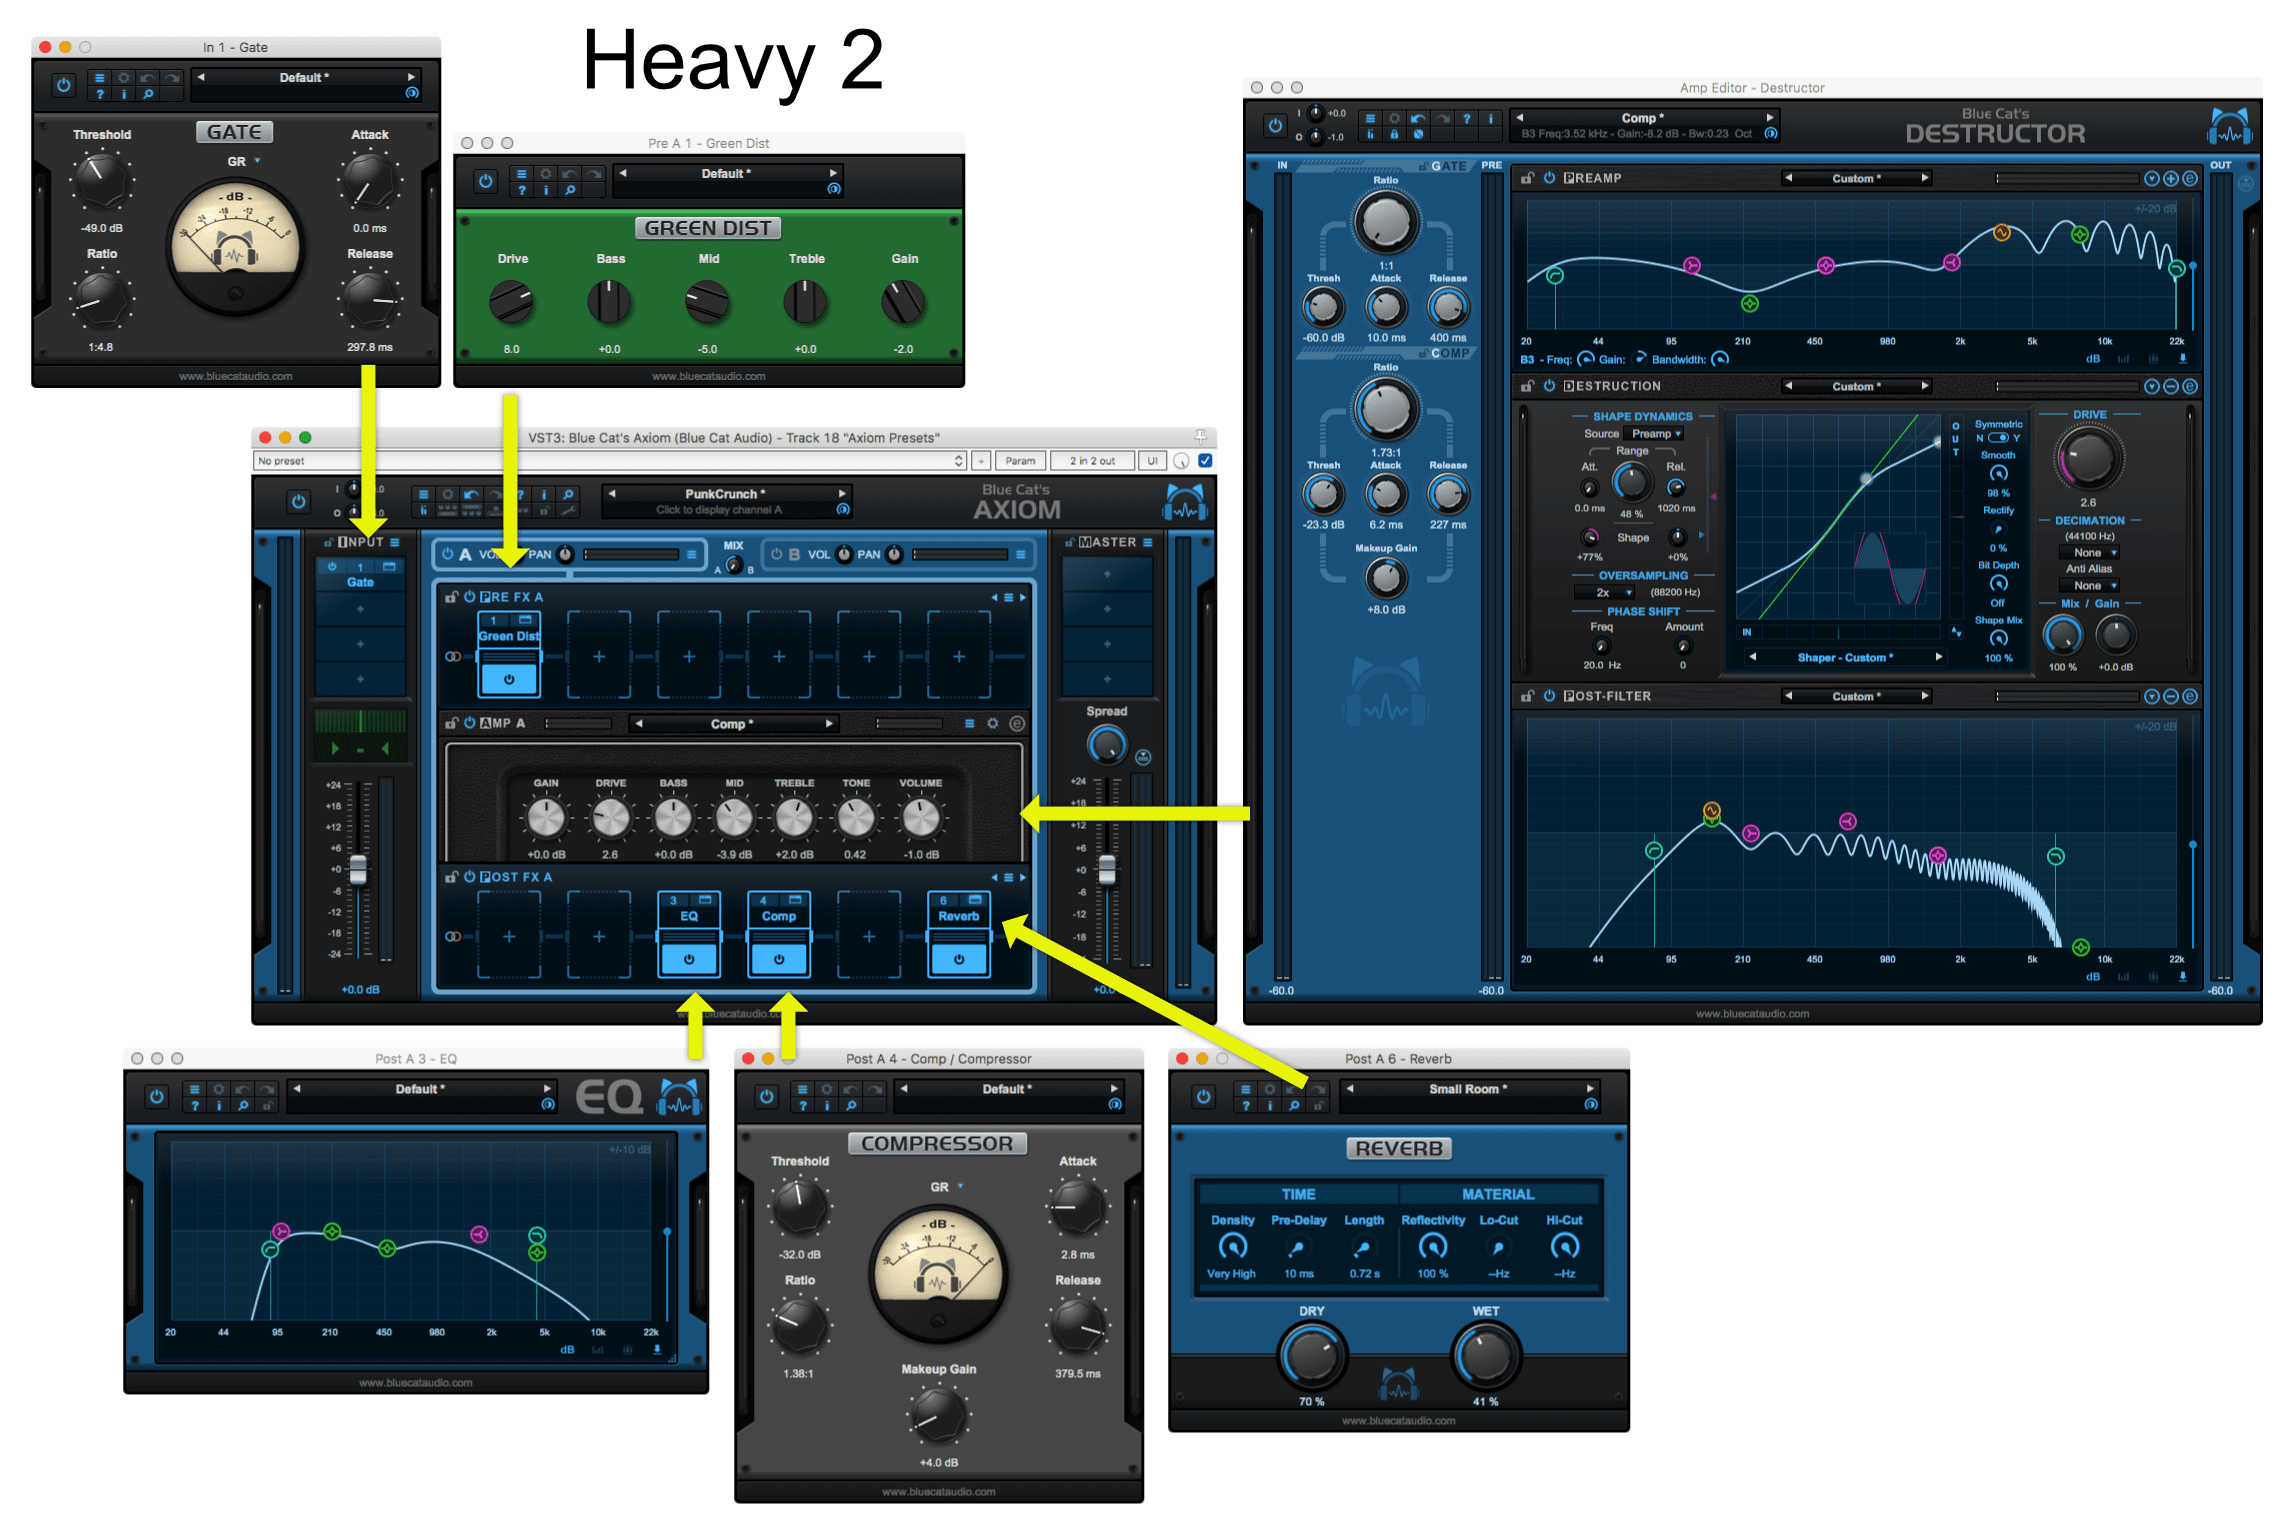
Heavy 2
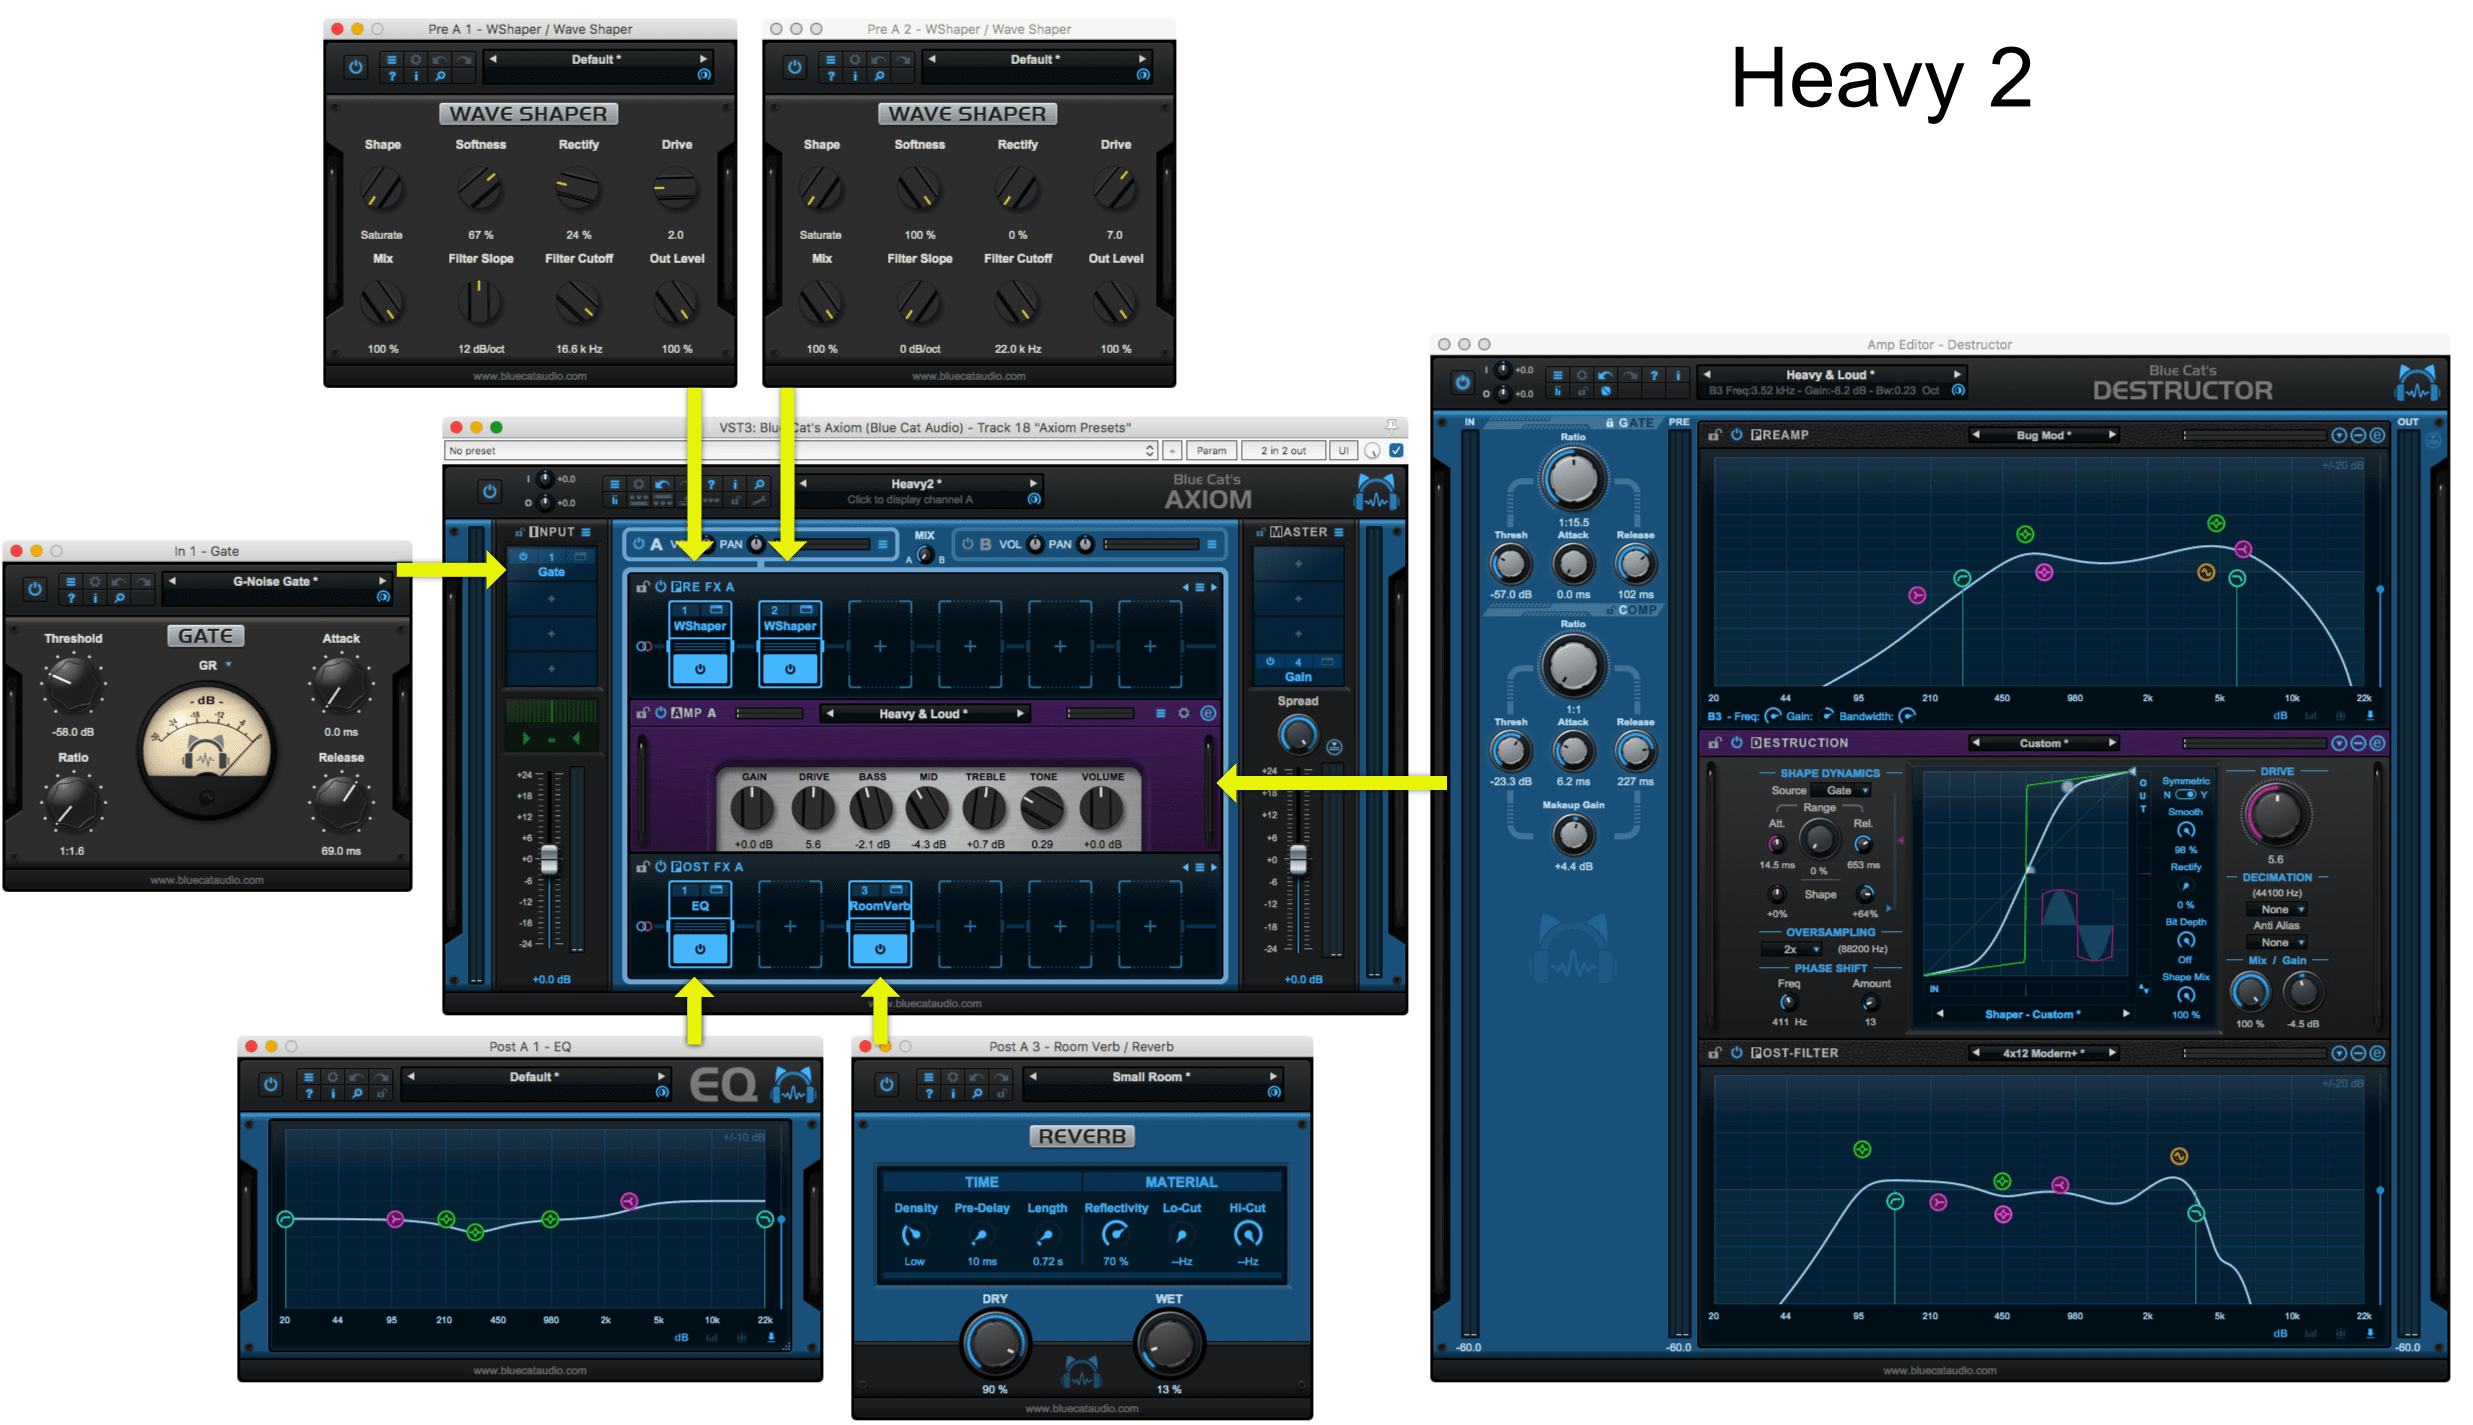
Heavy 2 is the washier version. This is from a death metal track that had a grindy feel. It’s that dense wall of sound. It sounds pretty neat with power chords too. If you want that chugga-chugga sound, it’s not for you. If you want blistering blast beats and a wall of sound, then this is what you want.
- A gate at the beginning - This cuts out a lot of the guitar noise, but not all of it. This gate is a bit chattery, and I don’t use the default gate at all in Axiom. I only subbed this in for distribution of the presets. Replace it with something else, please.
- Two waveshapers. Lots of distortion going in. LOTS of it.
- I used the “Heavy and Loud” destructor preset here, with some modifications.
- A second gate - This gate helps soften the on/off of the input gate. This happens after the waveshaping so it’s responding to the edges of the heavily distorted signal. Using 2 gates like this is a great way to get a more natural response.
- Lots of low-end cut. Guitars in this style can cause a lot of low-end build up very quickly
- You may be surprised that there’s a lot of threshold and ceiling usage here. The default has no range control, so this is irrelevant. I automate the range control here, and the makeup gain to create a less extreme sound for a solo.
It’s a simple sound otherwise.
PawnShop
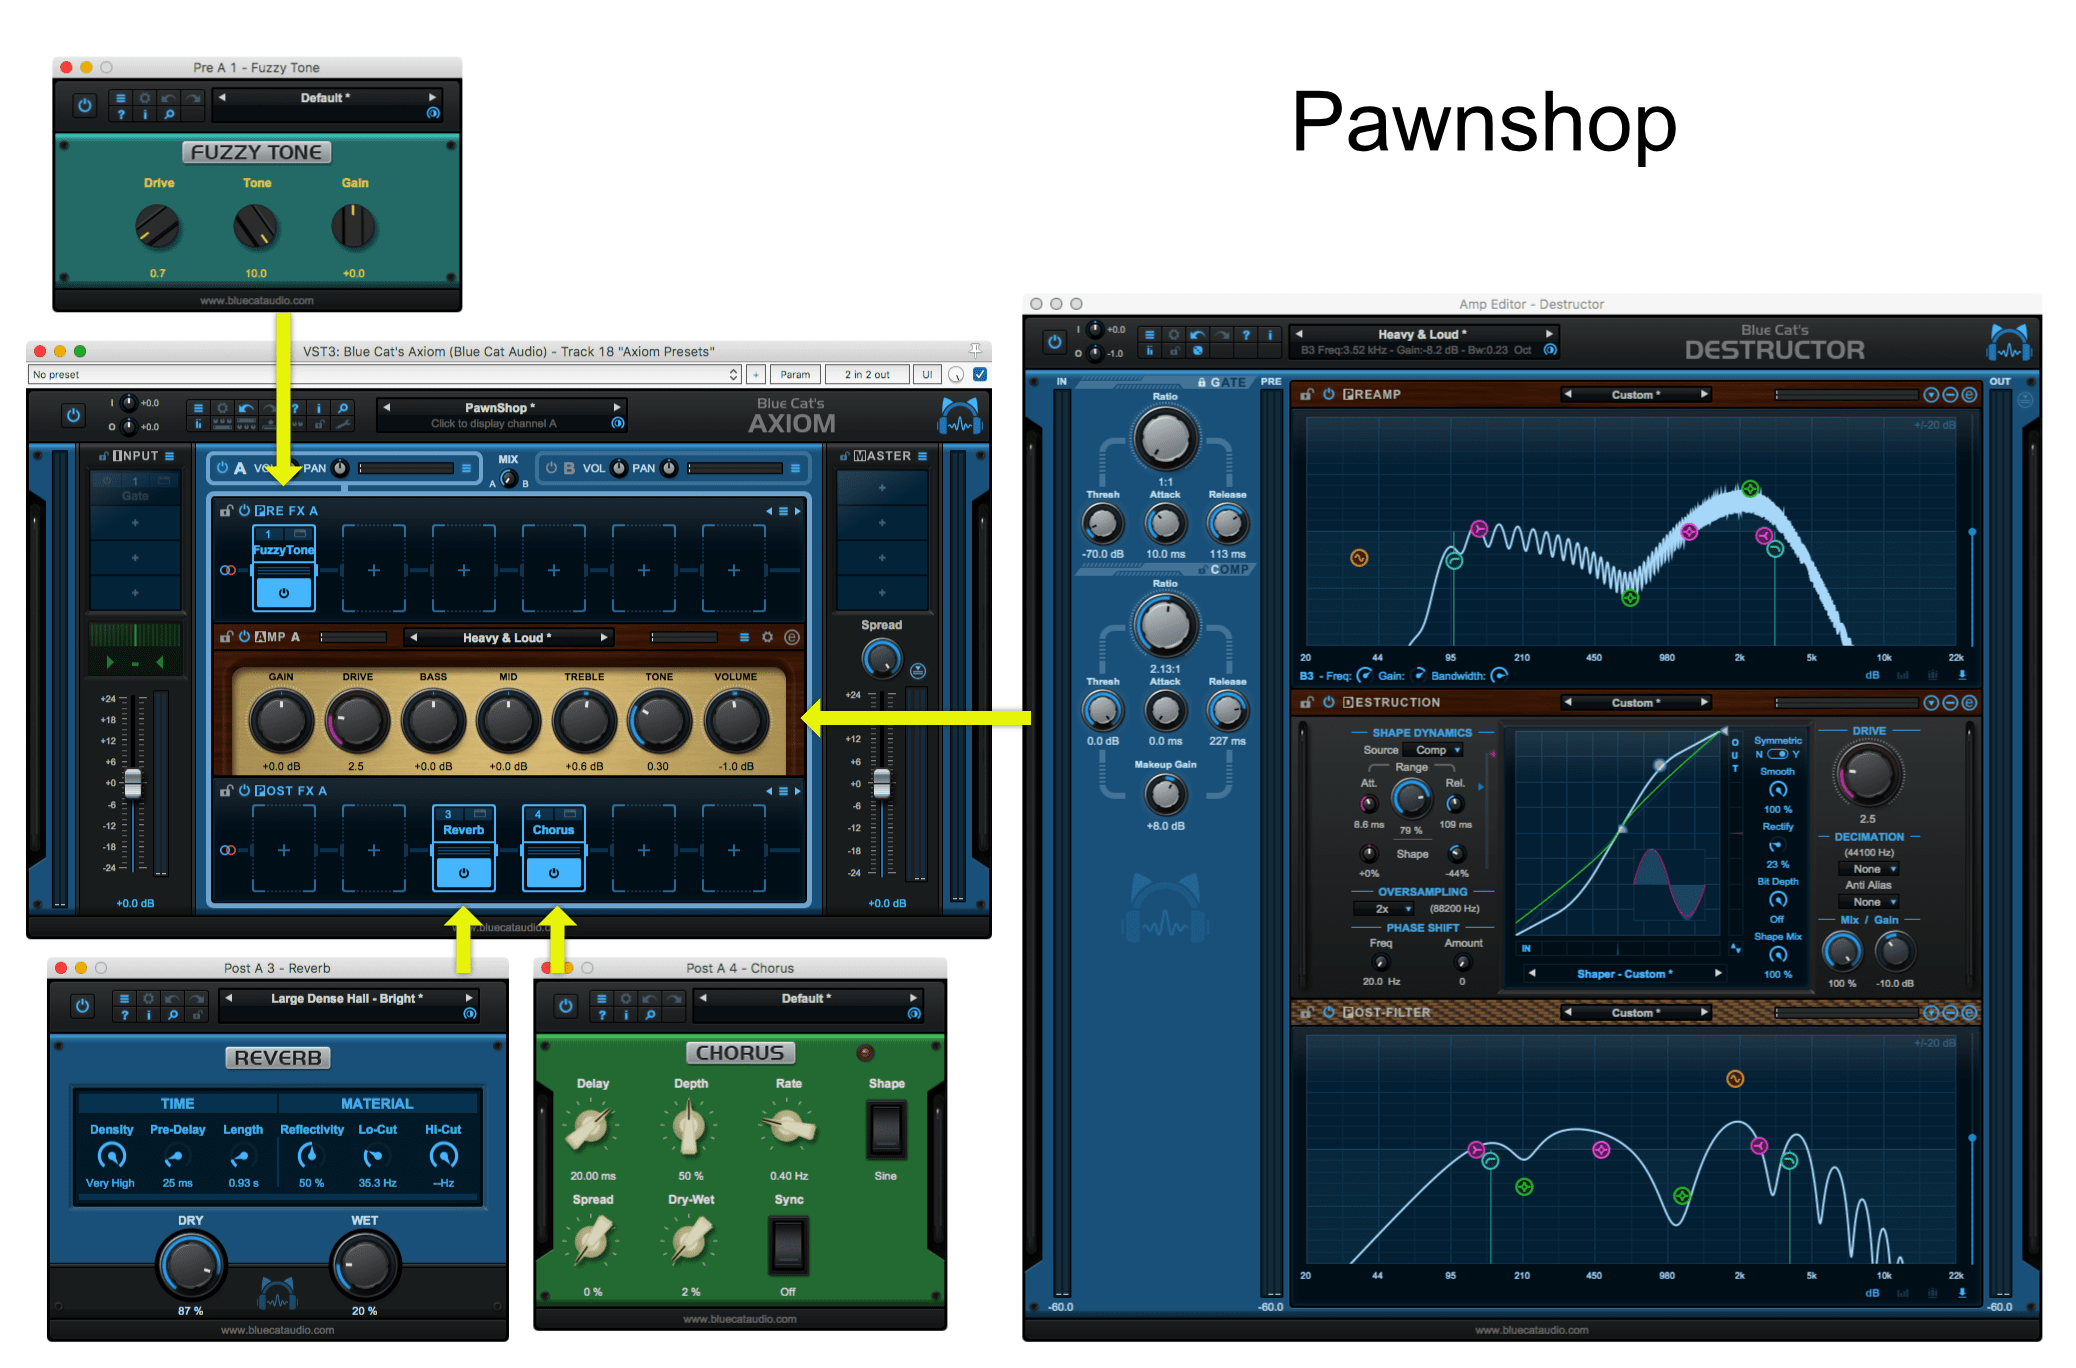
That 6” pawn shop amp that your father bought in the 50s. Someone thought it’d be funny to ram a pencil in the speaker. Still somehow made its way on to a number of hit records??
- Very light “fuzz” pedal applied for that old amp sound.
- Range and threshold and ceiling are fairly high. The distance between the threshold and ceiling is small, so while the sound is fairly clean, it breaks up quickly.
- Lots of midrange pulled out with an aggressive comb filter.
That’s it. Nothing fancy. Compare that to some of the other presets and you can see how extreme differences can be between sounds that “look” similar.
Punk Crunch
The name is self-explanatory.
- The ubiquitous Tubescreamer clone. I actually use Cytomic’s The Scream here. It’s an amazing plugin and it’s getting better soon!
- To get that ultra-bright NOFX like punk sound there’s no filtering in the preamp section. Let it all loose in to the Destruction.
- The waveshaper curve kicks in quite early here.
- The Range knob is active with a moderate threshold and ceiling. This is a rather subtle effect, but it’s necessary so the sound isn’t too screechy with those ultra bright steel strings.
- +8db of makeup gain
- The post-filter attenuates those high-frequencies now with a moderate comb filter being applied as well.
- Theres an EQ to clean up some more of the high end and a slight mid scoop.
- A post-amp compressor for that really tight sound.
- A short reverb enhances the realism so it can fit in to the mix with miked drums and a miked bass.
RockWideAB

This is a really generic rock amp preset. There’s only one notable thing about it: A and B channels.
Channel A is panned to the left. Channel B is panned to the right.
Channel B has a slightly different post filter with a more aggressive Comb filter. This creates enough of a difference that when panned opposite channel A you hear a pleasant stereo effect.
When collapsed to mono you don’t get any major issues. Just a slight change in the sound, like any stereo effect.
Mix
Mix Thick
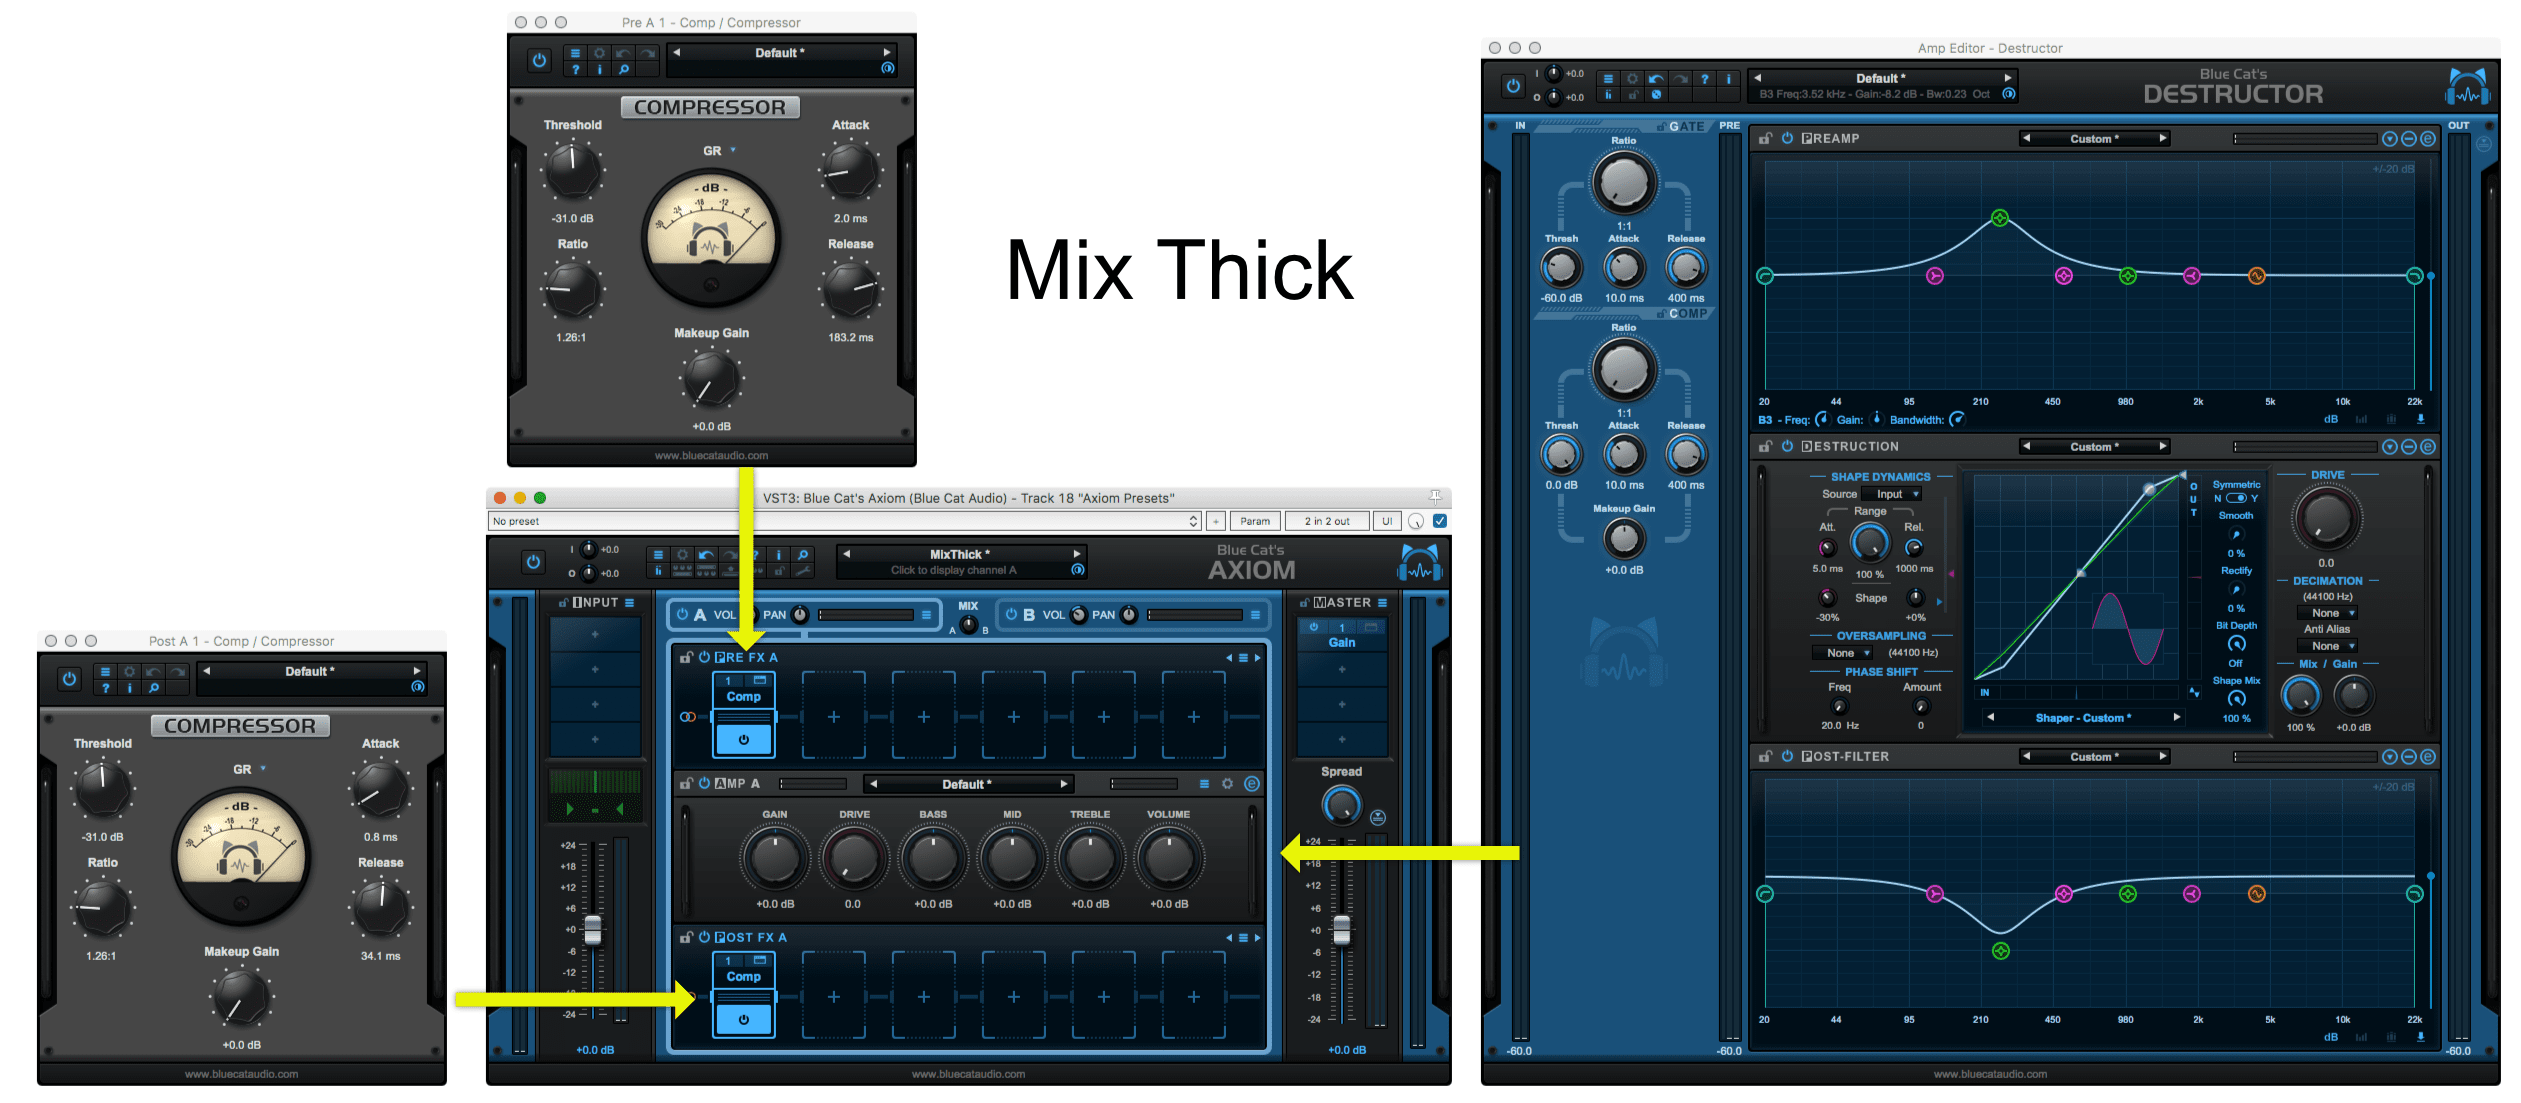
Mix Thick is a 2 stage compression with some very light distortion.
The preamp filter is used to emphasize the 250hz range, which goes in to some very subtle and highly dynamic distortion (observe the range). The post-filter compensates for that with an identical cut.
We feed some heavy midrange to be saturated, then we remove that heavy midrange. We’re still left with the harmonics from the saturation. It’s that Pre-emphasise technique discussed earlier.
After that there’s some fast release compression to help emphasize the sustain on the mix.
Tape
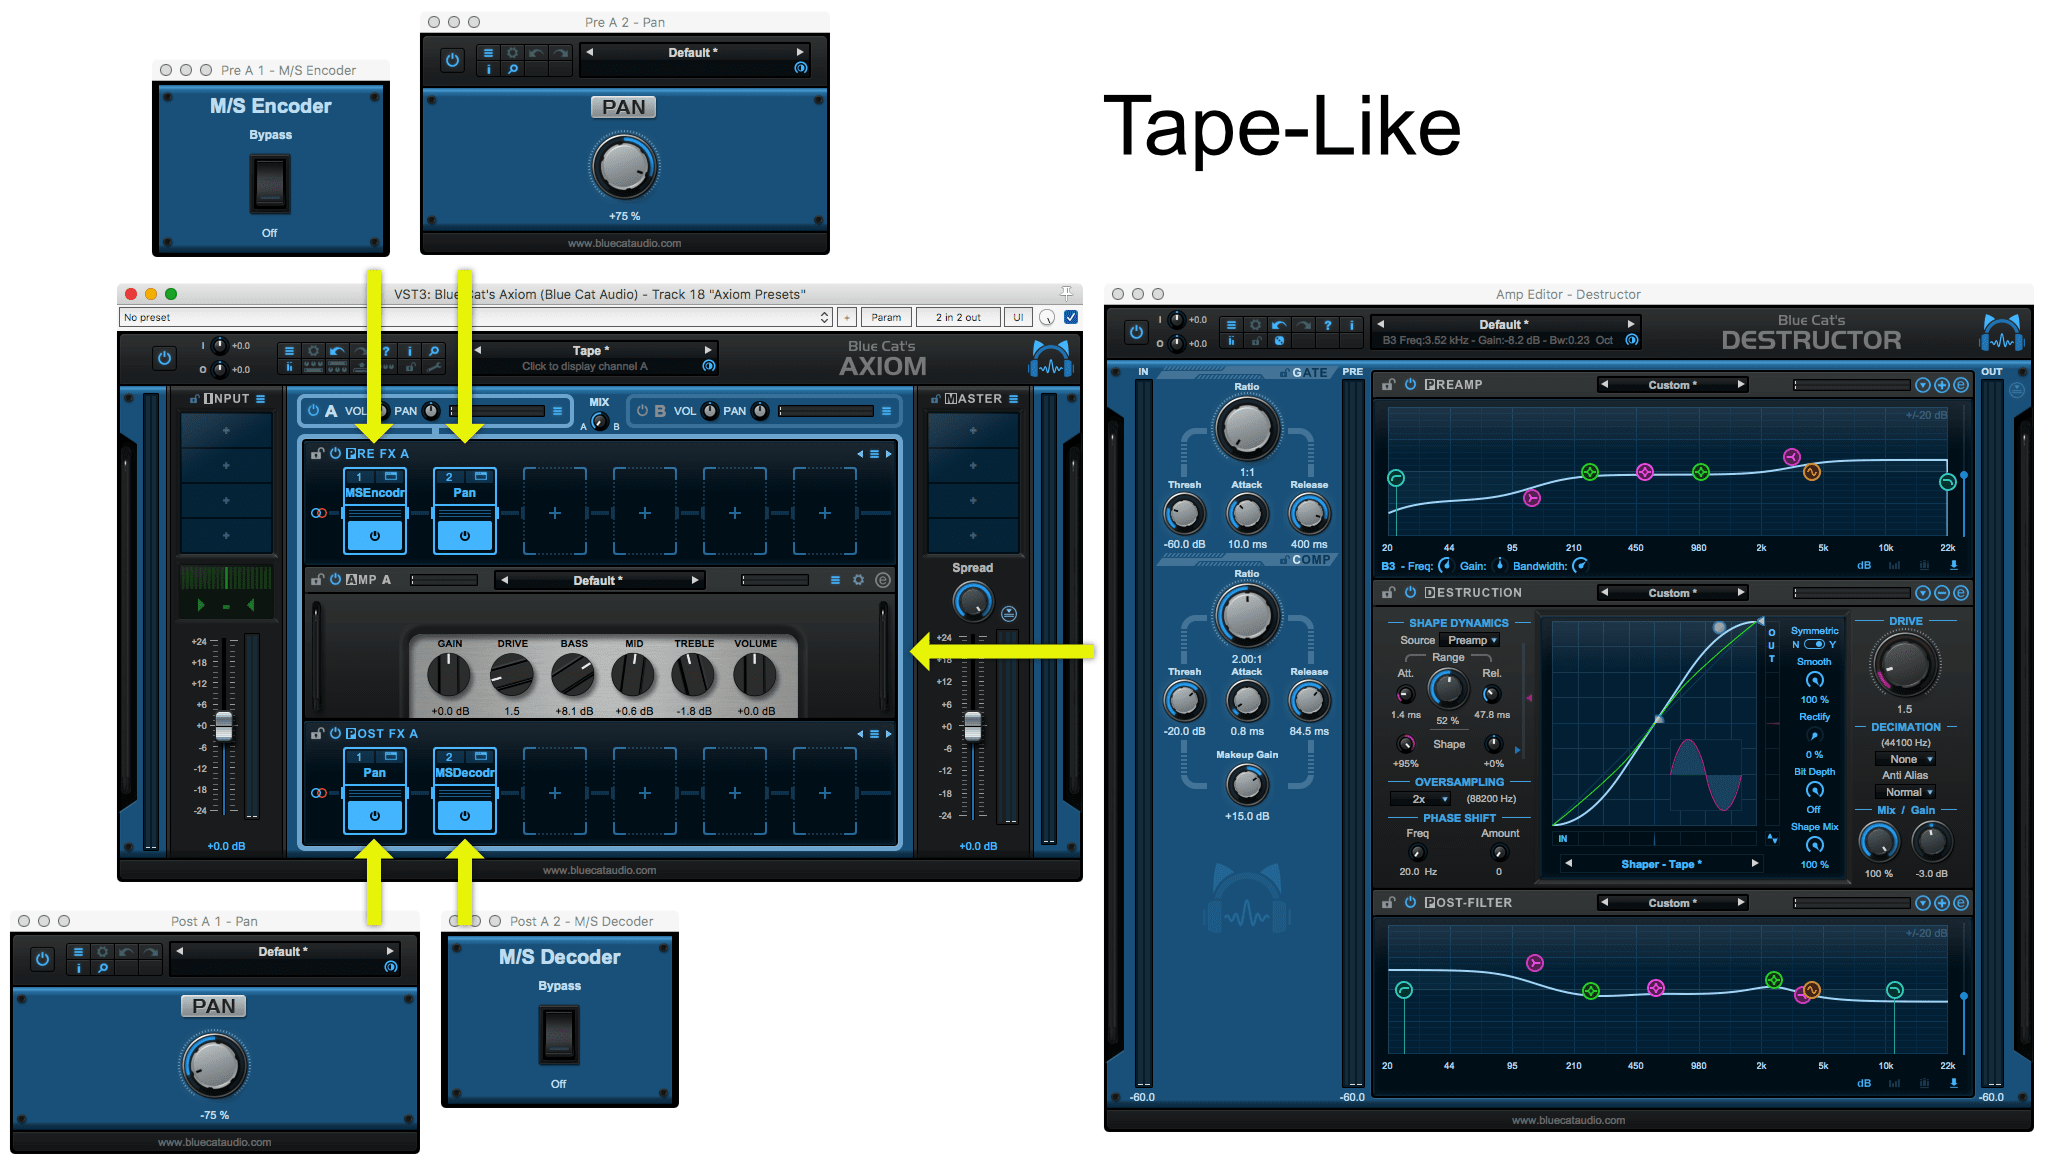
This isn’t really a tape emulation. It’s a tape like emulation. Let me walk you through it:
- A Mid/Side encoder is used. This puts the “mid” signal on the left, and the “side” signal on the right.
- A pan skews it so that we have a lot of side signal, and not much mid.
- Light compression is setup on the compressor. If you use the VU setup I described then this will only be hitting on the loudest parts of your track.
- Destructor is used with a high-end emphasizing preamp filter.
- The threshold and ceiling is set fairly far apart with low drive and a light waveshape.
- The post-filter is basically an inverse of the preamp. It’s that Pre-emphasise technique discussed earlier…. again.
- A pan “fixes” our mid/side skewing we did earlier
- A mid-side decoder brings us back to a normal L/R signal.
The result of this is that we add some distortion to the sides which adds a subtle width similar to tape. The very light compression and wide dynamic range of the destruction gives more of a tape-like vibe.
It should sound pretty awesome on just about any mix.
Conclusion
This is clearly not everything that Axiom is capable of. This is a somewhat large article, yet I’ve only covered maybe 1% of what’s possible with the default plugin. I didn’t even cover using Late Replies or many of the other included products!
Hopefully I’ve given you some ideas on how to use the product, or things to explore when you demo the product.
Support Me!
This post took 17 hours to research, photograph, write and edit. If you appreciate the information presented then please consider joining patreon or donating!