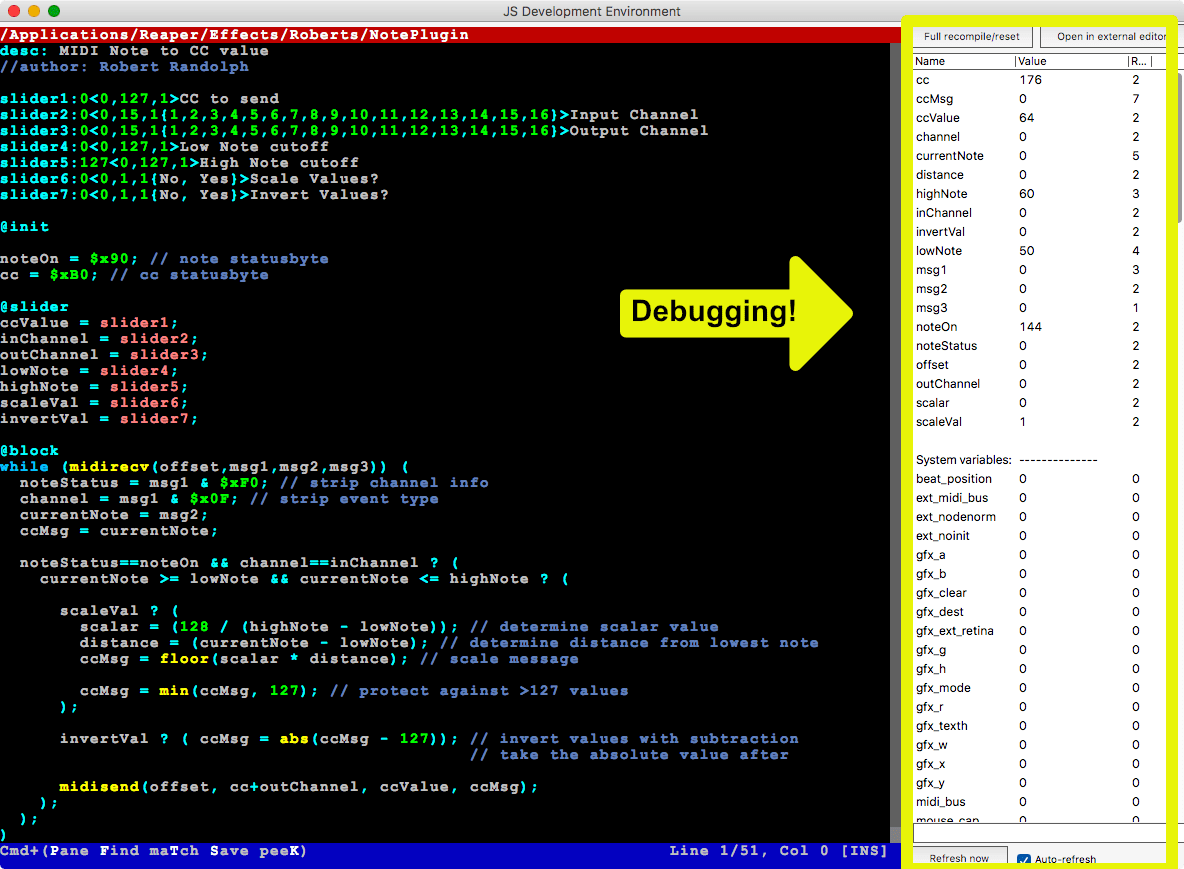
Today I’m going to show you how to write a MIDI plugin in Reaper using JSFX.
BUT WAIT! I’m going to assume that you are a total newb. I am going to walk you through every aspect of the process including how to find information.
The following topics will be covered:
- Basic JSFX MIDI programming
- How MIDI works, and how to find out more
- Simple Binary
- Counting in Binary
- Binary math
- Binary operators
- Hexadecimal
- Basic programming
- Basic problem solving
The only thing that you need for this is a computer with Reaper installed and a working internet connection. If you have any questions then please comment, I will happily answer to the best of my ability.
Big shoutout to Jon at The Reaper Blog. He brought up this question about a plugin that translated MIDI notes to CC on behalf of another user. That’s why I wrote this entire thing.
Contents
- For programmers
- What is JSFX?
- Write the plugin - Part 1
- JSFX basics
- Write the plugin - Part 2
- Result
- How do I use it?
- $#!+! My $#!+ is F****D!
- Conclusion
- Support Me!
For programmers
This tutorial really isn’t for you, but maybe you can skip to results to see what happened.
You may still enjoy reading this anyway, I hope!
What is JSFX?
A long time ago on a planet.. uh, well.. right here, there was some monstrosity called Jesusonic. Go ahead and click that link. Bask in its glory.
Keep basking…
Ok. Done? From the lineage of Jesusonic came JSFX which is an integated programming language in Reaper. This language allows you to create realtime audio, MIDI and video effects. (I was wrong, JS FX doesn’t do video. Video is done in EEL which is very close to JS FX. The language is the same, but the ‘container’ is different so to say) These effects can be programmed in place during a session and the results experienced immediately after saving your file.
A JSFX plugin works like any other VST/DX/AU plugin. You insert it on a track, the JSFX plugin accepts data and outputs data. The fun part is that we can output any data that we want!
Write the plugin - Part 1
Now we want to write a plugin. First I’m going to cover some concepts, then in part 2 we’ll dive in.
If you wish to just jump in you can simply skip to part 2. I will reference this pre-requisite information, and you can always jump back if you get lost.
If any of part 1 doesn’t sink in, or if you feel confused then just skip to part 2. I’ll be walking you through the application of these concepts and you may find it easier to understand these concepts in a context.
Come up with an idea
Generally the first thing that you need to do is come up with an idea. I already have an idea, so lets discuss that.
I want a plugin that takes incoming MIDI notes and converts them to MIDI CC (controller change). This would allow someone to use their keyboard keys to change the values of something. For instance I could press the keys on my keyboard to adjust the value of a knob in another plugin.
I’d like a few extra features as well:
- Limit the range - I want to limit the range of the incoming notes. There’s 128 possible MIDI notes, and I don’t have a 128 key keyboard. So ideally we want to limit the lowest note and the highest note that our plugin responds to.
- Scale the output - OPTIONAL sometimes I want the midi notes 1-128 to map directly to CC values 1-128 even if they are limited. Sometimes I want the notes to be scaled. Scaling means that if my lowest note is 1 and my highest note is 64 then each note is worth 2 CC values. So from 1->64 I would get a mapping of all 128 CC values.
- Channel selection - MIDI has 16 channels. Sometimes I may want to take MIDI notes from channel 1 and output MIDI cc to channel 10. Maybe some other combination. The plugin should allow you to select the input and output channel for the converted data
- Invert values - An option to invert the values output. This means that the first MIDI note would output a cc value of 127 and the last MIDI note would output a cc value of 0.
We’ll cover adding these features one by one along with the logic for each one.
Write it!
I’m just kidding. You can’t write anything yet. First we need to cover some JSFX basics, and some programming basics.
Most of these things won’t make immediate sense if you’ve never programmed before. You will have to reference back and forth as you go. Don’t be ashamed! That’s how we learn. Let the puzzle be built in your brain piece by piece. Each new piece put in place will help build a more recognizable picture, but only after much time spent digging through the unrecognizable pile of puzzle pieces!
JSFX basics
JSFX programming has a few basic things we need to cover. This section will allow you to read the code that’s presented in future sections. I’m going to explain each of these as if you have never programmed before.
If you have programmed before then you can hop right over to the JSFX page and learn how things work.
Programming concepts
Variables
A variable is just a word that references some data. There are various words in JSFX that do something special. The rest of the english language is ours to use.
The first time that we use a word that’s not used by JSFX, then a new storage space is create for us. We can reference the data in that storage space using the name we give it. Like this:
1
robert = 1;
Now anytime I use the word ‘robert’, it’s exactly as if I used the number 1. I can mutate (change) the value of ‘robert’ later too. If I do robert = 36, then any time after that ‘robert’ will be exactly like using the number 36.
Variables give us an easy way to hold on to data, and to refer to that data later.
We’ll be creating variables a lot.
Statements
A statement is a thing that does something. Assigning a variable is a statement for instance.
When we have a statement, we need to separate it from other statements. This is done with a ;. After a statement we just put a ; to say that we’re done with that.
If you have any errors, the most likely situation is that you forgot a ;. That goes even for the most experienced programmers.
Conditionals
When programming we’re often stood at a crossroads. We’ll need to act based on something that has happened before. If X happened then we do Y, but if T happened then we do R.
JSFX gives us a way of branching our program based on some value. It looks like this:
1
2
3
4
5
value ? (
	// do this if value is true
) : (
	// do this if value is false
);
First we need something to test. ‘value’ in the example above is something to test. A result of 0 is considered ‘False’. Anything other than 0 is considered true.
We can test just a variable, or we can test a comparison. We can compare 2 variables using operators like > (greater than) and < (less than). If we want to see if two things are equal then we use double equals signs like ==. If the comparison is correct then it is true, if the comparison is wrong then the value is false. So let’s try one:
1
2
3
4
5
6
7
robert = 1;

robert == 2 ? (
	john = 1;
) : (
	john = 2;
);
- First we assign ‘robert’ a value of 1.
- Then we check if ‘robert’ equals 2.
- If ‘robert’ equals 2 then we assign ‘john’ a value of 1.
- Else we assign john a value of 2.
What do you think ‘john’s value is?
Looping
Another thing that we often need to do in programming is to repeat an action. JSFX has 2 methods of doing this, but we’ll only need one of them. You can discover the second one here
The construct we will use simply says, “While this variable/comparison is true, repeat this block of code. Check the variable/comparison each time we repeat to know if we should stop” It looks like this:
1
2
3
while (thingToTest) (
	// do stuff here
);
Yeah, it’s that simple. The ‘while’ statement takes something to check, and then we have a bunch of code we put between () that’s executed. After the execution we check if our situation is still to our satisfaction. If it is then we repeat the code again.
Math
Math is simple. Just things like 1 + 1 or 4 - 3 work.
If you need more complex facilities, then we use functions. A list of math functions is here.
These functions take some information, and they return a result for us. We usually need to do something with that value, such as assign it to a variable or use it in a comparison. Let’s give it a shot.
1
2
3
robert = 1;

john = min(robert, 0);
We assign ‘robert’ a value of 1. Then we assign ‘john’ the result of min(robert, 0). min() takes 2 values and it returns the smallest of the two values.
What do you think the value of john is now?
I can’t help you with your math, but luckily we won’t need anything fancier than basic addition and subtraction today.
Functions
Sometimes we need to call another piece of code somewhere. We send it some data, and it gives us some data back. This is done with the syntax: function(data, data2, data3);. ‘data’, ‘data2’, ‘data3’ are any information that you want to send. They can be numbers, variables or even other functions that return a value!
From there we would assign that to a variable so we can use that value later. Like this result = function(data, data2, data3); Whatever ‘function’ returns is now stored inside of result.
Order of operations
Often you may see things like this: result = sqr(20 - ceil(9.8)); How do we interpret this?
The rule is that we work from the most interior parenthesis outwards.
- The right most thing is
sqr(20 - ceil(9.8));. - Now we dive in to the parenthesis and find
20 - ceil(9.8). - The rightmost bit in there is
ceil(9.8). Calling the ‘Ceil’ function with ‘9.8’ returns ‘10’. Now it looks likeresult = sqr(20 - 10) - Dive in to the parenthesis again and solve. We end up with
result = sqr(10); - Still working on the right, the function
sqr(10)returns ‘100’. - Final result is
result = 100.
The variable ‘result’ now contains the data ‘100’.
If you need to break it down visually, then open a text editor or a notebook and do it! Even the best programmers sometimes have to break down things in to their component pieces so they can understand it.
Create the plugin
Now that we have some basic programming knowledge, in the context of JSFX, under our belt we can create the plugin.
Let’s start!
File
The first thing we need to know is where to put this file that contains our code, and how to access it.
- Open Reaper.
- Go to
Options->Show REAPER resource path in explorer/finder - Navigate to the ‘Effects’ folder.
This is where JSFX files are stored. These are plaintext files, nothing special about them.
Create a new folder for yourself inside the ‘Effects’ folder. Create a new file there with a text editor, and give it no extension (Actually, you can give it an extension if you want. EDIT -I was made aware of a better way to do this_..jsfx is fine. Most JSFX plugins don’t have an extension. It’s up to you!).
To create a JSFX plugin:
- Create a track
- Open the FX browser (click the FX button on the track)
- Navigate to the JS folder
- Right click the JS folder and select
Create New JS FX... - Enter the name
Now we need to give it a Description after we learn to edit JSFX.
Editing JSFX

Now open Reaper. Add a track then click the FX button. Find the JS plugin that you just created. I can search for ‘Robert’ and find it since it’s in the ‘Effects/Roberts’ folder.
You will see the window on the left in the image above. Click that button that says ‘Edit’ and a text editor will open up in Reaper with our file.
This is where we’ll do all of our work from now on. You can edit the plugin inside of Reaper, and on the right side of the editor we have a realtime list of everything that’s happening inside of our plugin. Don’t worry if this seems intimidating, we’re going to work through it!
Description
In order for Reaper to know that we have a JSFX and what it’s called, we need to give it a description. JSFX has a format for this.
1
desc: Description here
Yeah, that’s it.
So I’m going to add a description and some extra information to my plugin:
1
2
desc: MIDI Note to CC value
//author: Robert Randolph
You see that line with //author? Those first 2 slashes indicate that the line is a comment. Comments are not read by Reaper when running the effect. It’s just a way of communicating to the person reading the code.
Save your file. Control-s (Windows) or Command-S (macOS).
Controls - Part 1

The first thing we need to do is lay out some controls. The users needs a way to interact with our plugin. Since we already thought out our idea beforehand, we can layout a set of controls based on that idea.
So let’s explore how JSFX allows us to create controls. The format looks like this:
1
slider1:5<0,10,1>slider description
Let’s work through that line:
- slider1 - this tells Reaper that this line contains info about a control, and that this is the first control
- : - the colon indicates that the information about the slider is coming next
- 5 - this is the default parameter. When the user opens the plugin for the first time, the slider will have a value of 5 until they change it.
- <0,10,1> - The part insides <> tell us about the min/mix and change size
- 0 - This is the lowest value of the slider
- 10 - This is the highest value of the slider
- 1 - This is the smallest change between values. Our slider will only adjust in increments of 1 whole number.
- slider description - this is the label on the slider in the GUI
So let’s try to make our first slider. We need to know what MIDI CC value to send. There are 128 possible options from 0 to 127. We can only use whole numbers (increments of 1). The default value can be anything, but I’ll use 0. We want it to be called “CC to send”. Try this on your own first before you see the solution!
1
slider1:0<0,127,1>CC to send
There’s our first slider. It has a default value of 0, limits from 0 to 127 in increments of 1 with the label ‘CC to send’. Excellent!
Now add controls for MIDI note (0-127) cutoffs for low and high note. Values from 0-127 in increments of 1. Remember these are new sliders, so we can’t reuse ‘slider1’.
Controls - Part 2
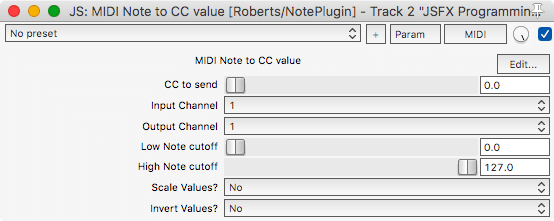
For some controls we don’t want a slider. We want the user to select from pre-defined values. Sliders can be turned in to checkboxes by adding {} after the increment value. It looks like this:
1
slider2:0<0,15,1{1,2,3,4,5,6,7,8,9,10,11,12,13,14,15,16}>Input Channel
The number 1 (after the 15) is our increment, but instead we create a list of values inside of curly braces {}. Each of these values inside of the curly braces is shown in a dropdown box.
The preselected values can be text too. To let the user choose to turn on Scaling or Inversion as we decided before, we can just use the words ‘Yes’ and ‘No’ like this:
1
slider6:0<0,1,1{No, Yes}>Scale Values?
That gives us a box with just the values of No and Yes. The default value is 0, which means the first value we offer is the default. ‘1’ would mean that the second value is selected, etc…
See if you can duplicate the controls I’ve laid out above. It shouldn’t be too difficult.
Init
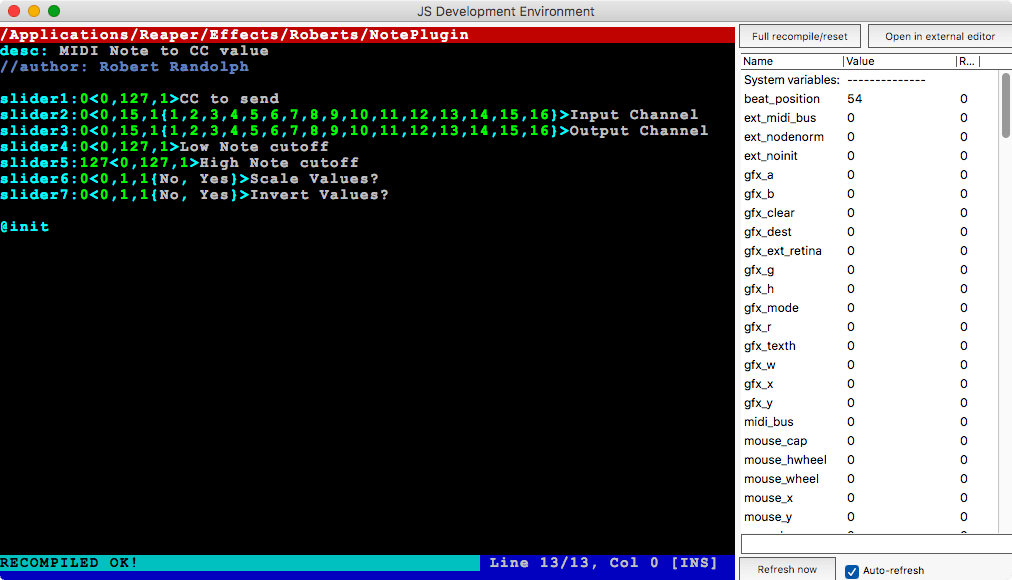
When our plugin is loaded, there’s a few things that we may want to do first. Right now we have nothing, but we’ll add that block anyway.
Simply add @init below your sliders. Later we’ll add some stuff here.
Slider
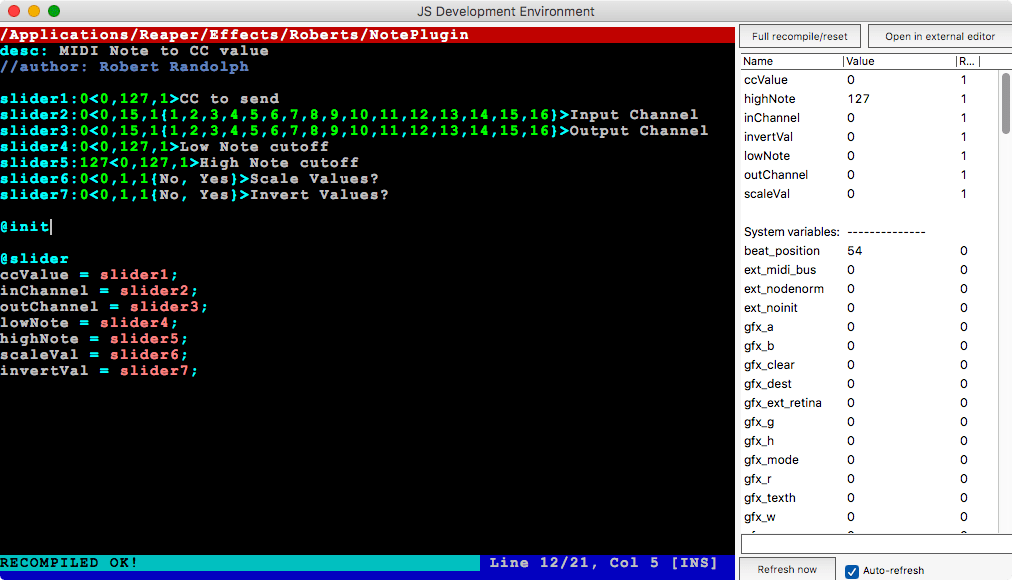
When we want to know the value of a slider in our program we can simply refer to it as ‘slider1’. With the default setup if we did something like slider1 + 2 then the result would be 2. The default slider1 value is 0. We add 2 to that, and we get 2.
It’s really bothersome to have to remember that ‘slider1’ is “CC to Send” though. So JSFX gives us a place that we can create a new variable that references a slider’s value. It looks like this:
1
2
@slider
ccValue = slider1;
Things inside the @slider section happen when a slider changes. When the user moves a slider, then all of that code between @slider and the upcoming @block is called. It can be any code, but we’re only going to do variable assignments. So we create a new variable called ‘ccValue’ that is assigned the value of slider1.
I’ve created a number of easy to remember variables that I can refer to the sliders by. Look at the screenshot above to see my setup.
EDIT Another option is to declare the slider with the variable that we want updated.
It looks like this: slider1:ccValue=0<0,127,1>CC to send. We simply add ccValue= in front of the default value, and now our ‘ccValue’ variable is updated when the slider moves.
Block
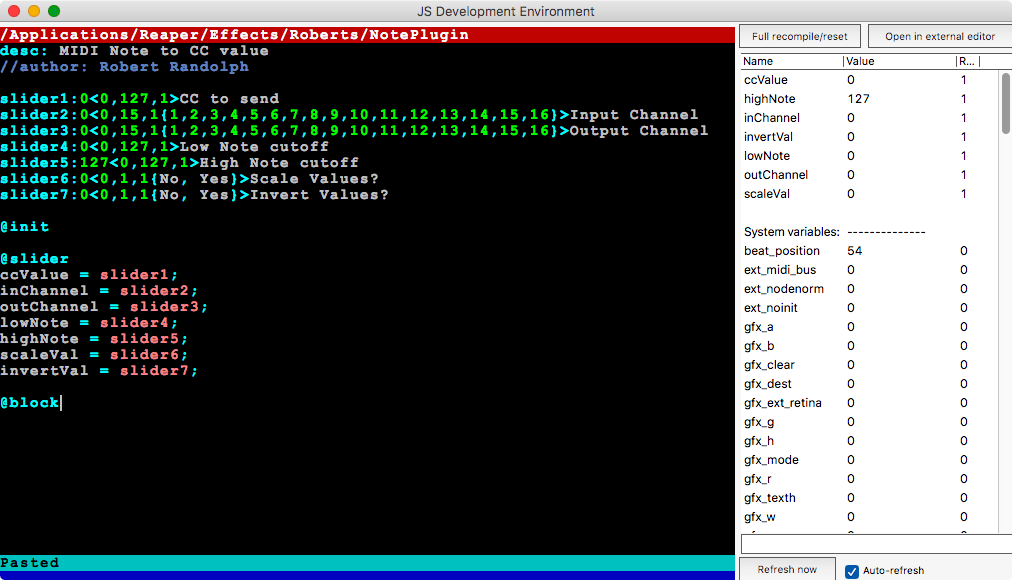
Eventually stuff needs to happen when our plugin receives data. @block is where that happens. The code in the @block section is called when our plugin needs to process some data.
Why is it called ‘block’ though? Audio is processed in blocks. MIDI is processed in blocks too. They are actually processed in the same blocks, but we’re only working with MIDI today. The plugin receives a block of data, acts on it, outputs it, then waits for more data.
If you’re paying attention you may realize that when we get a block of data, we’ll need to loop over that data to act on each piece of data in the block. That is correct, and we’ll cover that soon.
So just add a @block and we’re off to the races!
MIDI Concepts
In order to process MIDI we need to know what MIDI is.
I somewhat assume that you know what MIDI is if you’re reading this, but let’s go over some basics.
MIDI is a standard that covers a plethora of specifications related to a communication protocol. This communications protocol is generally used in musical and A/V applications to communicate simple data between devices.
This tutorial is only concerned with MIDI as a way of communicating data between devices. MIDI doesn’t actually do anything. It doesn’t make noises. It doesn’t make lights. It’s just the data that something else interprets, and that something else can do things based on that MIDI data.
MIDI data consists of 8bit ‘words’, and the full message may be multiple words. A simple MIDI message may look like this 10010000 1000000 1000000. That message says “Note E3 (64) on channel 1 with a velocity of 64”. By the end of this tutorial you’ll be able to figure that out on your own without any trouble.
In this tutorial we are going to deal with 3 ‘word’ messages. Most MIDI messages are 3 ‘words’. The exception to the 3 ‘word’ scenario is a type of message called System, which we don’t care about today and you probably won’t encounter very often. These words will be called bytes from now on, as 8 bits = 1 byte. Here is a typical 3 byte message:
- Status byte - this tells us what type of message the DATA represents so that we can interpret the rest of the message correctly, AND it tells us the channel. (MIDI has 16 ‘channels’ that we can communicate separately on)
- Value byte - this tells us the ‘value’ of that type of message
- Value byte #2 - this tells us the value of the first value.
A typical musical scenario is the pressing of a piano key. The first byte communicates the channel and that ‘this is a key press’. The second byte communicates the note. The third byte communicates how hard the key was pressed.
DON’T BE SCARED! I’m going to teach you how to make sense of these bits, bytes and bagels.
How did I find this information?
I just googled for ‘MIDI specification’ and I got this page, which wasn’t helpful really.
Then I found this one, which is a step up.
So I thought maybe searching for “MIDI message programming”, and then I found this one. Much better!
Just continually searching and adjusting search teams until you find something that gives you more clues. This is a process of finding bits of information, then refining your search based on that information. Eventually you build up a pile of info in your brain that is what you need.
It’s a process of refinement. If you don’t get it the first time, use the little knowledge that you have to get a little bit more knowledge. Now repeat!
Binary
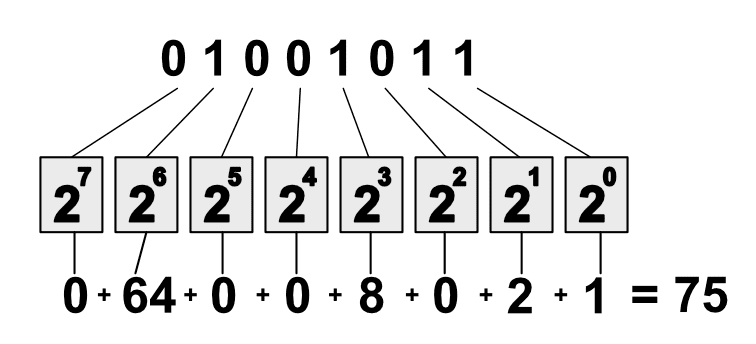
Computers “speak” in binary. MIDI messages come in binary. So we need to understand binary. Luckily it’s not that hard!
Binary is a different way of counting. In the form of counting that you are familiar with, each ‘place’ represents a multiple of 10. We have the 1’s place, 10’s place, 100’s place etc…
With binary, each place is a “2’s exponent place”. Each place can either be there or not. The ‘on-ness’ of a place is indicated by a 1 for “on” and a 0 for “off”.
Each place in binary is equivalent to 2^position. Our first position is 0, and we count up from there. So the first position is “two to the zero power”, either 1 or 0. The second position is “two to the first power”, either 2 or 0. The second position is “two to the second power”, either 4 or 0 etc…
To determine the decimal value of a binary number, we take the value of each place and add them together.
Let’s work through the image above.
Our binary number is 01001011. We work from right to left to figure this out (^implies that the next number is an exponent):
- 1 - the first bit on the right corresponds to 2^0. That bit is present, so that’s 1.
- 1 - the second bit is 2^1. That bit is present, so that’s 2.
- 0 - third bit is 2^2. We don’t use that position because it’s 0, so no calculation is needed.
- 1 - fourth bit is 2^3. That’s 8.
- 0 - fifth bit is 2^4. We don’t use that bit because it’s 0.
- 0 - sixth bit is 2^5. This bit is unused.
- 1 - seventh bit is 2^6. That’s a value of 64. We use this value.
- 0 - eighth bit is 2^7. That doesn’t matter because it’s 0.
So now we take all the values of the bits that are turned on and add them. 64 + 8 + 2 + 1. That equals 75. 01001011 = 75 in decimal.
So what have we learned? Next time you need to convert binary to decimal, all you have to do is google for “Binary to decimal converter”. I’m serious. Almost nobody does this in their head!
Even more importantly, binary values are not always used to represent numeric values. Imagine this, I have 8 light switches. I want to communicate in the shortest possible way that I want light switches one, two, four and seven turned on downstairs. I can call downstairs and say “75”. That corresponds to 01001011 in binary… Which tells us exactly which light switches we want on and off!
Often in software, numbers are used like this. They are called ‘flags’ or ‘bit fields’. We use numbers to communicate data other than numbers, we can communicate ‘state’ of simple on/off switches this way.
There are special math operators for binary that allow us to operate on binary, these are called ‘bitwise operators’. We will be using one of these in our plugin, and I will explain it later. It’s the ‘&’ operator, which I suggest you research on your own for fun.
We will also be using plain normal math to operate on our binary values. I will explain these as well. The only thing that you need to know is how to convert binary to decimal, and have a grasp of the idea that binary is often used to communicate data that doesn’t correspond to its numerical value.
Hex
Binary is a pain to be typing out all the time. Hexidecimal is much easier. We’ll be using hexidecimal in our plugin.
Binary is a ‘base 2’ system. Every place represents an exponential value of 2. Hexidecimal is a ‘base 16’ system. Every place represents an exponential value of 16.
“But we only have 10 numbers!”, you exclaim! You’re right. So we use letters. Counting in hexidecimal goes like this: 0, 1, 2, 3, 4, 5, 6, 7, 8, 9, A, B, C, D, E, F. The letter ‘A’ corresponds to ‘10. ‘F’ is 15’.
Just like binary, each place is an exponent. So 10 in hexidecimal is 1*16^1 + 0*16^0 == 16.
33 in hexidecimal is 3*16^1 + 3*16^0 == 3*15 + 3*1 == 51.
So let’s practice that again… Convert 7FB3E9AA to decimal.
How’d you do? I sure hope you googled, “Hexidecimal to decimal calculator”, copy&pasted and came up with “2,142,497,194”. If not, you’re crazy. USE TOOLS. Don’t do any more work than you need to!
In JSFX we denote that we’re using a hex value by prefixing our value with $x. That means that $x0F is a hexidecimal value of 0F, which we know is ‘15’ in decimal. EDIT - As of Reaper 5.00+ you can simply use 0x0F for hex values. The ‘$’ is not needed. I will be using the $x0F format for the rest of this post.
Binary to Hex
We’ll need to convert from binary to hex. The MIDI spec is often listed in binary, but we’ll be programming using hex. So let’s try this.
Our value is 01001011 just like before. Before you try to convert this, even using google (or WolframAlpha), let’s cover a trick.
You don’t actually need to convert the whole thing at once. Because 16 is the result of 2^4, we can cheat. We only need to work in chunks of 4 bits. Let’s split it up from right to left.
1011- These are our rightmost 4 bits. You should be able to figure out pretty quick that this is 1 + 2 + 8 = 11 in decimal. We know that’s ‘B’ in hexidecimal.0100- These are the next series of bits. We’ll treat these like their own entity. This is simply 2^2 = 4. That’s a value of… ‘4’ in decimal.
That’s it! Just combine those 2 values. 01001011 = 4B in hex. No matter how big the binary number is, we can convert it in chunks of 4 bits.
You may also recall from before that the MIDI messages are 3 bytes. That’s 3 sets of 8 bits. We can think of each byte as 2 hexidecimal places. So a MIDI message in hex may look like 90 40 40 (which is 10010000 1000000 1000000 in binary). This is a much easier way to type the data and think of things.
Don’t worry if this doesn’t make total sense yet. Just try to grasp the general idea. Once we start using this information, it should make more sense!
Write the plugin - Part 2
We are now fully armed with the general idea of the information we need to write this plugin. Don’t worry if everything doesn’t make sense yet!. This is an iterative process. You may need to try something, read about it, try it again, read about it some more… a dozen times.
Every programmer does this. All of us. It’s a process of trial and error. Even the super ultra smart geniuses went through this at some point.
The loop
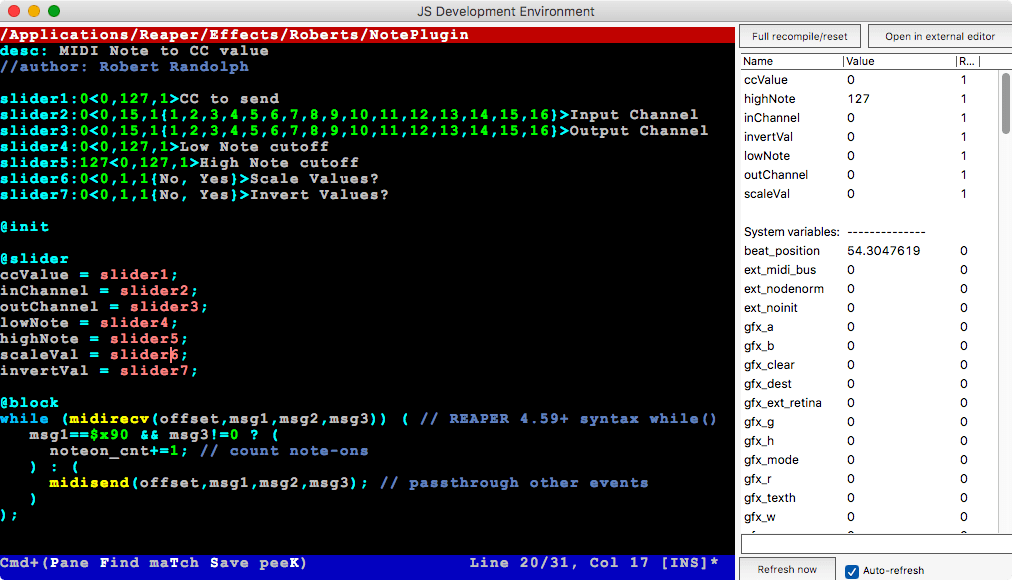
We already discussed how JSFX sends us a block of data, and we need to process each piece of the block. To do that we write a loop.
How do we write the loop? We don’t! We use one that we found. Google “JSFX MIDI programming” and this is the first result. Excellent. Let’s dig.
We know that we need to receive MIDI data and process it. So let’s grab the first thing that looks like it receives and processes data which is midirecv(offset,msg1,msg2,msg3) -- REAPER 4.60+.
The code is:
1
2
3
4
5
6
7
8
@block
while (midirecv(offset,msg1,msg2,msg3)) ( // REAPER 4.59+ syntax while()
   msg1==$x90 && msg3!=0 ? (
     noteon_cnt+=1; // count note-ons
   ) : (
     midisend(offset,msg1,msg2,msg3); // passthrough other events
   )
);
That’s exactly what we need. We want to process only notes, and that’s what this does.
The line msg1==$x90 && msg3!=0 says “If the first msg1 is a note and the velocity isn’t zero” then… we do stuff.
How do we know that? Let’s head over to that page about MIDI for programmers.
In the ‘NOTE messages’ section it tells us that we have 3 bytes. A status byte, which is msg1. A data byte 1, which is msg2. A data byte 2, which is msg3. Let’s go over each thing listed on that web page.
- “Status byte : 1001 CCCC” - The first 4 bits of the status byte indicate the type of event. Since we know that hex corresponds to 4 binary bits, the ‘9’ in
90corresponds to the first 4 bits of the status byte. The next 4 bits tell us which MIDI channel the event is on. So90is a NOTE message on Channel 1. If our ‘msg1’ in JSFX ==$x90then we know the data bytes refer to a note message on channel 1. - “Data byte 1 : 0PPP PPPP” - This is simply 7 bit data, values from 0-127. For MIDI notes this tells us which note. ‘msg2’ contains the information about which note number.
- “Data byte 2 : 0VVV VVVV” - 7bits of data again, from 0-127. For MIDI notes this is the velocity, or how fast (or hard) the key was pressed.
So this is how we figure out what the MIDI information is. We browse the spec (or google for more information), then we compare that information to the ‘msg1’, ‘msg2’ and ‘msg3’ that JSFX gives us.
But what about that offset value? Well we’ve been given a block of data, and the time position of each event is stored as an offset. If we want events to have the same ‘timing’ on output as input, then we just pass the offset to midisend() without changing it. You can create other effects like delays by messing with that value.
First Init value
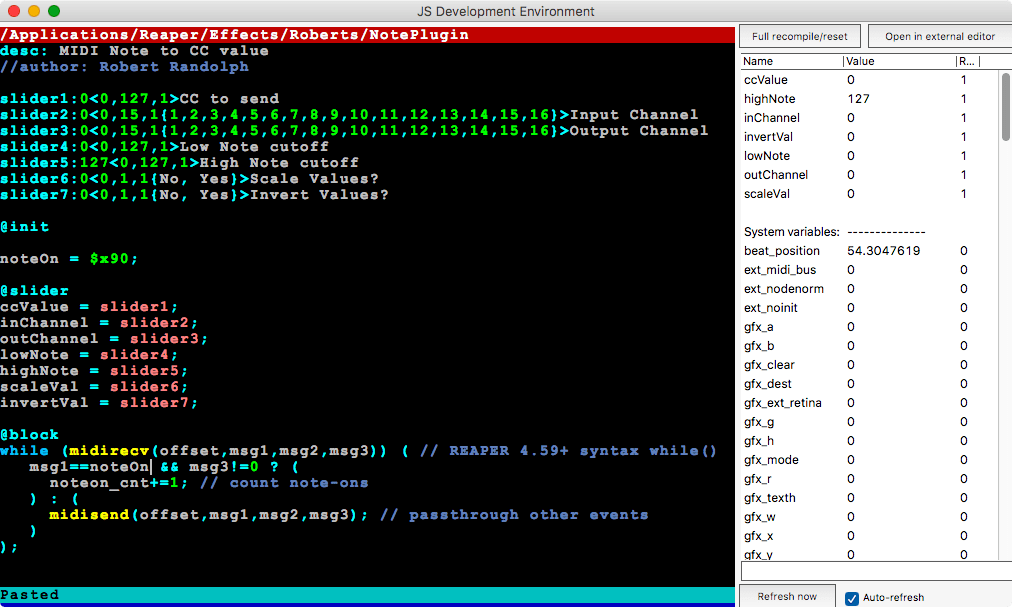
That $x90 value is ugly. We don’t always want to remember that. So let’s create a variable that corresponds to that always.
In our @init section, create a new variable like this noteOn = $x90;.
From now on when we want to reference the concept of a MIDI note event, we can use the word ‘noteOn’ instead of having to remember that silly value.
Finding the MIDI channel

We know that 90 in hex refers to a note on channel 1. But what if we receive a value of 91?
We don’t want to have to check for ‘90’, ‘91’, ‘92’, ‘93’ etc… to know if we have a note value! We need a way to split up the first 4 bits of the ‘status byte’ and the second 4 bits.
This is where bitwise operators come in to play. We are going to use the ‘and’ operator. This specific operation is part of bit masking. These things may sound scary, but I assure you they are not that difficult!
Let’s assume that we have a note message on channel 8. That value looks like 98. It’s a combination of 90 and 08. We want to ‘uncombine’ the 98.
Let’s first unpack that 98 to binary. Fire up google and you’ll convert your 98 hexidecimal to 1001 1000. Having this in binary helps us think about the problem better because we are using bitwise operations, so it’s nicer to think in bits.
The “and” bitwise operator takes 2 values. It compares the bits in each place. If both places have a 1, then the result is 1. If either places has a 0, then the result is 0. That’s where the trick lies. We can ‘turn off’ values by using a bitwise ‘and’ that has 0s in the place we want to cut off.
So if we just want the first 4 bits, then we leave those and turn off the other 4. So look in the image above.
We do the following operation: 1001 1000 & 1111 0000. From top to bottom the numbers are ‘anded’. If both numbers are 1 then the result is 1. If either number is 0 then the result is 0.
Look at the result! It zero’d out the rightmost 4 bits. The result is only our leftmost bits. Now we have a value that only contains information about ‘what type of event’ we’re dealing with.
We need to do this in hexidecimal though. Easily enough, we know that each hex place is 4 bits. ‘F’ is “all bits”, and ‘0’ is “no bits”. So to extract the event type and channel we do this:
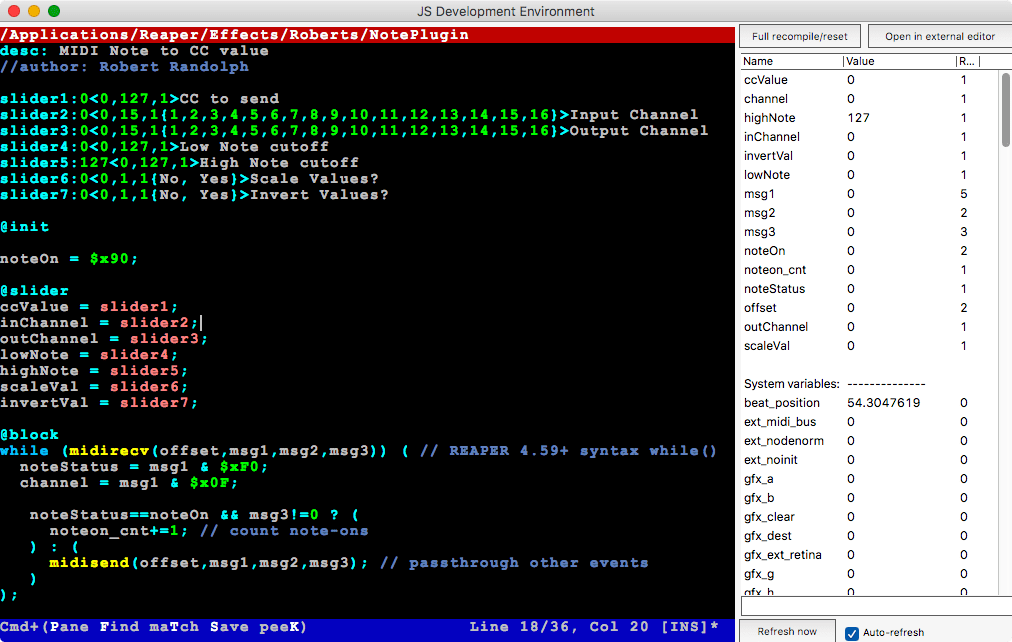
1
2
noteStatus = msg1 & $xF0;
channel = msg1 & $x0F;
We’ve taken the first message, zerod out the left most bits, and assigned that to noteStatus. Now we can use noteStatus to find out if our message is a note, and not worry about the channel.
Then we took the first message and zerod out the left most bits. This contains the 4 bits that is our MIDI channel number.
Now let’s add those variables in to our loop (since we need to extract these values for each piece of data in the block) and change our code to use the noteStatus variable to check if we are processing a note:
Filtering the MIDI Channel
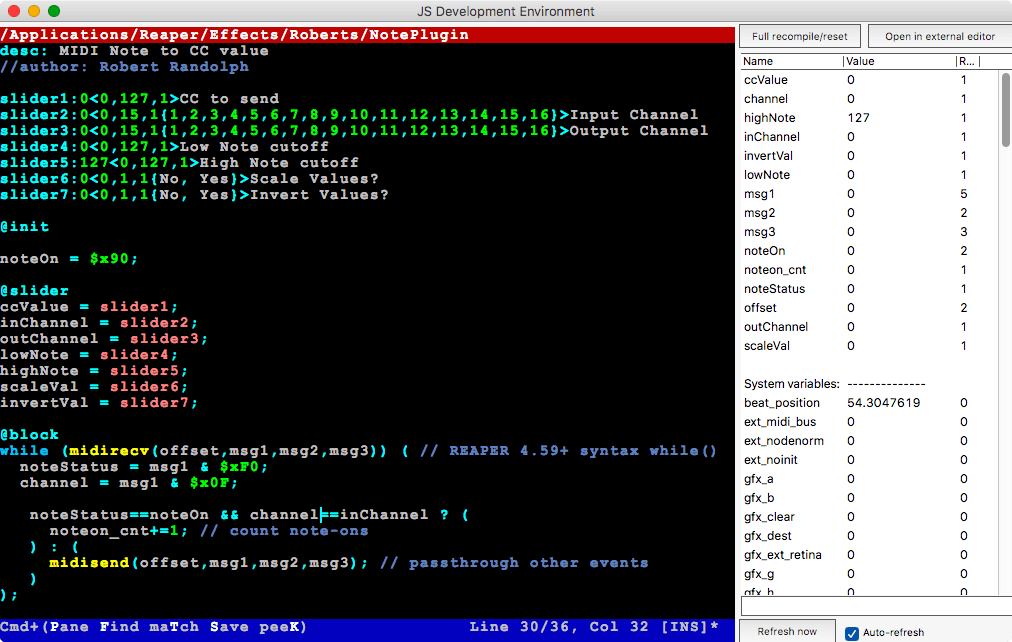
Now we need to make sure that we only respond to messages on the MIDI channel that the user selected. This is as simple as using our inChannel variable in our conditional.
I’m going to replace the msg3!=0 with a check for the correct MIDI input channel. See the screenshot.
Reacting to the correct notes
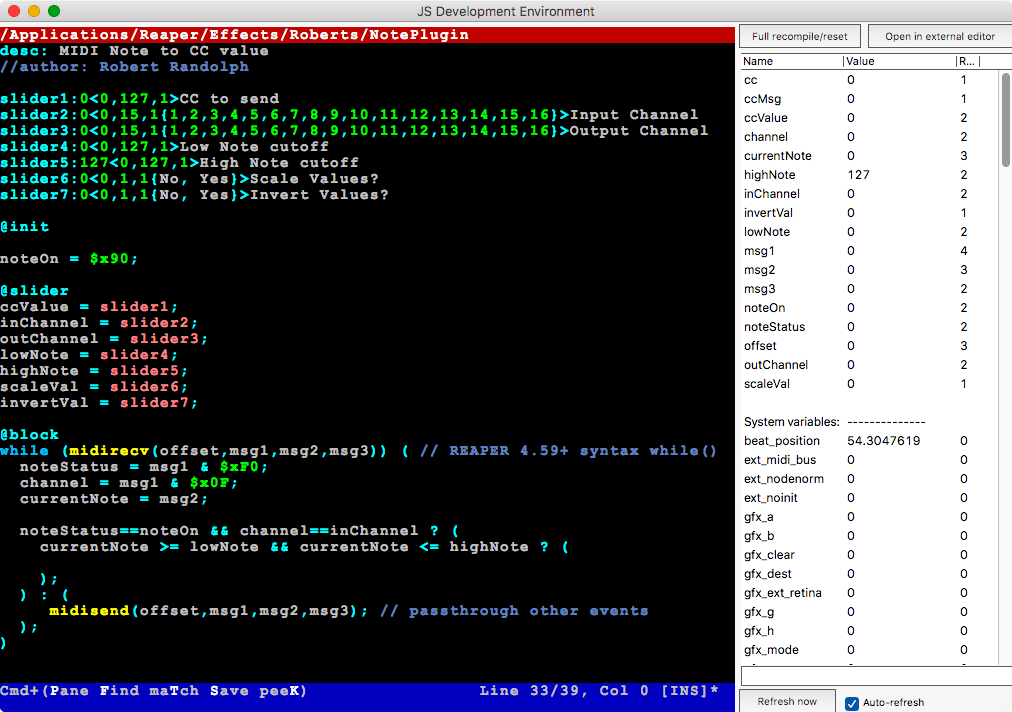
In our specification we said that we wanted to only react to a range of notes. After we’re sure that we have a note message on the correct channel, we want to make sure that the note is in the range that we determined.
In english we would say “If the input is greater than the lowNote AND the input is less than the highNote”.
First thing I’ll do is assign msg2 to something more readable. Inside the ‘while’ loop where we determined the noteStatus and channel, let’s assign currentNote = msg2. Now we can refer to currentNote when we want to know the note number.
Then since we learned conditionals already, so we can translate that to code to this:
1
2
3
notecurrentNote >= lowNote && notecurrentNote <= highNote ? (

);
There’s no : ( ) because we don’t care what happens if the note is out of range. We only act if the scenario is correct.
Remember to indent your code as you go!
Made the plugin do something
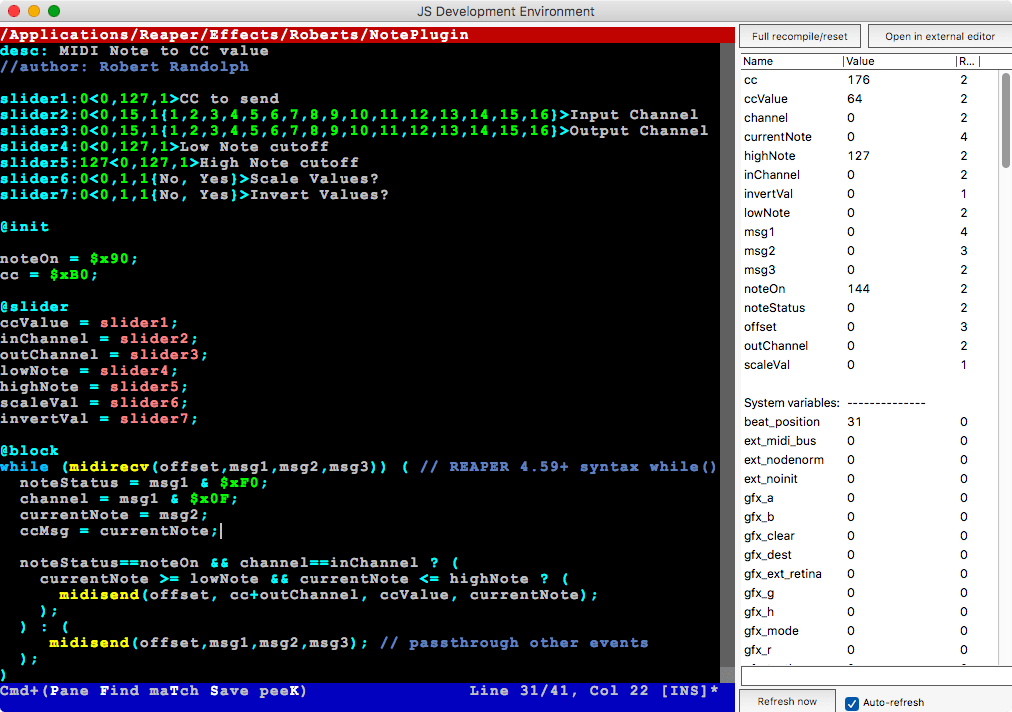
Right now our plugin does nothing. Let’s make it work, but ignore the scaling and inversion.
Let’s just make the plugin output the current MIDI note value as a CC message. First though, what is a CC message? We’ll visit the reference that I’ve been using most of this tutorial, but you can find this information directly in the specification.
MIDI CC messages are exactly like note messages. The first status byte is B0 to signify a CC event plus the MIDI channel. The second byte selects which MIDI CC message, from 0-127. The third byte is the value of that CC from 0-127.
First thing we need to do is create a variable that references that B0. In the @init section we’ll add cc = $xB0;.
Next we want to use the midisend function to output our data, and we’ll do this in the section where we act if our note is in the correct range. It looks like this:
1
midisend(offset, cc+outChannel, ccValue, ccMsg);
We keep our offset the same. Then we combine the B0 CC message with our channel. Simple addition works here, no bit math necessary. Next we send the ccValue, which is selected by the user in the GUI, as the CC number. Now we send the ccMsg value as the value of the midi CC. (The astute reader will notice that I created this variable and snuck it in… Look at the screenshot to see where it was created. Pay attention closely!)
Your code should look just like in the screenshot so far.
Invert
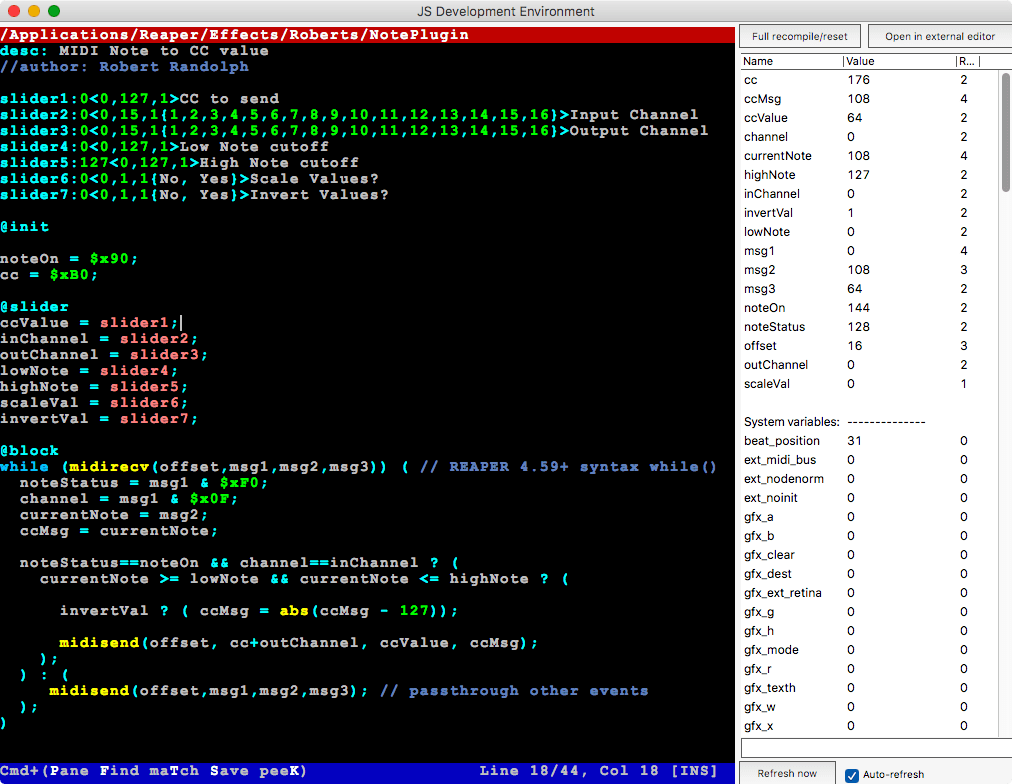
Now we need to implement the invert functions.
The idea is that we want an input of 127 to come out as 0, and an input of 0 to come out as 127. We don’t want to create a massive map of values. That would be silly. Let’s abuse some math.
What’s an easy way to turn 127 to 0? Just subtract 127! What if we subtract 127 when the value is already 0 though? We end up with -127. That’s very close to what we want. We want 0 to be 127, not to be -127. What we want is the absolute value. Let’s check the JSFX reference and find the absolute value function. It’s abs(). Now let’s implement a new variable that contains our inverted value;
1
ccMsg = abs(ccMsg - 127);
We only want to do this calculation when the inversion slider is active, so let’s surround that in a conditional
1
invertVal ? ( ccMsg = abs(ccMsg - 127));
We’ll insert that code before we use midisend() when the note is in range. See the screenshot.
Scaling
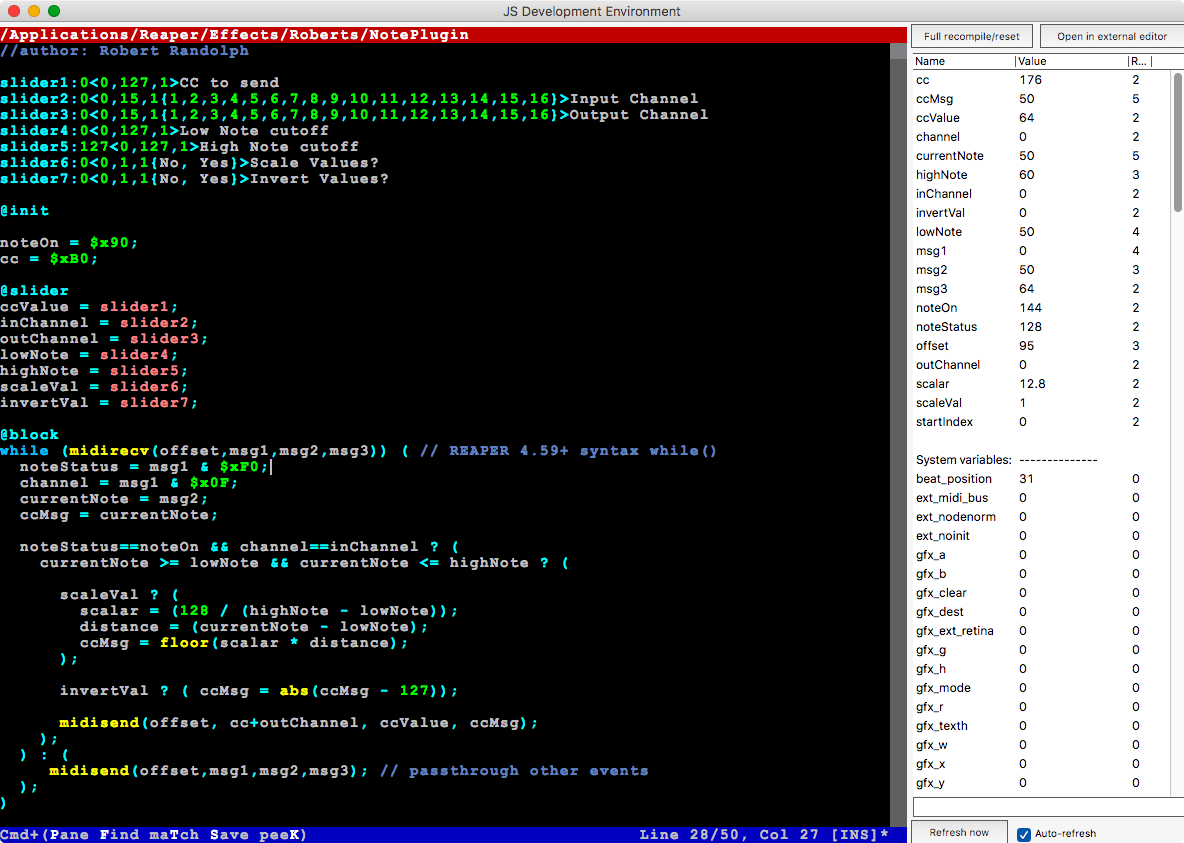
Next we need to scale the values optionally. This is more complex. What we need to do is figure out the distance between lowNote and highNote, then figure out how to map that range to a range of 0-127.
First thing is figure out the distance between the high and low note. ccMsg = highNote - lowNote;. Easy.
Now we need to figure out how much ‘one value’ equals between our high/low notes. That’s defined as such 128 / (highNote - lowNote);. So if our high note is 80, and our lowNote is 90 we have a distance of 10. That means each increase in note value will correspond to a 128 / 10 (12.8) increase in ccMsg. Each note increase changes the CC value by 12.8. We’ll call this our ‘scalar’ and define it like this scalar = (128 / (highNote - lowNote));
So now we know how much the distance between notes scales to CC values. We need to create real values out of this. We need to know how far we are from the low note. Our current distance from the low note is currentNote - lowNote. So if our currentNote is 55, and our lowNote is 50, then we know we’re a distance of 5 from our low note. We’ll call that our ‘distance’ and define it like this: distance = (currentNote - lowNote);
To get the CC value, we multiply the distance by the scaling value: ccMsg = scalar * distance;. The first part determines the scaling, then we multiply it by the distance.
We have a problem here though! Our example before gave us a value of ‘12.8’. CC values are whole numbers. We need to make sure that the value we send is a whole number. We only want an integer. Check the JSFX reference again to find something that makes sure we only have an integer.
floor() is an option. ceil() is an option too. I want to use floor, so let’s wrap our entire thing in a floor: ccMsg = floor(scalar * distance);.
Once again, we also only want to do this if our scaleVal slider says ‘Yes’ (or is true). So we’ll wrap that in a conditional, and our final code gets inserted after the inversion code:
1
2
3
4
5
scaleVal ? (
  scalar = (128 / (highNote - lowNote));
  distance = (currentNote - lowNote);
  ccMsg = floor(scalar * distance);
);
It’s important here to know that this is how a lot of programming is done. You slowly solve the problem, piece by piece. We figured out the easiest part. Then we kept breaking it down until we assembled a fully working piece of code.
Protection
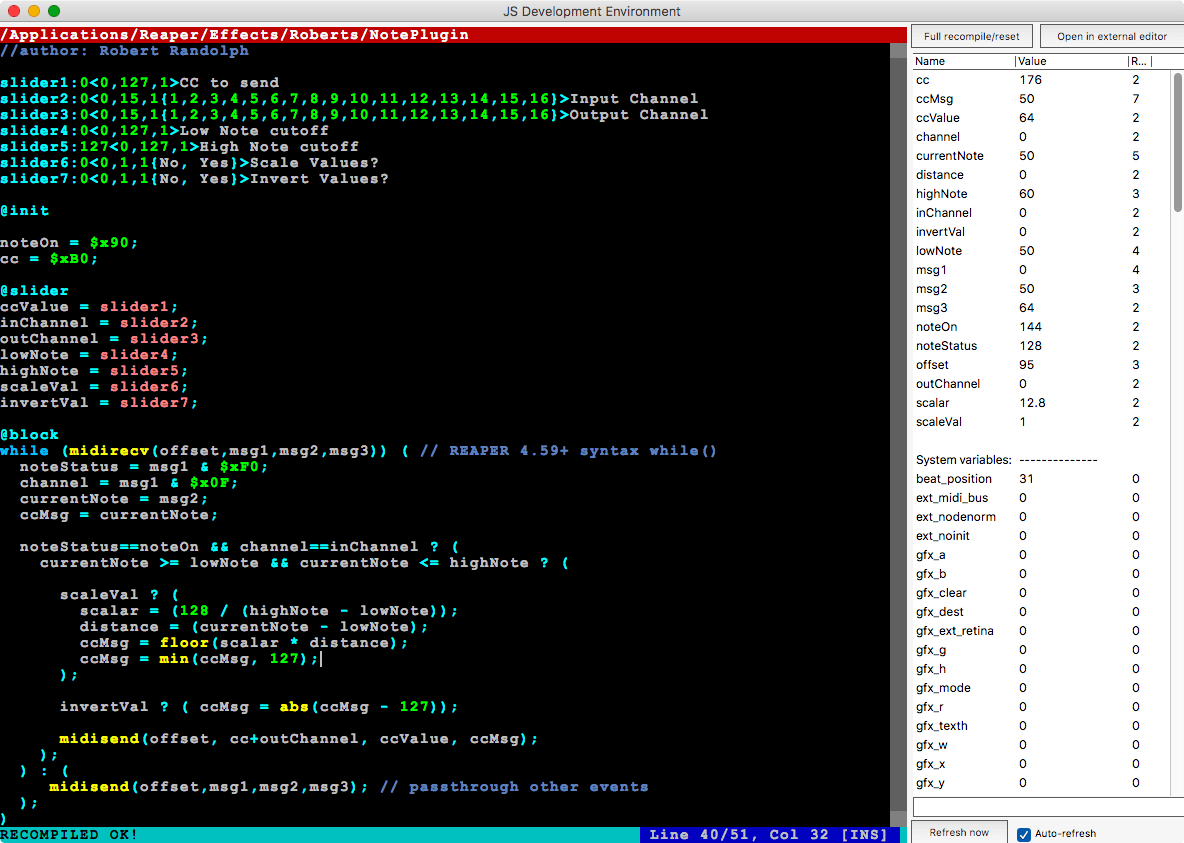
We’re limited to values of 0 to 127 for our ccMsg, and it’s possible that after scaling we may end up with a value that’s greater than 127!
We need to add some protection code. There’s a few ways to do this, so I’m going to let you solve it yourself. You can of course see how I solved it in the screenshot.
Finish it off
There’s a few last things here. The first issue is that for this plugin, I never want to send MIDI that isn’t part of the conversion. So I will remove the ‘else’ line from our biggest conditional. I took away this bit:
1
2
3
: (
     midisend(offset,msg1,msg2,msg3); // passthrough other events
  );
Next is to COMMENT YOUR CODE. This should be done the whole time! I intentionally left comments out of this code so there was less visual clutter. I actually had to retake a number of screenshots because I instinctively commented something.
Anytime you write something that isn’t entirely obvious, add a comment in plain english explaining it. Even if nobody ever looks at your code, it will help you while you’re working on the code. I can’t tell you how much time I’ve spent trying to understand my own code! It’s probably the biggest time sink in the industry. Do it for yourself, COMMENT YOUR CODE.
Result
Here is my resulting code:
1
2
3
4
5
6
7
8
9
10
11
12
13
14
15
16
17
18
19
20
21
22
23
24
25
26
27
28
29
30
31
32
33
34
35
36
37
38
39
40
41
42
43
44
45
46
47
48
49
50
desc: MIDI Note to CC value
//author: Robert Randolph

slider1:0<0,127,1>CC to send
slider2:0<0,15,1{1,2,3,4,5,6,7,8,9,10,11,12,13,14,15,16}>Input Channel
slider3:0<0,15,1{1,2,3,4,5,6,7,8,9,10,11,12,13,14,15,16}>Output Channel
slider4:0<0,127,1>Low Note cutoff
slider5:127<0,127,1>High Note cutoff
slider6:0<0,1,1{No, Yes}>Scale Values?
slider7:0<0,1,1{No, Yes}>Invert Values?

@init

noteOn = $x90; // note statusbyte
cc = $xB0; // cc statusbyte

@slider
ccValue = slider1;
inChannel = slider2;
outChannel = slider3;
lowNote = slider4;
highNote = slider5;
scaleVal = slider6;
invertVal = slider7;

@block
while (midirecv(offset,msg1,msg2,msg3)) (
  noteStatus = msg1 & $xF0; // strip channel info
  channel = msg1 & $x0F; // strip event type
  currentNote = msg2;
  ccMsg = currentNote;

  noteStatus==noteOn && channel==inChannel ? (
    currentNote >= lowNote && currentNote <= highNote ? (

      scaleVal ? (
        scalar = (128 / (highNote - lowNote)); // determine scalar value
        distance = (currentNote - lowNote); // determine distance from lowest note
        ccMsg = floor(scalar * distance); // scale message

        ccMsg = min(ccMsg, 127); // protect against >127 values
      );

      invertVal ? ( ccMsg = abs(ccMsg - 127)); // invert values with subtraction
                                               // take the absolute value after

      midisend(offset, cc+outChannel, ccValue, ccMsg);
    );
  );
)
This code actually took me about a total of 25 minutes to write, including looking up the MIDI spec and testing things. For a total beginner, it may take you days!
Programming takes practice like anything else.
How do I use it?
Using this JSFX plugin requires a keyboard and a plugin. Follow these steps to use it.
- Create a track
- Insert the JSFX plugin on the track
- Insert ReaEQ on the track
- Set the track input to your MIDI controller. A keyboard is necessary.
- Turn on input monitoring
- Record arm the track
- Open ReaEQ
- Move a slider (like the Frequency slider on band 2)
- Go to the ‘Param’ button in the upper right of the ReaEQ window. It should say ‘Last touched [Freq-Band-2]’ at the top
- Go to the ‘Midi CC’ window and select a MIDI cc.
- Set your plugin to output to the same MIDI cc.
- Play notes!
The result should be just like in the video above.
$#!+! My $#!+ is F****D!

Yeah. That happens. Now we need to debug!
I considered adding a purposeful error in this code so you would need to learn to debug, but I thought this may be discouraging.
Debugging in JSFX is fairly easy though. Open up the editor and on the right side you can see all of your variables, and all of the system variables. If something is wrong, then assign it to a variable and watch. You can also put the cursor on a variable and press Control-k (Windows) or command-k (macOS) and the status line at the bottom will be updated with the current value of that variable.
That’s really all there is to it. You develop an idea in your mind of what something should be, you find a way to see what it actually is, then you slowly work through the possibilities to how that isn’t happening.
If you suspect that something is wrong, don’t delete it until you are sure!. Comment it out with // until you have confirmed that it should be deleted.
If you can’t figure out what is wrong, then create a new plugin, and use the simplest portion of the code that you can. This method allows you to isolate portions of the code more easily so you can narrow down issues. Debugging is always the processing of narrowing it down. Everything you do is confirming parts of the code that do work until you narrow it down to an area that doesn’t work. Then you can fix that, hopefully!
If you still can’t figure out what’s wrong, then go to the forum and tell Justin that it’s his fault. (I’m kidding… kinda).
Conclusion
Hopefully this has been somewhat helpful. I may or may not do a series on an audio plugin, it depends on how well this is received ($$$$).
If you have any questions or error corrections then please leave a comment. I’m sure I made some errors, I always do! Everyone does! (is what I keep telling myself).
Big shoutout to Jon at The Reaper Blog. He brought up this question about a plugin that translated MIDI notes to CC on behalf of another user. That’s why I wrote this entire thing.
Support Me!
This post took 8 hours to research, photograph, write and edit. If you appreciate the information presented then please consider joining patreon or donating!