Gain staging. It’s a popular phrase now. It was a popular phrase before, but it is now too. There was a short period in the late 80s, 90s and early 00’s where, as digital tookover, people forgot it was a thing.
Now we have a whole generation of musically-inclined people that are learning to work entirely digitally, and the necessity of gain staging has slipped by their grasp. It used to be an obvious skill, but now the benefits are a matter of workflow rather than a matter of basic operation.
I get asked about gain staging all the time, and while I generally try to avoid writing about things that are already explained elsewhere, I am going to tackle this one. Why? Because there’s one aspect of gain staging that matters to everyone, and almost nobody discusses it.
CONTROL CONTROL CONTROL CONTROL CONTROL CONTROL CONTROL
Contents
- What is gain staging?
- Why did gain staging matter?
- What does gain staging matter now?
- How do you gain stage?
- Conclusion
- Support Me!
What is gain staging?

What gain staging is is simple. Between each processor, any processor including your faders, there is a pathway where the audio travels.
Gain staging is adjusting the volume of the audio in this pathway. This can be done by an actual volume control of some sort, or by the output level of the previous processor.
Yes. It’s really that easy, but it’s important that gain staging applies between any process, even inside processors!
Why did gain staging matter?
This section is titled “why did gain staging matter?”, but all of this still applies if you use any analog equipment, including headphones or speakers! Soon you’ll find out that it always matters, period.
Every piece of analog equipment has a noise floor and headroom. Both of these things have subtle transitions from ‘OK sounding’ to totally noise or totally distorted. Some very high-fidelity equipment transitions between OK and ‘noise/distortion’ very quickly, which allows you to have a large range of workable levels. Some less awesome equipment will slowly get noisier as you go down the range, and slowly distort more and more as you go up.
Most importantly, some equipment will gradually distort, but in very pleasant ways… but only to a point.
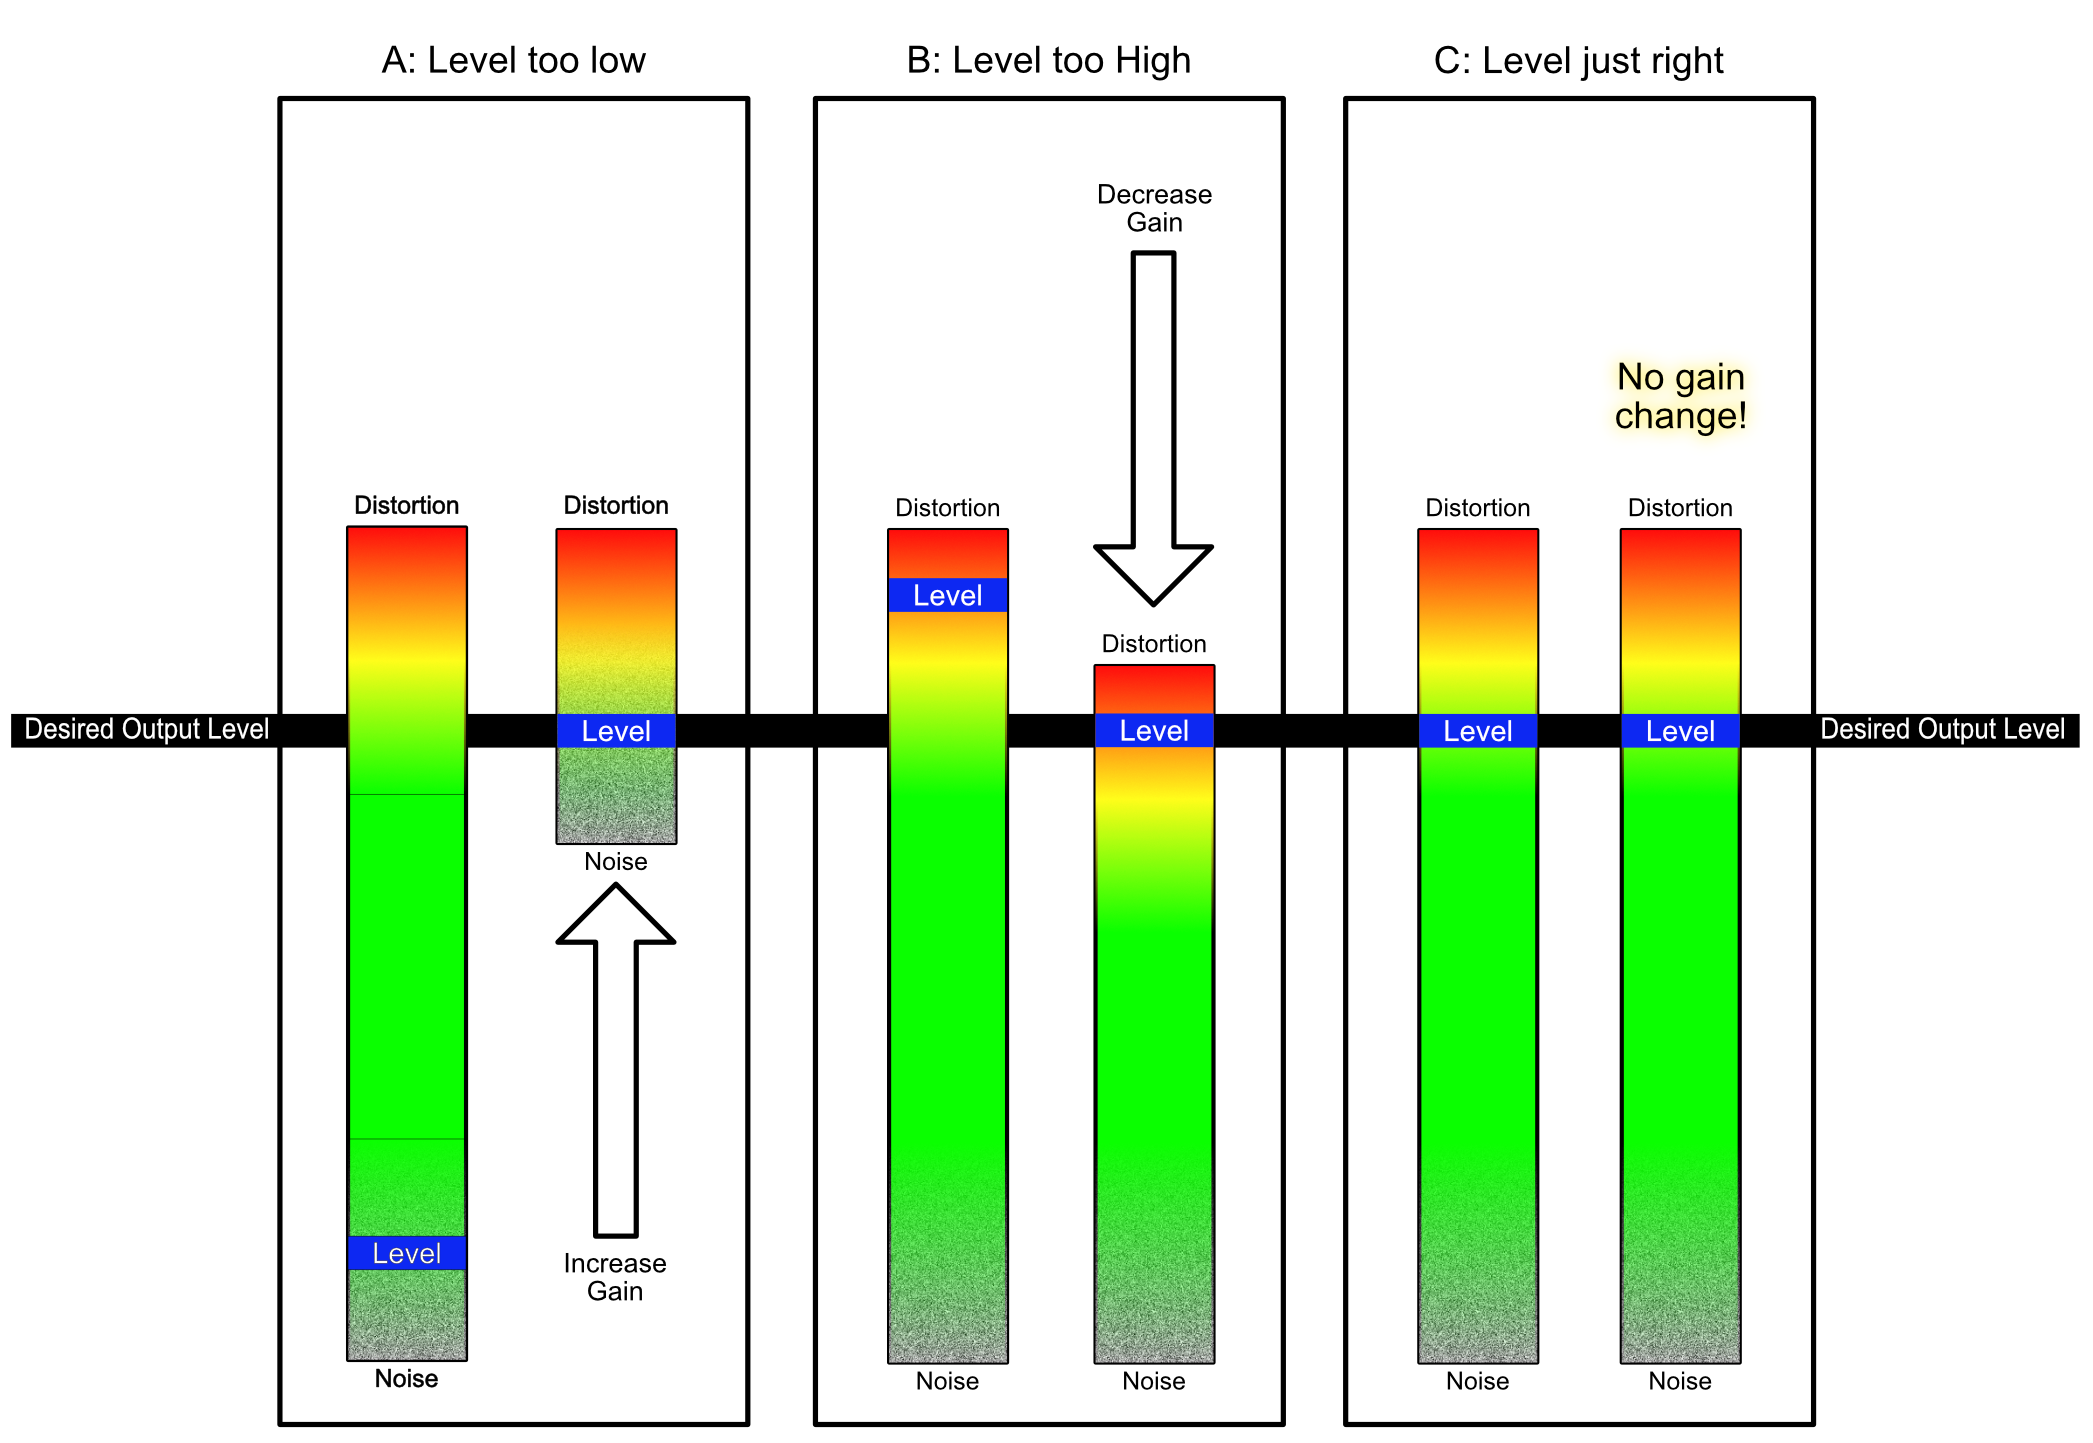
Let’s look at the graphic above. The black bar is the desired output level we want of our signal. The blue bar is where our signal exists inside that range I described.
-
A - Our signal (blue bar) is deep in the noise. In order to bring our signal (blue bar) up to the desired level (black bar), we need to apply a lot of gain. Not only does that bring our signal up, but the noise comes up as well. Now we just hear our signal with the noise, but louder.
Even though we turned the signal up, our equipment still has the same heardroom. We did nothing but increase the noise level and give ourselves less room to work with before distortion happens.
-
B - Our signal (blue bar) is rather loud, and is in the range of the equipment where it begins to distort. In order to bring our signal (blue bar) down to our desired level (black bar), we need to turn down the gain.
Even though we turned the signal down, our equipment still has the same noise floor. Now our signal is distorted and still has the same noise level. Even though we turned it down, that doesn’t change the physical reality that the noise floor of our system is unchanging (in this simple example!)
-
C - Our signal level is just right. There’s no gain changes needed, so we retain the same headroom and noise floor as we move to the next process. Perfect.
Anyone that’s worked with microphones knows this effect. If you are recording something, then often you want the microphone to be close as to the source as possible so that your desired source is loud, and the background noise is low. If your desired source is soft, then when you turn up the whole signal you get a lot of noise. The exact same thing is happening here.
Example B - part 2

Example B in the previous section is a curious one. With the previous example A, we can mostly say that we always want to avoid noise. (though some people argue, including myself, that we don’t!). Not all distortion, or saturation is bad. Example B also shows us little change to distance from the undesirable noise floor.
What if we want a little bit of saturation in our signal? Maybe we’re using a piece of gear that sounds amazing when you over drive it a bit.
Now we have to think even more! Let’s take a common (very simple!) block diagram of a signal processor. There’s 3 potential places where the yummy saturation can occur, and 5 potential places to adjust the signal level.
- A - This is the signal input in to the processor. This level is determined by the gear coming before it.
- B - An input trim. Not all gear has this, and it’s actually somewhat rare to have a true input trim that comes before any input stage electronics. This may affect the level going in to something like a transformer, which can be a great source of pleasant distortions. The input trim stage may even be acheived with tubes or some other pleasantly distortion gain control circuit.
- Input stage - This is some sort of combination of electronics that prepares the signal for processing by the main processing stage.
- C - Input level. This is a stage for controlling the level after the input stage, and before the main processing stage.
- Processing block - As labelled: this is where stuff happens. More nice distortions may be happening here, depending on the level!
- D - Output gain - This is the last place that you get to control the gain before moving on to the next stage.
- Output stage - Just like the input stage, this may have things like a transformer, tubes, interesting sounding FET-based circuits etc… They may distort pleasantly with higher input levels.
- E - Output is the signal path to the next processor.
All of these points bear consideration when attempting to get the ideal sound out of your processor. Maybe the input stage only sounds decent with a moderate input level, but the output stage is transformer coupled and sounds amazing with a higher level. So you need to adjust the input or trim appropriately, and find a way to drive that output transformer.
Maybe the input stage sounds great with a hot signal, but the output stage sounds kinda flabby? Or what if only the processor sounds good overdriven? You have to consider all of these options and adjust the signal level at each stage to get the appropriate sound.
What does gain staging matter now?
Most of us work in the digital realm. For those that work in analog, you’re already familiar with gain staging whether you realize it or not, but in the digital realm the consequences are not as obvious.
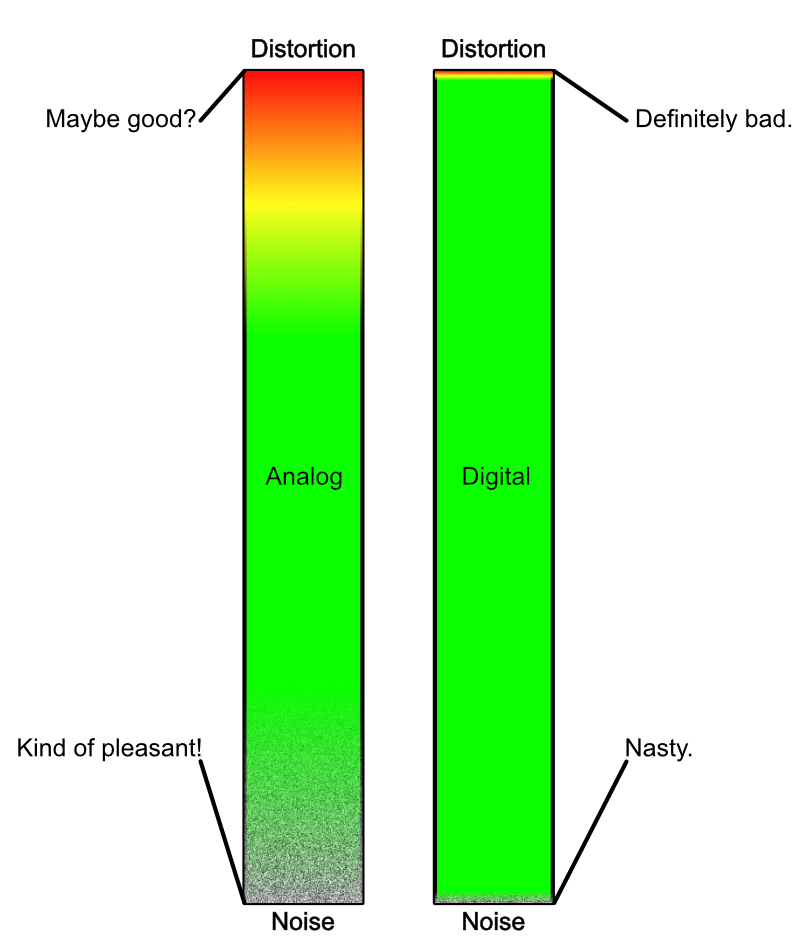
In the analog world you may have a range of ~20db between where obvious distortions start, and where the signal is totally crushed. The noise floor at 100hz, 1khz and 10khz may be 25db apart! Everything is squishy and level dependent.
The point where digital distortion begins is right at 0.0dbFS. The point where digital noise starts is bit-depth * ~6.02 (24 bit noise floor is about -144.5dbFS).
So in the digital world there’s very obvious start and stop points. Likewise due to the nature of floating point signals we can move our signal around crazy amounts without distortion or adjusting the noise floor. (this is a topic for another post.)
So why do digital users need to be concerned with gain staging? Let’s cover what I feel are the 3 most common reasons.
I/O

Despite working in the digital realm, we still need to get audio to our ears. Many people also need to get audio in to their DAW.
Since both pre-amps, interfaces, monitors etc… are analog equipment, they fail to the same limitations as our analog examples that we discussed before.
The issue is that whatever analog grit we pick up, we take with us to the digital realm. If our input signal is riding up near the ‘distortion-level’ of our preamp, then that distortion will be recorded digitally. If our input signal is near the noise floor of our preamp, then we also record that noise to our digital representation.
However, if we get the input level nice and clean in the analog realm, then we can manipulate it digitally with minimal quality loss. The digital noise floor and headroom are precise and easily located. Once the signal is free of the tyranny of analog limitations, it’s not subject to it again until…
We have to output it.
The reverse holds true for output out of your soundcard/interface and in to your monitors. These are also analog devices with analog limitations. The limitations may have high tolerances, but they exist nonetheless. The control we have is the digital signal that exits our computer to these devices.
-
NOTE - It used to be common advice to ‘record as hot as possible and don’t hit 0dbFS or you’ll clip’. Clearly this is poor advice on many levels. Not only does it require that you have very high quality preamps and conversion, but it also requires that in the digital realm you once again change the level of your signal, as we’ll discuss shortly.
Record your signal as hot as is necessary, which will occur naturally when you learn how to gain stage
Emulations and Models
Music culture is often defined by the appreciated works that we’ve grown accustomed to as we mature. These works have traditionally been made with a variety of analog devices, many of which are nearly ubiquitous. For many of us the sound of rock is the 1176 compressor. The sound of radio is an SM7 and the DPR-402. The sound of the 60s might be the Capitol records or Abbey Roads sound. A 90s or 00’s drum sound is the distressor in action.
These days there’s a wide variety of techniques to recreate these processors and sounds nearly exactly. I’ve covered this before (check the modeling/emulation section), but let’s go over it again. Emulation is when specific behaviour of the components of a device are replicated. Modeling is when the behaviour of large sections, or the device itself, are replicated without specific concern for each component that creates the model.
Along with the emulation or modeling of the obvious characteristics of these processors is the perhaps non-obvious dive back in to the analog world of ‘nearly-distorted’ and ‘nearly-noisy’.
Everytime an analogue emulation or model is used, there is once again a need to use analog best-practices for gain staging.
If you wish to have the brilliant input-stage sound of a specific processor, the input level going in to that plugin must be correct. If you want the transformer-like output stage, then you need to drive the output stage inside the plugin properly.
At every point before and after an analog emulation or model, you must have the signal level set appropriately to get the desired effect.
Control
This is it. This is what I think is the most important part of gain staging in the digital world, and it applies whether or not you use analog-like processing or not.
CONTROL
First let’s take the most simple example of a volume fader. This applies to nearly all DAW faders.
-
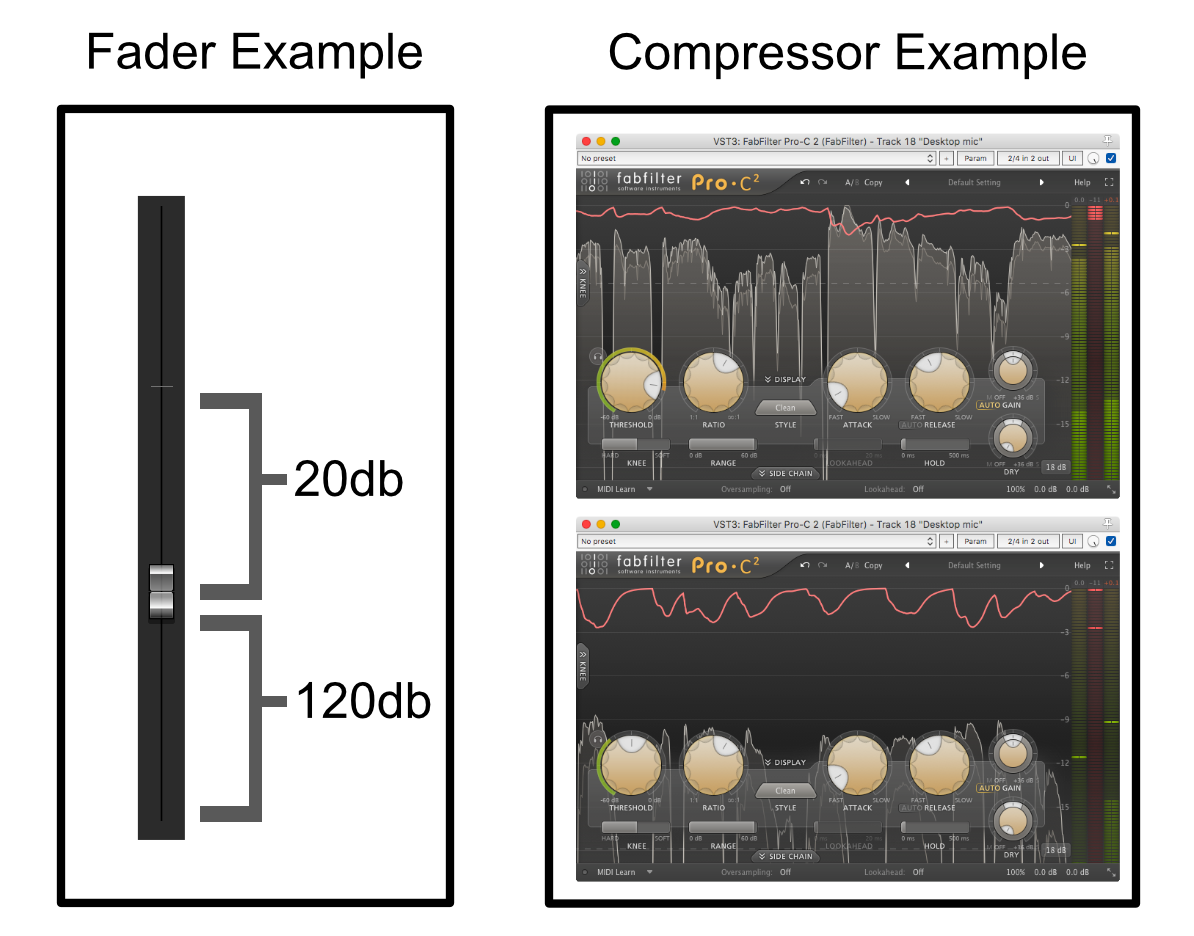
In the image above, that tick line is 0db. Our fader is set at -20db of reduction. The minimum level of the fader is about -140db of reduction. Half of our fader controls 20db of gain change, and the other half controls 120db of gain change.
If you wanted to have quick and precise control over your signal levels, which half of the fader do you think you want your signal to be on? The top half where you can do 20db of adjustment in 200 pixels, or the bottom half where you do 120db of gain changes in the same 200 pixels?!
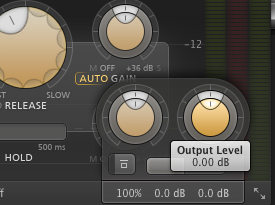
Ok faders. That’s obvious, but what about other processors? Let’s take a compressor. The example here is Fabfilter Pro-C2.
-
In the top image we have a very strong input signal. Look at the threshold knob on the left, this is how we set ‘when compression happens’. To begin working with the signal the knob needs to be set at nearly a 90% value! That means if you want to adjust this for gentle or extreme compression, we have very little knob range to work with. The range above is important, because with a very soft knee, compression begins before the audio reaches the threshold (a topic for another post!)
In the bottom image, we have a properly gain staged signal. The compressor just starts to hit our threshold when it’s perfectly at 50% of its value, which happens to be -18dbFS (this is important!). We can set the threshold high or very low and explore the wide range of sounds available to us.
This concept of control applies to everything. Every good plugin is designed with a specific range of parameter utilization in mind. Sometimes you’ll use high values, sometimes low, but with your input signal calibrated correctly the processor will usually begin to impart its characteristics around 40-60% of knob values.
With your knob values ‘mostly centered’, you’ll have the widest range of control to do what you want. If you need more parameter control in one direction or the other, then you just adjust the gain staging before that point!
How do you gain stage?
So how DO you gain stage, and how do you know where to start?
How
HOW to gainstage is easy. It’s simply a matter of controlling the level of signals as they pass through your signal path. Use utility plugins, trimmers, input controls, output controls, etc… as much as needed. A very useful often tool is VCA fader control as well.
Really, that’s all there is to it: change the gain in the signal path so it’s passing through at the ‘correct’ level. It’s not rocket surgery.
Some plugins will have controls for input gain, output gain, band gain, drive gain, gain gain, and gain again. Use them, add your own in the signal path.
Most importantly though, you need some way of knowing to what level you need to adjust the gain…
To what?
To what level you gainstage is confusing at first for many people, because there’s no single right answer.
When working with most plugins, especially software that models or emulates analog hardware, you need to both gain stage and have a meter that gives you a readout that’s applicable to the task.
Ideally a VU meter is the optimal metering solution. This is what was used for the last ~70 years when designing and, more importantly, operating gear. VU meters have specific ballistics that give a more reasonable estimation of the signal’s value than peak meters.
The issue though is that we have that ‘nearly-distorted’ area in analog, but that isn’t present in digital! So in order to emulate that ‘nearly-distorted’ and ‘distorted’ range of the analog equipment, without introducing digital distortion, we need to do it in a range below 0dbFS. This is where meter calibration comes in.
Currently the most common calibration for VU meters is that 0VU corresponds to -18dbFS (remember that number?). If we gain stage our signal so it’s around 0VU, then our signal processor has 18db of headroom where it can do the thing it does when you run it hard.
Since most professional studio gear was designed with +4dBu = 0VU, we can also say that we’re calibrating to +4dBu = -18dbFS. This is important again, because when considering our analog inputs and outputs they were also (usually) designed with that calibration in mind! If your input signal to your pre-amps is hitting 0 on your VU meter in your DAW, then you know you’re in the sweetspot of about +4dBu on your preamps. Awesome.
BUT WAIT There’s more. Remember in in the control section, how we said we wanted optimal control? Well if you have a very light background sound, then you may not want it at 0VU when it hits your faders. You’d probably like the signal already a bit low, so you don’t have to pull down the fader to that black pit of low resolution despair. That’s fine. Use a trim/utility plugin to pull the signal down roughly before it hits the fader. Now use your fader to mix! No more fussing around with fine-control modifiers to adjust things or hunting around for faders all over the place. Everything is already ready and in the optimal zone.
Conclusion
Gain staging is an often misunderstood topic at any level of production, but especially in digital production. I’ve not covered every aspect of gain staging, however I hope that I’ve given you an overview of the topic so that you can begin to experiment on your own without having to dive in to all the voodoo (and often incorrect information) out there on the internet.
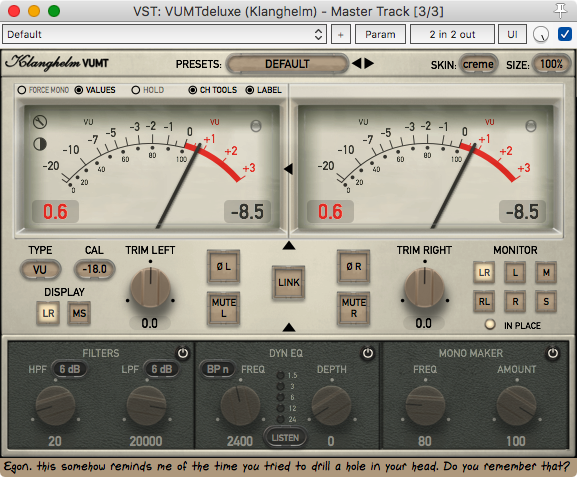
I don’t recommend products often, but I really love Klanghelm VUMT Deluxe as a VU Meter. It’s easy to use, the ballistics are correct and it includes a surprisingly useful dynamic EQ. (Of course the default setup is -18dbFS = 0VU)
The most imporant take away here is that gain staging is preparing your signal for the next process to work optimally. Sometimes that optimal level is obvious or implicit, and sometimes it’s taste. Regardless of how obvious the necessary level is, it’s still necessary to be aware of it and potentially adjust it.
If you have any questions, please let me know in the comments.
Support Me!
This post took 5 hours to research, screenshot, draw, write and edit. If you appreciate the information presented then please consider joining patreon or donating!