This time I’m covering some quality of life improvements that Mixbus offers. Seemingly little things that make day-to-day studio life much easier.
None of these are really ground-breaking features, but they can easily save you hours a week… and probably some stress too.
- Spectral Analysis
- Inline scopes
- Basic Editing
- Automatic Range Editing
Don’t forget Part 1, Part 2 and Part 4.
Contents
Spectral Analysis
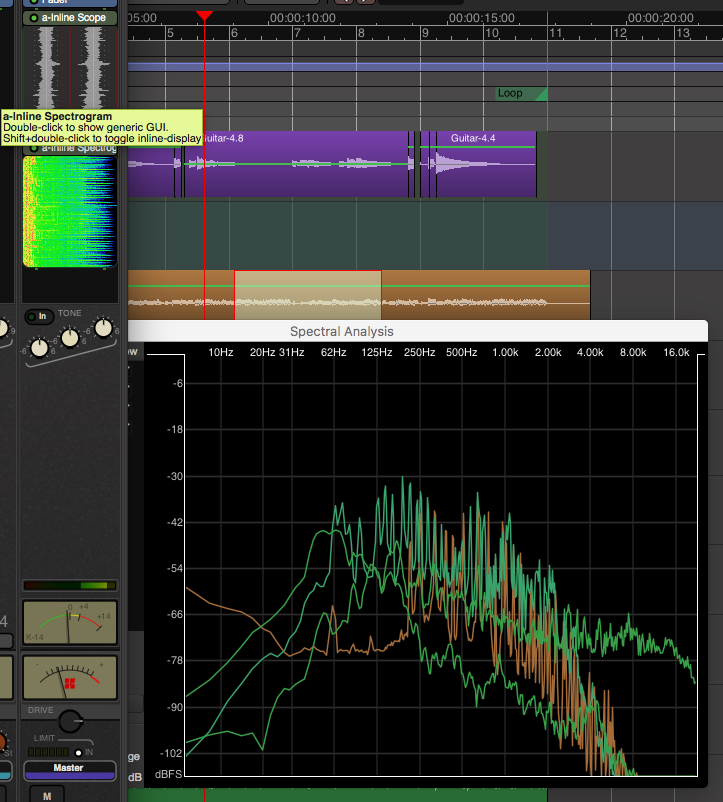
Mixbus allows you to select a range, or a number of regions, and perform an FFT analysis on them. The signals can be selectively overlaid which allows you to get a quick idea of where there may be collisions of certain frequency ranges.
The spectral analysis window is very useful. Check out in the video when I overlay the kick and bass guitar, or the overheads and the kick. EQing starting points have never been this easy.
Inline Scopes
Mixbus supports the inline display LV2 extension. This means that lv2 plug-ins can display things in the mixer of Mixbus.
The video above is showing some of the things that are possible or included. The waveform view and spectrogram are both very useful and included.
I can’t tell you how much time this feature has saved me when mixing in Mixbus. Large sessions are often difficult to navigate and find which channel is making a certain sound. Having ‘a-Inline Scope’ on every channel makes it extremely easy to locate signals. No more watching meters for a few seconds… just a quick glance is all that’s needed.
Basic Editing
Basic editing? A cool feature?
Damn right it is.
Mixbus’s basic editing shortcuts and overall editing paradigm is delightful on first launch. In the video above I have a guitar note that was played a bit late. The video shows how fast I can cut the note out and move it to the correct place.
Some other DAWs have complex selections of modifiers, menus or rely on automatic functions like quantize.
The idea in Mixbus is to provide the user a number of simple functions that make it easy to do exactly what you want quickly rather spending 30 seconds trying to tune a dialogue box that ultimately leaves you with a result you need to fine-tune anyway. Though… Mixbus does have some of those functions for when they are useful.
The process in the video above is (with follow range off and edit point to playhead):
- R - for range tool
- Left-drag to select rough area
- Z - zoom to range
- Left-drag to select the note
- S - Split range
- U - Select regions under range
- A - Align Sync Relative (move sync point, the beginning in this case, of the region to the edit point)
- The playhead is already on the grid, but you can use ctrl-arrow (cmd-arrow on mac) to move it quickly to the grid line you want.
- Alternatively you can use ` to set the playhead to mouse and just point your mouse where the region should go.
- Shift-Z - go to previous zoom level
This may seem like a lot, but there’s only about a dozen editing commands to remember. Flying through a session making edits is a breeze. If you’ve ever spent time in an LA or Nashville Pro Tools editing suite and watched a professional editor work, then you know what’s possible with a limited but powerful selection of simple shortcuts.
Mixbus gives you this power and a bit more, and without giving you control-alt-option-super-meta-shift-windows-function induced carpal tunnel.
Automatic Range Editing
Some DAWs have what’s called Object Editing. Object editing is a very powerful system where each region/item/clip/object/whatever… has a number of adjustable properties. Some DAWs have an automation mode called Latch Preview. Latch Preview lets you select an area and audition automation changes before applying them, then applying them in 1 click.
Mixbus doesn’t have object editing or latch preview, but it does make up for it with a very simple workflow for quickly adjusting the volume of a section of audio. Automatic Range Editing.
Simply select a range (R for range tool), select draw tool (D for draw tool) then adjust the line. A pre-fader automation segment is created and adjusted. There’s a very nice overlay that tells you the amount of adjustment that’s been made.
Editing dialog, vocals, bass guitar, wild synth leads etc.. is so fast. While this workflow is reproducible in other products, nothing else I’m aware of provides such a fluid and simple experience out of the box.
Support Me!
This post took 3 hours to research, screenshot, write and edit. If you appreciate the information presented then please consider joining patreon or donating!