This is a bit of a meta-video that I suspect 95% of my readers won’t care about.
YouTube has a system of audio processing set up that is bewildering and annoying. I have figured out a system to process the audio of your videos so that they meet the YouTube audio standards about 95% of the time.
This method will cost you about five euros at most, and the single necessary plug-in is often on sale for half price or less.
I tested dozens of audio files from music to dialogue to various types of noise and various combinations of these. While my method will not always give you perfect results, it will get you close to the ideal results with minimal effort and minimal cost.
Contents
Video
This time I explain more in the video than in the text, so it may be worth watching the video as well.
What’s the problem?
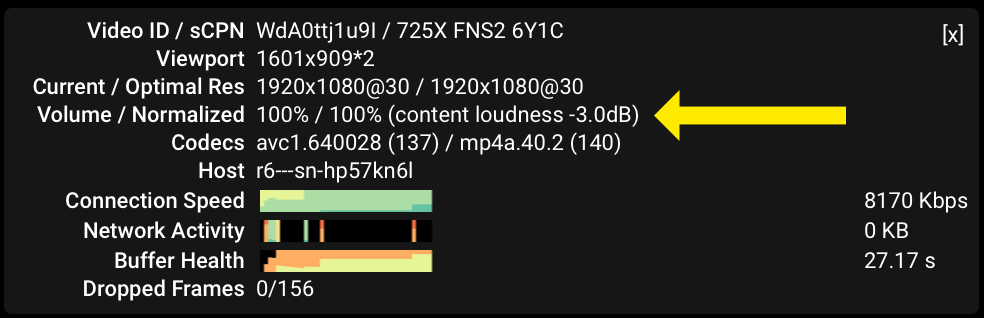
Pick a video on youtube, right click it and select “Stats for nerds”. A little informational window will pop up.
There are two numbers that you need to care about and that line pointed two by the arrow. I have bolded them below.
100% / 100% (content loudness -3.0dB)
- First number - The first number is nothing more than the volume you have set in the player, so you do not need to think about this.
- Second number - This is the percentage that YouTube has adjusted the volume when processing the video. YouTube will never turn up a video, so this value will never be higher than 100%. If the value is lower than 100% then your audio has been penalized.
- Third number - The third number gives you the decibel value of how much your video was penalized OR how much headroom you have left. This can be a positive value.
The goal here is to have that reads 100% / 100% (content loudness 0.0dB).
If the content loudness value is negative then your audio is too low and it will cause your viewers to turn up their viewing system or simply turn off the video.
If the content loudness value is positive then your audio was penalized and that means that you have unnecessarily compressed or limited the audio. your audio will sound stuffy and somewhat weird compared to other properly prepared videos on YouTube.
Fix it… fast and cheap.
You will need a DAW and 2 plugins: Hornet LUMeter and a limiter of your choice.
Ideally your limiter will have ISP protection, but it’s not strictly necessary. The free limiter I suggest below has ISP protection.
I’m describing a method here that goes against what is traditionally known or mastering audio for YouTube. I have tested this method thoroughly confident that it works, but if someone attempts this and finds that it does not work I would love to know what your results were.
Limit
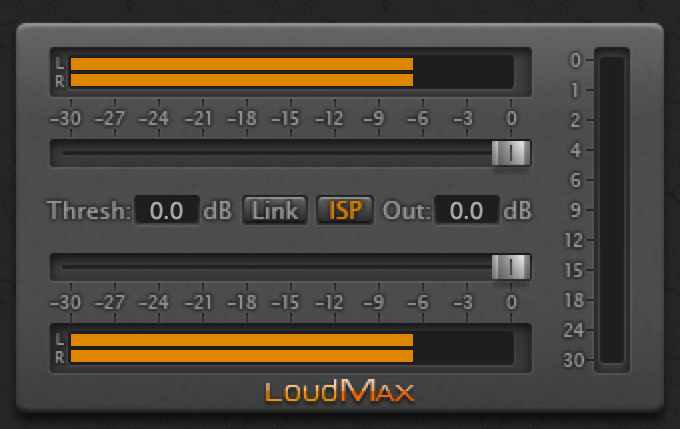
You can get the free Loudmax Limiter to use for this process if you don’t have anything. Your DAW’s built in Limiter plugin is likely sufficient.
This is the FINAL plugin in the chain. It goes after the LUMeter plug-in described below.
LUMeter setup
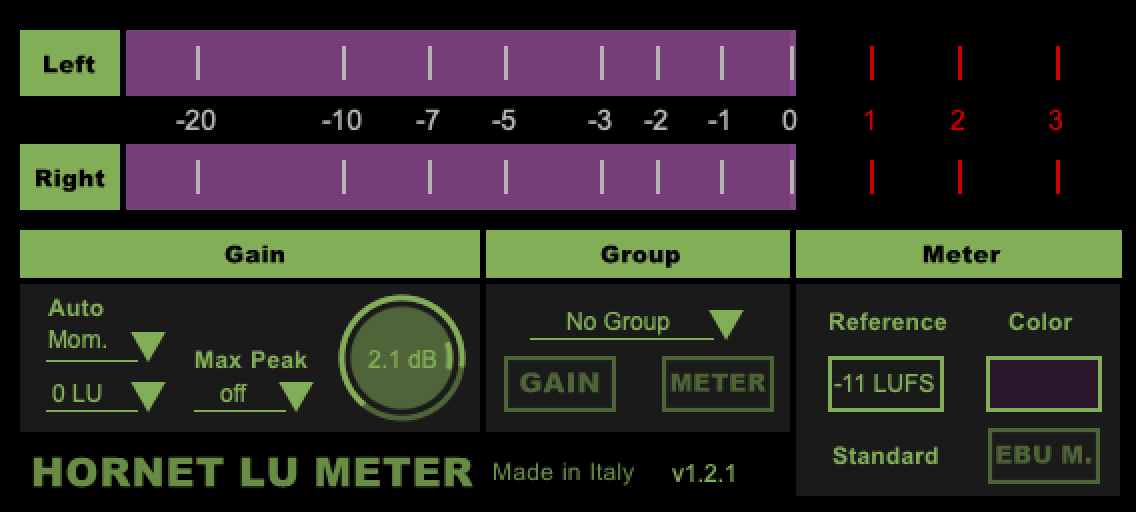
LUMeter will be the first plug-in in your chain. You need to have it set up as pictured above. The important settings are:
- -11 LUFS reference - Even though I’ve read that YouTube uses -13LU integrated, I have found that using -11LUFS reference with momentary gives the best results.
- Max Peak Off - We want as a limiter to do the work so make sure LUMeter does not factor in the Max Peak values.
- Momentary - Once again it is assumed that YouTube uses integrated loudness, but I have found that using the momentary method gives the best results.
Set up everything but the momentary auto gain before hitting play. Turn on the momentary auto game and hit play.
Ideally you would play back the entire file, but it is only important to play at least the loudest section.
When you hit stop the auto gain should turn to OFF and then you do not press it again unless you make changes to your audio.
Optionally Compress
If your audio has large swings in dynamics then I strongly suggest using a compressor.
- Ratio - Set this to 10:1
- Threshold - Set this so that your average/normal audio level does not trigger the gain reduction
- Attack - Set this to a low value. 0-1ms
- Release - Set this to a ~500ms for most sources.
When setup correctly the compressor will not be touching most of your audio (you can verify this with the compressor’s gain reduction meter). It should only be “working” on louder passages.
If your audio is particularly dynamic then this method will not work. I tried to use integrated LUFS values from -10 to -20 with a wide range of sources, and youtube would still penalize or the audio would be too loud. The momentary solution I’ve presented appears to work the best for the widest range of sources.
Conclusion
That is really all there is to it. When you upload your video you should get a second percentage of 98%-100% and a content loudness less than -1dB. Ideally it will be very slightly above 0.0dB.
There are some types of audio that this does not work perfectly on, but if you find that you are having issues with this method then let me know. As long as your audio doesn’t have massive dynamic range, this works great in my experience.
Support Me!
This post took 9 hours to research, test, write and edit. It also cost me $49 to purchase products to test. If you appreciate the information presented then please consider joining patreon or paying me for my time spent bringing you quality content!