
Cubase has some really neat features for when you’re mixing your project. Some of them are available in other DAWS, but I know of nothing that matches Cubase in the complete workflow.
So give me a few minutes of your time as I count down demonstrate the features that I think get too little recognition for how useful they are.
Contents
- Introduction
- Video
- Mixconsoles - Plural
- Meter Bridge
- Q-Link
- Visibility
- Keyboard Shortcuts
- Bypass
- Side-chain
- Channel Settings
- Conclusion
- Meta
Introduction
There’s a lot more cool features than what I’m discussing here. This article is about the features where I think the hype:leverage ratio is out of whack.
I’m structuring the article and video based on the things where I feel that the usefulness significantly exceeds the amount of discussion I’ve seen regarding the feature.
Here’s some cool features that I’ve covered before:
Video
Mixconsoles - Plural
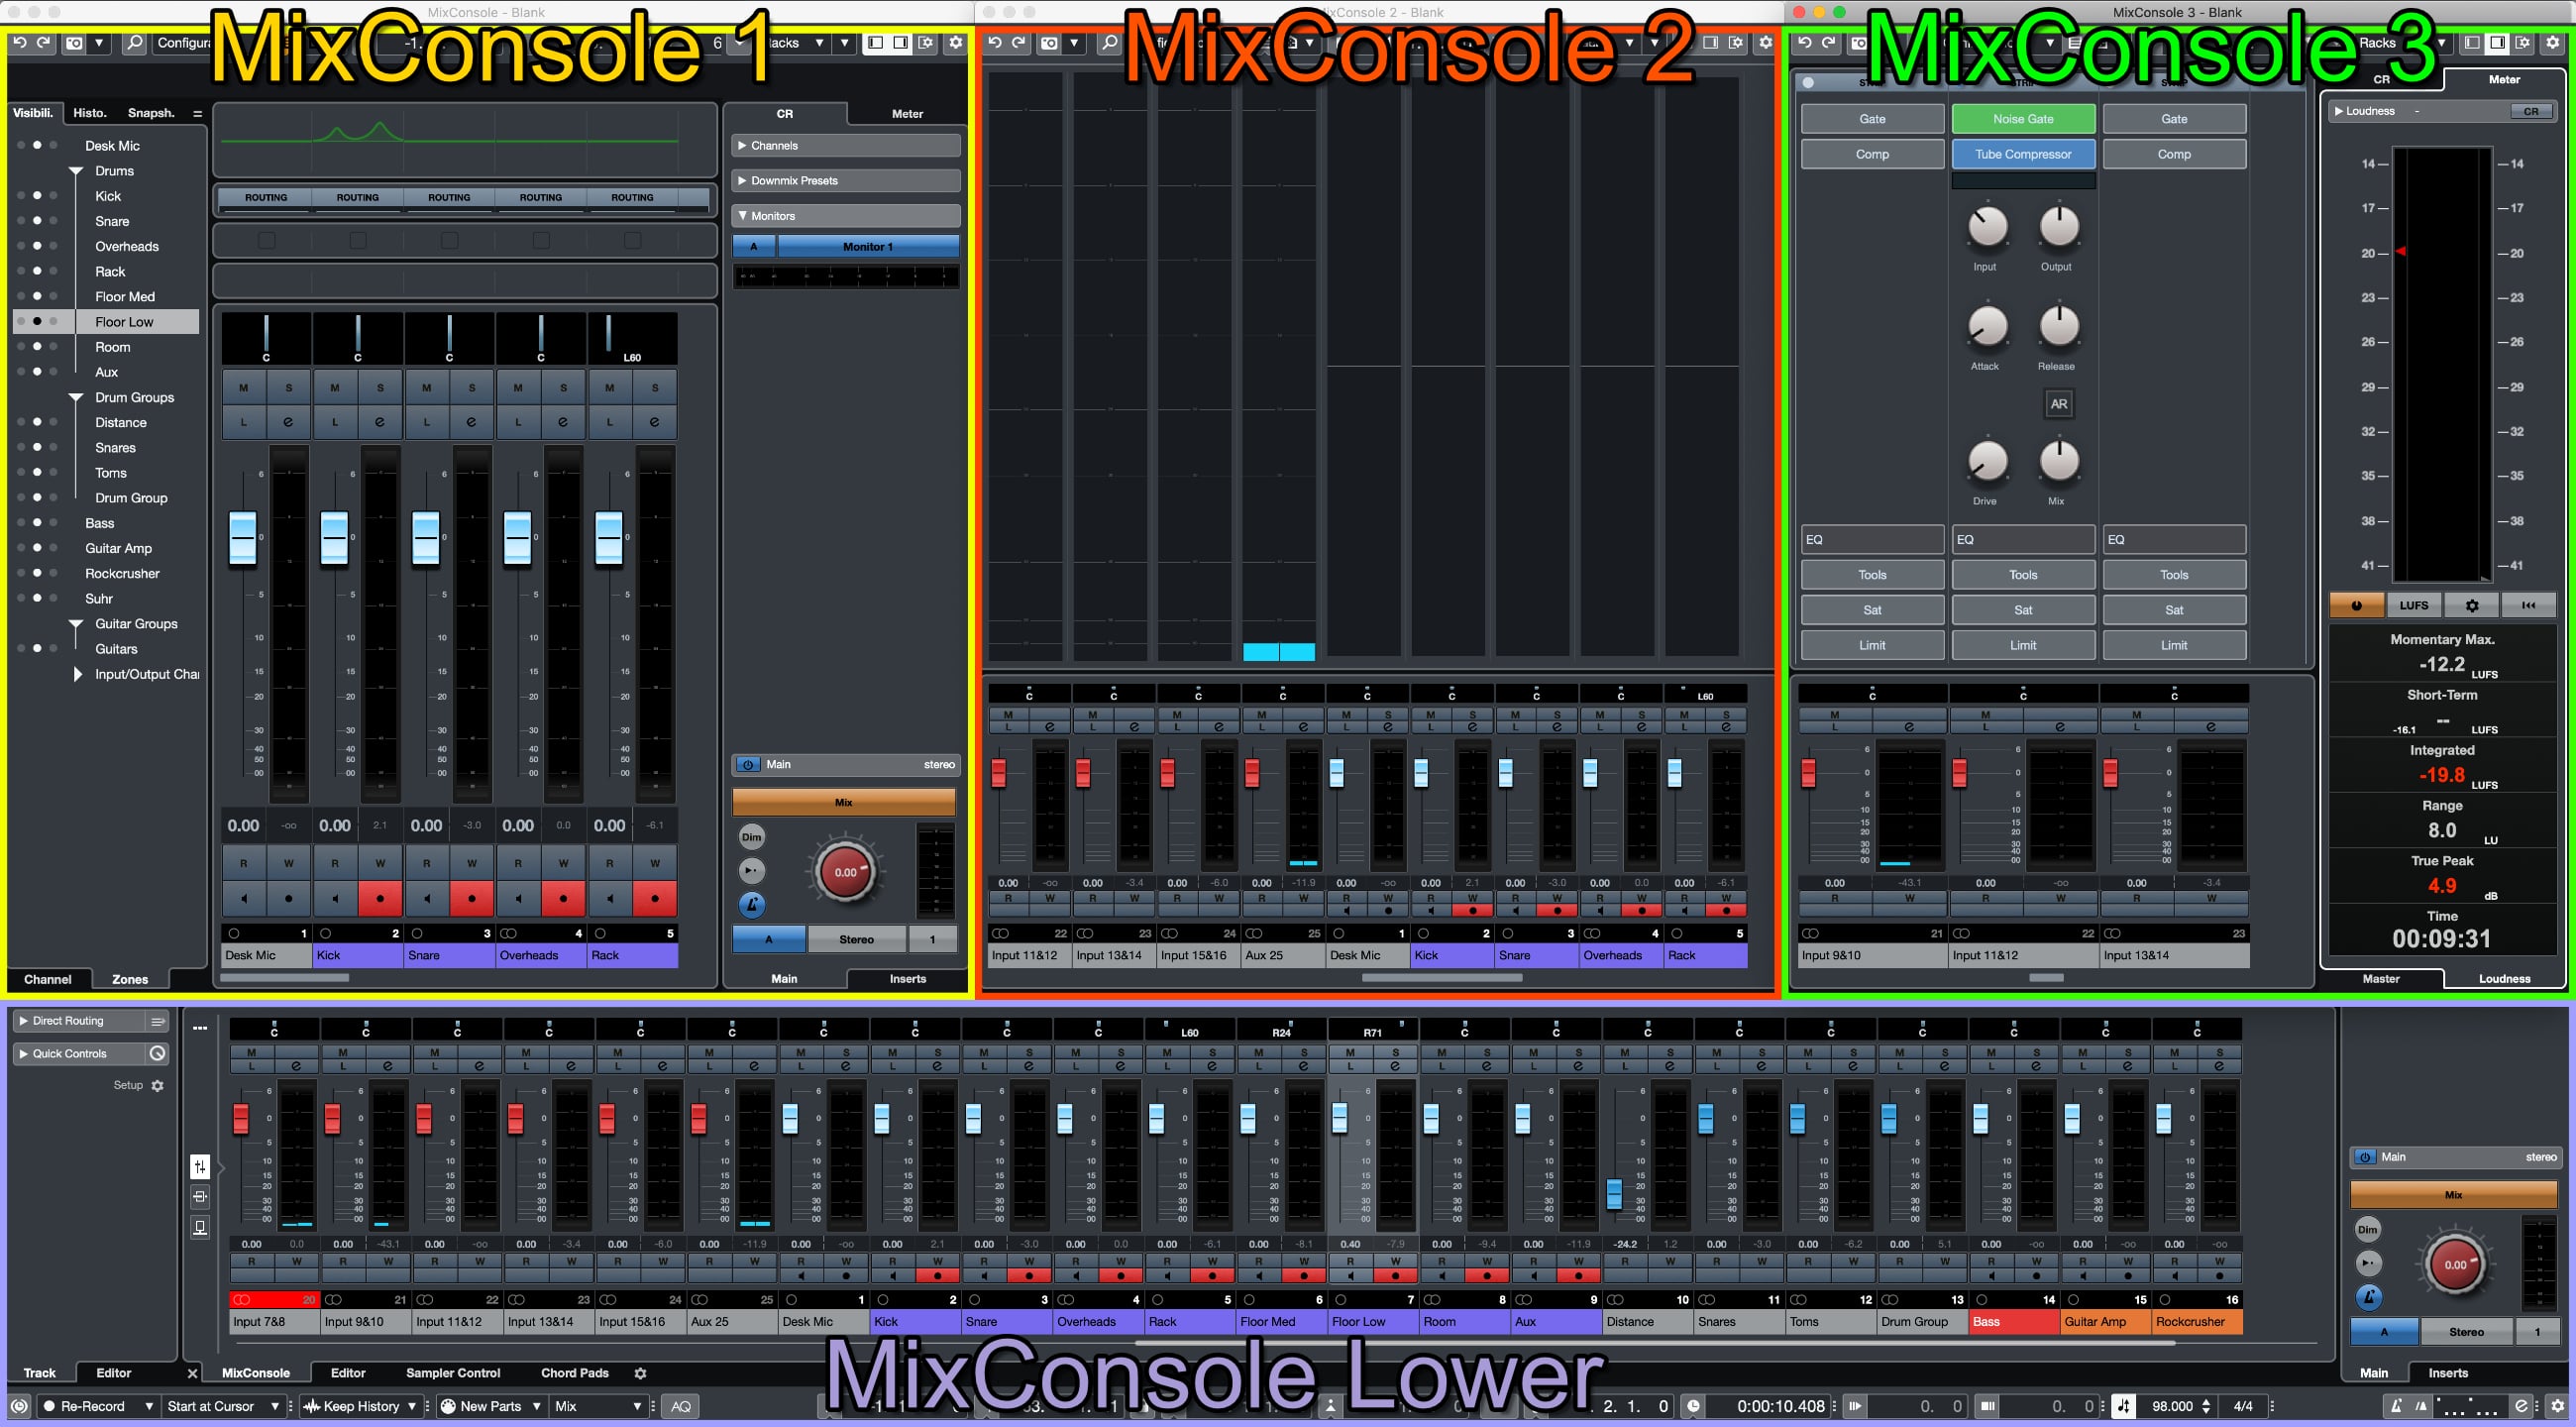
Cubase has a mixer, and a mixer… and a mixer.
AND… a mixer.
There’s 4 available MixConsoles in Cubase, and they all can be setup differently. What can be different?
- Track visibility
- Racks
- Channel size
- Meter settings
- Left/Right mixer zone setup
- Scroll position
You could have a mixer setup for just your string section, one for only your master track, and one for that banging trap beat.
Maybe you want a mixer setup for only metering, or you want quick access to the channel strip?
There’s so many possibilities! If you’re reading and you have larger projects then I’m sure your eyes are wide right now, but even people with smaller projects will be able to appreciate how easy it is to access things by simply opening your customized MixConsole for that task.
I believe this is the most under-rated feature in Cubase, and from what I’ve seen it’s also one of the most underutilized.
No more thinking in terms of process, “How do I get to X” or “What do I press to show…”. Multiple MixConsoles allow you to think in terms of context, “I wish to see this thing”. BANG Open the correct MixConsole and the context is presented to you.
Link
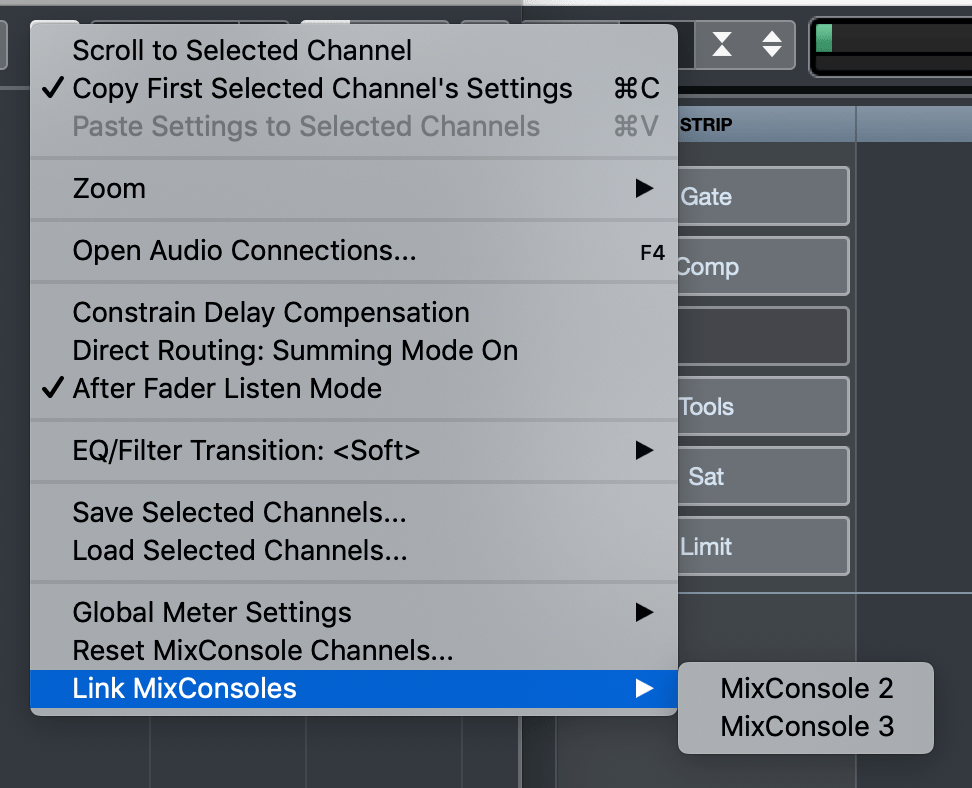
Cubase allows you to have your mixer channels span multiple windows. Each of the MixConsole windows can be linked to another. The primary window is the master, and the secondary/tertiary MixConsole windows are overflow.
So if there’s channels that can’t be displayed on your primary, then they are displayed on the secondary. If the secondary overflows then the tertiary starts to display channels.
Really cool.
Meter Bridge

Metering is important. Cubase already has excellent metering, and some of those features extend to each meter.
Sometimes you just want some big meters to see what’s happening. Enter the Meter Bridge.
The Meter Bridge is a set of big meters. That’s it, and that’s pretty useful.
Q-Link

The concept of selecting some channels and having them automatically group basic controls isn’t unusual. Many DAWs can do that.
Q-Link is something that many DAWs can not do. In fact, I don’t know of any that can replicate its behaviour. Q-Link links everything.
Fader/pan, channel rack parameters, I/O and ever plugin parameters. That’s right, if the same plugin is in the same slot, then you can change the same parameters in plugins across multiple tracks.
Adding/Removing plugins works as well. Maybe you have one of those fancy channel strip or console emulation plugins and you want it on every channel? Turn on Q-Link, Select the Channels you want, add the plugin to one channel. Now all channels have the plugin and you can even adjust parameters in the plugin and have them sync’d across tracks.
Q-Link can be turned on/off whenever you want so that you don’t accidentally make grouped parameter changes when you are doing other actions on selected tracks. Q-Link is not hotkey mapped by default, so I have mine set to option-q (alt-q).
I don’t know of any other product that offers something as comprehensive as Q-Link, nor allows you to change the grouped parameter behaviour with a single easily-accessible click.
Visibility
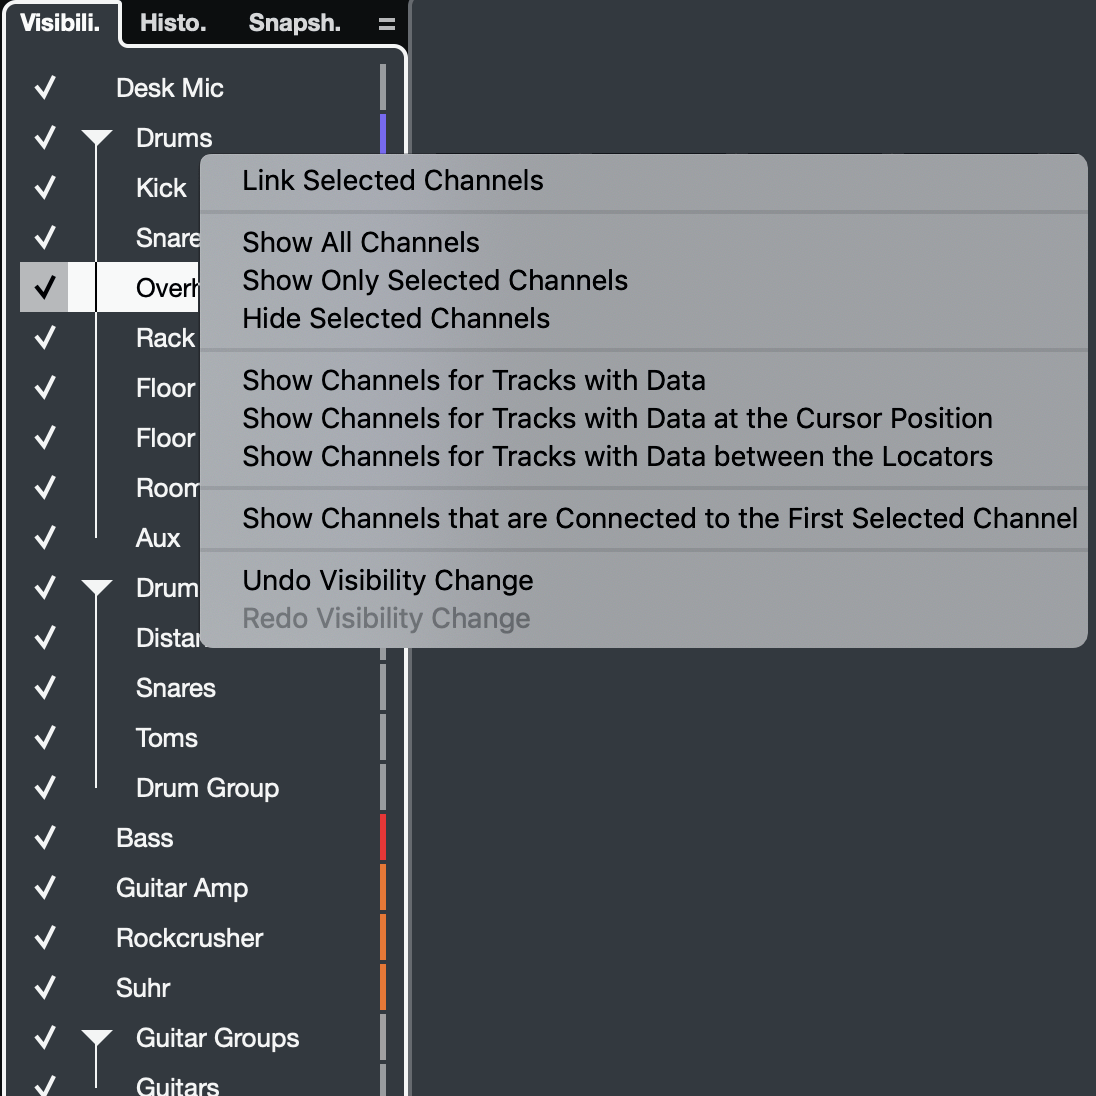
Most DAWs have something like this, and Cubase’s isn’t even the best implementation (REAPER’s is).
When utilized along with multiple mix consoles though, it becomes a brilliant tool.
The functionality is not complex:
- Left-Click to toggle a track’s visibility in the mixer.
- Left-Drag to toggle any tracks that you your mouse passes by their Y-position. You do not need to move the mouse over the checkmark, which means a swipe is sufficient even if it’s a bit inaccurate.
- Shift-Left-Click to exclusively only show the clicked track/group.
The right click menu has a number of useful features:
- Show Show All Channels
- Show/Hide Only Selected Channels
- Show Channels with Data
- Show Channels with Data at cursor position
- Show Channels with Data between locators
- Show Channels that are Connected to the First Selected Channel
- Undo/Redo visibility change - !! Separate undo stack for visibility changes. It is unlikely that many people will use this, but the unobtrusive availability of the function is excellent for those that might want it.
But wait! There’s more; Sync options are available:
- Sync visibility between MixConsoles
- Sync visibility with project
- Sync Visibility with Channel Filters
AND there’s more:
- Channel Visibility Configuration - You can save named setups of track visibility configurations.
- The top 8 slots are all assignable by key command!
I don’t know if you get excited about things like this (like I do), but being able to find things quickly is one of things I find most important in any product. Cubase’s Visibility functions make this a breeze.
Channel Filter
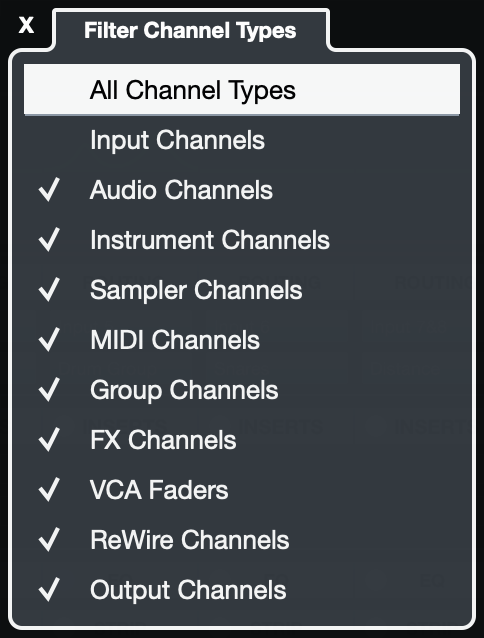
Channel visibility also has some macro functionality. You can adjust the visibility of channels by their type.
I find Channel Filters particularly useful for recording and setting levels with only input channels and the Meter Bridge visible.
I’ve also found it useful to only display groups/vcas while mixing, or to limit my view to a specific channel type (audio/instrument/midi/sampler) exclusively.
It’s just another way to cut down your project into manageable chunks, and it’s not hidden away in some dark corner. (I’m looking at you Digital Performer! 2 layers deep in the view menu, not attached to the mixer, contextual availability and not assigned to a shortcut by default.)
Zones
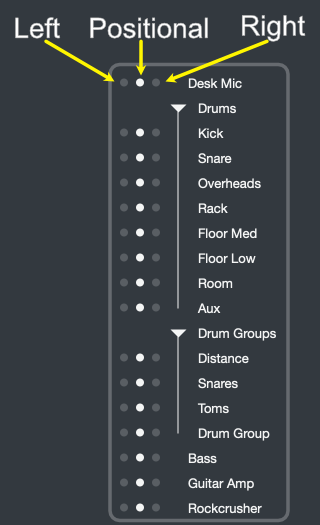
Cubase allows you to have tracks positioned as they are in your project, or pinned to the left or right. These 3 potential positional indicators are available via the Zones tab of the Visibility panel.
I like to have my groups pinned to the right with my master channel. I sometimes pin my Auxes to the left. No matter where they are in the project or where/how I scroll they will be right there.
Don’t want them there? Then save a channel visibility configuration that doesn’t show them!
NOTE: left/right pinned channels do not respond to channel visibility syncing. Excluding pinned channels from syncing may seem strange at first, but once you begin using multiple MixConsoles, I believe that it makes sense. You generally don’t want your master channel disappearing on all of your views because it was in the way on a single view. I pin things that I believe are important, and that means I want them to be prominent.
Keyboard Shortcuts
My preferred way of working is with both hands on the keyboard. I know where everything is, and there’s a 1:1 mapping of input to output, with some light contextual switching via modifier keys.
Even if you don’t like using keyboard shortcuts, Cubase’s bantam offering of shortcuts will make your non-mousing hand happy.
- Primary Parameter increase/decrease, coarse/fine - Volume adjustment on the selected tracks.
- Secondary Parameter increase/decrease, coarse/fine - Pan adjustment on the selected tracks.
- Solo
- Mute
- Arrow Keys - Navigates elements in the mixer. You can select almost anything in the mixer and use enter to activate that element (same as left-clicking it).
Of course there’s keys for many other mixer functions, but this small selection is eminently useful. It’s 5 tasks that happen in every mixing session: faders, pan, mute, solo, navigate mixer.
I will admit that the default keys are idiotic. Re-assign them to something easily pressed by your non-mousing hand, then use them.
Surprisingly few DAWs have these basic functions available for mixing, so if you have them: use them!
Bypass

Sometimes you just want to hear your mix without some processing decisions that you’ve made, and you want it to happen across the entire mix.
Using the “State buttons” (toggleable via the setup toolbar function), Cubase allows you to bypass the following, for all tracks, with a single click:
- Inserts
- Channel EQ
- Channel Strip processors
- Sends
To use the global bypasses, you must option-click/alt-click. That may sound like an annoyance at first, but consider the possibility of accidentally clicking one of the buttons early in the mixing process. You might become somewhat irritated trying to figure out why none of your sends work! Protecting the function with a modifier is a subtle, but smart design choice.
Selected tracks can be bypassed by selecting and option-shift/alt-shift clicking the rack to bypass. Individual tracks also have these capabilities.
Quite useful while mixing.
Side-chain
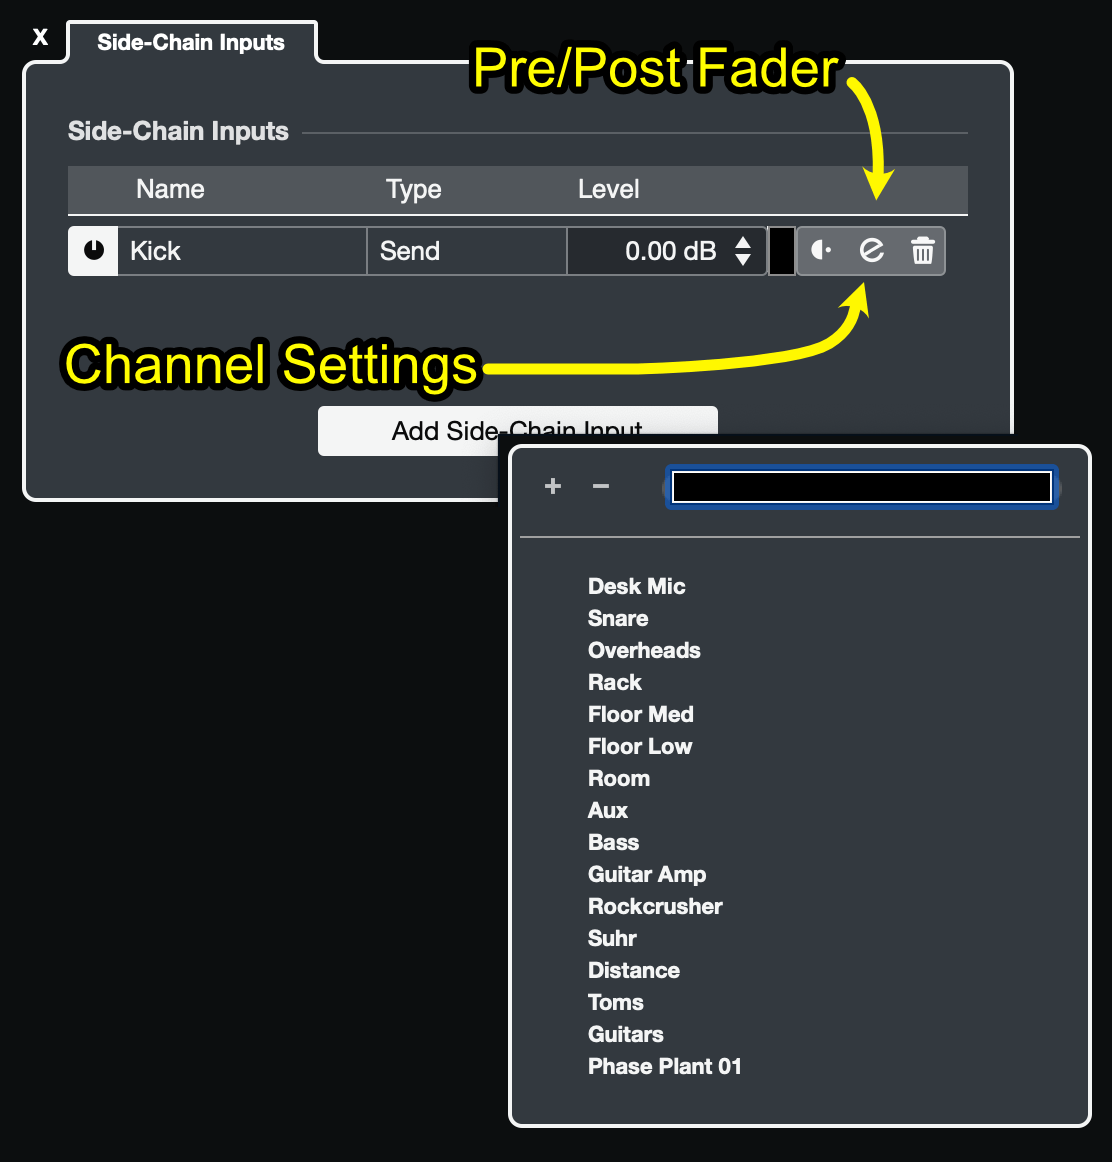
Side-chaining is the act of applying processing to a primary signal, but utilizing a secondary signal as the source of information to base DSP decisions on.
An example would be a compressor. The device might track the volume changes of Signal B, but apply the subsequent processing to Signal A. Signal B in this example would be the side-chain signal.
Cubase makes side-chain processing one of the most pleasant experiences of any DAW. Features of the process:
- Search - Rather than scrolling around for a channel, or dragging and dropping across a project, or any other absurd workflow… you just search for the channel that you want.
- Multiple signals - It’s easy to setup sidechain sources.
- Then send level for all of the sources is colocated to the sidechain destination.
- Pre-Post Fader Send - Selection of pre/post fader sends is right there.
- Quick access to sending channel settings - Hit the
ebutton. - Reverse navigation - The channel settings window has a “Targets” widget at the top. This lets you see all things it is sending to, including sidechain sends.
It’s an overall pleasant experience. Kudos Steinberg.
Channel Settings
The channel settings window is no less cool than other features, but it is mentioned a fair bit so I’ve put it at the bottom.
All of your channel processing needs are placed in a sanely laid out single window that’s accessible via hotkey or any number of ‘probably useful’ sites.
I don’t believe a description is necessary because the functionality is largely self-evident by looking at it. If there’s any single trait that makes a software GUI “good”, then that is it. If you’re even mildly familiar with music production, then you know what you’re looking at.
If you want to go even further down into the rabbit’s den, look in the upper left where you can:
- Go to next/previous channel
- Go to next/previous edited channel
- Search for a channel
- Explore targets and destinations
All in one click and searchable.
Not to mention you can also:
- See sources
- See targets
- Show output chain
- Load track presets
- Reload track presets - in case you edited something and want to return to where you started.
Once again, all in one click from buttons with clear indications (but not necessarily clear meanings until you learn them.)
EVERYTHING (well, almost) that you’d want for mixing is readily available in the Channel Settings window.
TIP: Make sure you right click somewhere and select Always on Top. Now you can select tracks via the e or hotkey and have the Channel Setting window follow along. I like to keep my Channel Setting window at the top of my mixer.
Conclusion
That’s not all of the features Cubase offers for mixing, but it’s the stuff that I don’t see talked about much despite how pragmatic or outright cool the feature is.
Thank you for reading, and I’ll hopefully see you in the next 3 articles about Cubase!
Meta
This post took 38 hours to research, write, screencapture, design, narrate, deal with migraines, eat some tortilla chips, proof and edit.
Nobody reads this down here, but if you’re wondering why there’s only 8 (or 11 depending on how you count)… Congrats on paying attention. Top 8 or Top 11 didn’t sound as cool :)
